
Users
Learn how Wristband manages user attributes, authentication, onboarding, and user lifecycles.
Overview
Users are individuals who authenticate and interact with your application. Each user belongs to a tenant and is associated with an identity provider (IdP), which manages their authentication.
A tenant can contain multiple users, but users are isolated across tenants. This allows the same individual to have separate user accounts in different tenants.
Wristband manages user identities, profile attributes, lifecycle, and authentication. The following sections explain how users are represented, authenticated, provisioned, and managed in Wristband.
User Attributes
Wristband provides a set of built-in attributes for storing user profile information. The following table lists the supported attributes, whether they are required, and whether their values must be unique.
| User Attribute | Required | Unique | Description |
|---|---|---|---|
email | Yes | Yes | The user's primary email address. |
emailVerified | Yes | No | Indicates whether the user's email address has been verified. |
username | Conditional | Yes | The user's username, required when configured as a login identifier for the Wristband identity provider. |
externalId | Conditional | Yes | The user's identifier in an external identity provider, required for externally managed users. |
fullName | No | No | The user's full name, including any middle names, titles, or suffixes. |
givenName | No | No | The user's first name. |
familyName | No | No | The user's last name. |
middleName | No | No | The user's middle name. |
honorificPrefix | No | No | A prefix such as Mr., Mrs., or Dr. |
honorificSuffix | No | No | A suffix such as Jr., Sr., or MD. |
nickname | No | No | The user's nickname. |
displayName | No | No | The name displayed to identify the user within your application. |
pictureUrl | No | No | URL of the user's profile picture. |
gender | No | No | The user's self-described gender. |
birthdate | No | No | The user's date of birth. |
phoneNumber | No | No | The user's primary phone number. |
preferredLanguage | No | No | The user's preferred language. |
locale | No | No | The user's preferred locale for formatting dates, numbers, and other localized content. |
timeZone | No | No | The user's time zone. |
status | Yes | No | The user's current authentication status. |
Configuring Required Attributes
Wristband allows you to customize which user attributes are required through the User Schema configuration.
The following attributes can be configured as required or optional:
birthdatefamilyNamefullNamegivenNamephoneNumberusername
User Schema settings can be configured at two levels:
- Application Level: Defines the default attribute requirements for users across the application.
- Tenant Level: Allows individual tenants to override the application's User Schema requirements.
For instructions on configuring these settings, see Updating the User Schema.
Attribute Uniqueness
Unique user attributes, including email, username, and externalId, are scoped to the combination of a tenant and identity provider.
The following examples illustrate when users can and cannot share the same email address across tenants and identity providers:
- Different Tenants: Users belonging to different tenants can have the same email address.
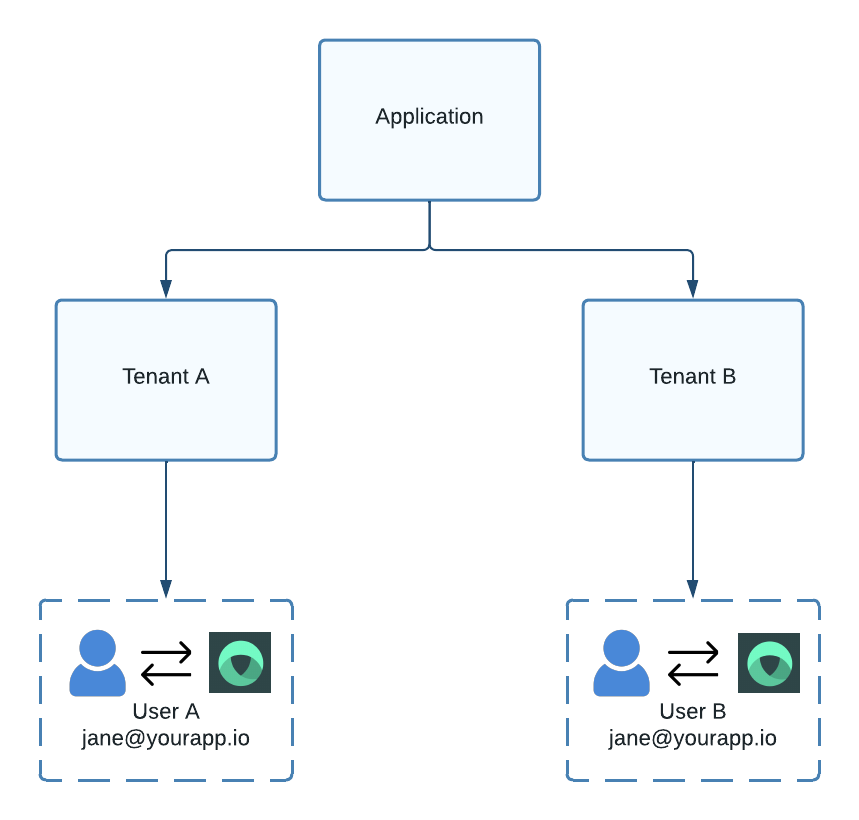
Figure 1: Users in different tenants can share the same email address.
- Same Tenant and Identity Provider: Users cannot share the same email address when they belong to the same tenant and identity provider. Attempting to create a duplicate user will result in an error.
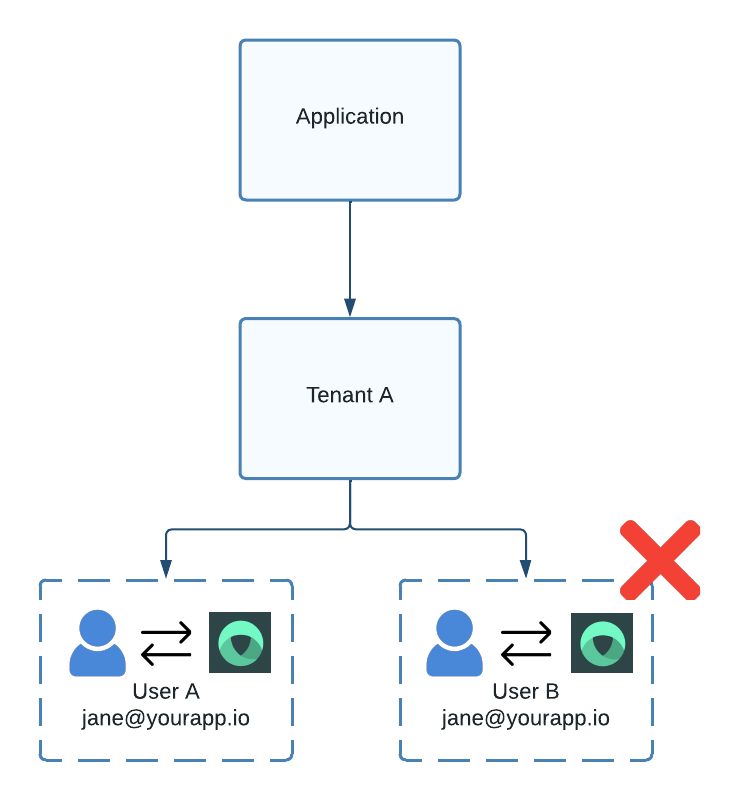
Figure 2: Users cannot share an email address within the same tenant and identity provider.
- Same Tenant and Different Identity Providers: Users within the same tenant can share an email address if they are associated with different identity providers.
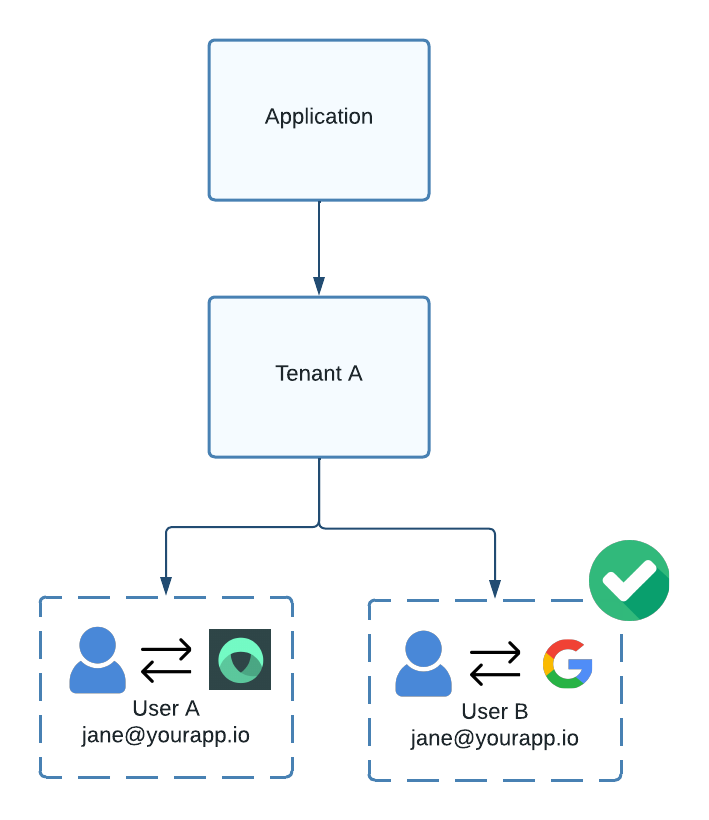
Figure 3: Users associated with different identity providers can share an email address within the same tenant.
Custom Metadata
Wristband allows you to extend user profiles with custom metadata to store information beyond the built-in user attributes. Each user supports two types of custom metadata:
publicMetadata: Stores non-sensitive information that can be accessed by end users, such as user preferences.restrictedMetadata: Stores information that should not be exposed to end users, such as internal identifiers. Users or OAuth2 clients must have theuser:manage-restricted-metadatapermission assigned to them in order to update a user's restricted metadata.
Both fields accept JSON objects containing custom key-value pairs, as shown in the following example:
{
  "publicMetadata": {
    "theme": "dark",
    "notificationPreferences": {
      "email": true,
      "push": false
    },
    "favoriteProjects": ["project-a", "project-b"]
  },
  "restrictedMetadata": {
    "internalUserId": "usr_1234",
    "crmContactId": "contact_5678"
  }
}
Custom Metadata Limits
The JSON objects assigned to publicMetadata and restrictedMetadata are each subject to the following constraints:
-
Maximum Size: Each metadata object can contain up to 4 KB of JSON data.
-
Maximum Nesting Depth: Nested objects can have a maximum depth of 3 levels.
-
Maximum Top-Level Fields: Each metadata object can contain up to 15 top-level fields.
-
Field Naming: Field names must match the following regular expression:
^[a-zA-Z]([-_]?[a-zA-Z0-9]+)*$Field names must begin with a letter and may contain letters, numbers, hyphens (
-), and underscores (_). -
Nested Arrays: Arrays cannot be nested directly within other arrays. However, arrays can contain objects that have their own array fields.
For example, the following is not allowed because it contains arrays nested directly within another array:
{
  "notAllowed": [[1, 2], [3, 4]]
}
The following is allowed because the outer array contains objects with their own array fields:
{ "allowed": [ { "nestedList": [1, 2] }, { "nestedList": [3, 4] } ] } -
Case-Insensitive Field Names: Field names are case-insensitive. If duplicate fields are provided with different capitalization, the last value provided overwrites the previous values.
Email Verification
Email verification confirms that users have access to the email addresses associated with their accounts.
Wristband uses email verification to protect authentication workflows that rely on email delivery, such as password resets and magic link login. It also helps ensure that sensitive account information is not sent to an unverified email address.
Flows That Depend on Email Verification
The following authentication flows require a verified user email address:
- Password Reset: Users must have a verified email address to receive password reset emails.
- Magic Link Login: Users must have a verified email address to receive magic link authentication emails.
- Tenant Discovery by User Email: Wristband can identify a tenant based on an existing active user whose verified email address matches the address entered during tenant discovery.
Tenant Discovery Email DomainsTenant discovery can also identify tenants through configured Tenant Discovery Email Domains. This mechanism matches the domain portion of the user's email address and does not require an existing user account in the tenant.
For more information, see the Tenant Discovery Email Domains documentation.
Methods for Verifying a User's Email
Wristband supports several methods for verifying user email addresses:
- Email Verification Flow: Sends a verification email containing a link that the user can click to confirm ownership of their email address.
- User Activation Flow: Verifies the user's email address when they complete an email-based account activation process.
- Change Email Flow: Sends a confirmation email to a user's new email address before updating their account.
- Email Invitation Flows: Verifies the user's email address when they complete an invitation flow.
- External Identity Provider Sync: Uses email verification information supplied by an external identity provider. When the IdP confirms that an email address is verified, Wristband can mark it as verified. Otherwise, Wristband can use its own verification flow.
- Manual Verification: Administrators can verify a user's email address directly through the Wristband Dashboard.
- Programmatic Verification: Applications can manage email verification status using the Create User API or Patch User API.
User Status
Each Wristband user has a status attribute that determines whether they are eligible to authenticate and which lifecycle operations can be performed on their account.
The following table lists the supported user statuses and their allowed transitions.
| User Status | Description | Allowed State Transitions |
|---|---|---|
ACTIVE | The user is activated and can authenticate using Wristband, provided all other authentication requirements are satisfied. | INACTIVE |
INACTIVE | The user has been deactivated and cannot authenticate. | ACTIVE |
PENDING_INVITE_ACTIVATION | The user was provisioned through an invitation flow but has not completed account activation. Authentication is not permitted. | ACTIVE, INACTIVE |
PENDING_SIGNUP_ACTIVATION | The user was provisioned through signup but has not completed account activation. Authentication is not permitted. | ACTIVE, INACTIVE |
PROVISIONED | The user has been created but is not yet activated. Authentication is not permitted until the account is activated. | ACTIVE, INACTIVE, PENDING_INVITE_ACTIVATION, PENDING_SIGNUP_ACTIVATION |
Onboarding Users
Wristband supports multiple onboarding methods for creating and activating users. The appropriate method depends on whether users register themselves, receive invitations, authenticate through an enterprise identity provider, or are provisioned by administrators.
Tenant Signup
Tenant-level signup allows users to self-register for an account within an existing tenant.
Users can access the hosted signup page at:
https://<tenant_vanity_domain>/signupTenant-level signup can be enabled or disabled independently for each tenant. You can also restrict self-registration to users with email addresses from specific domains through the tenant's Allowed Signup Email Domains configuration.
Depending on the configured signup workflow, users may need to complete account activation before they can authenticate.
For more information, see the Signup Workflow documentation.
Application Signup
Application-level signup allows users to self-register by creating a new tenant and an initial user account within your Wristband application.
Users can access the hosted signup page at:
https://<application_vanity_domain>/signupDuring signup, users provide the information required to create their tenant and user account, including a unique tenant name.
Application-level signup can be enabled or disabled through the application's settings.
For more information, see the Signup Workflow documentation.
New User Invitation
The New User Invitation Flow allows administrators to invite individuals to join an existing tenant using an invitation email or a generated invitation link.
When a user accepts the invitation, Wristband provisions their account within the specified tenant and completes the configured onboarding process.
Administrators can also assign roles when creating an invitation. These roles are automatically assigned to the user during activation.
For more information, see the New User Invitation Workflow documentation.
Manual Provisioning Through Wristband's Dashboard
Administrators can manually create user accounts within a tenant using the Wristband Dashboard.
Newly created users have a status of PROVISIONED, an unverified email address, and no password. These users cannot authenticate until their accounts are activated and the necessary authentication requirements are satisfied.
You can activate a manually provisioned user using one of the following methods:
- Existing User Invitation: Sends an invitation email that allows the user to complete account activation, verify their email address, and set a password if password authentication is enabled.
- Manual Activation: An administrator can change the user's status to
ACTIVEand verify their email address. If password authentication is required, the user must complete the Password Reset Flow to establish a password.
For more information, see the Existing User Invitation Workflow documentation.
Just-in-Time (JIT) Provisioning
Just-in-Time (JIT) provisioning automatically creates user accounts when users successfully authenticate through an enterprise identity provider for the first time.
This allows organizations to onboard users through their existing identity providers, such as Okta or Microsoft Entra ID, without manually creating accounts in Wristband beforehand.
For more information, see the JIT Provisioning documentation.
Programmatic Provisioning Through Wristband's APIs
You can provision users programmatically using Wristband's APIs. This is useful for importing existing users, automating account creation, or integrating user provisioning into your application's workflows.
To create users programmatically, see the Create User API.
Assigning Roles to Users
Wristband supports role assignments for controlling which permissions users have within your application. Roles can be assigned automatically, manually, or programmatically.
The following role assignment methods are supported:
- Role Assignment Policies: Automatically assign default roles during signup or enterprise identity provider user synchronization.
- Wristband Dashboard: Administrators can manually assign or remove roles for individual users. Roles can also be assigned when creating user invitations.
- Enterprise Identity Provider Role Mappings: Map claims or groups from an external identity provider to Wristband roles. For example, an Okta group can be mapped to a specific Wristband role. See the Role Mapping documentation.
- Wristband APIs: Manage user role assignments programmatically using the following endpoints:
Enforcing Authorization in Your ApplicationWristband manages user role and permission assignments, but your application is responsible for enforcing authorization decisions when users access its protected resources.
Managing Users With Wristband's Dashboard
You can create, configure, and manage users through the Wristband Dashboard. The following sections explain how to perform common user management tasks.
Adding Users
You can manually create users within a tenant through the Wristband Dashboard.
To add a new user:
- From the Dashboard Home page, select the application where you want to create the user.
- From the left navigation menu, select Users.
- Click Add User.
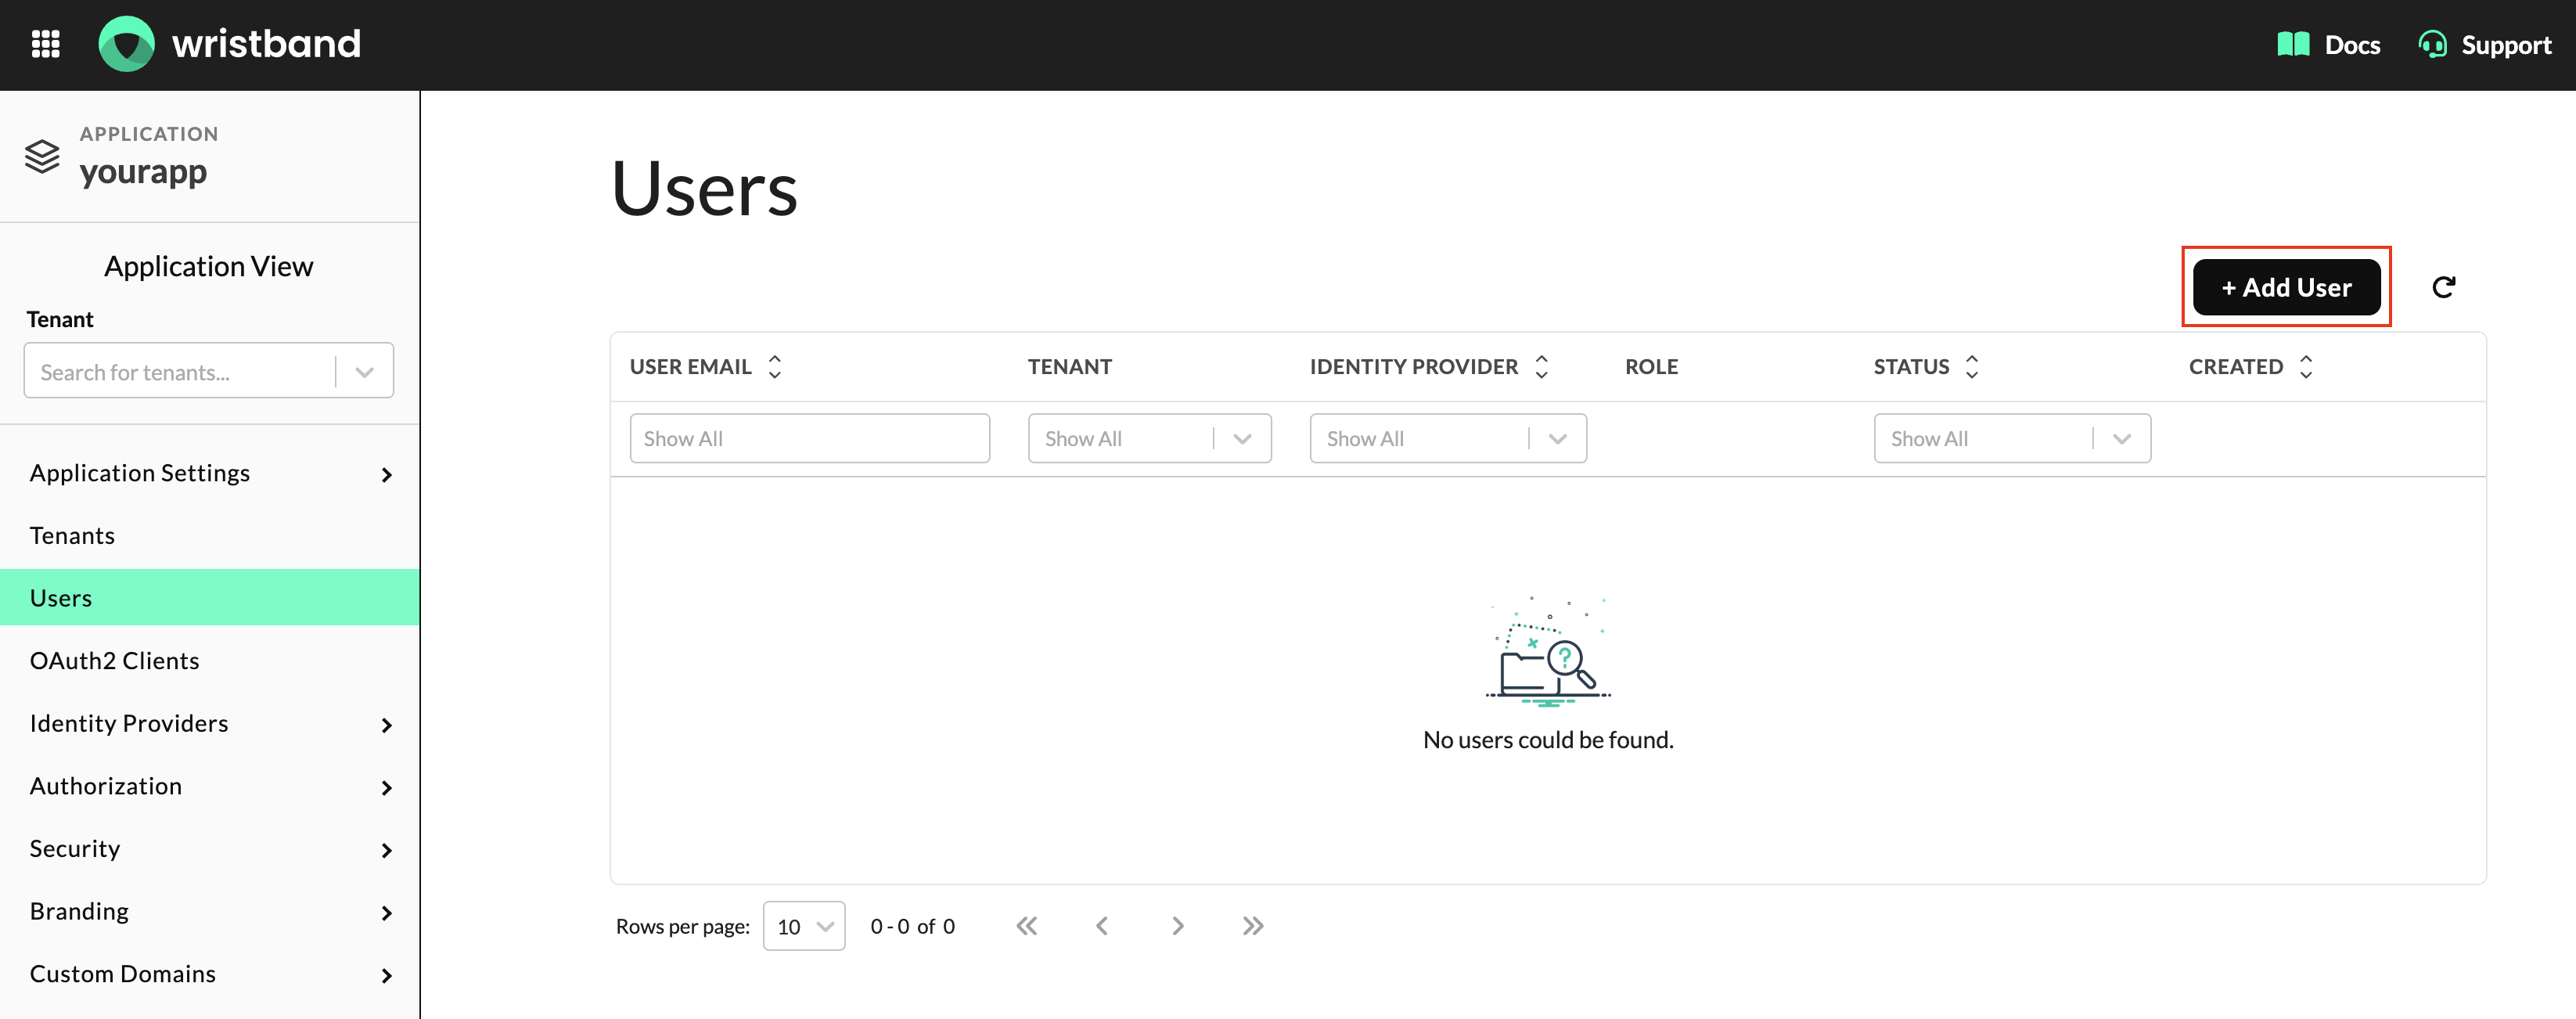
Figure 4: Add a new user from the Users page.
- In the Create New User modal, provide the following information:
- Tenant: The tenant the user will belong to.
- Identity Provider: The identity provider (IdP) responsible for authenticating the user. In most cases, select Wristband, as users of external IdPs, such as Okta or Microsoft Entra ID, are typically provisioned automatically through Just-in-Time (JIT) provisioning or self-signup rather than manually.
- External ID: Required only when an external IdP is selected instead of Wristband. This value must be the user's unique identifier in the external IdP. When the user authenticates through that IdP, Wristband uses the External ID to locate their corresponding Wristband user account.
- Email: The user's email address. This value must be unique (case-insensitive) within the specified tenant and IdP combination.
- Optionally, select any roles you want to assign to the user.
- If you want to activate the user through an invitation email, enable the send invitation option.
- Click Create to provision the user.
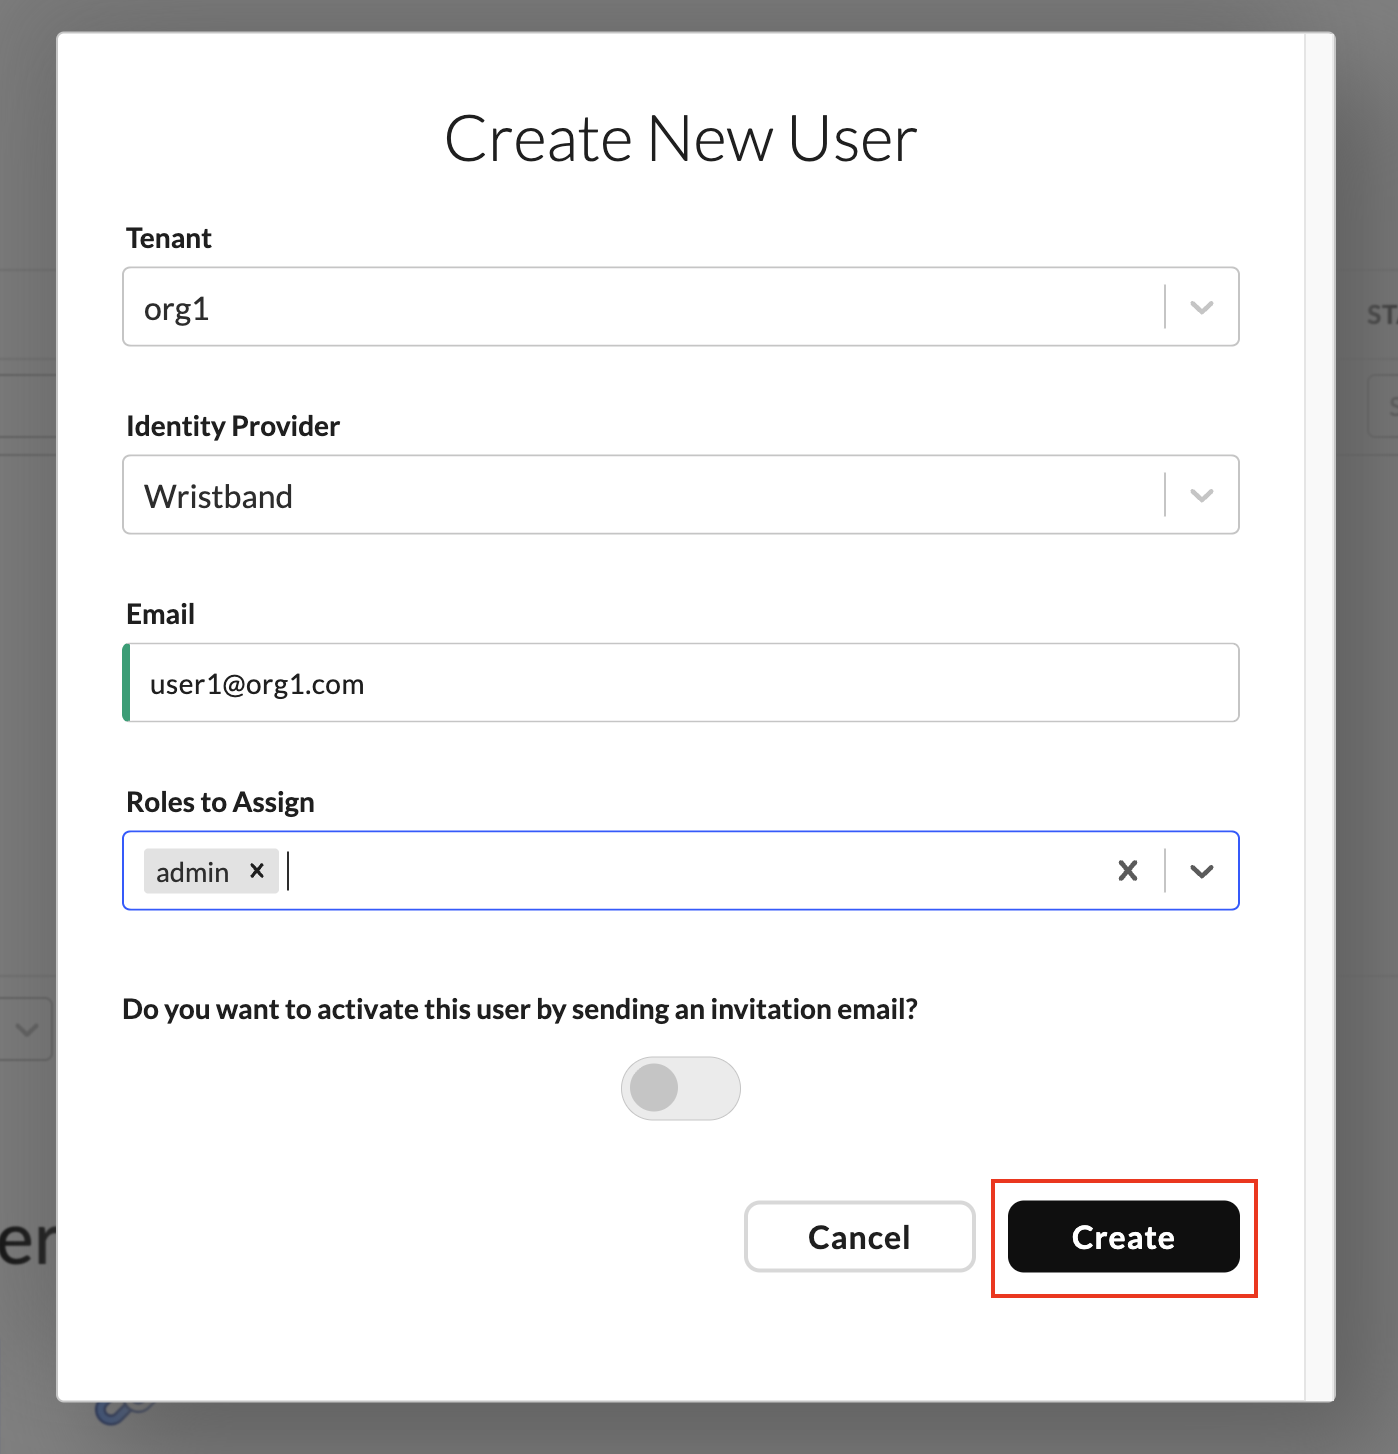
Figure 5: Configure a new user's account details.
If you create a user without sending an invitation, the user will have a status of PROVISIONED, an unverified email address, and no password.
To allow the user to authenticate, you must activate their account using one of the following methods:
- Send an Existing User Invitation: The user receives an email allowing them to activate their account, verify their email address, and set a password if password authentication is enabled.
- Manually Activate the User: Change the user's status to
ACTIVEand verify their email address using the Wristband Dashboard. If password authentication is required, the user must then complete the Password Reset Flow to set a password.
Editing Existing Users
You can view and update a user's profile information through the Wristband Dashboard.
To edit a user:
- From the left navigation menu, select Users.
- Select the user you want to modify from the users table. This opens the User Details page.
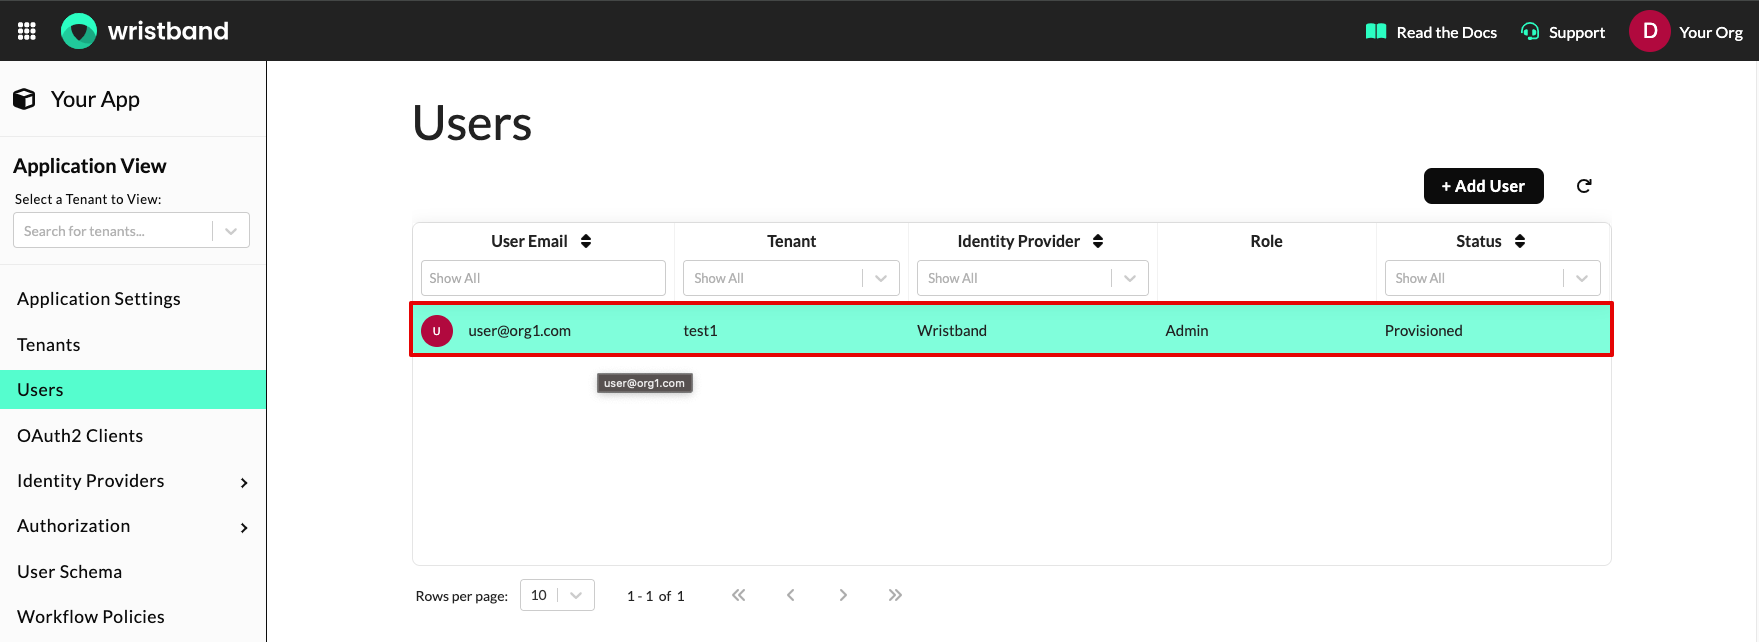
Figure 6: Select a user from the Users table.
- On the User Details page, locate the Profile section.
- Update the available profile attributes as needed.
- Click Save to apply your changes.
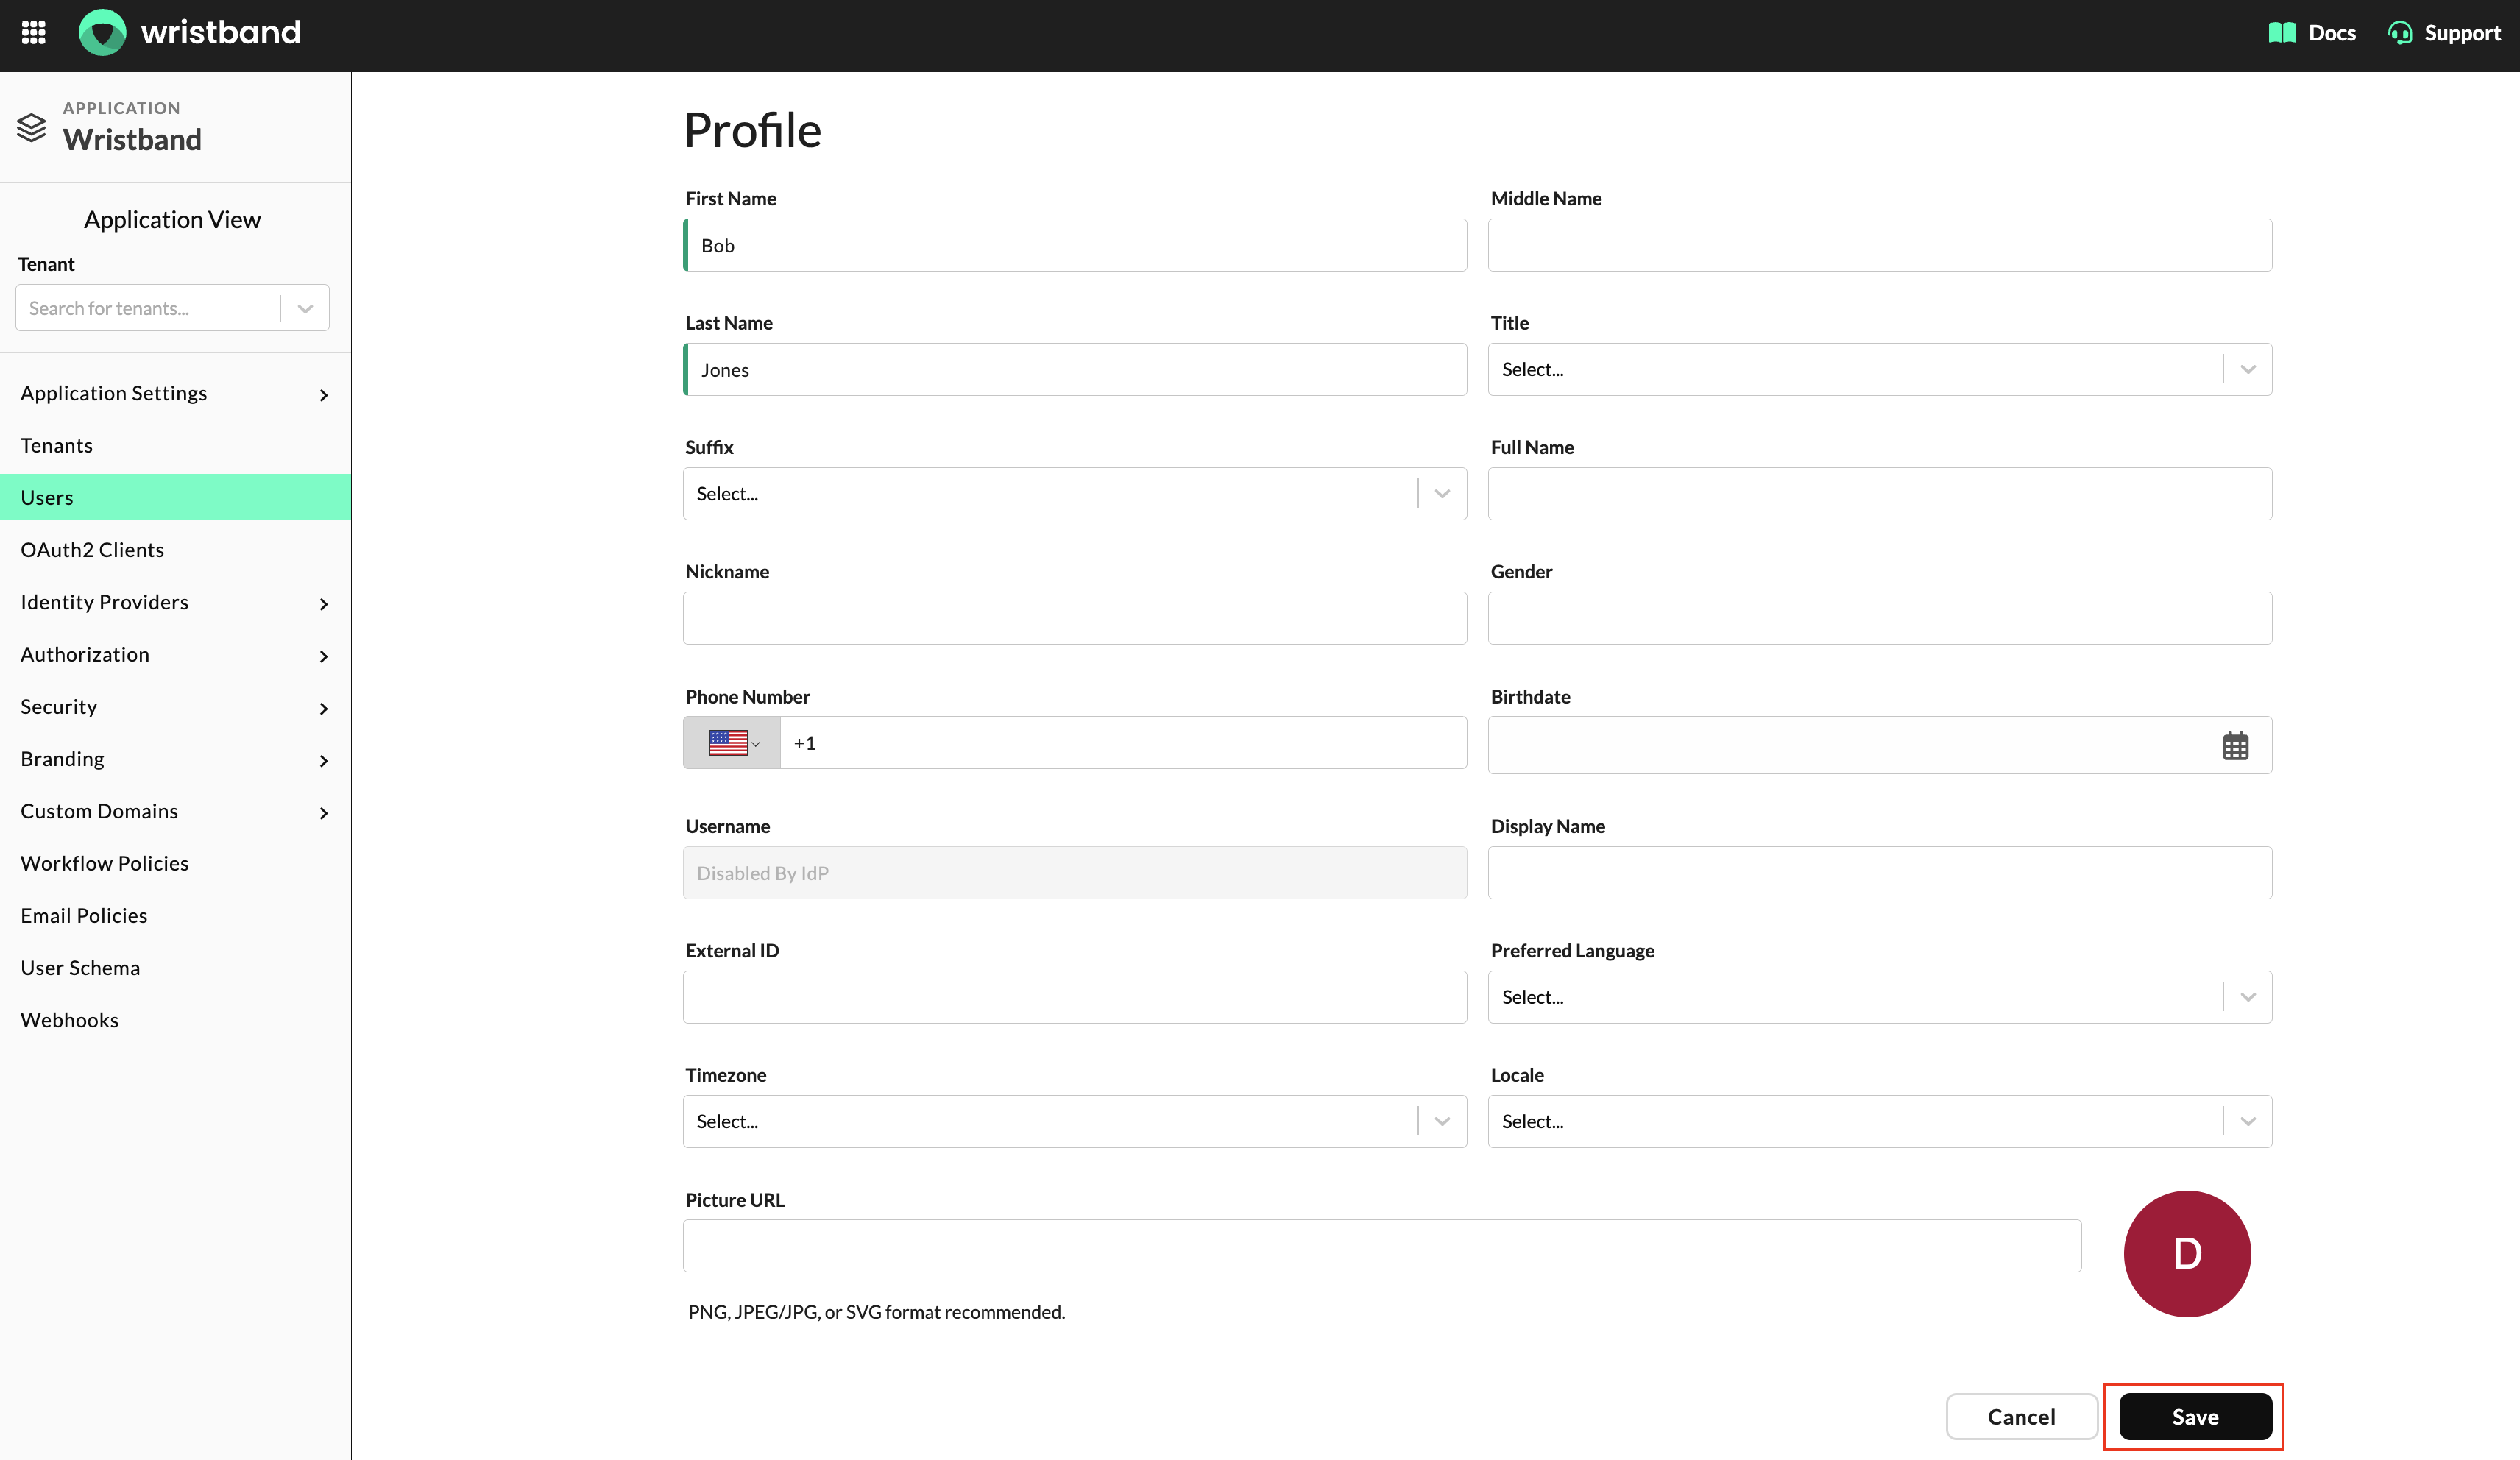
Figure 7: Update a user's profile attributes.
Updating Custom Metadata
You can add or modify a user's Public Metadata and Restricted Metadata through the User Details page.
To update custom metadata:
- On the User Details page, locate the Metadata section.
- Expand Public Metadata or Restricted Metadata to open the corresponding JSON editor.
- Enter a valid JSON object containing the metadata you want to associate with the user.
- Click Save to apply your changes.
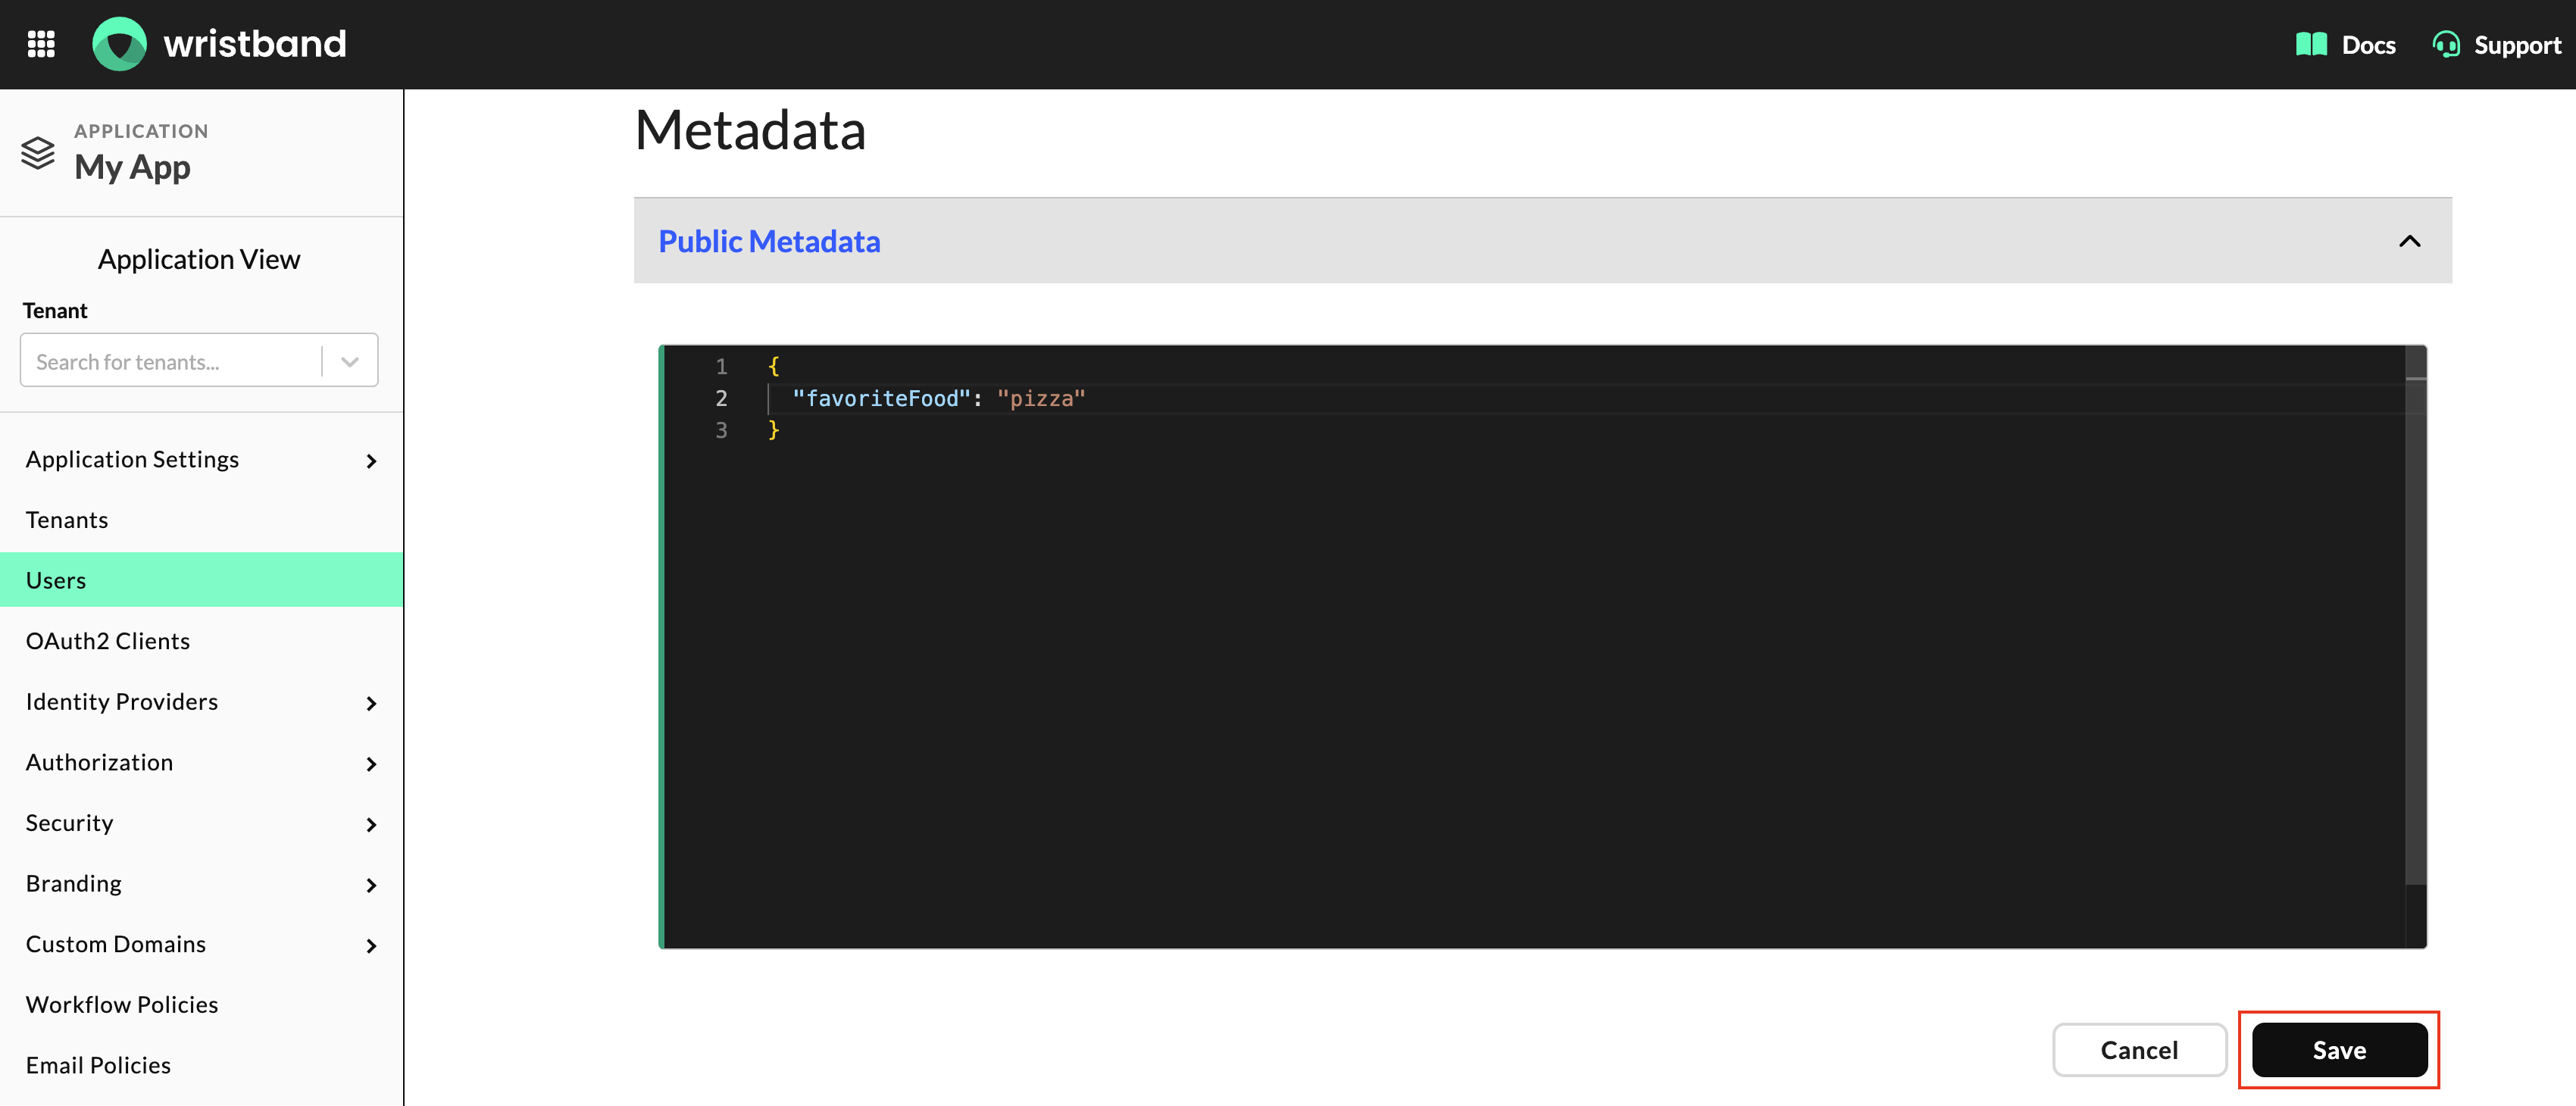
Figure 8: Configure custom metadata for a user.
For more information about supported metadata structures and limits, see Custom Metadata.
Verifying a User's Email Address
You can manually verify a user's email address or send them a verification email through the Wristband Dashboard.
To verify a user's email address:
- On the User Details page, locate the Email Settings section.
- If the user's email address is unverified, click Verify Email.
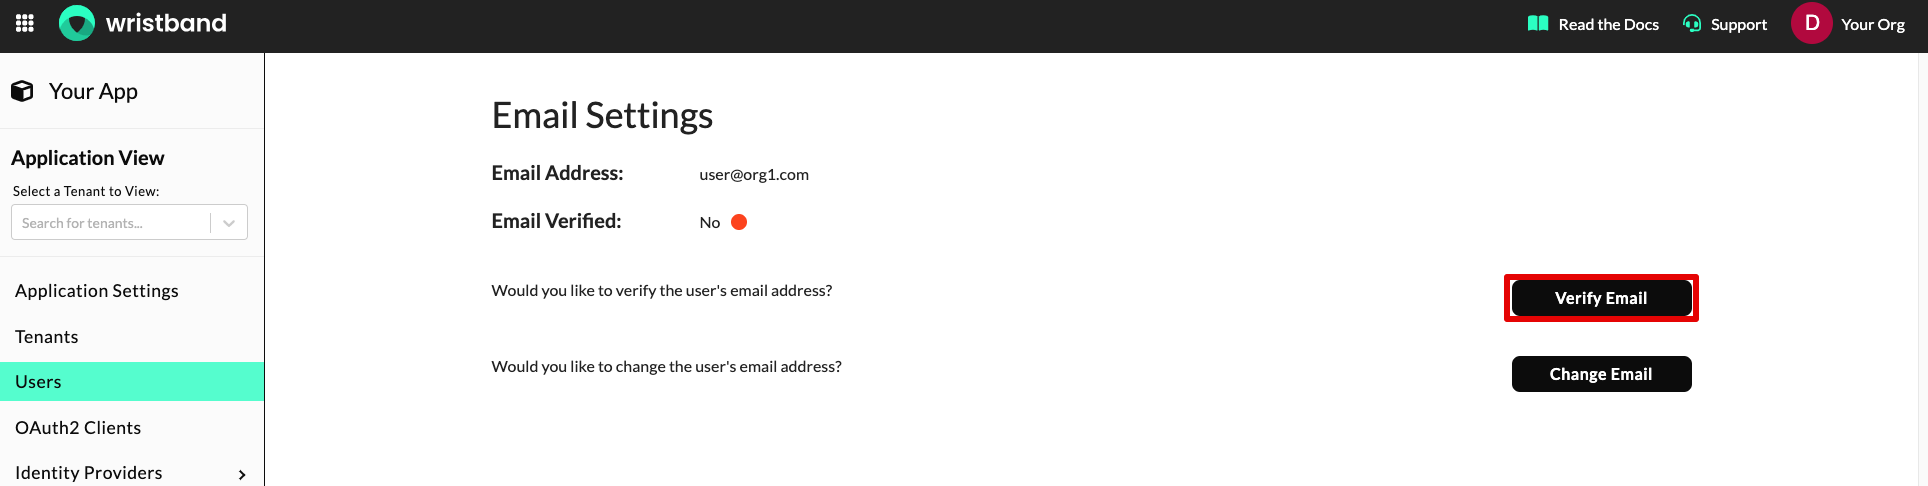
Figure 9: Verify a user's email address.
- Select one of the following verification methods:
- Mark email as verified immediately: Marks the user's email address as verified without sending a verification email.
- Send the user a verification email: Sends an email containing a verification link. The user must click the link to verify their email address. This option is only available for users with an
ACTIVEstatus.
- Click Verify to perform the selected verification action.
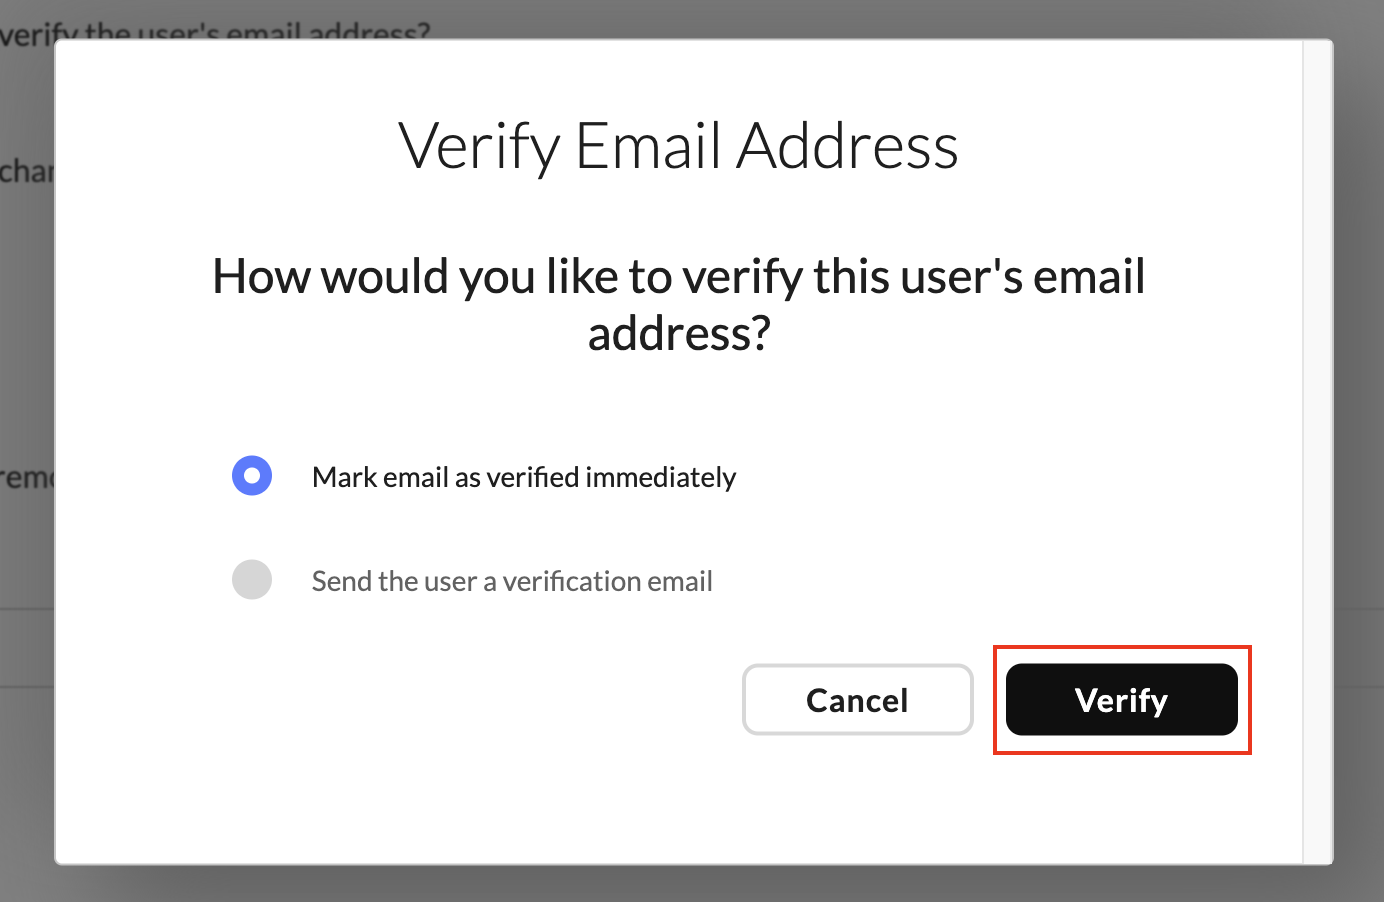
Figure 10: Select the email verification method.
Changing a User's Email Address
You can update a user's email address through the User Details page.
To change a user's email address:
- On the User Details page, locate the Email Settings section.
- Click Change Email.
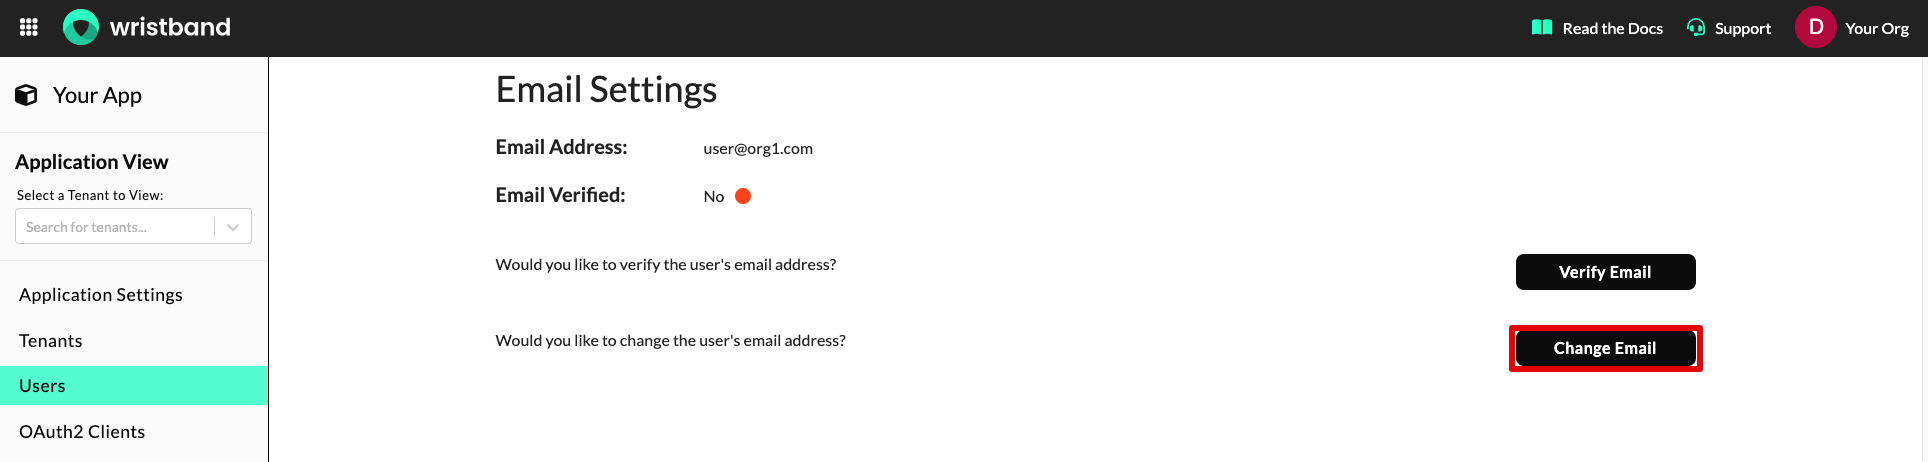
Figure 11: Change a user's email address.
- In the Change User Email Address modal:
- New Email: Enter the user's new email address.
- Verification Method: Select one of the following options:
- Change email with verification: Immediately updates the email address and marks it as unverified.
- Mark new email as verified immediately: Immediately updates the email address and marks it as verified.
- Send a confirmation email before changing: Sends a confirmation email to the new address. The email address is only updated and marked as verified after the user clicks the confirmation link. This option is only available for users with an
ACTIVEstatus.
- Click Change to update the user's email address and apply the selected verification method.
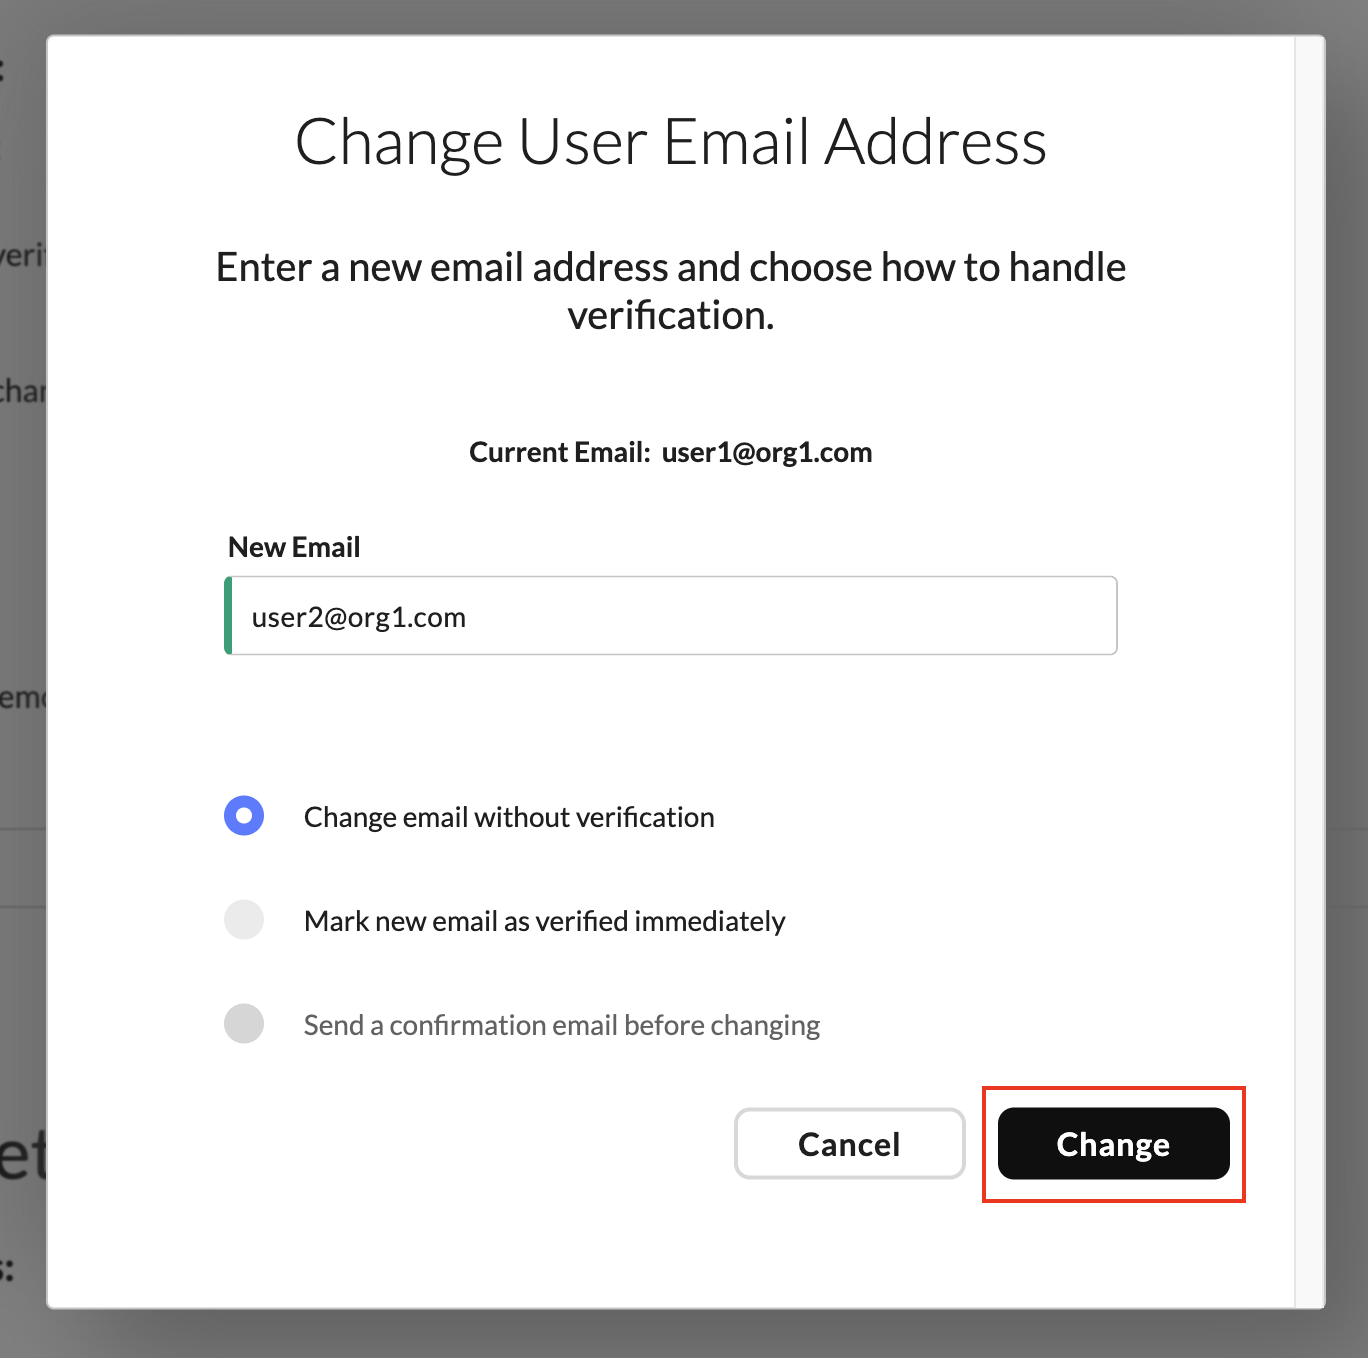
Figure 12: Configure the new email address and verification method.
Assigning Roles
You can assign or remove roles for a user directly from the User Details page.
To manage a user's roles:
- On the User Details page, locate the Roles section.
- Use the Assigned Roles dropdown to select or remove roles.
- Click Save to apply your changes.
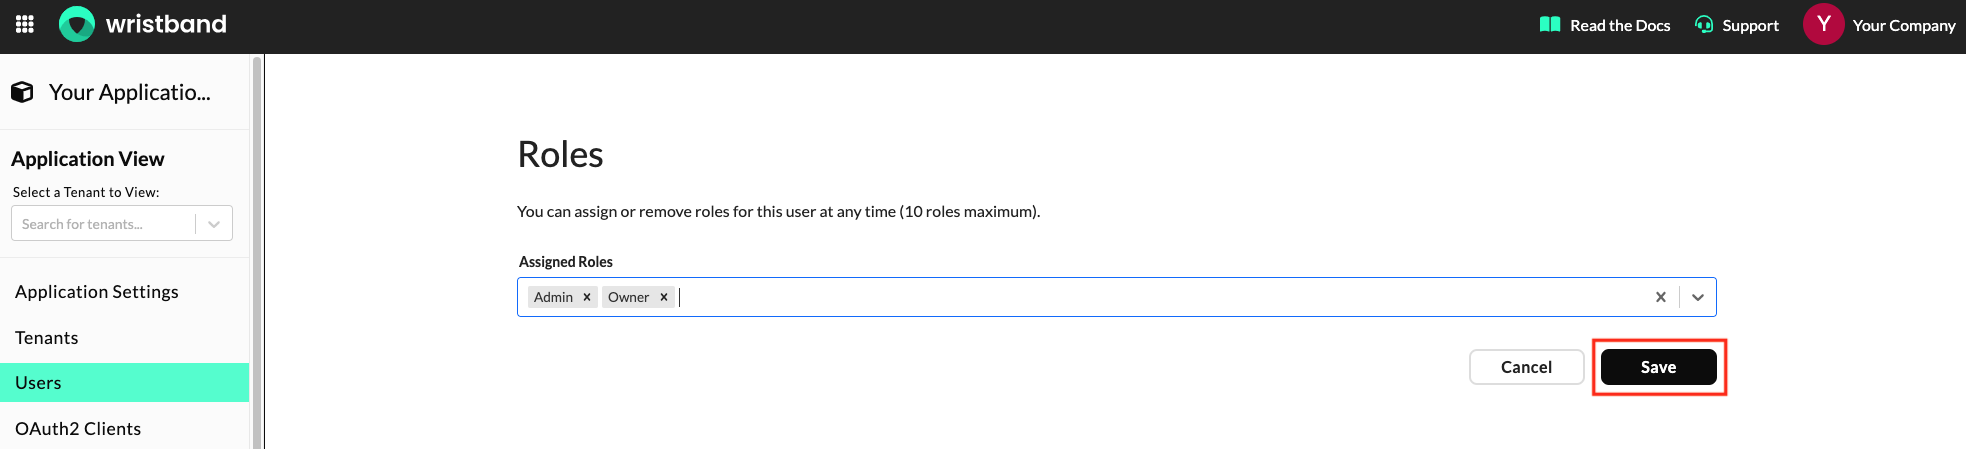
Figure 13: Manage a user's assigned roles.
Managing a User's Status
You can activate or deactivate users and trigger certain activation workflows through the User Details page. The available actions depend on the user's current status.
To manage a user's status:
- On the User Details page, locate the Status Settings section.
- Review the user's current status and available actions.
- Select the appropriate action to update the user's status or initiate an activation workflow.
Users With a PROVISIONED Status
The following actions are available:
- Send Invite: Sends an Existing User Invitation Email, allowing the user to complete account activation.
- Activate: Changes the user's status to
ACTIVEwithout requiring an email-based activation workflow. - Deactivate: Changes the user's status to
INACTIVE.
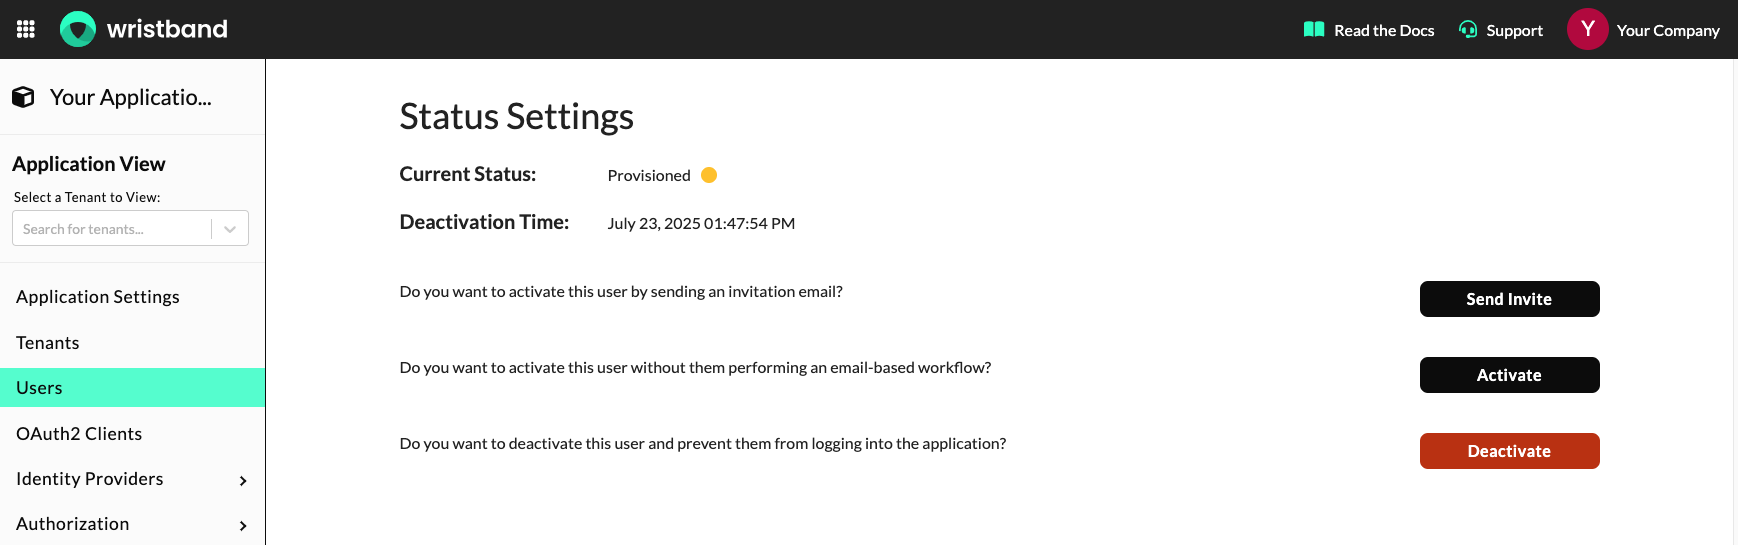
Figure 14: Available actions for a provisioned user.
Users With a PENDING_SIGNUP_ACTIVATION Status
The following actions are available:
- Send Activation: Resends the activation email, allowing the user to complete the signup activation process.
- Activate: Changes the user's status to
ACTIVEwithout requiring the activation workflow. - Deactivate: Changes the user's status to
INACTIVE.
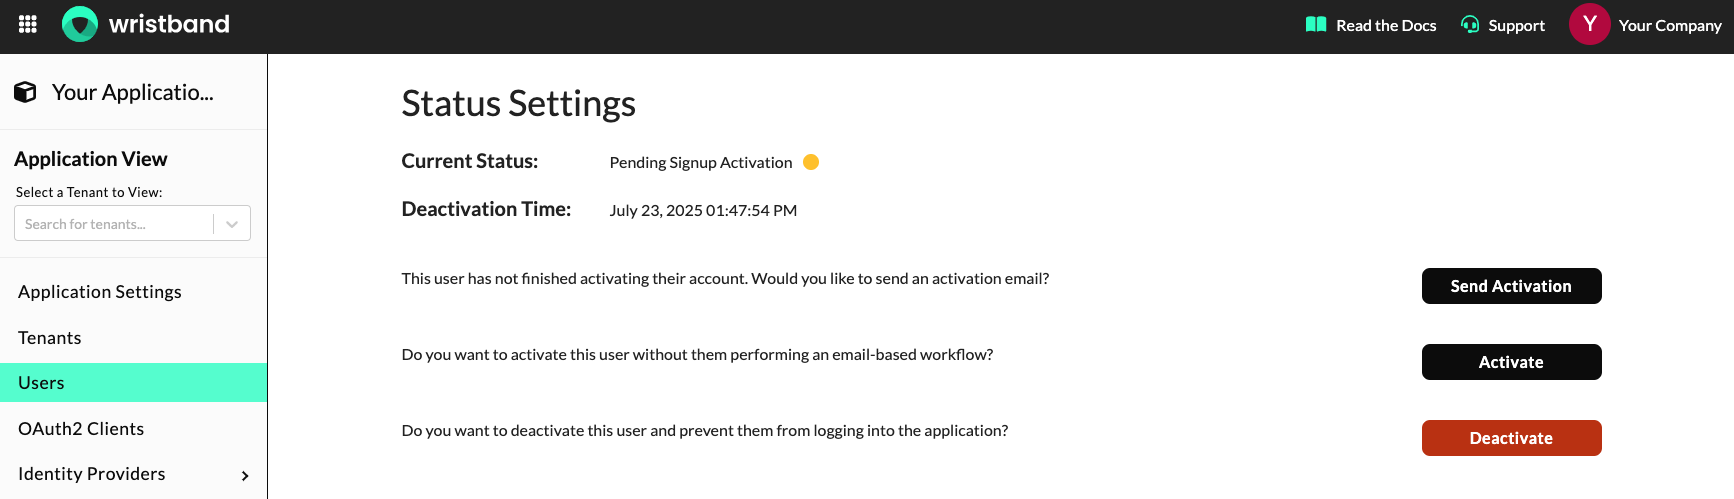
Figure 15: Available actions for a user pending signup activation.
Users With a PENDING_INVITE_ACTIVATION Status
The following actions are available:
- Send Activation: Resends the activation email, allowing the user to complete the invitation activation process.
- Activate: Changes the user's status to
ACTIVEwithout requiring the activation workflow. - Deactivate: Changes the user's status to
INACTIVE.
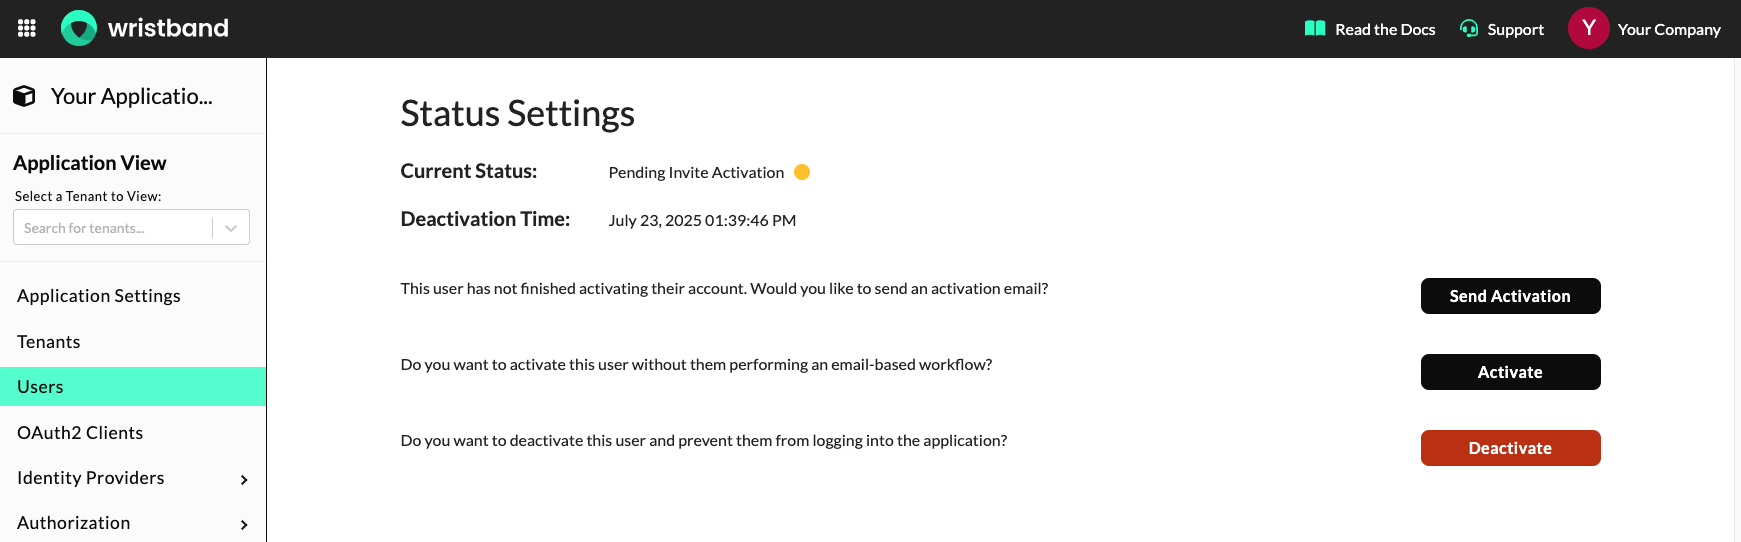
Figure 16: Available actions for a user pending invitation activation.
Users With an ACTIVE Status
The following action is available:
- Deactivate: Changes the user's status to
INACTIVE, preventing them from authenticating.
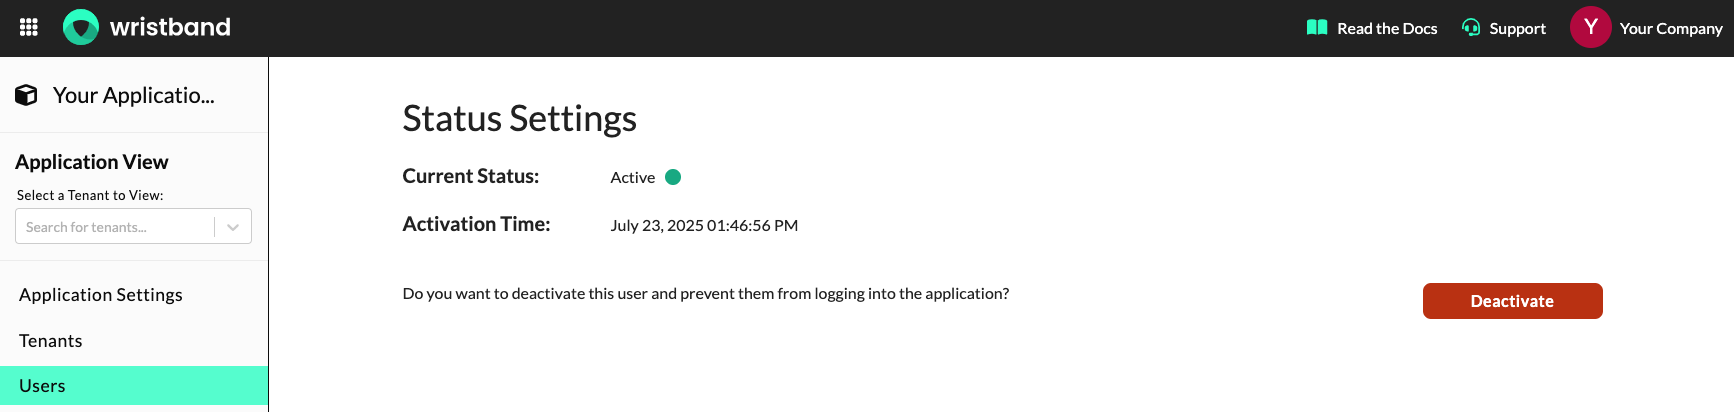
Figure 17: Deactivating an active user.
Users With an INACTIVE Status
The following actions are available:
- Send Invite: Sends an Existing User Invitation Email, allowing the user to complete an activation workflow.
- Activate: Changes the user's status to
ACTIVE.
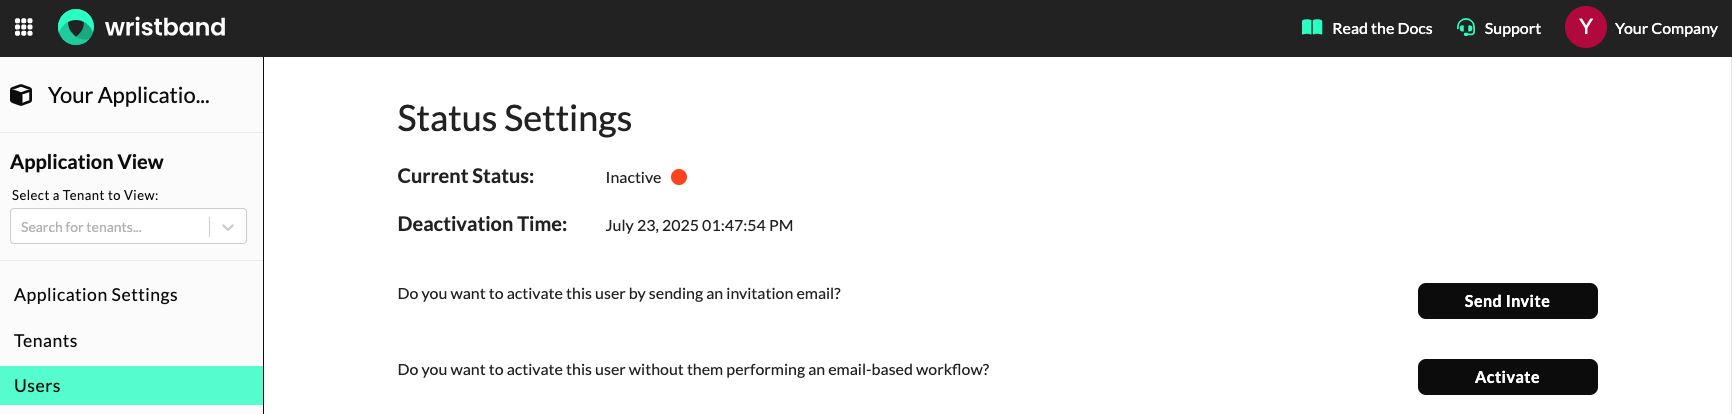
Figure 18: Available actions for an inactive user.
Viewing a User's Active Refresh Tokens
You can view and revoke refresh tokens associated with a user through the User Details page.
To manage a user's refresh tokens:
- On the User Details page, locate the Active Refresh Tokens section.
- Review the active refresh tokens associated with the user.
- Use one of the following actions:
- Revoke an Individual Token: Click the More Options (⋮) menu next to a refresh token and then select Revoke Refresh Token.
- Revoke All Tokens: Click Revoke All Tokens to revoke all refresh tokens associated with the user.
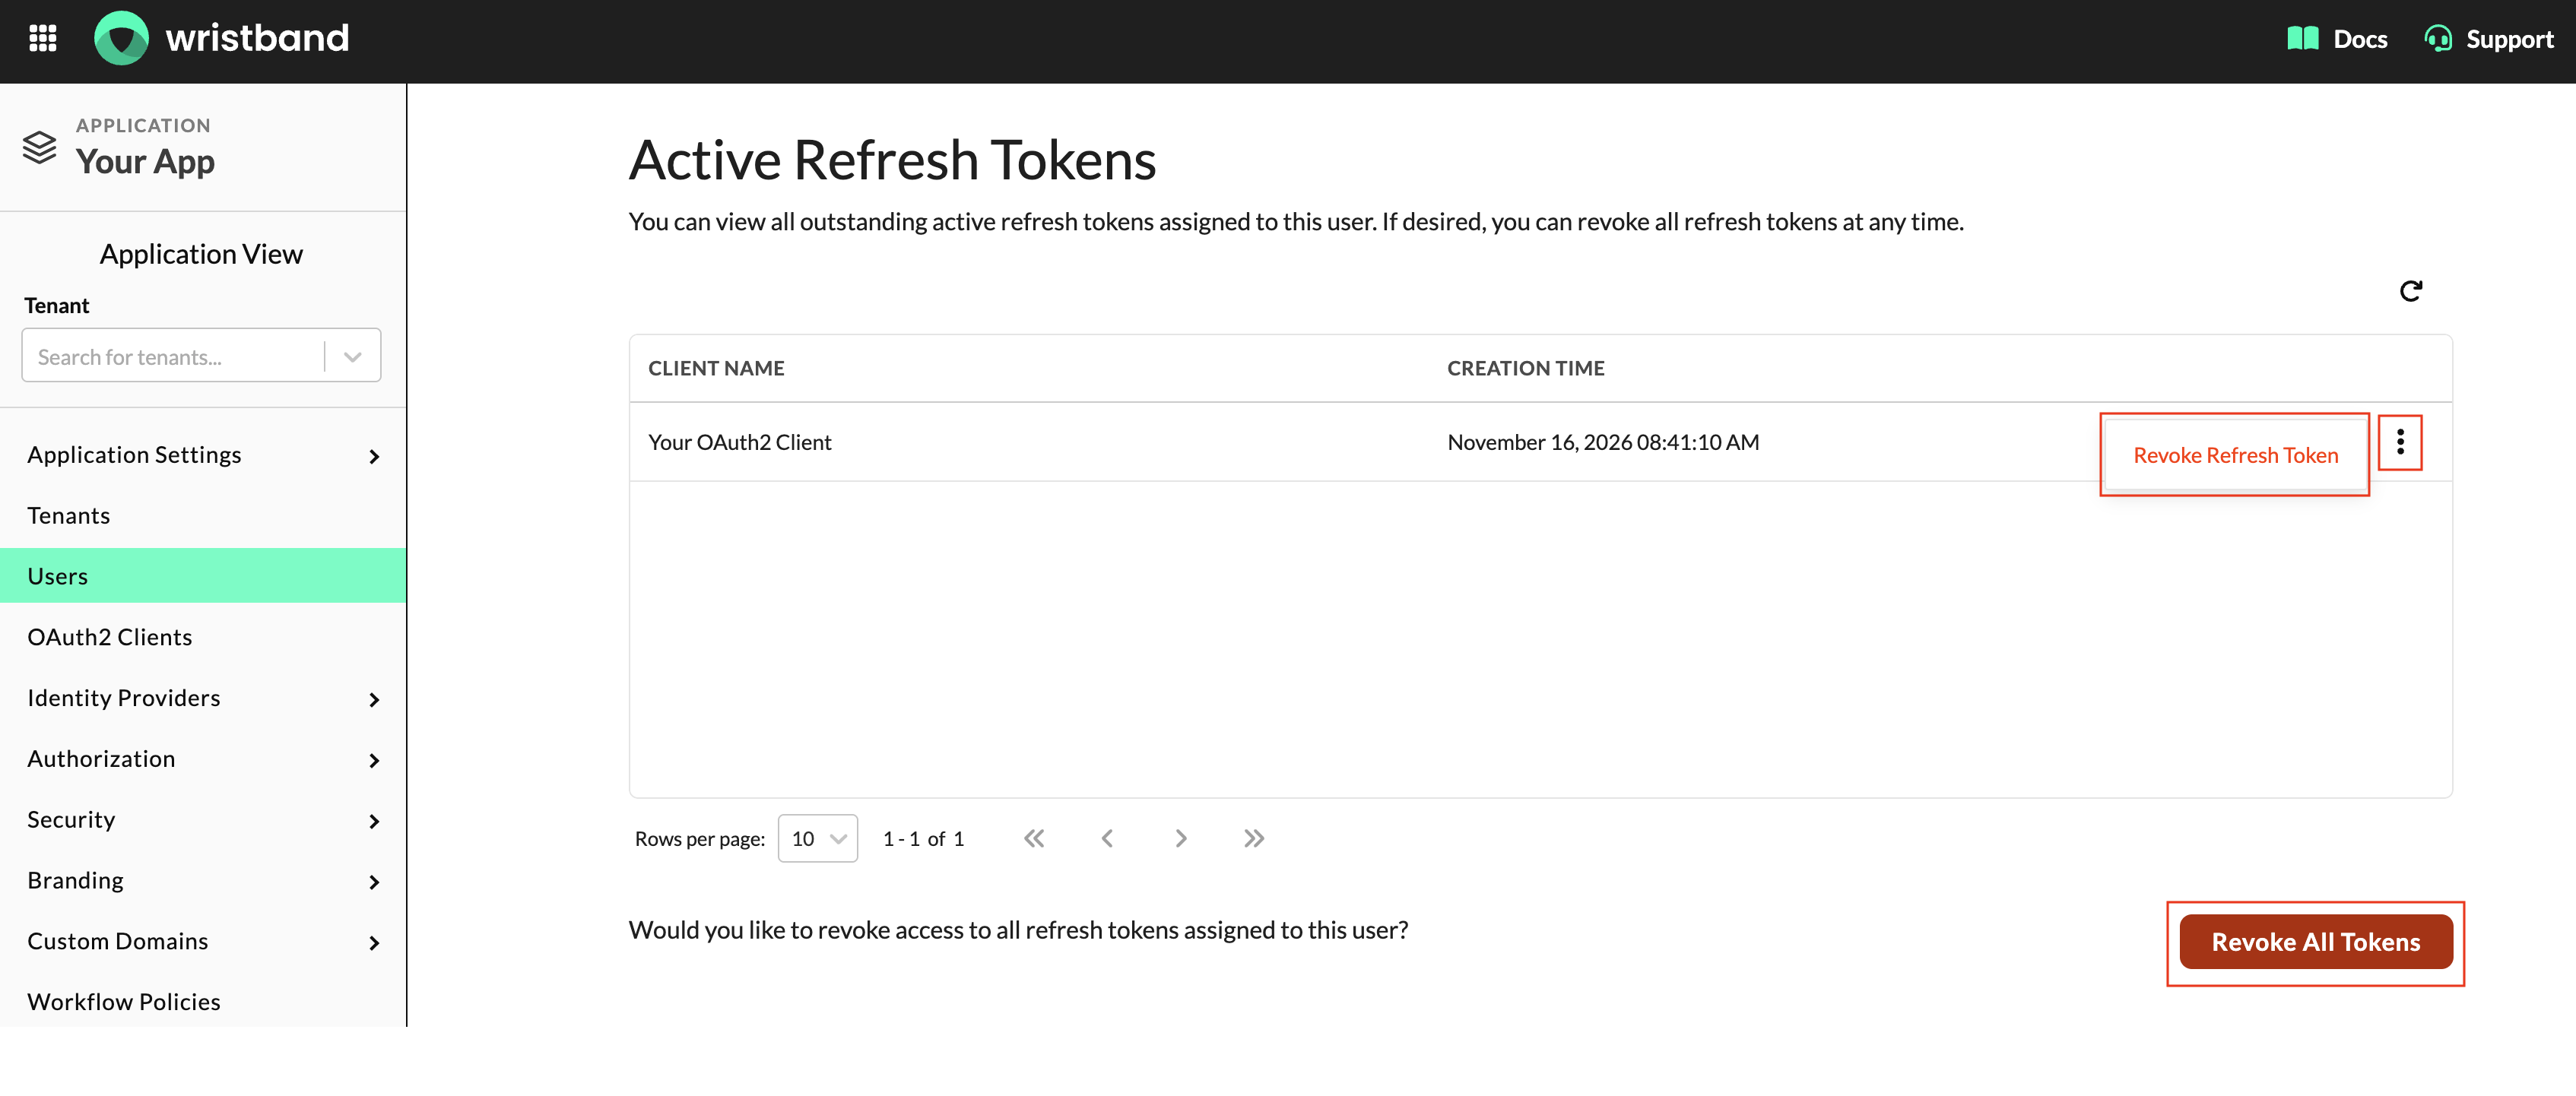
Figure 19: View and revoke a user's active refresh tokens.
Viewing a User's Active Auth Sessions
You can view and delete a user's active authentication sessions through the User Details page.
To manage a user's authentication sessions:
- On the User Details page, locate the Active Auth Sessions section.
- Review the user's active authentication sessions.
- Use one of the following actions:
- Delete an Individual Session: Click the More Options (⋮) menu next to a session and then select Delete Auth Session.
- Delete All Sessions: Click Delete All Sessions to delete all authentication sessions associated with the user.
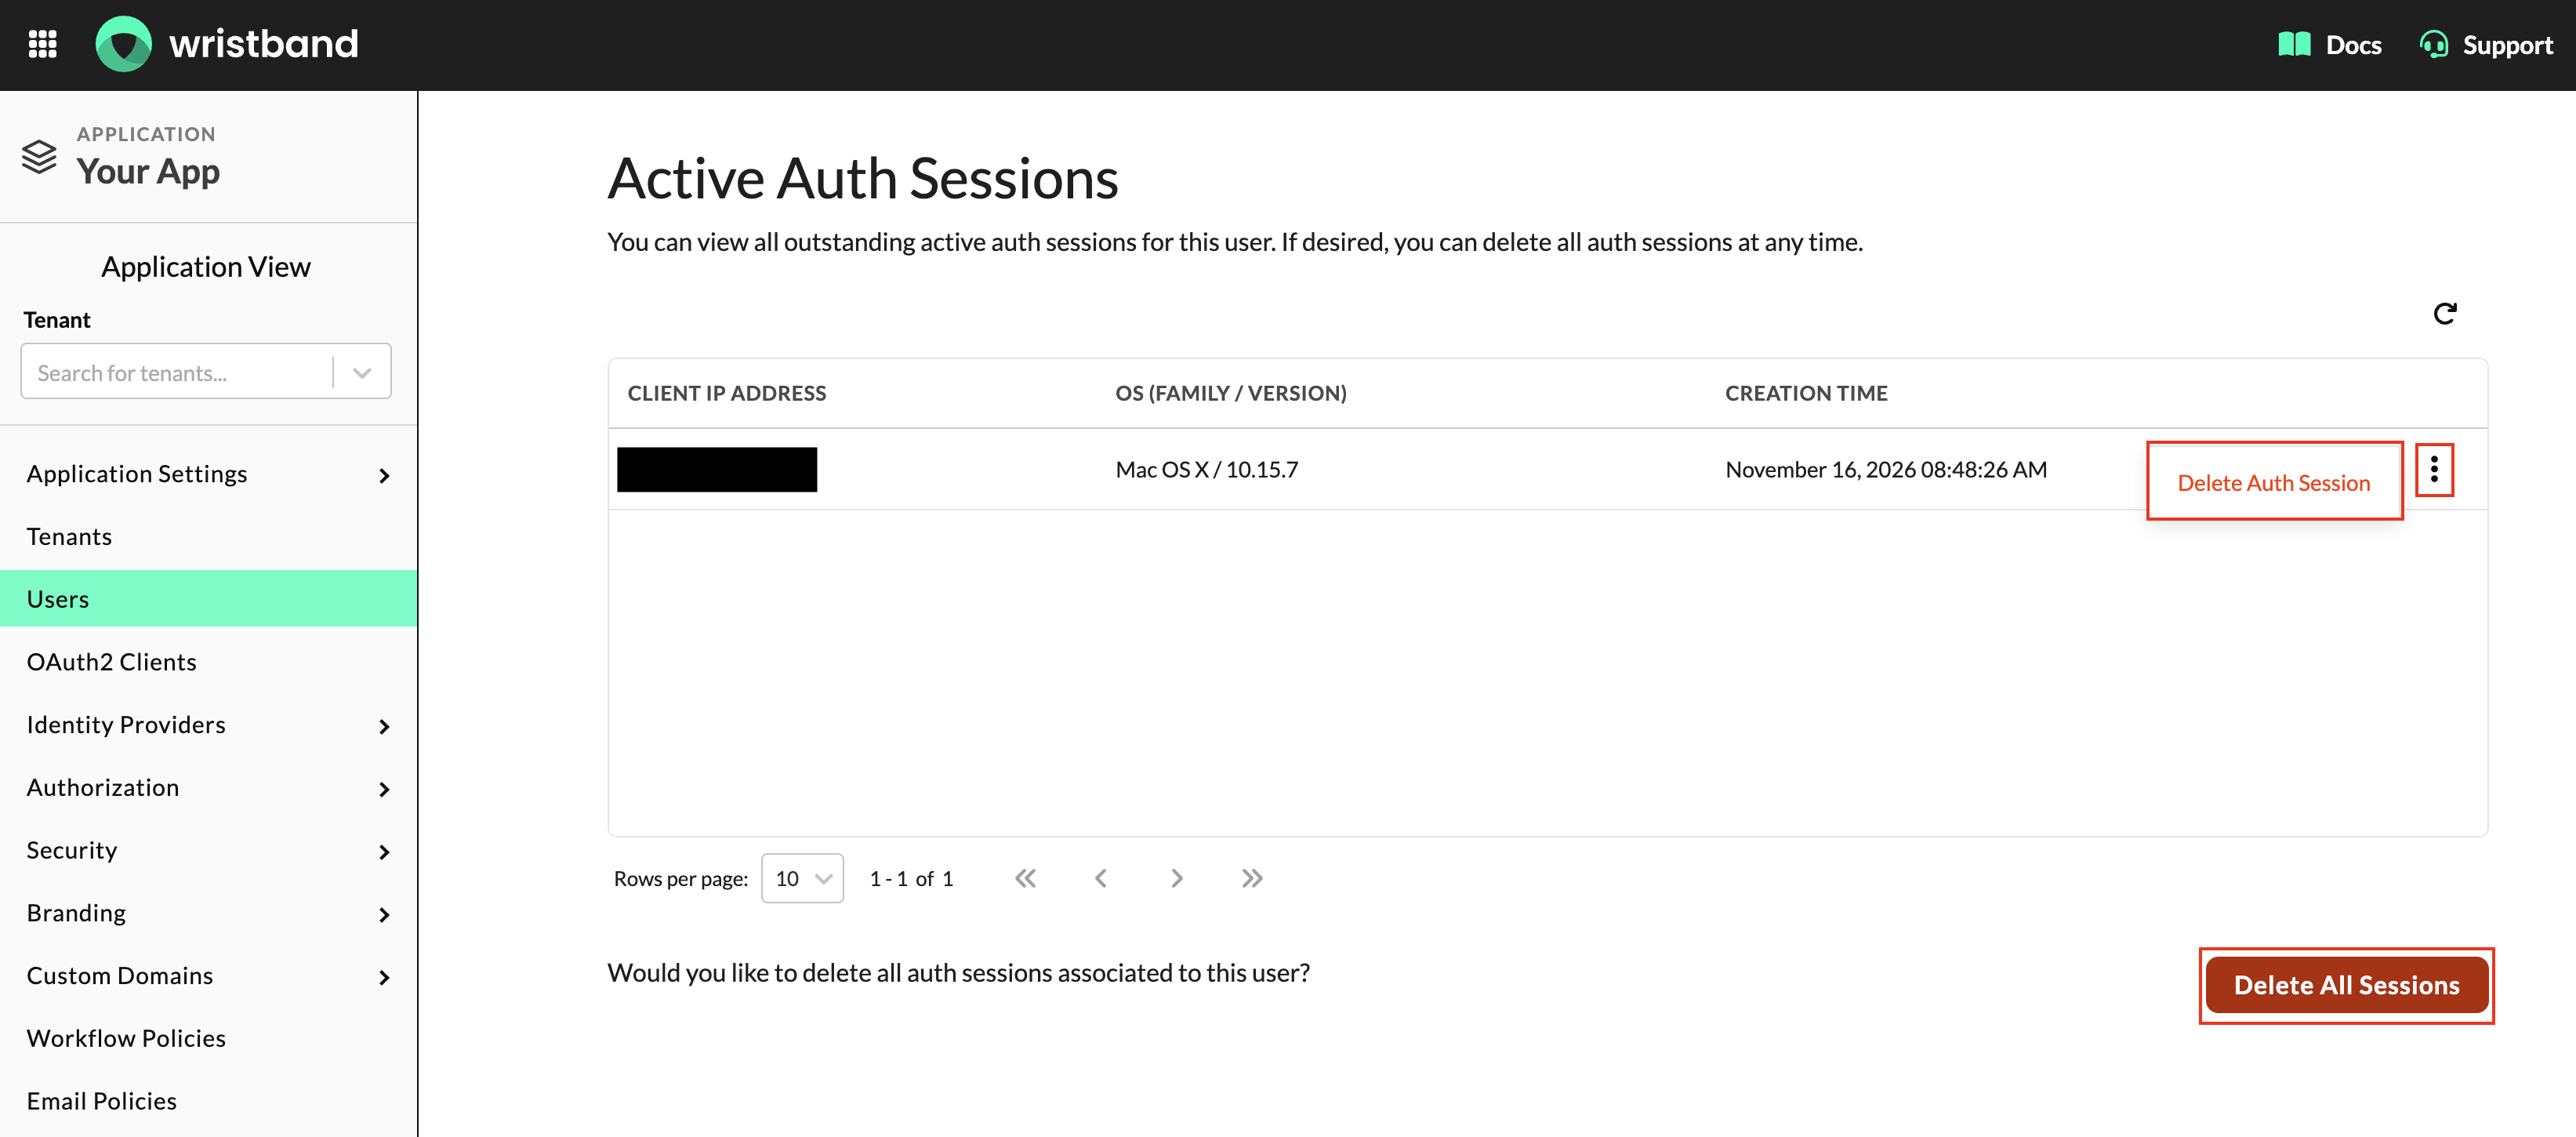
Figure 20: View and delete a user's active authentication sessions.
Deleting a User
You can permanently delete a user through the Wristband Dashboard.
To delete a user:
- On the User Details page, locate the Delete This User section.
- Click Delete.
- Follow the confirmation prompt to permanently delete the user.
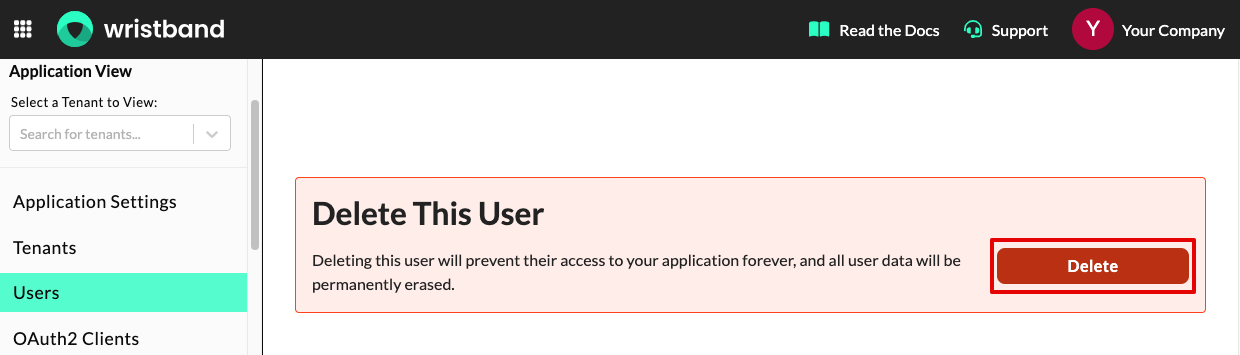
Figure 21: Delete a user from the Wristband Dashboard.
User Deletion Is PermanentDeleting a user permanently removes their account and associated user data. This action cannot be undone.
Inviting New Users
You can invite new users to join a tenant through the Wristband Dashboard by sending invitation emails or generating single-use invitation links.
To create a new user invitation:
- From the left navigation menu, select Users.
- Locate the New User Invitations section.
- Choose one of the following invitation methods:
- Emails: Send an invitation directly to a user's email address.
- Generated Links: Create a single-use invitation link that can be shared through external channels, such as Slack.
Sending Invitation Emails
To invite a user by email:
- Select the Emails tab and click Send Invite.
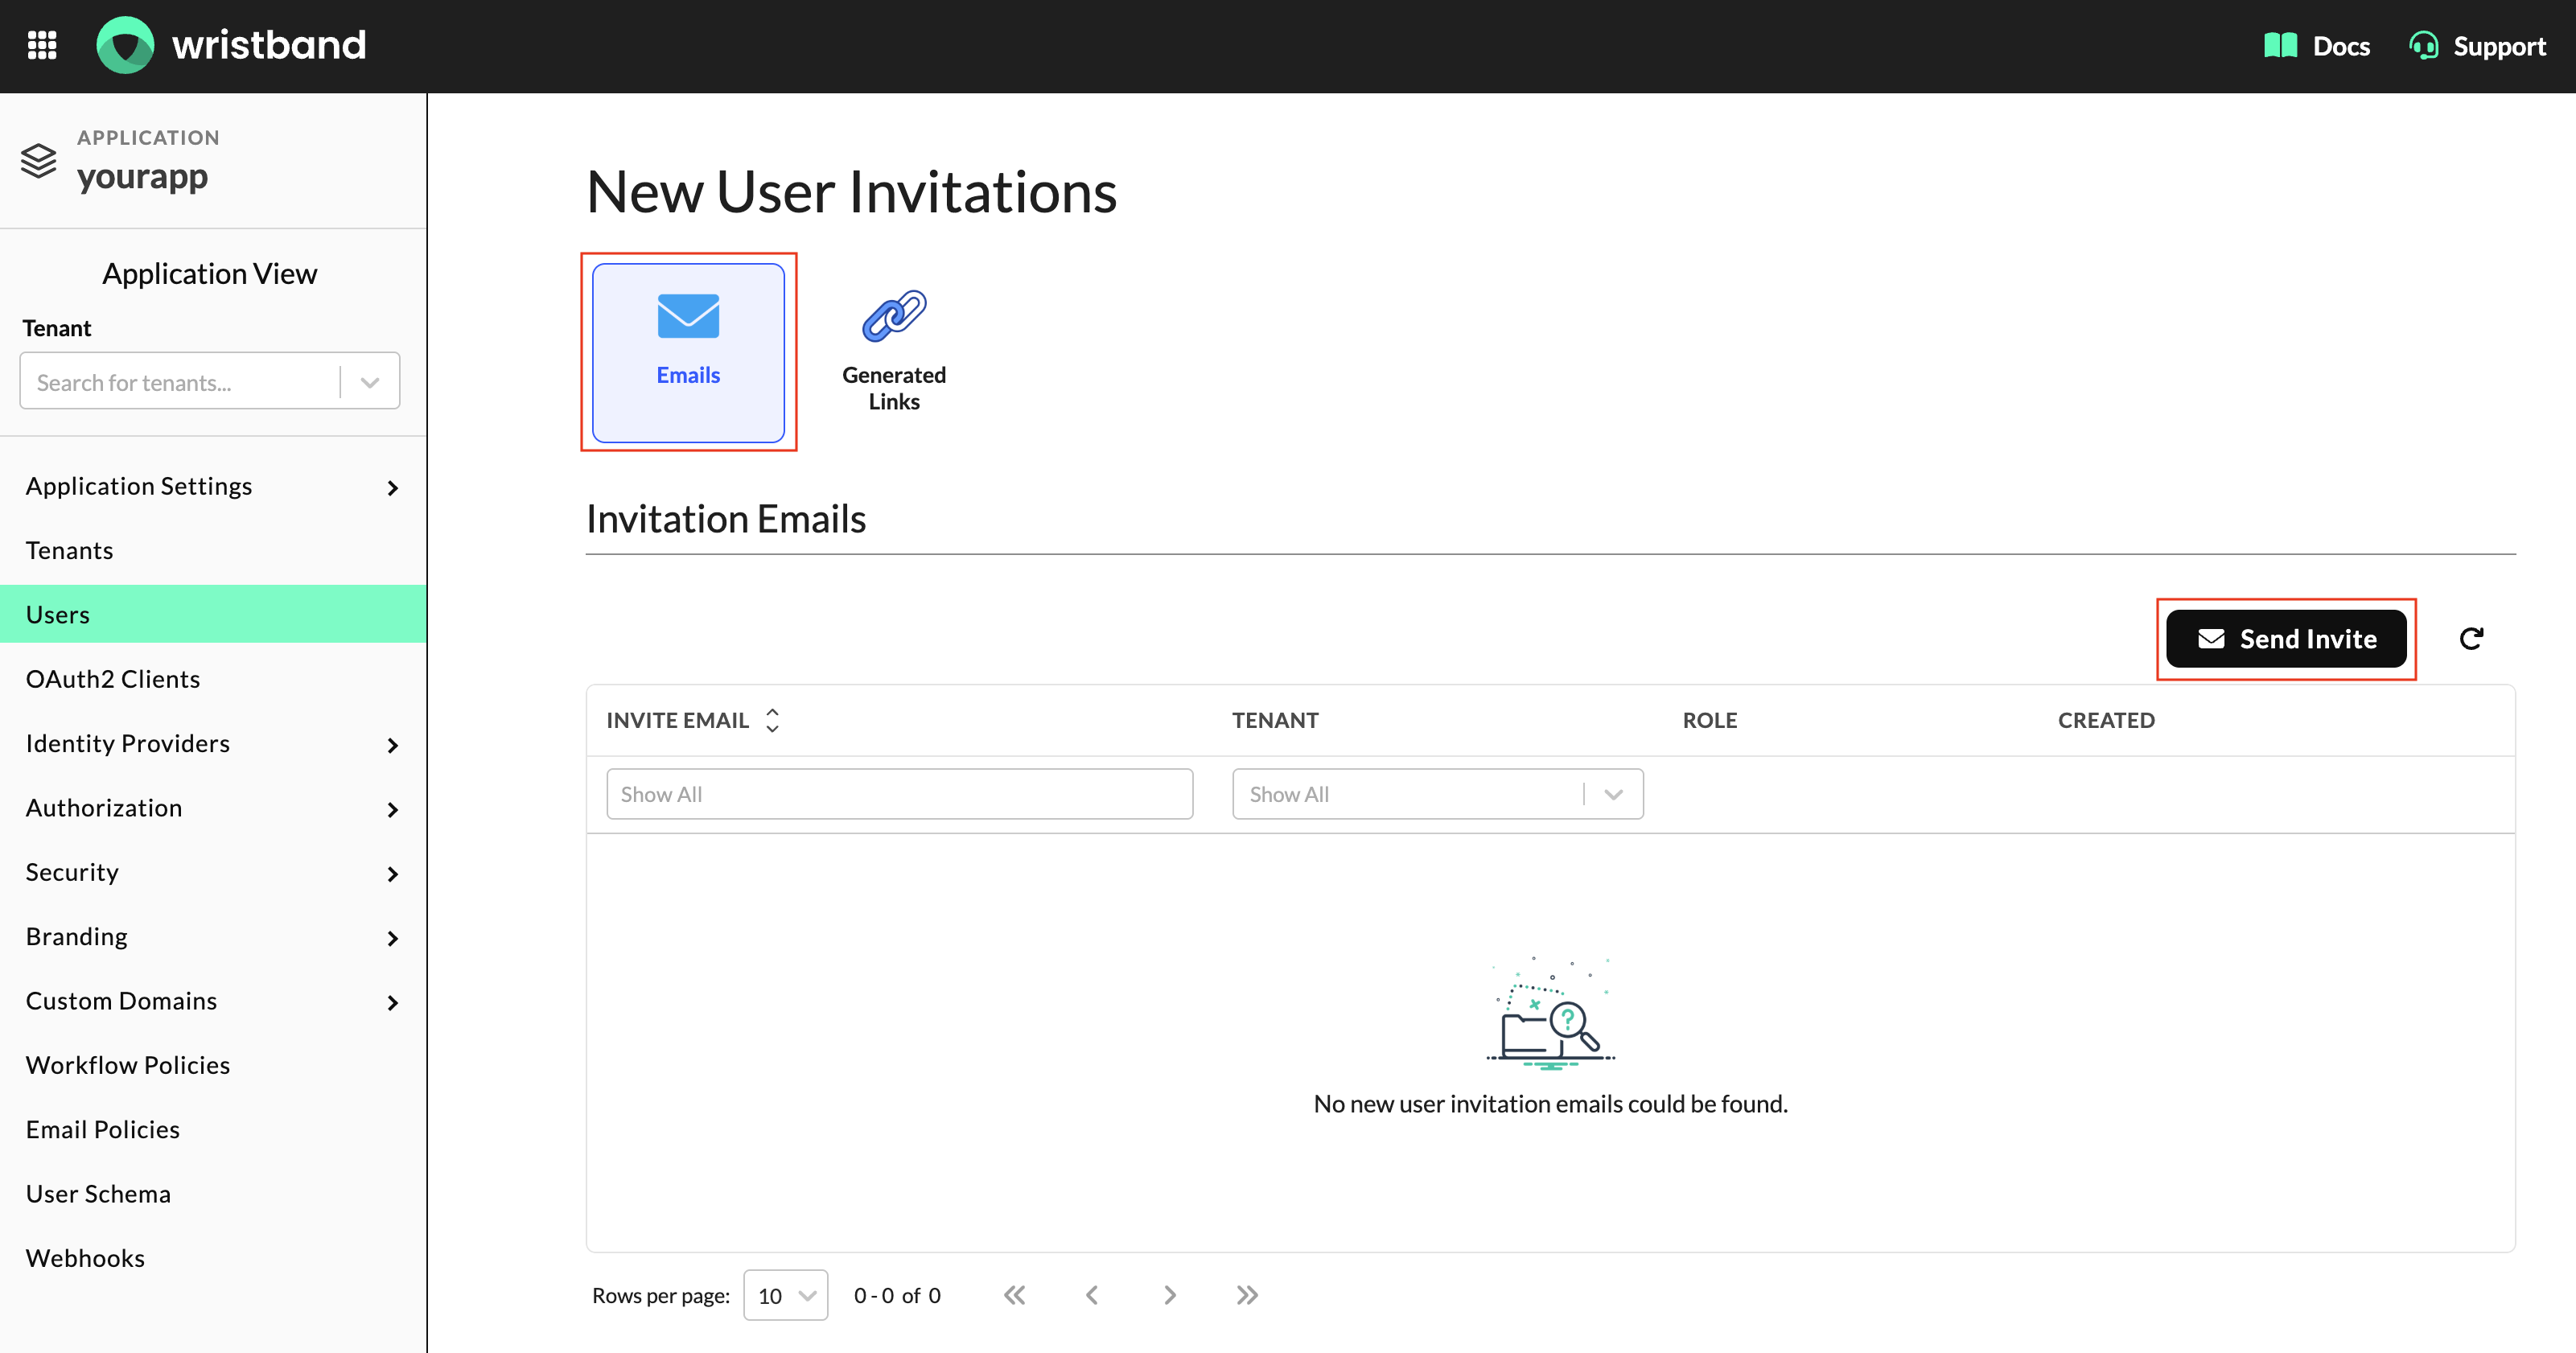
Figure 22: Send a new user invitation email.
- In the Send New User Invite modal, provide the following information:
- Tenant: The tenant the user will join. This field is required when sending an invitation from the Application View. When sending an invitation from the Tenant View, the currently selected tenant is used automatically.
- Email: The email address of the user you want to invite.
- Roles: Optional roles to assign to the user when they accept the invitation.
- Click Send Invite to send the invitation email.
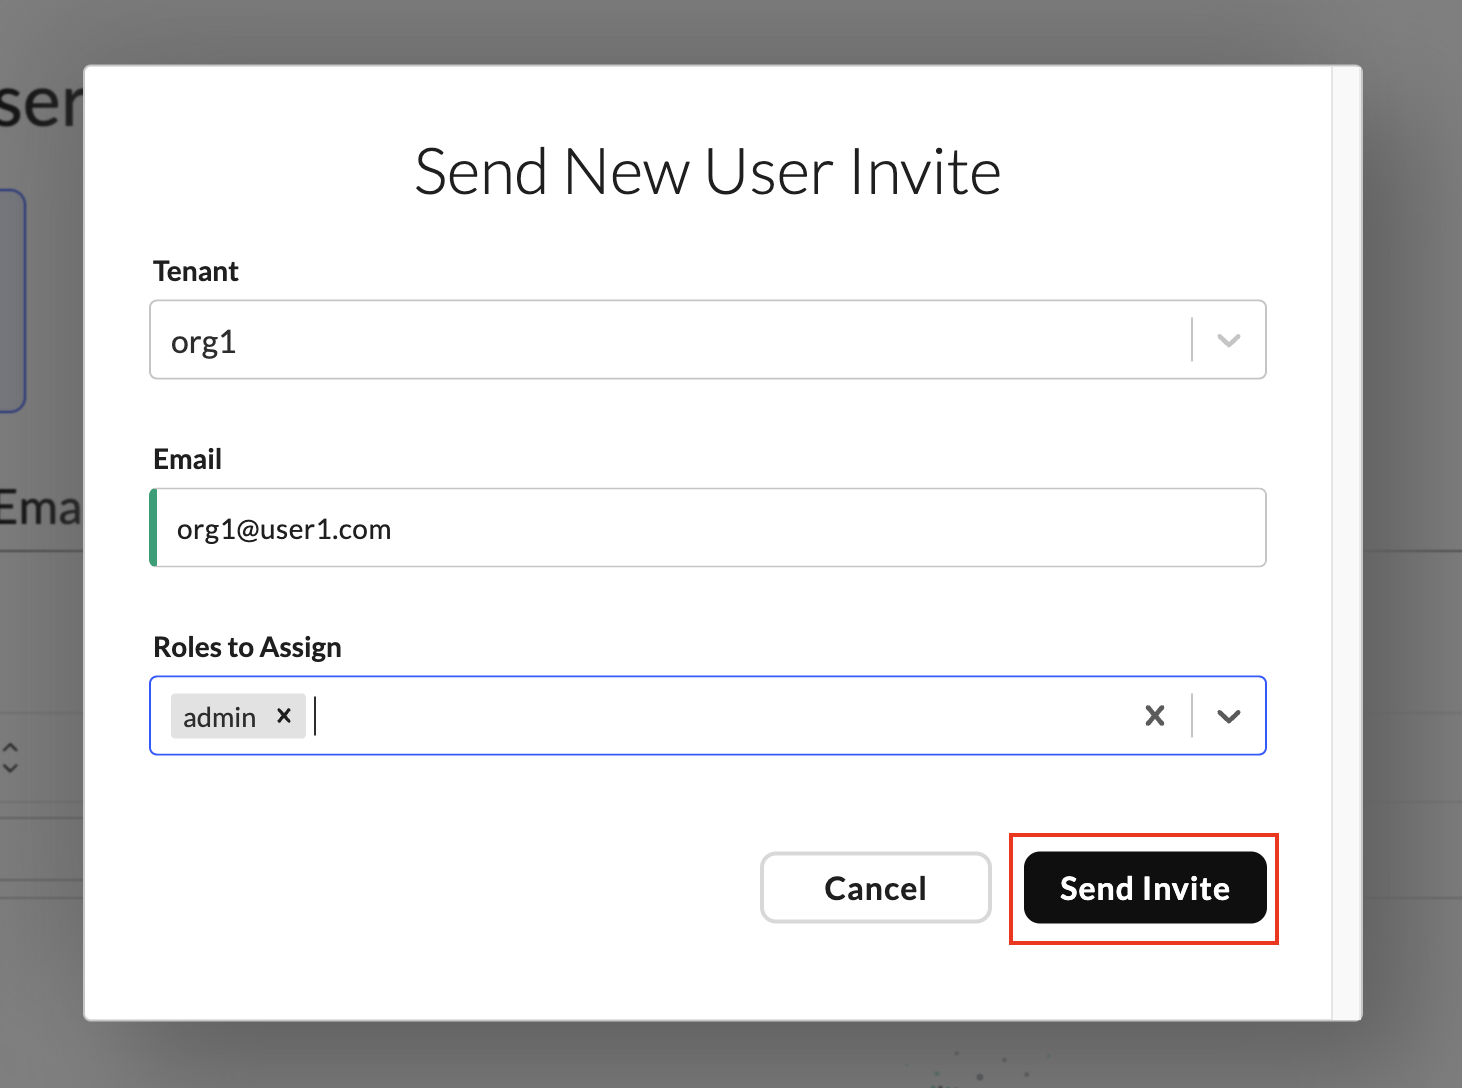
Figure 23: Configure and send a new user invitation email.
Generating Invitation Links
You can generate single-use invitation links to invite users through external communication channels, such as Slack, instead of sending invitation emails.
To generate an invitation link:
- Select the Generated Links tab and click Create Link.
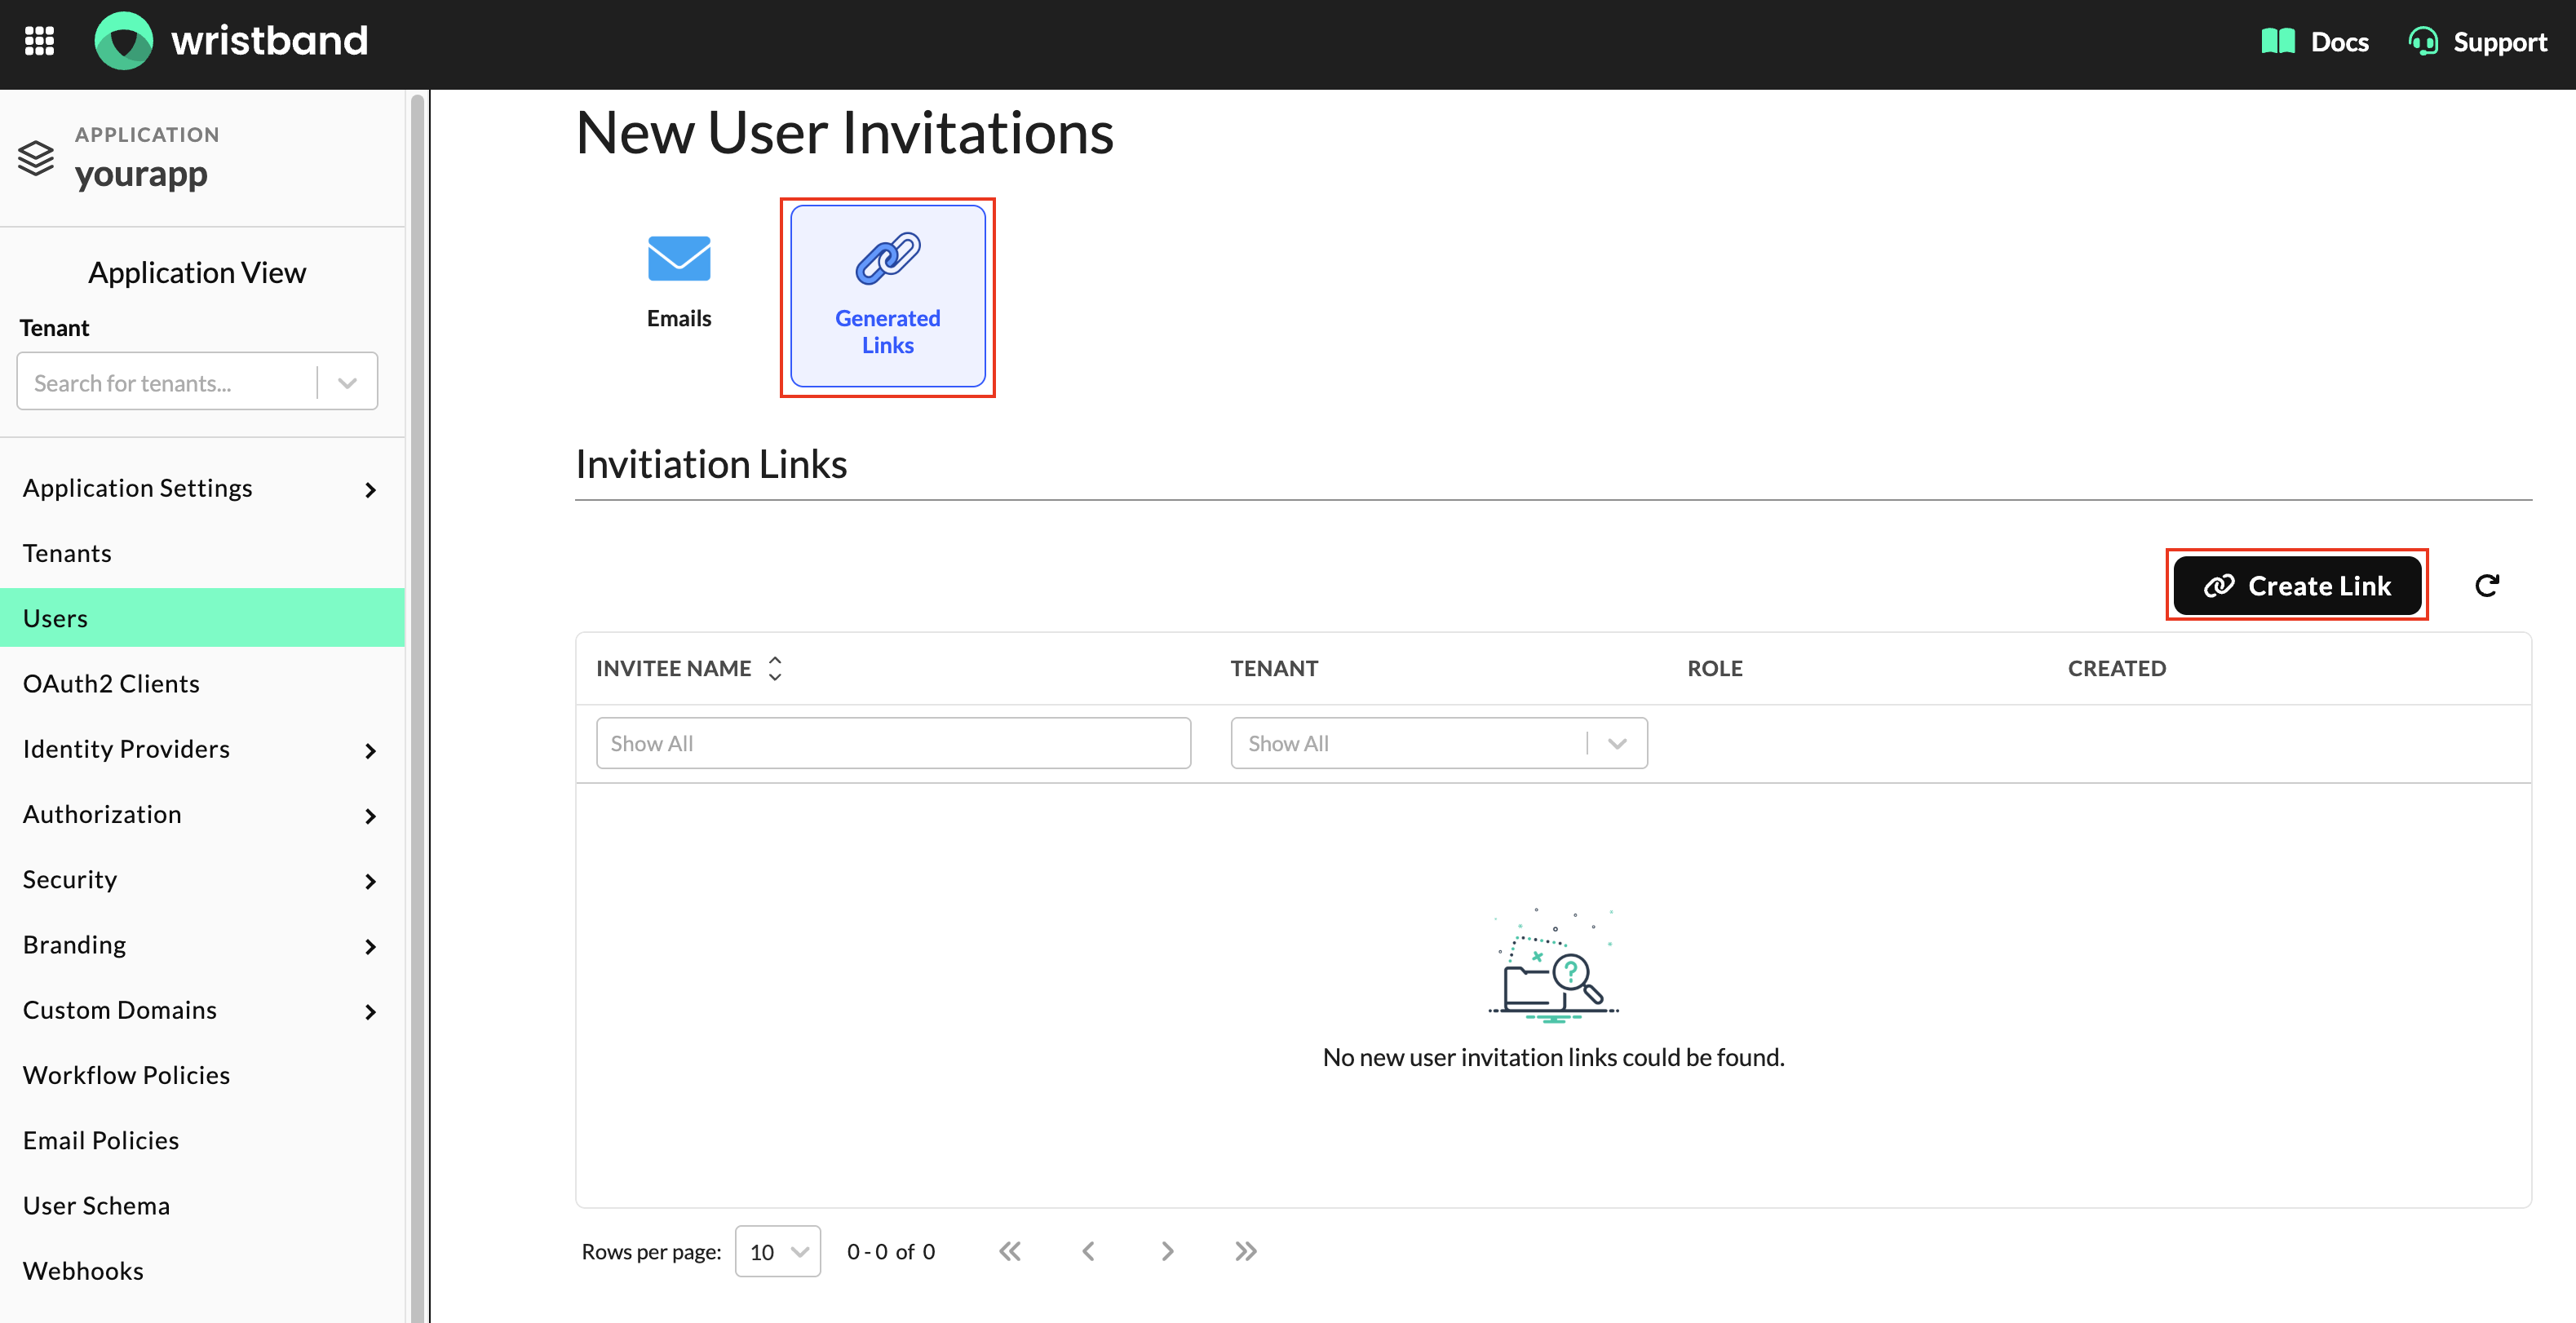
Figure 24: Create a new user invitation link.
- In the Generate New User Invite Link modal, provide the following information:
- Tenant: The tenant the invited user will join. This field is required when generating a link from the Application View. When generating a link from the Tenant View, the currently selected tenant is used automatically.
- Invitee Name: A name used to identify the invitation link.
- Roles: Optional roles to assign to the user when they accept the invitation.
- Click Create Link to generate the invitation link.
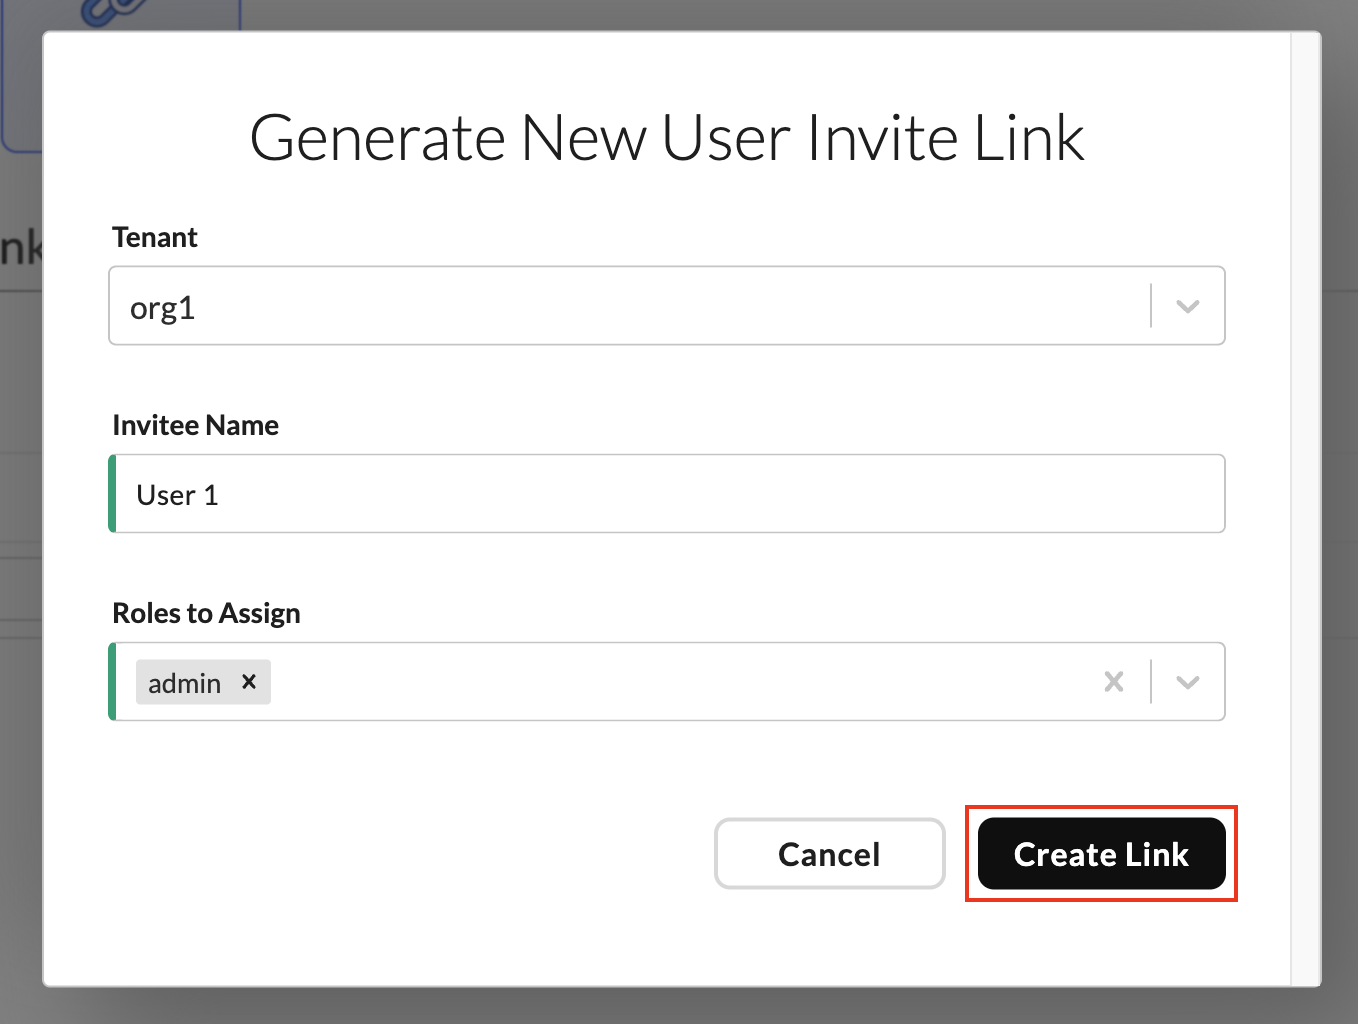
Figure 25: Configure and generate a new user invitation link.
- Click Copy to copy the generated invitation link to your clipboard. You can then share the link with the intended recipient through your preferred communication channel.
- Click Done to close the modal.
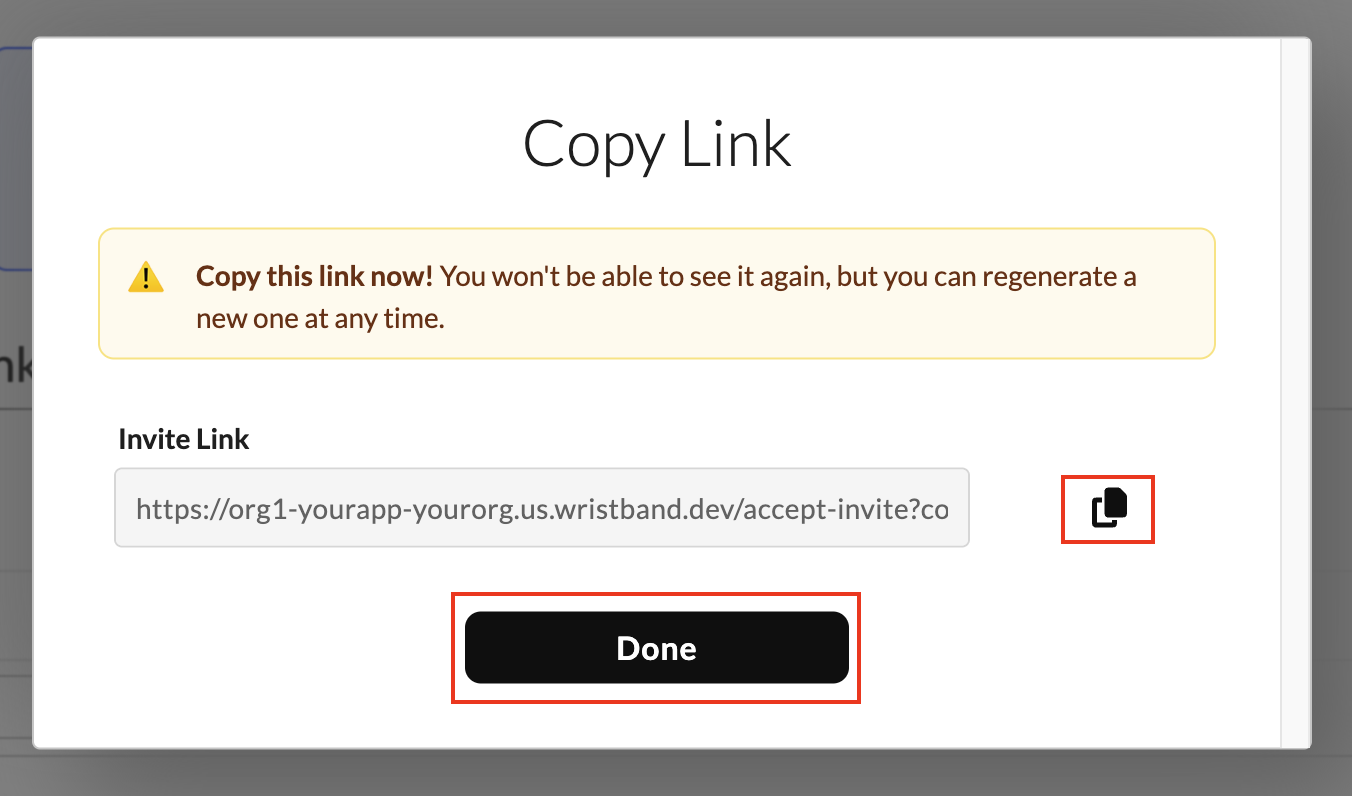
Figure 26: Copy the generated invitation link.
Invitation Link ExpirationGenerated invitation links are single-use and expire according to the expiration period configured in the New User Invitation Workflow Policy.
For more information about configuring the invitation process, see the New User Invitation Workflow documentation.
Managing Active Invitations
The Wristband Dashboard allows you to view and manage active email invitations and generated invitation links. Active invitations are those that have not yet been accepted or expired. Once an invitation has been accepted or expired it will no longer be displayed in its corresponding invite table.
Managing Email Invitations
The Emails tab displays all active email invitations.
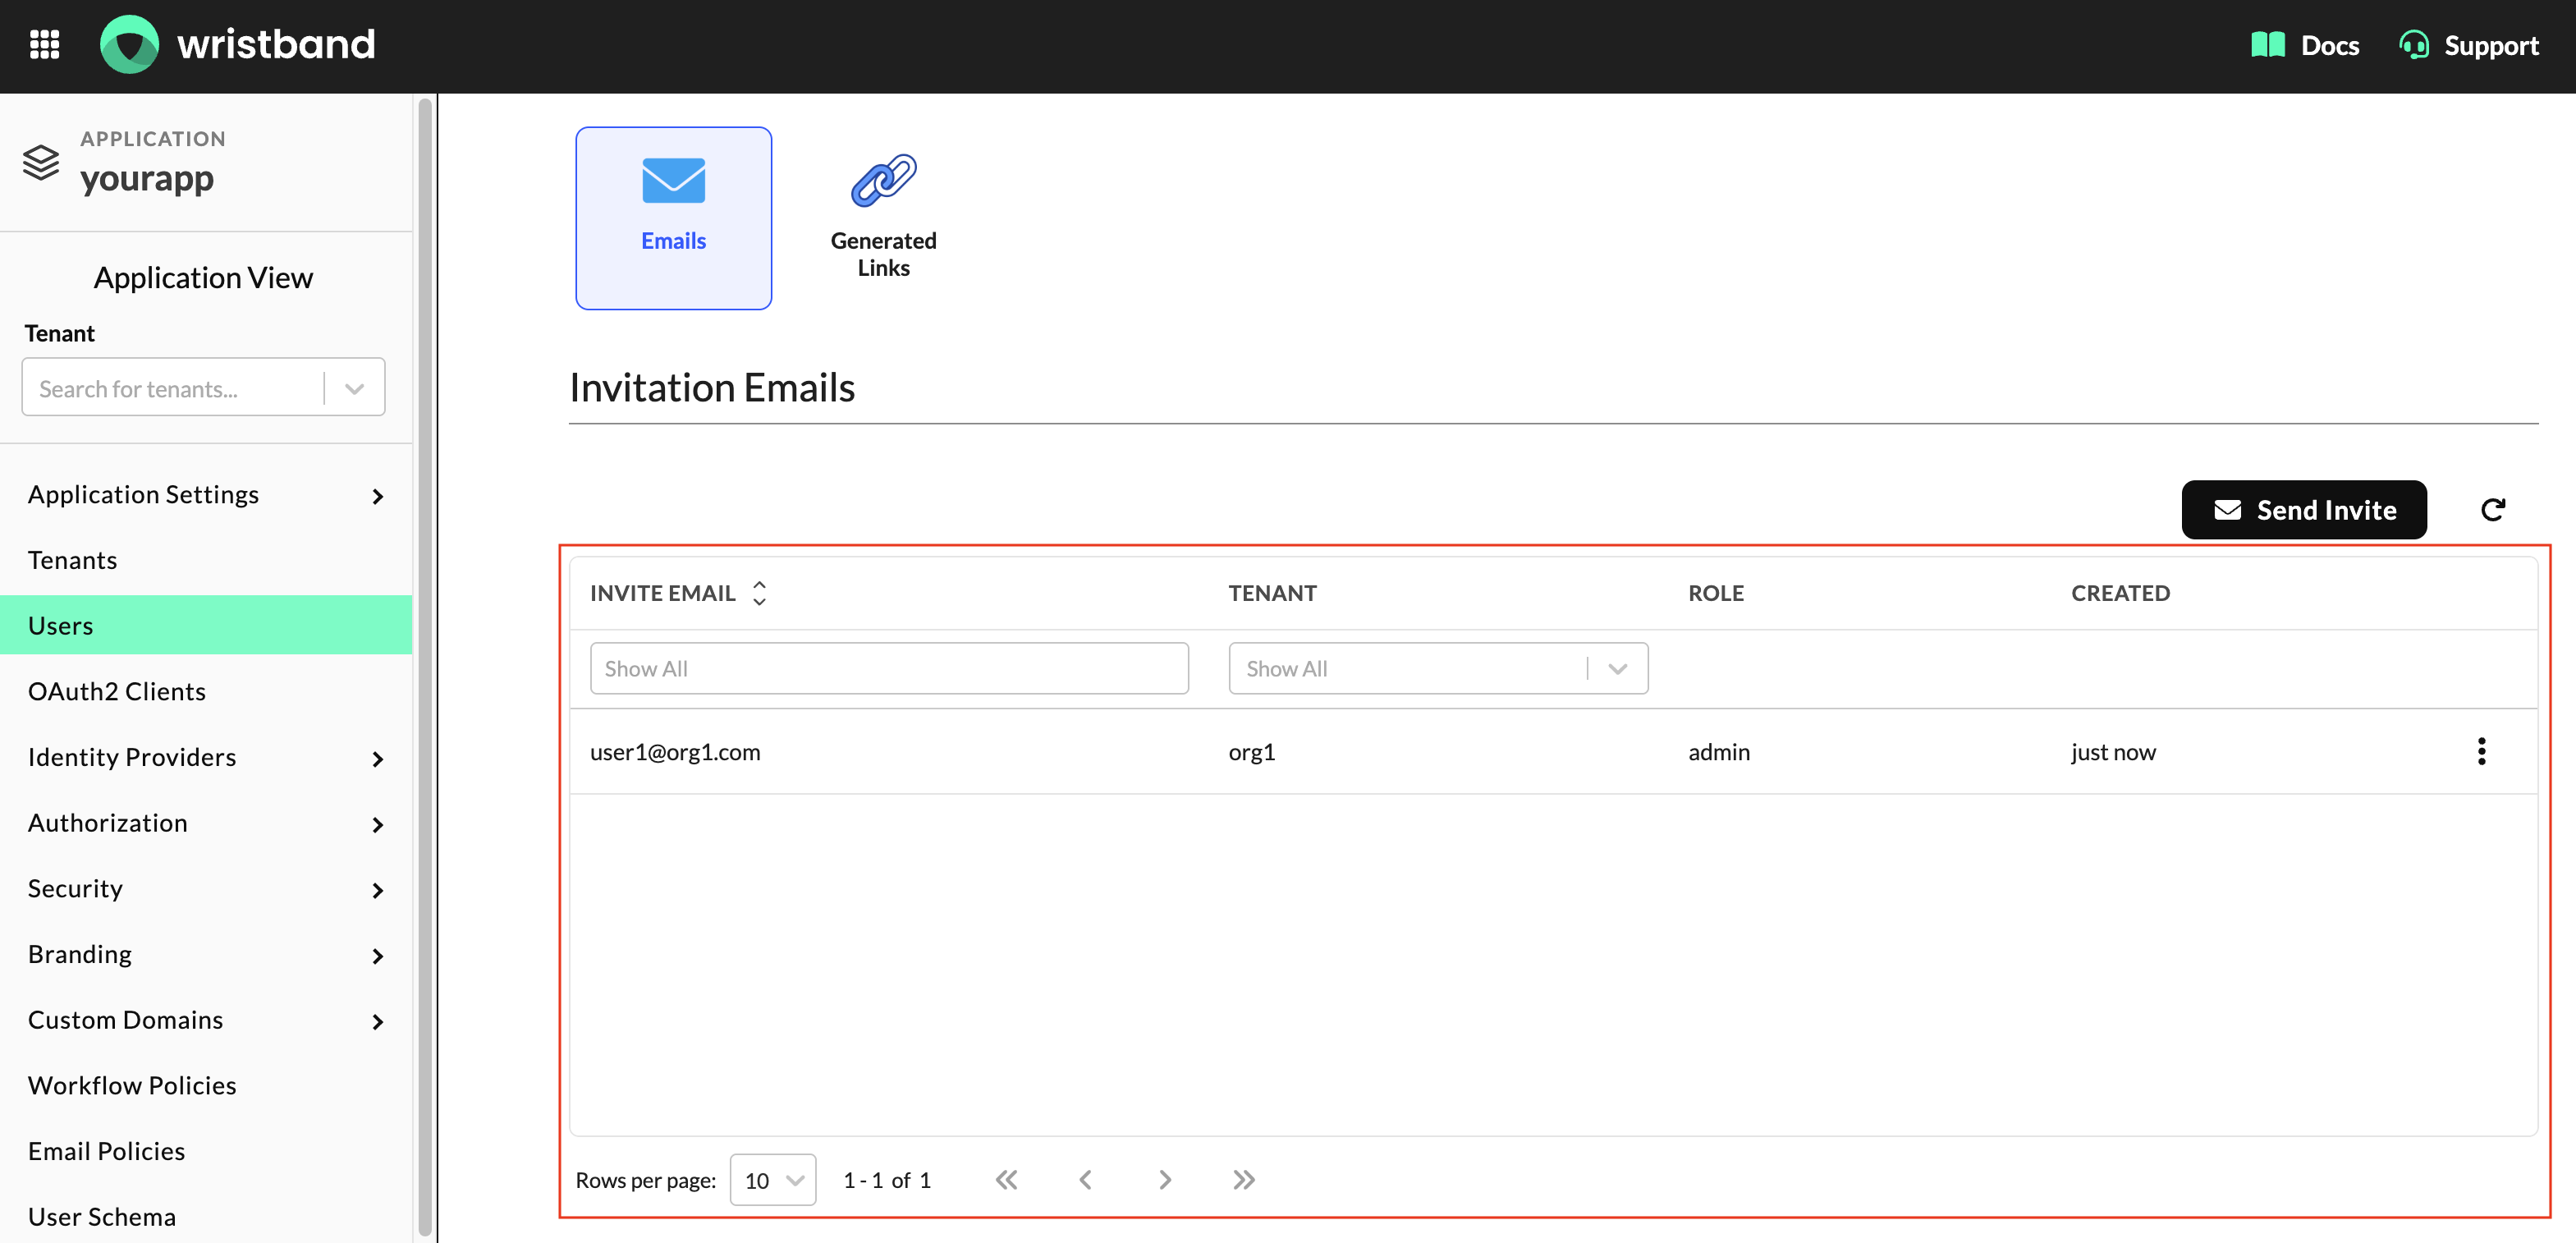
Figure 27: View active email invitations.
To manage an email invitation, click the More Options (⋮) menu next to the invitation and select one of the following actions:
- Resend New User Invites: Sends a new invitation email to the recipient and invalidates any previously sent invitation links for the same email address.
- Cancel Invite: Cancels the invitation and invalidates the associated invitation link, preventing it from being used.
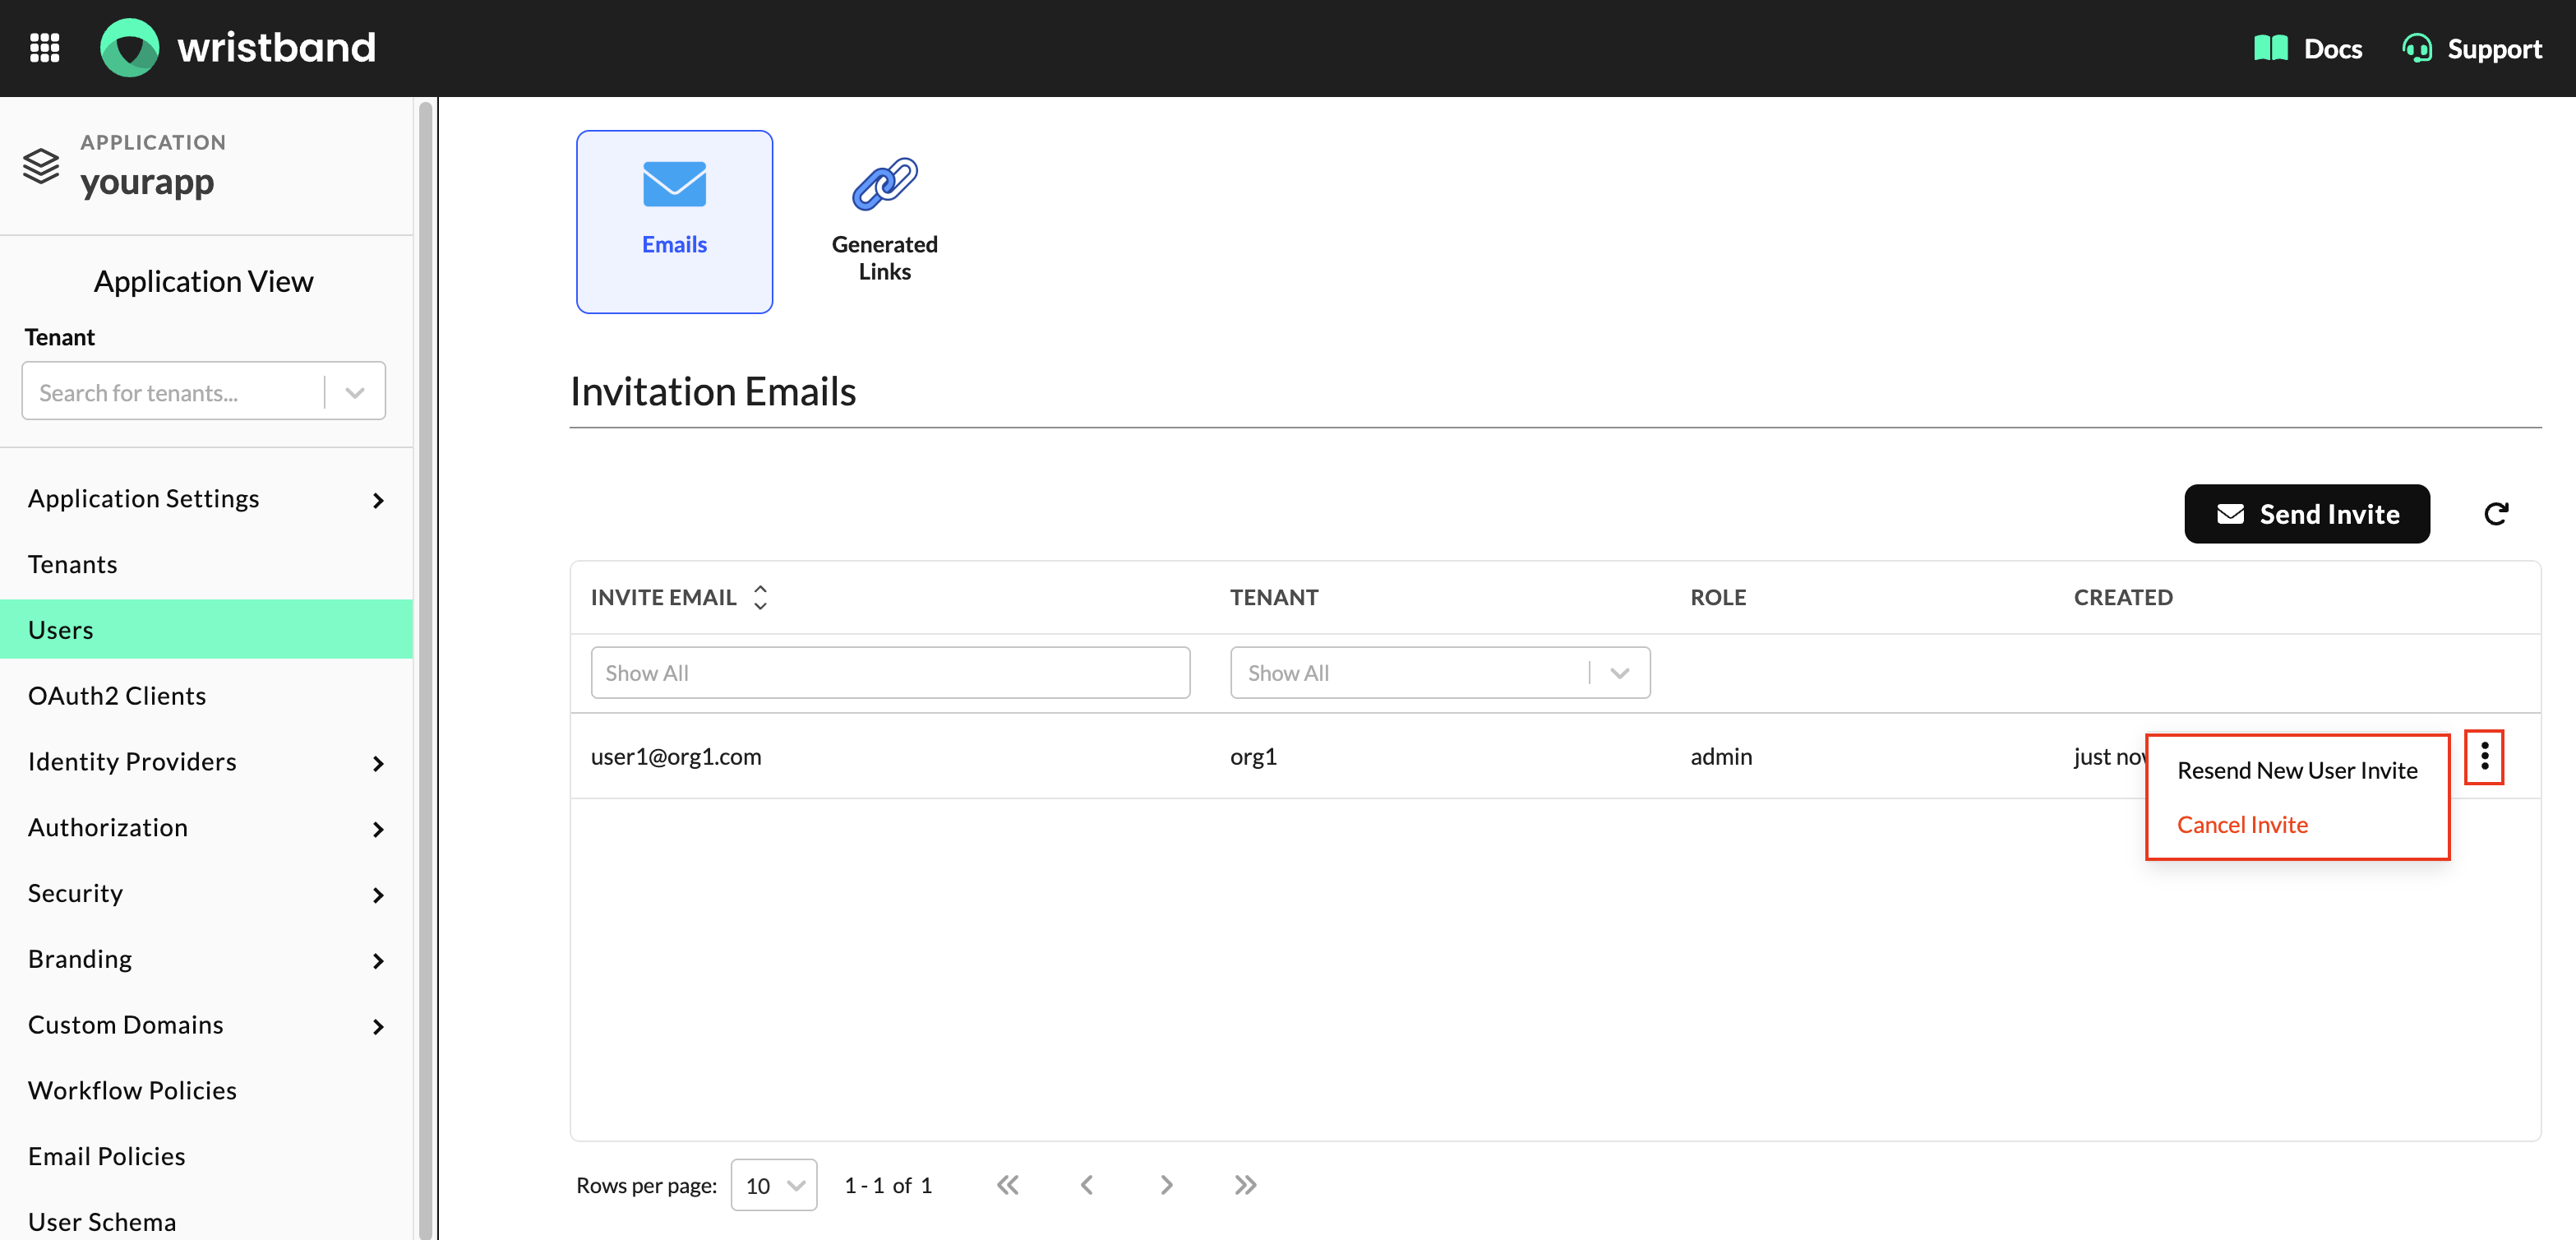
Figure 28: Manage an active email invitation.
Managing Invitation Links
The Generated Links tab displays all active invitation links.
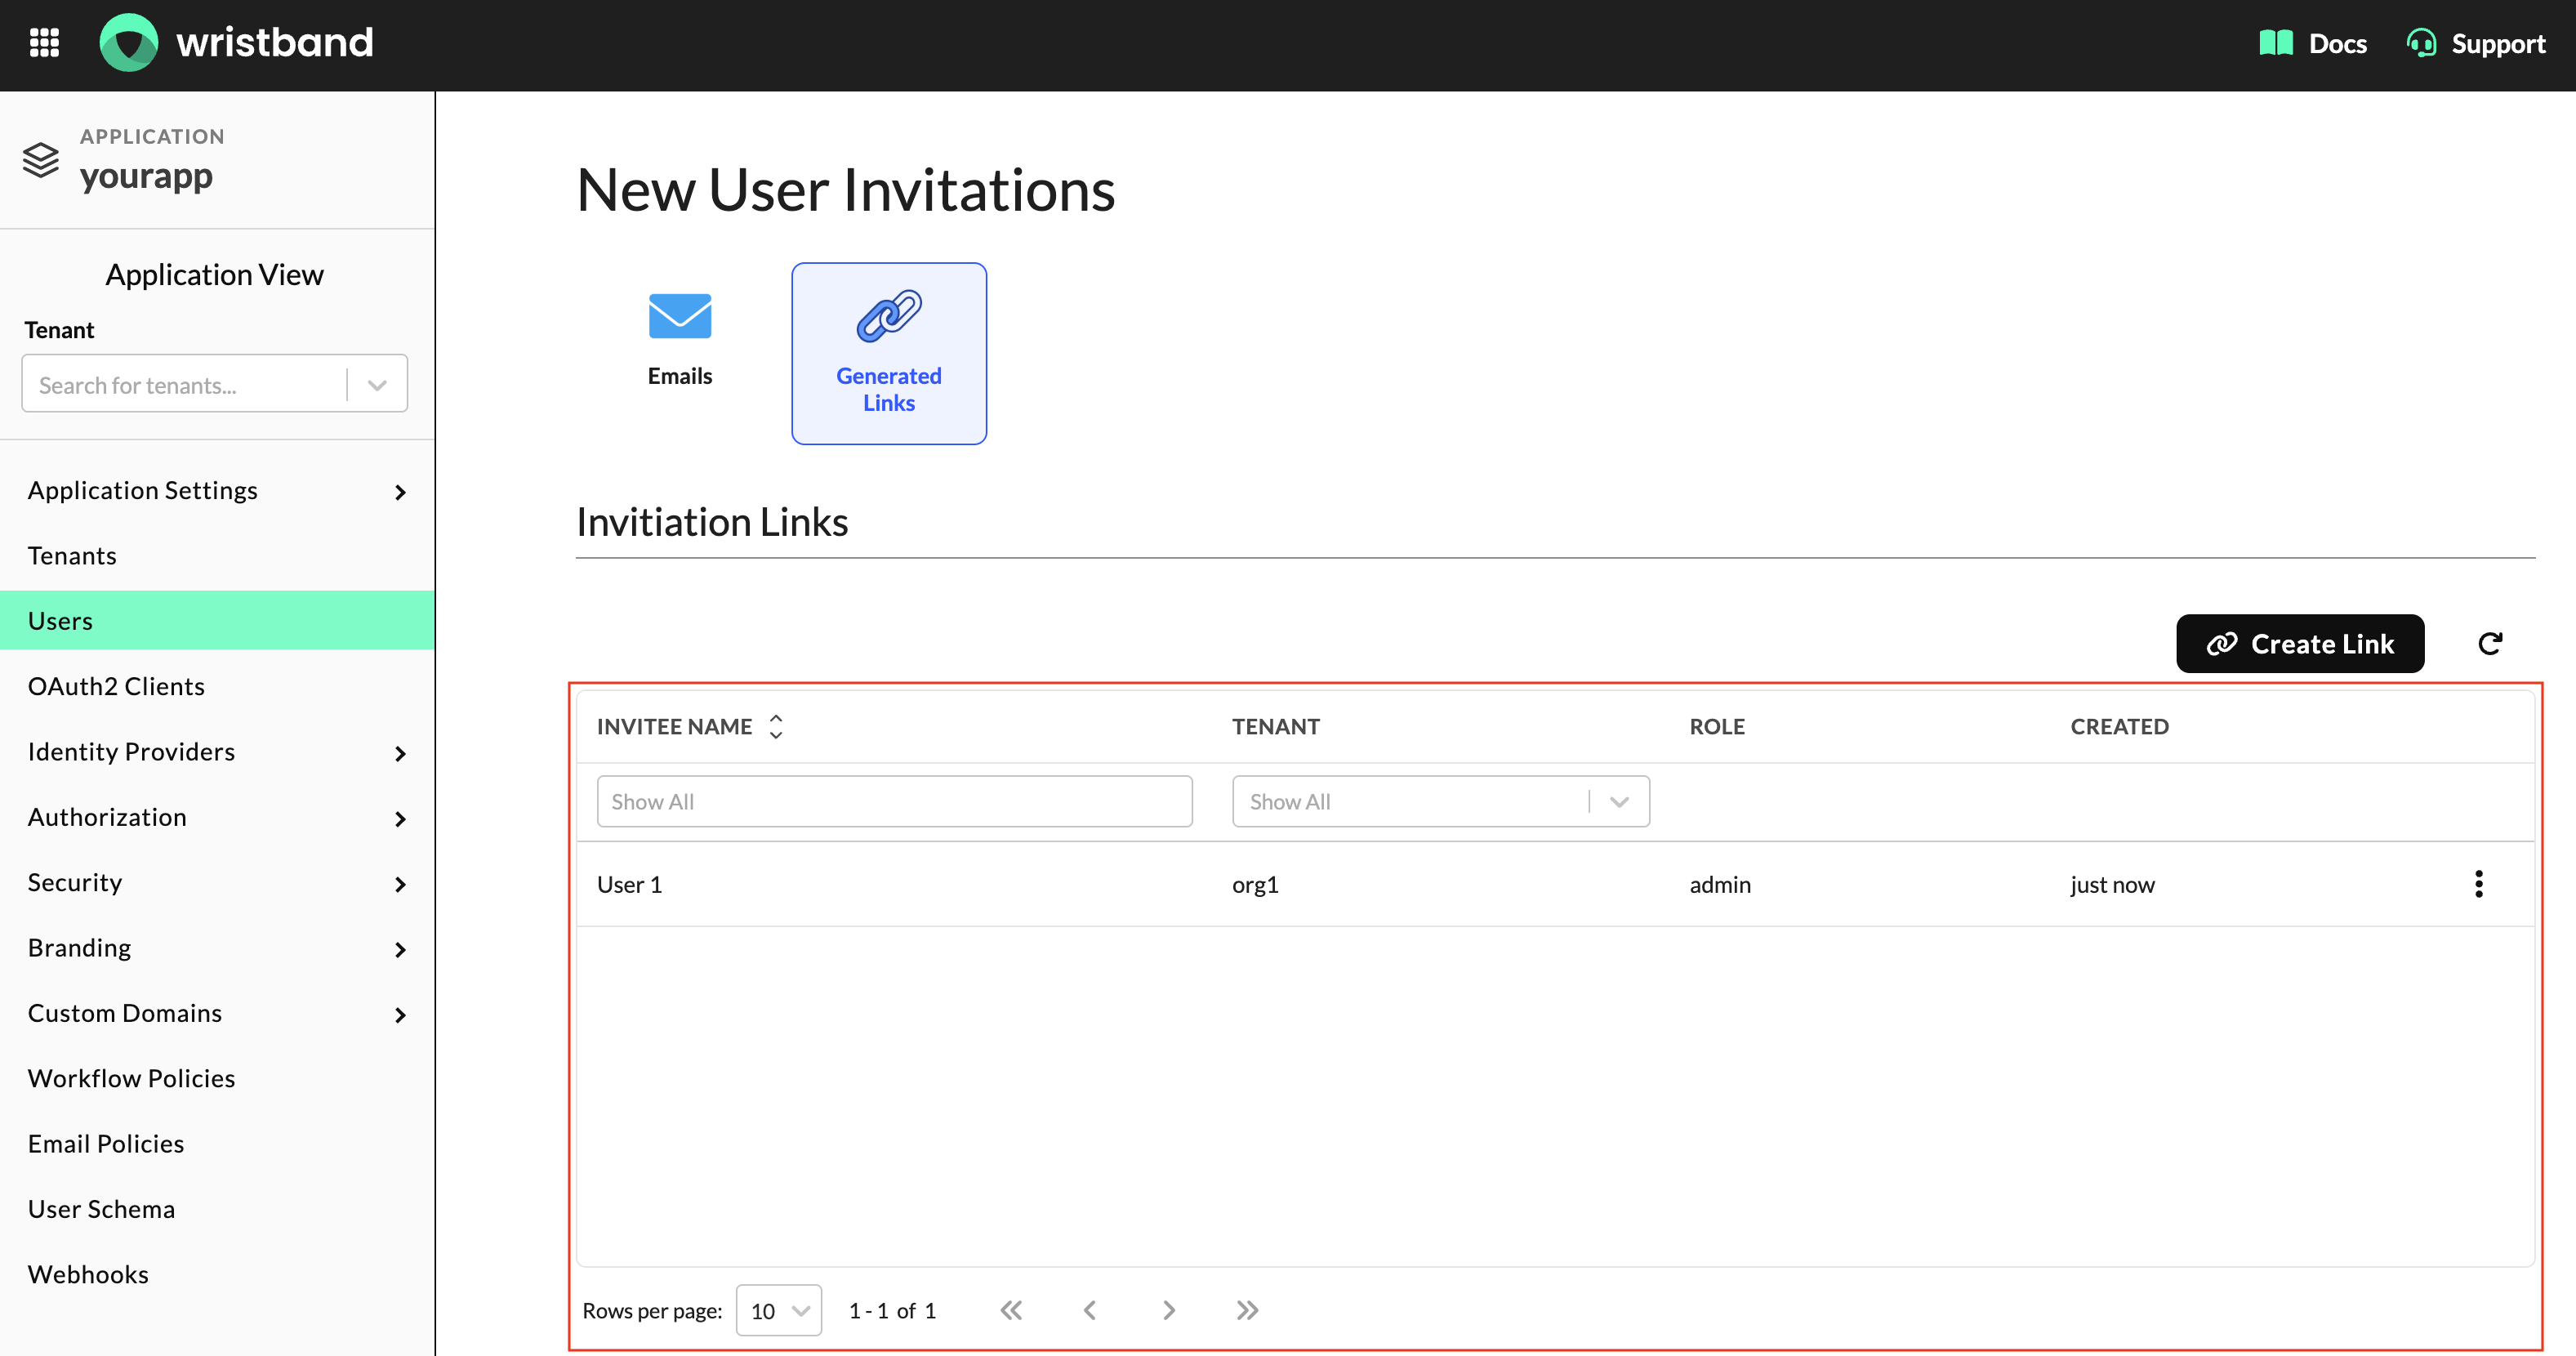
Figure 29: View active generated invitation links.
To manage an invitation link, click the More Options (⋮) menu next to the link and select one of the following actions:
- Regenerate Invite Link: Generates a new invitation link and invalidates the previously generated link, preventing it from being used.
- Destroy Invite Link: Permanently invalidates the invitation link, preventing it from being used.
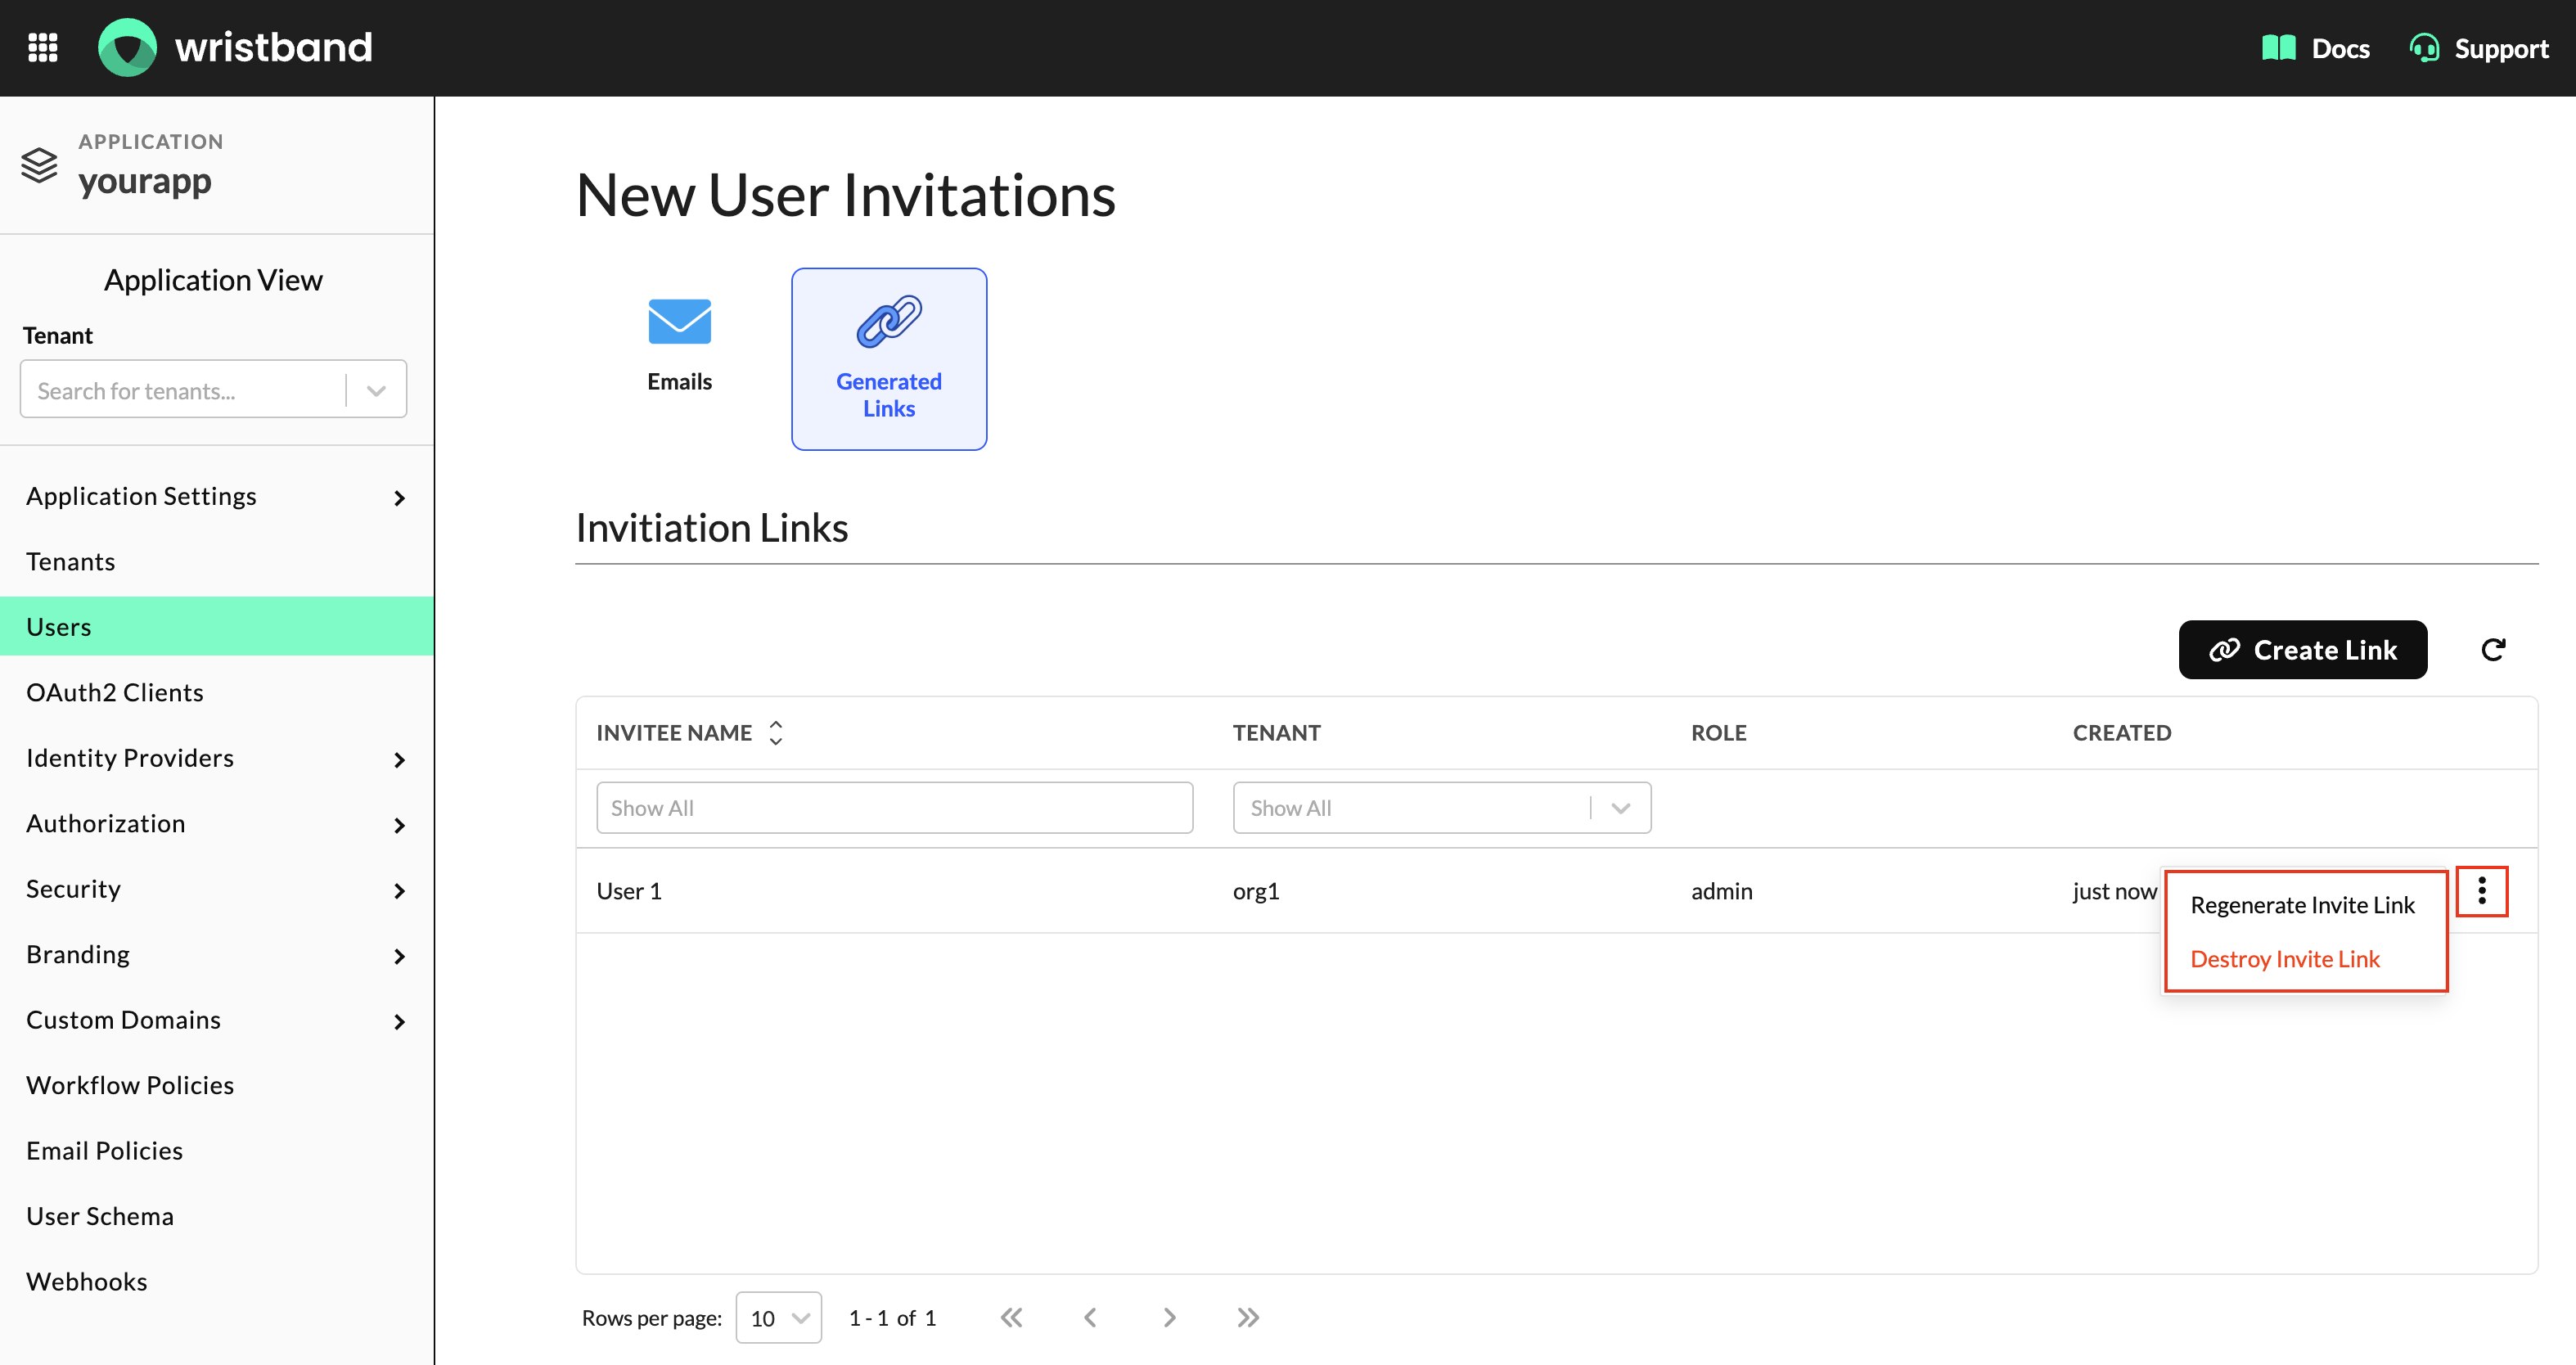
Figure 30: Manage an active generated invitation link.
Updating the User Schema
You can configure which user profile attributes are required through the Wristband Dashboard. Wristband's hosted pages and User Management APIs automatically enforce these requirements based on the configured User Schema.
To update the User Schema:
- From the left navigation menu, select User Schema.
- Review the available user attributes and their required settings.
- Enable or disable the corresponding toggles to configure which attributes are required.
- Click Save to apply your changes.
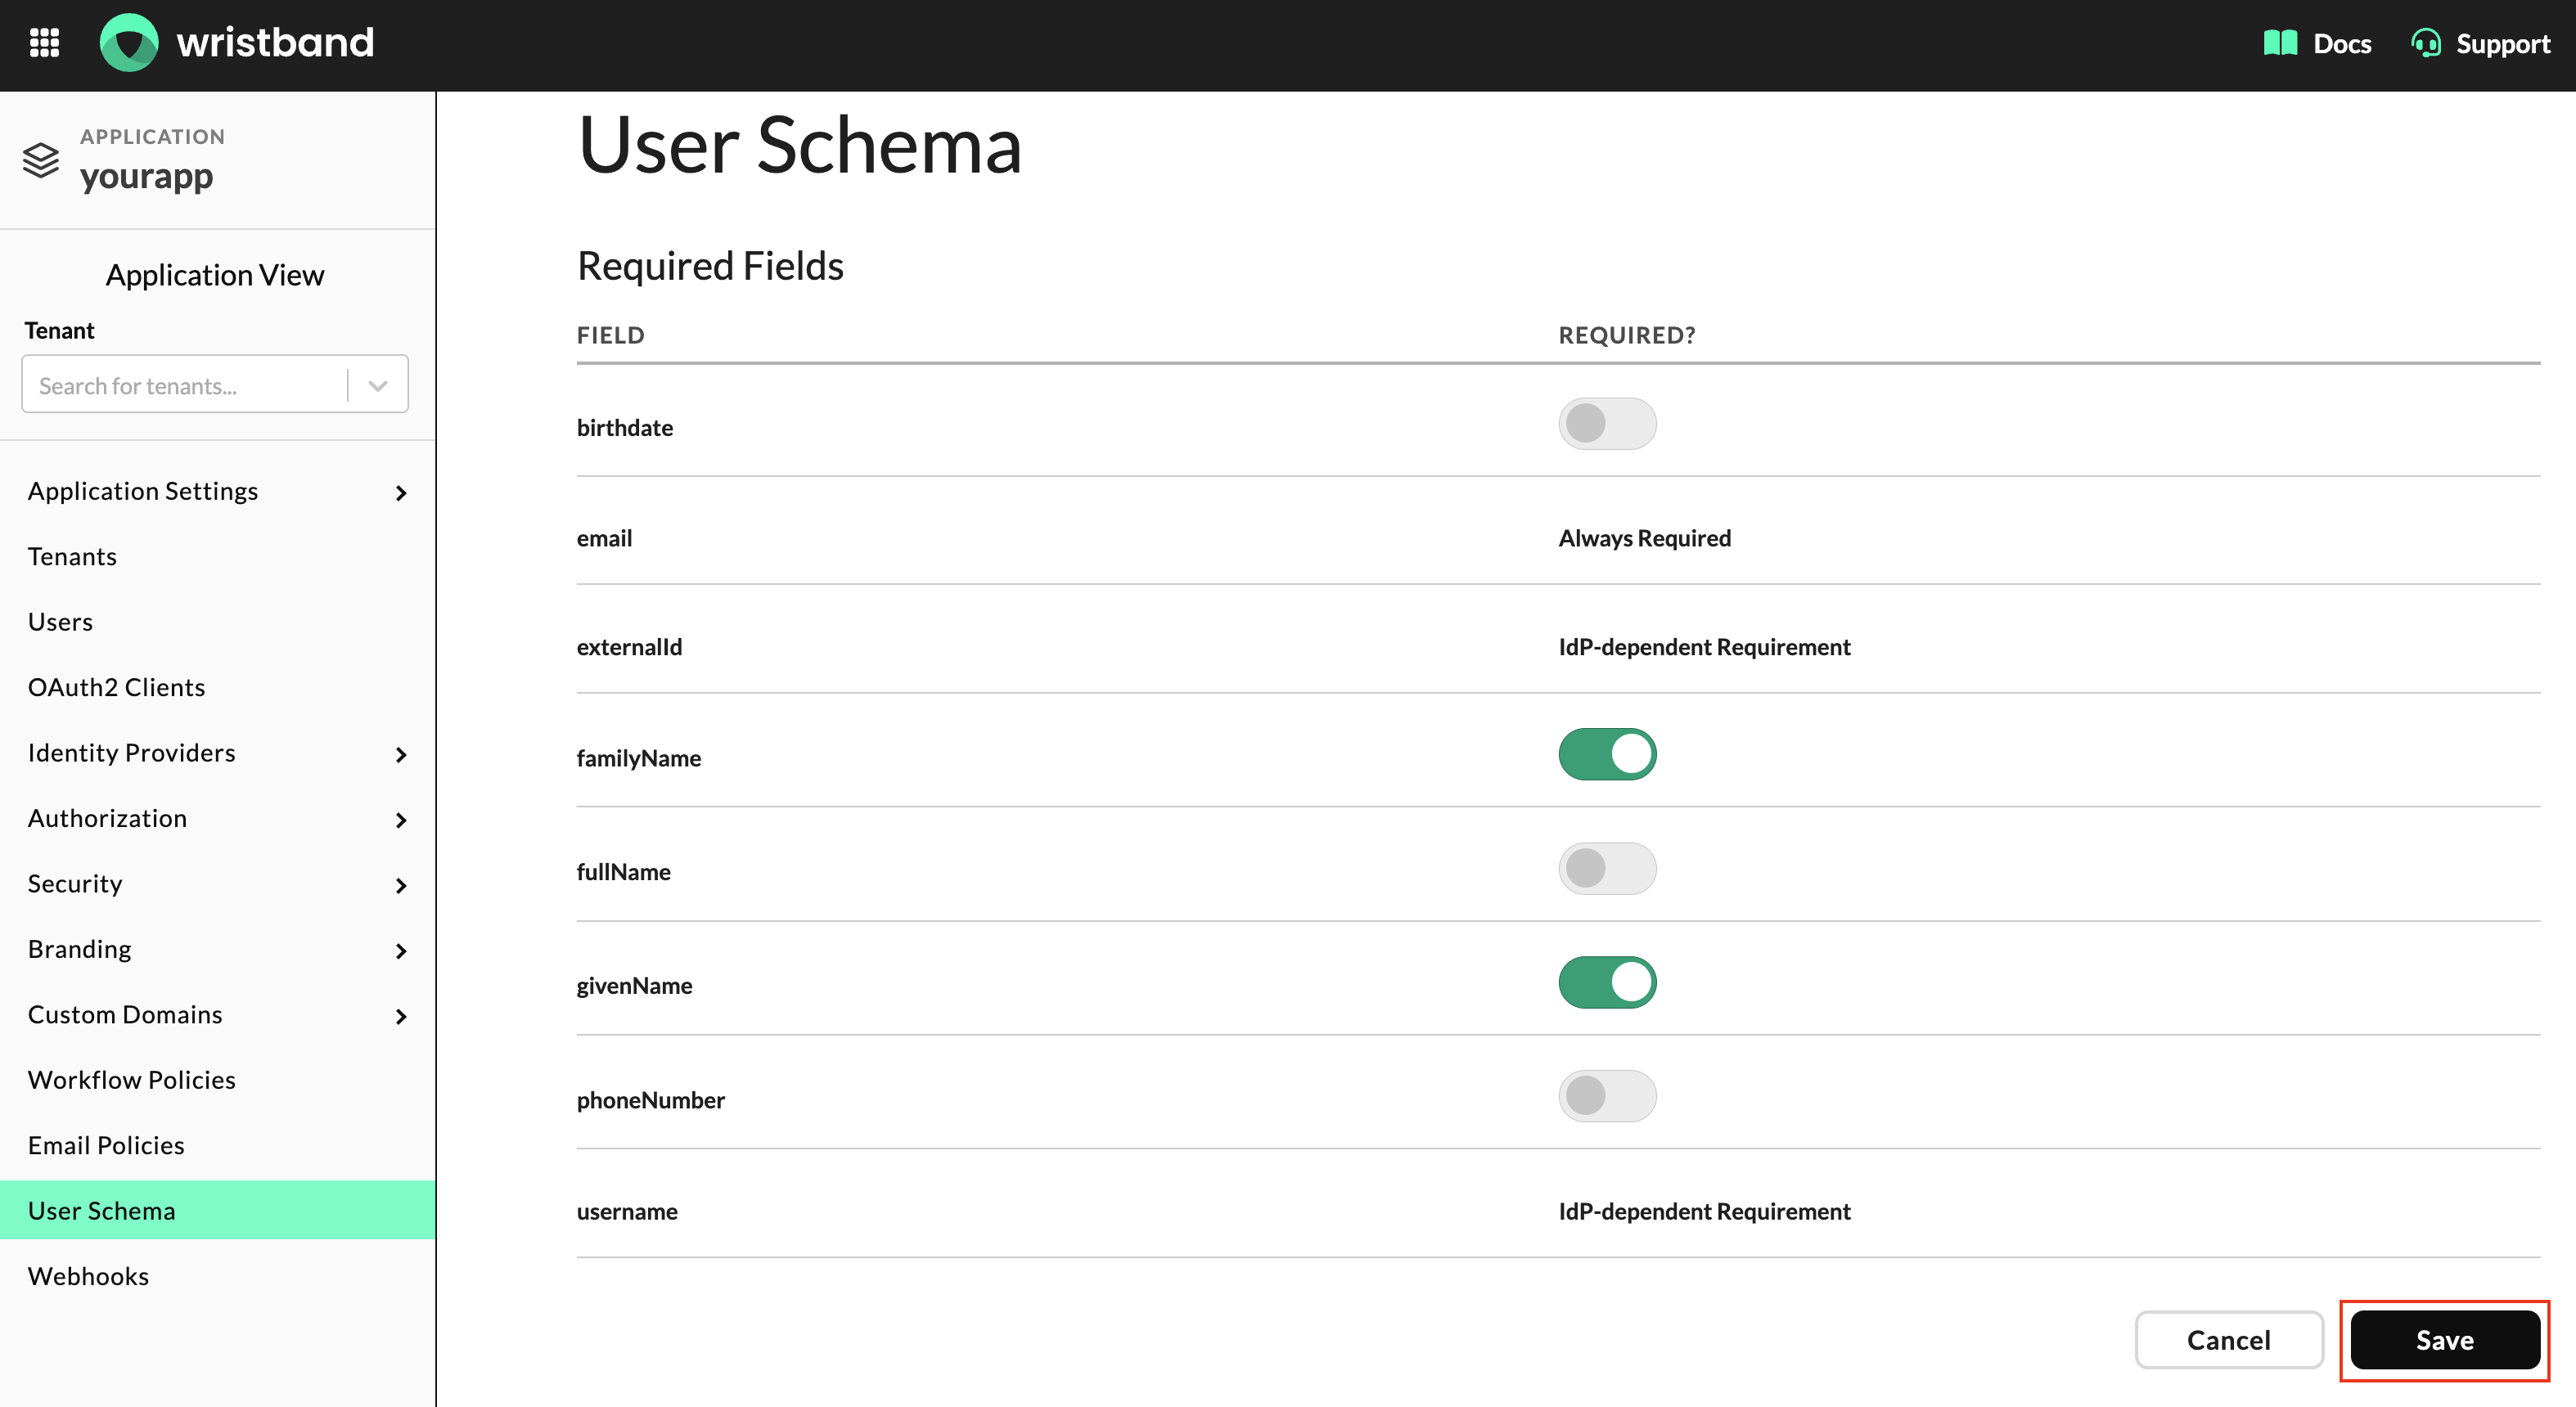
Figure 31: Configure required user attributes through the User Schema settings.
The scope of your changes depends on your current Dashboard view:
- Application View: Configures the default User Schema requirements across the application.
- Tenant View: Allows you to customize User Schema requirements for an individual tenant.
Automatic User Schema EnforcementWristband's hosted pages and User Management APIs automatically adapt to the configured User Schema requirements. Hosted pages enforce required fields when collecting user information, while User Management APIs validate user attributes against the configured schema when creating or updating users.
Tenant-Level User Schema OverridesTo apply tenant-specific User Schema settings, you must enable the User Schema tenant override. Otherwise, the tenant continues to inherit the application's User Schema configuration.
For more information, see the Tenant Override System documentation.
Updated about 20 hours ago