
Tenants
Learn about Wristband tenants and how to create, configure, and manage them through the Wristband Dashboard.
Overview
Tenants are a core part of Wristband's authentication and data model. Each tenant represents a distinct group of users that is logically isolated from other tenants within the same application. Every user must belong to a tenant.
Tenants can have their own identity providers, security policies, and branding configurations, allowing you to customize the authentication experience for each tenant. For more information, see the Multi-Tenancy Model documentation.
Tenants support a variety of application architectures:
- B2B Applications: Tenants typically represent customer organizations, each with its own users and authentication requirements.
- B2C Applications: A single tenant can be used to manage consumers who do not belong to a specific organization.
- White-Labeled Applications: Tenants can provide independently branded authentication experiences without exposing the parent application's identity.
Wristband supports three tenant types to accommodate these use cases.
Tenant Types
Wristband supports three types of tenants: Standard, Global, and Standalone. Each type determines how application and tenant information appears on Wristband's hosted pages and in transactional emails.
The tenant type is selected when a tenant is created and cannot be changed afterward. An application can contain any combination of tenant types, but only one Global tenant is permitted per application.
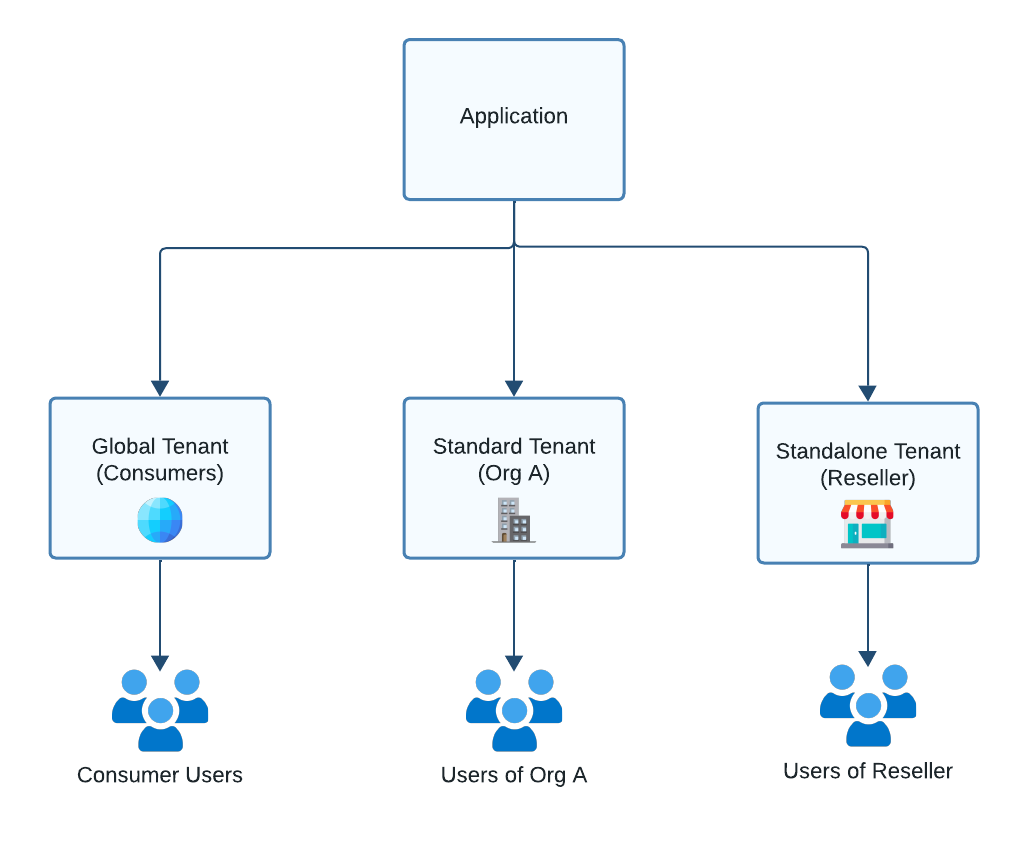
Figure 1: An application containing Standard, Global, and Standalone tenants.
Standard Tenants
Standard tenants are the default tenant type and are recommended for most B2B applications. They typically represent customer organizations but can also be used for internal groups, such as application administrators.
Hosted pages and transactional emails for Standard tenants display both application-level and tenant-level information, allowing users to identify the organization and application they are accessing.
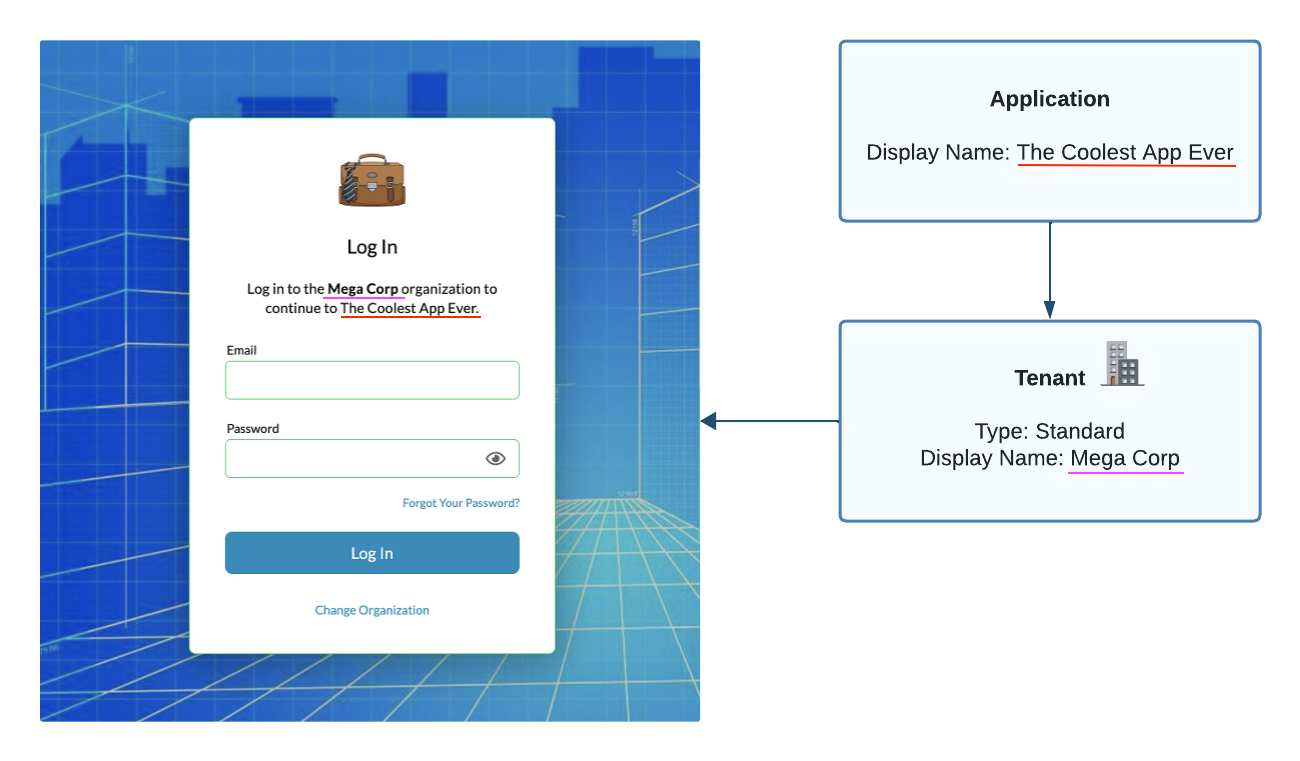
Figure 2: Sample login page for a Standard tenant, displaying both application and tenant information.
Global Tenants
Global tenants are designed for B2C applications where users do not belong to a specific organization. They provide an application-centric authentication experience by displaying only application-level information on hosted pages and in transactional emails. Tenant-specific references are hidden.
Global tenants have the following restrictions:
- One per Application: An application can contain only one Global tenant.
- Excluded From Tenant Discovery: Global tenants are never returned in tenant discovery results.
- No Enterprise Identity Providers: Enterprise identity providers (IdPs) cannot be configured for Global tenants.
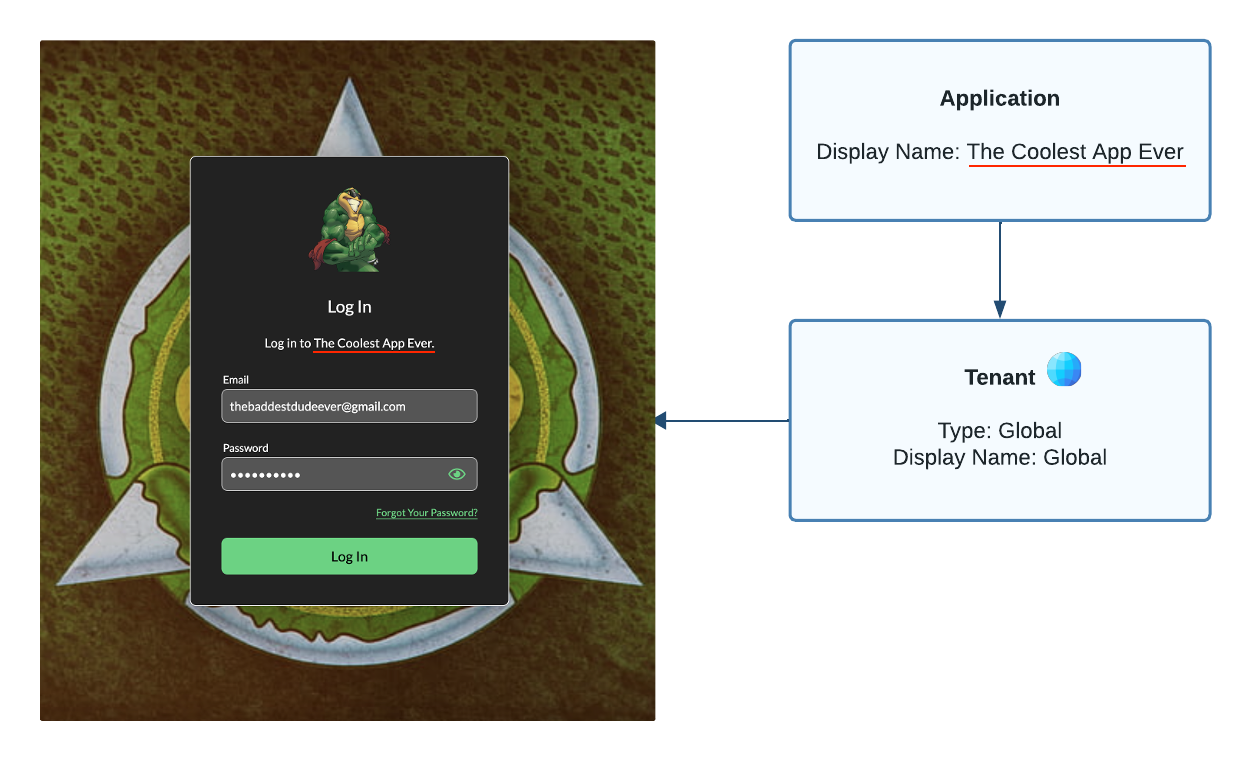
Figure 3: Sample login page for a Global tenant, displaying only application-level information.
Standalone Tenants
Standalone tenants are designed for B2B applications that require a fully white-labeled authentication experience.
Hosted pages and transactional emails for Standalone tenants display only tenant-level information, hiding all references to the parent Wristband application. This allows each tenant to present its own identity and branding to users.
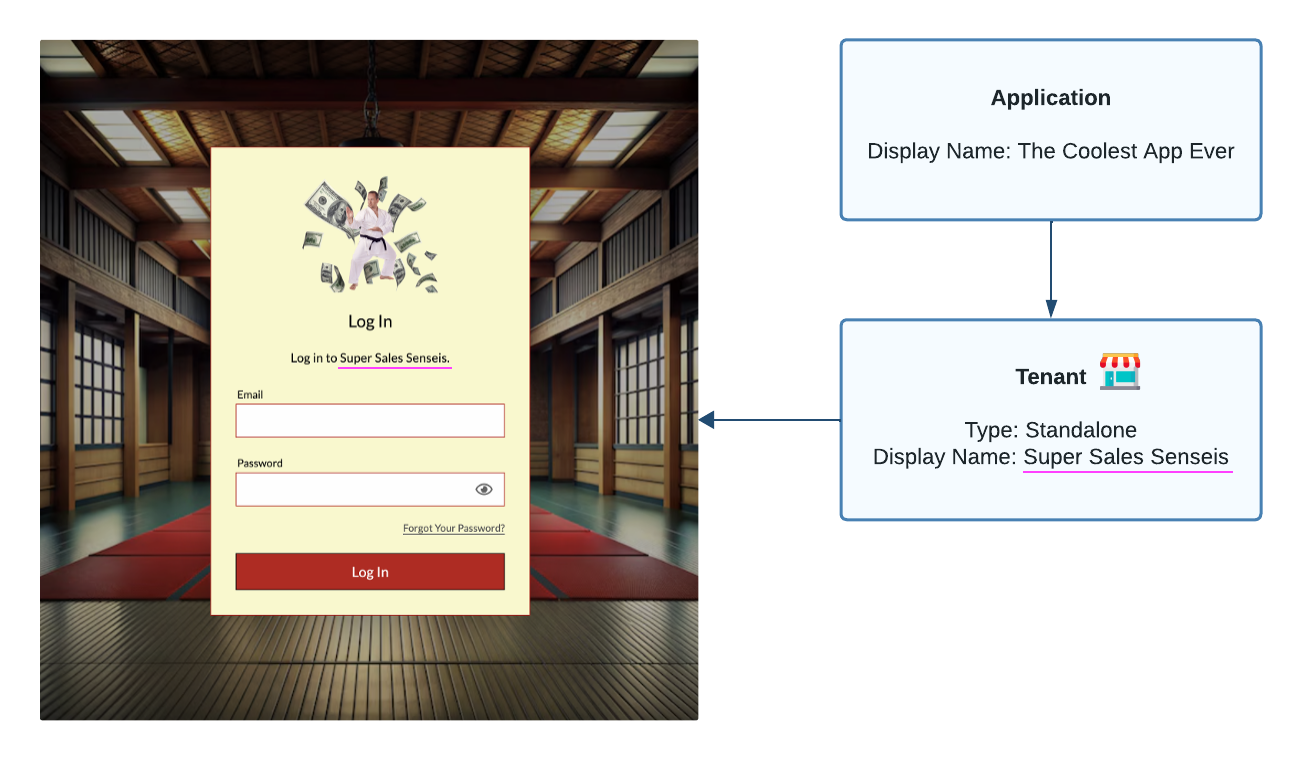
Figure 4: Sample login page for a Standalone tenant, displaying only tenant-level information.
Tenant Type Comparison
The following table summarizes the key differences between Wristband's tenant types.
| Feature | Standard | Global | Standalone |
|---|---|---|---|
| Primary Use Case | B2B | B2C | White-labeled B2B |
| Displays Application Information | Yes | Yes | No |
| Displays Tenant Information | Yes | No | Yes |
| Maximum Per Application | Unlimited | 1 | Unlimited |
| Included in Tenant Discovery | Yes | No | Yes |
| Supports Enterprise IdPs | Yes | No | Yes |
Custom Metadata
In addition to native properties, you can extend Wristband tenants with custom metadata using these two fields:
- Public Metadata: Stores non-sensitive tenant information that can be accessed by end users, such as public tenant settings.
- Restricted Metadata: Stores tenant information that should not be exposed to end users, such as internal and external identifiers. Users or OAuth2 clients must have the
tenant:manage-restricted-metadatapermission assigned to them in order to update a tenant's restricted metadata.
Both publicMetadata and restrictedMetadata accept a JSON object, as demonstrated in the following example:
"restrictedMetadata": {
  "stripeCustomerId": "1234",
},
"publicMetadata": {
  "locale": "en-US"
}
Custom Metadata Limits
The JSON objects assigned to custom metadata are subject to the following constraints:
-
The max size of the JSON is 4KB.
-
The max nested object depth is 3.
-
The maximum number of top-level fields within an object is 15.
-
Field names must match the following regex pattern:
^[a-zA-Z]([-_]?[a-zA-Z0-9]+)*$. -
Nesting arrays directly within each other is not permitted. For example, the following value is not allowed:
{
  "notAllowed": [[1, 2], [3, 4]],
}
In contrast, the following is allowed:
{ "allowed": [ { "nestedList": [1, 2] }, { "nestedList": [3, 4] } ] } -
Object fields are case-insensitive. If duplicate fields are provided, the last value written overwrites previous ones.
Enabling Tenant-Level Signups
Tenant-level signup allows users to self-register for an account within an existing tenant.
When tenant-level signup is disabled, users cannot self-register. Instead, they must be invited, provisioned manually, or provisioned through an enterprise identity provider (IdP) using Just-in-Time (JIT) provisioning.
The tenant-level signup page is accessible at the following URL:
https://<tenant_vanity_domain>/signupIf tenant-level signup is disabled, users attempting to access this URL will see an error page, as shown below.
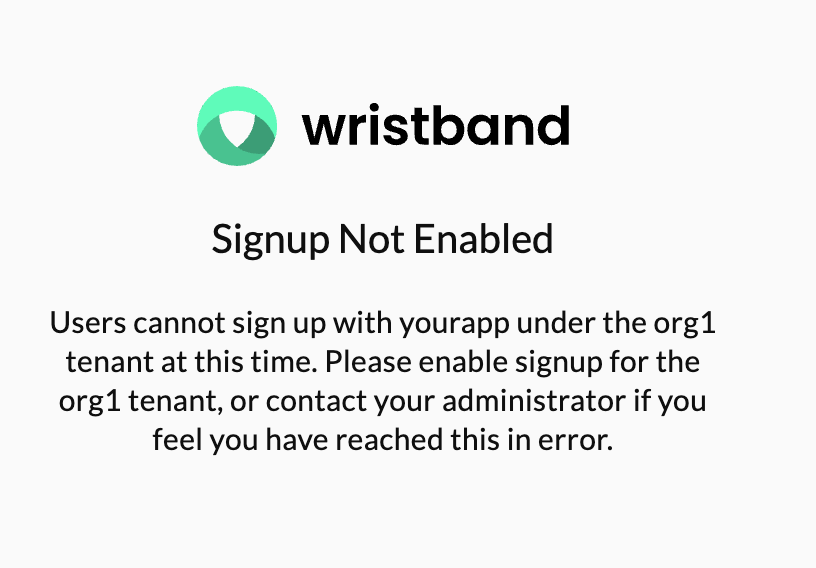
Figure 5: Error page displayed when tenant-level signup is disabled.
Allowed Signup Email Domains
When tenant-level signup is enabled, you can restrict self-registration to users with email addresses belonging to specific domains by configuring an allowlist of email domains.
During signup, Wristband checks the domain portion of the user's email address against the configured allowlist. Only users whose email domains match an allowed domain can complete the signup process. Signup attempts using email addresses from other domains are blocked.
Allowing Signups From Any Email DomainIf no Allowed Signup Email Domains are configured, users can sign up using an email address from any domain.
Tenant Discovery Email Domains
Tenant Discovery Email Domains allow you to associate specific email domains with a tenant, making it easier for users to discover their organization during the tenant discovery flow.
When a user enters their email address during tenant discovery, Wristband checks the domain portion of the email address against the configured Tenant Discovery Email Domains for each tenant. If the email domain matches, and the tenant is active, that tenant is included in the list of discovered tenants returned for the user.
For example, if a tenant named acme has acme.com configured as a Tenant Discovery Email Domain, a user entering [email protected] during tenant discovery will have the acme tenant included in their discovery results.
You can configure multiple email domains for a single tenant, and the same email domain can be associated with multiple tenants. If no Tenant Discovery Email Domains are configured, the tenant will not be discoverable through email domain matching, but may still be discovered through other supported tenant discovery methods.
Tenant Discovery Email Domains Are Not Supported for Global TenantsTenant Discovery Email Domains can only be configured for Standard and Standalone tenants. Global tenants do not support this feature because they are excluded from the tenant discovery process.
Deactivating a Tenant
Deactivating a tenant prevents its users and OAuth2 clients from authenticating and blocks the creation of new tenant resources, such as users and OAuth2 clients.
All existing tenant data and resources are preserved. You can reactivate a deactivated tenant at any time to restore normal functionality.
Deleting a Tenant
Deleting a tenant permanently removes the tenant and all its associated data and resources, including users and OAuth2 clients.
Managing Tenants With the Wristband Dashboard
You can create, configure, and manage tenants through the Wristband Dashboard. The following sections walk through common tenant management tasks.
Creating a Tenant
To create a new tenant:
-
From the Dashboard Home page, select the application where you want to create the tenant.
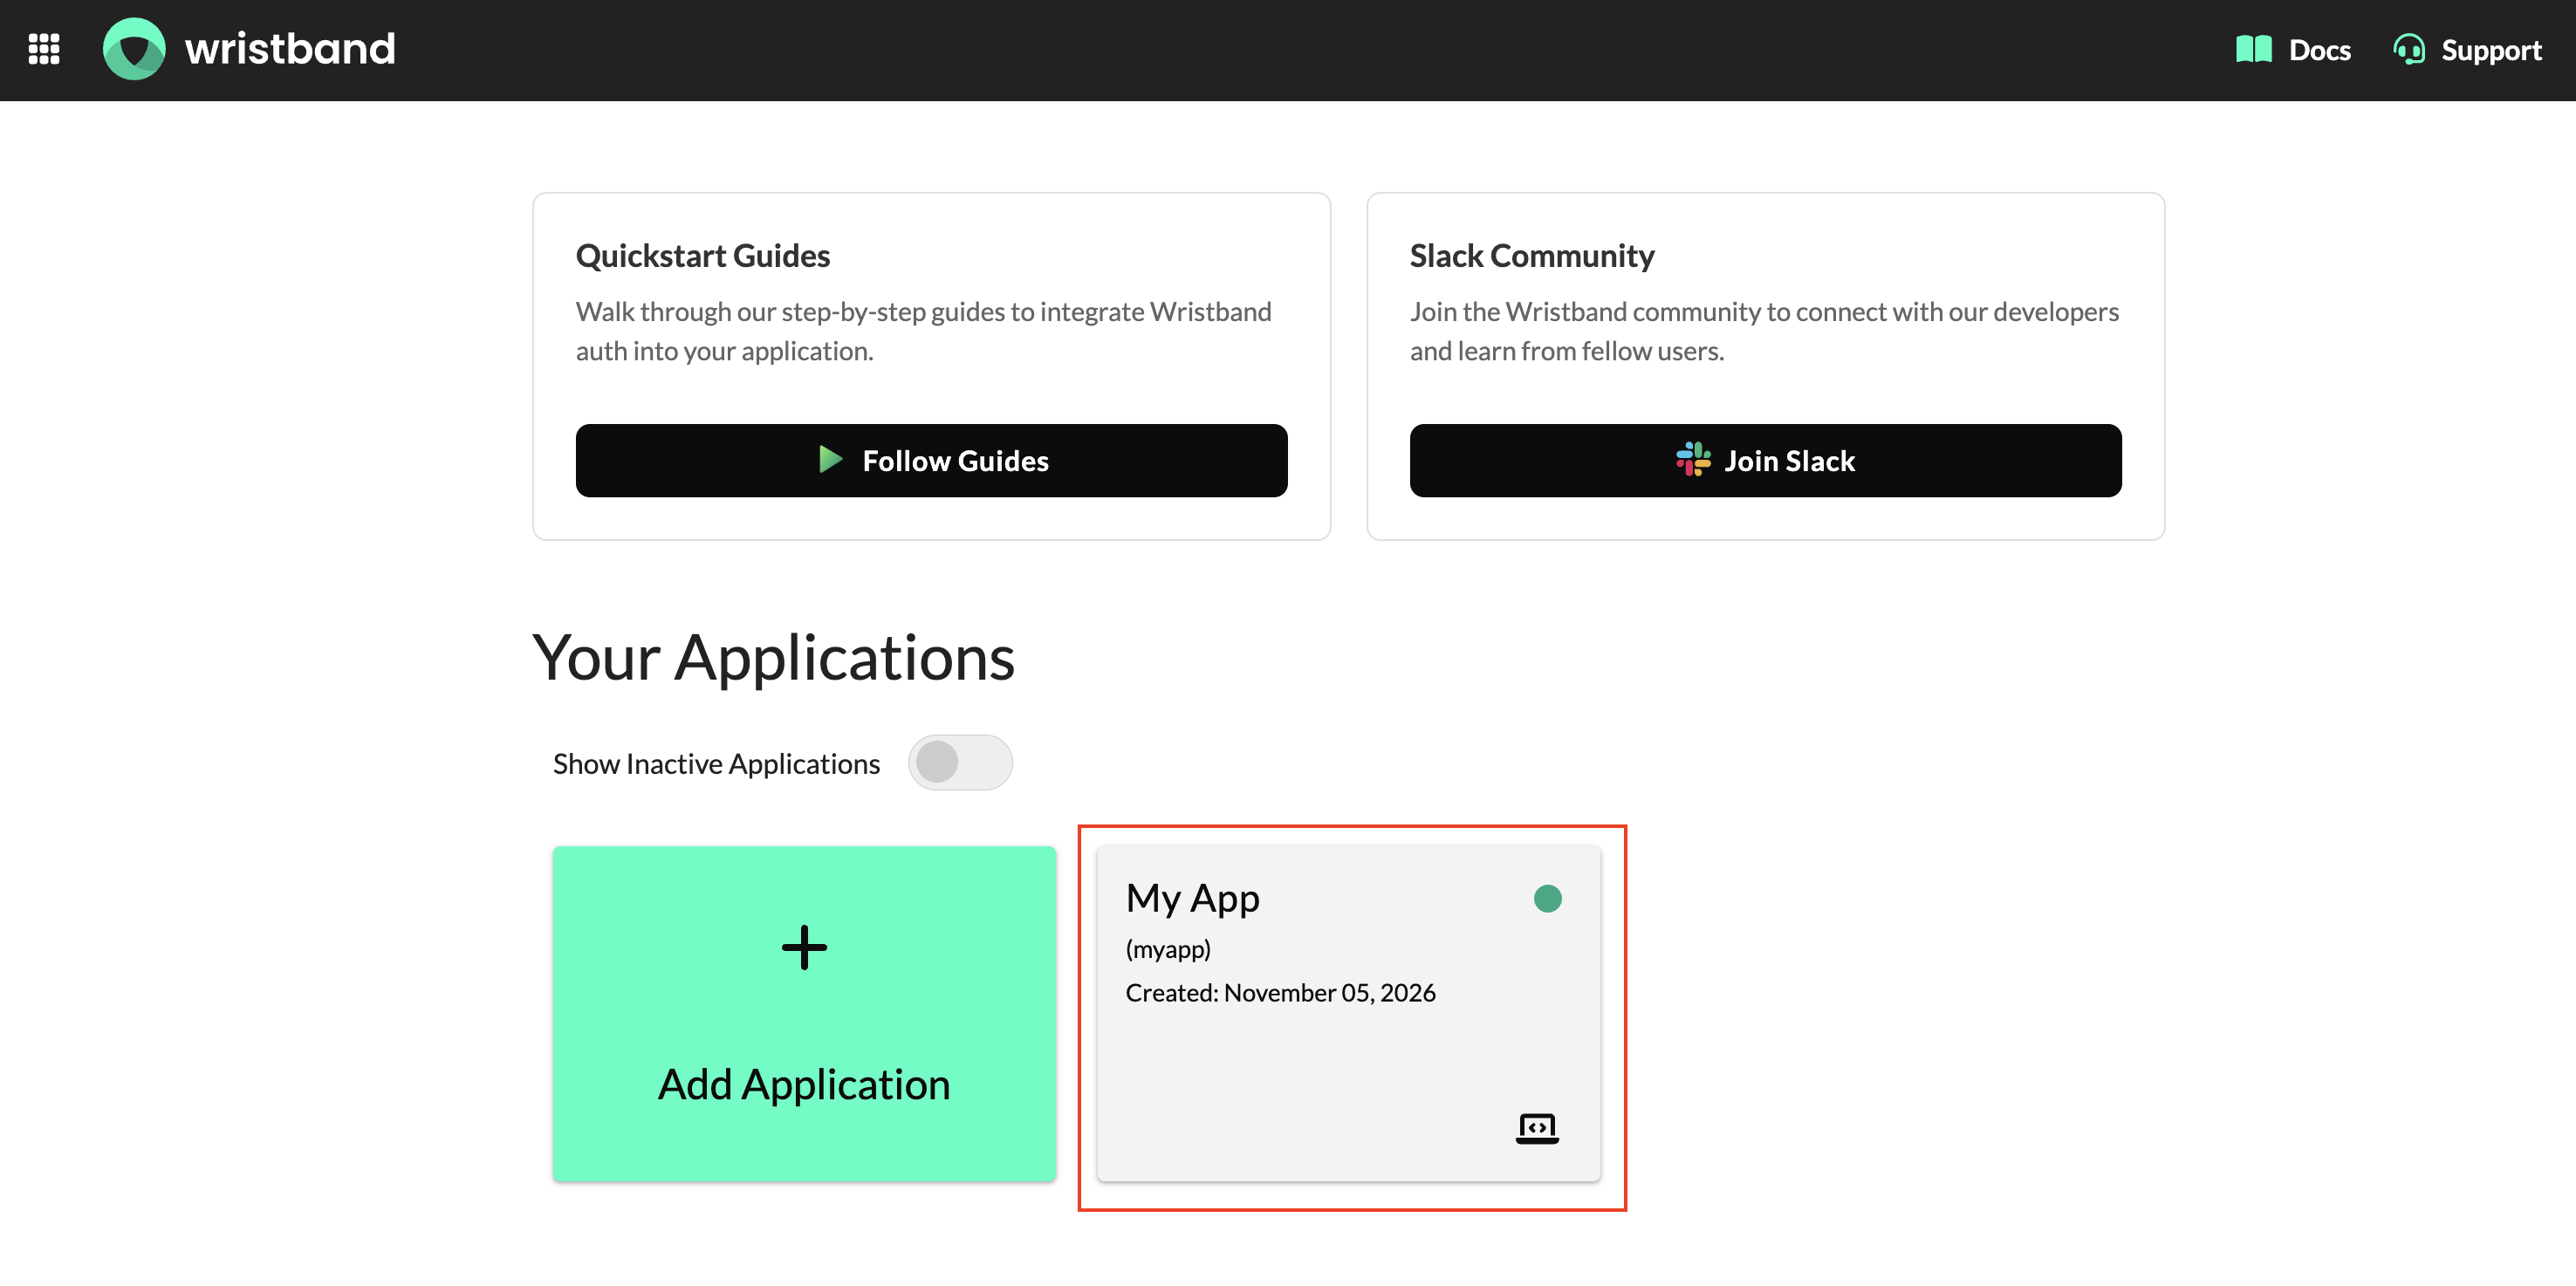
Figure 6: Select the application where you want to create the tenant.
-
From the left navigation menu, select Tenant, then click Add Tenant.
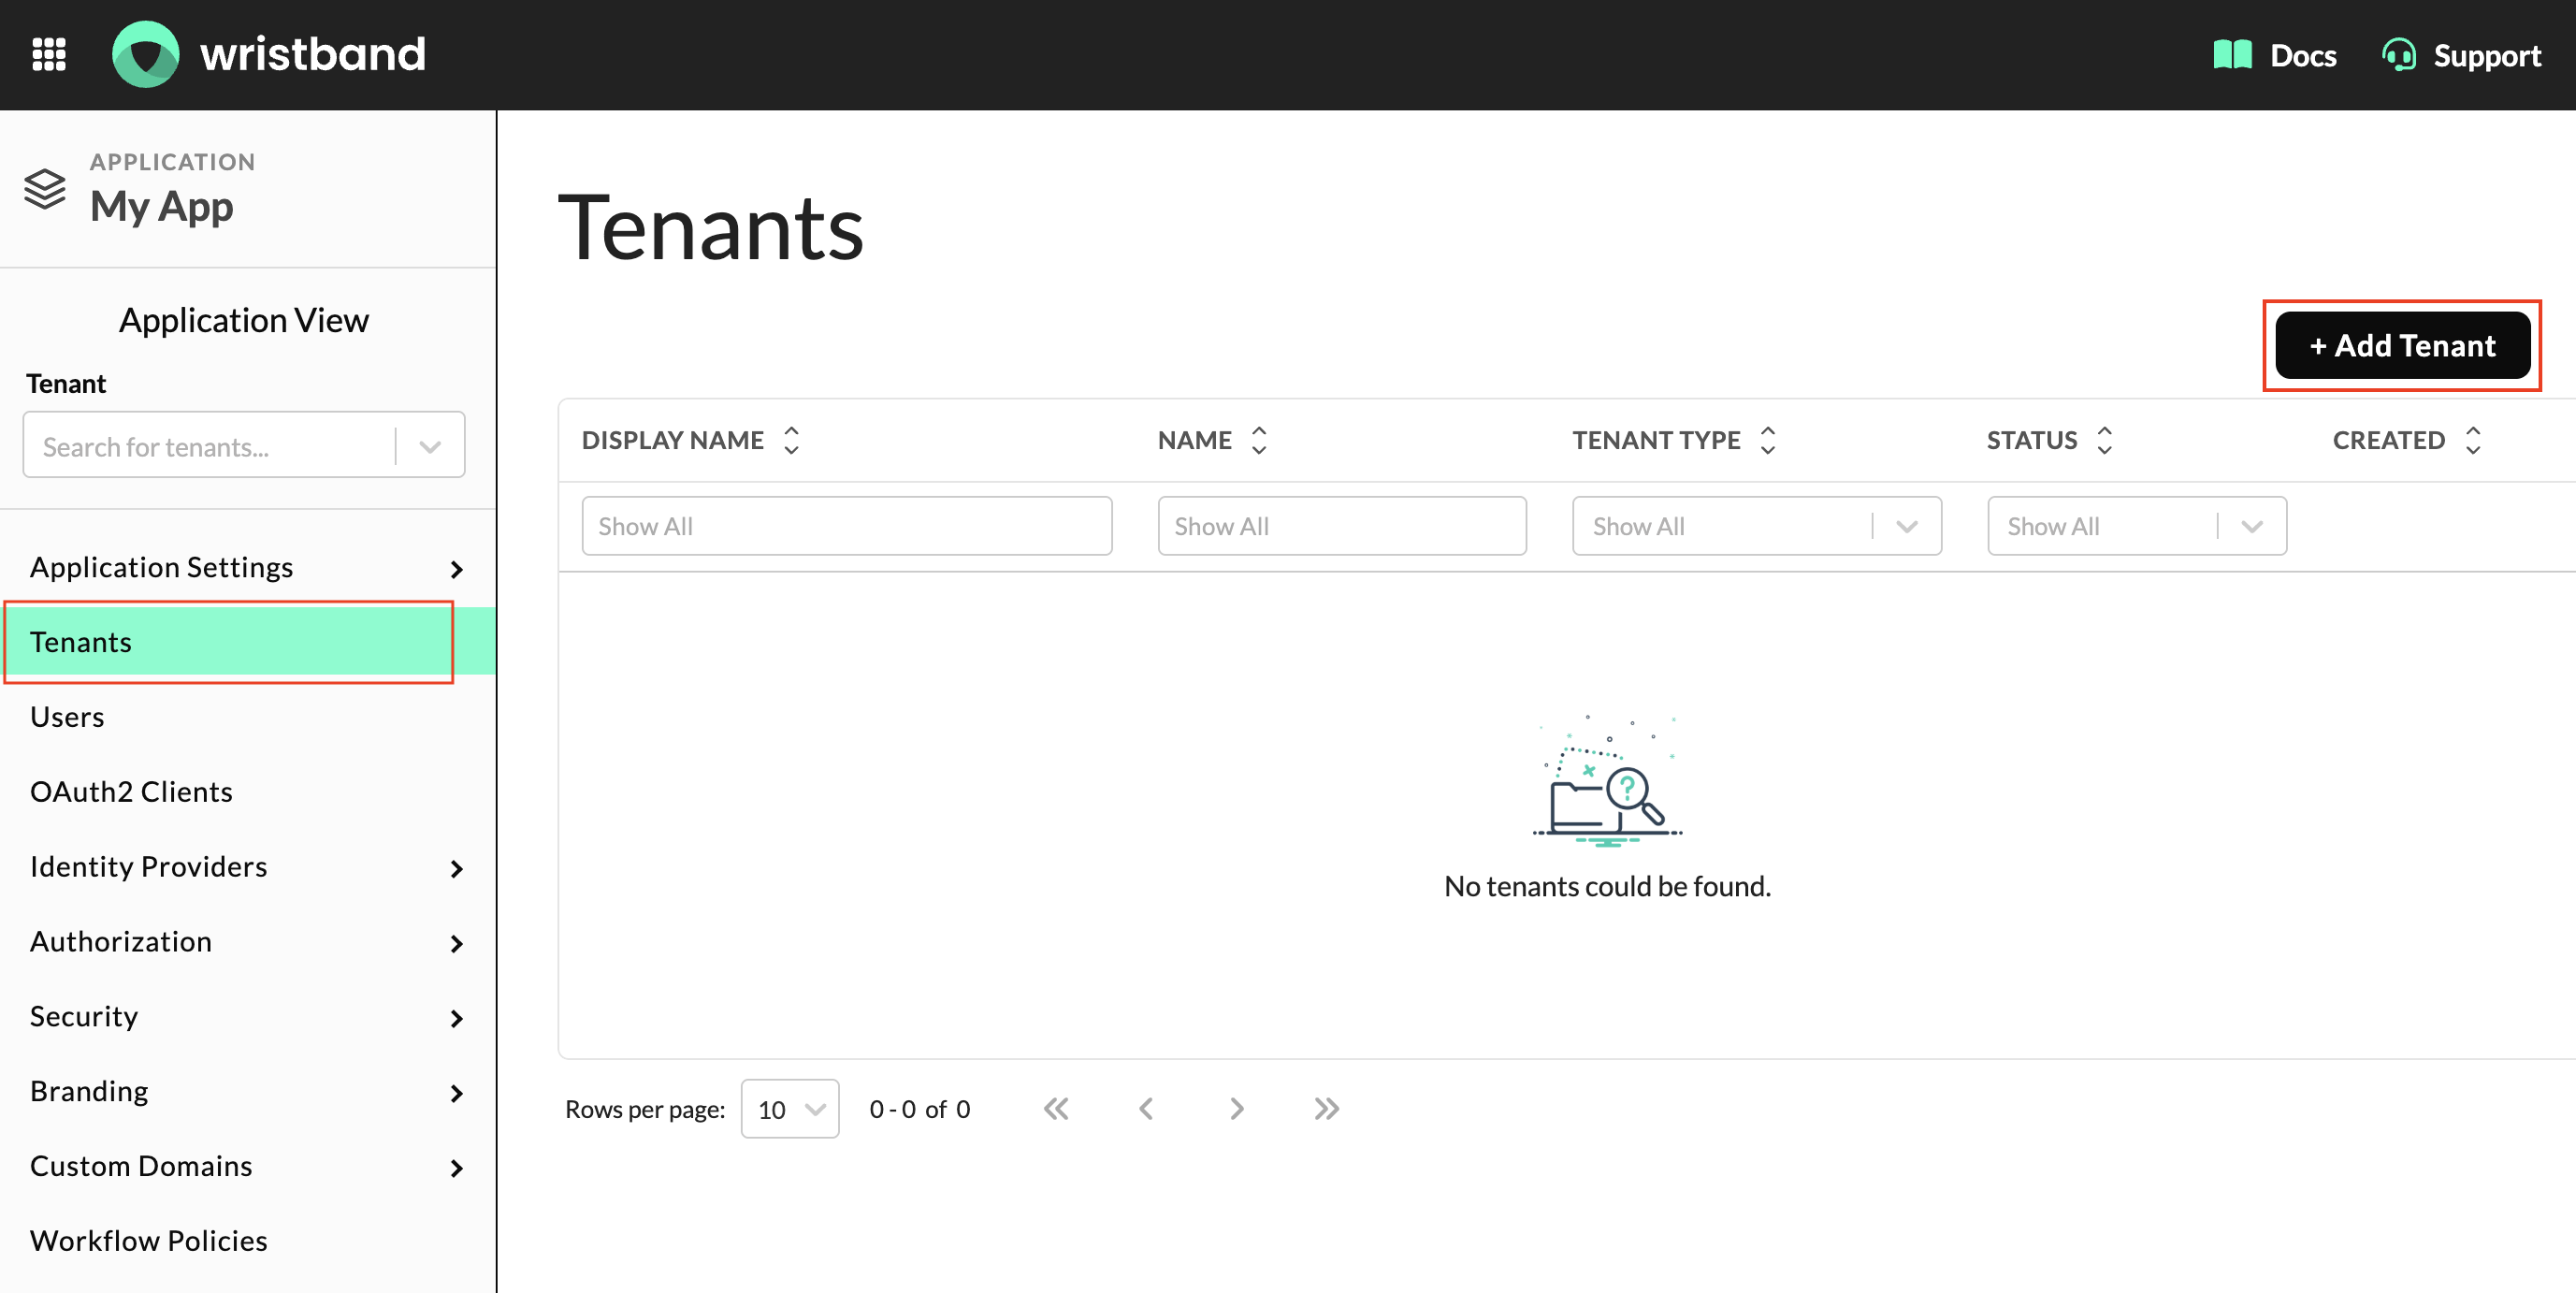
Figure 7: Open the tenant list and select Add Tenant.
-
In the Create Tenant dialog, provide the following information:
- Tenant Type: Determines the tenant's type and behavior. See Tenant Types for more information. This value cannot be changed after creation.
- Display Name: A user-friendly name displayed on Wristband's hosted pages and in transactional emails. This value can be updated after creation.
- Name: A unique identifier for the tenant within the application. This value cannot be changed after creation.
-
Click Create to provision the tenant.
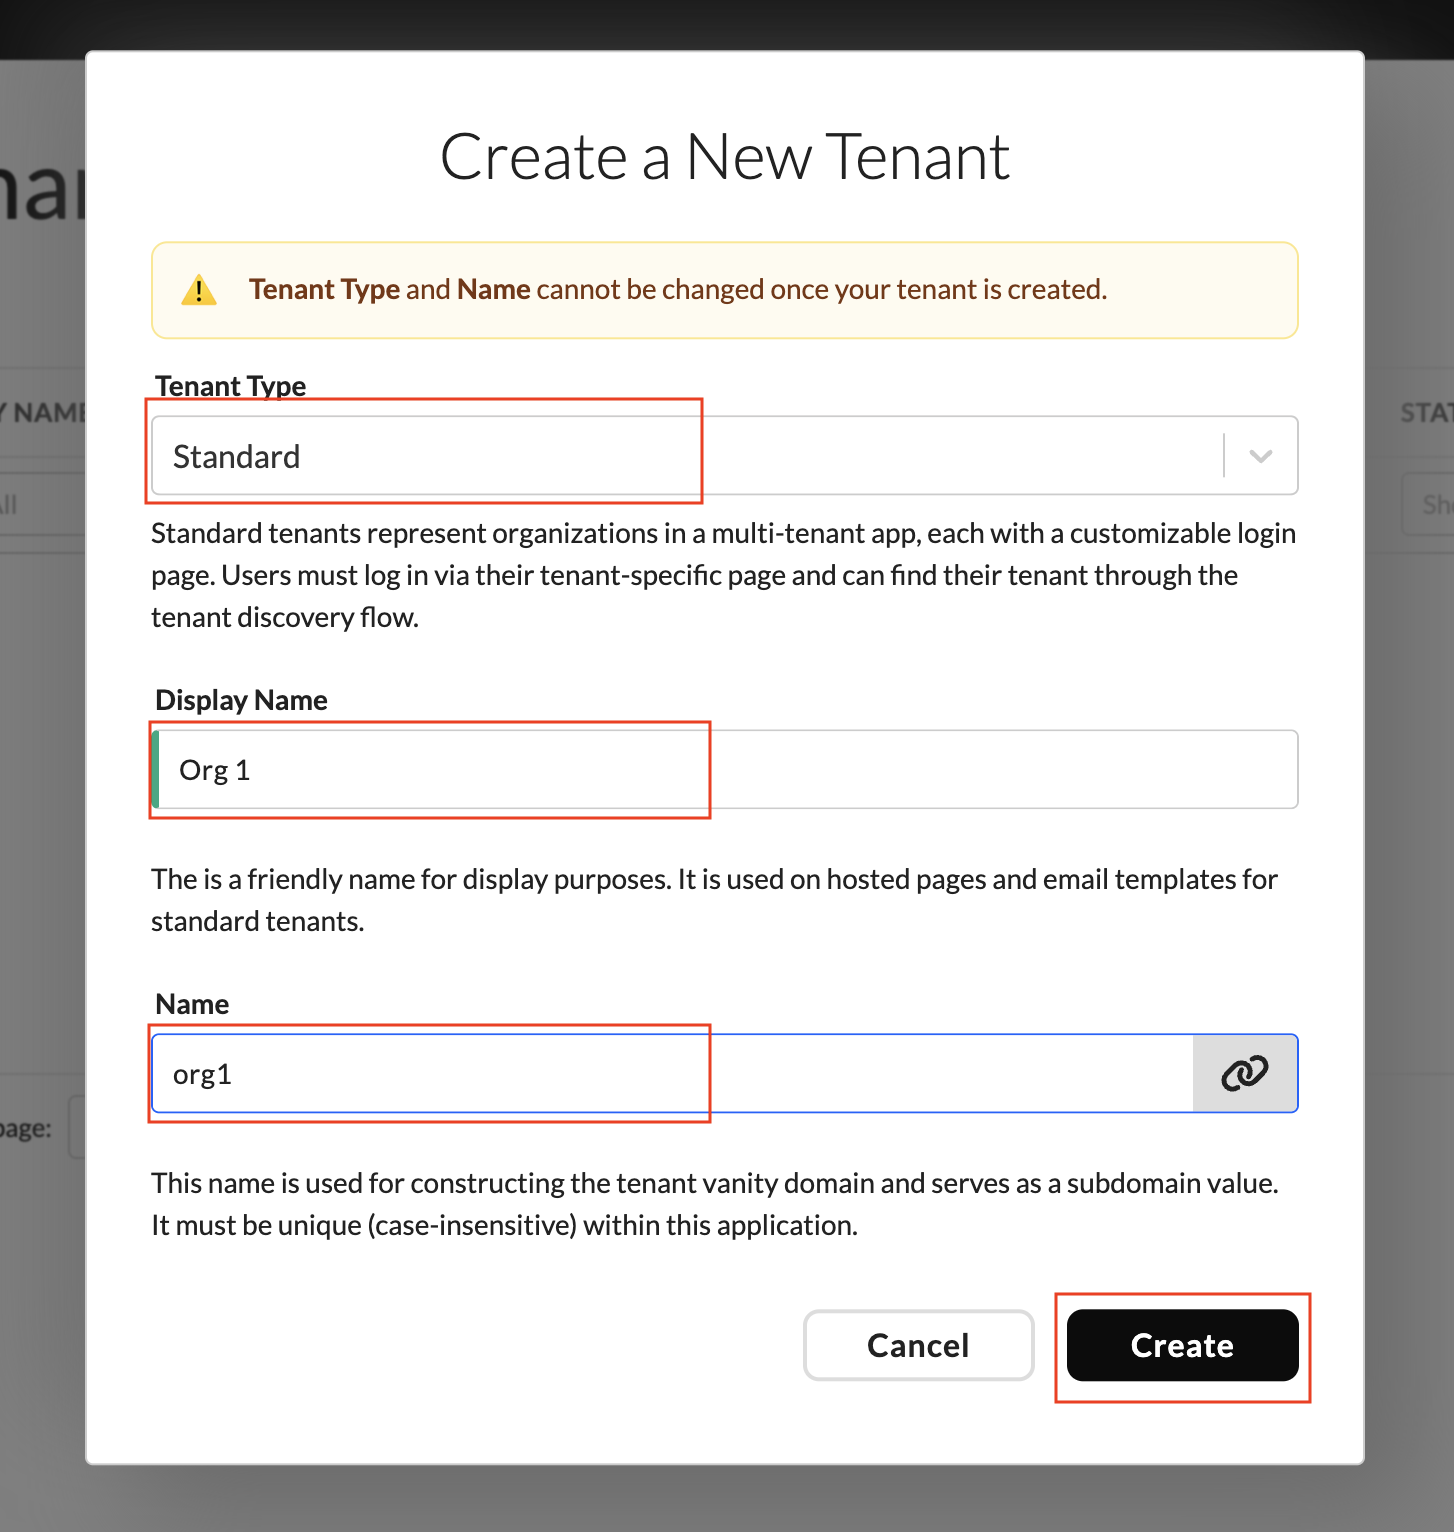
Figure 8: Enter the tenant type, display name, and name, then select Create.
-
Once the tenant is created, click View Tenant to open its Tenant Settings page.
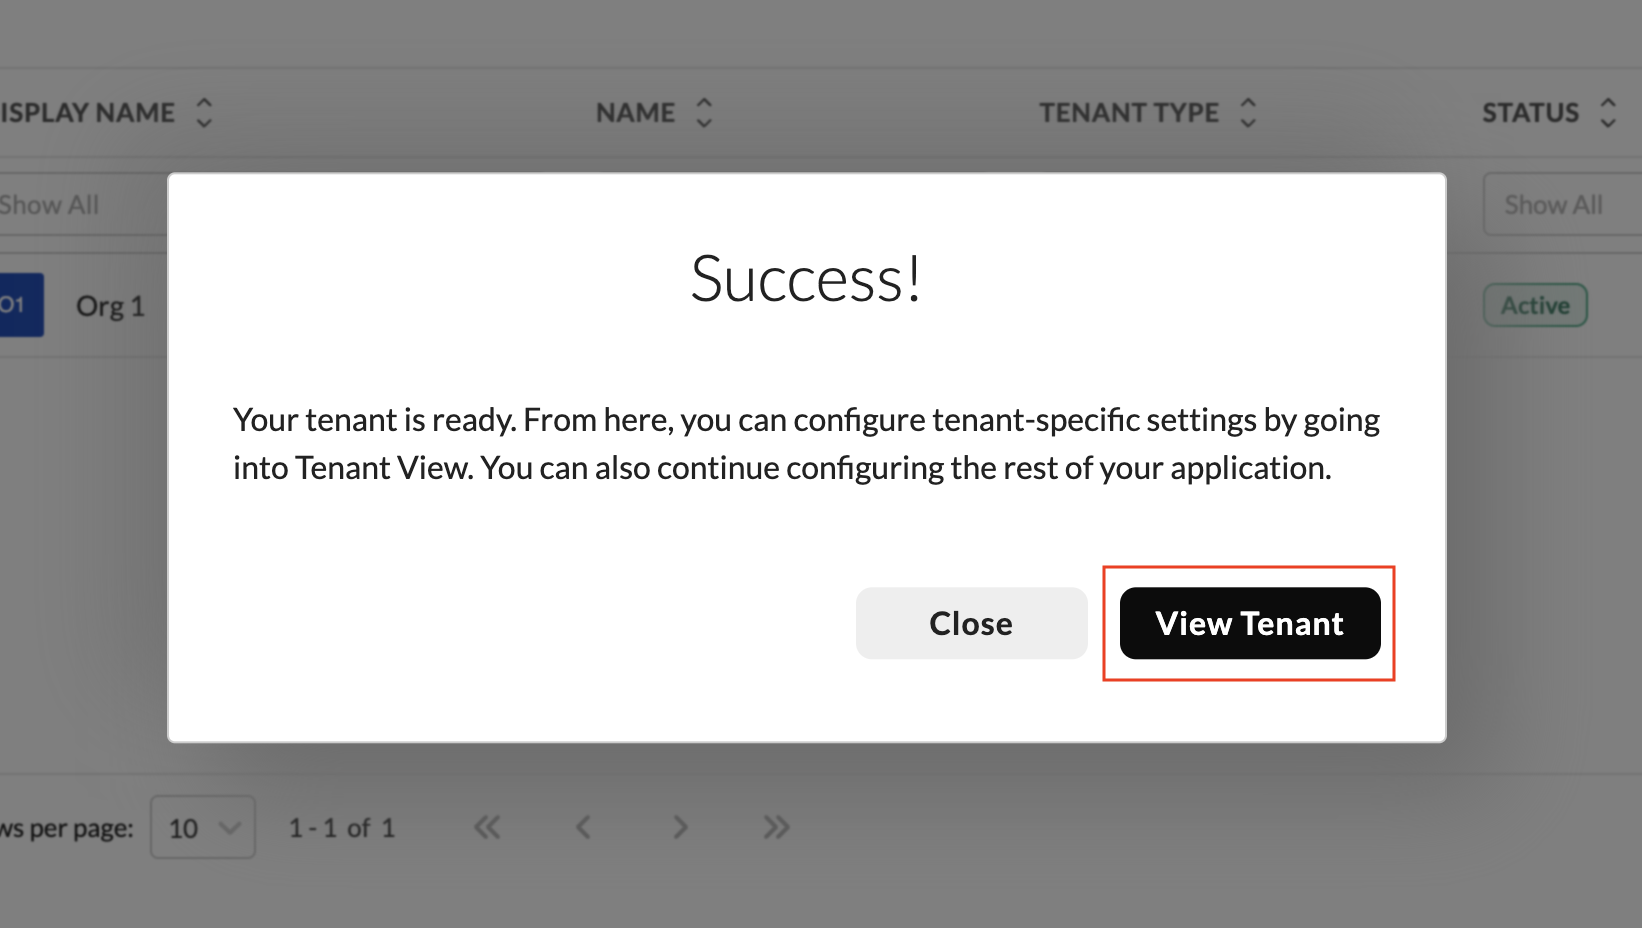
Figure 9: Select View Tenant to open the newly created tenant's settings.
Configuring a Tenant
After creating a tenant, you can manage its settings through the Wristband Dashboard.
To access a tenant's settings:
- From the Dashboard Home page, select the application that contains the tenant.
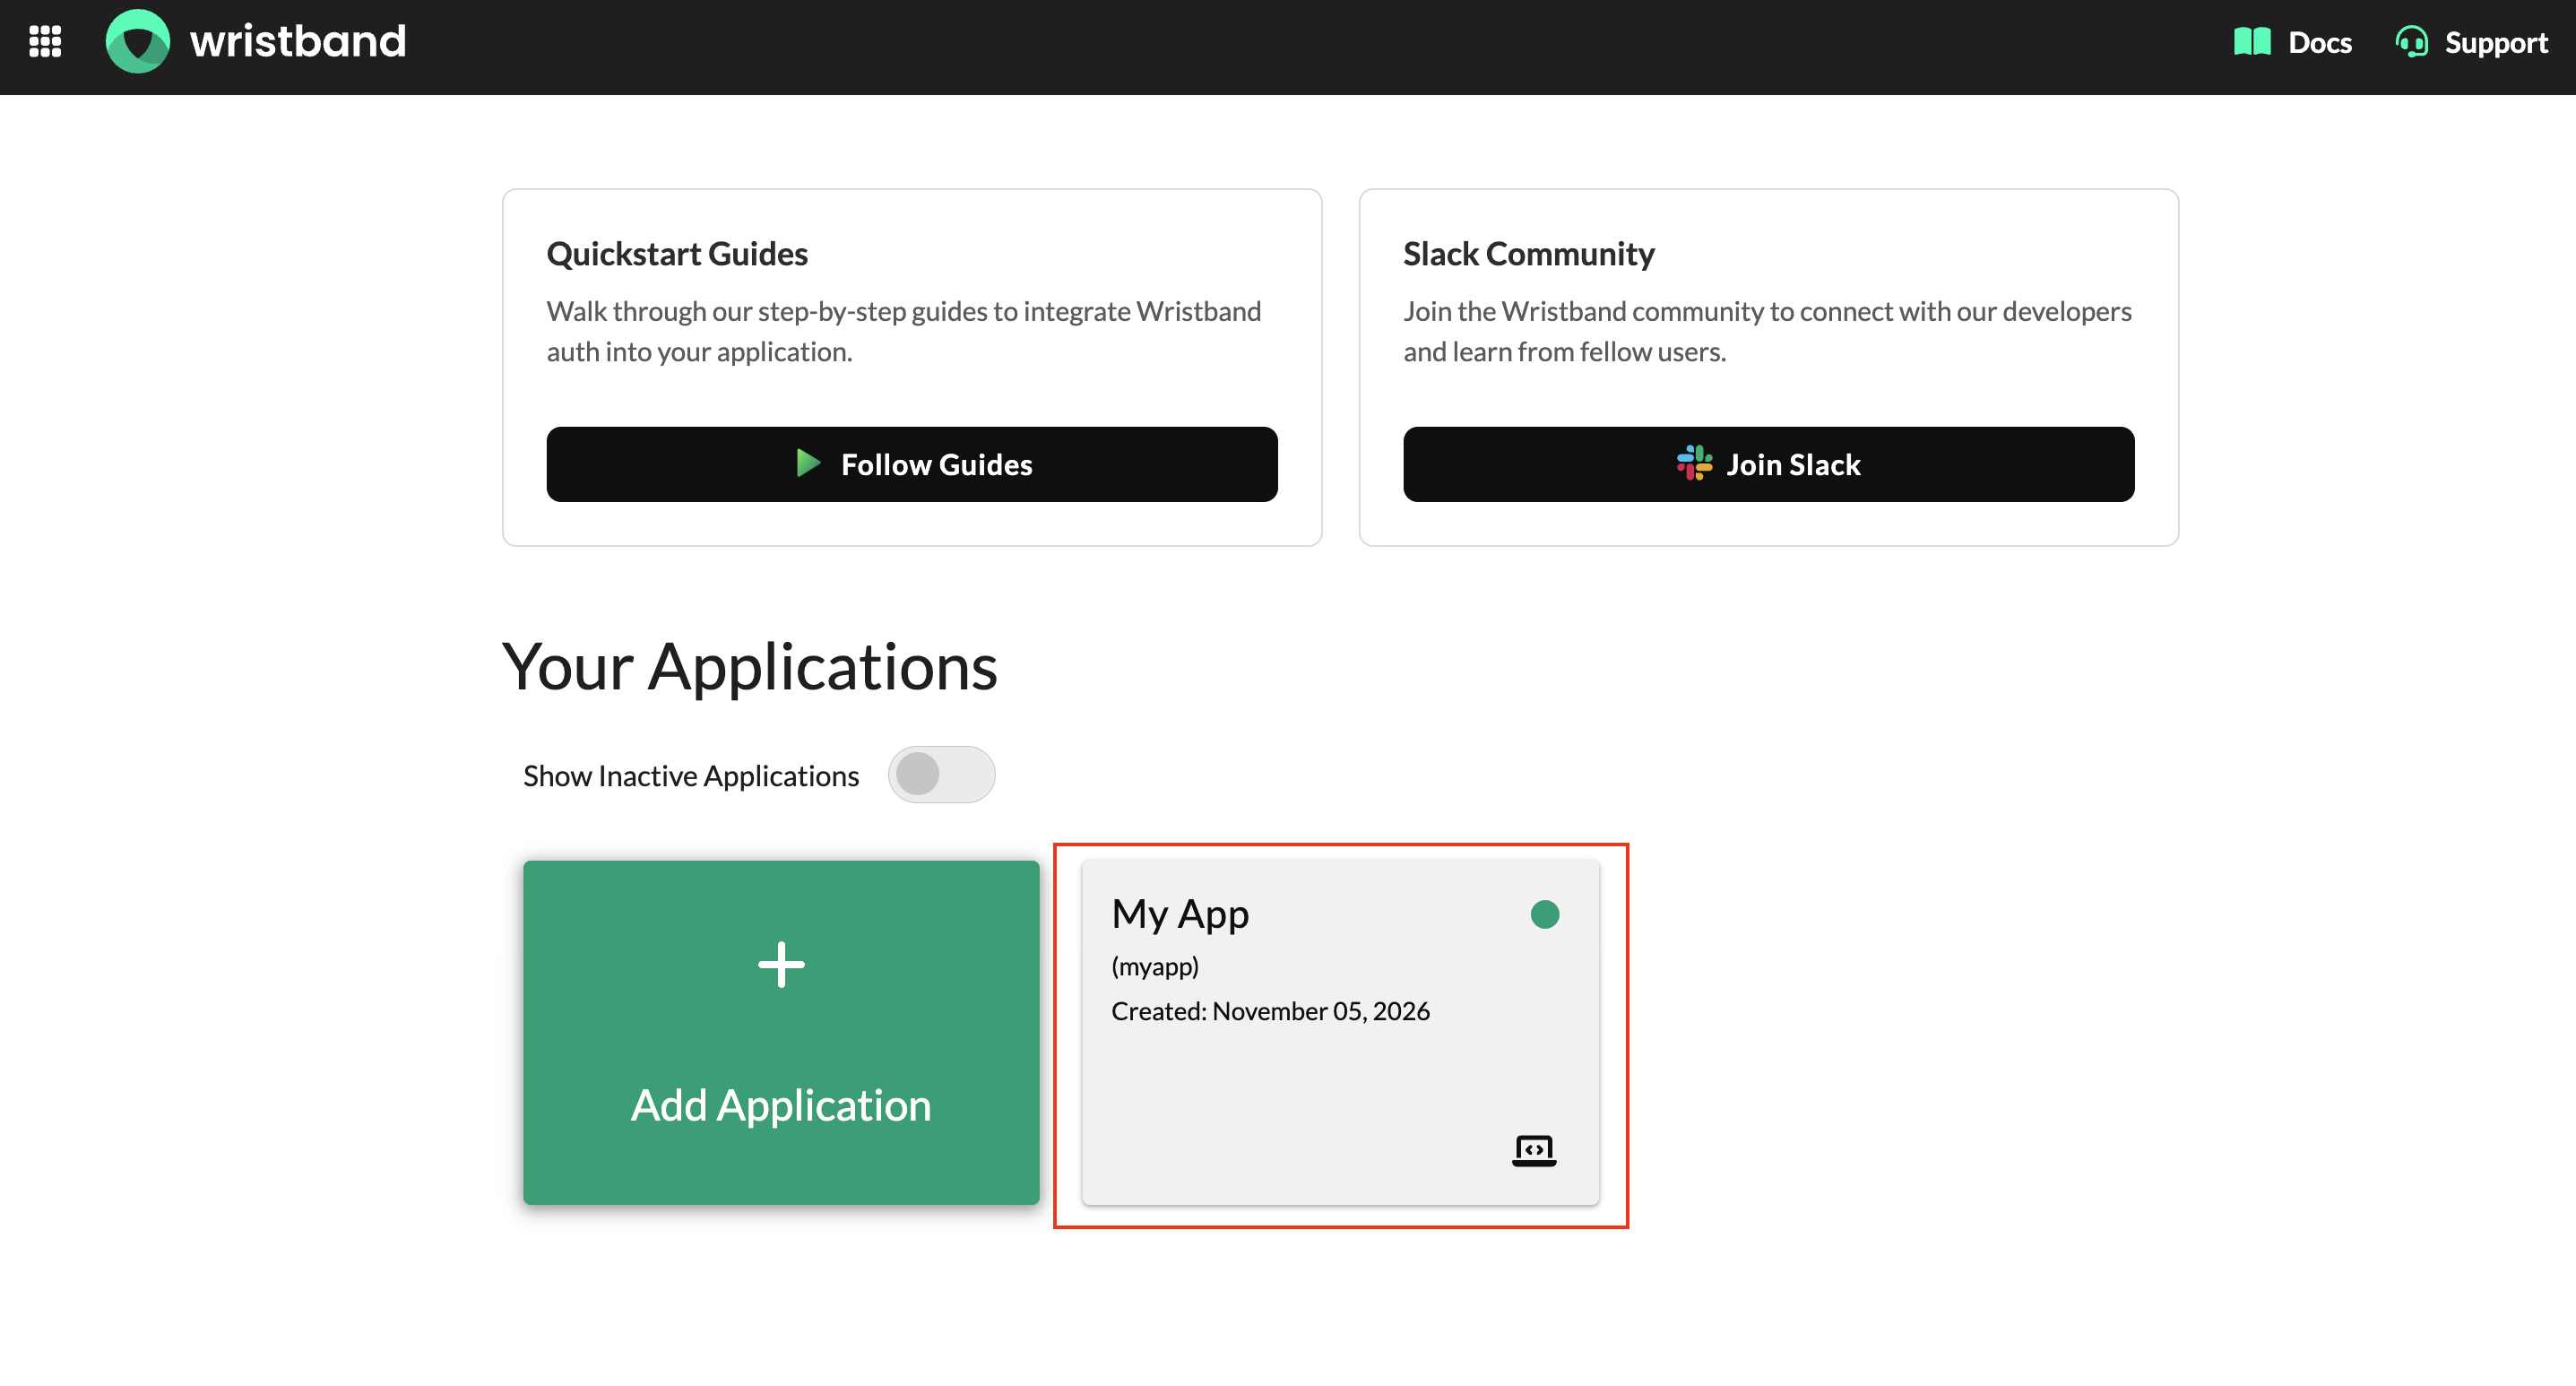
Figure 10: Select the application that contains the tenant.
- From the left navigation menu, select Tenant, then select the tenant you want to configure from the table. This opens the Tenant Settings page.
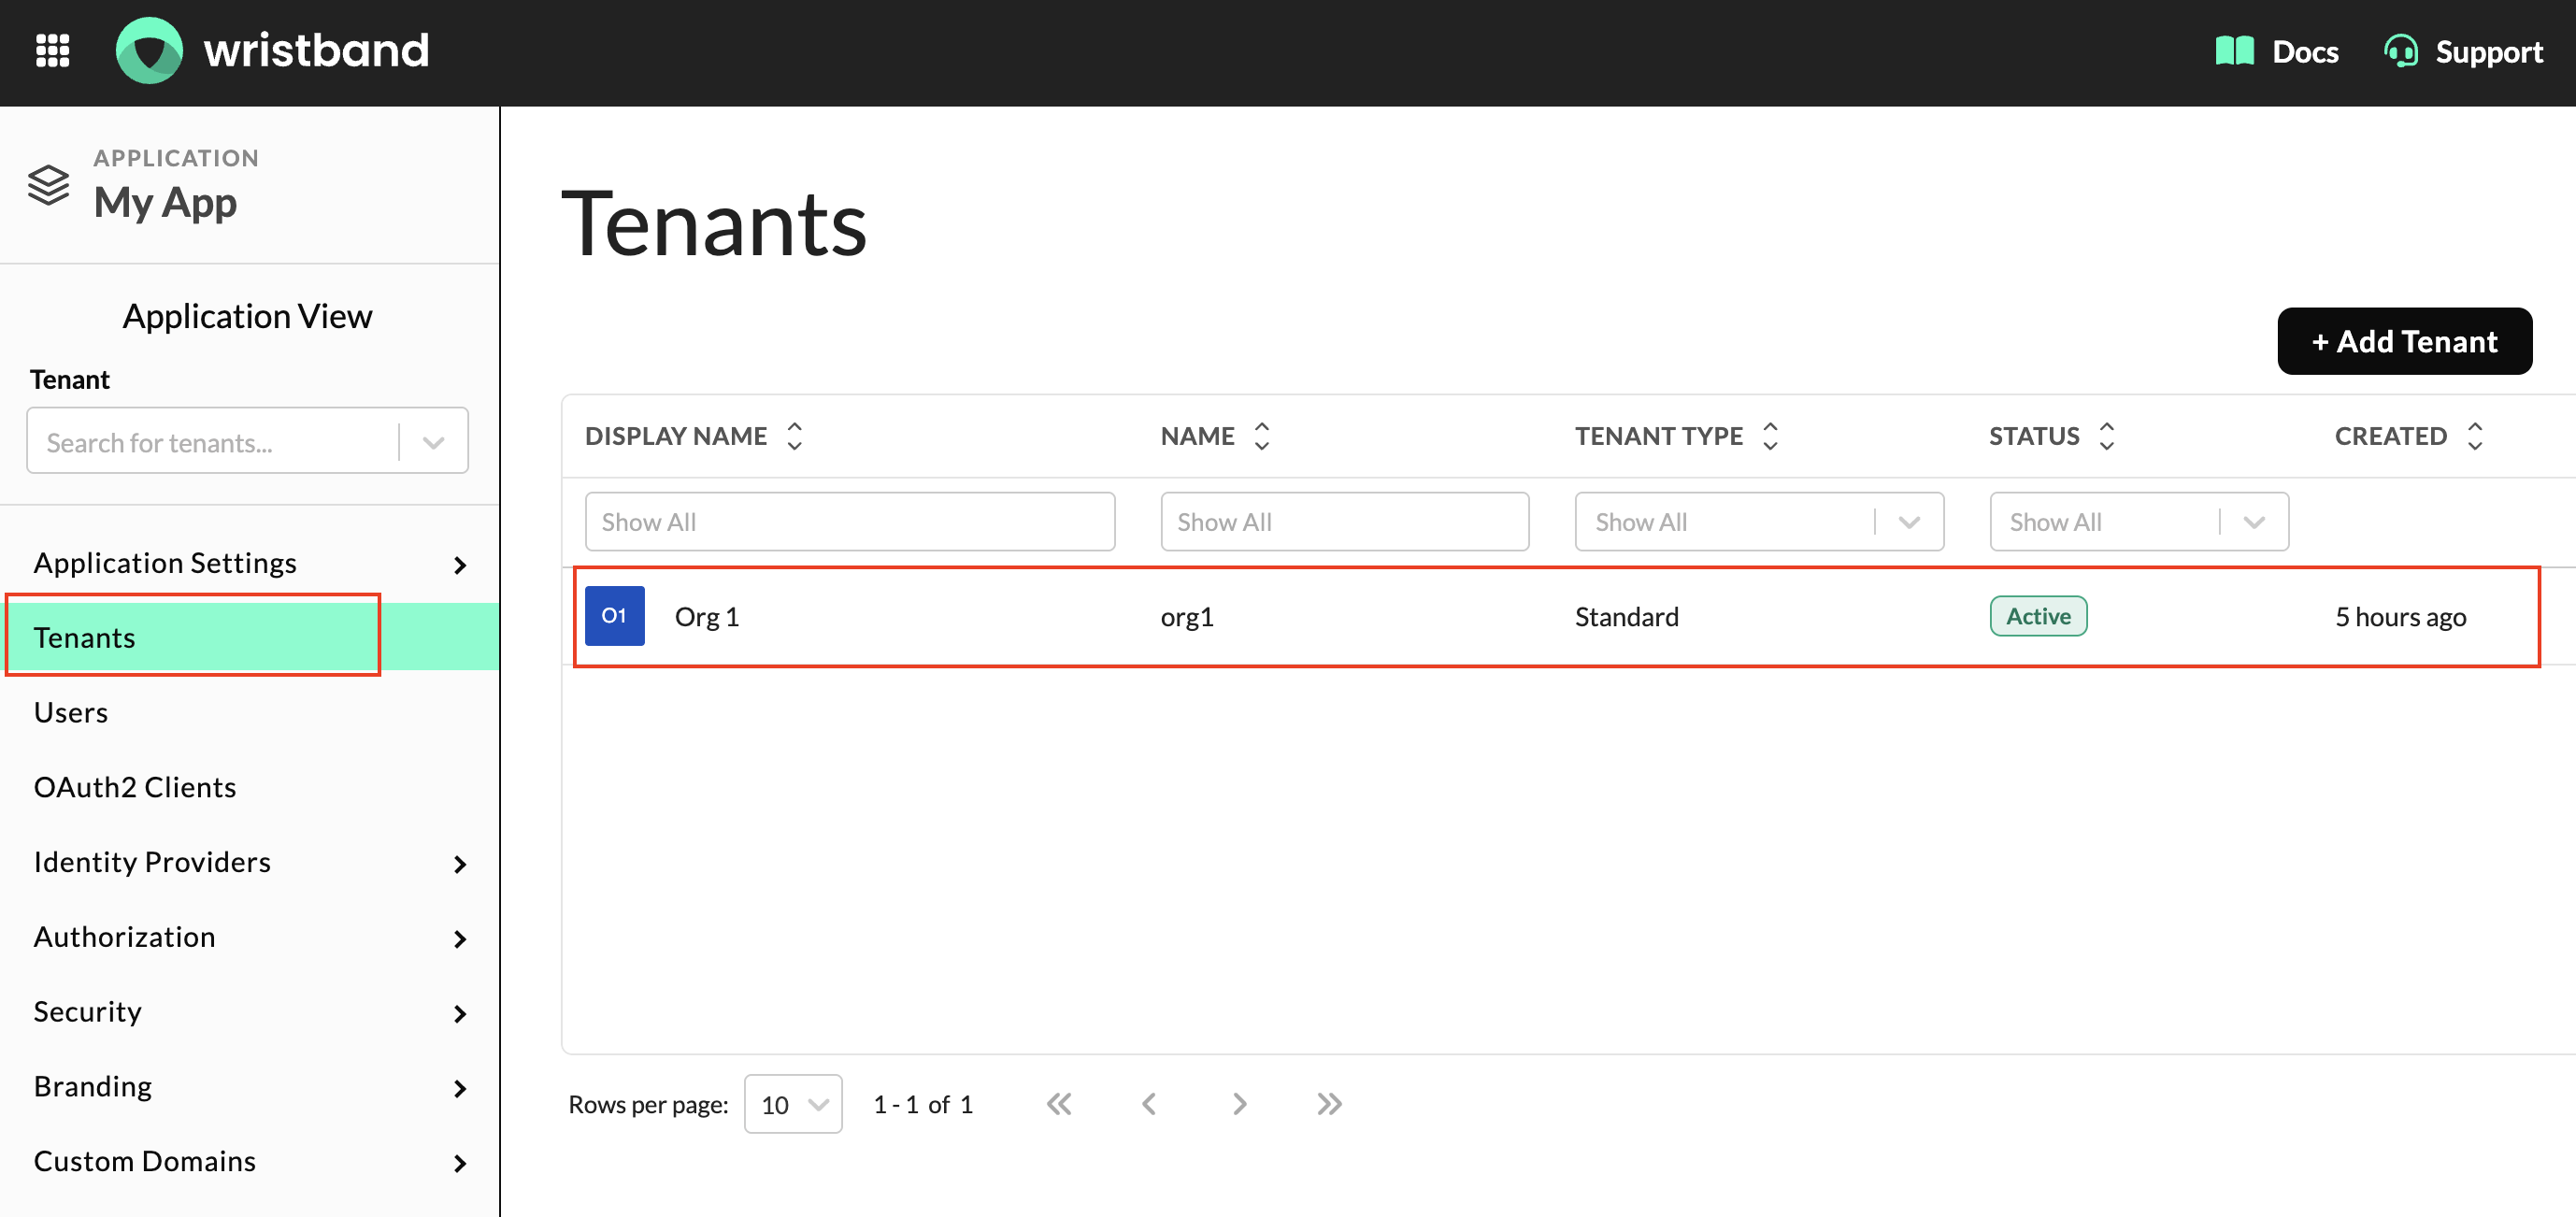
Figure 11: Select the tenant you want to configure.
Configuring a Tenant Logo
You can customize a tenant's branding by configuring a logo that appears in the following locations:
- Tenant Discovery: The tenant's logo is displayed next to its name in tenant discovery results.
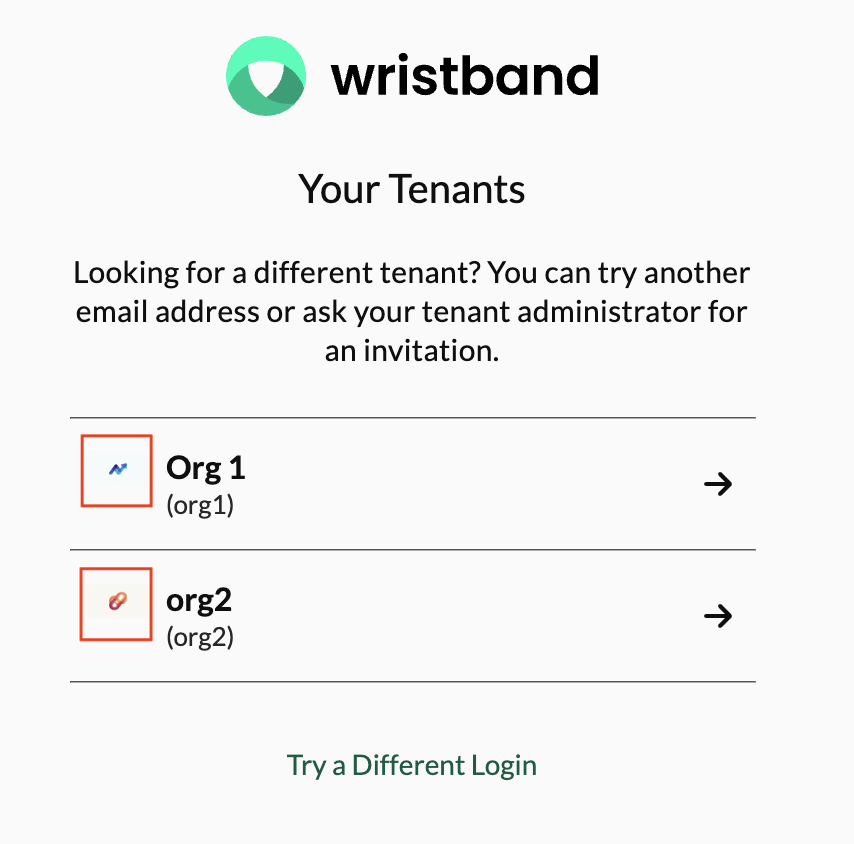
Figure 12: Tenant logos in tenant discovery results.
- Dashboard Tenants Table: The tenant's logo is displayed in its corresponding row in the Wristband Dashboard.
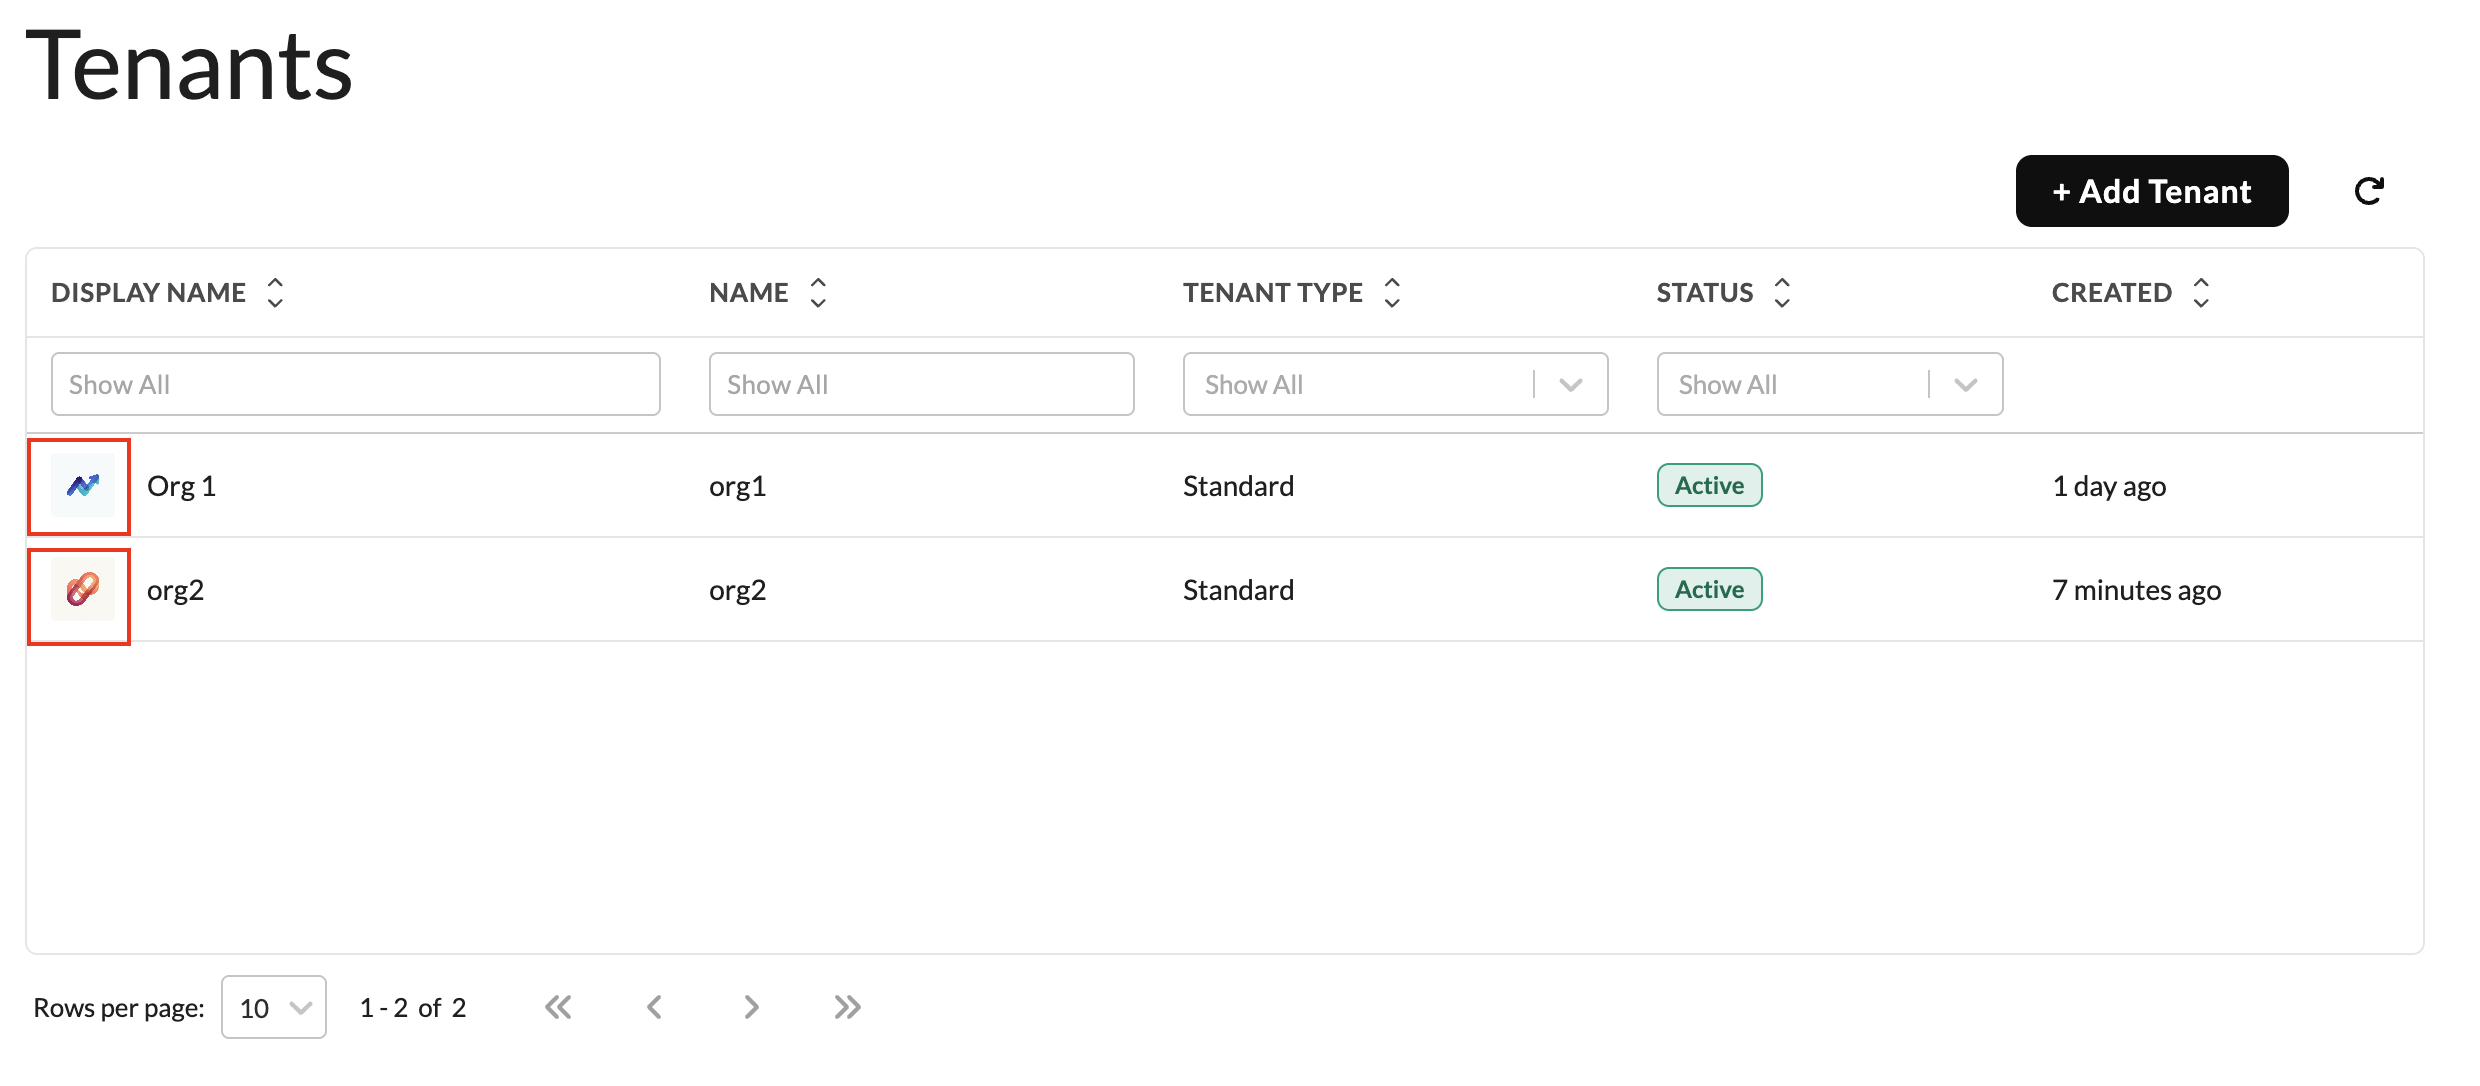
Figure 13: Tenant logos in the Dashboard Tenants table.
To configure a tenant's logo:
- On the Tenant Settings page, locate the Logo URL field.
- Enter a publicly accessible URL pointing to the tenant's logo image. Supported formats include PNG, JPEG/JPG, and SVG. SVG is the recommended format for tenant logos because it maintains image quality at different sizes.
- Review the logo preview displayed next to the field.
- Click Save to apply your changes.
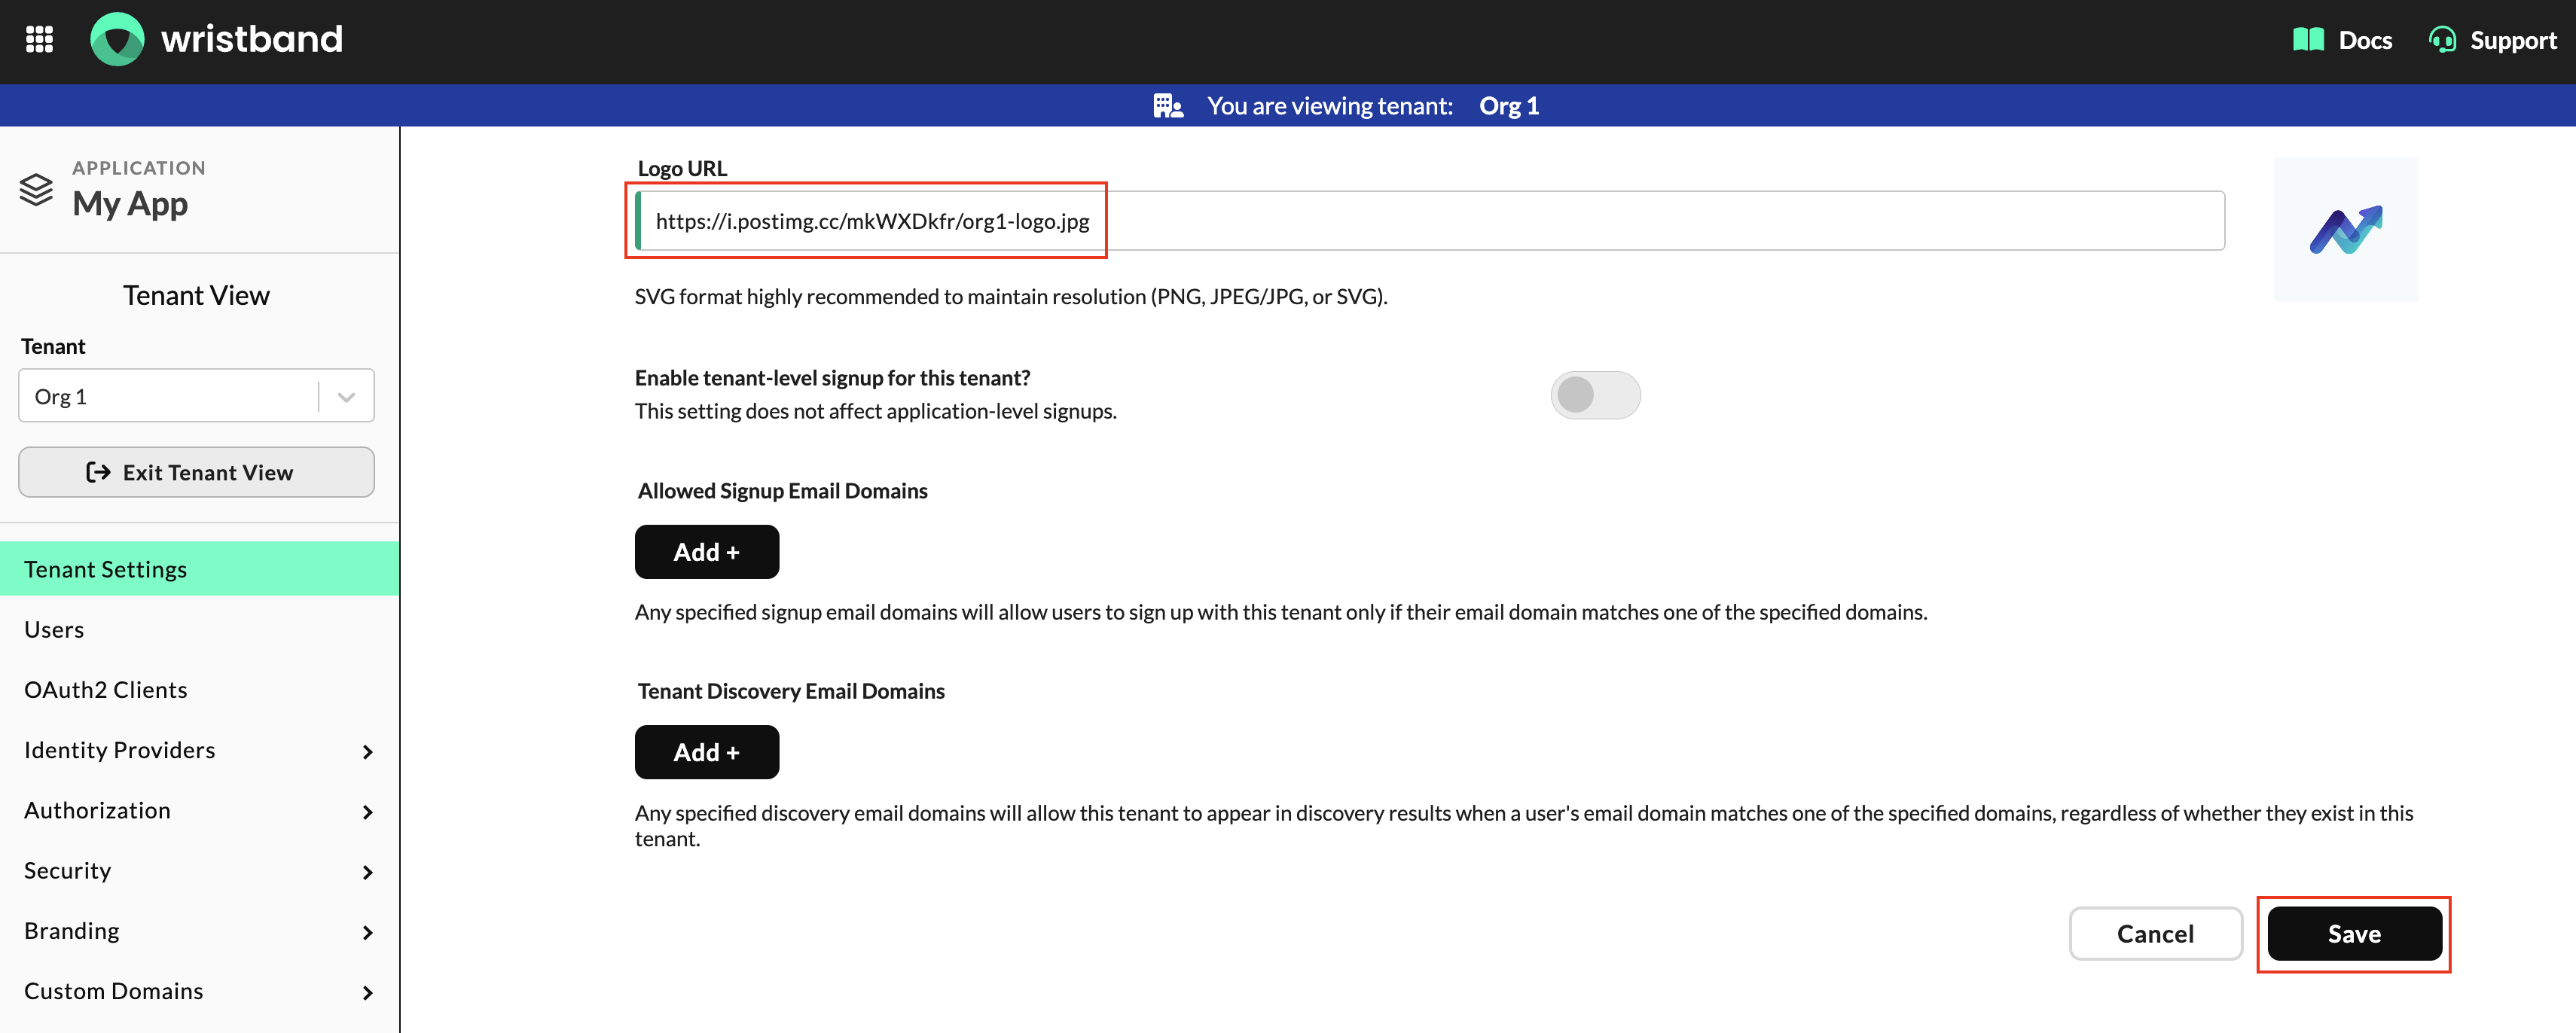
Figure 14: Configure the logo URL for your tenant.
Configuring Logos for Tenant Login and Signup PagesThe logo displayed on a tenant's hosted login and signup pages is configured separately through the tenant's Page Branding settings.
For more information, see the Page Branding documentation.
Configuring Tenant-Level Signup
You can enable or disable tenant-level signup through the Tenant Settings page to control whether users can self-register for an account within the tenant.
To configure tenant-level signup:
- On the Tenant Settings page, locate the Enable tenant-level signups for this tenant toggle.
- Enable the toggle to allow users to self-register within the tenant, or disable it to prevent self-registration.
- Click Save to apply your changes.
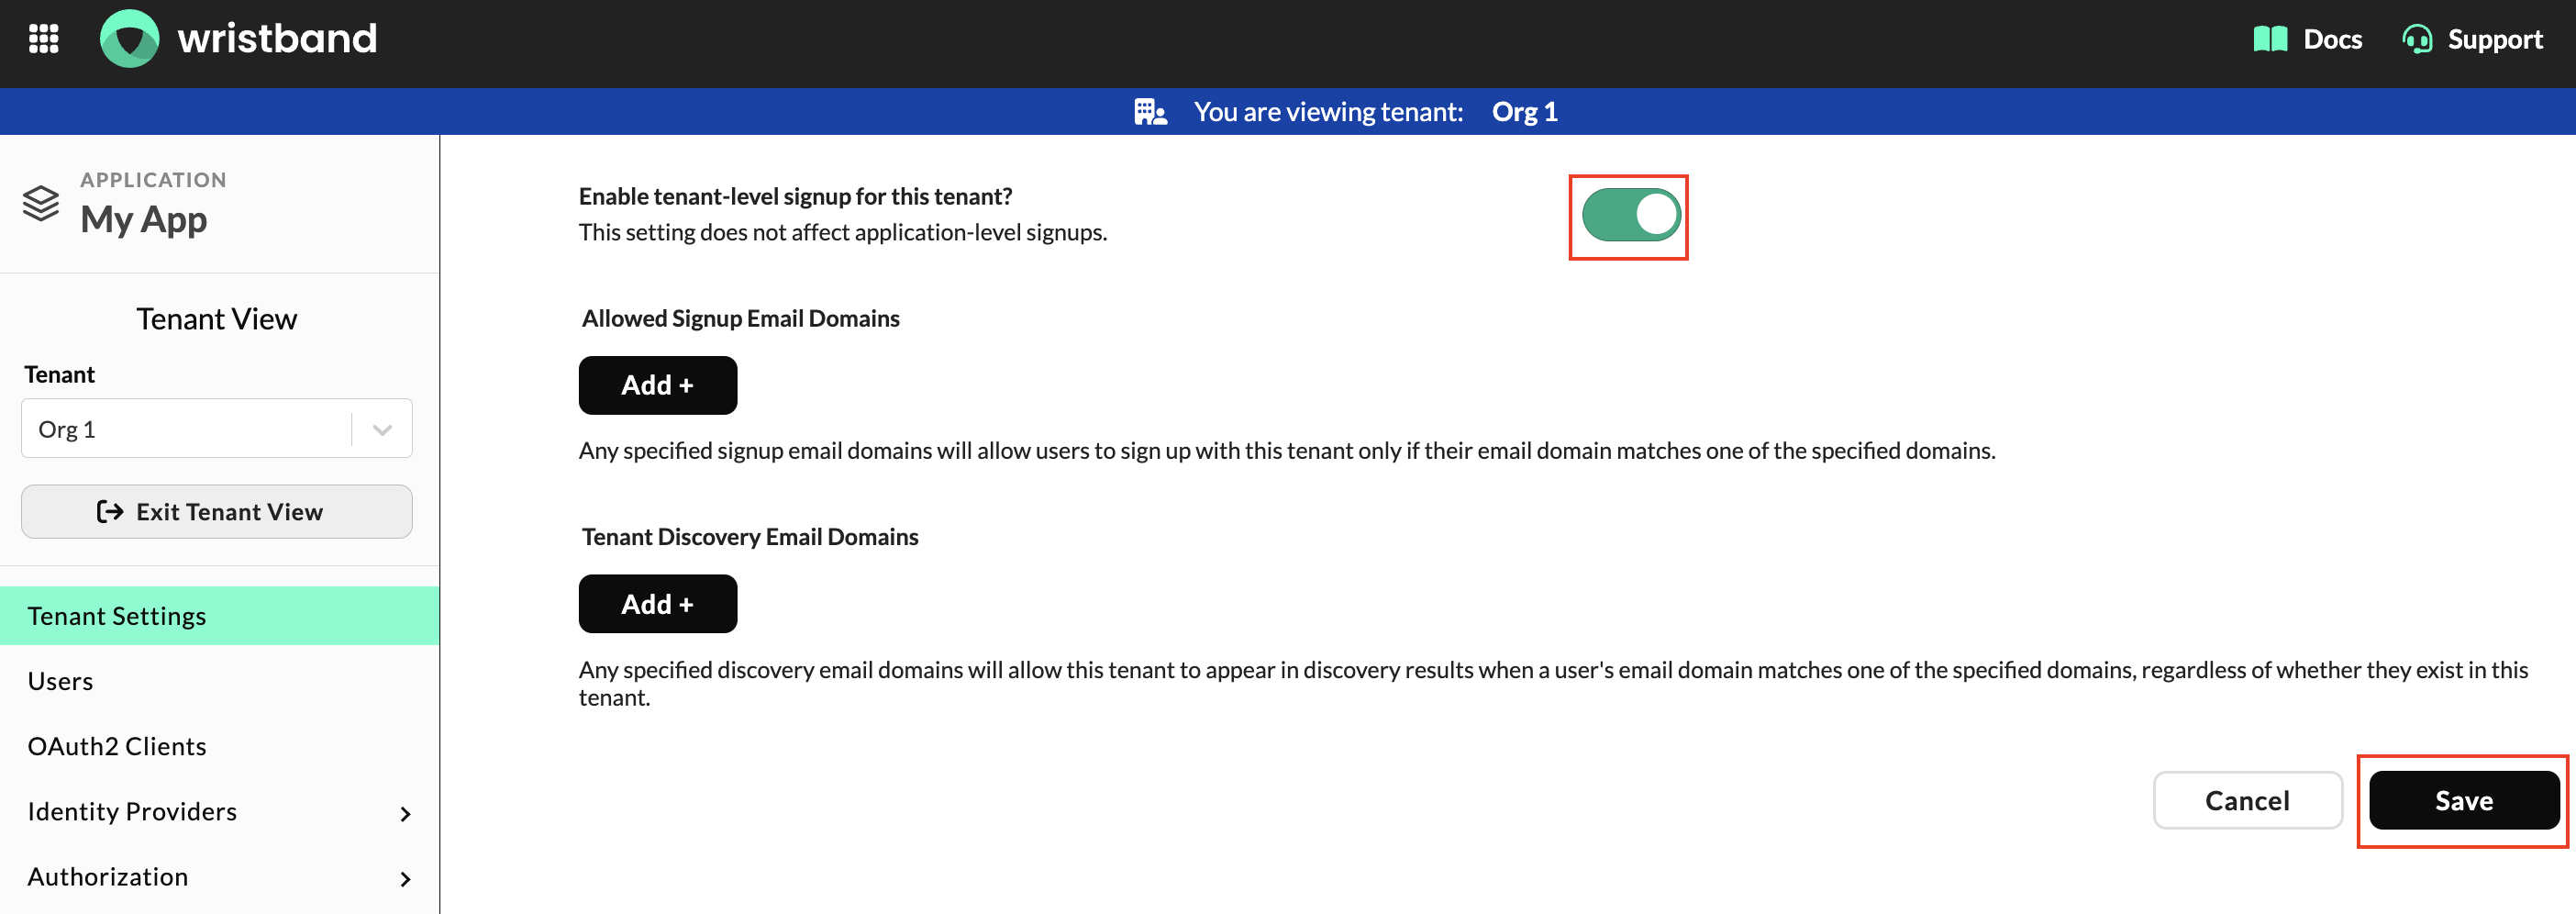
Figure 15: Enable or disable tenant-level signup.
For more information, see Enabling Tenant-Level Signups.
Configuring Allowed Signup Email Domains
When tenant-level signup is enabled, you can restrict self-registration to users with email addresses from specific domains by configuring an allowlist of email domains.
To configure Allowed Signup Email Domains:
- On the Tenant Settings page, locate the Allowed Signup Email Domains section.
- Click Add to register a new allowed email domain.
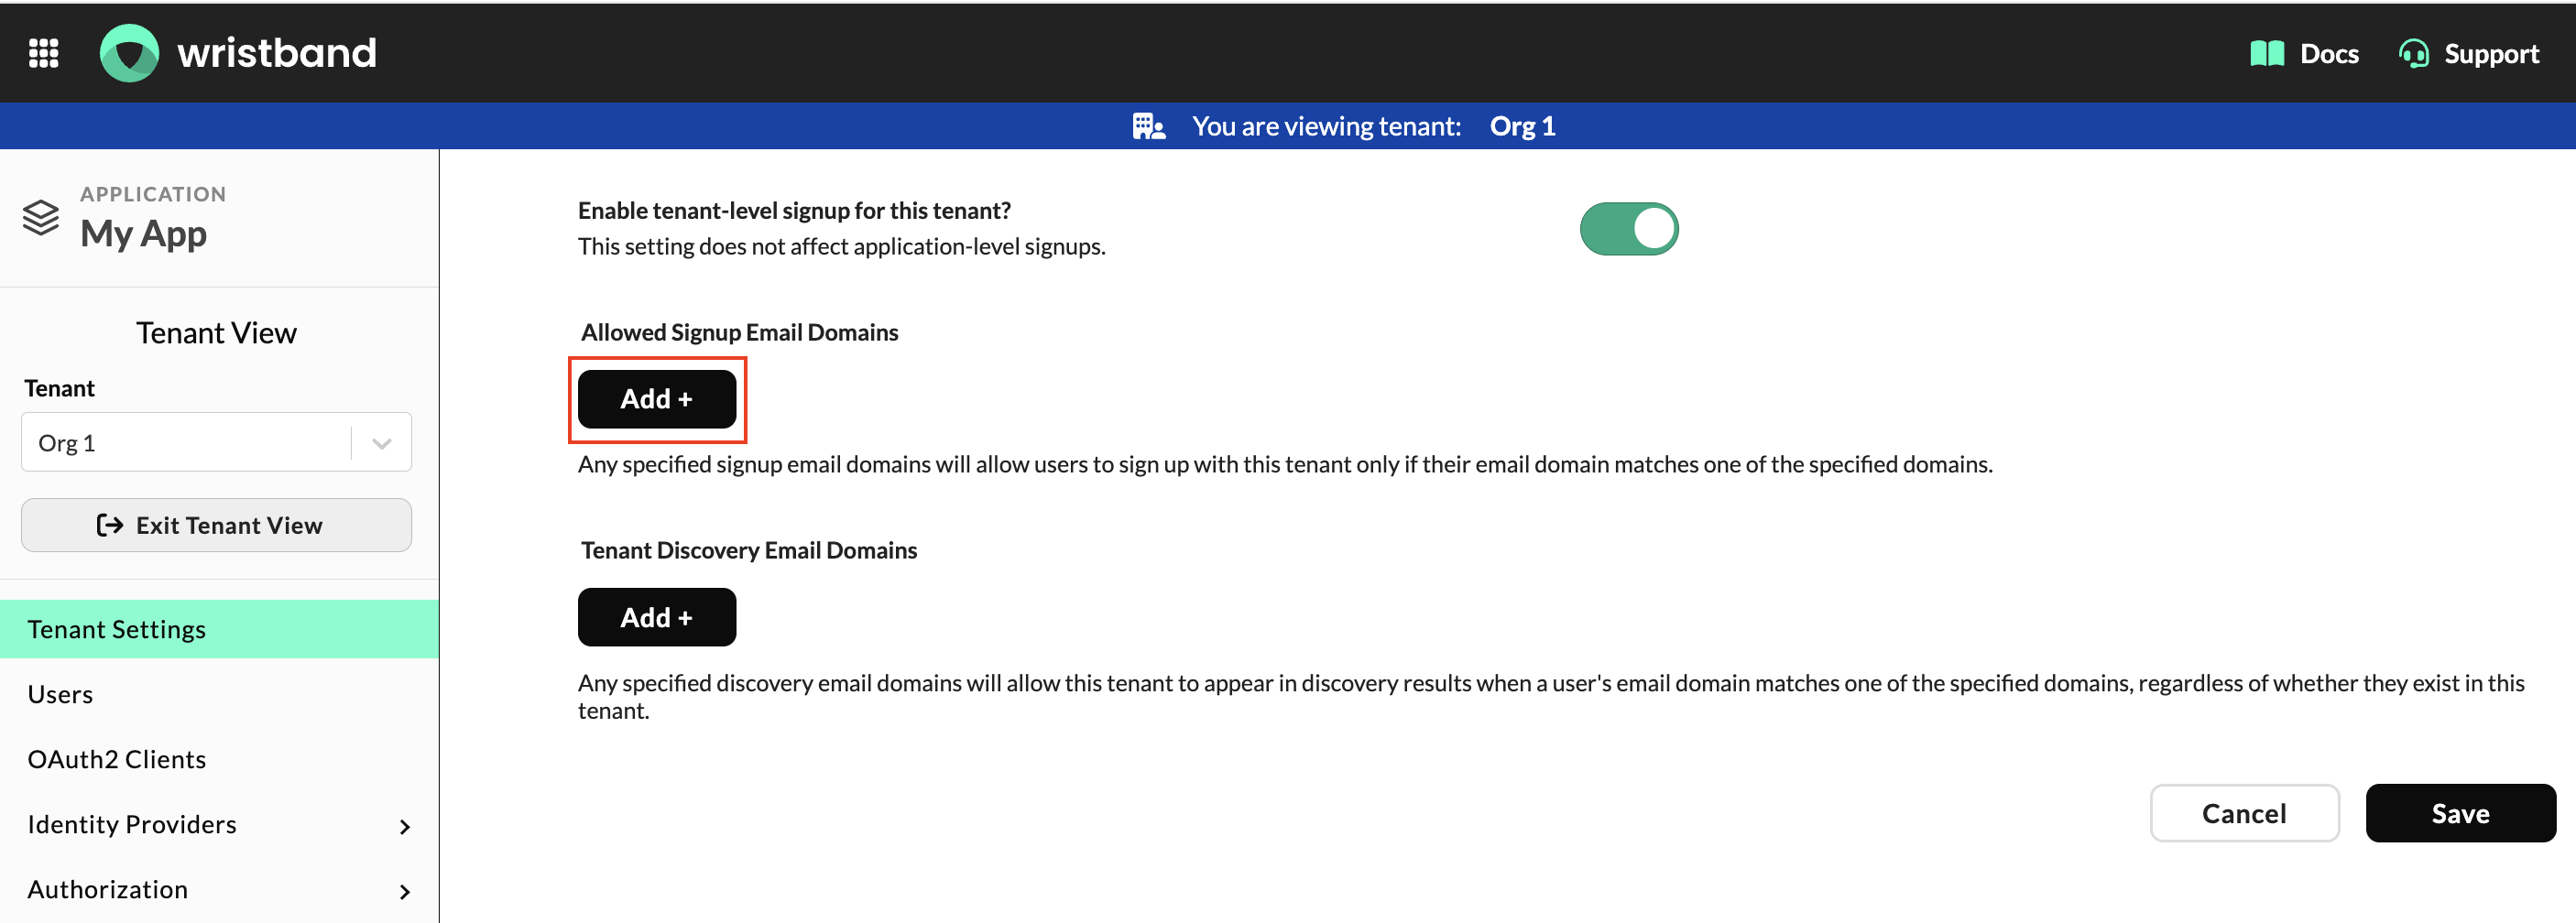
Figure 16: Add a new allowed signup email domain.
- Enter an email domain that should be permitted for signup, such as
org1.com. - Repeat these steps for any additional email domains you want to allow.
- Click Save to apply your changes.
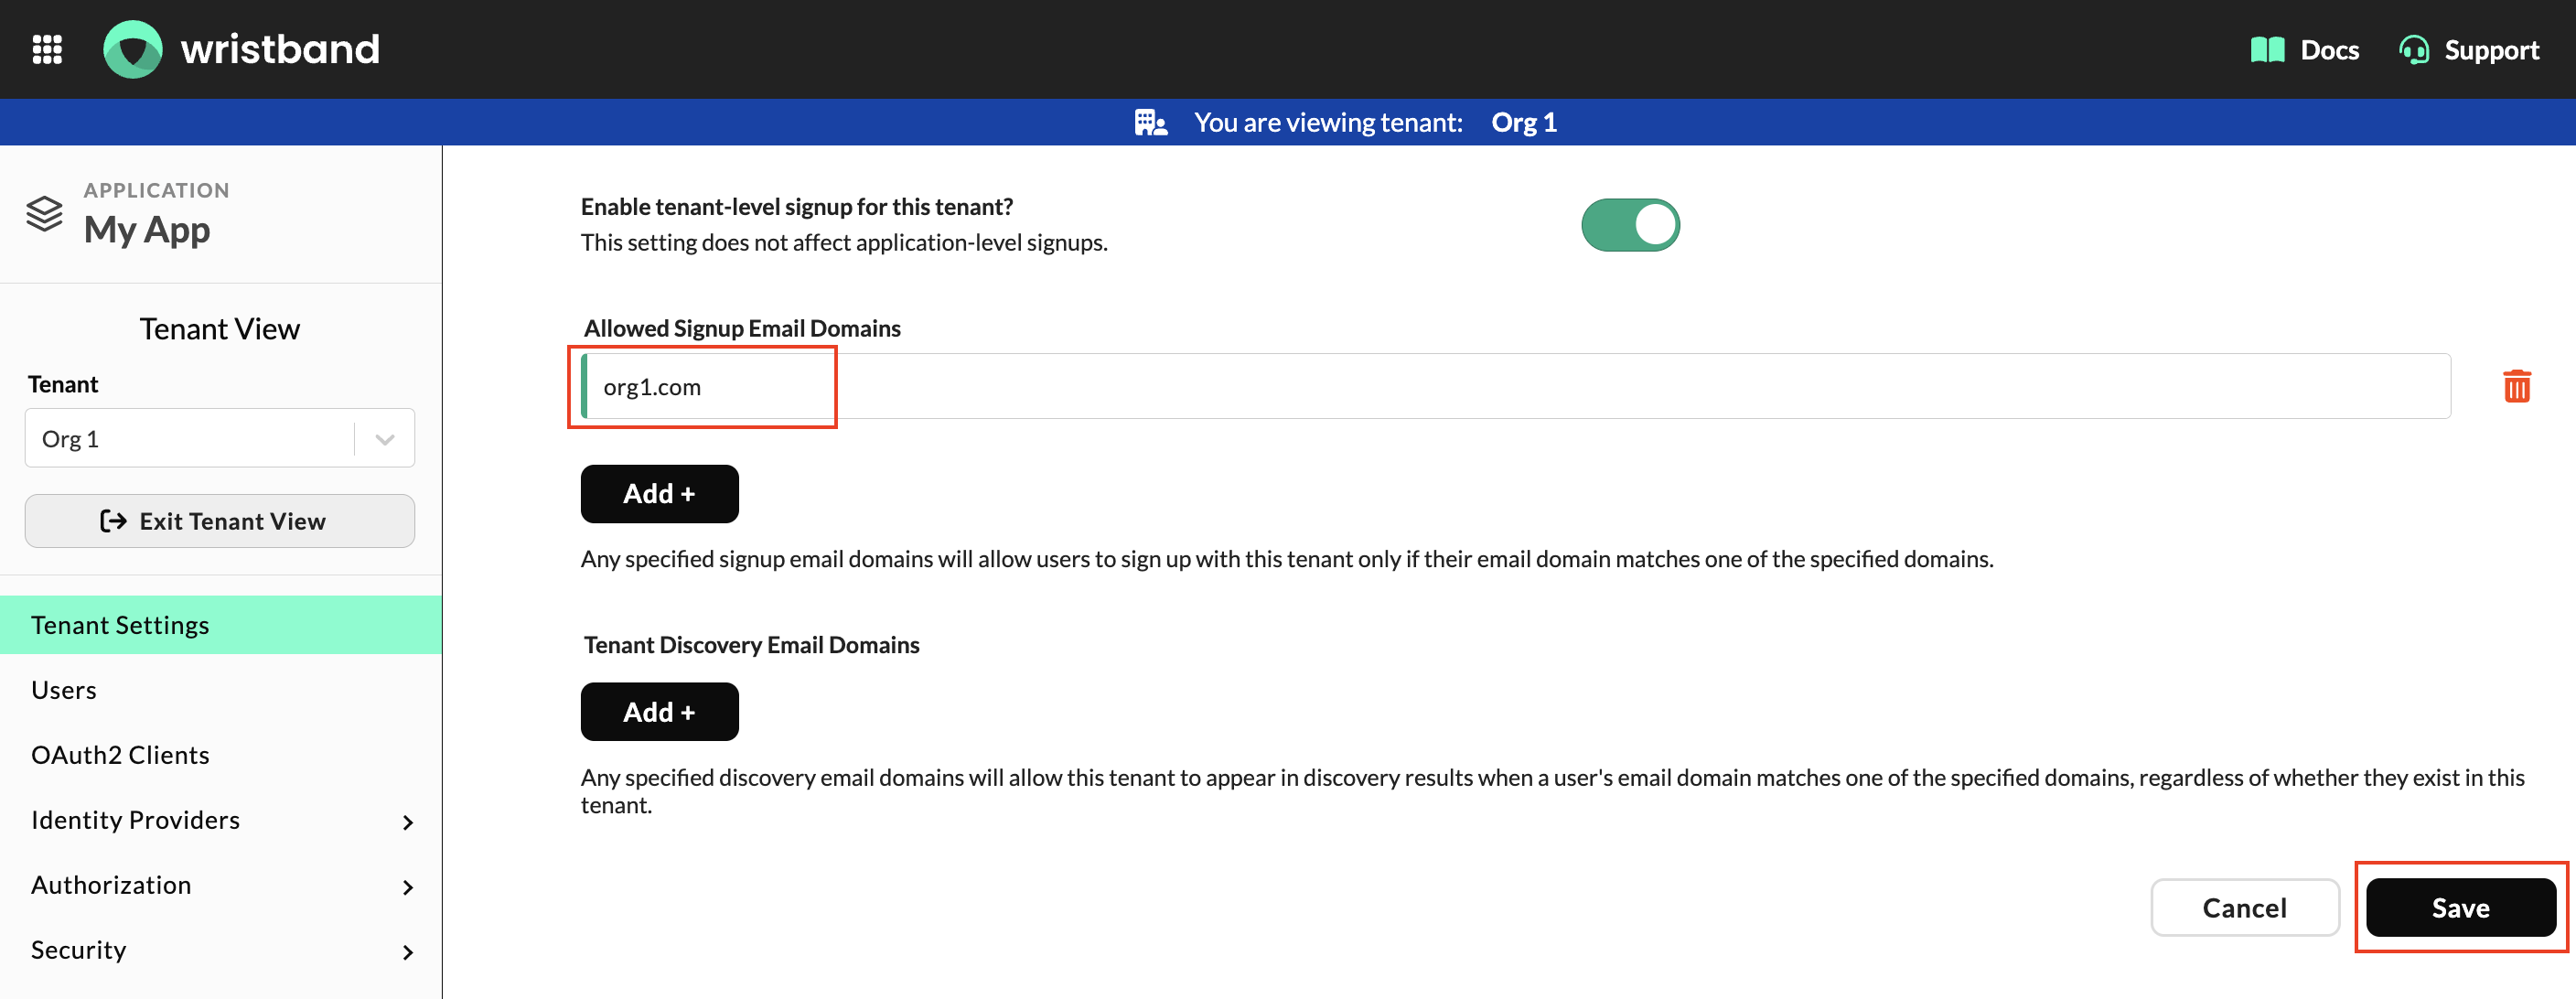
Figure 17: Configure the allowed signup email domains for your tenant.
For more information, see Allowed Signup Email Domains.
Configuring Tenant Discovery Email Domains
You can associate email domains with a tenant to make it discoverable to users during the tenant discovery process. When a user enters their email address, Wristband includes any active tenants with matching Tenant Discovery Email Domains in the discovery results.
To configure Tenant Discovery Email Domains:
- On the Tenant Settings page, locate the Tenant Discovery Email Domains section.
- Click Add to register a new email domain.
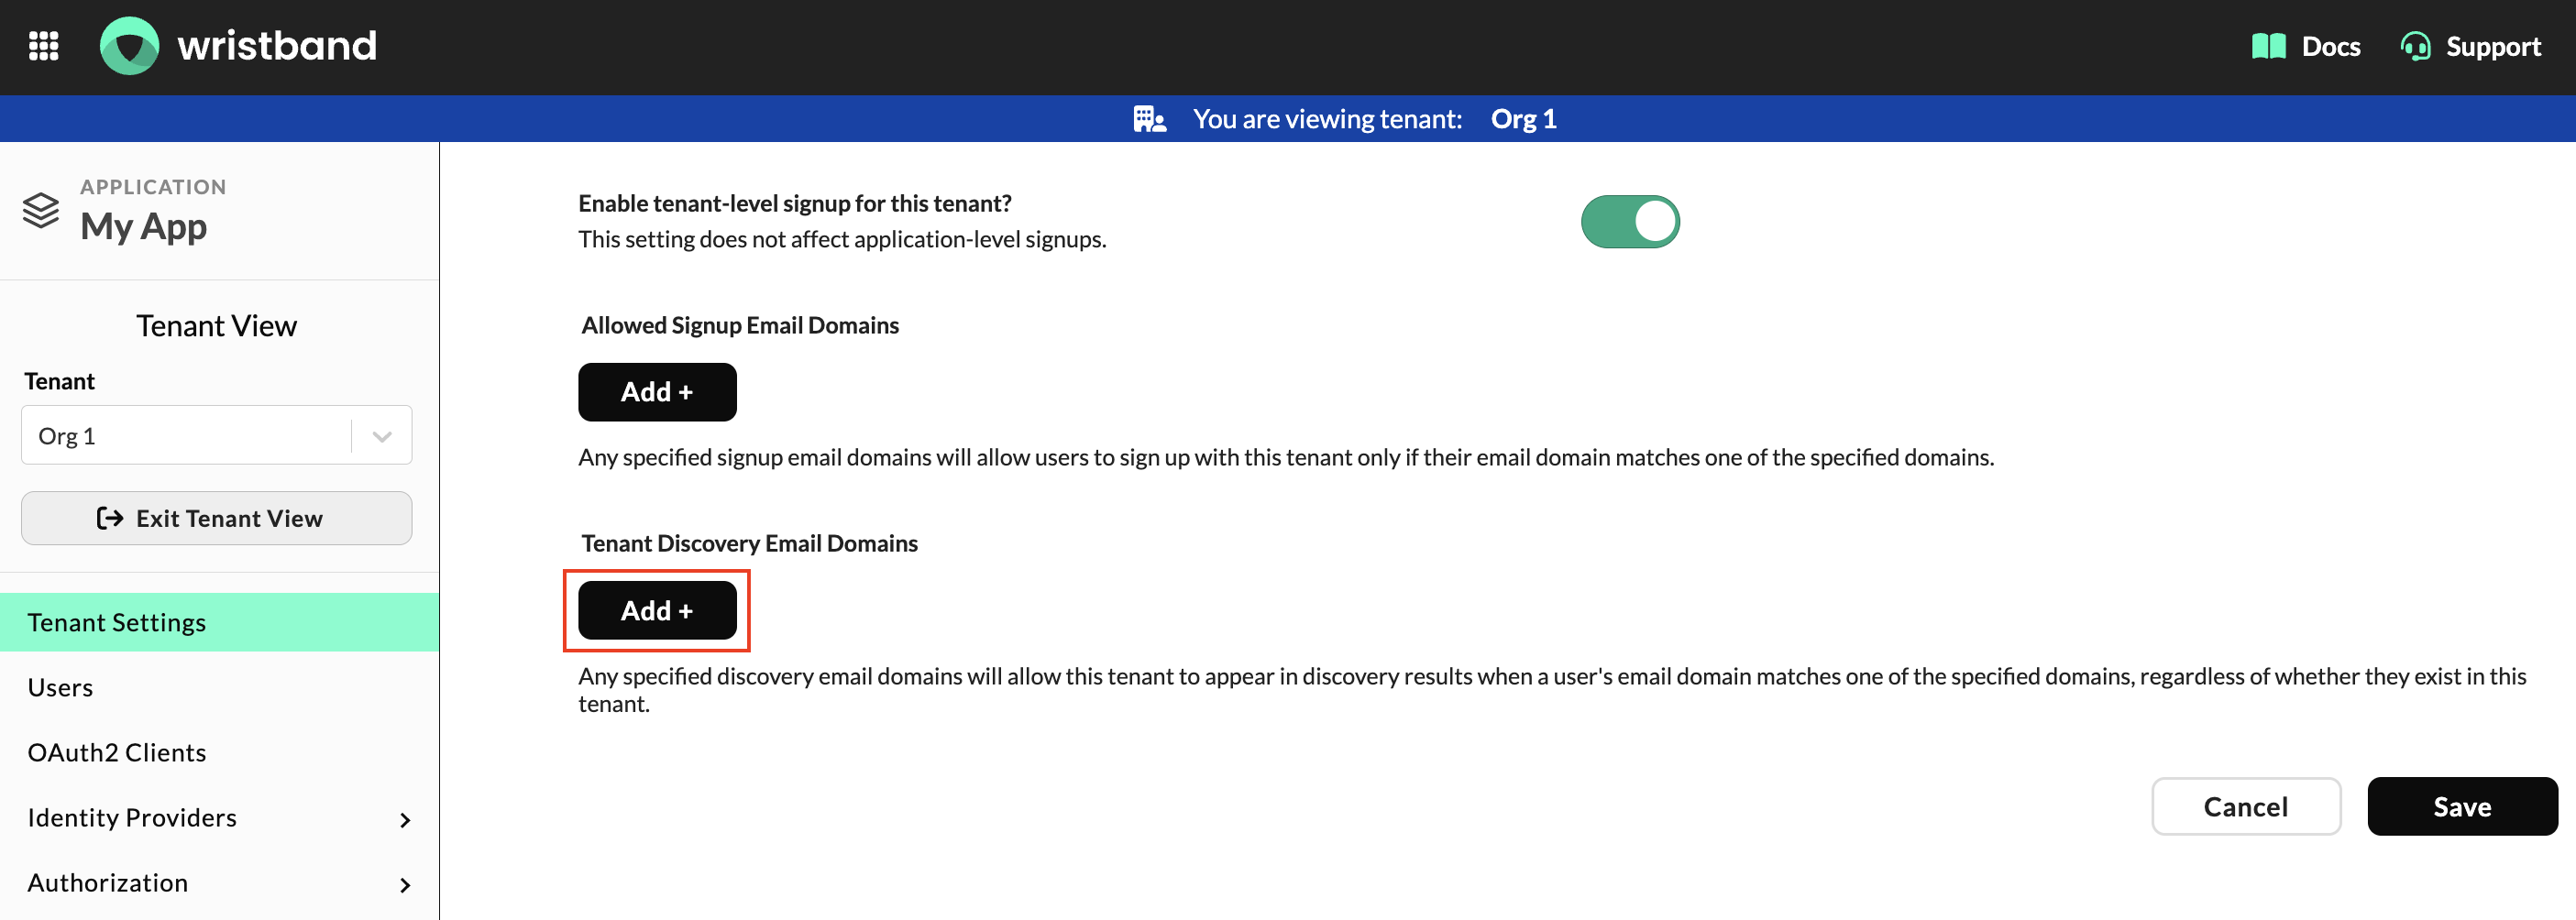
Figure 18: Add a new tenant discovery email domain.
- Enter an email domain to associate with the tenant, such as
org1.com. - Repeat these steps for any additional email domains you want to associate with the tenant.
- Click Save to apply your changes.
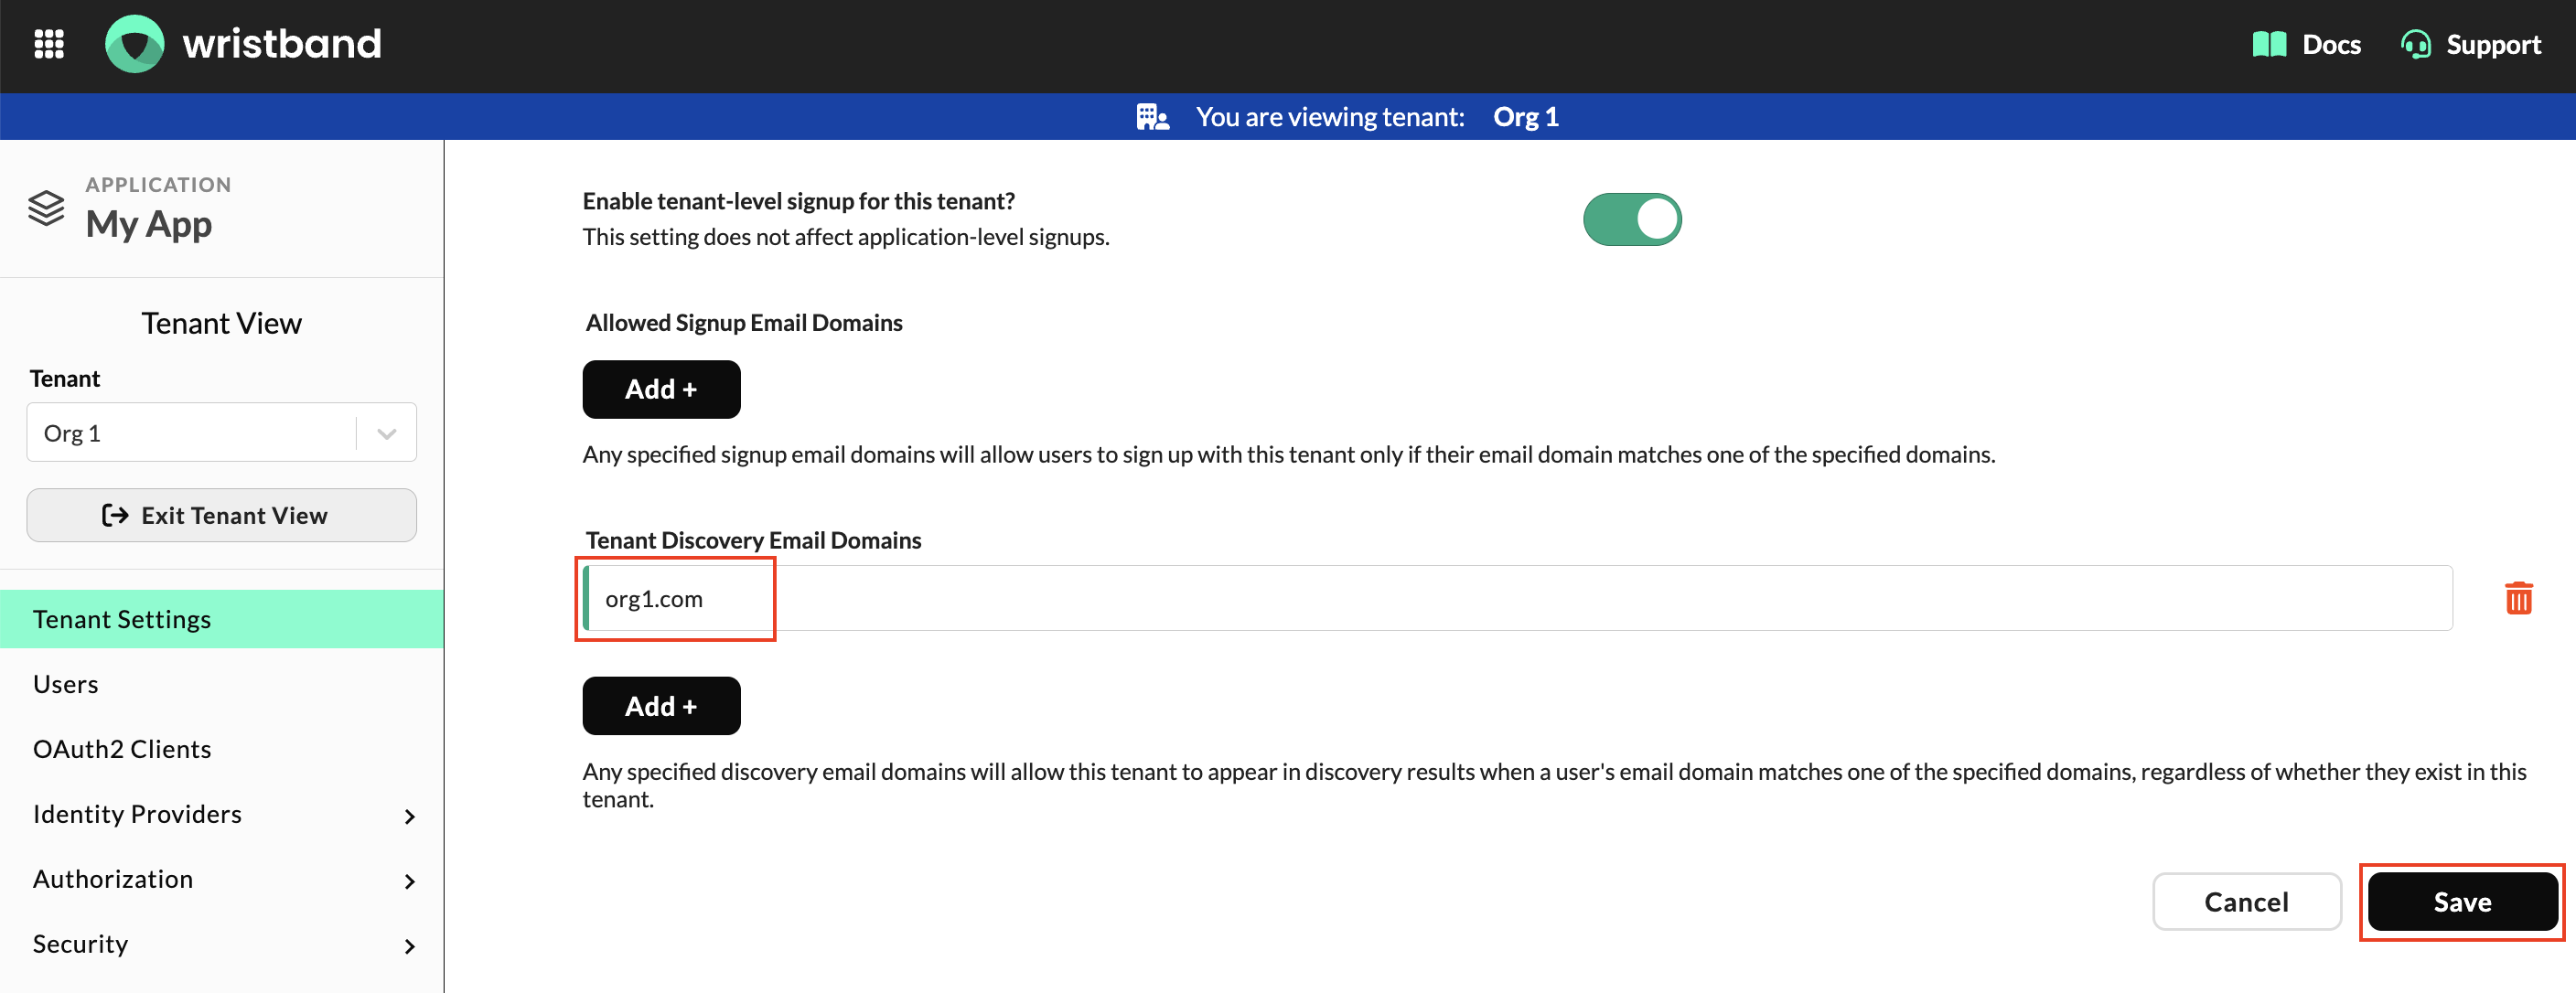
Figure 19: Configure the tenant discovery email domains for your tenant.
For more information, see Tenant Discovery Email Domains.
Configuring Tenant Custom Metadata
You can add custom metadata to a tenant through the Tenant Settings page. Wristband supports two types of metadata:
- Public Metadata: Stores non-sensitive tenant information that can be accessed by end users, such as public tenant settings.
- Restricted Metadata: Stores tenant information that should not be exposed to end users, such as internal and external identifiers. Users or OAuth2 clients must have the
tenant:manage-restricted-metadatapermission assigned to them in order to update a tenant's restricted metadata.
To configure tenant custom metadata:
- On the Tenant Settings page, locate the Metadata section.
- Expand Public Metadata to view the JSON editor.
- Enter a valid JSON object containing the public metadata you want to associate with the tenant.
- Click Save to apply your changes.
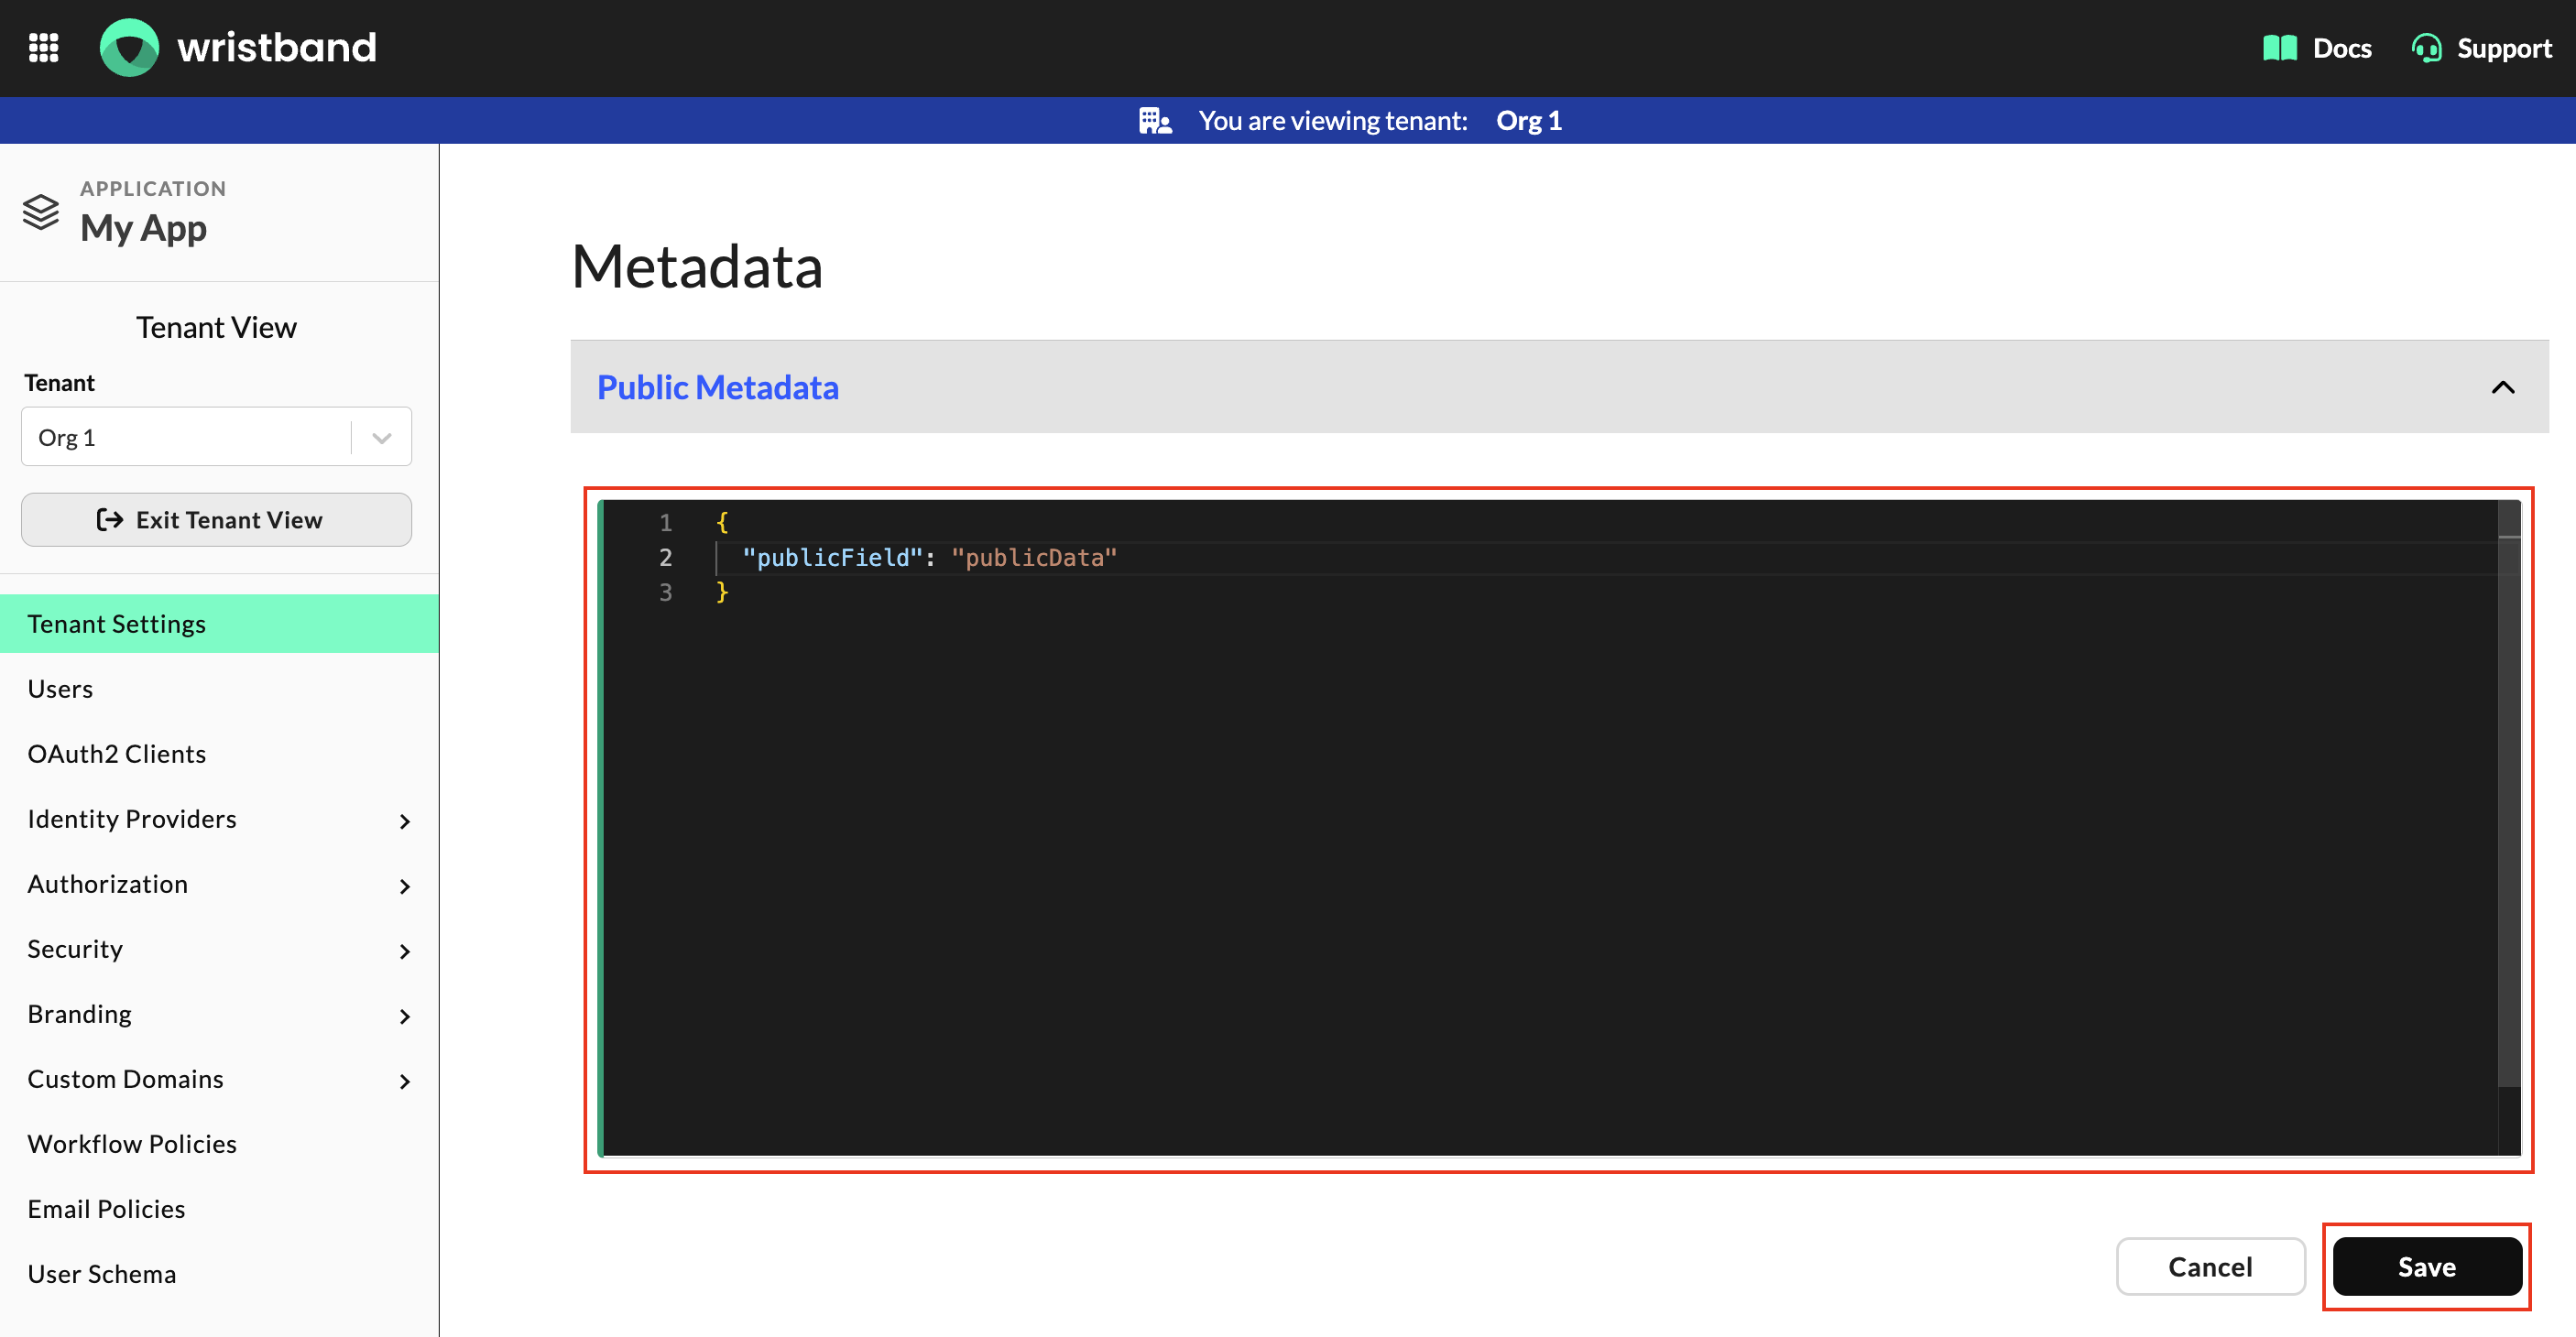
Figure 20: Configure public metadata for your tenant.
- Expand Restricted Metadata to view its JSON editor.
- Enter a valid JSON object containing the restricted metadata you want to associate with the tenant.
- Click Save to apply your changes.
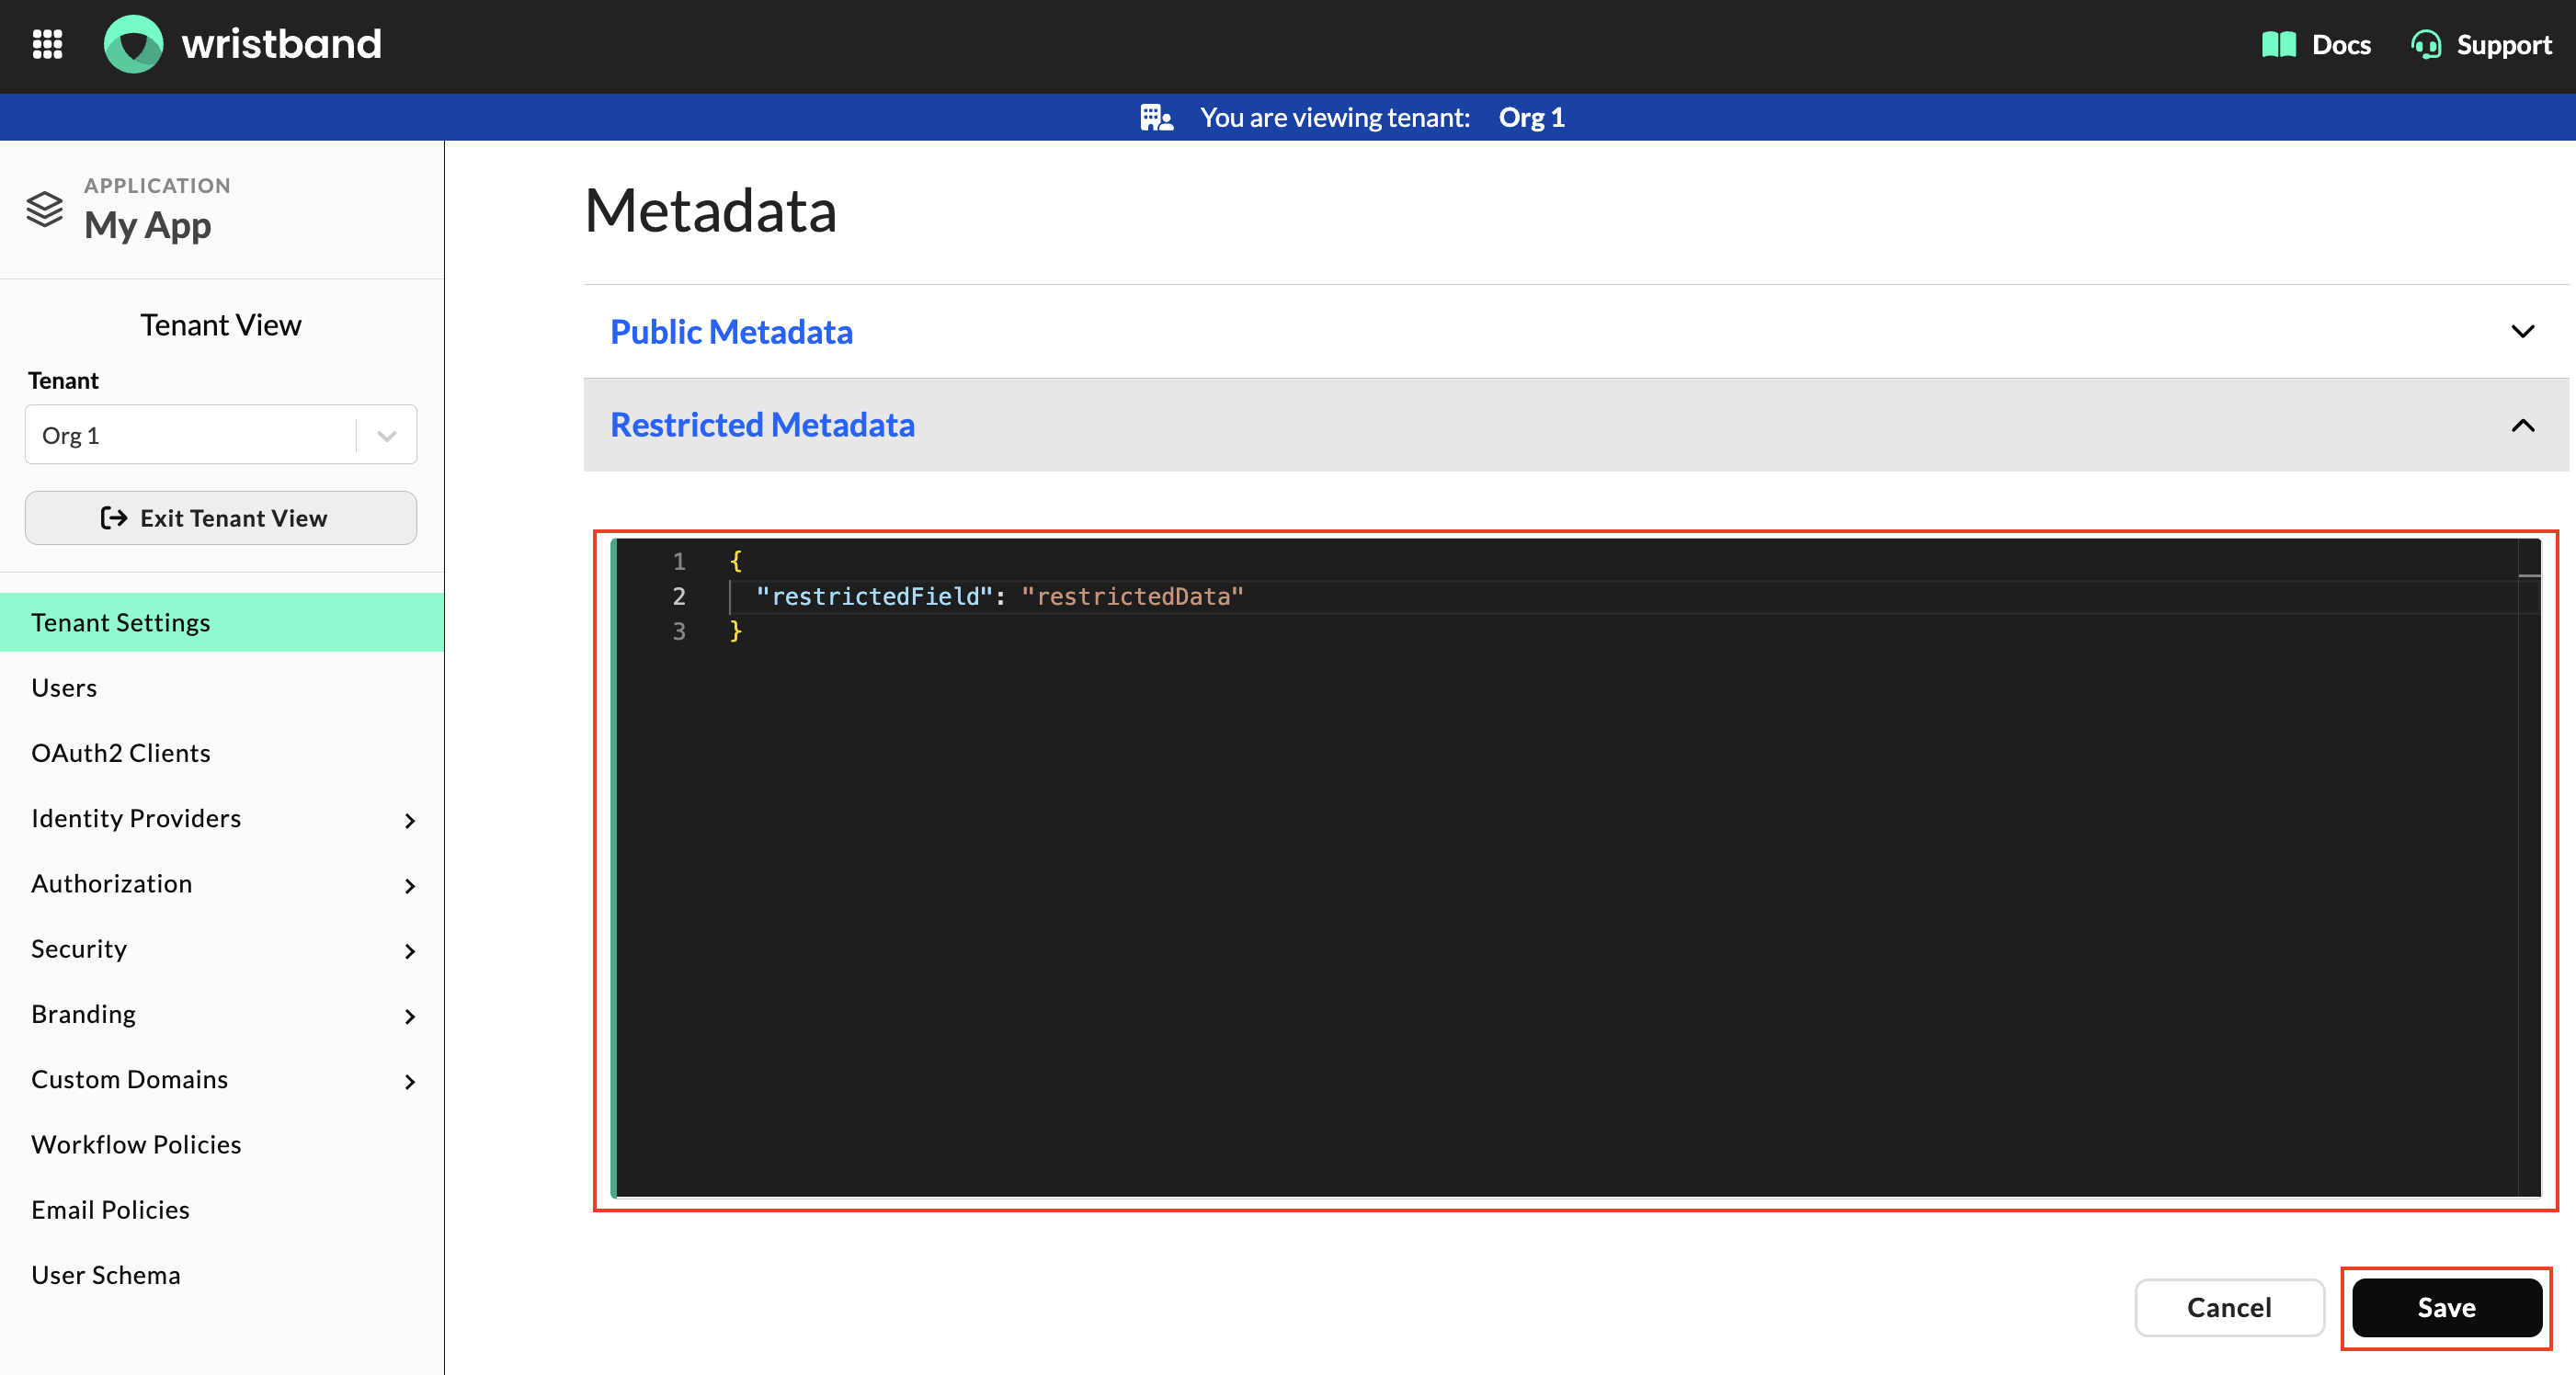
Figure 21: Configure restricted metadata for your tenant.
Custom Metadata RequirementsBoth Public Metadata and Restricted Metadata must be valid JSON objects and are subject to size, nesting, and field naming restrictions.
For more information, including examples and supported limits, see the Custom Metadata section.
Viewing Tenant Details
You can view your tenant's identifying information and configuration details directly from the Wristband Dashboard.
To view your tenant's details:
- On the Tenant Settings page, locate the tenant information panel at the top of the page.
- Review the following tenant details:
- ID: The unique identifier assigned to your Wristband tenant, used when interacting with certain Wristband APIs.
- Tenant Name: The tenant's unique name within your application.
- Default Vanity Domain: The default domain assigned to your tenant by Wristband, used to construct tenant-level authentication URLs and other Wristband API URLs.
- Active Custom Domain: The tenant's active custom domain, if one has been configured.
- Creation Time: The date and time the tenant was created.
- Last Modified Time: The date and time the tenant was last updated.
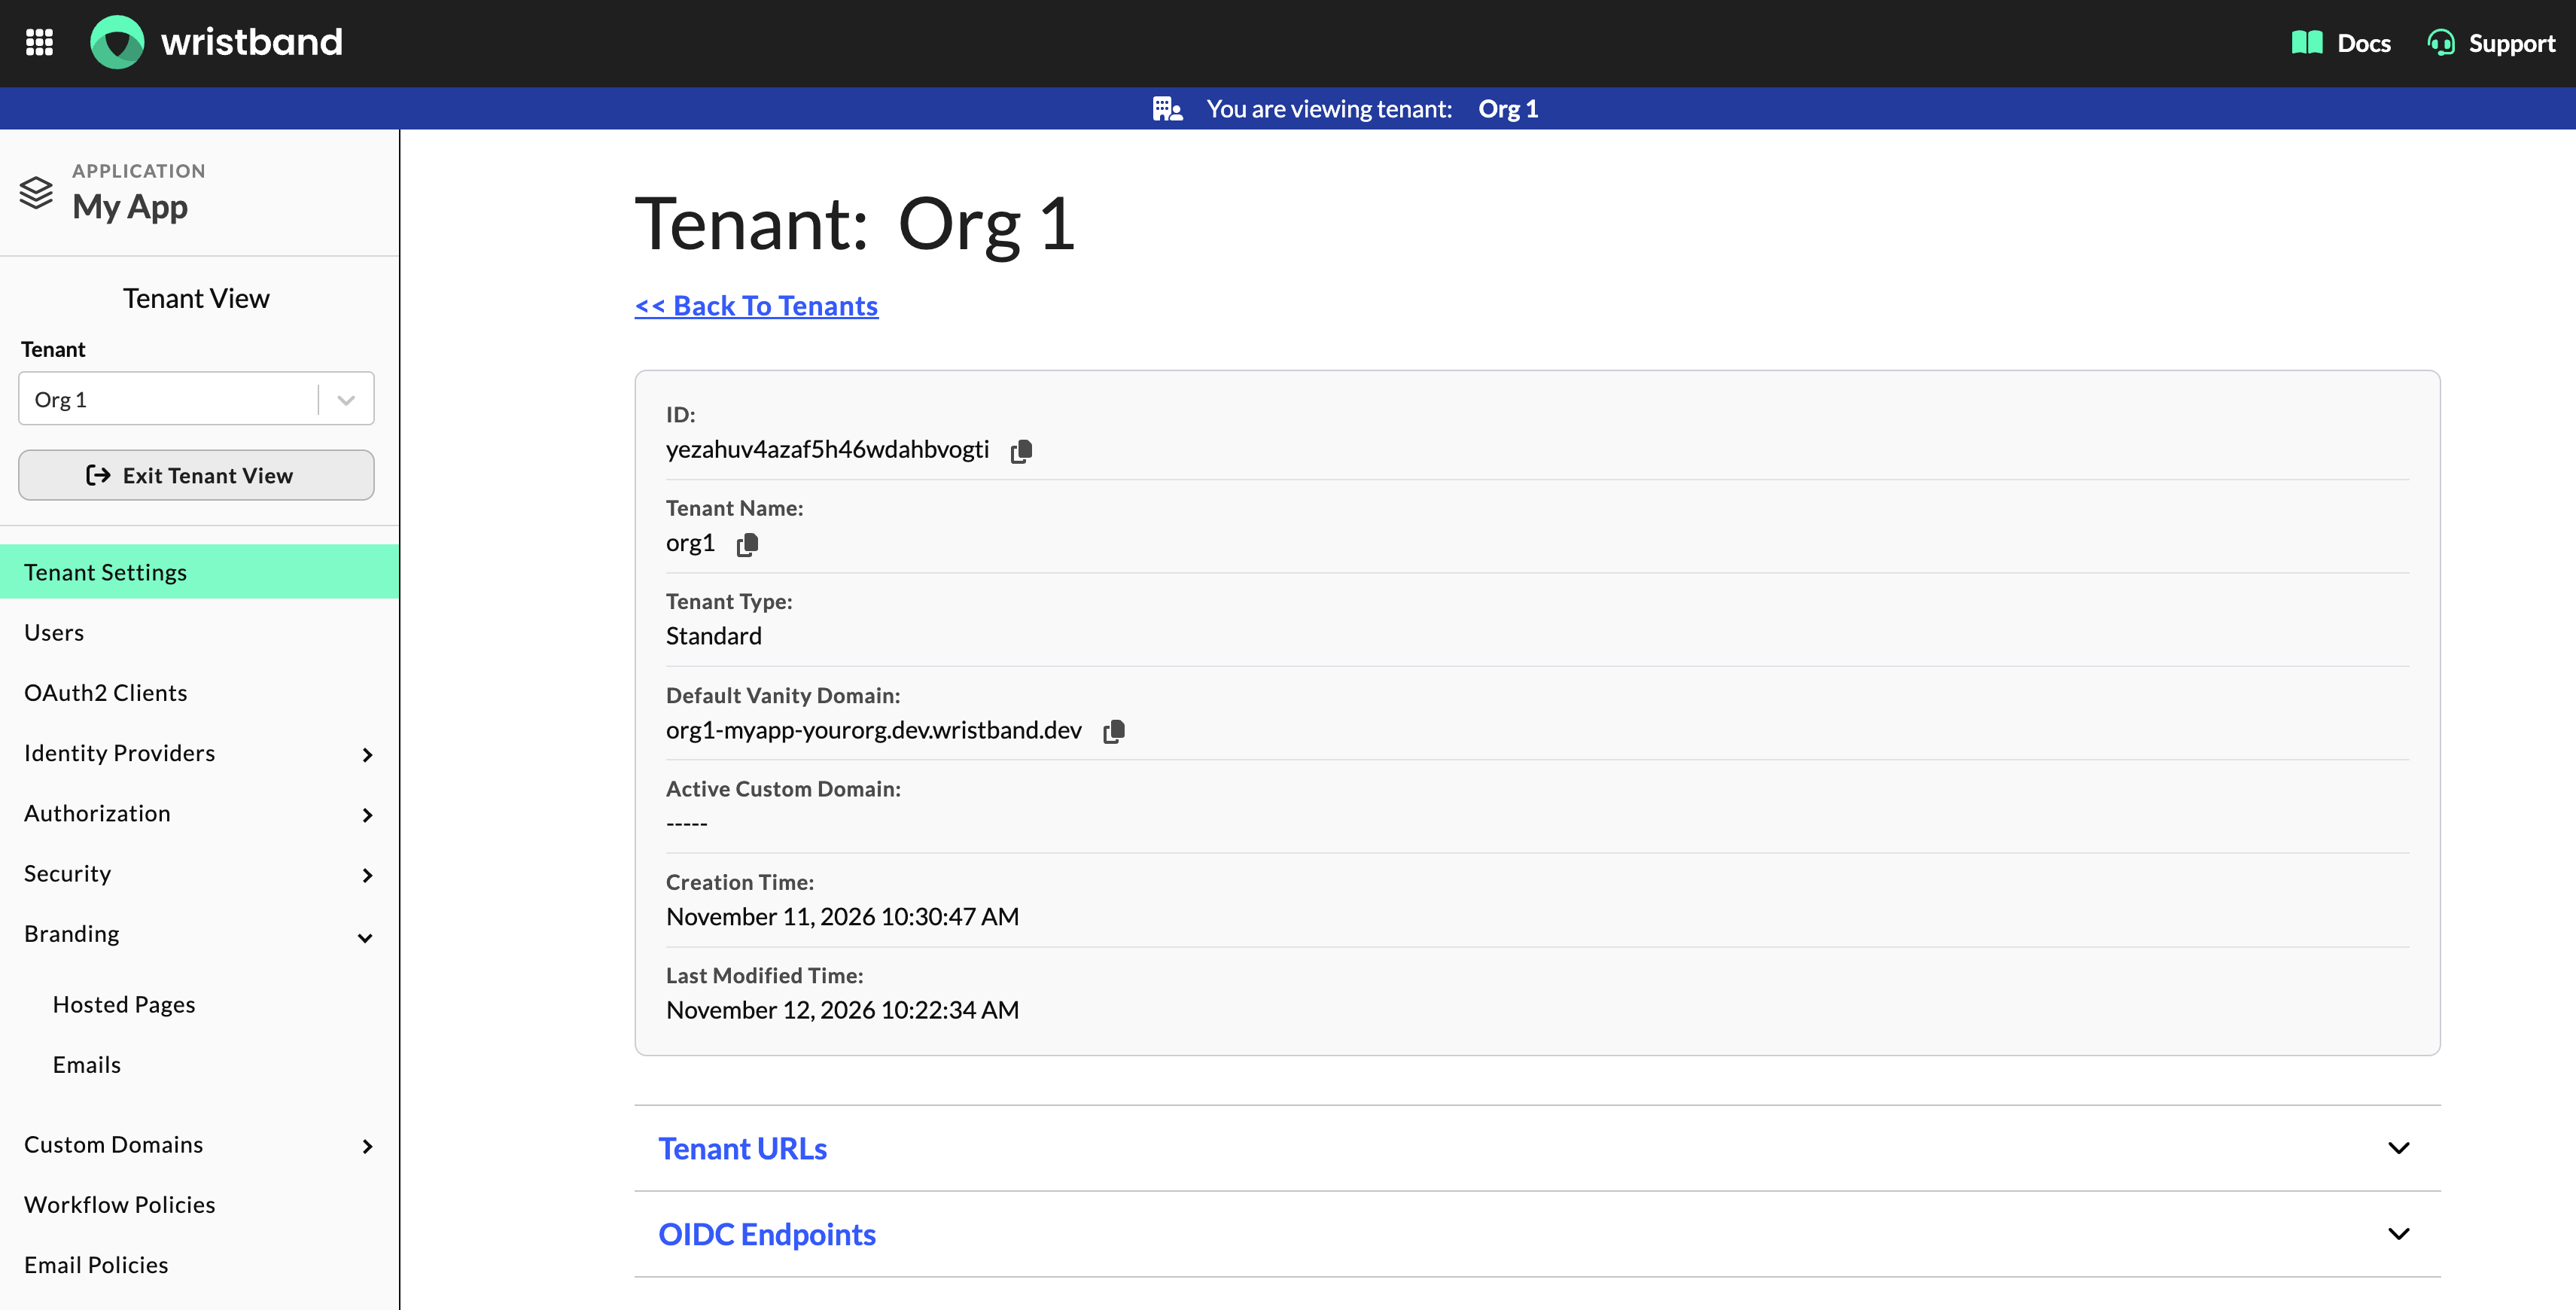
Figure 22: Viewing tenant details in the Wristband Dashboard.
Viewing Tenant Login and Signup URLs
You can view, copy, and open your tenant's login and signup URLs directly from the Wristband Dashboard.
To view these URLs:
- On the Tenant Settings page, expand the Tenant URLs section.
- Locate the following URLs:
- Tenant-level Signup URL: Directs users to Wristband's hosted signup page, where they can self-register for an account within the tenant.
- Tenant-level Login URL: Directs users to Wristband's hosted login page for the tenant.
- Click the copy icon next to either URL to copy it to your clipboard, or click the open icon to open it in a new browser tab.
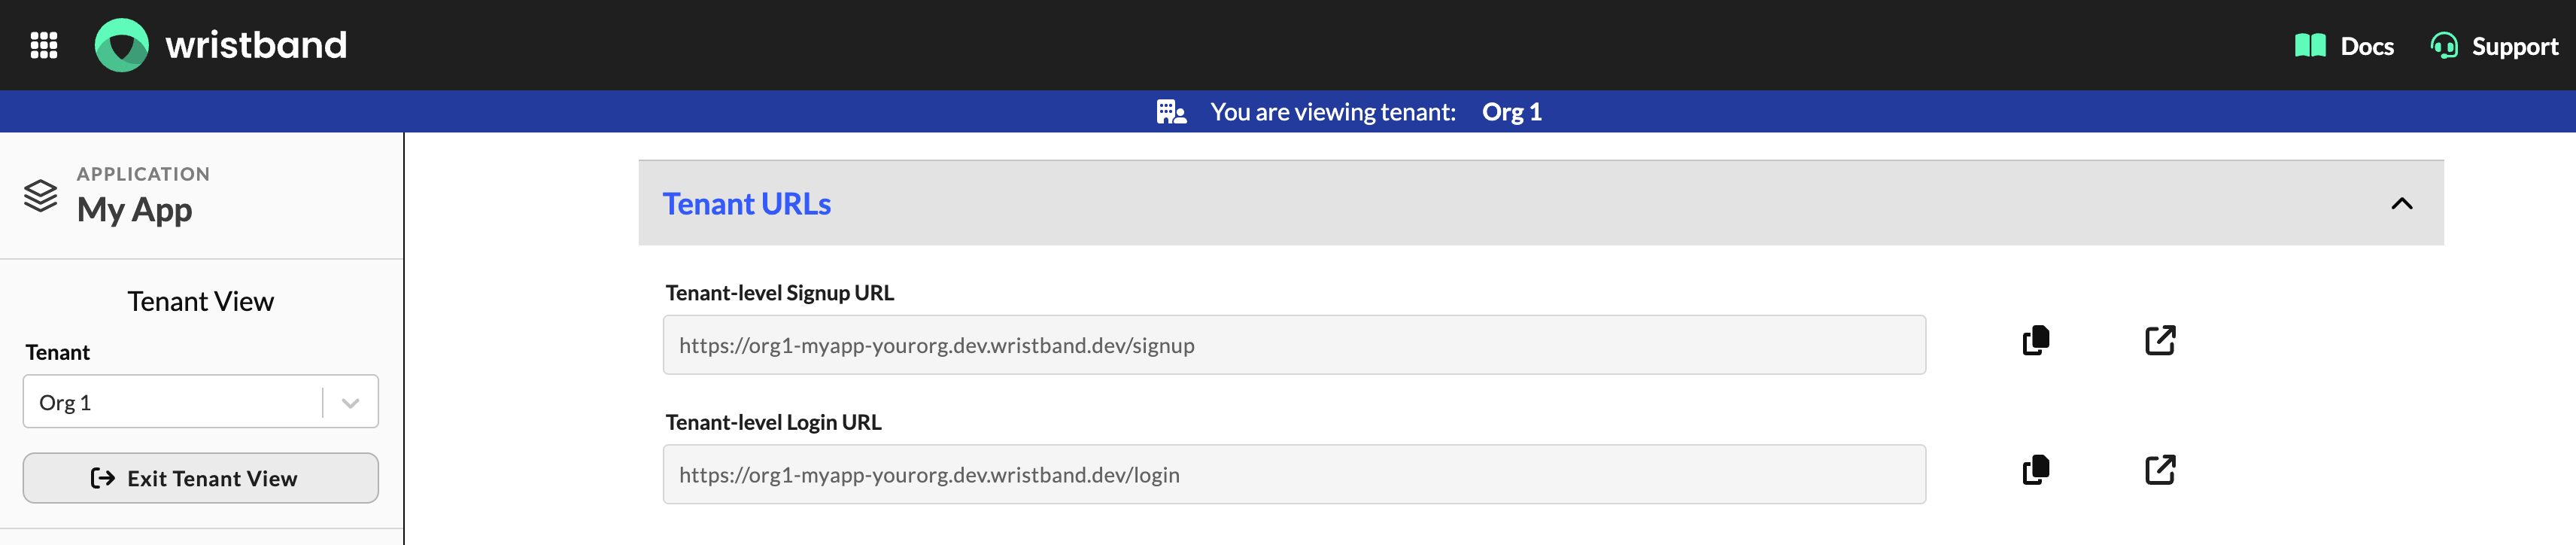
Figure 23: Viewing tenant-level login and signup URLs.
Tenant-Level Signup RequirementsTenant-level signup must be enabled for users to access the hosted signup page. If disabled, navigating to the Tenant-level Signup URL will display an error page.
See Enabling Tenant-Level Signups for more information.
Tenant-Level Login RequirementsThe Tenant-level Login URL initiates authentication by redirecting users to your application's Login Endpoint with query parameters identifying the tenant. Your Login Endpoint must then redirect users to the tenant's Authorize Endpoint to continue the authentication flow.
For this flow to work, your application's Login URL must point to a correctly implemented Login Endpoint. Otherwise, users may encounter an error page during authentication.
For more information, see the Login URL documentation.
Viewing OIDC Endpoints
You can view and copy your tenant's OpenID Connect (OIDC) endpoint URLs directly from the Wristband Dashboard. These endpoints are used to integrate your application with Wristband's authentication services.
To view your tenant's OIDC endpoints:
- On the Tenant Settings page, expand the OIDC Endpoints section.
- Review the available endpoint URLs, including the tenant-specific Authorization URL and OIDC Configuration URL.
- Click the copy icon next to any endpoint URL to copy it to your clipboard.
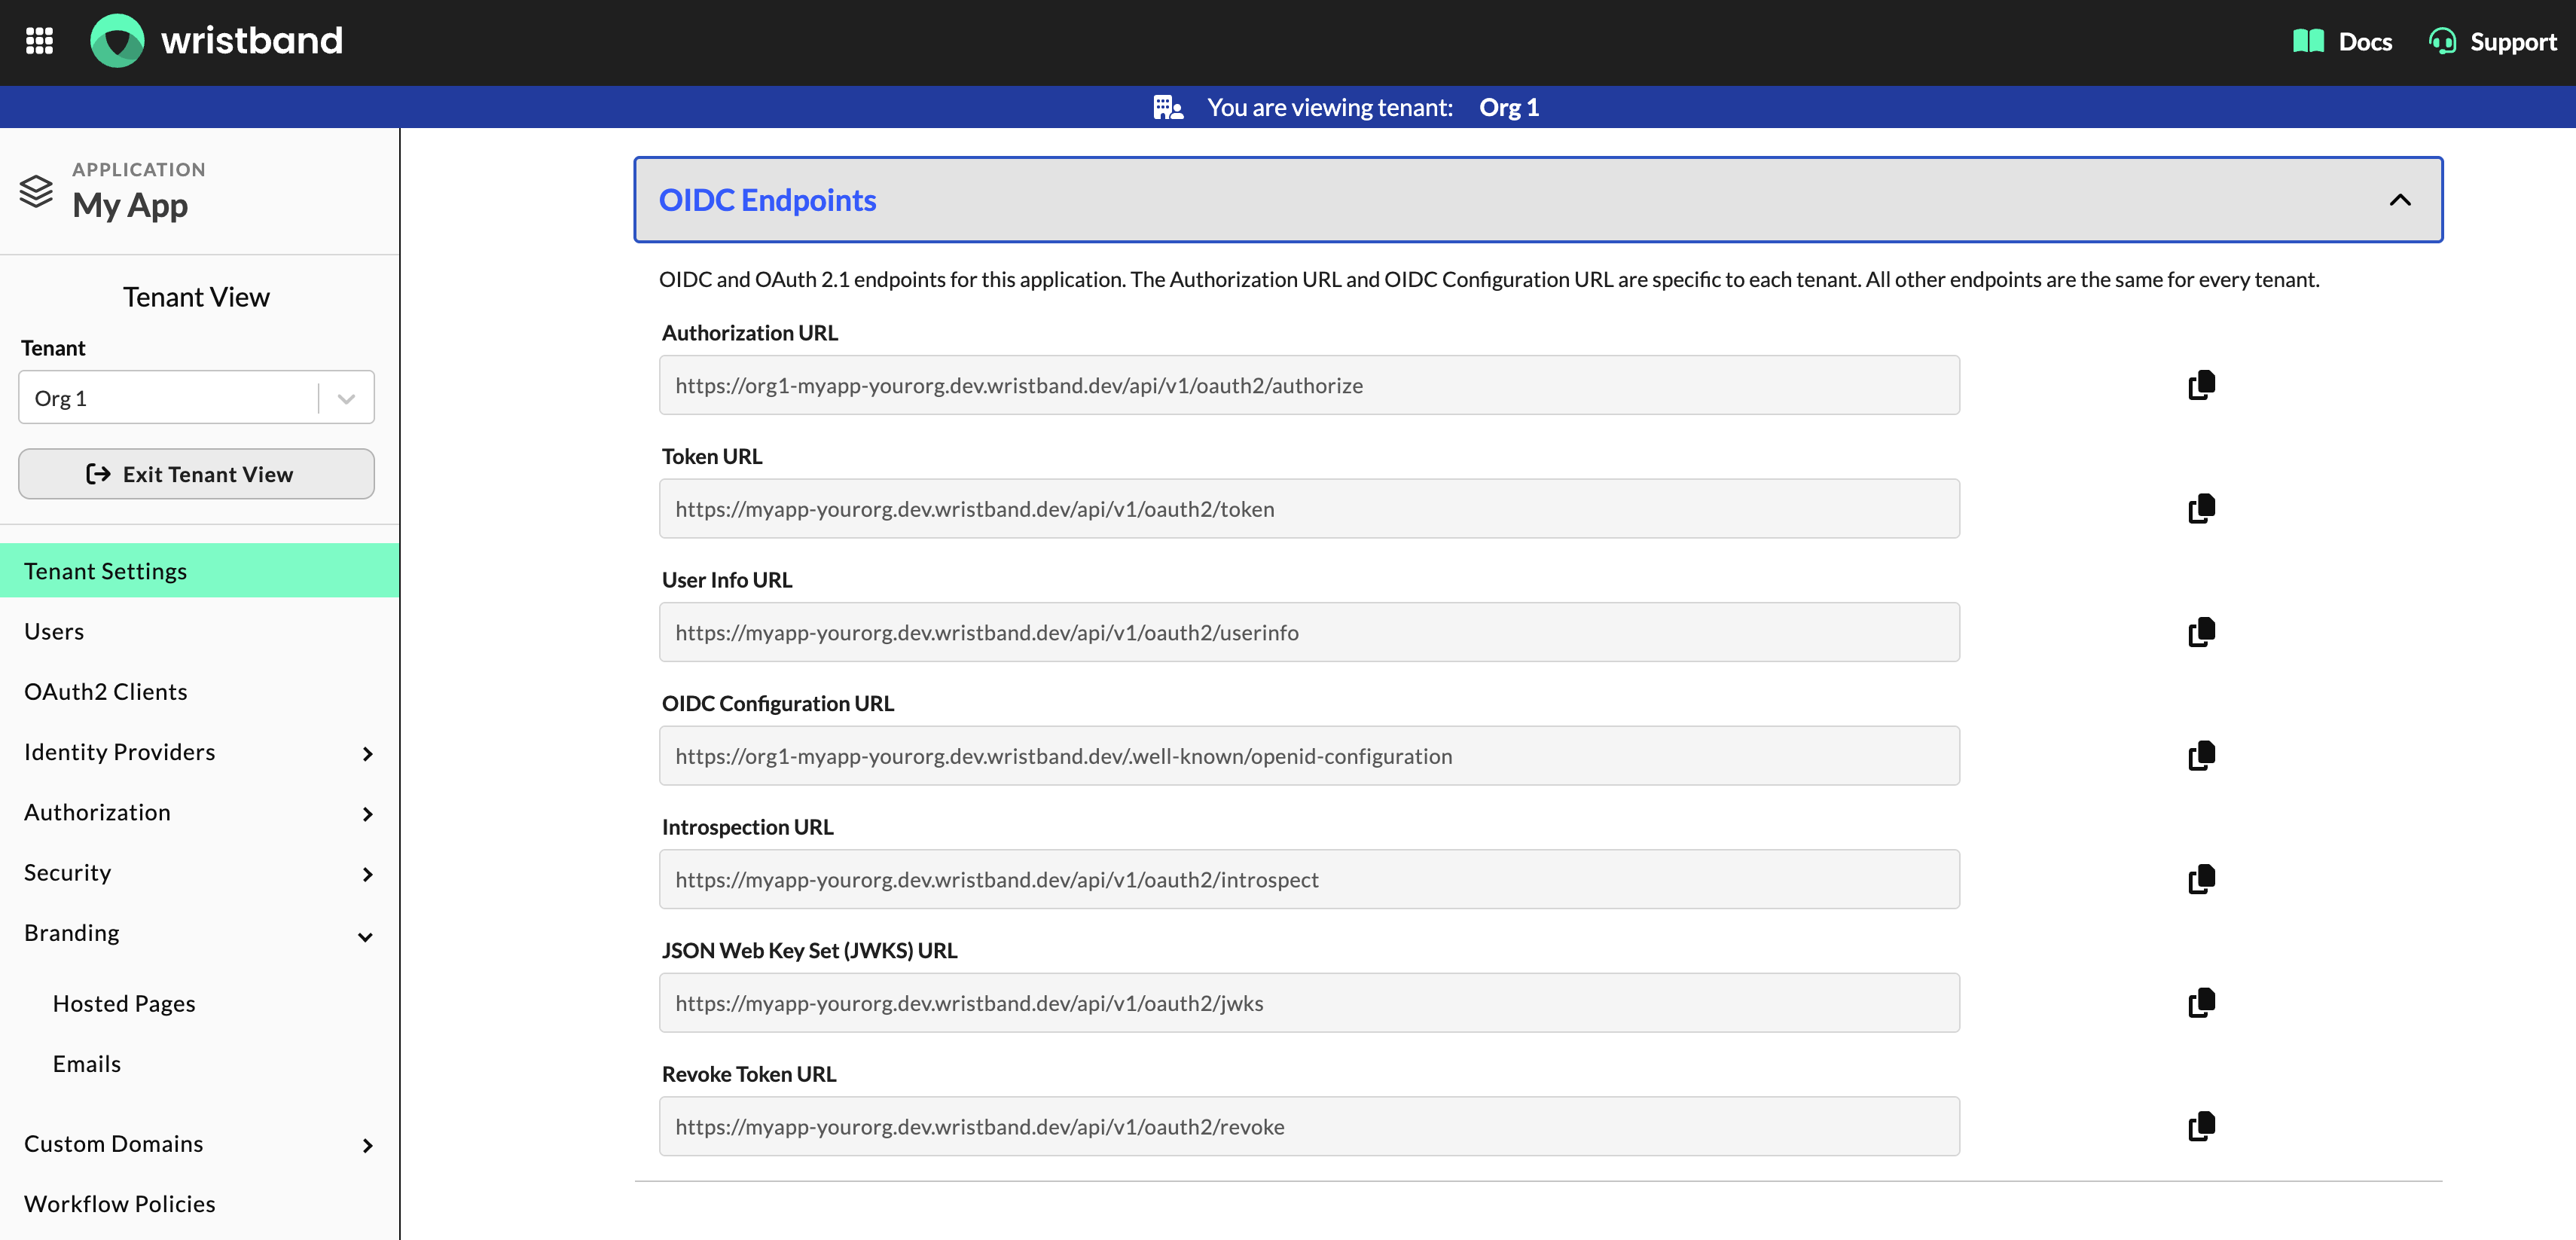
Figure 24: Viewing tenant-level OIDC endpoints.
Tenant-Specific vs. Shared EndpointsEach tenant has its own Authorization URL and OIDC Configuration URL. All other endpoints, including the Token, User Info, Introspection, JWKS, and Revoke Token endpoints, are shared across the application and its tenants.
Viewing and Managing Tenant Overrides
By default, tenants inherit their configuration settings from the parent application. You can enable tenant-level overrides to customize specific settings for individual tenants without affecting other tenants in the application.
The Override Configurations section provides an overview of which tenant-level overrides are currently enabled. You can also enable or disable individual overrides directly from this section.
To view and manage tenant overrides:
- On the Tenant Settings page, locate the Override Configurations section.
- Each toggle indicates whether the corresponding tenant-level override is enabled:
- Enabled: The tenant uses its own configuration instead of inheriting the application's configuration.
- Disabled: The tenant inherits the corresponding configuration from its parent application.
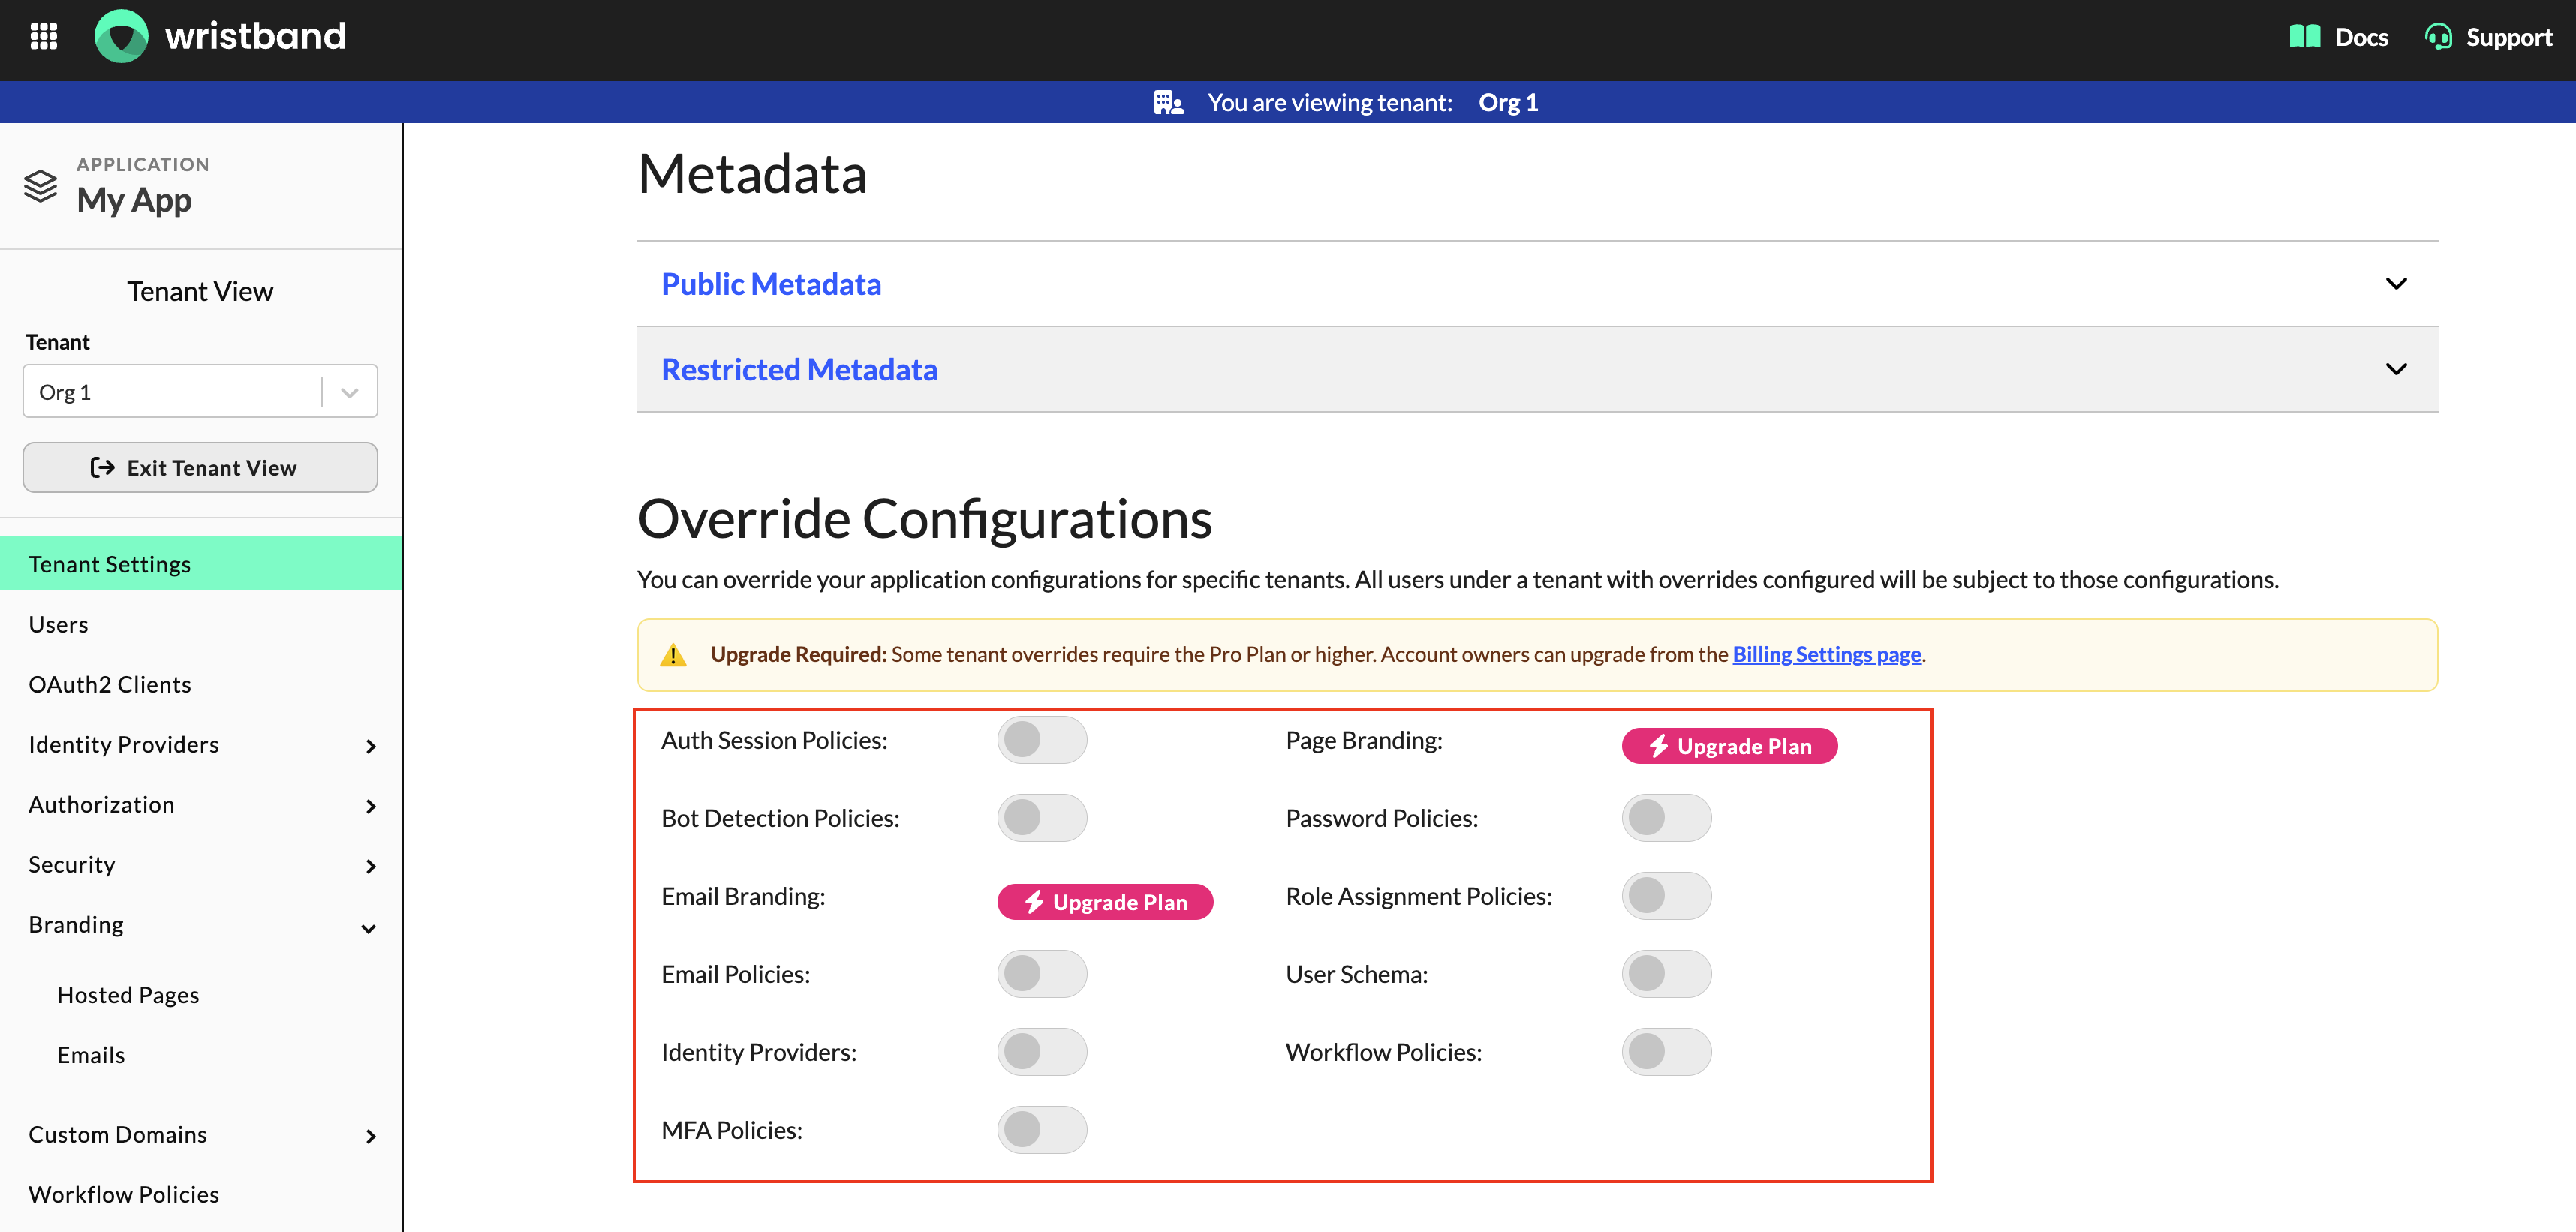
Figure 25: View and manage tenant-level configuration overrides.
Configuring Tenant OverridesTenant overrides should generally be enabled from the corresponding policy or configuration page, where you can make tenant-specific changes and enable the override as part of the same workflow.
The Override Configurations section on the Tenant Settings page is primarily intended to provide an overview of enabled overrides and a convenient way to manage their status.
For more information, see the Tenant Override System documentation.
Subscription RequirementsSome tenant-level overrides require the Pro Plan or higher. If an override is unavailable under your current subscription, the Dashboard displays an Upgrade Plan badge instead of a configuration toggle.
Activating and Deactivating a Tenant
You can activate or deactivate a tenant through the Wristband Dashboard. The available action depends on the tenant's current status.
To activate or deactivate a tenant:
- On the Tenant Settings page, locate the Status Settings section.
- Depending on the tenant's current status:
- Active: Click Deactivate to change the tenant's status to
INACTIVE. - Inactive: Click Activate to change the tenant's status to
ACTIVE.
- Active: Click Deactivate to change the tenant's status to
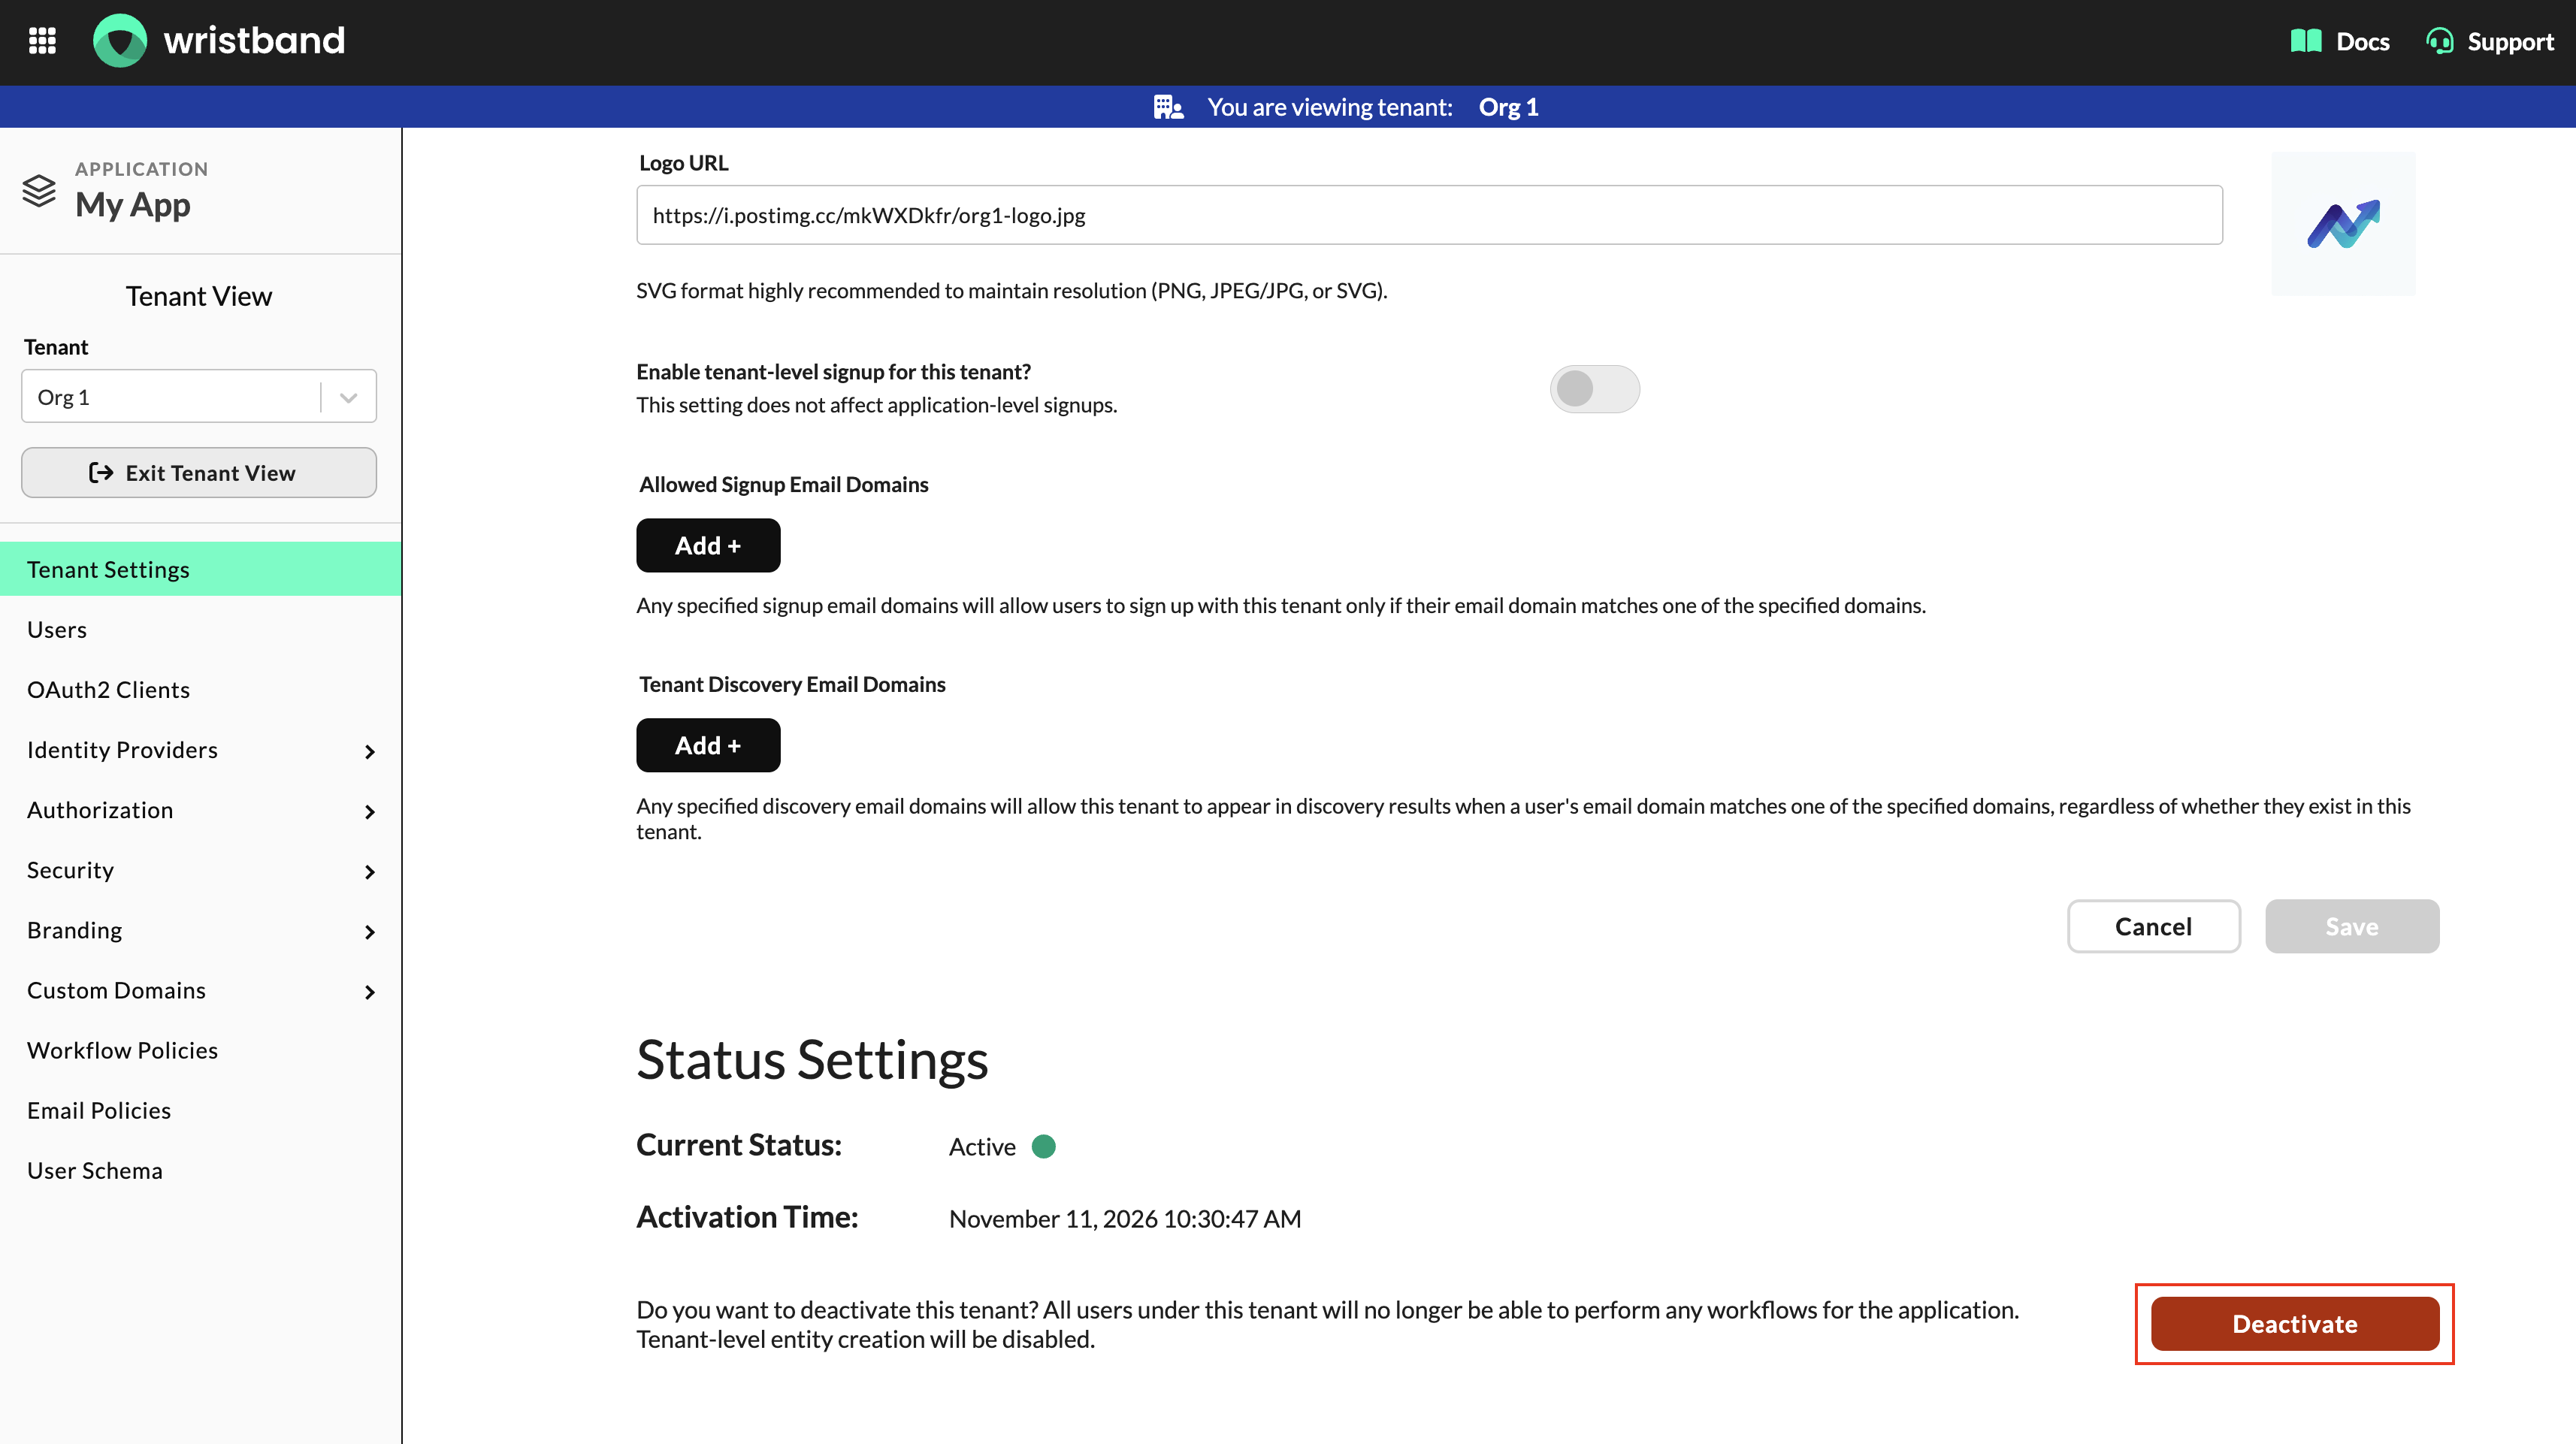
Figure 26: Deactivating a tenant.
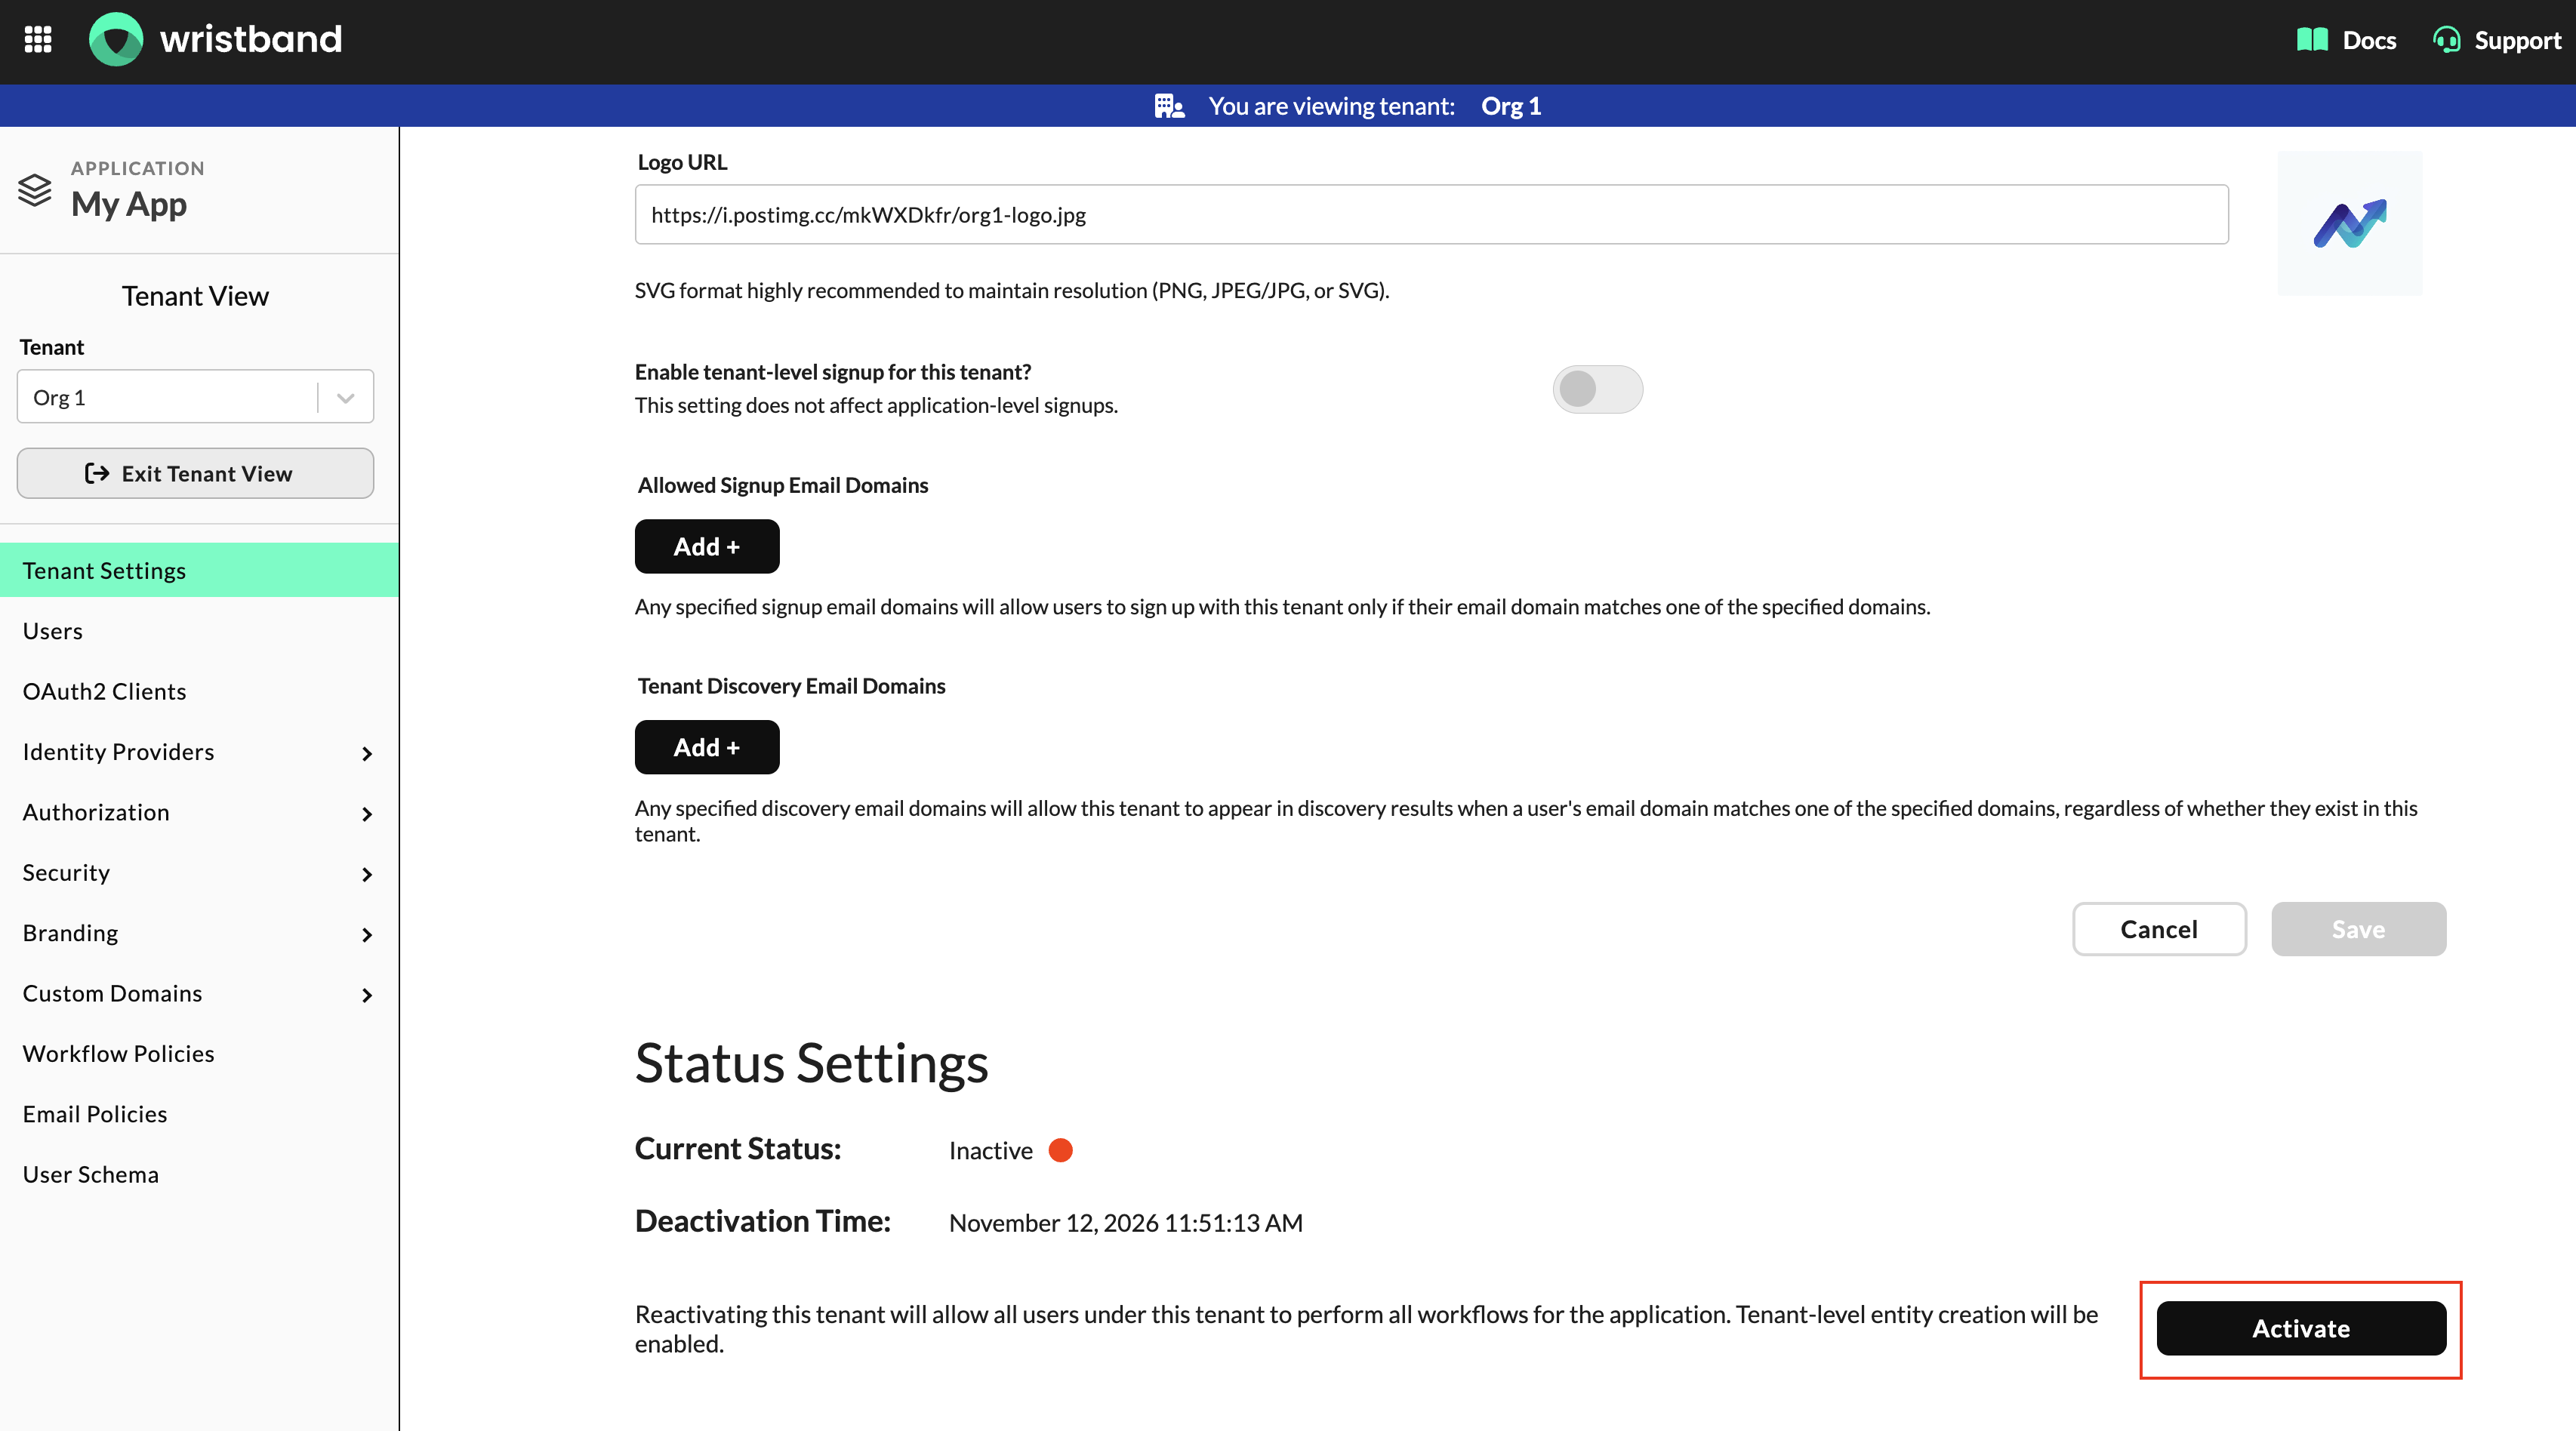
Figure 27: Activating a tenant.
For more information about how deactivation affects authentication and tenant resources, see Deactivating a Tenant.
Deleting a Tenant
You can permanently delete a tenant and all its associated resources through the Wristband Dashboard.
To delete a tenant:
- On the Tenant Settings page, locate the Delete Tenant button.
- Click Delete Tenant.
- Follow the confirmation prompt to permanently delete the tenant.
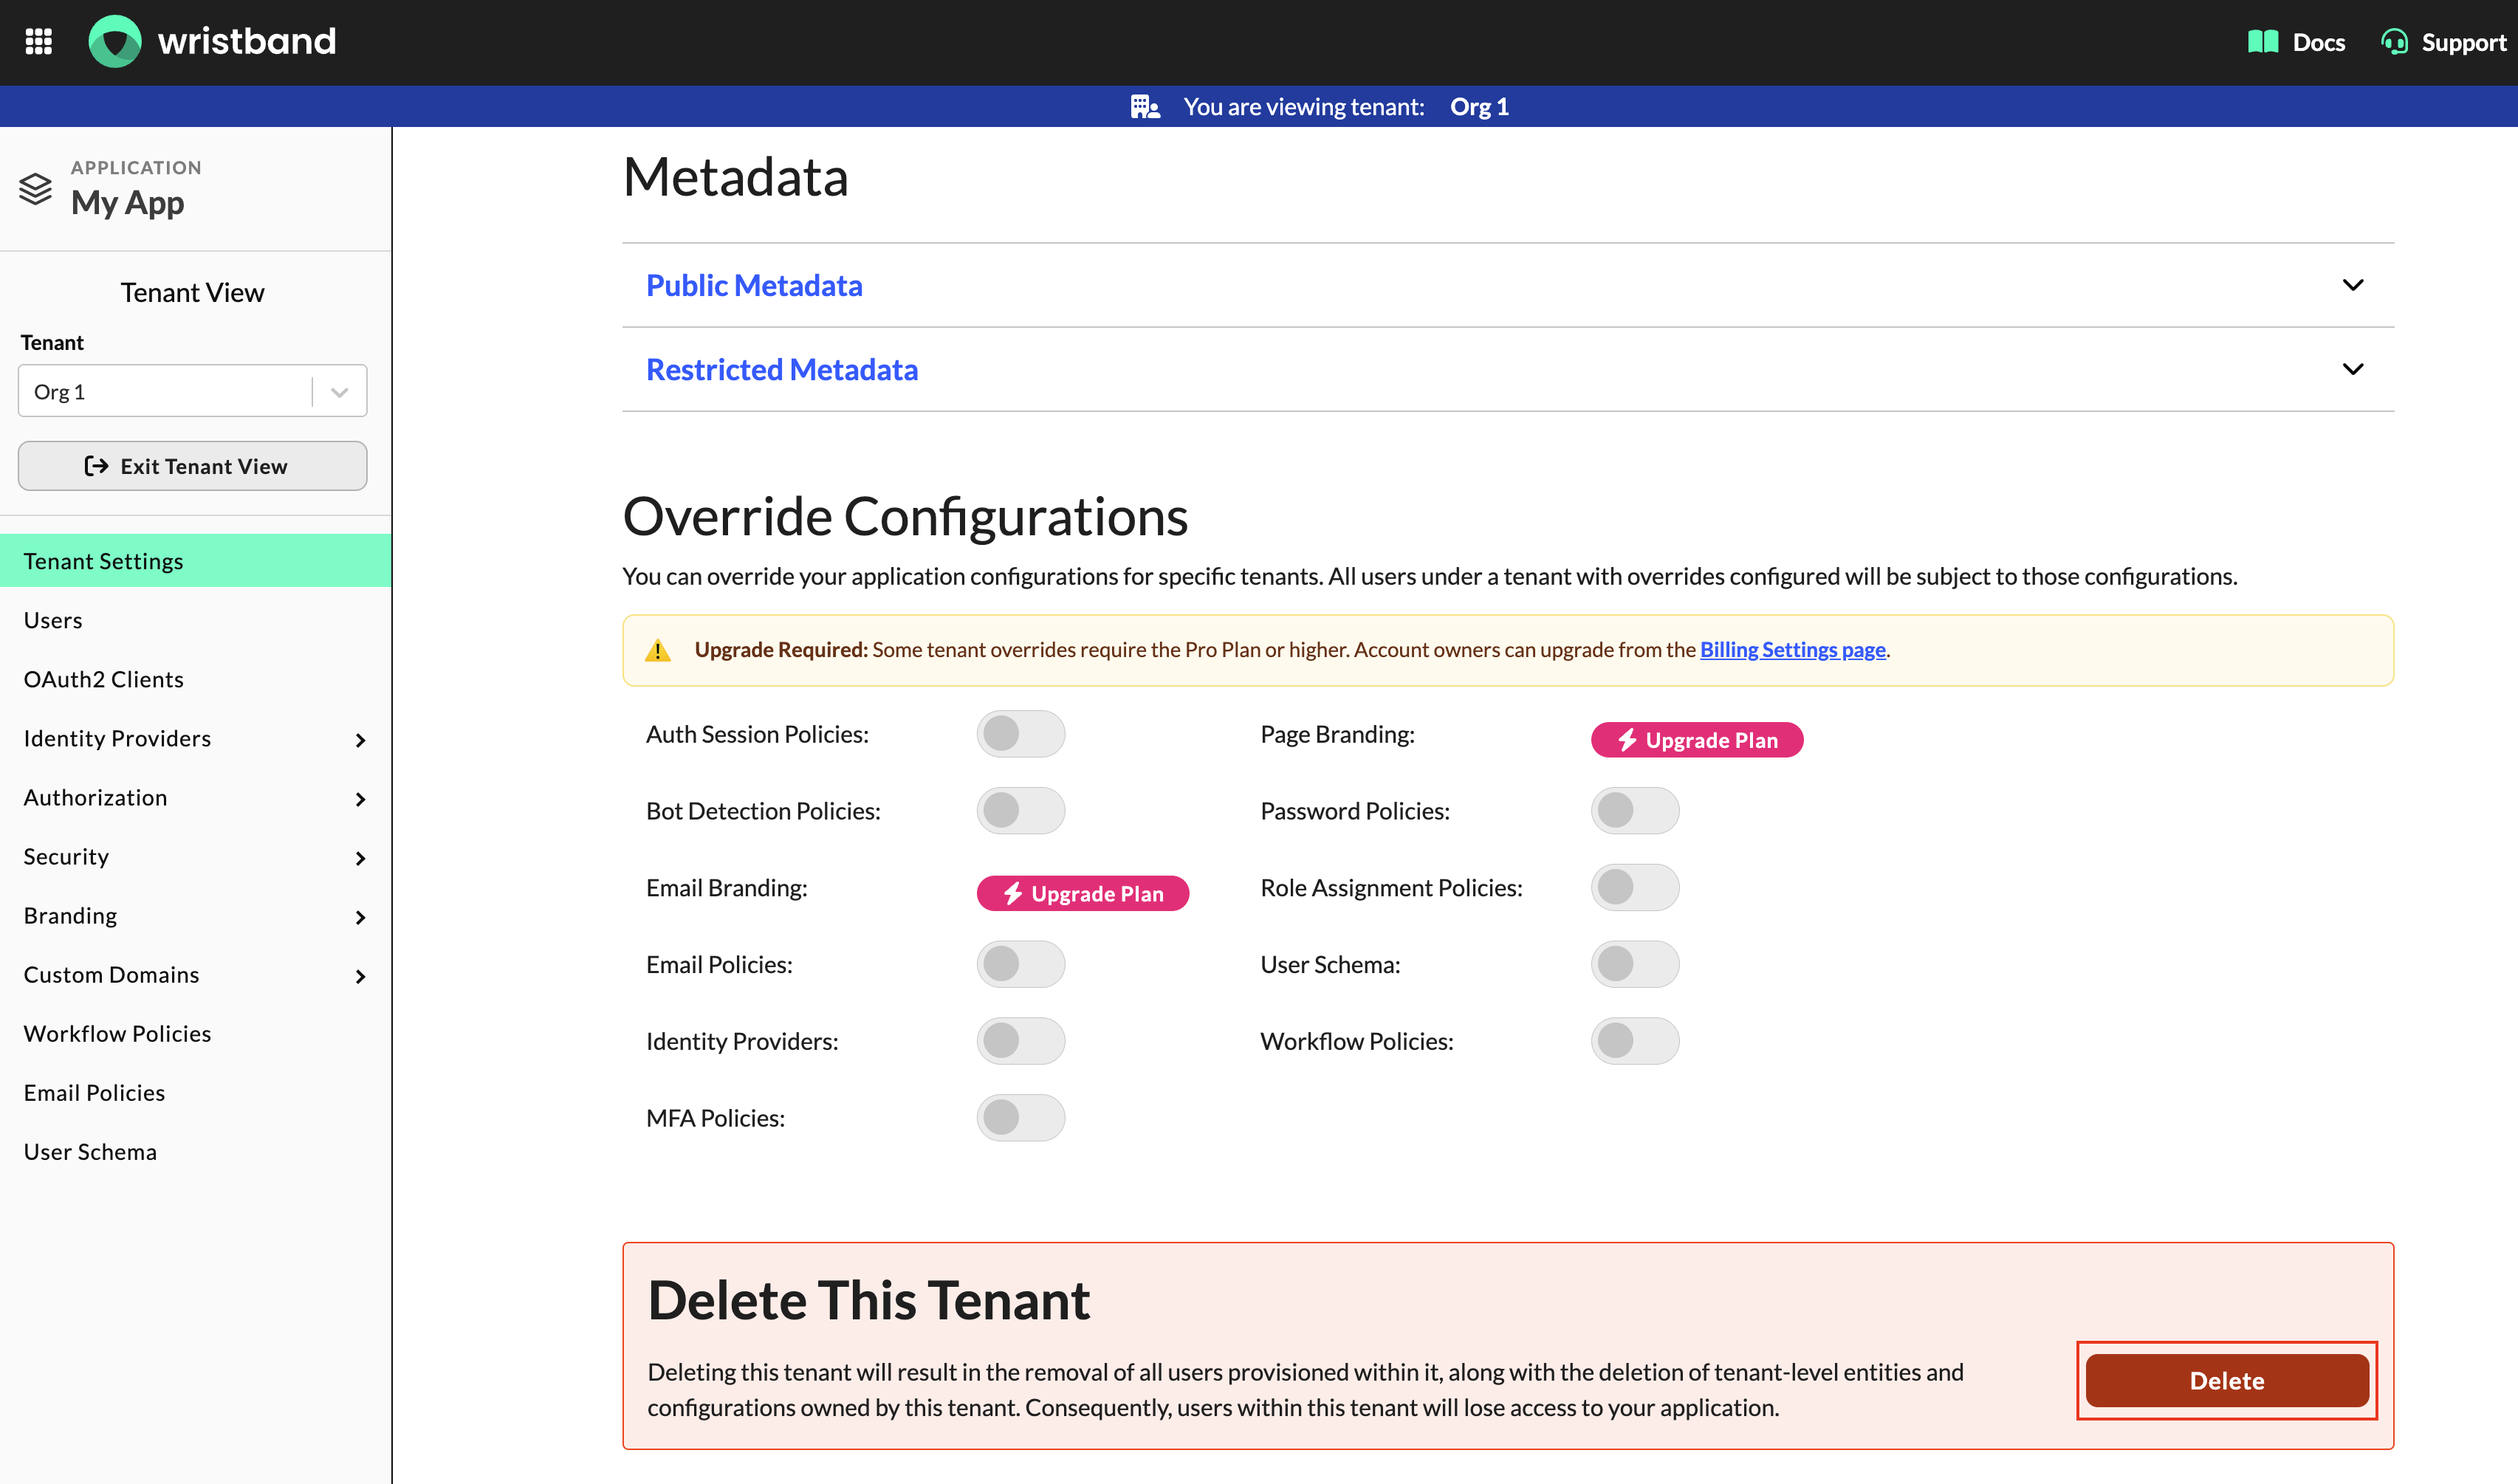
Figure 28: Deleting a tenant.
Updated 5 days ago