
Microsoft
Setting Up a Microsoft Integration
Follow this step-by-step walkthrough to configure Microsoft social authentication for your Wristband application.
1. Locate Your External IdP Callback URL
- In the Wristband dashboard, enter Application View for the application you wish to establish a Microsoft integration.
- Navigate to the
Identity Providers > Socialmenu in the side navigation. - After landing on the Social Identity Providers page, select the Microsoft provider icon at the top.
- Locate the Redirect URL field near the bottom of the form and click the copy button to save the value. You will need it for the configuration steps below.
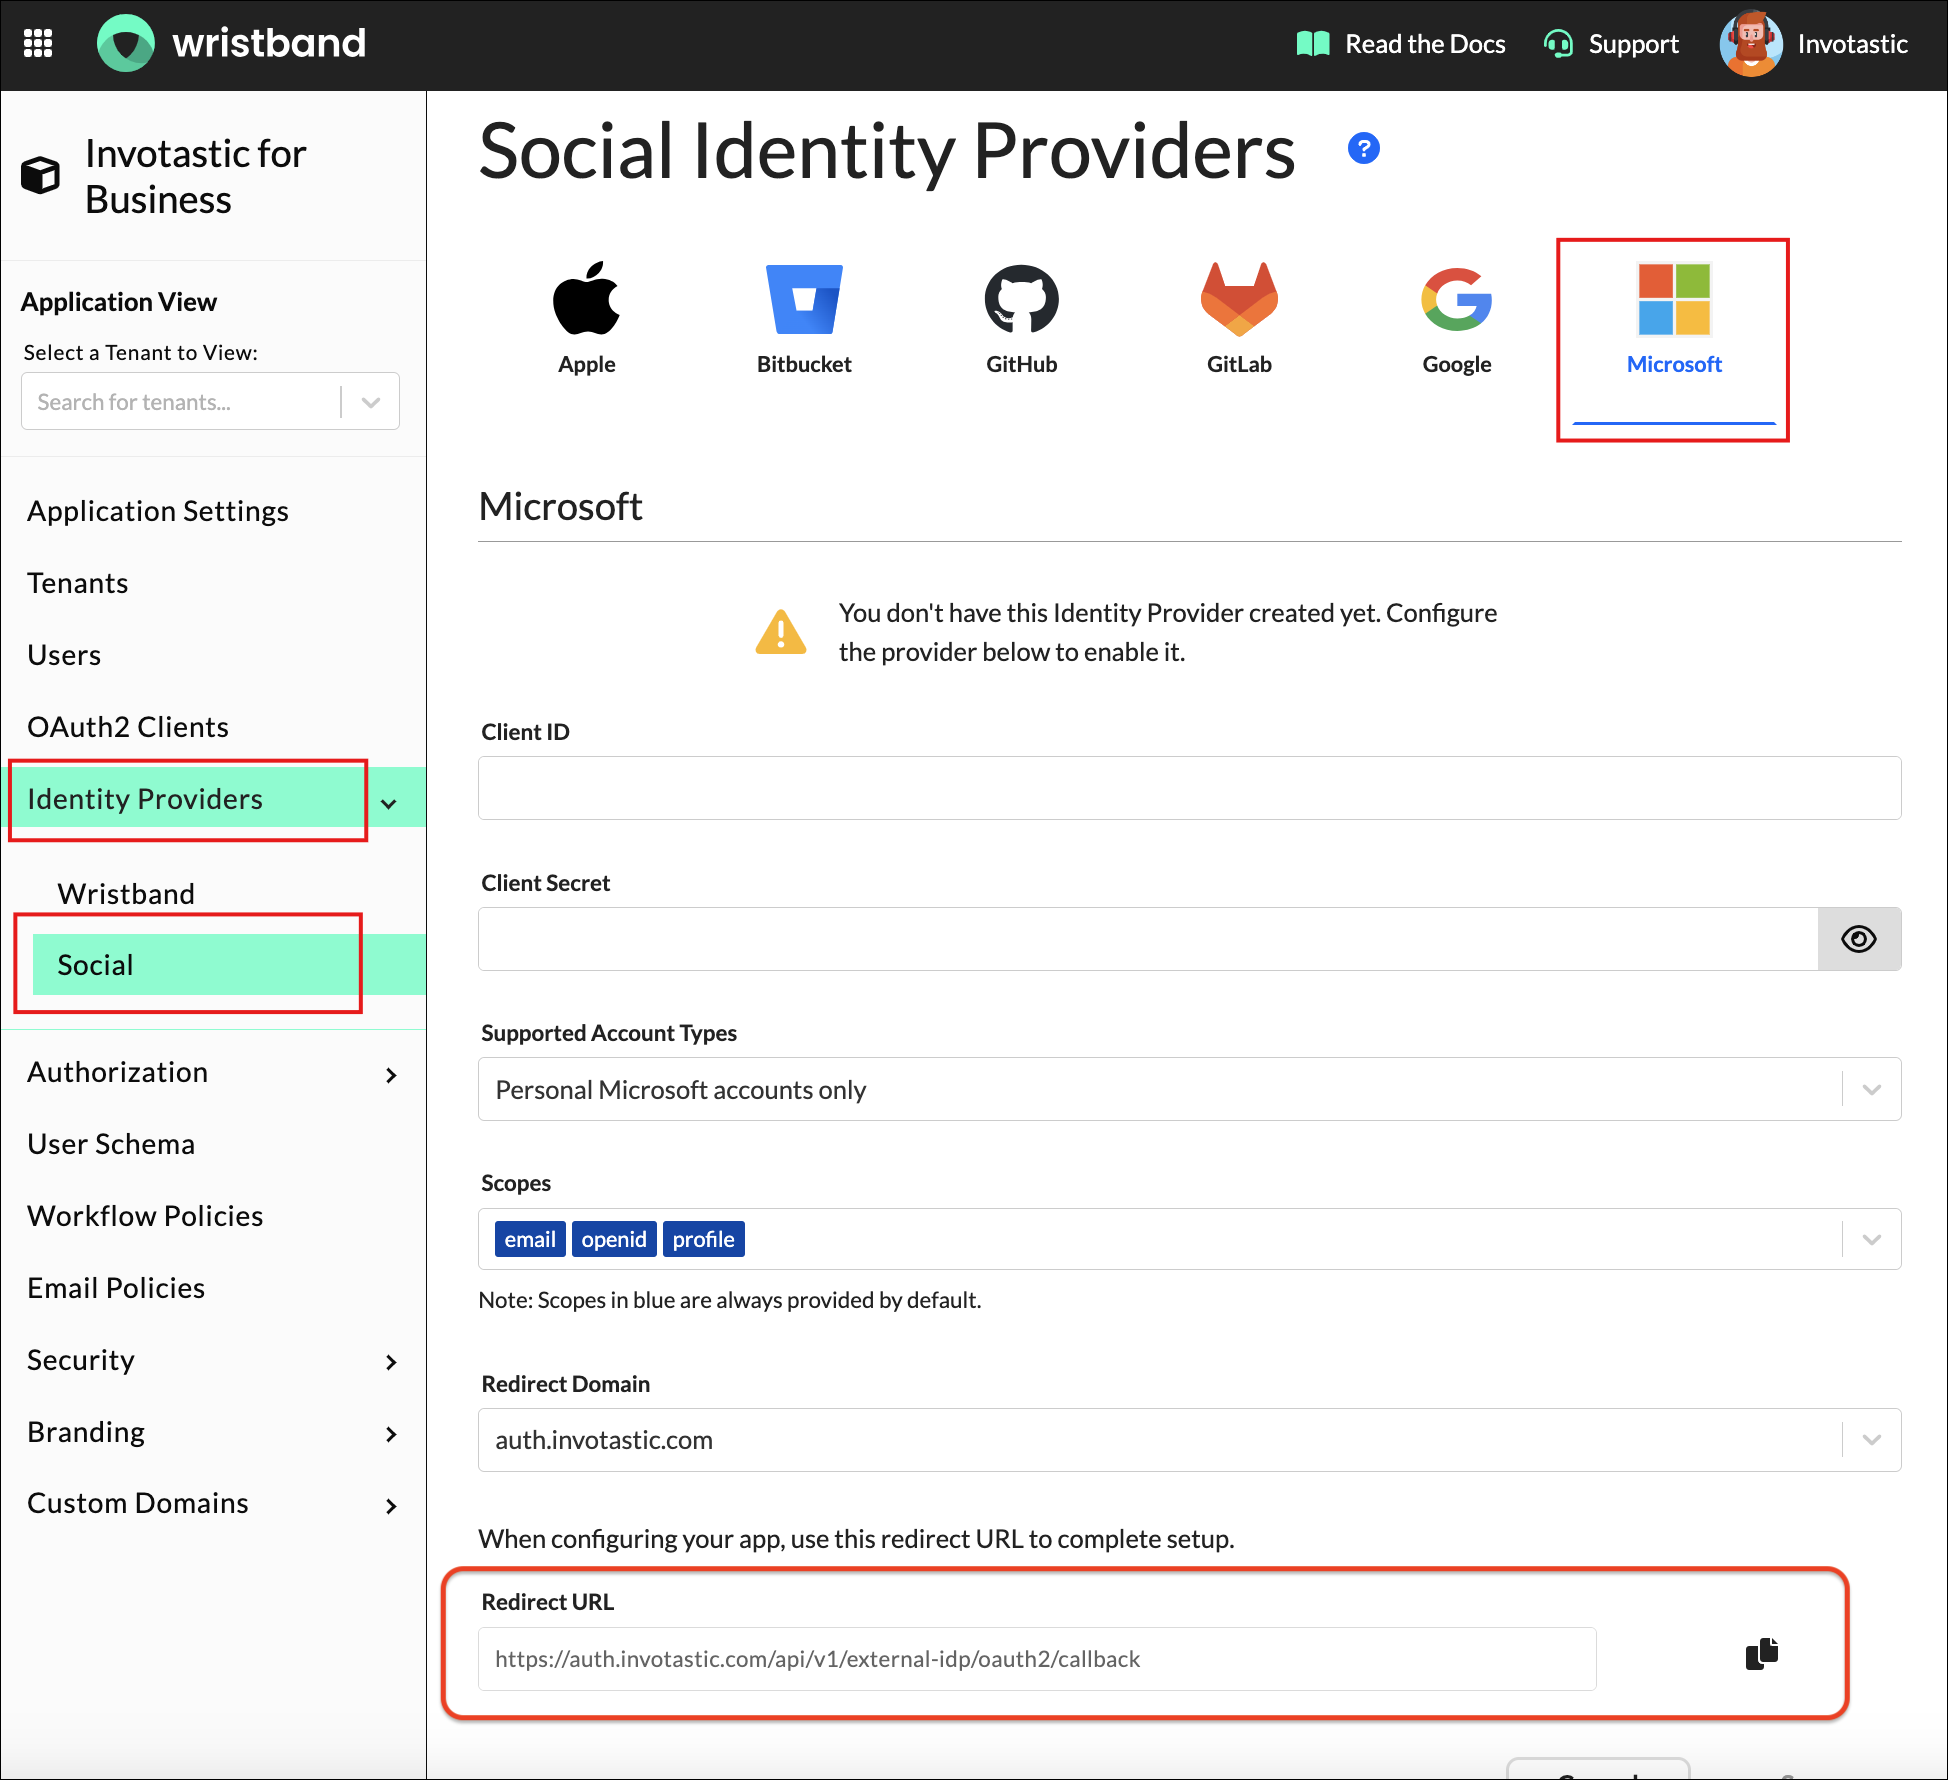
Figure 1: Copy the Microsoft provider’s Redirect URL from Wristband.
2. Sign Up/Login to Your Account
- Ensure you have a registered Microsoft Azure account.
- Navigate to the Microsoft Azure Console before finalizing your Wristband dashboard configuration.
https://azure.microsoft.com/en-us/free
3. Register a New Application
- Search for "Microsoft Entra ID" in the top navigation bar of the Azure dashboard.
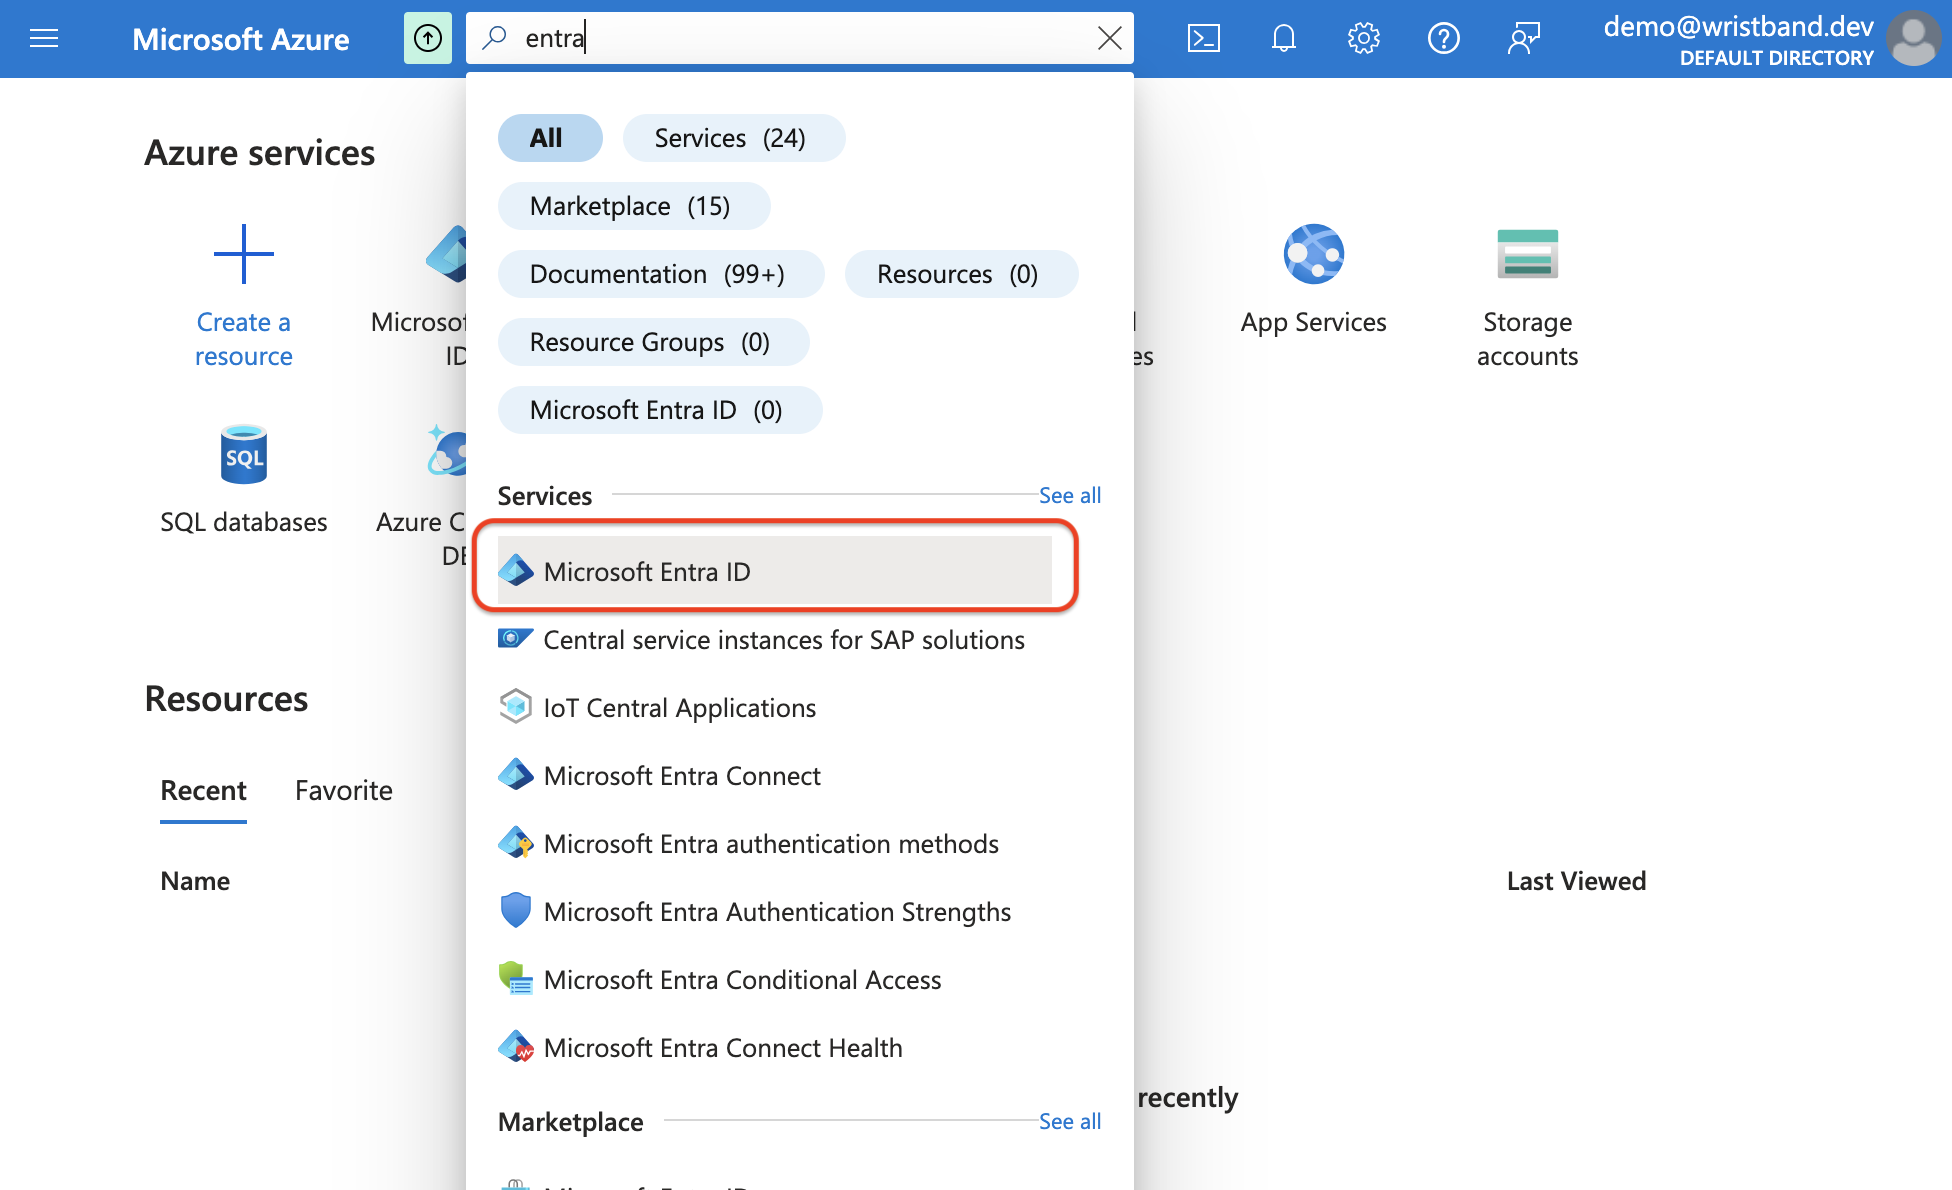
Figure 2: Search for Microsoft Entra ID in the Azure dashboard.
Microsoft Tenants
When you choose the Entra ID service, Microsoft will direct you to the Overview Page of your default tenant. If necessary, you can also create and switch to another tenant.
2. From the Entra ID Overview page, click App registrations in the left-hand menu.
3. Click the New registration button at the top of the page to start creating your application.
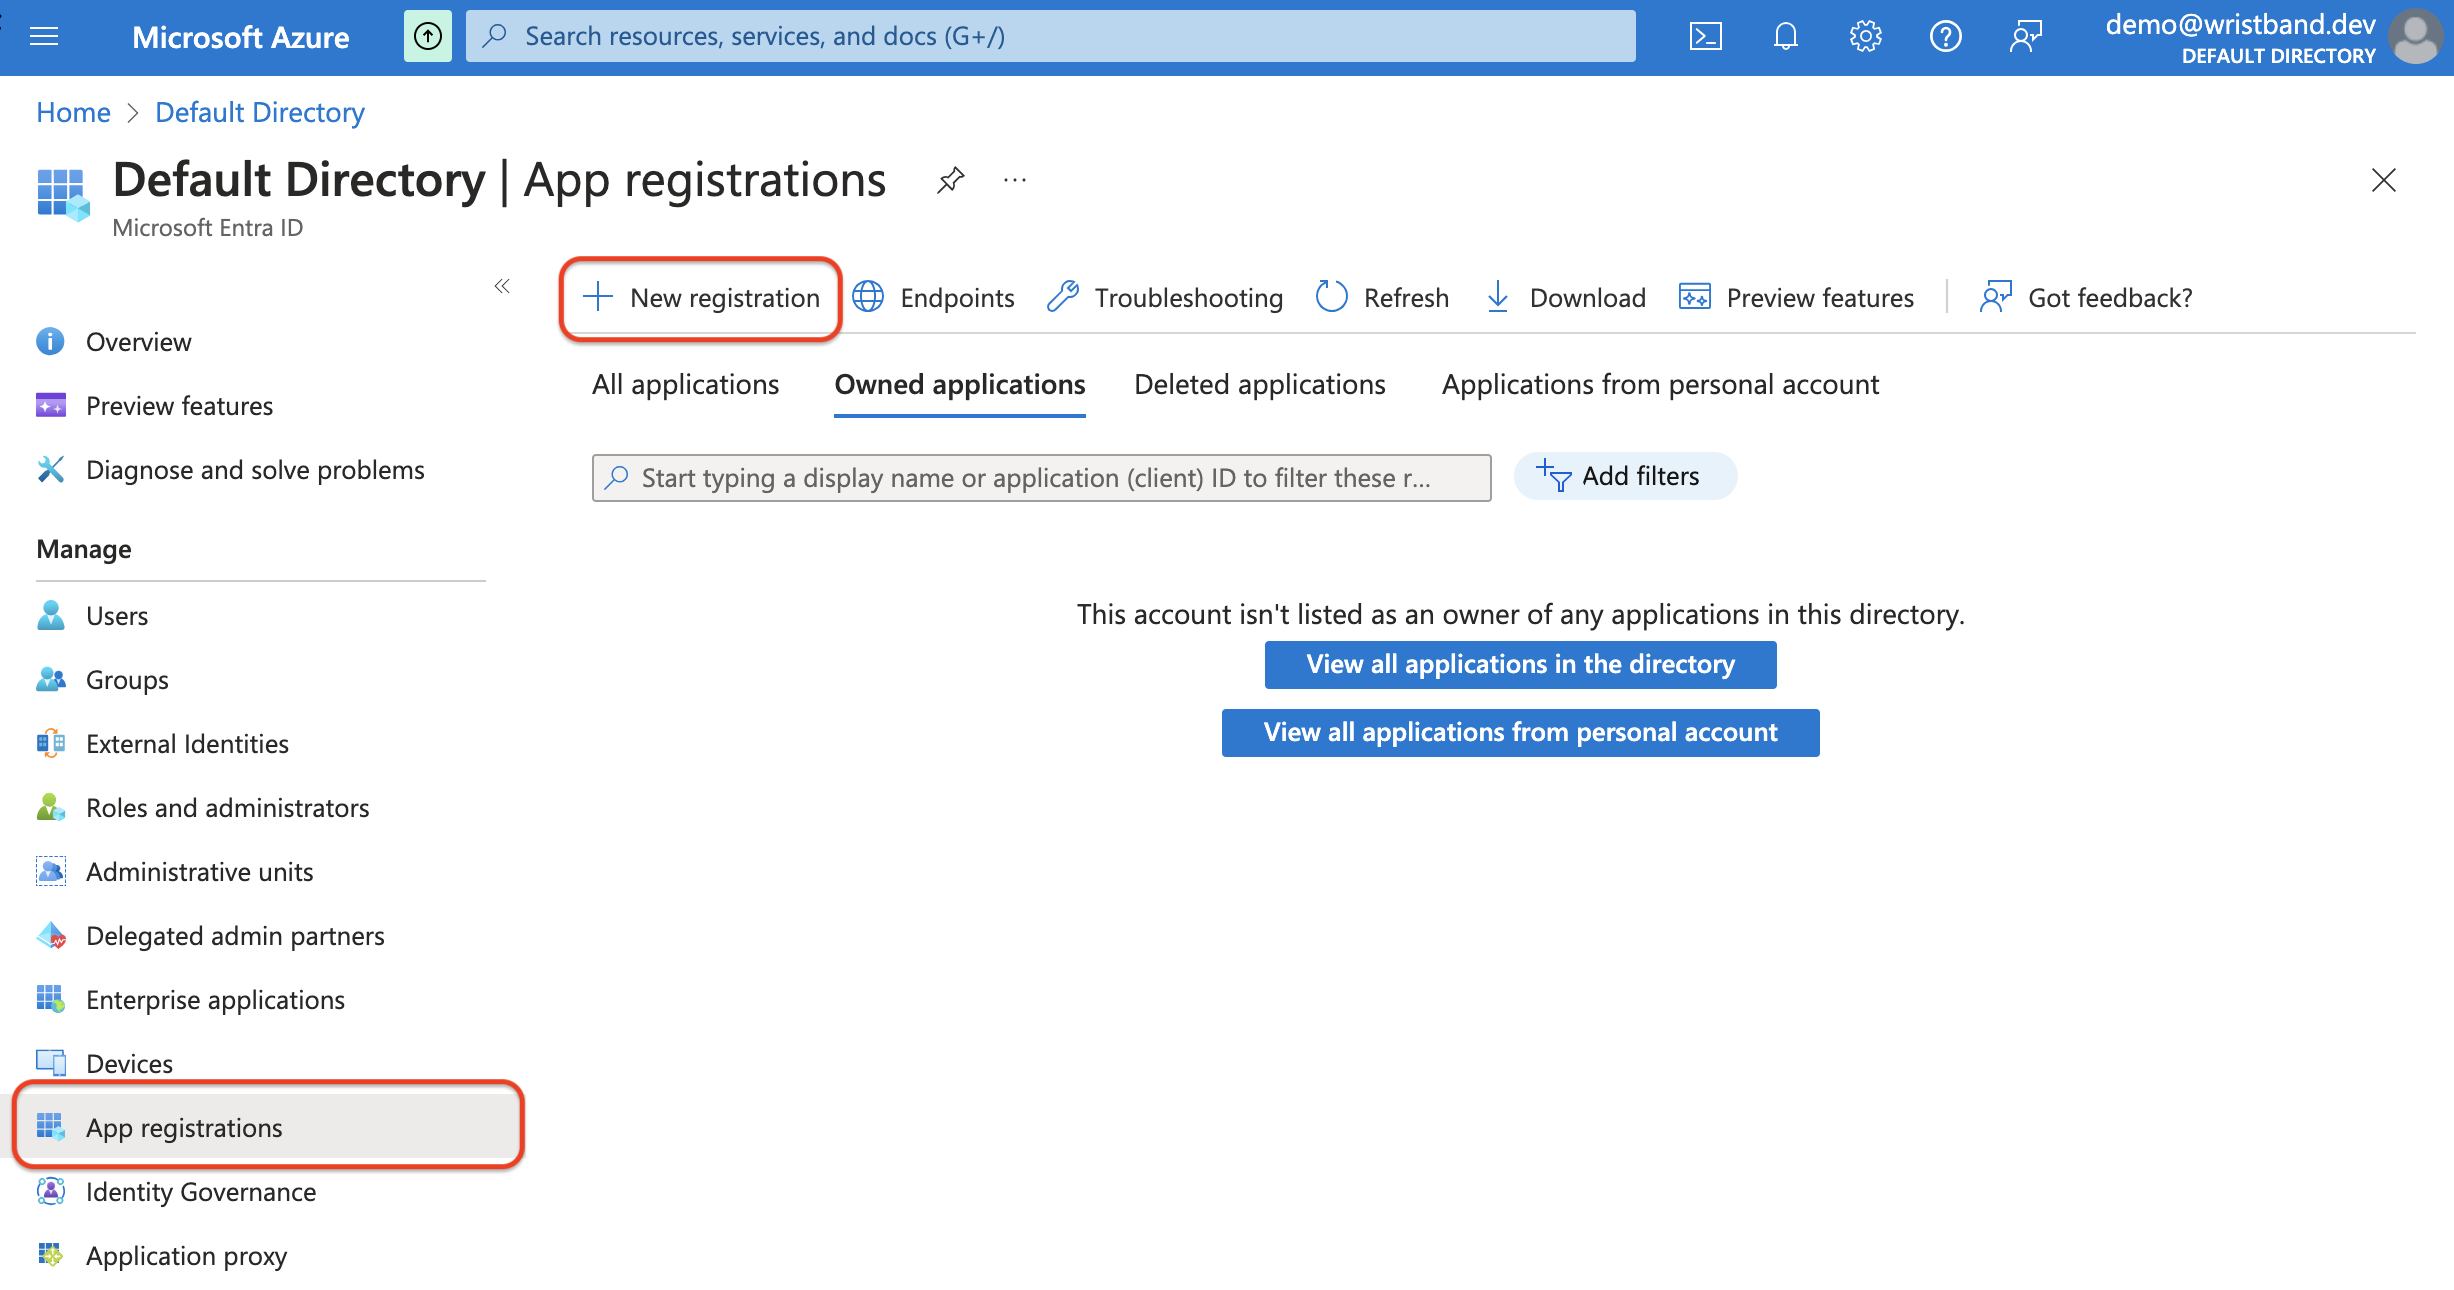
Figure 3: Open App registrations and select New registration.
- On the Register an application page, fill out the following fields:
- Name: You can give this whatever value you deem appropriate.
- Supported account types: Depending on your requirements, you should only choose one the following options (
Default Directory only - Single tenantis meant for Enterprise SSO):Accounts in any organizational directory (Any Microsoft Entra ID tenant - Multitenant)Accounts in any organizational directory (Any Microsoft Entra ID tenant - Multitenant) and personal Microsoft accounts (e.g. Skype, Xbox)Personal Microsoft accounts only
- Redirect URI: Here, select the Web platform option and paste in the External IDP Callback URL value you copied from the Wristband dashboard during step 1.
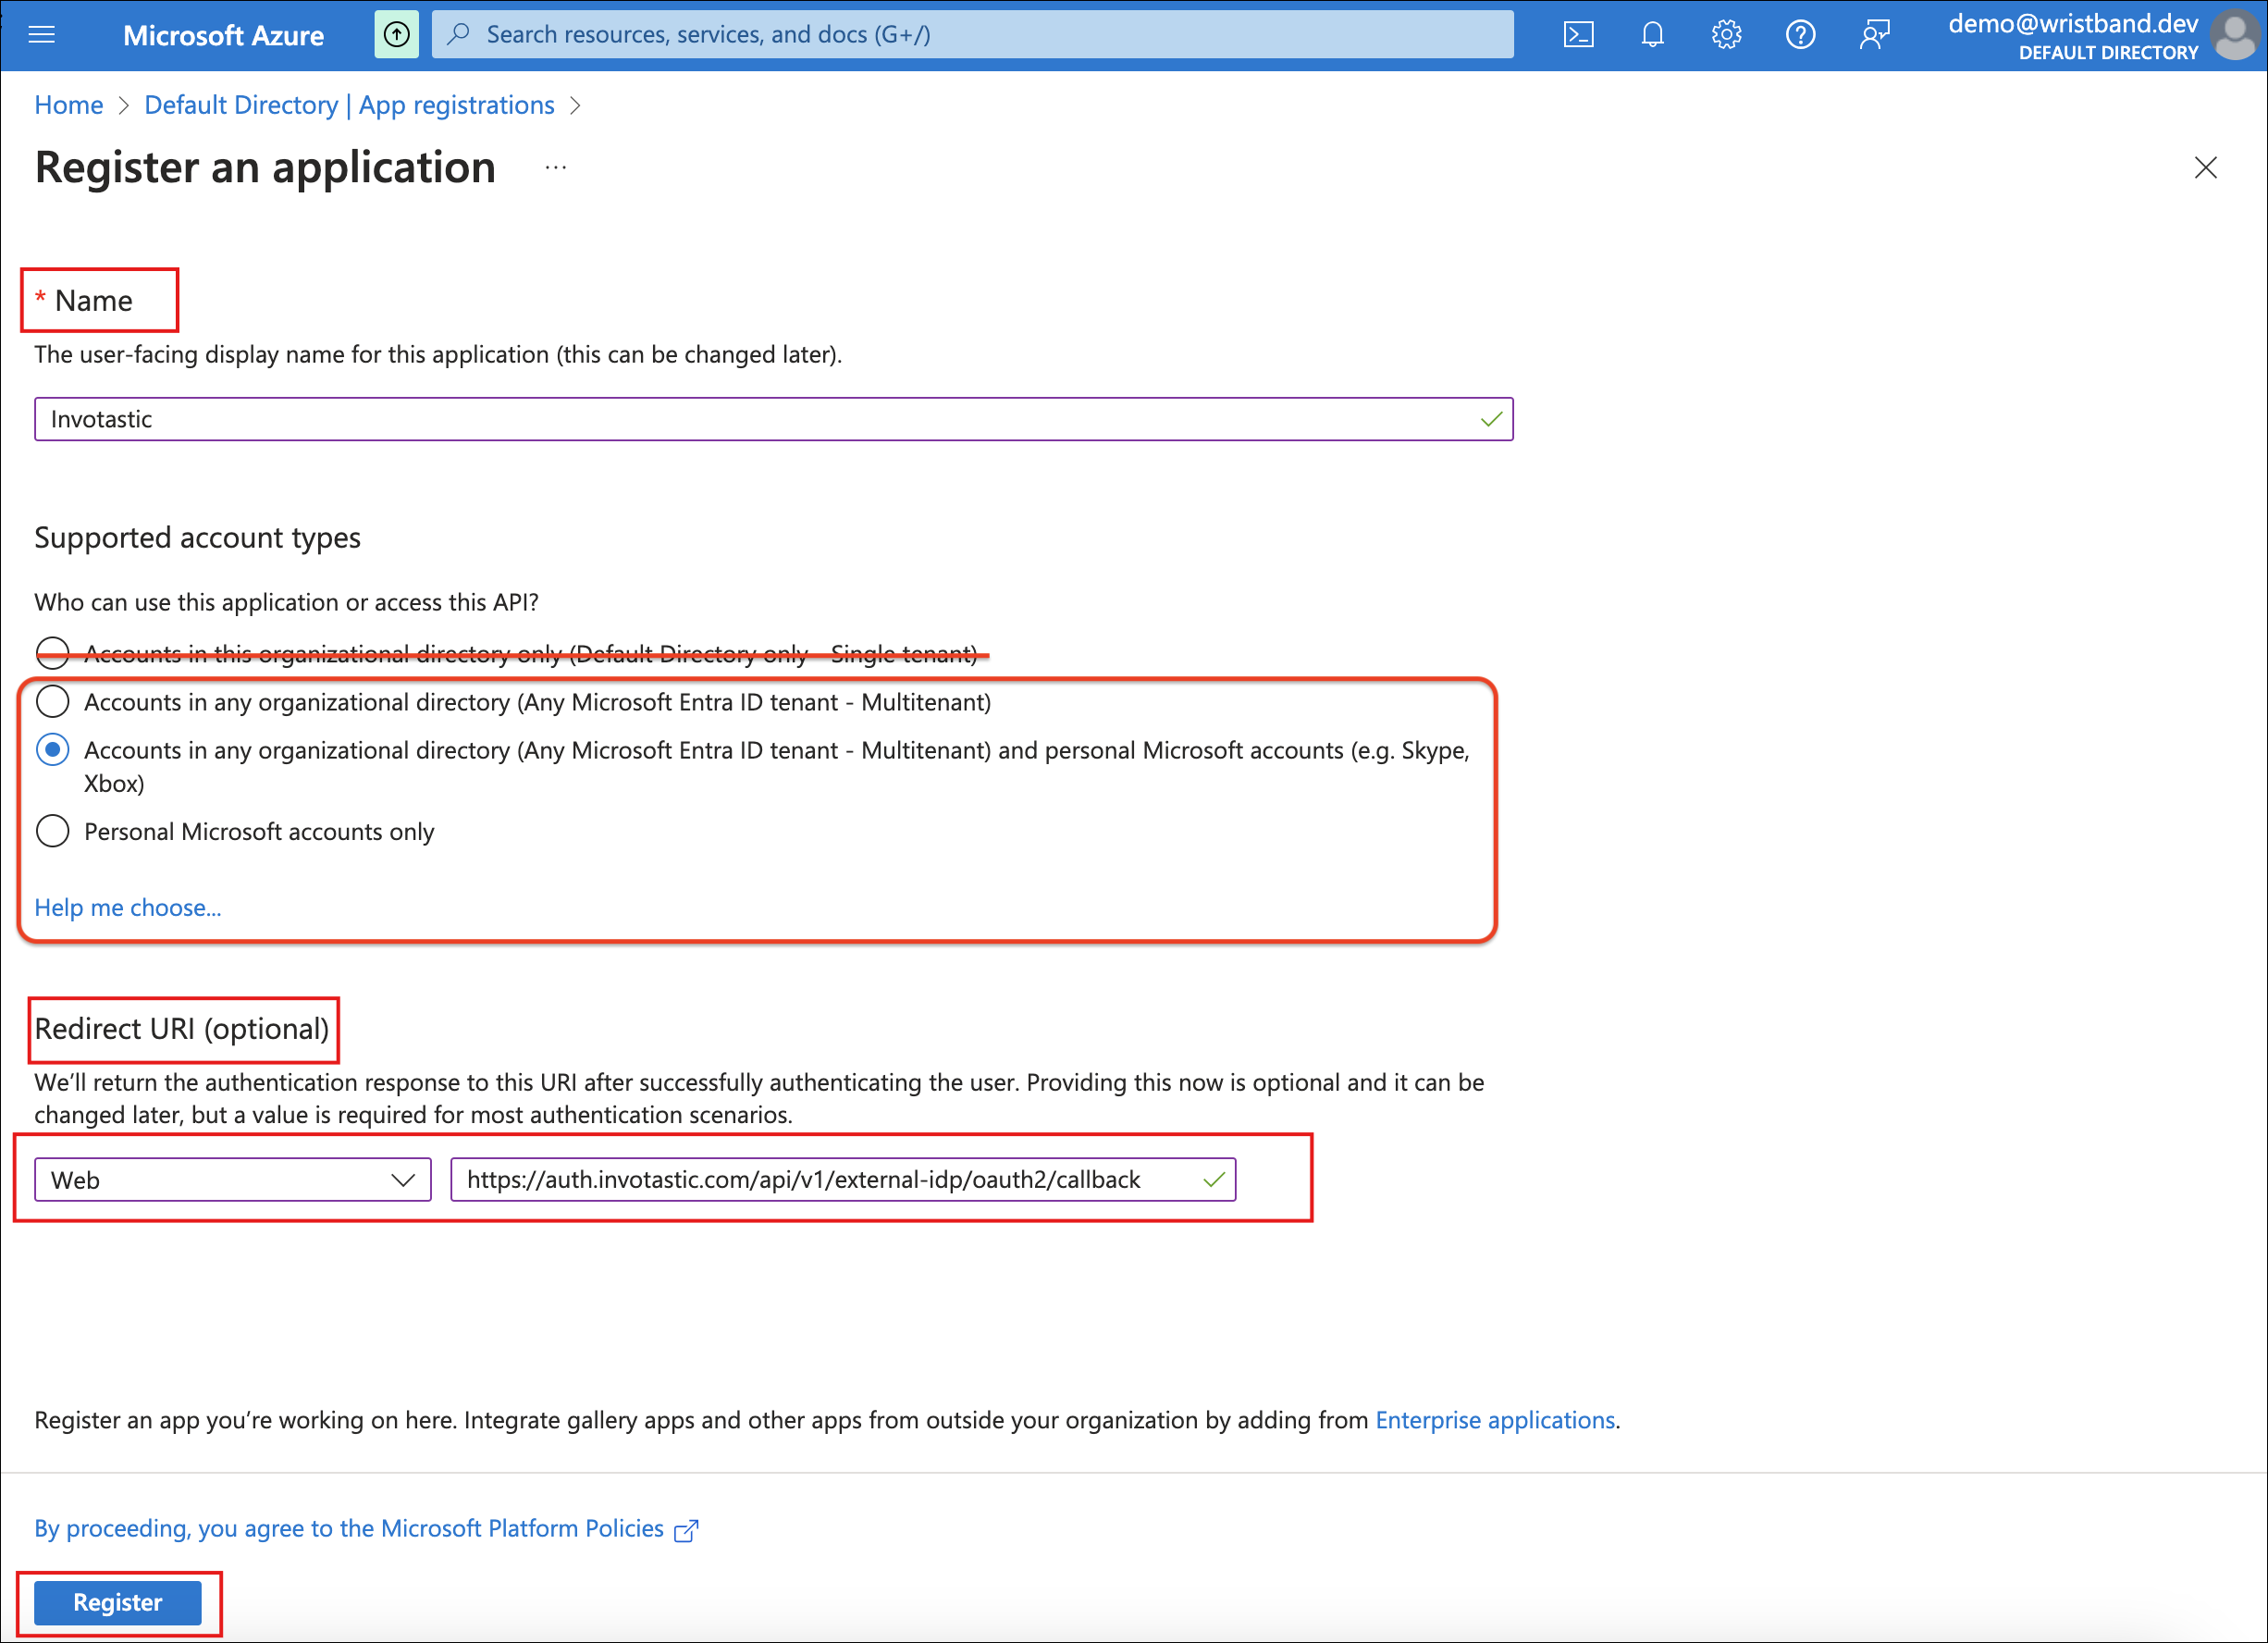
Figure 4: Enter the application details and add the Wristband callback URL as a Web redirect URI.
- Click Register at the bottom of the page to complete the application registration.
- Wait for Microsoft to redirect you to the application's Overview page.
4. Get the Client Information
- Locate the Application (client) ID on the app registration's Overview page.
- Copy and store this value safely. It acts as your Client ID when creating the External Identity Provider in Wristband.
- Add Client Credentials by clicking the Add a certificate or secret link.
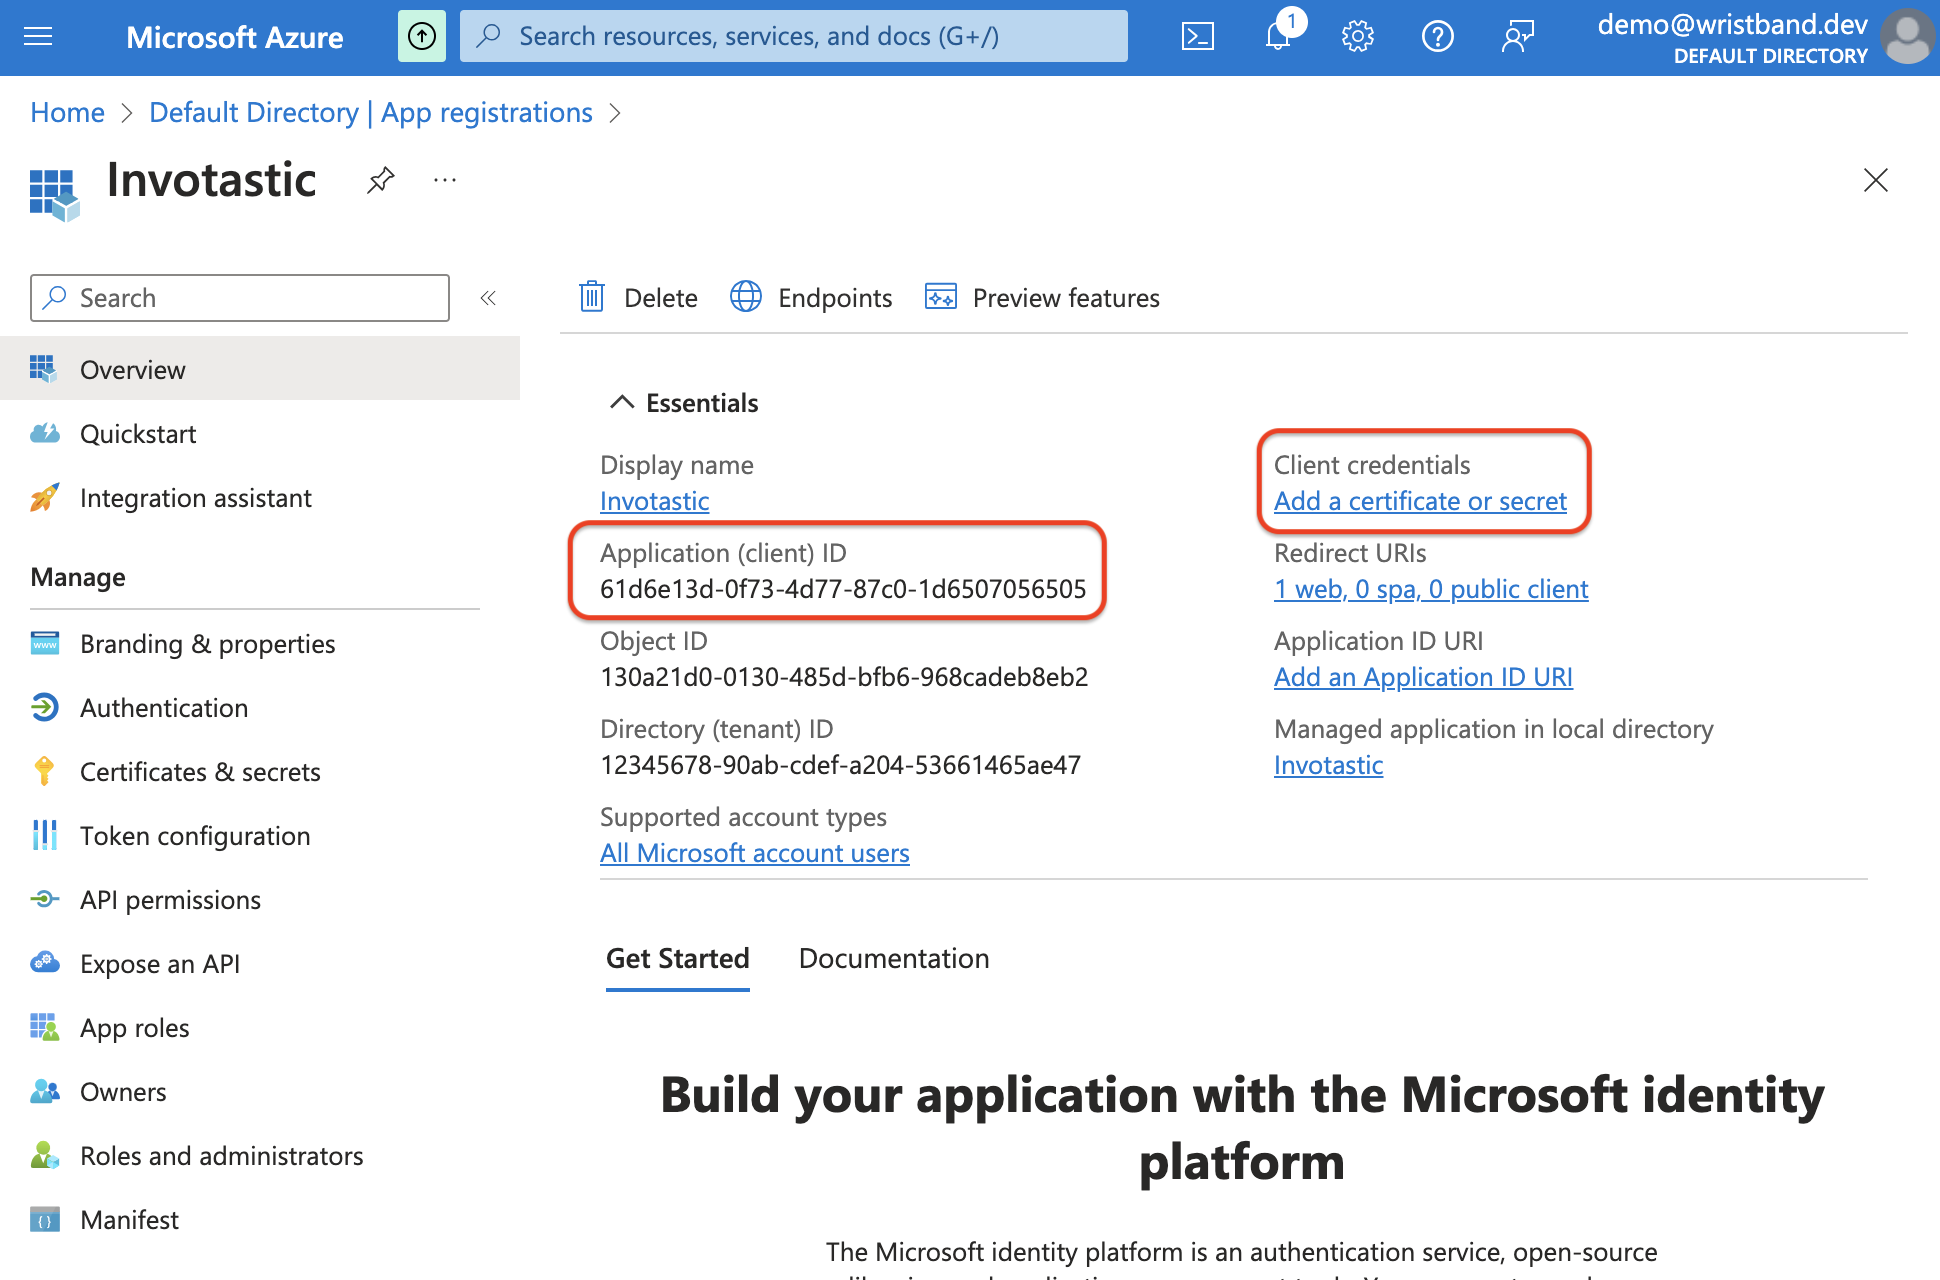
Figure 5: Copy the Application (client) ID and open the certificate or secret settings.
- Click New Client Secret button.
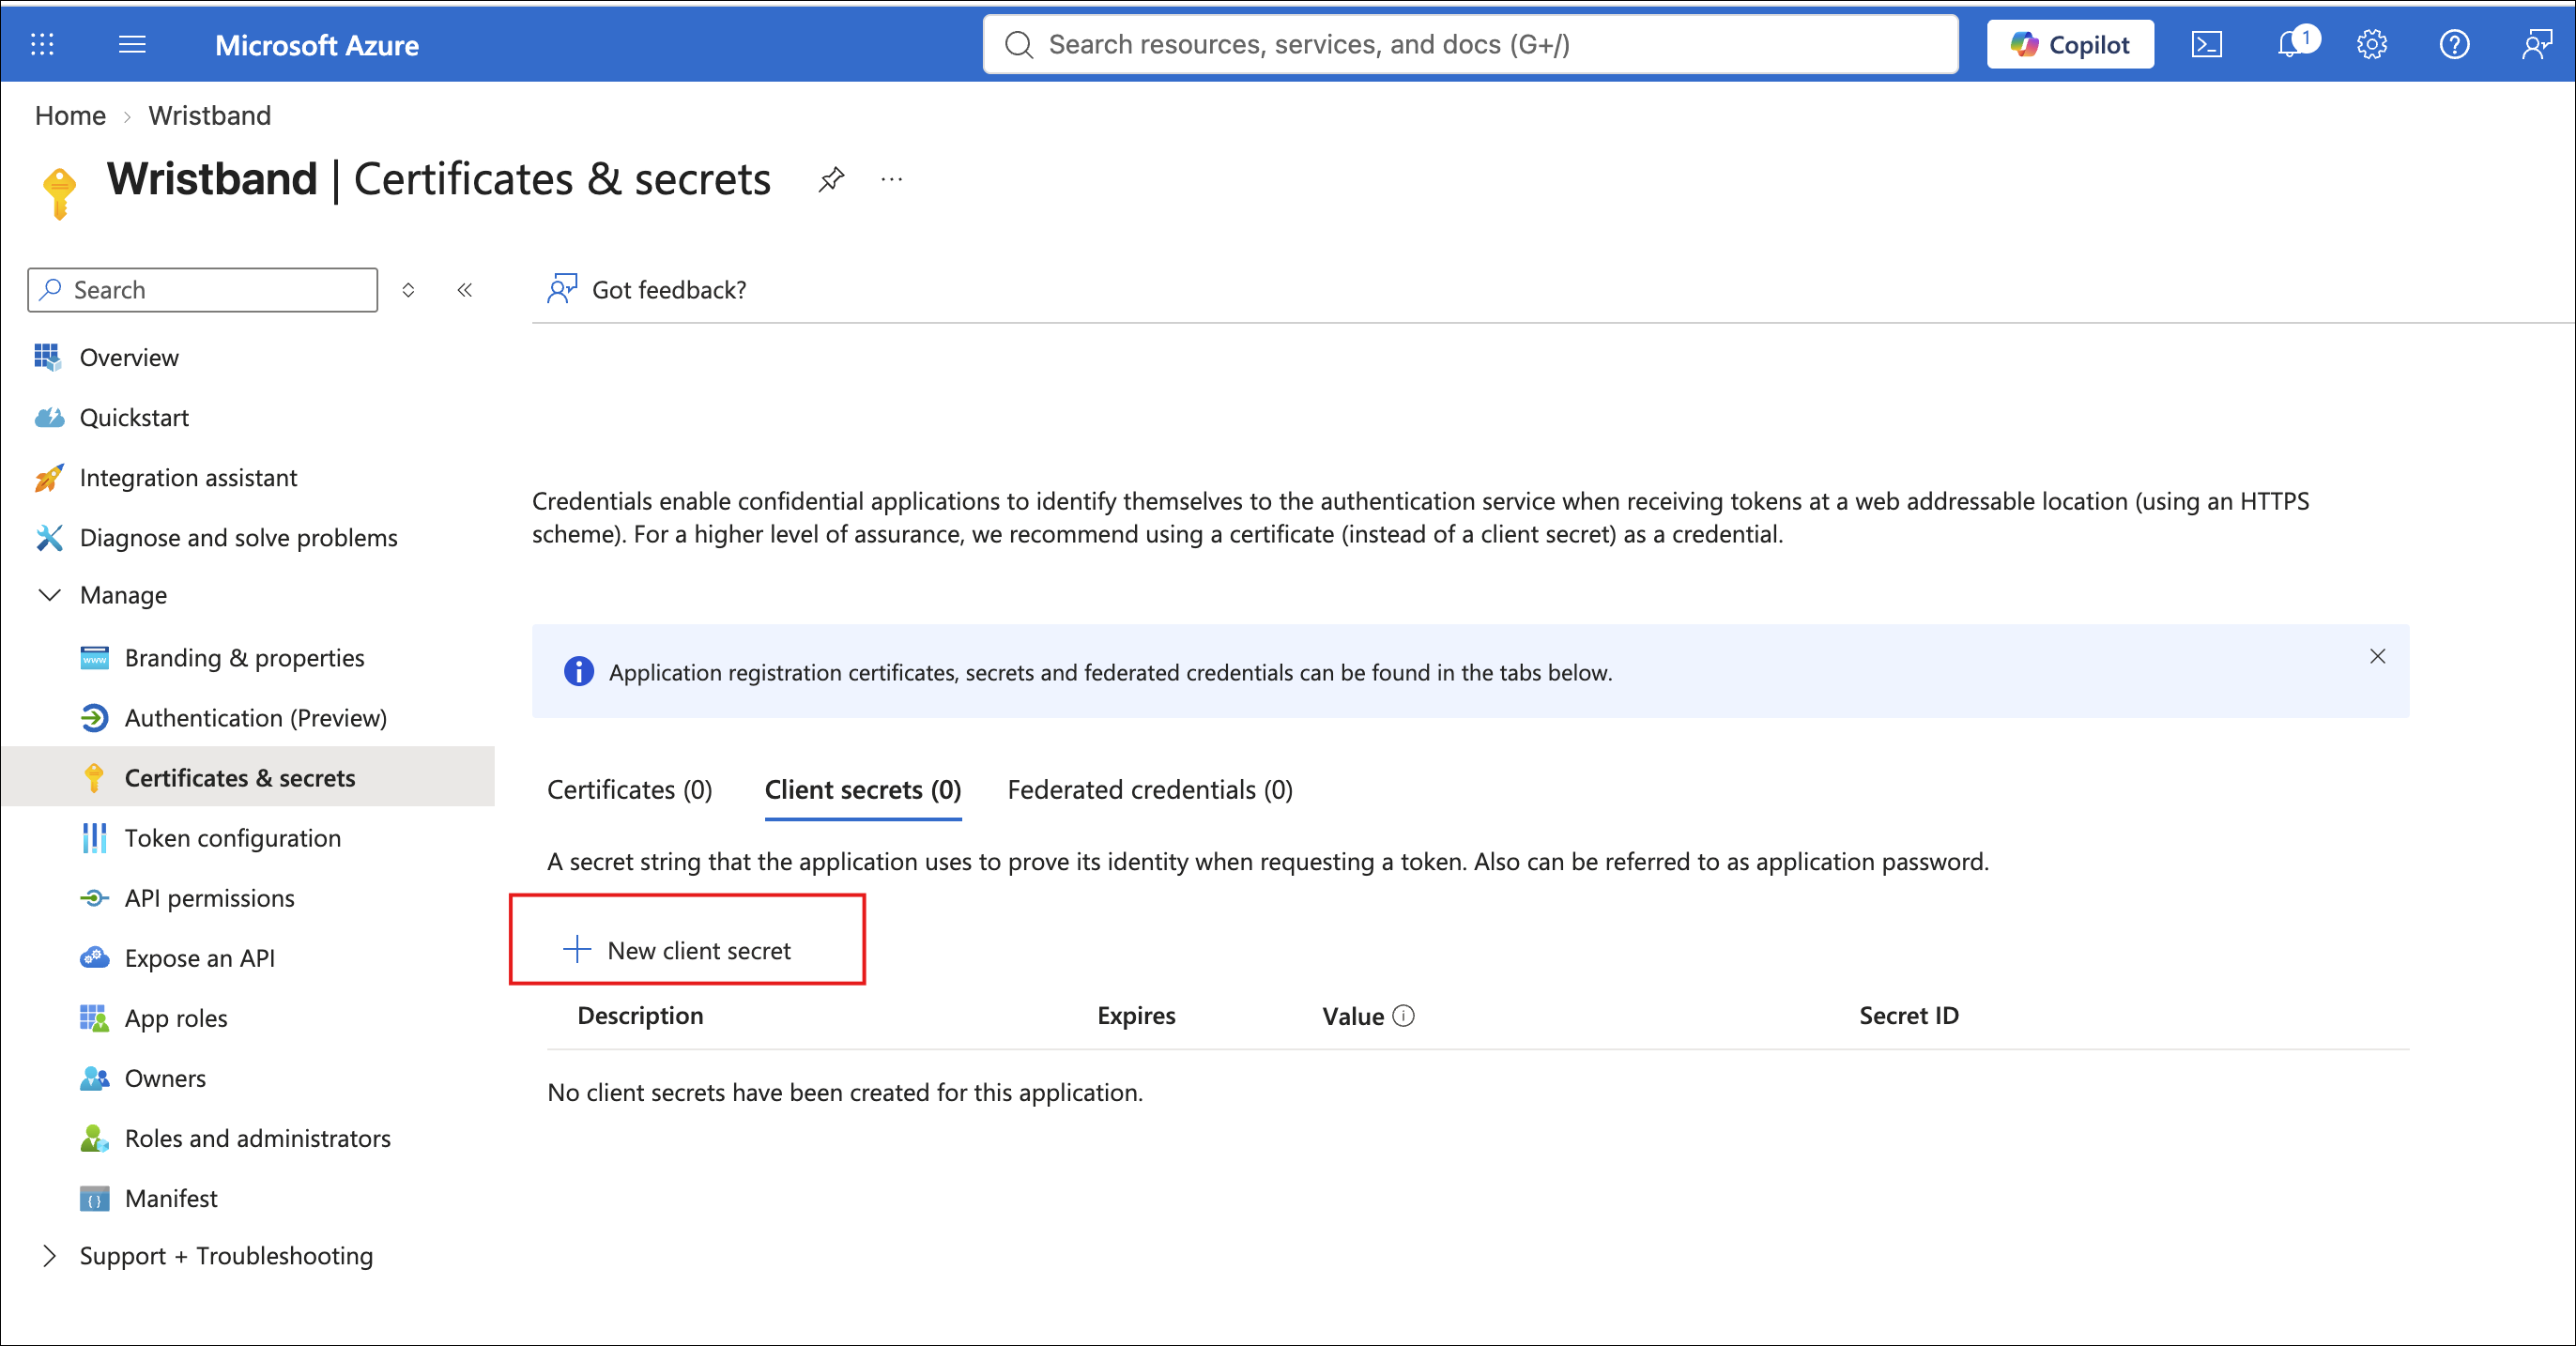
Figure 6: Select New client secret.
- In the Add a client secret pane, complete the form fields with your preferred values. We recommend choosing a longer Expires duration so you do not have to rotate secrets too frequently.
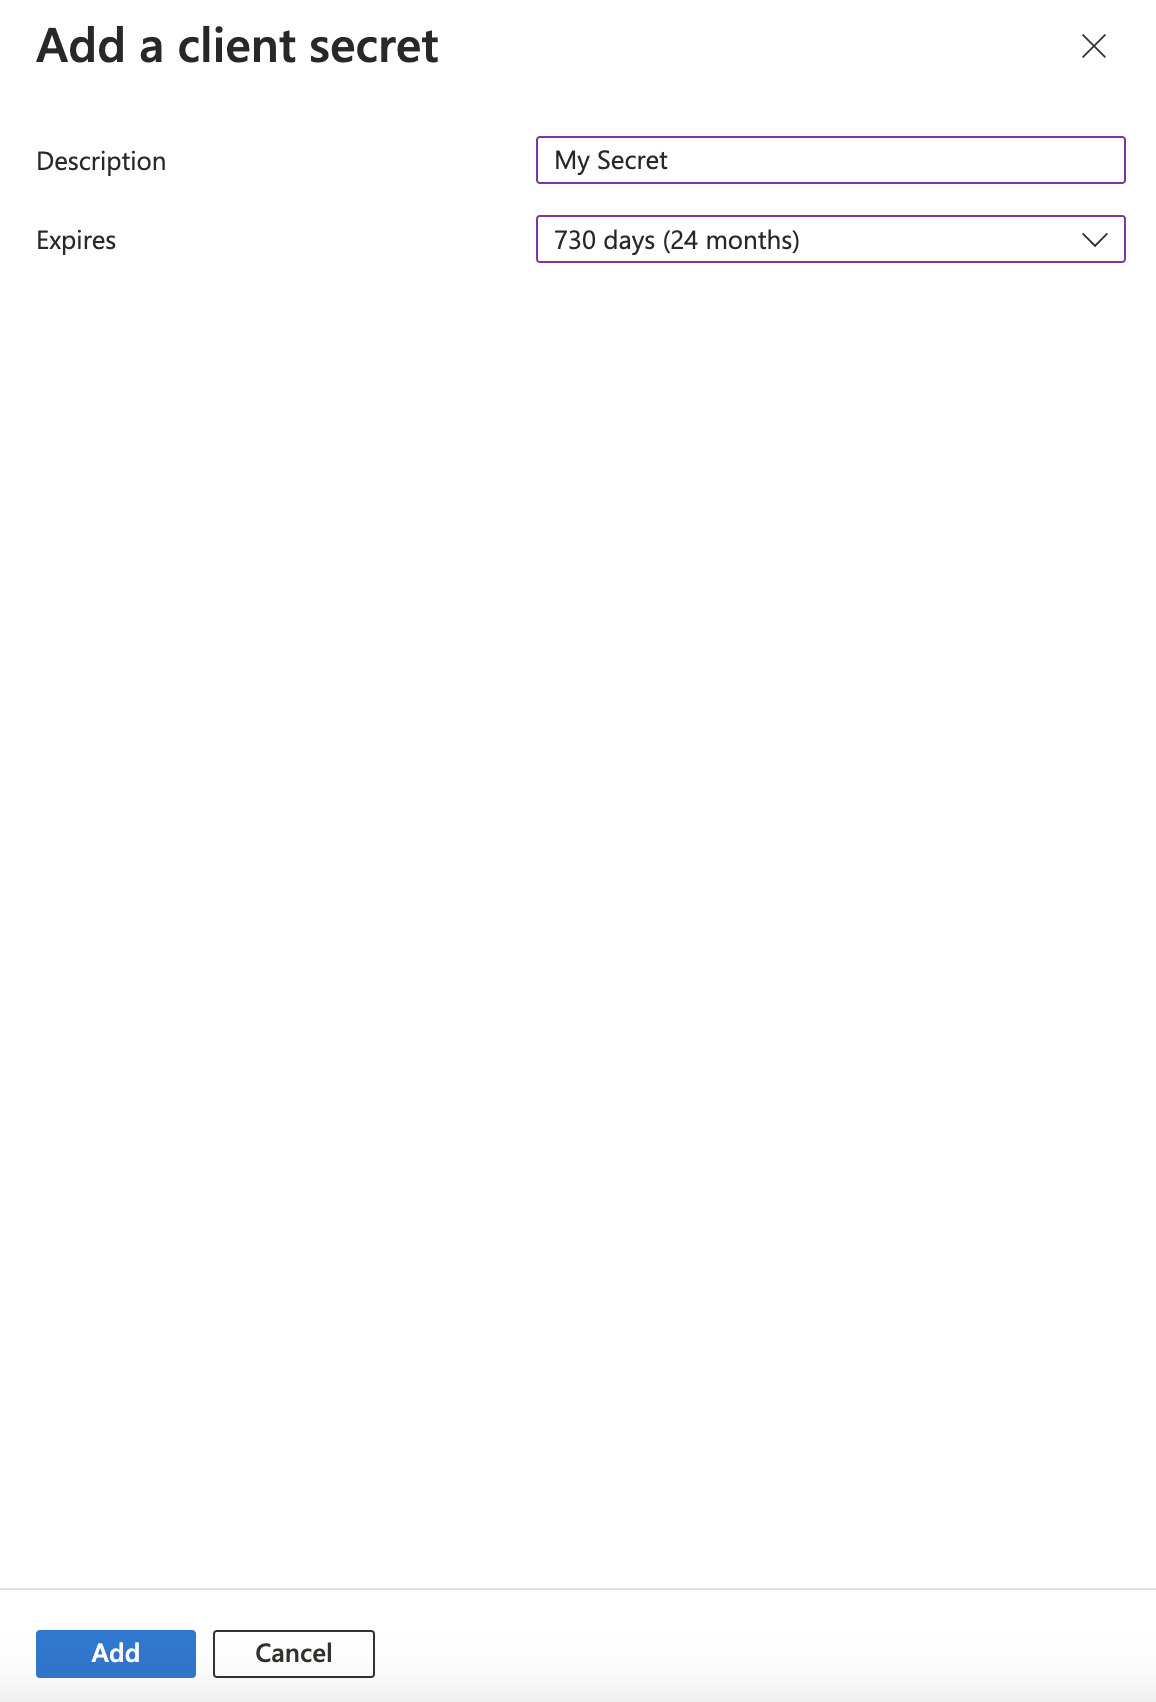
Figure 7: Enter a description and expiration period for the client secret.
- Locate the newly created secret in the secrets table.
- Copy the Value immediately, since Microsoft only displays it once upon creation.
- Save this value securely; you will use it as your Client Secret when configuring the Wristband External Identity Provider.
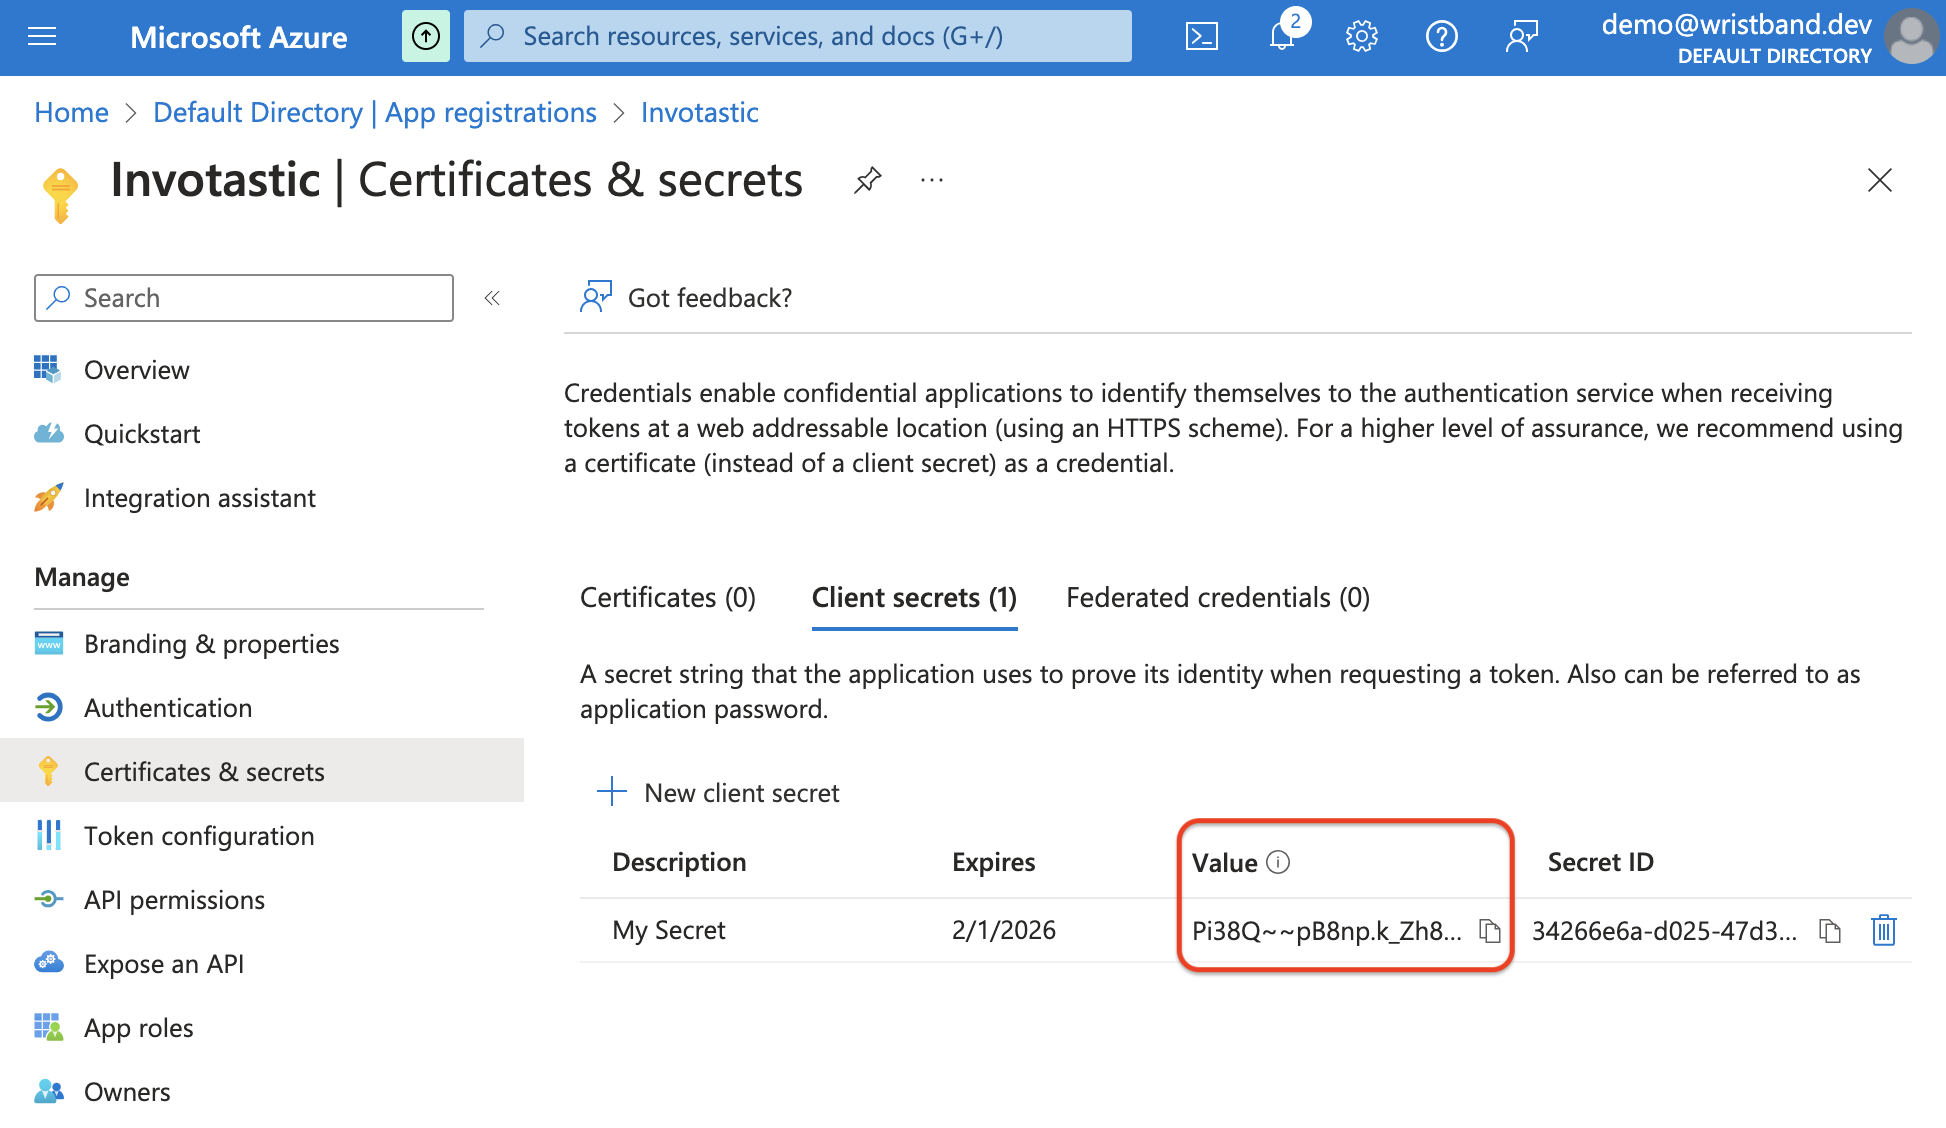
Figure 8: Copy the new client secret’s Value.
This completes the necessary configuration on the Microsoft side for your social login integration.
5. Configure the Microsoft IdP in Wristband
- Return to the Social Identity Providers page in the Wristband dashboard that you opened in Step 1. Complete the form to configure your Microsoft External IdP using the following values:
- Client ID: This is the Client ID value that you copied in step 4.
- Client Secret: This is the Client Secret value that you copied in step 4.
- Supported Account Types: This must match the value of the "Supported account types" you selected in step 3. The values map as follows:
| Microsoft Values | Wristband Values |
|---|---|
| Accounts in any organizational directory (Any Microsoft Entra ID tenant - Multitenant) | Accounts in any organization directory |
| Accounts in any organizational directory (Any Microsoft Entra ID tenant - Multitenant) and personal Microsoft accounts (e.g. Skype, Xbox) | Accounts in any organization directory and personal Microsoft accounts |
| Personal Microsoft accounts only | Personal Microsoft accounts only |
- Wristband automatically requests the following scopes during Microsoft authorization (any additional scopes are optional):
- openid
- profile
- Click Save to finish the configuration and switch the Microsoft External IdP to an
ENABLEDstatus.
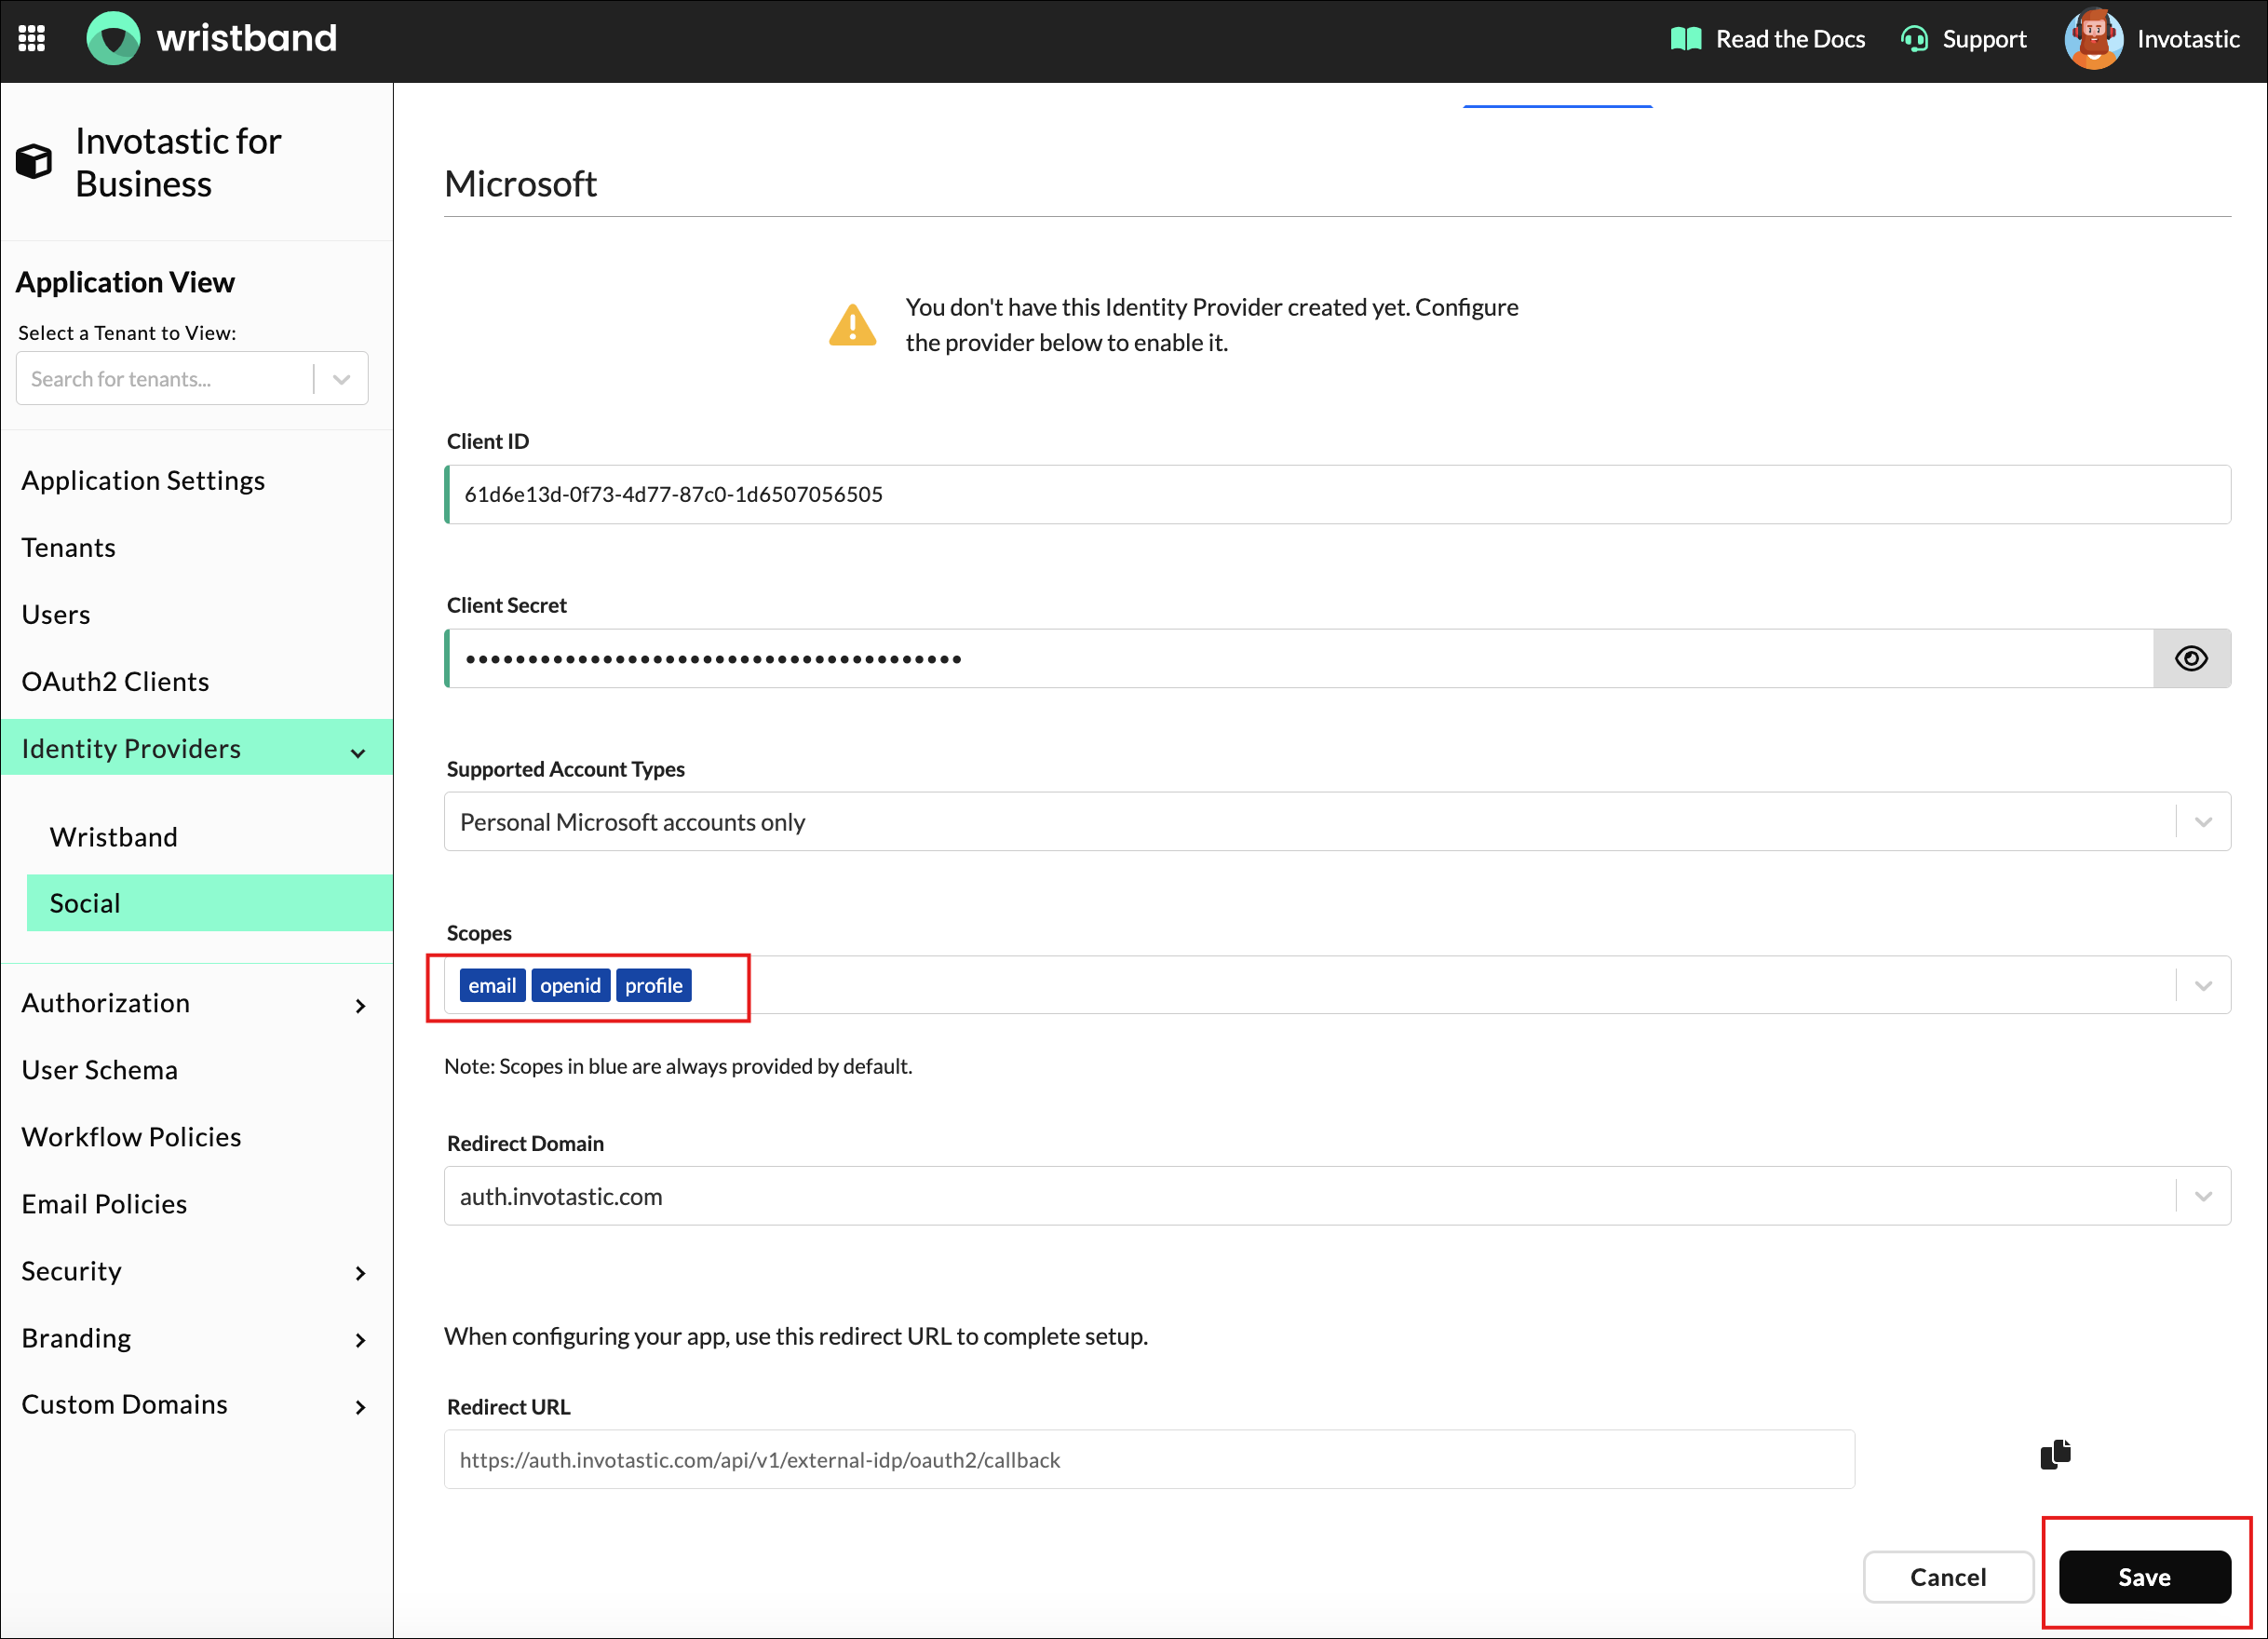
Figure 9: Enter the Microsoft credentials in Wristband and save the identity provider.
The Microsoft social login integration is now complete. The next time users reach the tenant-level login page, they will see a Microsoft login button.
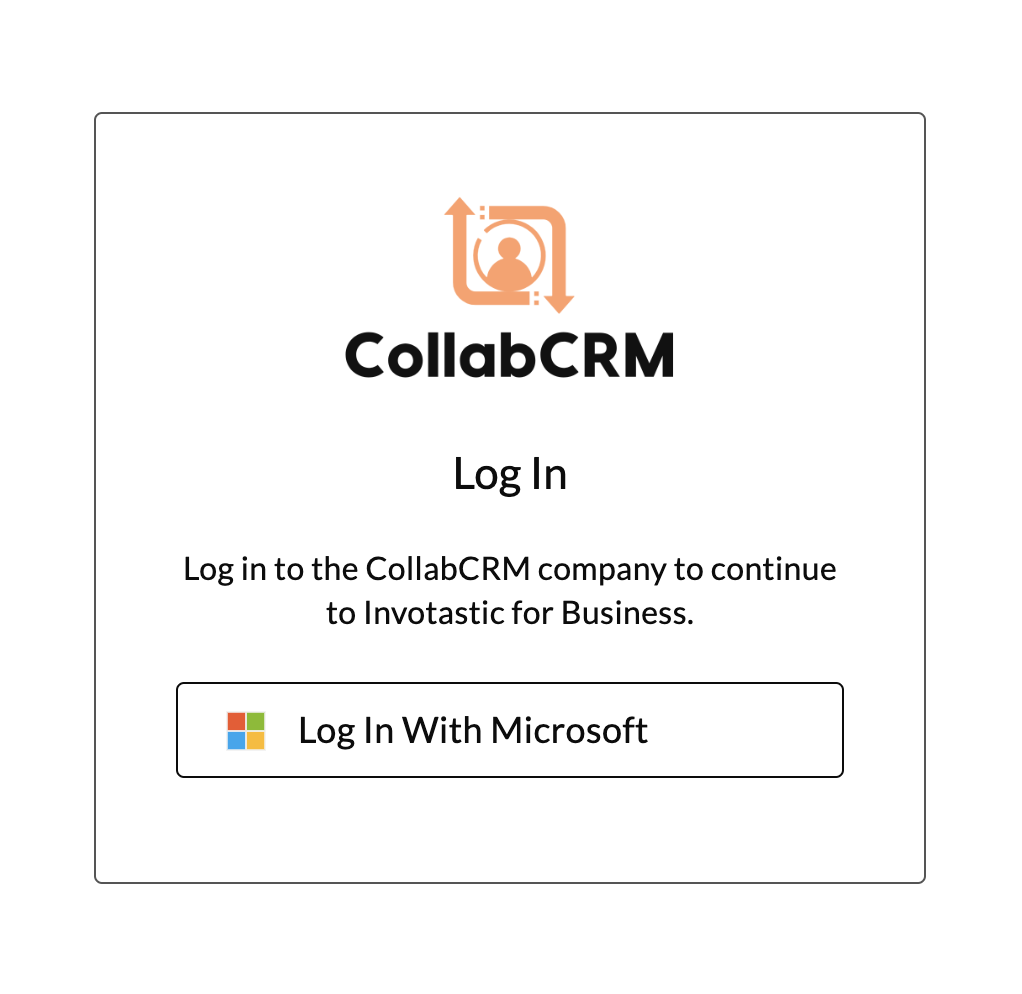
Figure 10: Sign in with Microsoft button on the tenant-level Login Page.
Updated 6 days ago