B2C Auth
Learn how to configure Wristband to give your app a seamless B2C-style authentication experience.
B2C Auth With Multi-Tenancy
Wristband is built for multi-tenant authentication, making it a natural fit for B2B apps where users are grouped into distinct organizations with roles and permissions. But it also works seamlessly for B2C scenarios, where all users share a single tenant, sign up individually, and manage their own accounts. B2C auth emphasizes personal identity, self-service, and a streamlined onboarding flow. This guide shows how to configure Wristband to deliver that kind of experience with minimal setup.
At a high level, to enable a B2C experience with Wristband, you'll need to perform the following:
- Use a Global Tenant in your Wristband application to serve all B2C users.
- Enable self-signup on the Global Tenant to support user-driven onboarding.
- Use Wristband's branding configurations and security policies to customize the authentication flows.
- Configure the Wristband SDK.
- Configure basic roles for end users and admin users.
Before Proceeding...This guide is not meant to be a comprehensive quickstart on its own. It is assumed the reader has at least a basic understanding of Wristband concepts and integration patterns. If you're unfamiliar with Wristband's architecture, please review the docs on Wristband's Multi-Tenancy Entity Model. Likewise, if you want to learn more about how to integrate your application with Wristband, please refer to our quickstart guide.
Create Wristband Entities
To configure Wristband to support B2C authentication, you'll first need to create the following entities using the Wristband Dashboard:
- An Application
- An OAuth2 Client (for example purposes, this guide will use a Backend Server client type)
- A Global Tenant
In the sections below, we'll go over in more detail how each of these entities should be created and configured.
Create an Application
From the Wristband Dashboard home page, create a new application by clicking the "Add Application" button. In the modal that is displayed, fill out the following fields:
- Display Name: This field can contain any value and will be used by Wristband when displaying your application in the Dashboard, hosted pages, and emails.
- Name: This field will be used when constructing your application's vanity domain. This field is immutable and can't be changed after the application is created.
- Enable Production Environment Validations: If you're planning to use this application in production, set this value to enabled; otherwise, it can be set to disabled. Enabling this setting will ensure that any configuration values you set for this application are secure for production use. Note, this value is immutable and can't be changed after the application is created.
- Application Login URL: The login URL is the endpoint within your application that redirects to the Wristband Authorize endpoint. If you're creating an application for local testing, then the URL might look like:
http://localhost:3001/login; however, if you're creating a production application, the URL will need to use thehttpsscheme and can't point to localhost. An example of a valid production login URL is:https://yourapp.com/login.
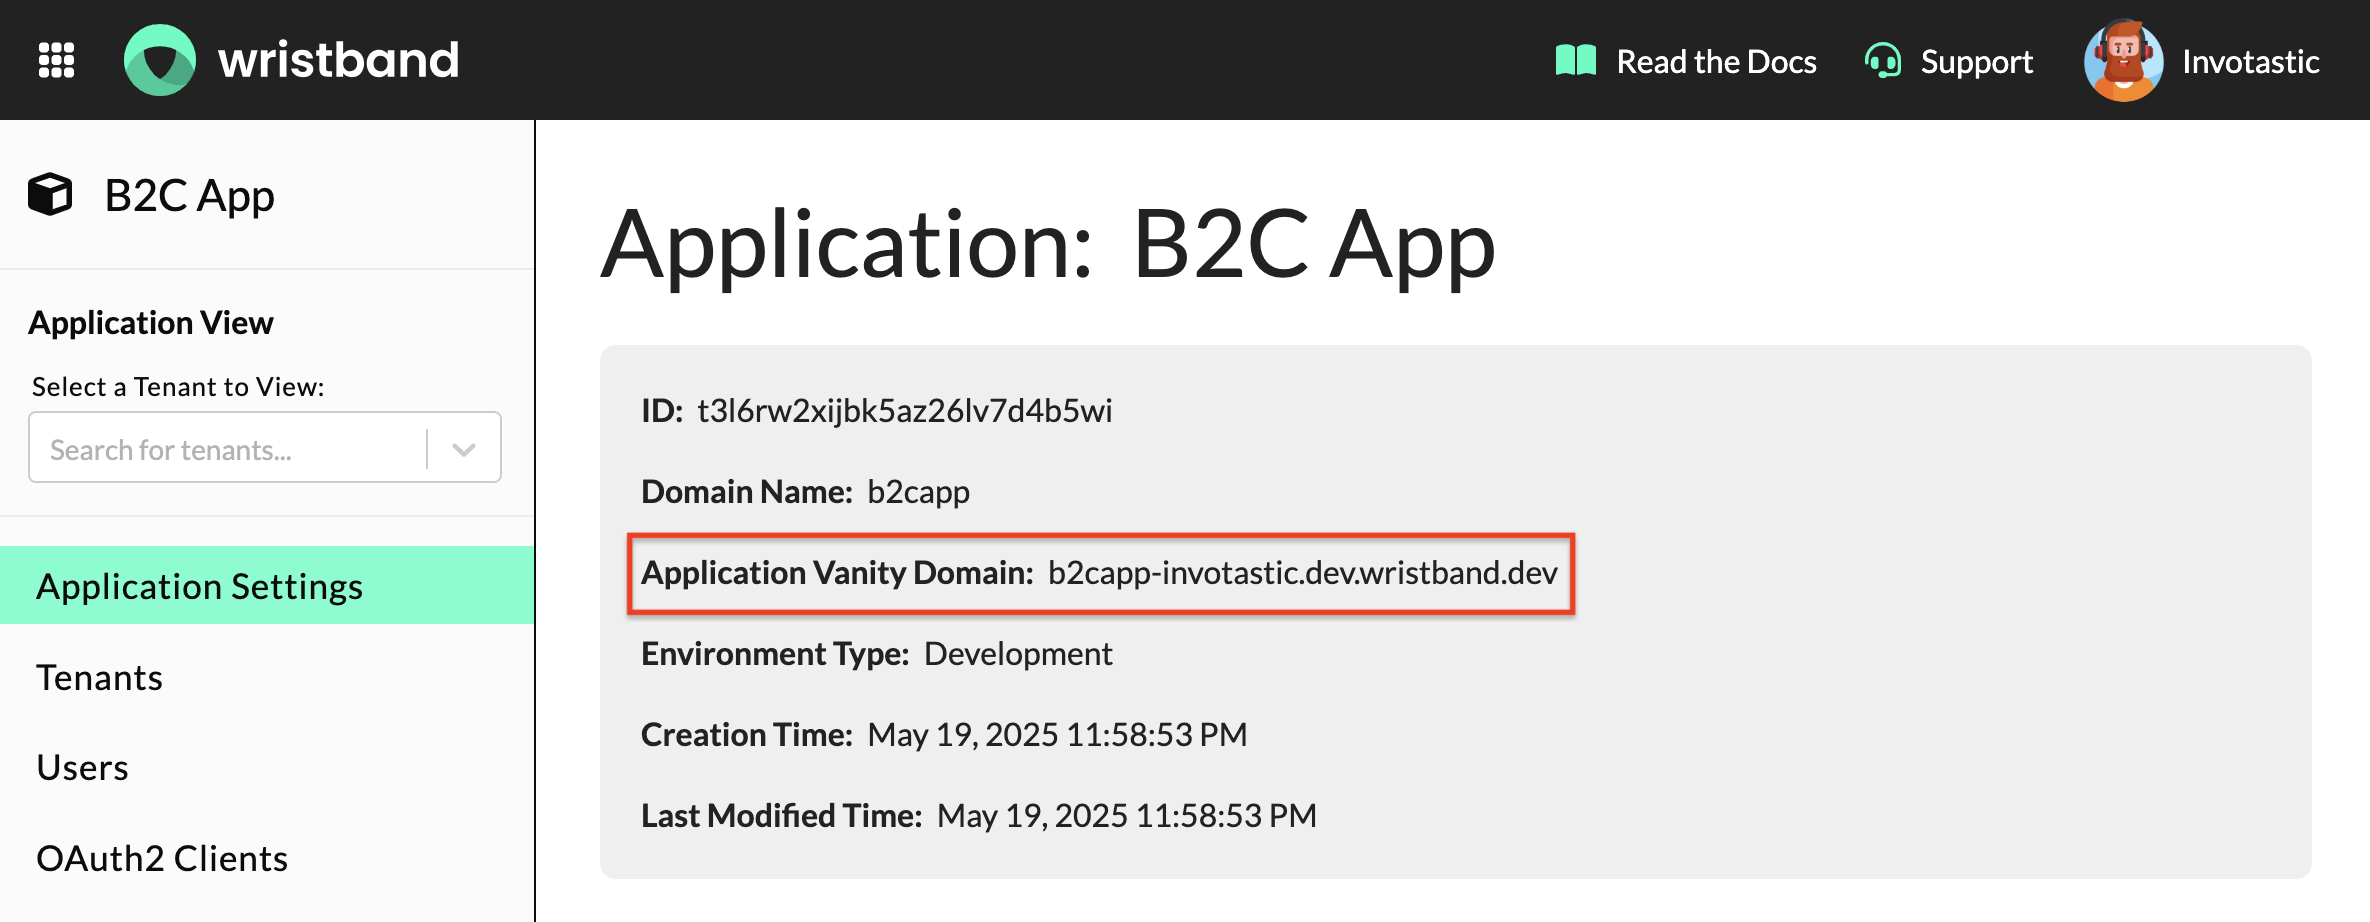
Copy The Application Vanity Domain
If you aren't already within the Application View, select the application from the Dashboard Home Page that you just created. This will take you to the Application Settings page. On the Application Settings page, you will see details regarding your application, including the "Application Vanity Domain". Copy this value as it will be needed to configure the Wristband Auth SDK.
Disable Application-Level Self-Signup
If self-signup is enabled at the application level, then end users will be able to self-provision new tenants within your application. Since this is a B2C application, we want the end users to exist within a single tenant; therefore, we need to ensure that self-signup is disabled for the application.

Create an OAuth2 Client
Inside the Application View for your newly created application, select "OAuth2 Clients" from the left navigation menu. Create an OAuth2 Client from the "Add Client Modal" and fill out the following fields:
- Type: Backend Server (this guide demonstrates configuring a Backend Server, but you should choose the type that matches your application).
- Client Name: This value can be anything you want and is just used as a human-readable identifier for your client.
- Redirect URIs: The redirect URI should point to the endpoint within your application that Wristband will redirect to after authenticating the user. For example, if your application is running locally, then the redirect URI might be set to a value like:
http://localhost:3001/auth/callback. However, if the application is running in production, the redirect value would probably look something like:https://yourapp.com/auth/callback.
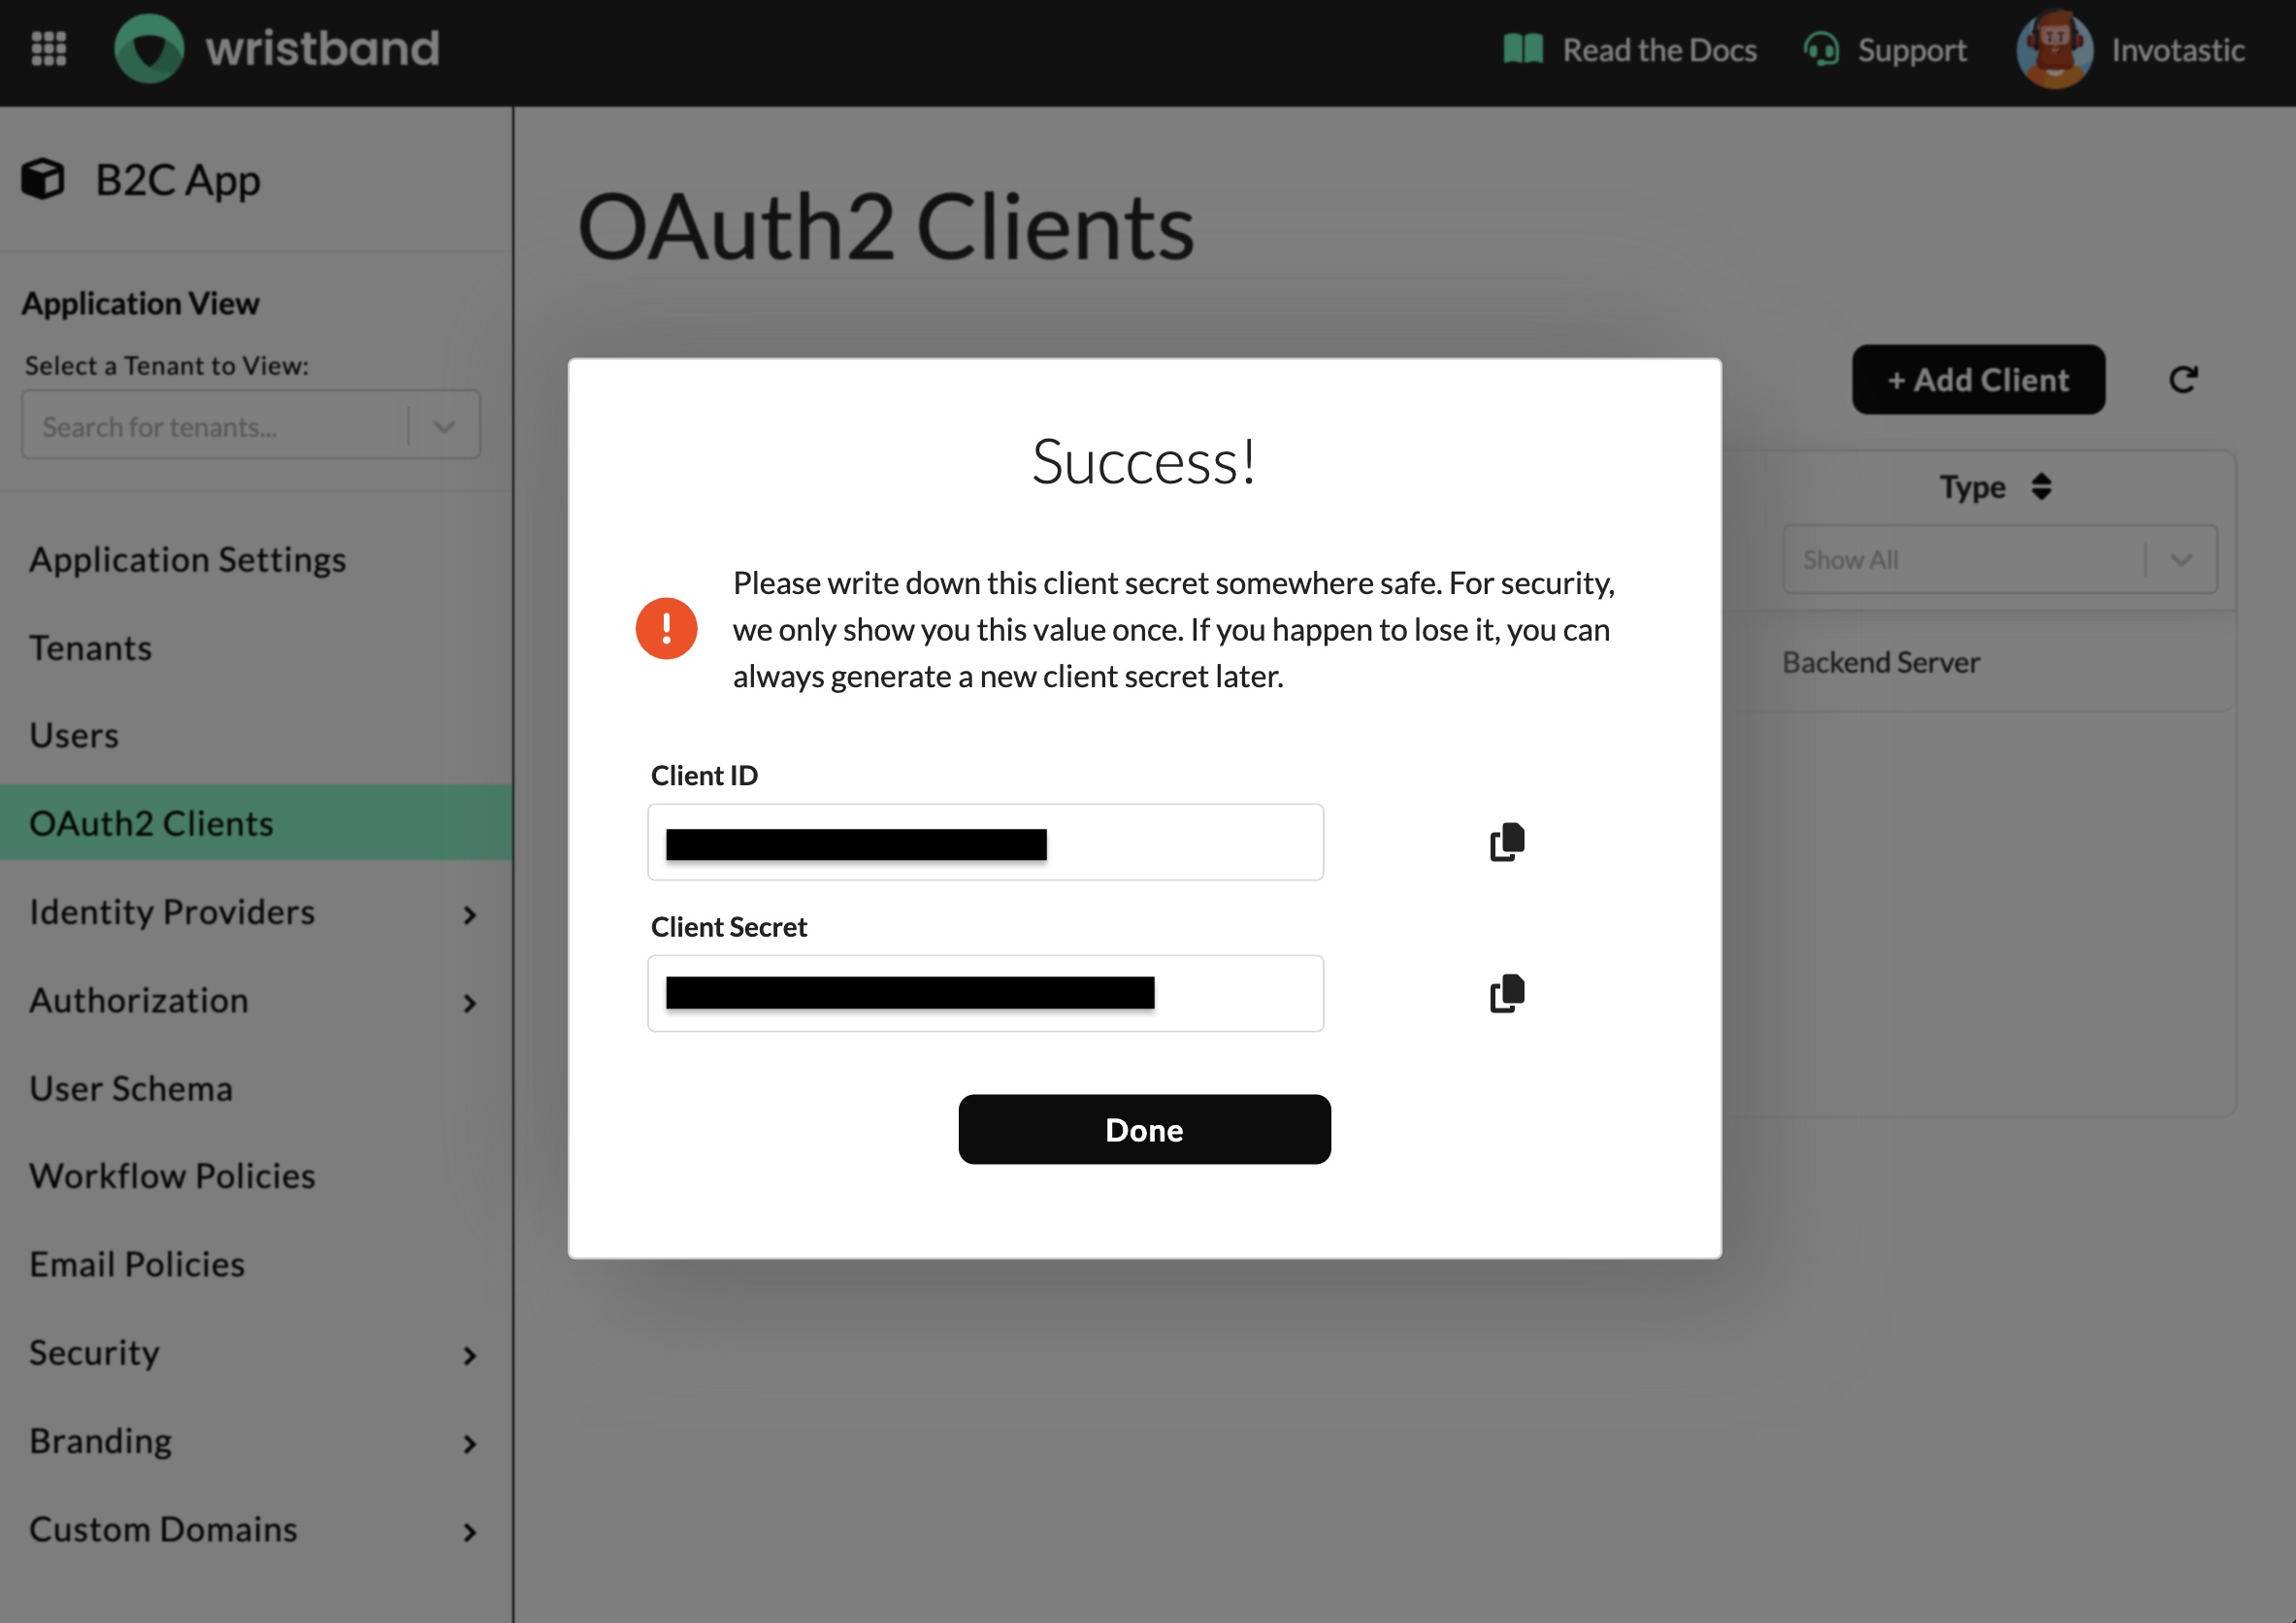
Copy Client ID and Secret
After creating the client, make sure to copy the values from the "Client ID" and "Client Secret" fields displayed in the success dialog. These values will be needed to configure your Wristband SDK. If you lose your client secret, you can rotate the client secret to create a new one.
Create the Global Tenant
In order to create a B2C authentication experience, you'll need to provision a Global Tenant within the application. The users for your application's end consumers will exist within this tenant. To create the Global Tenant, navigate to the Application View and select "Tenants" from the left navigation menu. Click the "Add Tenant" button and fill out the following fields within the modal:
- Tenant Type: This value must be set to "Global".
- Display Name: This field can contain any value and will be used by Wristband when displaying your tenant in the Dashboard, hosted pages, and emails. For B2C applications, this should be your product or service name.
- Name: This field will be used when constructing your tenant's vanity domain. This field is immutable and can't be changed after the tenant is created. If you need to change this value in the future, you can override it using custom domains.
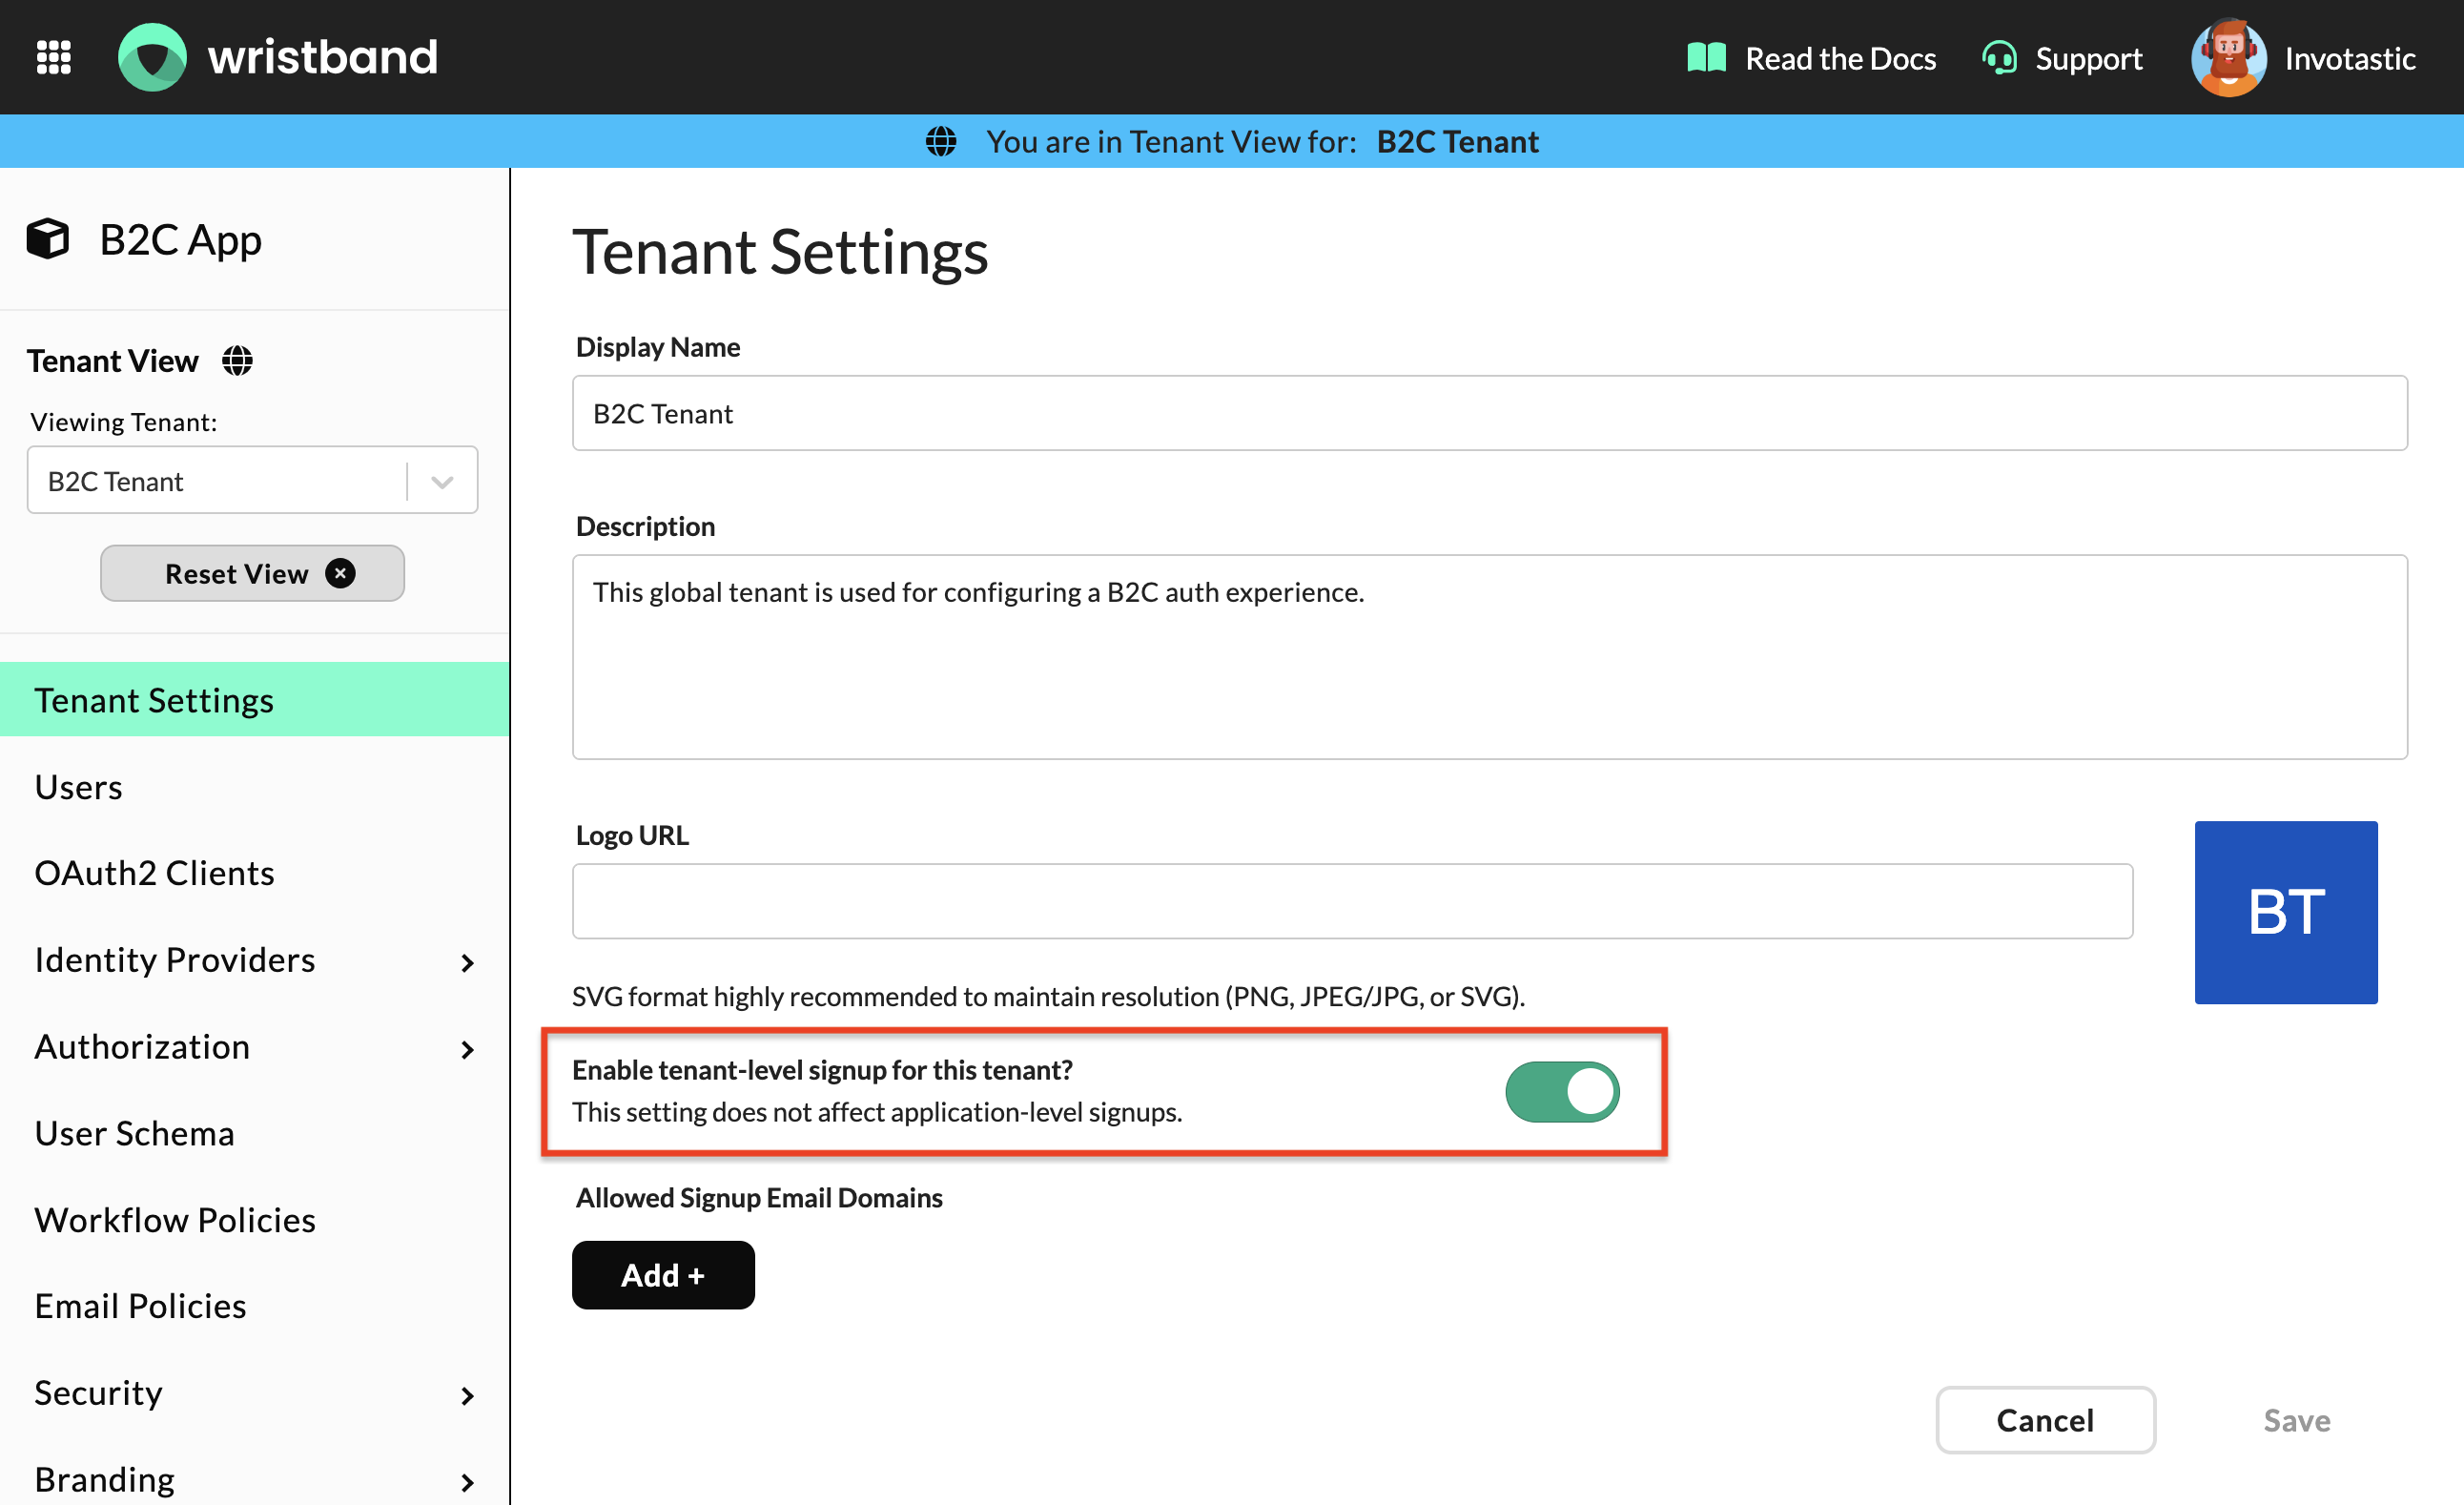
Enable Self-Signup For The Global Tenant
On the Tenant Settings page, use the enable tenant-level signup toggle to enable self-signup. This makes the Tenant Signup Page accessible to your users.
Customize Your Application
Wristband offers many customization options for your B2C application. Most configurations can be managed at the application level through the Dashboard, with custom domains being the only exception requiring tenant-level configuration.
Refer to our documentation on how to customize different aspects of your B2C application:
Custom Domain RestrictionsIn order to create custom domains or custom email domains for your application, you'll need to be on the Pro Plan or higher.
Configure the Wristband SDK
After creating and customizing your app in the Wristband Dashboard, you'll need to configure the Wristband SDK in your code. This section will go over how to set up the Wristband SDK for your B2C application.
While Wristband offers SDKs for various frameworks, this guide will utilize the Express SDK in its examples. Although syntax may differ across frameworks, Wristband maintains consistent patterns throughout all SDKs, so the principles covered here can be applied to your preferred framework.
For more detailed information around integrating your application with Wristband, refer to our framework-specific quickstart guides.
SDK Initialization
When creating an instance of WristbandAuth in your Express project, ensure you have the following AuthConfig properties set.
// wristband-auth.ts

import { createWristbandAuth } from '@wristband/express-auth';
import { AuthConfig } from './types';

const authConfig: AuthConfig = {
  // Use the client credentials and application vanity domain from earlier.
  clientId: '<your-client-id>',
  clientSecret: '<your-client-secret>',
  wristbandApplicationVanityDomain: '<your-application-vanity-domain>'
};

export const wristbandAuth = createWristbandAuth(authConfig);
Login Endpoint Configuration
Configure your backend's Login Endpoint to redirect users to your Global Tenant's login page. The approach for doing this depends on whether you're using a custom domain for your Global Tenant.
Configuration Without a Custom Domain
Create a LoginConfig with the defaultTenantName parameter set to the Global Tenant's name you created earlier.
// app.ts

import { CallbackResultType } from '@wristband/express-auth';
import wristbandAuth from './wristband-auth';

...

app.get('/auth/login', async (req, res, next) => {
  try {
    // Replace the value of "defaultTenantName" with your Global Tenant's name.
    const loginConfig = { defaultTenantDomainName: '<your-global-tenant-name>' };

    const loginUrl = await wristbandAuth.login(req, res, loginConfig);
    res.redirect(loginUrl);
  } catch (err) {
    console.error(err);
    next(err);
  }
});

...
Configuration With a Custom Domain
If you're using a custom domain for the Global Tenant, create a LoginConfig with the defaultTenantCustomDomain parameter set to the Global Tenant's custom domain.
// app.ts

import { CallbackResultType } from '@wristband/express-auth';
import wristbandAuth from './wristband-auth';

...

app.get('/auth/login', async (req, res, next) => {
  try {
    // Replace the value of "defaultTenantCustomDomain" with your Global Tenant's
    // custom domain.
    const loginConfig = { defaultTenantCustomDomain: '<your-global-tenant-custom-domain>' };

    const loginUrl = await wristbandAuth.login(req, res, loginConfig);
    res.redirect(loginUrl);
  } catch (err) {
    console.error(err);
    next(err);
  }
});

...
Logout Endpoint Configuration
Similar to login, you'll need to configure your backend's Logout Endpoint to always redirect users to Wristband's Logout Endpoint for the Global Tenant.
Configuration Without a Custom Domain
Create a LogoutConfig with the tenantName parameter set to the Global Tenant's name you copied earlier.
// Logout endpoint
app.get('/auth/logout', async (req, res, next) => {
  const { session } = req;
  const { refreshToken } = session;
  const logoutConfig = { refreshToken, tenantDomainName: '<your-global-tenant-name>' };
  res.clearCookie('session');
  res.clearCookie('CSRF-TOKEN');
  session.destroy();

  try {
    const logoutUrl = await wristbandAuth.logout(req, res, logoutConfig);
    return res.redirect(logoutUrl);
  } catch (err) {
    console.error(err);
    return next(err);
  }
});
Configuration With a Custom Domain
If you're using a custom domain for the Global Tenant, then you'll need to create a LogoutConfig with the tenantCustomDomain parameter set to the Global Tenant's custom domain.
// Logout endpoint
app.get('/auth/logout', async (req, res, next) => {
  const { session } = req;
  const { refreshToken } = session;
  const logoutConfig = { refreshToken, tenantCustomDomain: '<your-global-tenant-custom-domain>'};
  res.clearCookie('session');
  res.clearCookie('CSRF-TOKEN');
  session.destroy();

  try {
    const logoutUrl = await wristbandAuth.logout(req, res, logoutConfig);
    return res.redirect(logoutUrl);
  } catch (err) {
    console.error(err);
    return next(err);
  }
});
Now that you've updated your login and logout endpoints, users should always land on the Global Tenant's login page on login and be redirected to the Global Tenant's Logout Endpoint on logout.
Configure RBAC
Create Roles for Each Persona
B2C applications often utilize roles to enforce authorization. Using the Wristband Dashboard, you can easily create roles to represent the different personas of your application. For example, imagine two basic personas: end users and admins. In this case, you could create the following two roles:
- End User: This role will be assigned to end users of your application. Users who are assigned this role should be allowed to perform basic operations within your application; however, they do not have elevated privileges to perform administrative actions.
- Admin: This role will be assigned to your application's admins, i.e, the creators/employees behind the B2C application. Users who are assigned this role will have access to administrative capabilities within the application.
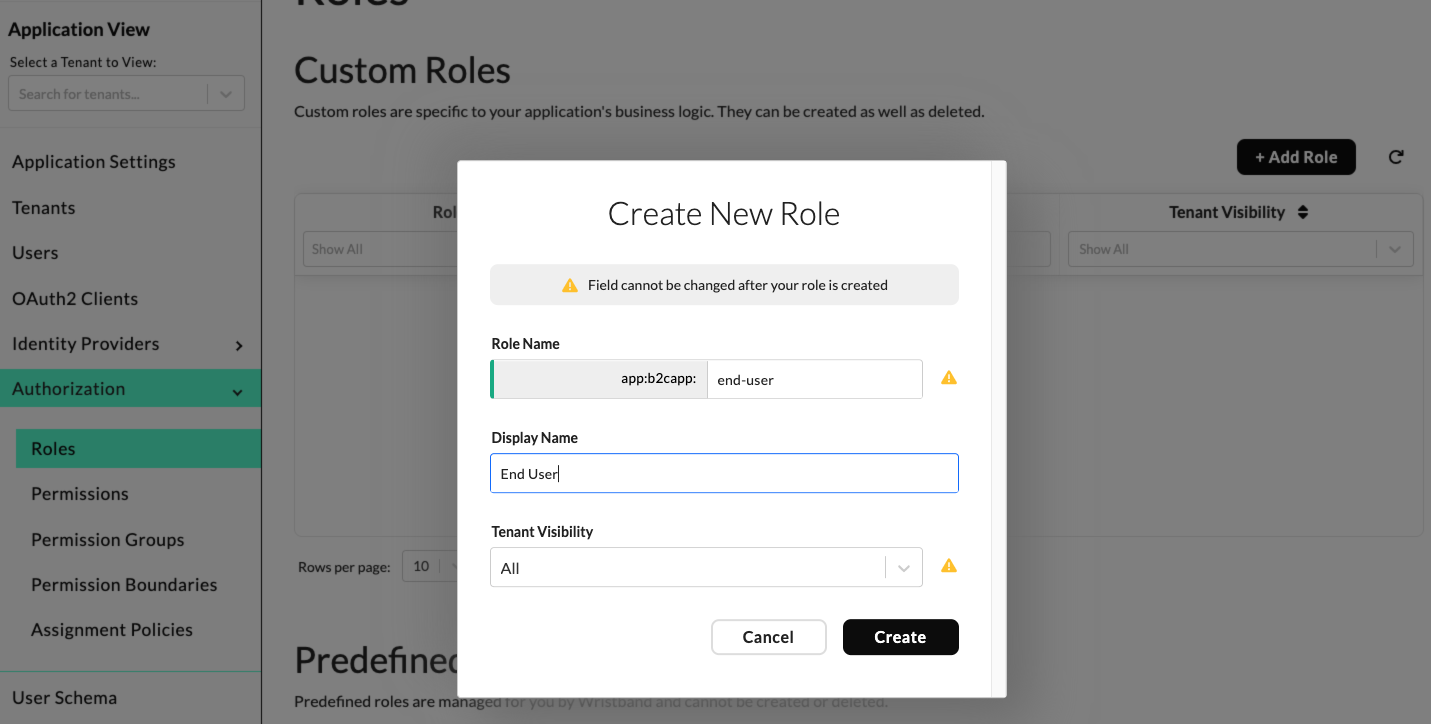
To create roles within the Dashboard, navigate to the Application View and select "Authorization" -> "Roles" from the left navigation menu. Create a role for each persona by clicking the "Add Role" button and filling out the following fields:
- Role Name: This value can be anything you want. It serves as a human-readable, unique identifier of the role. This value is immutable and can't be changed after the role is created.
- Display Name: This value can be anything you want. The Wristband dashboard will use this value when displaying the role.
- Tenant Visibility: Determines which tenants have access to this role. Set this value to "All" so that all tenants within the application can access the role, including the Global Tenant.
Assigning Permissions and Boundaries
Once you've created your roles, you'll need to consider what permissions to assign to your roles. Within Wristband, there are two types of permissions: custom and predefined.
Custom Permissions
Custom permissions are those that you create to control access to resources within your application. For example, if your application had a document resource, you may want to create permissions corresponding to the CRUD operations that can be performed on a document, such as: document:create, document:read, document:update, and document:delete. Note, for custom permissions, it's your application's responsibility to perform the proper authorization checks to ensure that users have the correct permissions to perform an action on a resource - Wristband doesn't enforce authorization decisions for custom permissions. Also, if your application's authorization logic is simple enough, you may not need to assign any custom permissions to your roles. Instead, the authorization decisions can be made entirely based on the user's assigned roles.
Create Custom Permissions
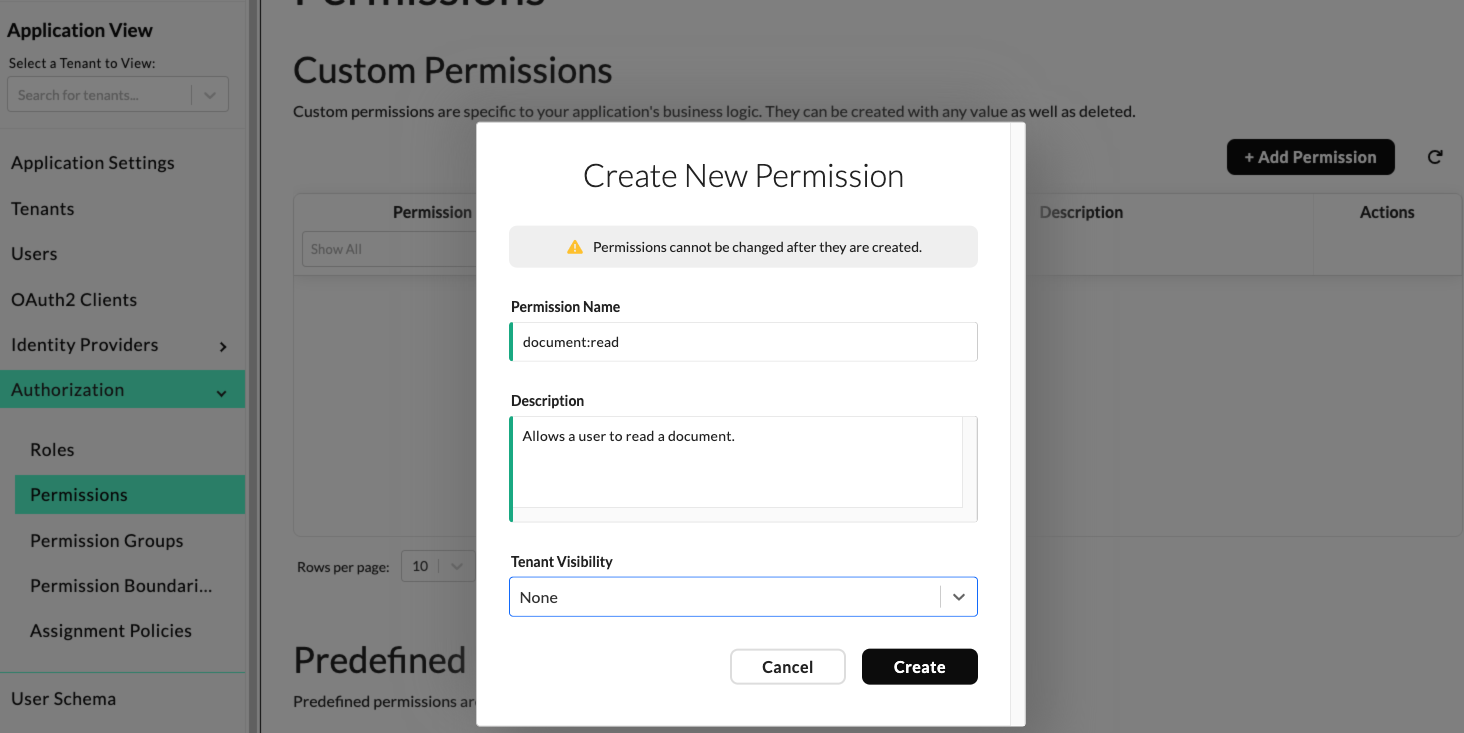
To create custom permissions within the Dashboard, navigate to the Application View and select "Authorization" -> "Permissions" from the left navigation menu. Click the "Add Permission" button and fill out the following fields:
- Permission Name: The name of the permission. This value can be anything that you want, but typically you'll want to follow some convention, such as
<resource>:<verb>when naming your permissions. For example, if you had a document resource and you wanted to create a permission that allowed users to read a document, then you would name your permissiondocument:read. - Description: A description of the permission.
- Tenant Visibility: Determines which tenants have access to this permission. For B2C applications, you'll typically set this value to "None" since your roles will be defined at the application level instead of the tenant level. You only need to set this value to "All" if you intend to have roles defined at the tenant level that need to be able to have this permission assigned to them.
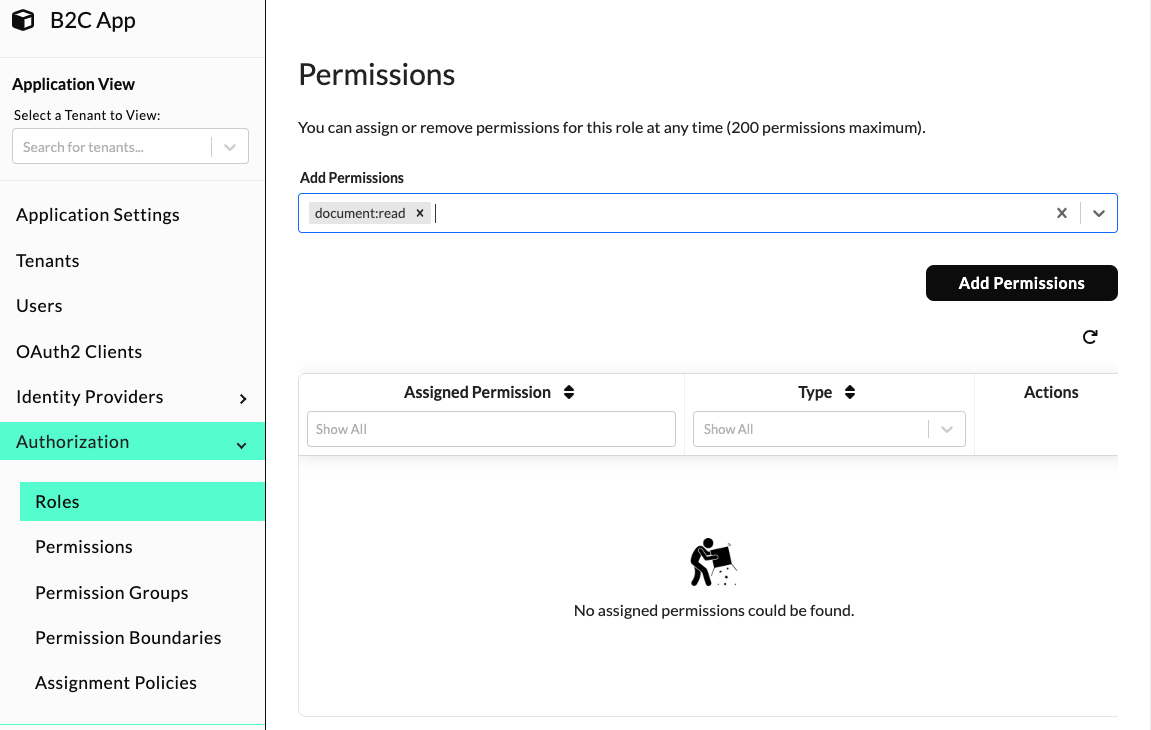
Assign Custom Permissions to Roles
To assign custom permissions to roles, navigate to the Application View and select "Authorization" -> "Roles" from the left navigation menu. Next, click the role from the Custom Roles Table that you would like to assign the permission to. Scroll down to the "Permissions" section and enter the name of your custom permission into the "Add Permissions" drop-down. Finally, click the "Add Permissions" button.
Predefined Permissions
Predefined permissions are those that Wristband defines to control access to resources that Wristband maintains (e.g., users, tenants, applications, etc). When you call Wristband's APIs, you must ensure that the access token passed in the request is associated with a user who has the necessary permissions to perform the requested operation. For example, if your application needed to call Wristband's Get User API on behalf of a user, then the user whose access token is passed in the request would need to have the user:read permission assigned to them.
Furthermore, Wristband also has the concept of a permission boundary. A permission boundary defines the scope of access that a permission grants. For example, if you assigned the user:read permission to a user, the permission boundary would define what users within an application that the user:read permission grants access to. Out of the box, Wristband defines the following three permission boundaries:
- Self: The "Self" permission boundary bounds the permission to resources directly associated with the user itself.
- Tenant: The "Tenant" permission boundary bounds the permission to resources owned by the tenant that the user belongs to.
- Application: The "Application" permission boundary bounds the permission to resources owned by the application that the user is associated with.
Going back to our previous example, where your application has two roles: "End User" and "Admin". If we wanted to assign predefined permissions to these roles, then we'd also have to assign the correct permission boundaries as well. The table below shows which permission boundaries should be assigned to each role.
| Role | Permission Boundary | Description |
|---|---|---|
| End User | Self | End users can make Wristband API requests that only affect resources directly associated with their user. |
| Admin | Application | Admins can make Wristband API requests for all resources associated with the application that they belong to. |
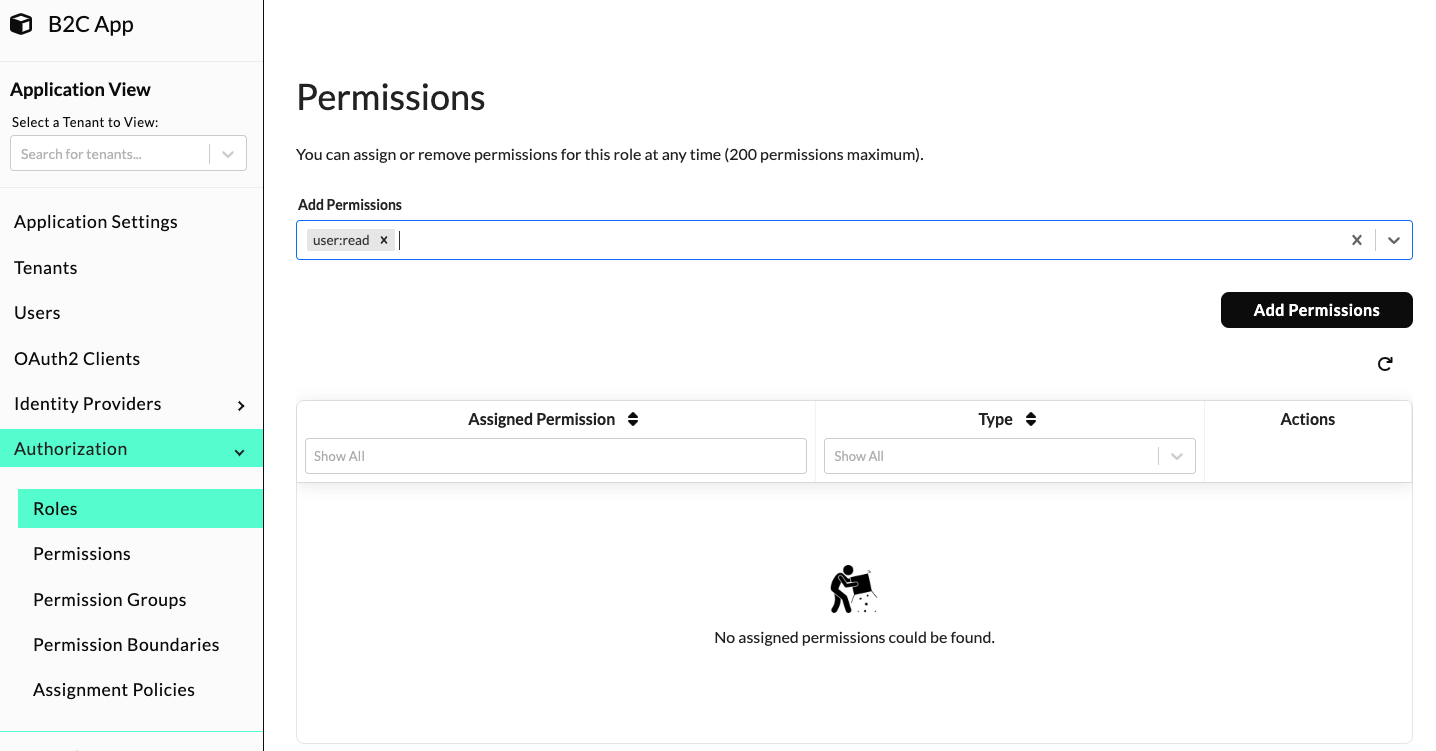
Assign Predefined Permissions to Roles
To assign predefined permissions to roles, navigate to the Application View and select "Authorization" -> "Roles" from the left navigation menu. Next, click the role from the Custom Roles Table that you would like to assign the permission to. Scroll down to the "Permissions" section and enter the name of the predefined permission into the "Add Permissions" drop-down. Finally, click the "Add Permissions" button.
Assign a Permission Boundary to a Role
To assign a permission boundary to a role, navigate to the Application View and select "Authorization" -> "Roles" from the left navigation menu. Next, click the role from the Custom Roles Table that you would like to assign the permission boundary to. In the "Permission Boundary" drop-down, select the permission boundary you'd like to assign to the role.

Assigning Roles To Users
For B2C applications, there are multiple ways that users can be assigned roles. Below, we'll discuss some of the most common approaches.
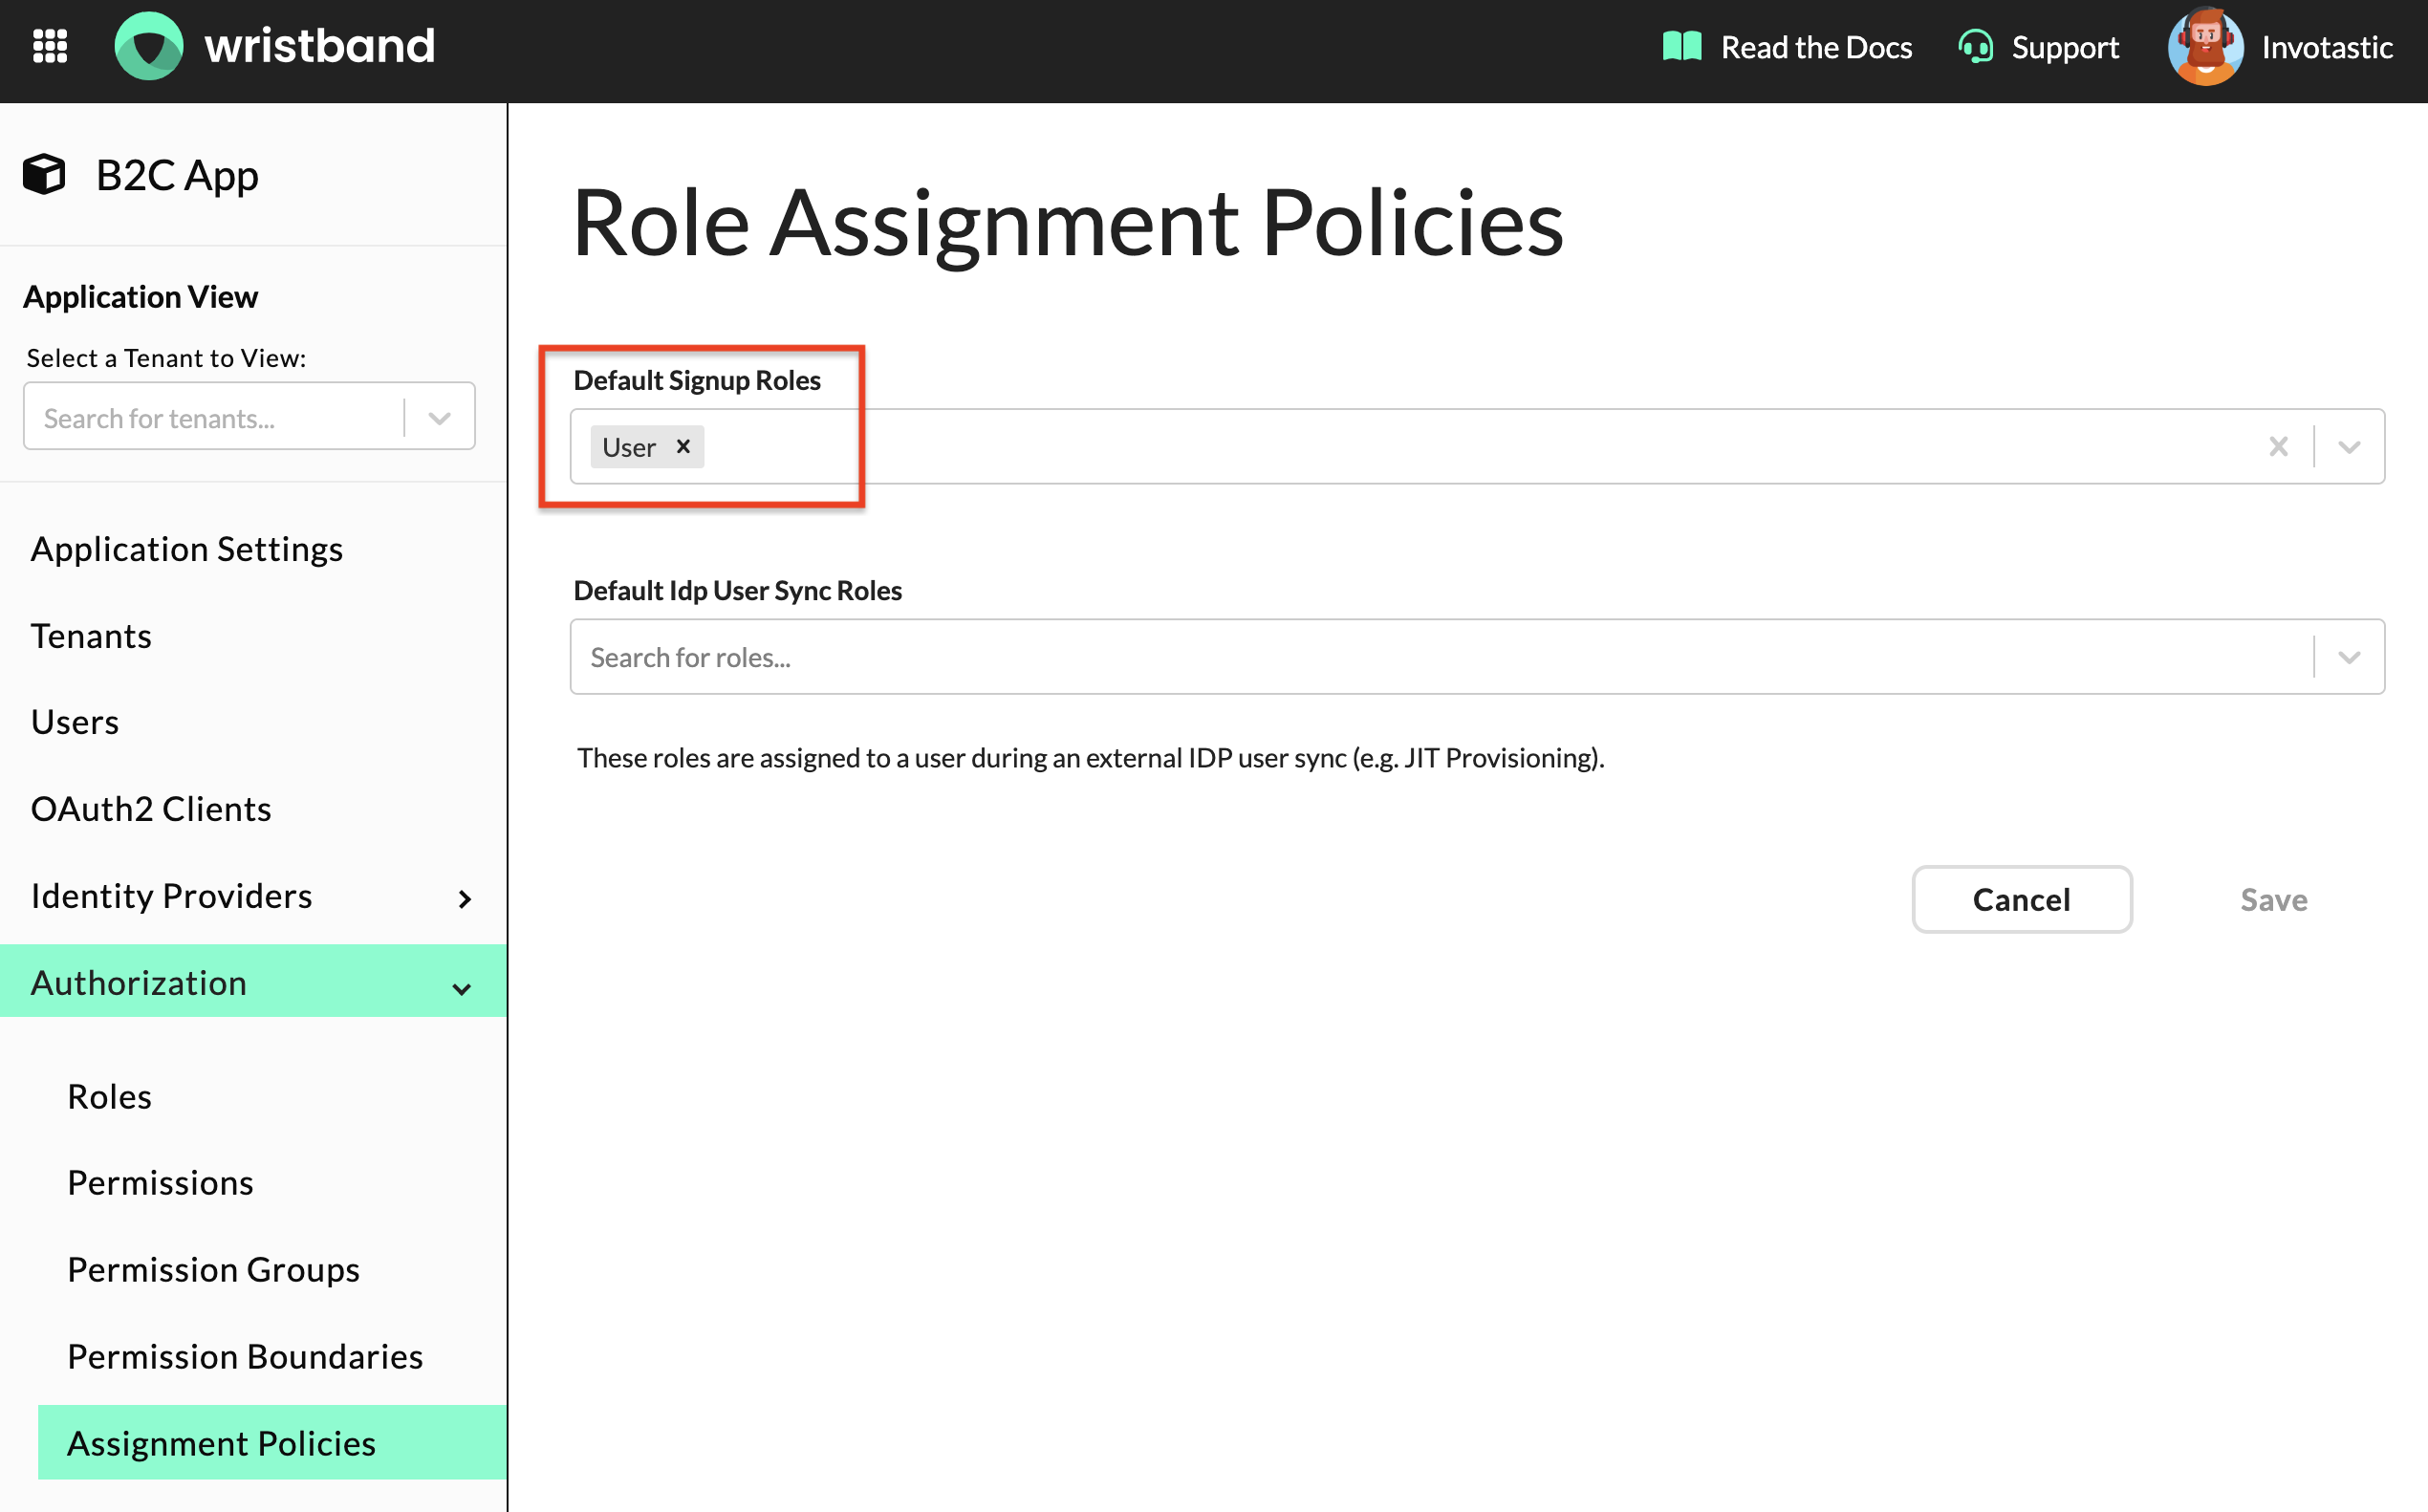
Configure Default Signup Roles
When users provision themselves by going through the self-signup flow, you'll often want to assign them a default role. To configure a default signup role, in the Wristband Dashboard, navigate to "Authorization" -> "Role Assignment Policies" in the left side navigation menu. Update the "Default Signup Roles" field with your desired role. Now, when users go through the self-signup flow, they will automatically be assigned the role that you specified.
Manually Assign Roles to Invited Users
When manually inviting users to your application, you can specify an explicit list of roles to assign them. Existing administrators can use invitations to onboard users who require special roles, such as other admins.
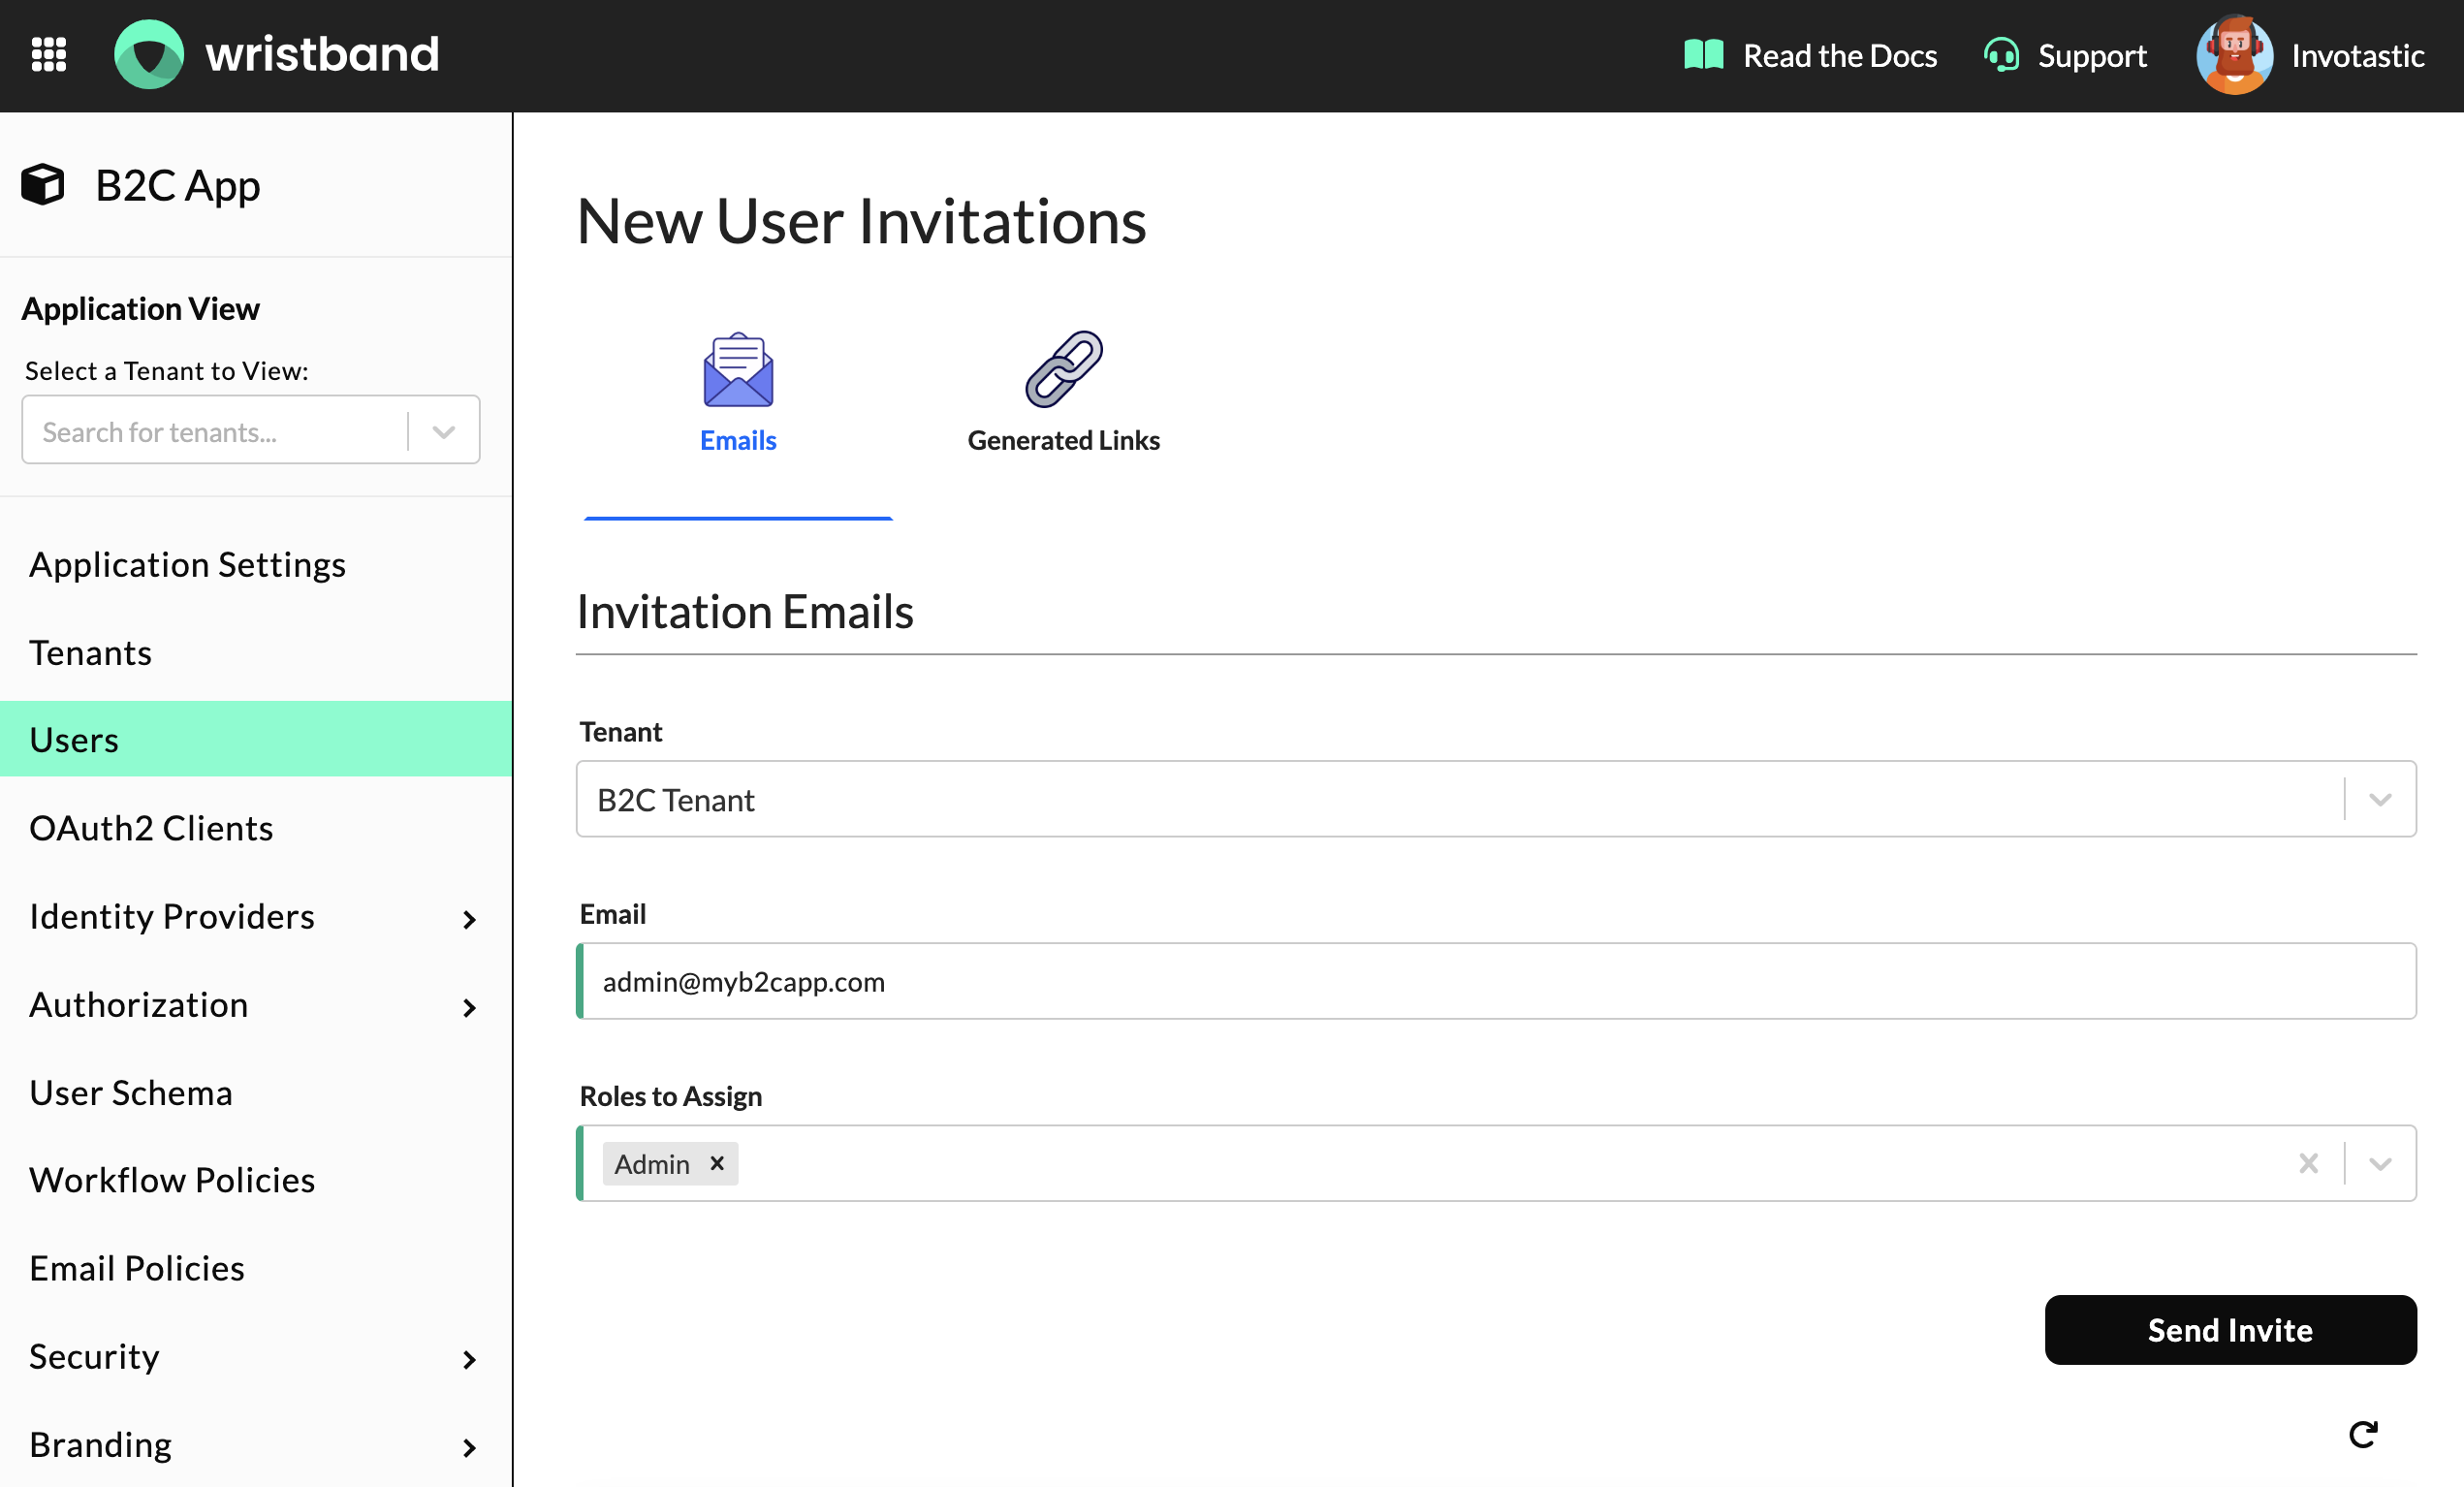
To send a user invitation from the Wristband Dashboard, select "Users" from the left side navigation menu. Scroll down to the "New User Invitations" section and specify the following:
- Tenant: This is the tenant under which the invited user will be provisioned.
- Email: The email to which the invite will be sent.
- Roles to Assign: List of roles that will be assigned to the user after they accept the invite.
Updated 5 months ago