
SSO-Only Integration
Delegate enterprise SSO to any IdP for consumer authentication while retaining full ownershipp of user data and session states outside of Wristband.
Overview
The SSO-Only Integration is a lightweight pattern for customer-facing applications that already manage internal users and sessions, but need to support enterprise SSO for client organizations. Instead of managing full lifecycle users, sessions, and tokens end-to-end, Wristband strictly handles the SAML or OIDC handshake with enterprise IdPs.
Under this model, tenants exist in Wristband solely to store identity provider configurations and map to your application’s existing tenant database—they do not serve as a source of truth for users. Wristband simply returns verified identity claims directly to your application backend, handing off complete control from there.
Note: This pattern is sometimes referred to as "identity brokering".
Why Use This Pattern
This pattern is ideal if you already maintain a production auth system handling email-based authentication (such as passwords or magic links) and need to layer enterprise SSO on top. It allows you to support SSO without migrating your entire authentication stack or splitting user records across two separate databases. Wristband acts strictly as an identity broker for SSO-enabled tenants, leaving your existing session model and core user store completely intact.
How It Works
At a high level, the flow works as follows:
- User enters their email on a login page you control and self-host
- Your app parses the email domain to determine whether SSO applies
- If so, your app initiates the login flow with Wristband
- Wristband validates the request and passes control to your Tenant Login page
- Your app identifies the tenant's IdP and hands off to Wristband to begin authentication
- Wristband handles the SAML/OIDC handshake and the user authenticates with their corporate credentials
- Wristband passes the result back to your app via your External IdP Login URL
- Your app retrieves the verified user identity from Wristband
- Your app revokes the auth code and provisions the user if they don't exist yet
- Your app mints a session and redirects the user into the application
Wristband Setup
1. Create a Wristband Application
-
Open the Wristband Dashboard and create a new manual application.
-
Once created, go to the left navigation menu.
-
Click Application Settings to access your configuration details.
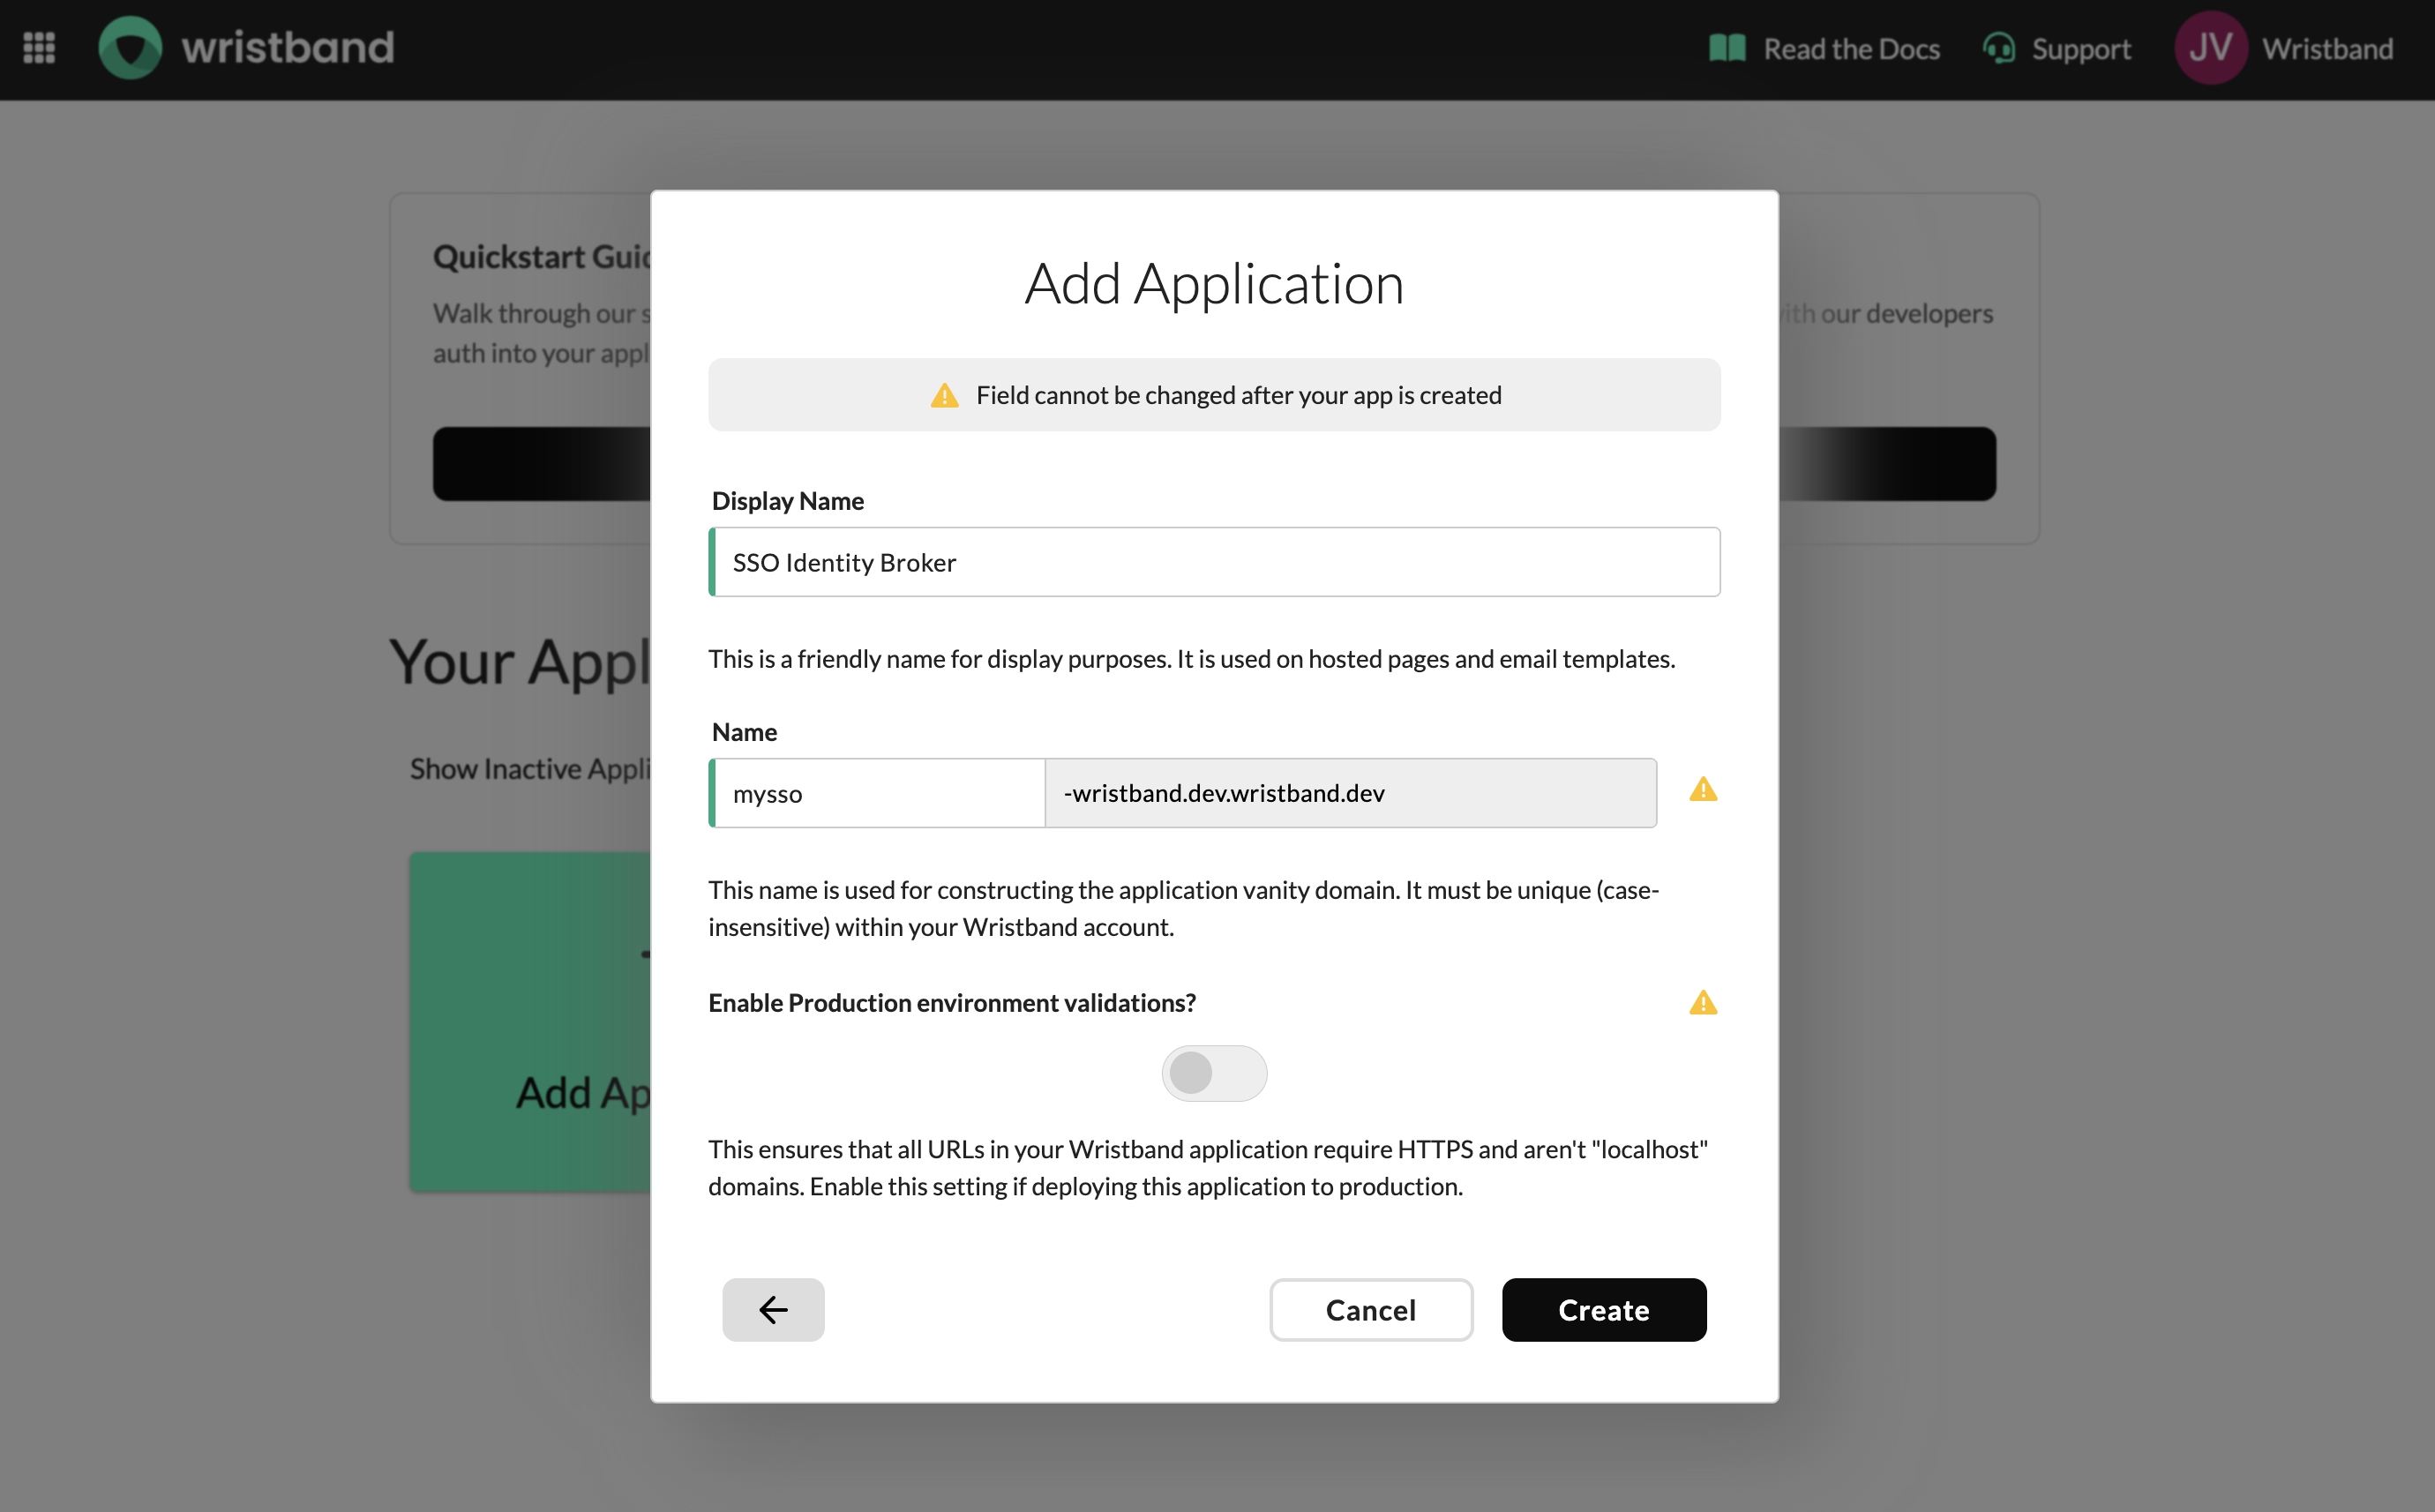
Figure 1: Create an app manually in the Wristband dashboard.
2. Configure Application Settings
Copy The Application Vanity Domain
-
Look for the Default Vanity Domain field on the Application Settings page.
-
Copy the domain string.
-
Store it securely—this value is required for making API calls to Wristband during the SSO flow.
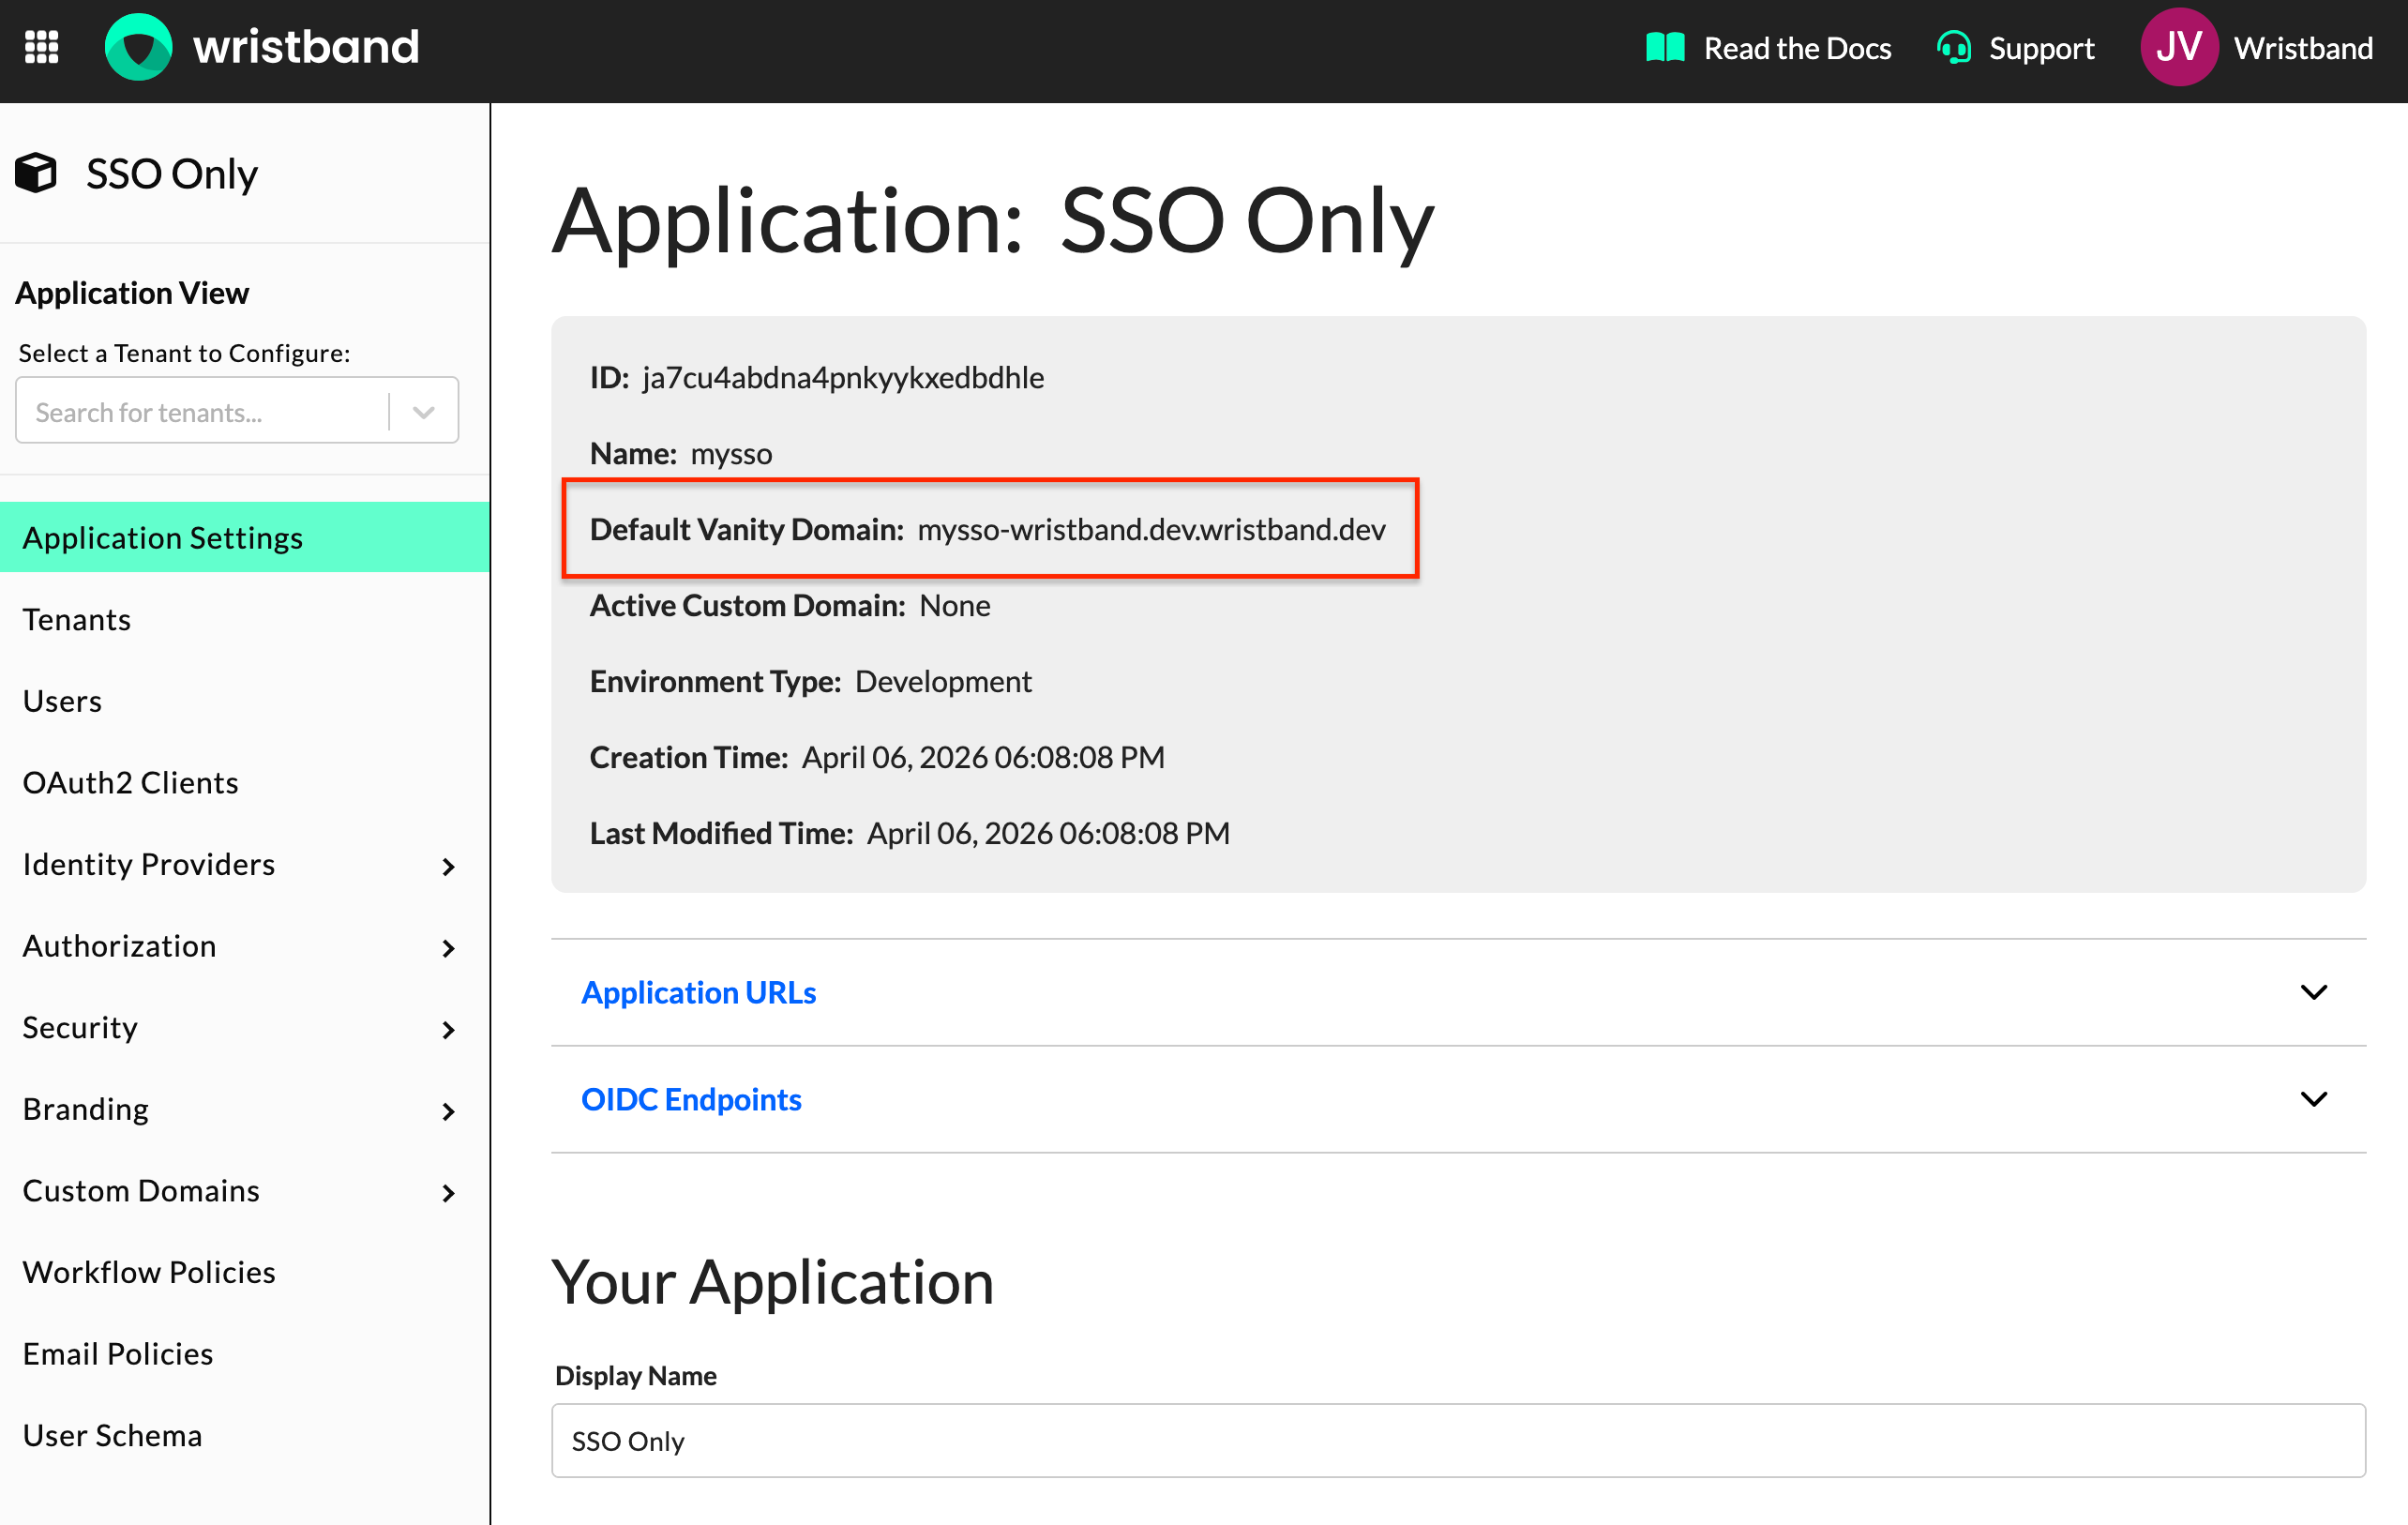
Figure 2: Copy the Default Vanity Domain value from the Application Settings page.
General Settings
-
General Settings: Leave all values at their default settings.
-
Login URL Field: Keep the pre-populated placeholder value. This endpoint is completely bypassed and is never invoked during an SSO-Only Integration flow.
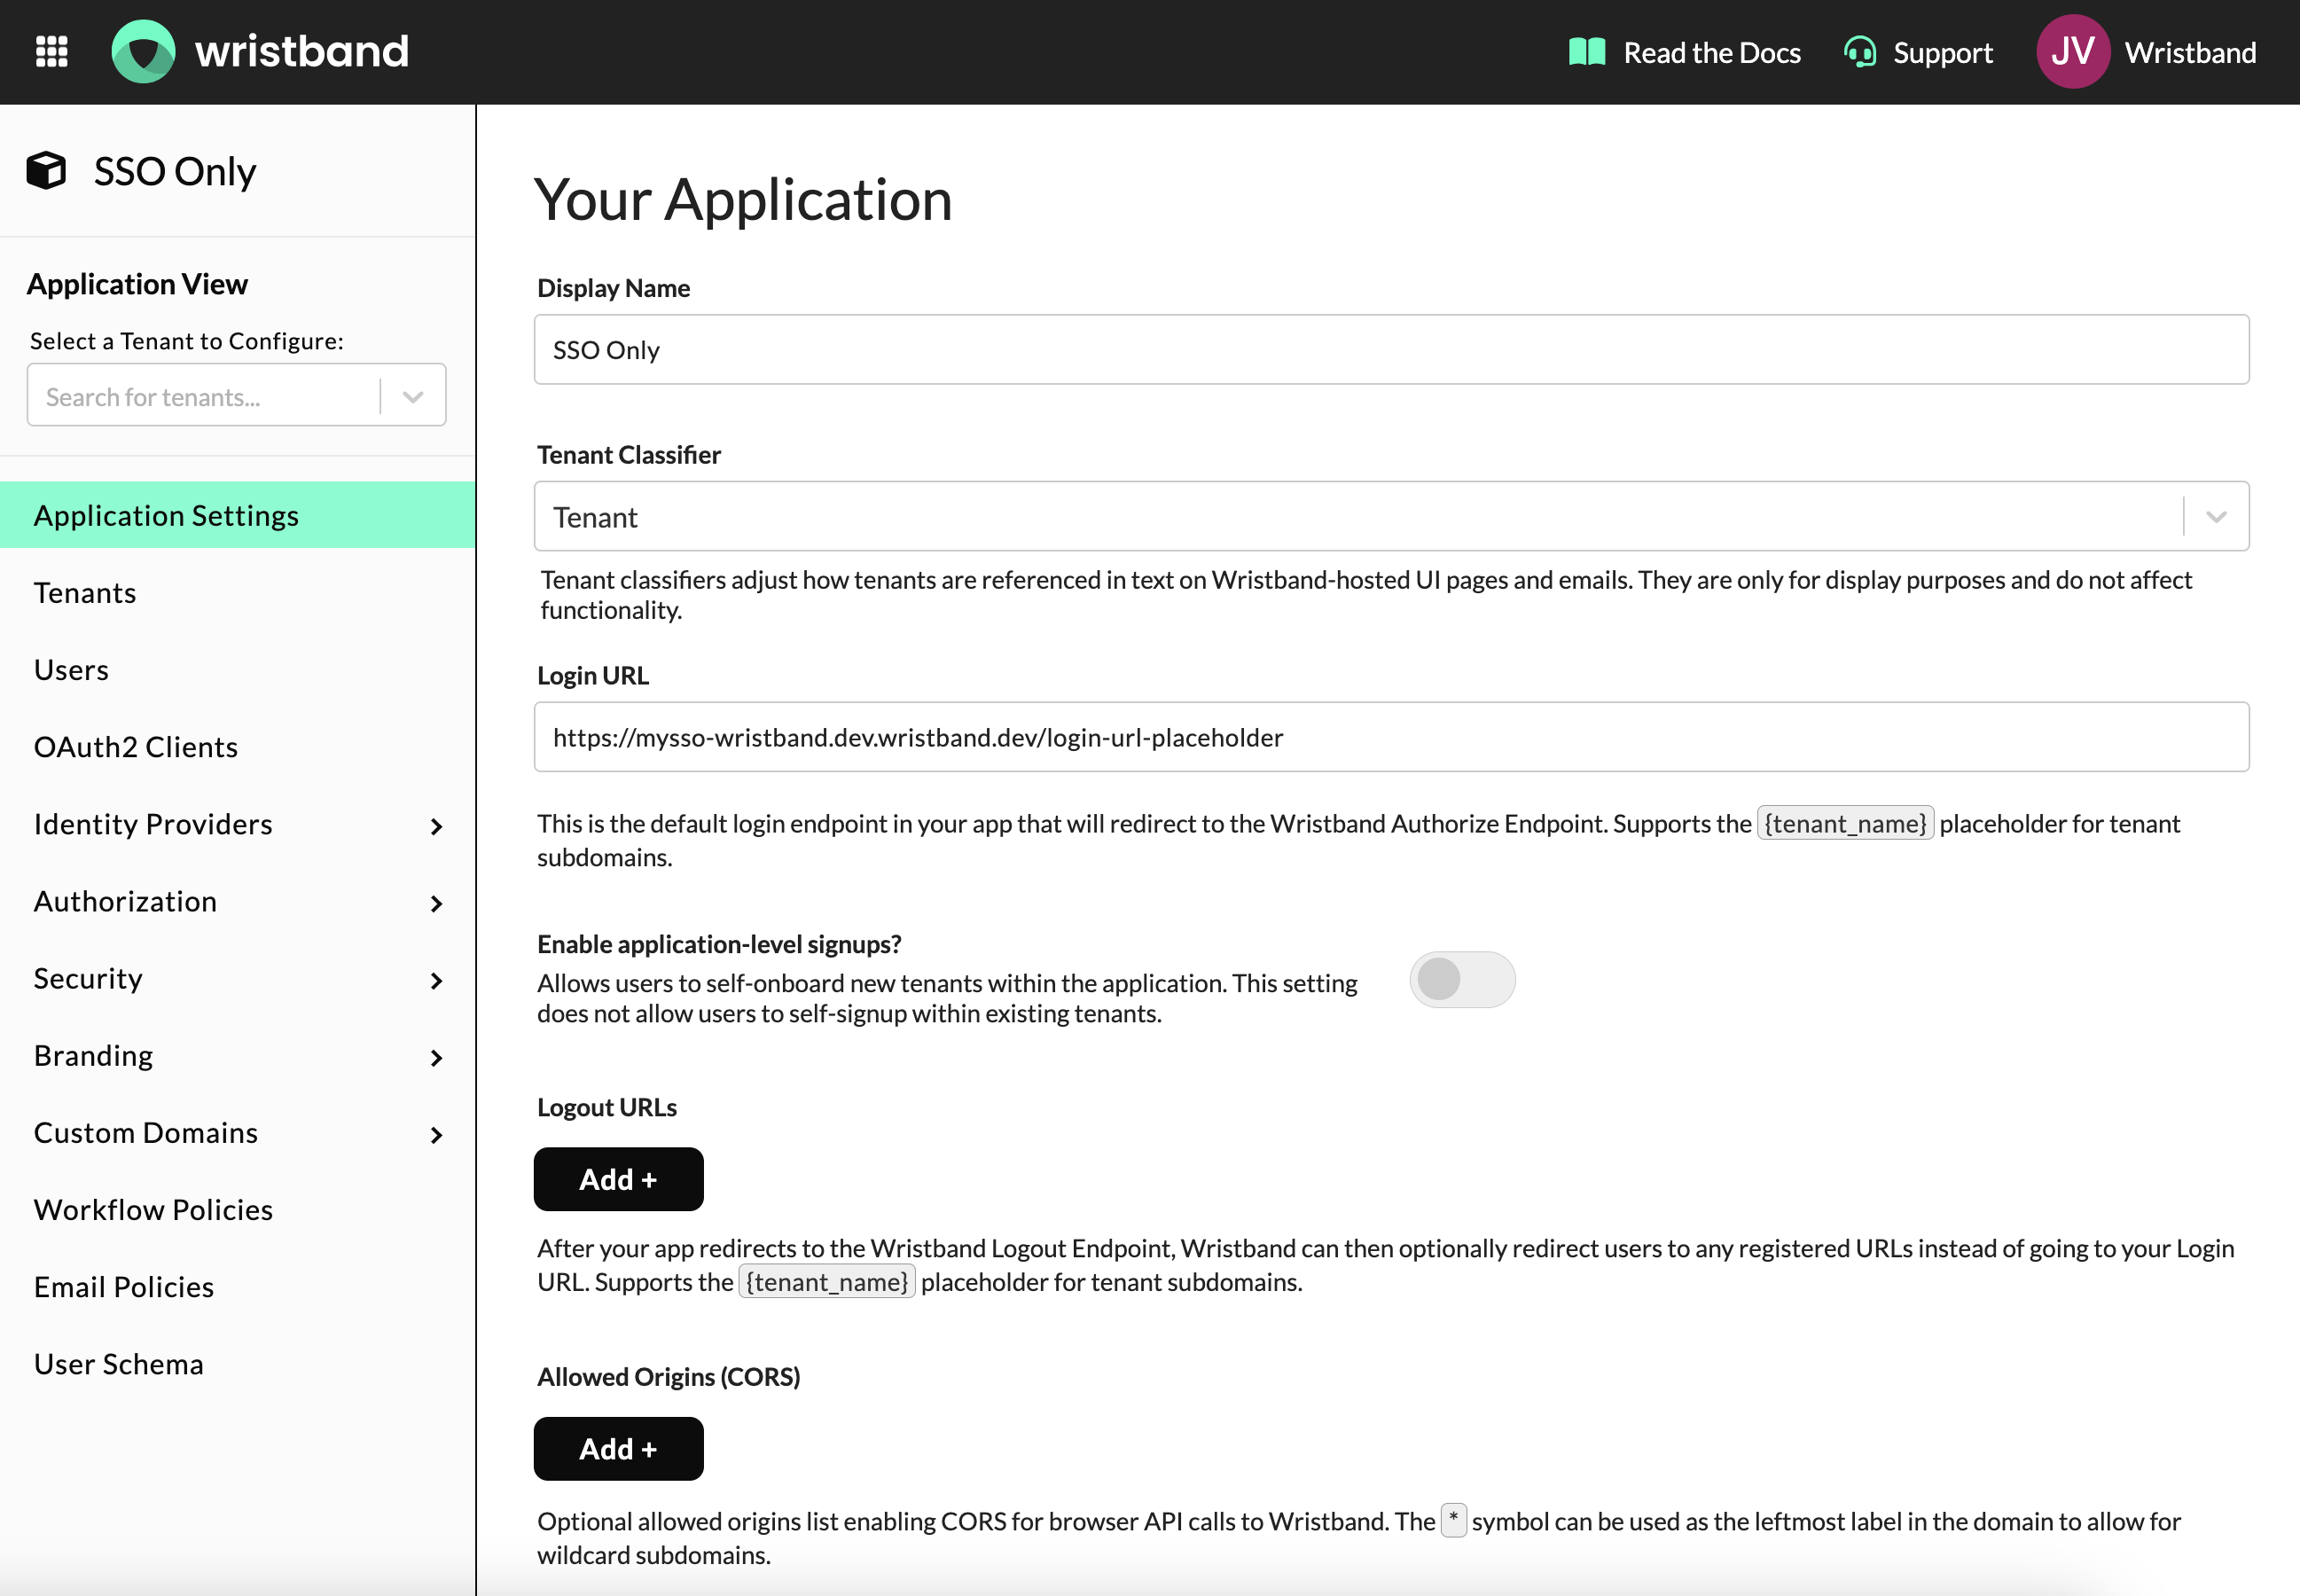
Figure 3: Application settings: Login URL can be left as the default placeholder value.
Custom Page URLs
Wristband provides two mandatory integration URLs that must be configured to support the authentication flow, alongside an optional custom error page URL for handling setup failures and login edge cases.
Configure the following URLs:
-
Tenant Login Page URL: Set this value to an internal endpoint on your server. It receives the validated authorization request token from Wristband via the
reqquery parameter. This endpoint handles backend logic exclusively; no UI should be rendered here (e.g.,https://myapp.com/auth/tenant-login). -
External IDP Login Page URL: Set this value to an internal endpoint on your server. It receives the external IdP authorization code from Wristband after the user successfully authenticates with their enterprise identity provider, passed via the code query parameter. This endpoint processes the incoming callback payload; no UI should be rendered here (e.g.,
https://myapp.com/auth/sso/callback).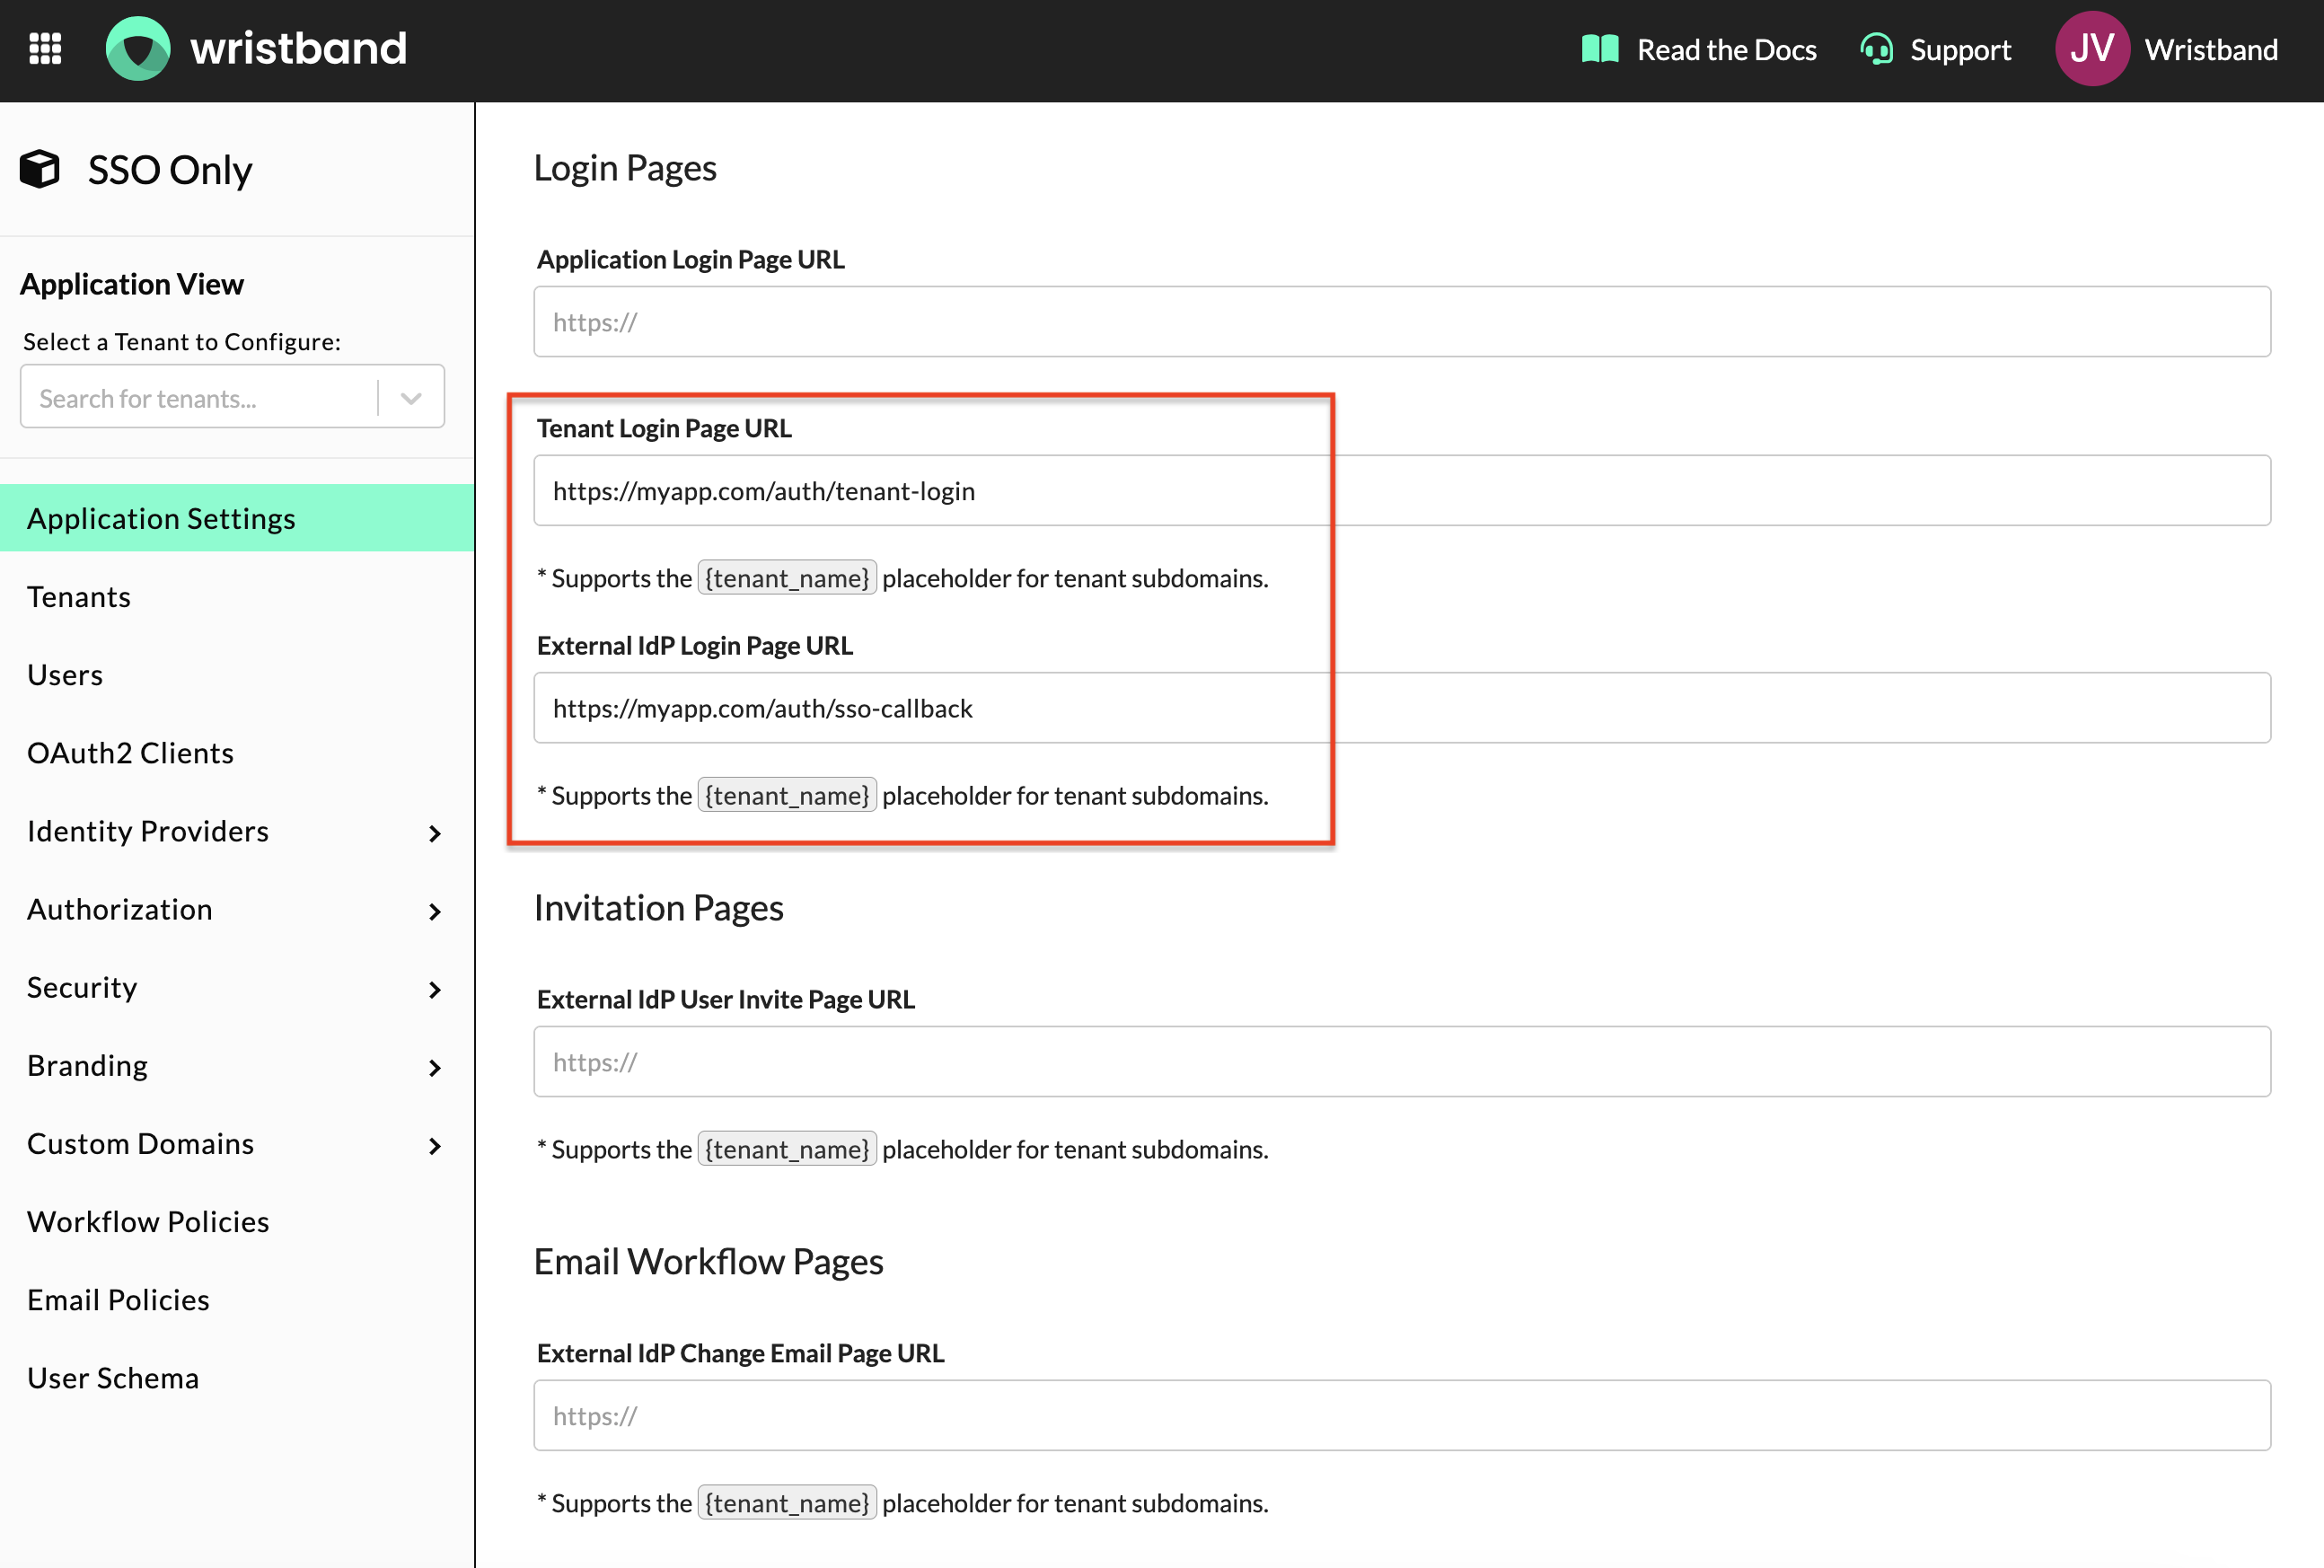
Figure 4: Custom page URL settings: Tenant Login Page URL and External IDP Login URL must both be configured
-
Tenant Error Page URL (optional): To render custom visuals or apply custom error handling logic during failures, set this field to an endpoint inside your own application (e.g.,
https://myapp.com/auth/tenant-error).Note: If you only require visual customization without custom error logic, you can configure Page Branding directly in the Wristband Dashboard to match your brand identity instead of using this URL.
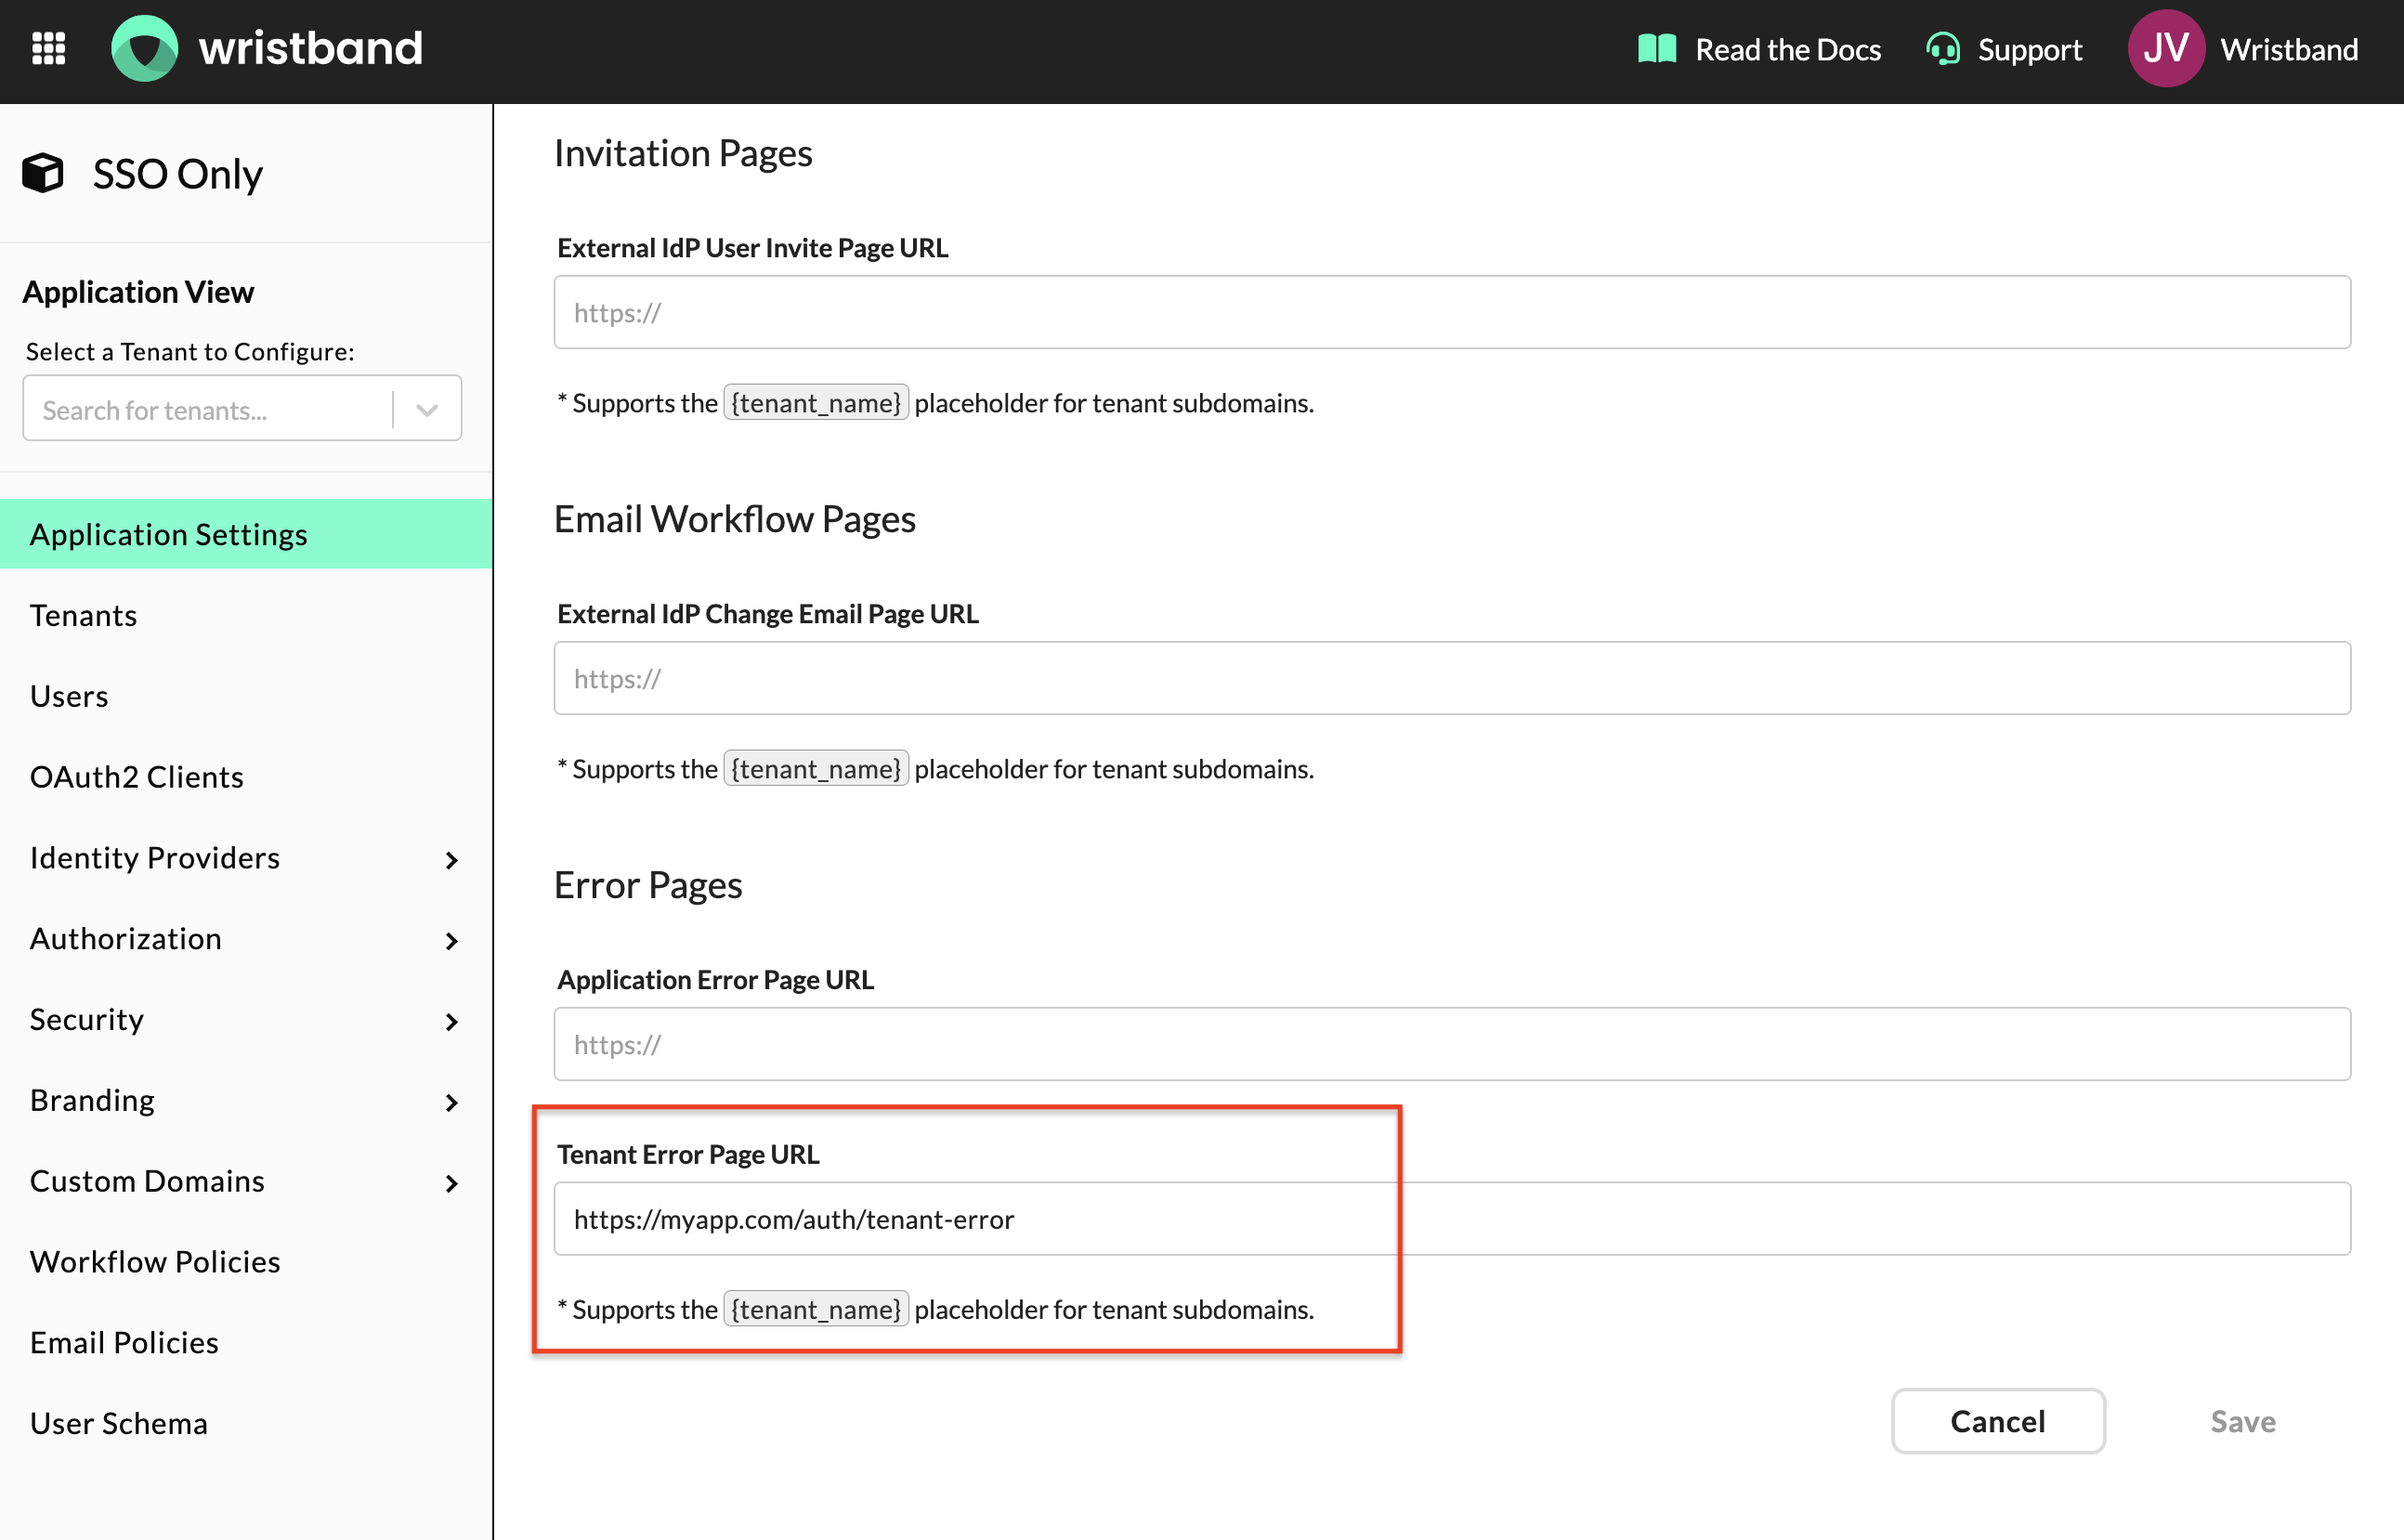
Figure 5: Tenant Error Page URL: Configure this if you want a custom error experience.
3. Create a Role and Assign Permissions
Next, create a custom role in the Wristband dashboard. This role establishes the authorization baseline and grants your application the access needed to execute the SSO flow.
In the Wristband dashboard, navigate to Authorization > Roles in the side navigation and click "Add Role". Fill out the following fields:
- Name: Any value (e.g.
sso-login-executor). Note that this field is immutable once set. - Display Name: Any value (e.g.
SSO Login Executor). - Tenant Visibility:
All
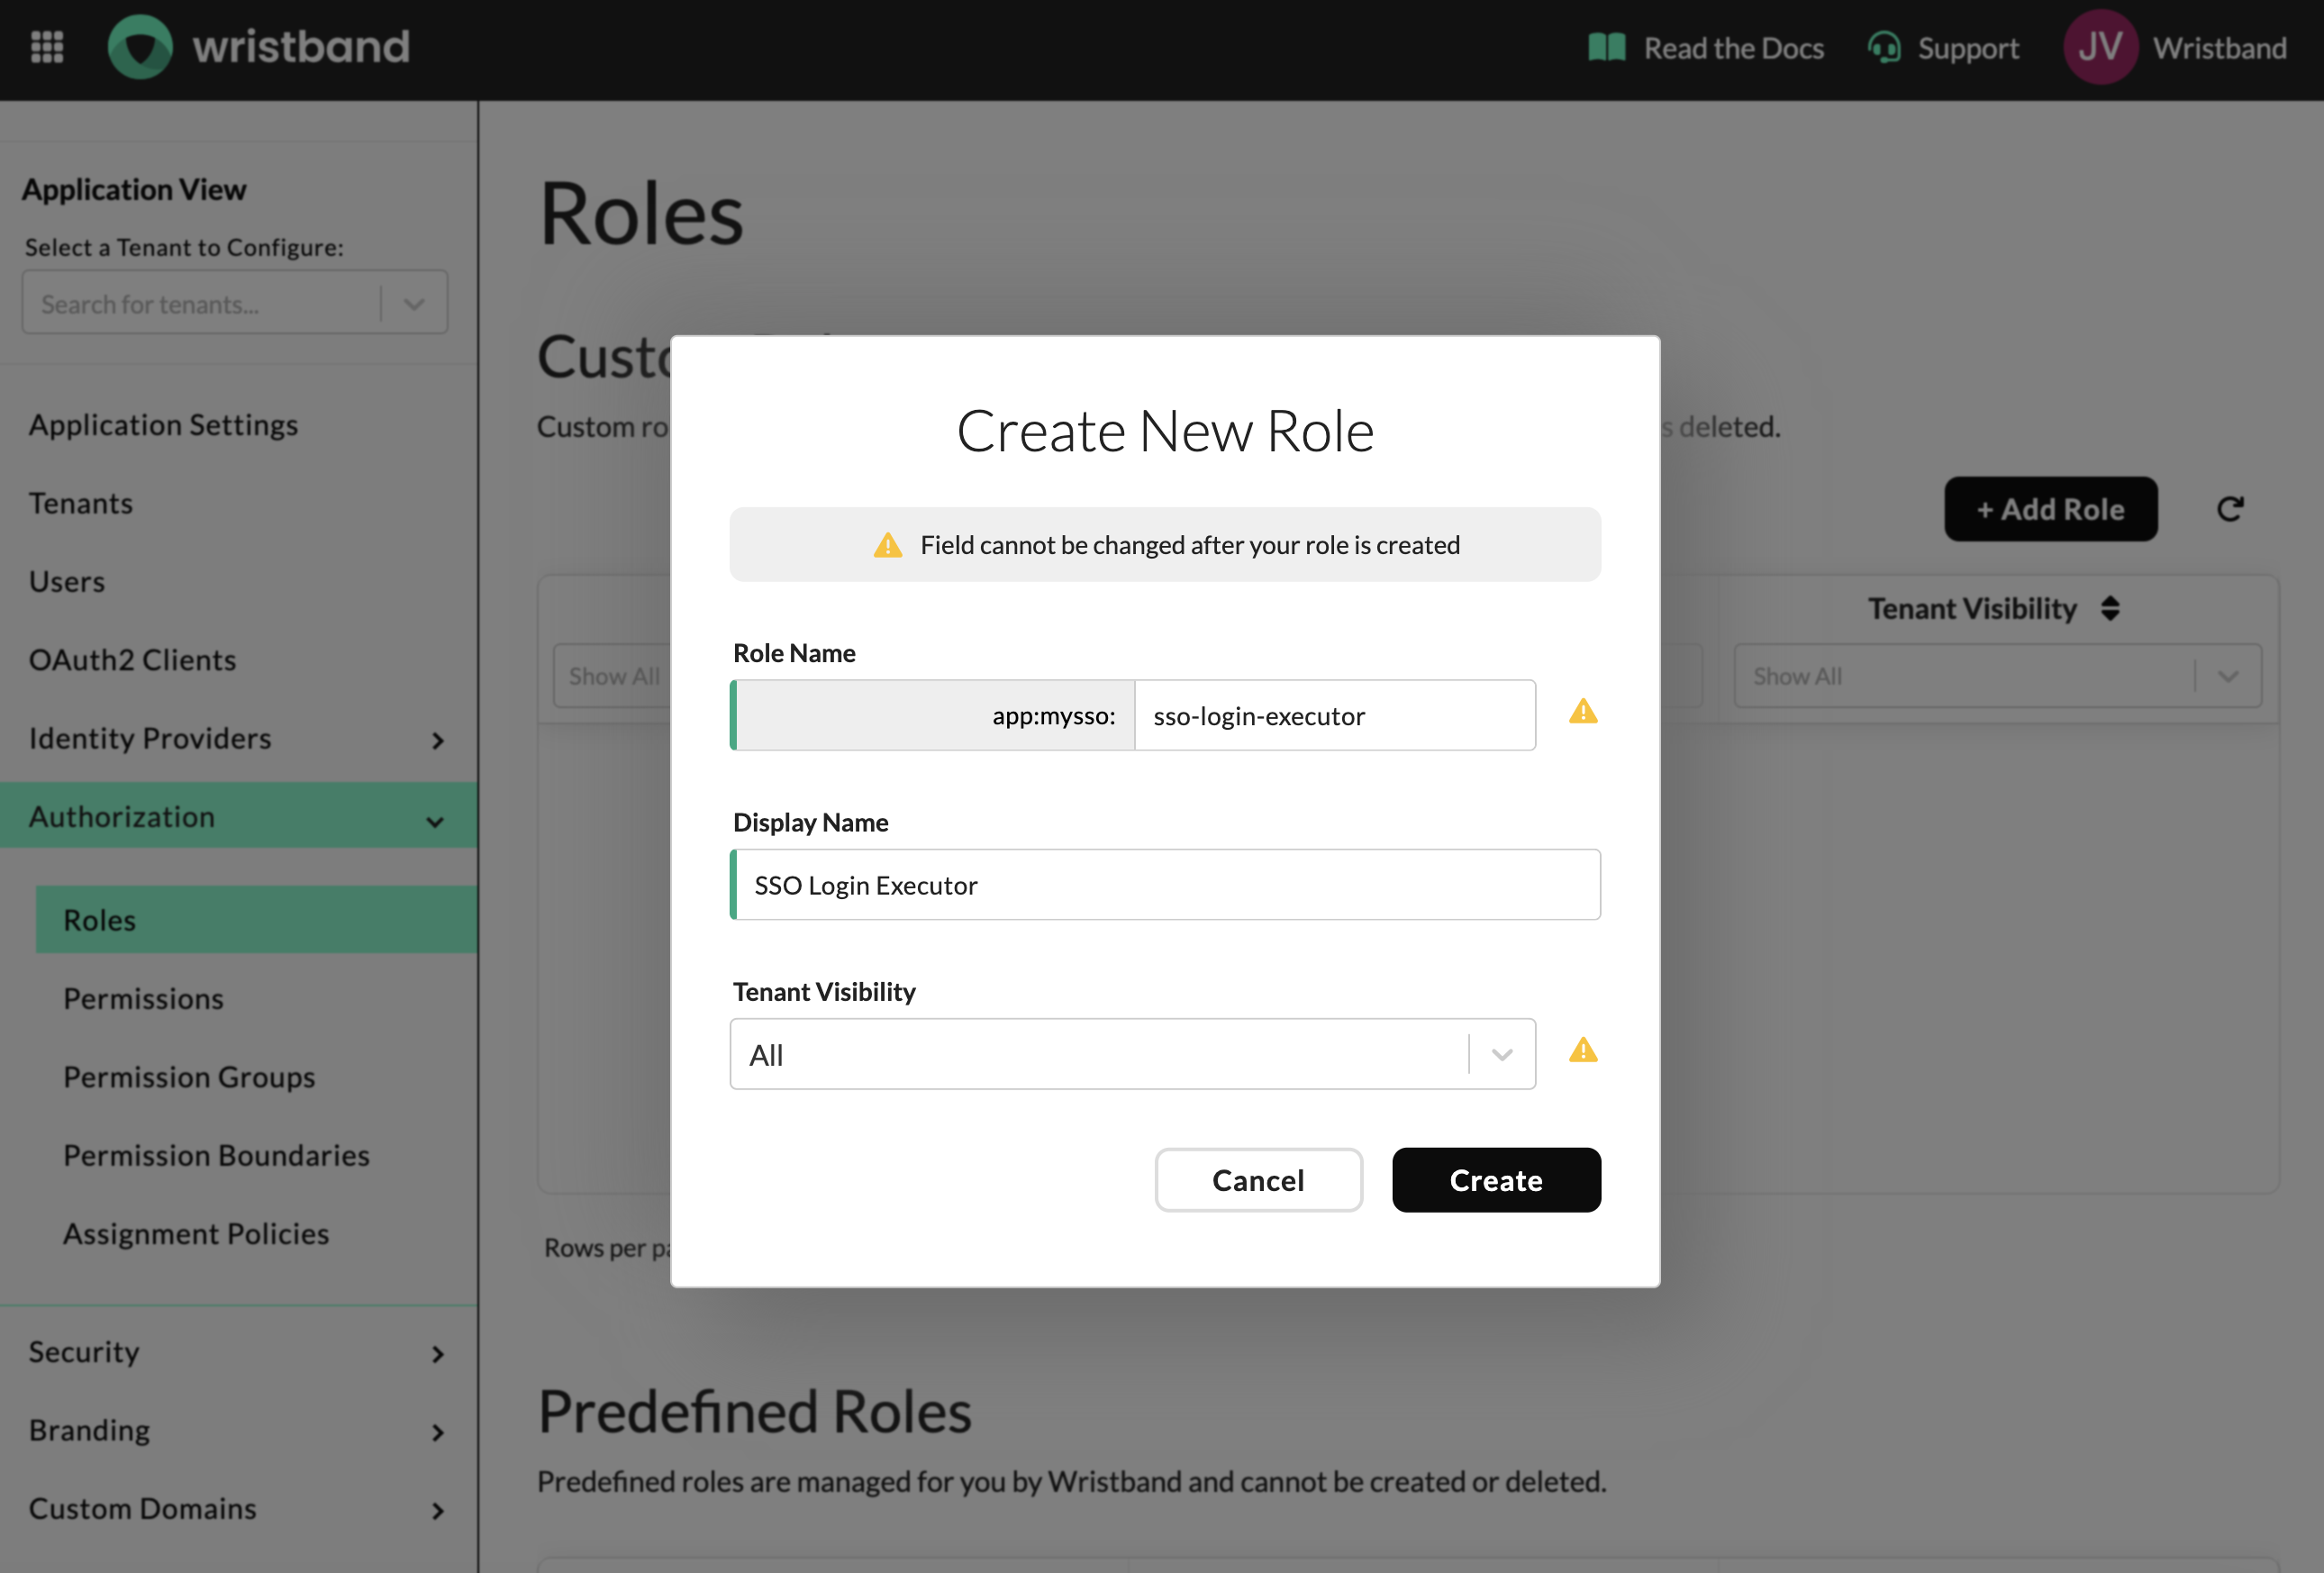
Figure 6: Role creation form. Name is immutable once set.
Once created:
- Locate your newly created role in the table and click the row to open its configuration page.
- Find the Permission Boundary drop-down.
- Select
Applicationto scope the role's access globally across all tenants.
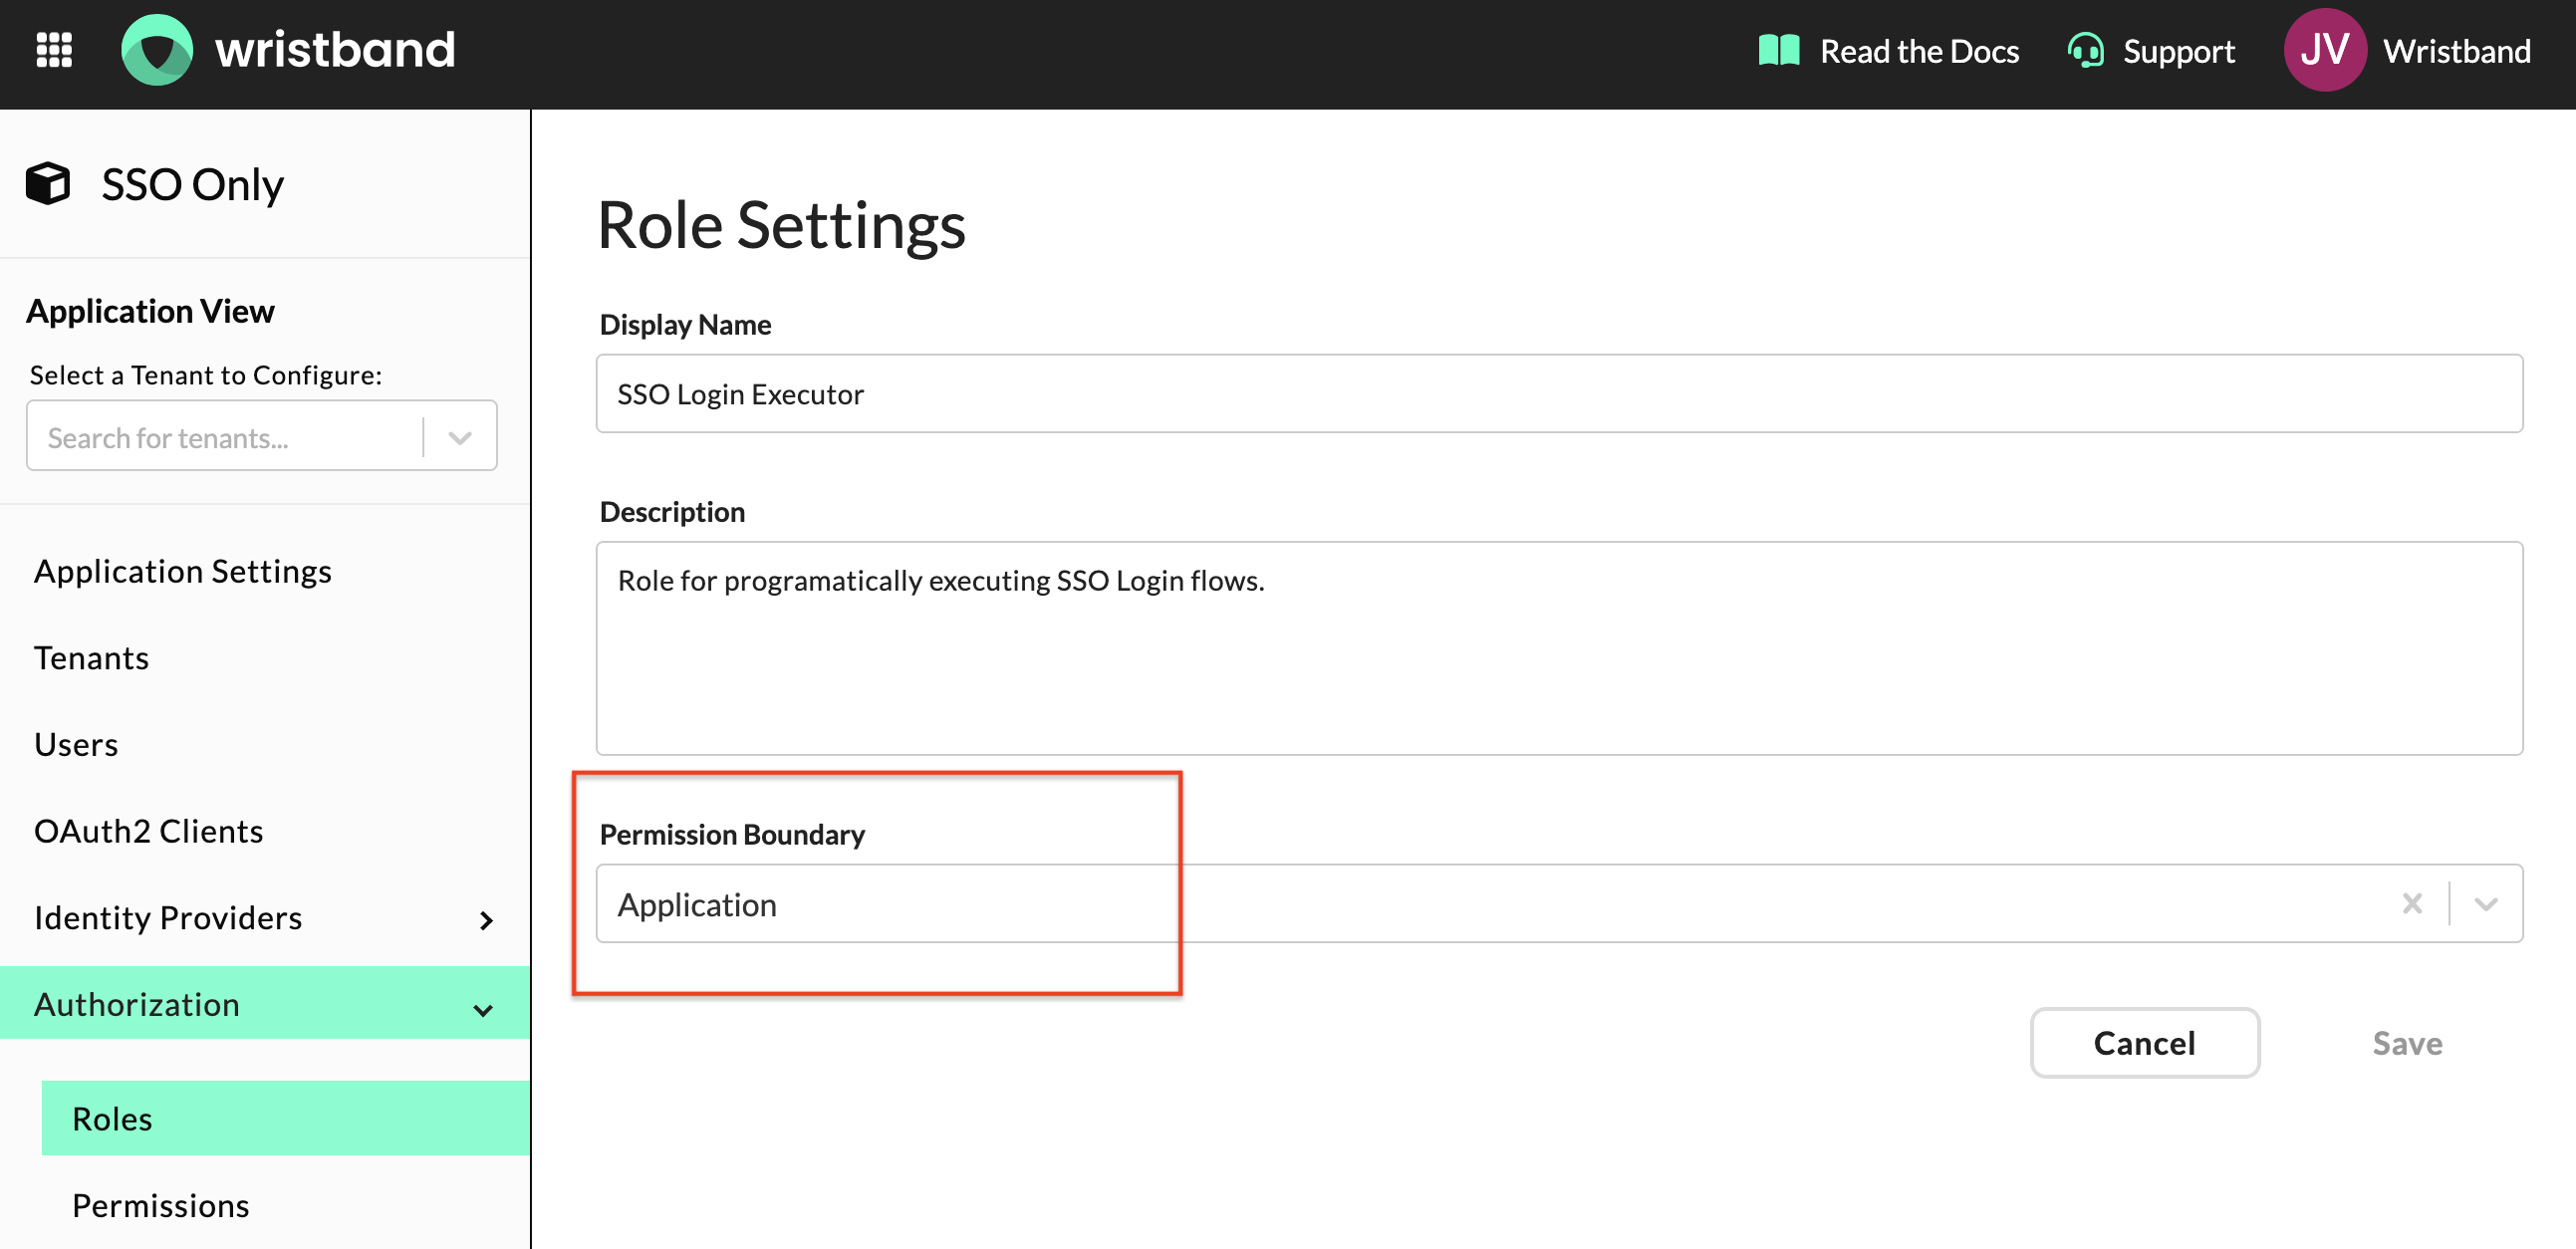
Figure 7: Permission boundary set to Application to enable access across all tenants.
Scroll down to the Permissions section and assign the following permissions to this role:
external-idp-login-workflow:execute: Allows your application to execute the SSO-Only flow on behalf of a tenant.identity-provider:read: Allows your application to read the tenant's identity provider configuration.
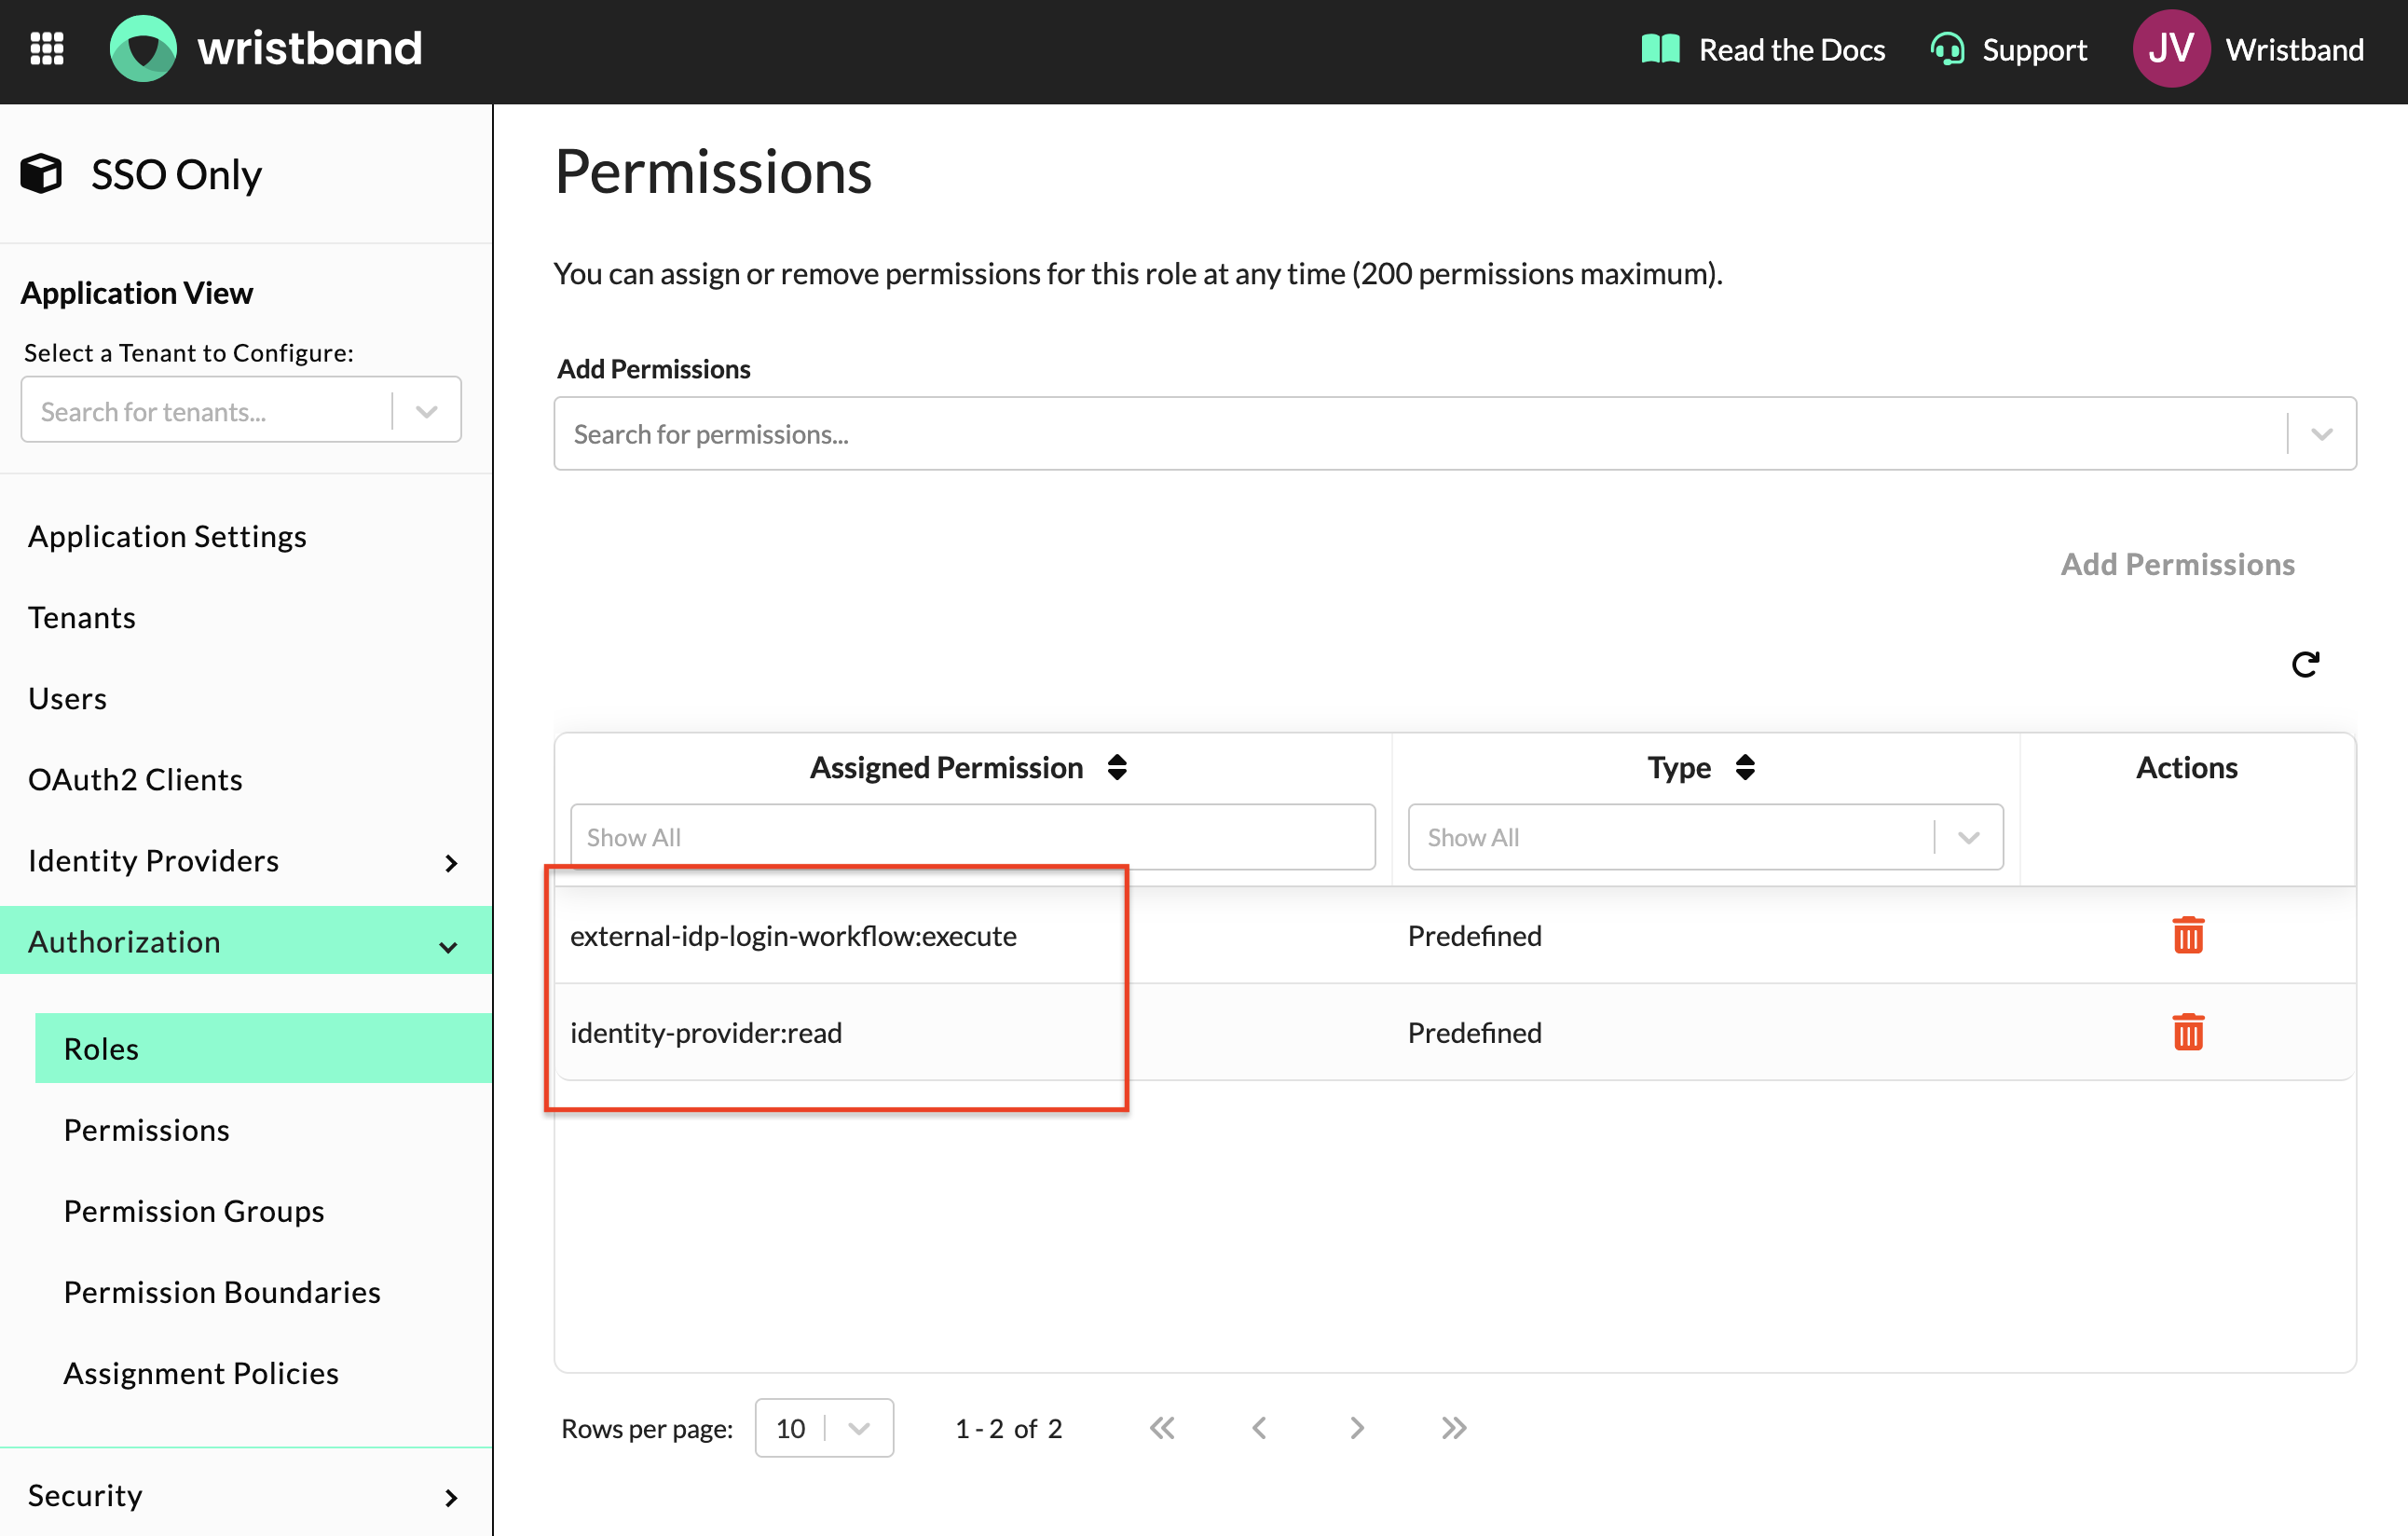
Figure 8: Assign all required permissions to the role.
4. Create and configure an OAuth2 Client
Copy Client ID and Secret
Navigate to OAuth2 Clients in the side navigation and click "Add Client". Fill out the following fields:
- Type:
Backend Server - Name: Any value (e.g.,
SSO Client).
Upon creation, your Client ID and Client Secret will be displayed:
- Copy the Client ID and Client Secret from the confirmation dialog immediately after creation.
- Save these values securely—the Client Secret is only shown once and cannot be retrieved later.
- Use these credentials in your application environment variables to authenticate server-to-server API calls to Wristband during the SSO handshake.
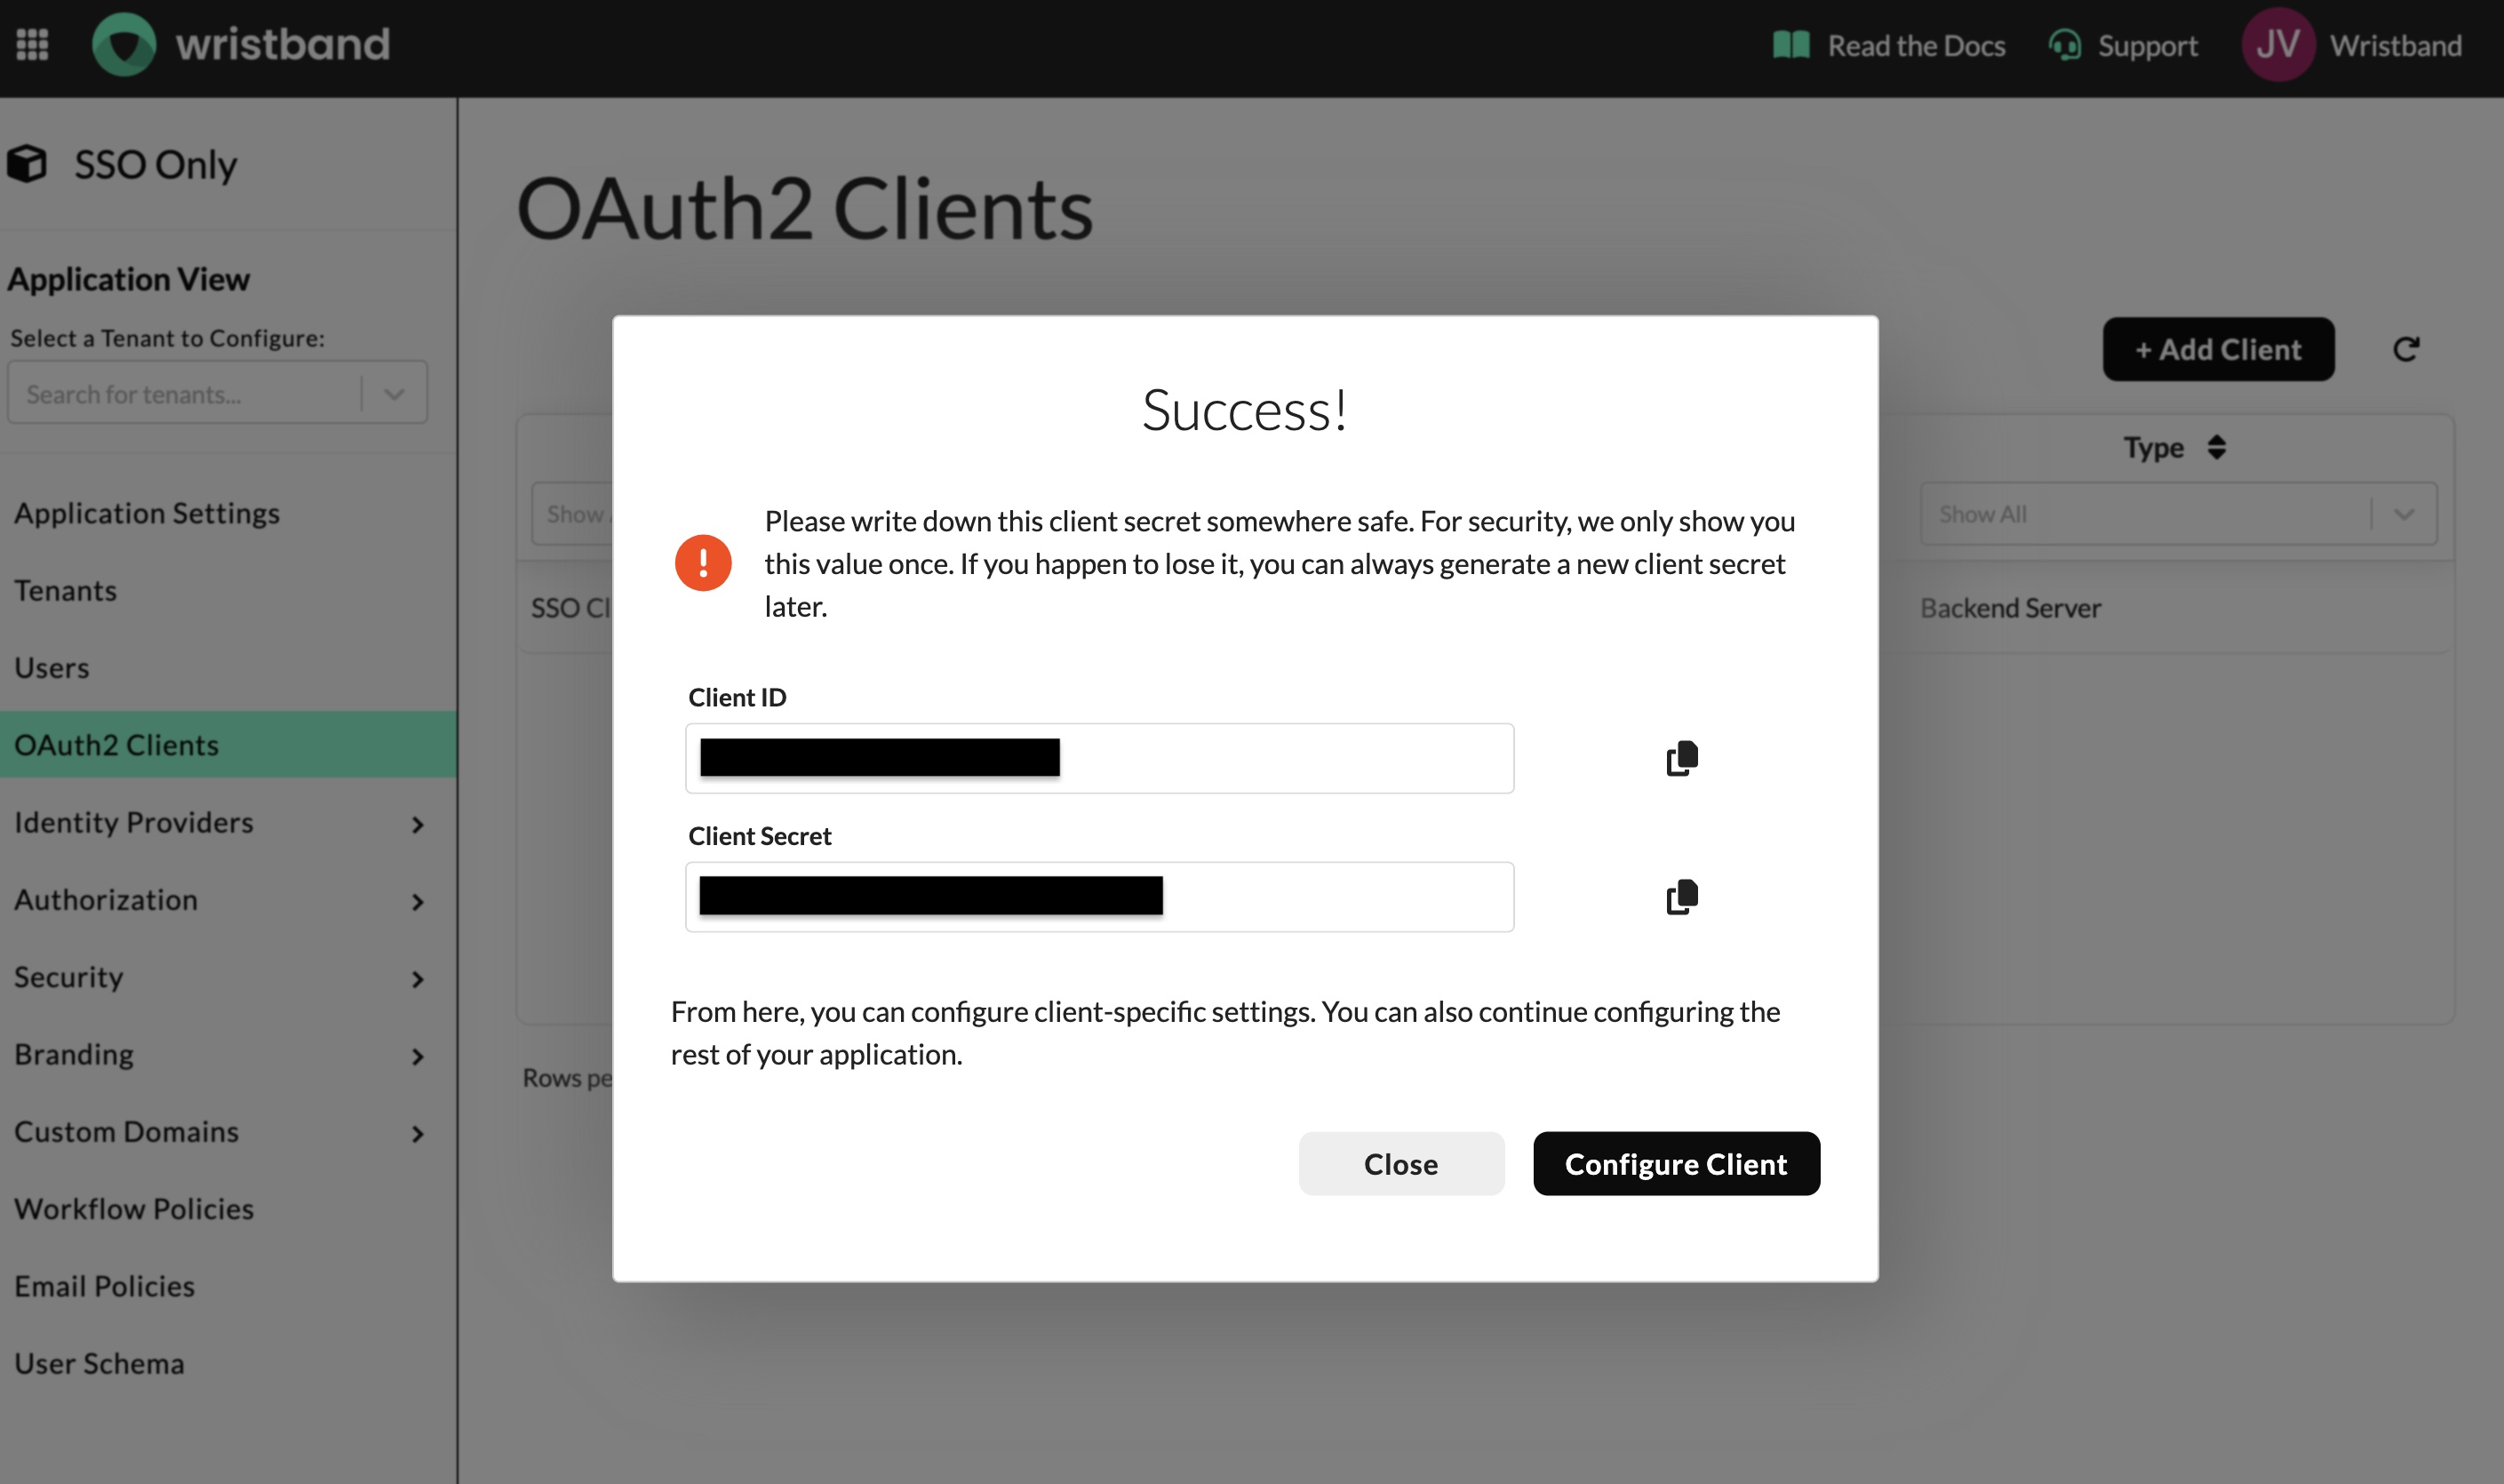
Figure 9: Copy both Client ID and Client Secret before proceeding.
Click "Configure Client" to continue setting up the client.
Enable Client Credentials:
- Scroll down to the Advanced Settings section of your client configuration.
- Locate the allowed grant types and check/enable Client Credentials.
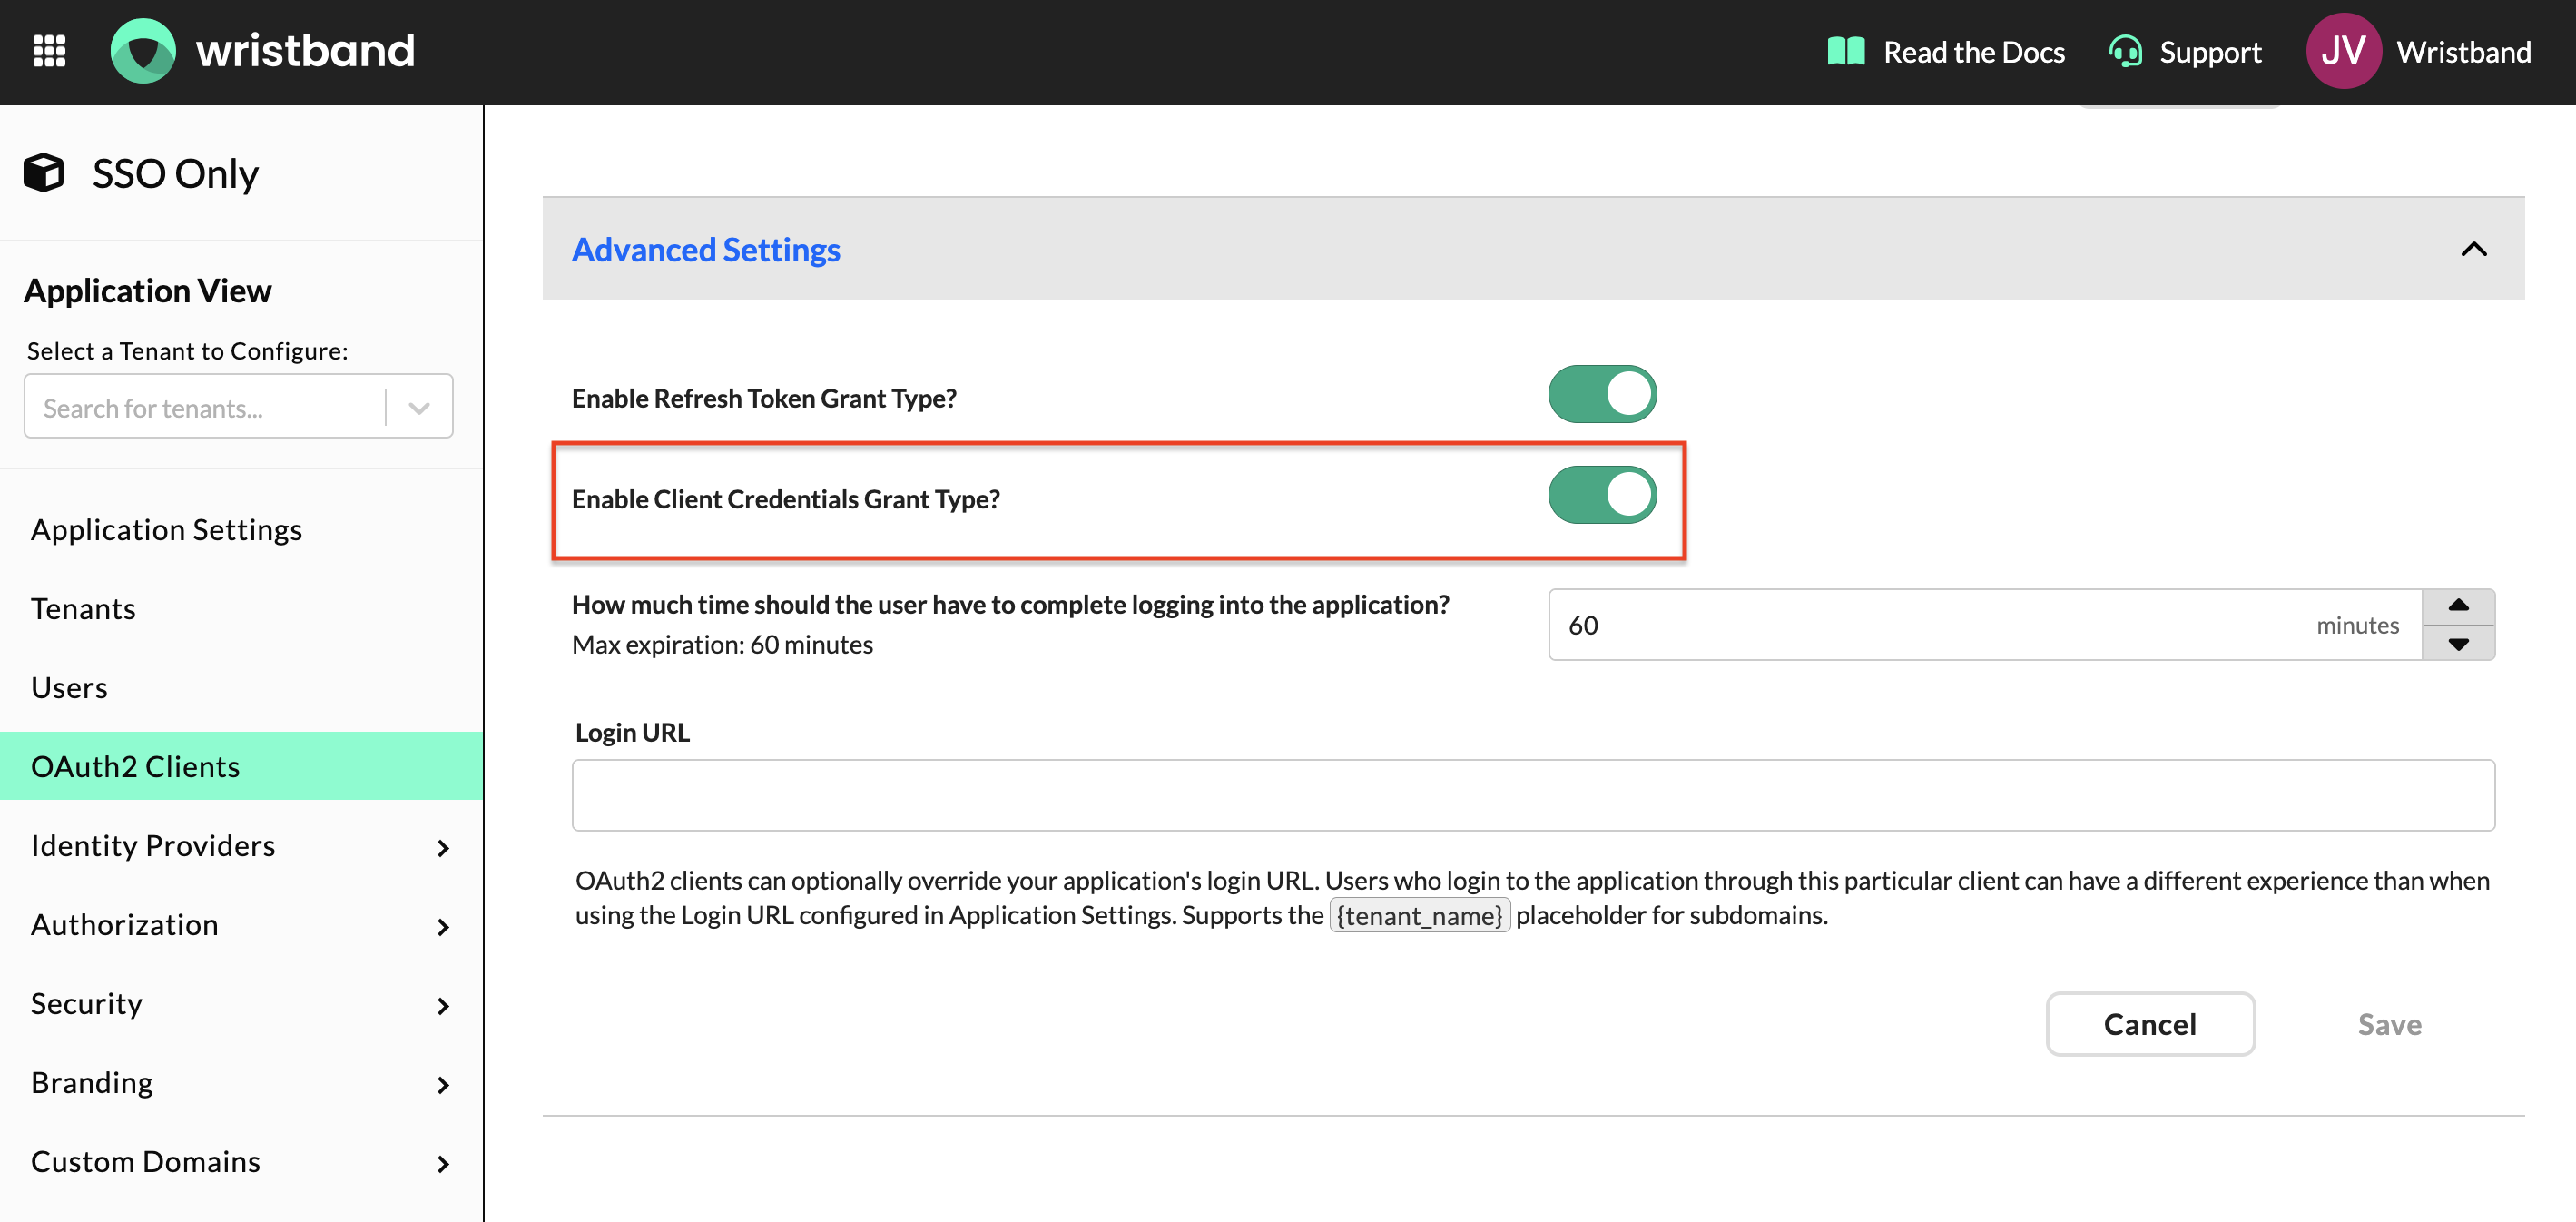
Figure 10: Enable the Client Credentials grant type under Advanced Settings.
Assign Role:
- Scroll down to the Assigned Roles section of your client configuration.
- Locate and select the custom role created in Step 3.
- Save your changes to grant this client the permissions required to securely execute the SSO handshake.
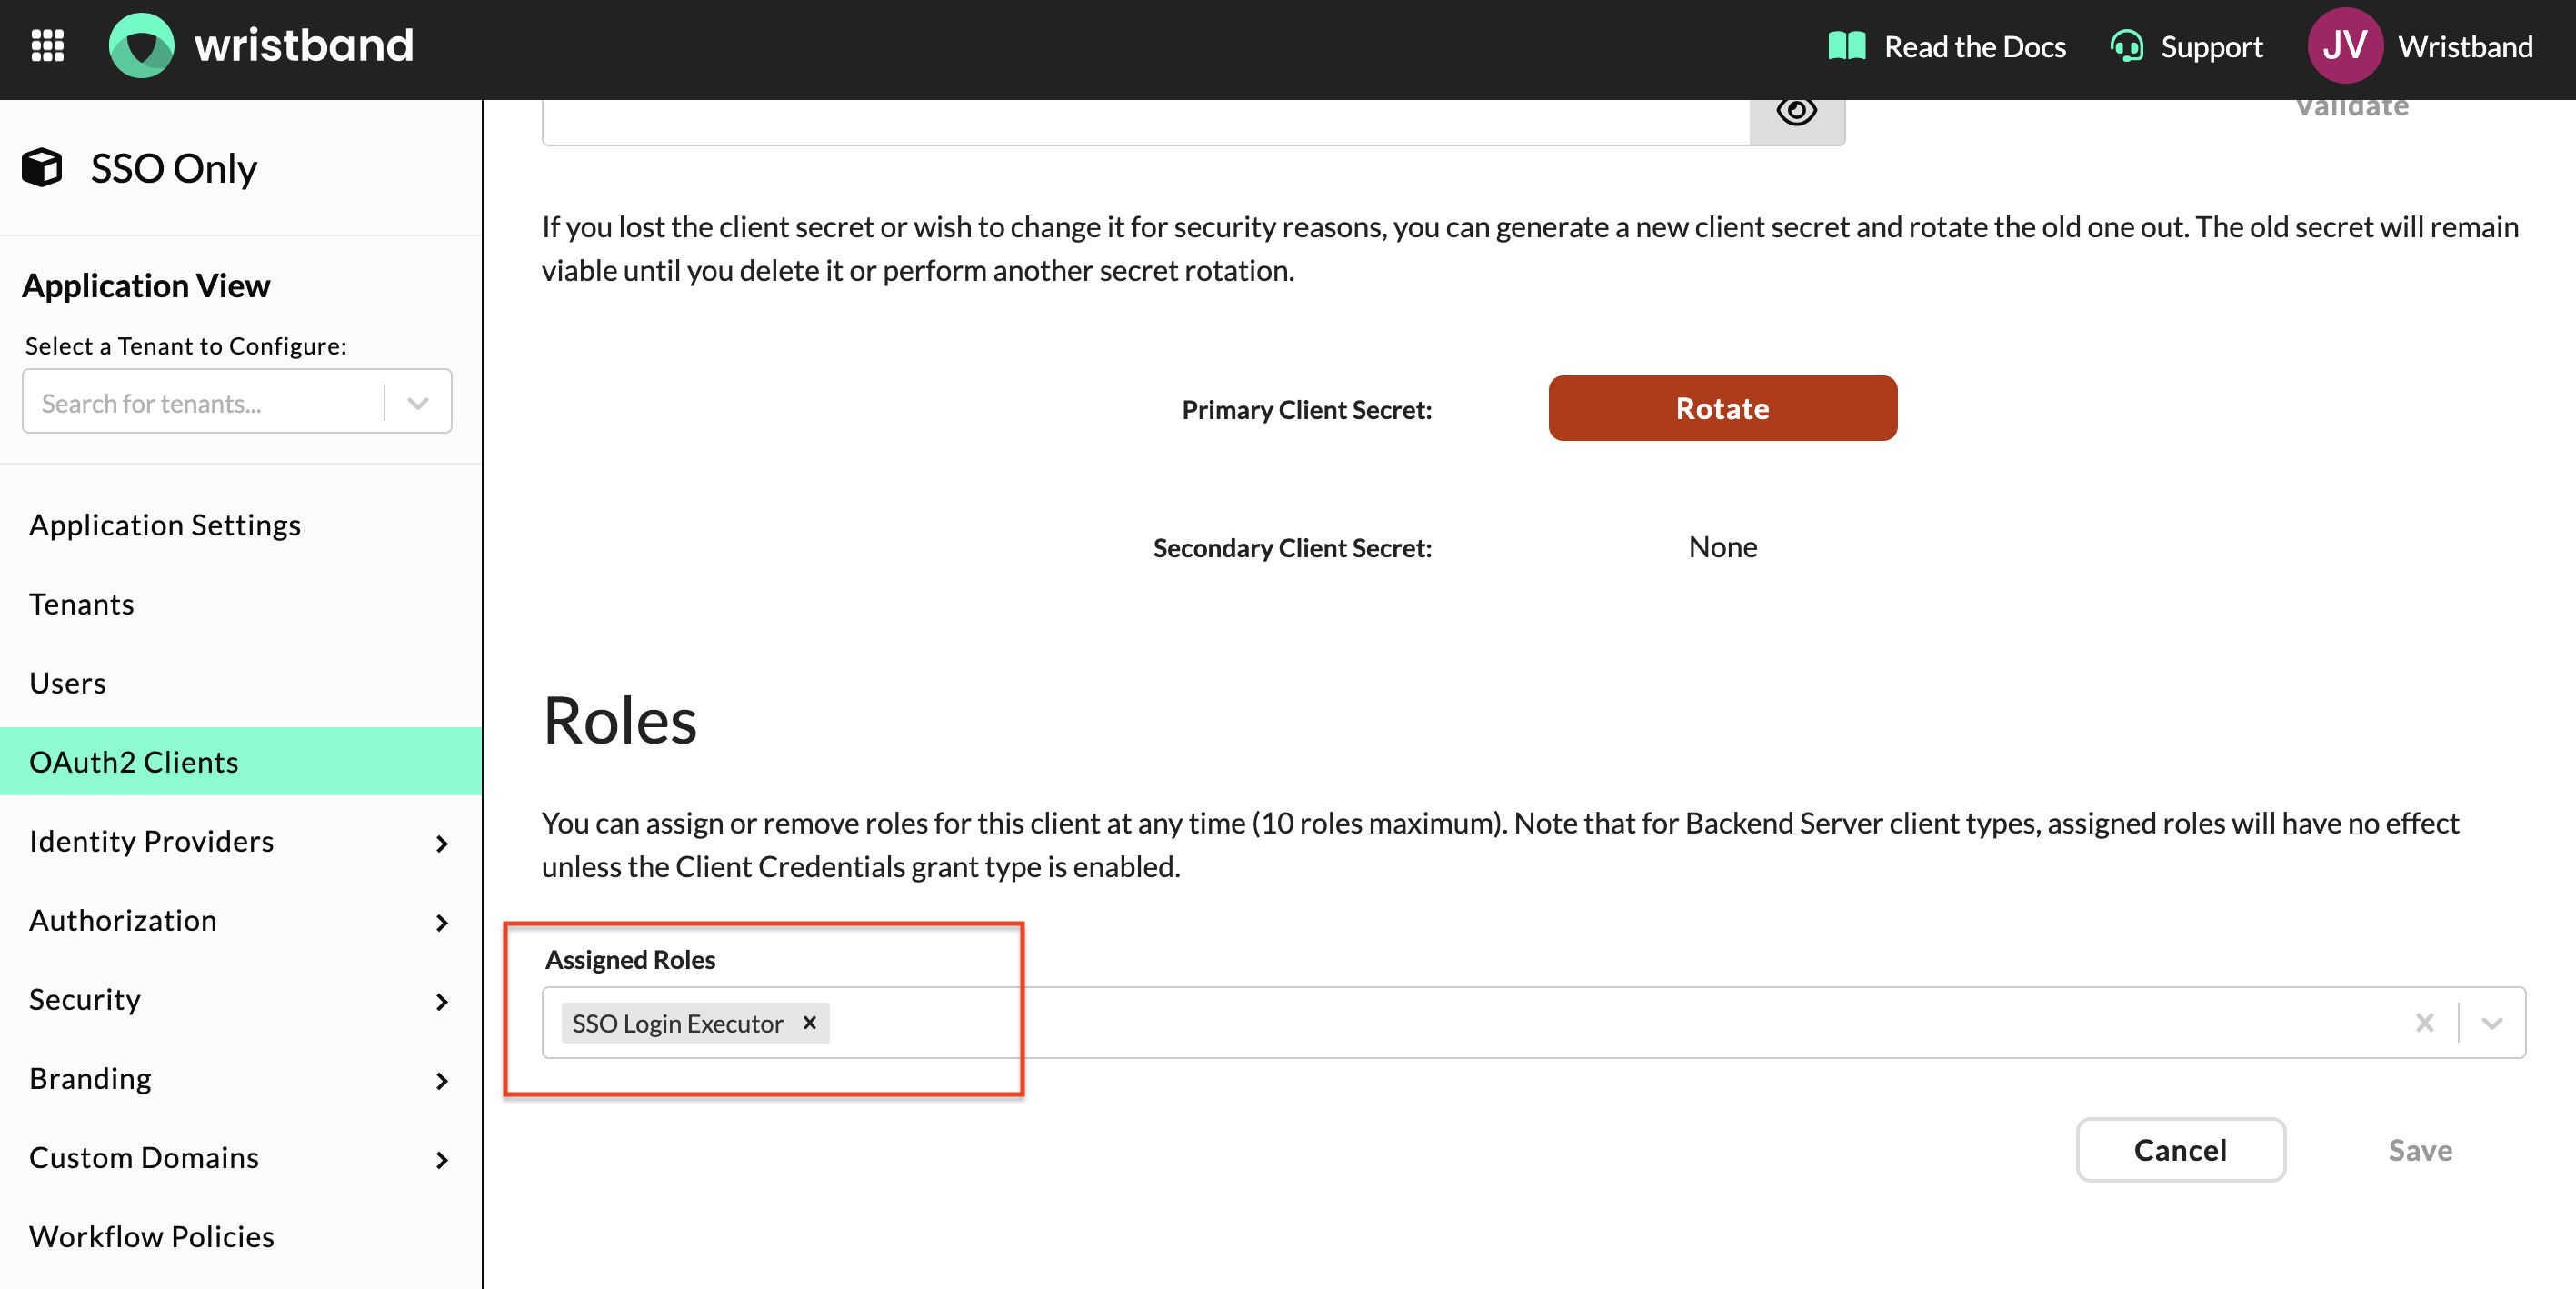
Figure 11: Assign your role to the OAuth2 client.
5. Create a Tenant and Configure an Enterprise IdP
Note: Repeat these steps to onboard additional SSO tenants as needed.
Create a Standard Tenant:
In the Wristband dashboard, navigate to Tenants in the side navigation and click "Add Tenant". Complete the following fields in the modal:
- Type: Standard
- Display Name: Any value.
- Name: This value is used to generate the tenant's vanity domain, which is used when redirecting to the Wristband Authorize endpoint.
Click "View Tenant" at the bottom of the modal to open the Tenant View and continue configuration.
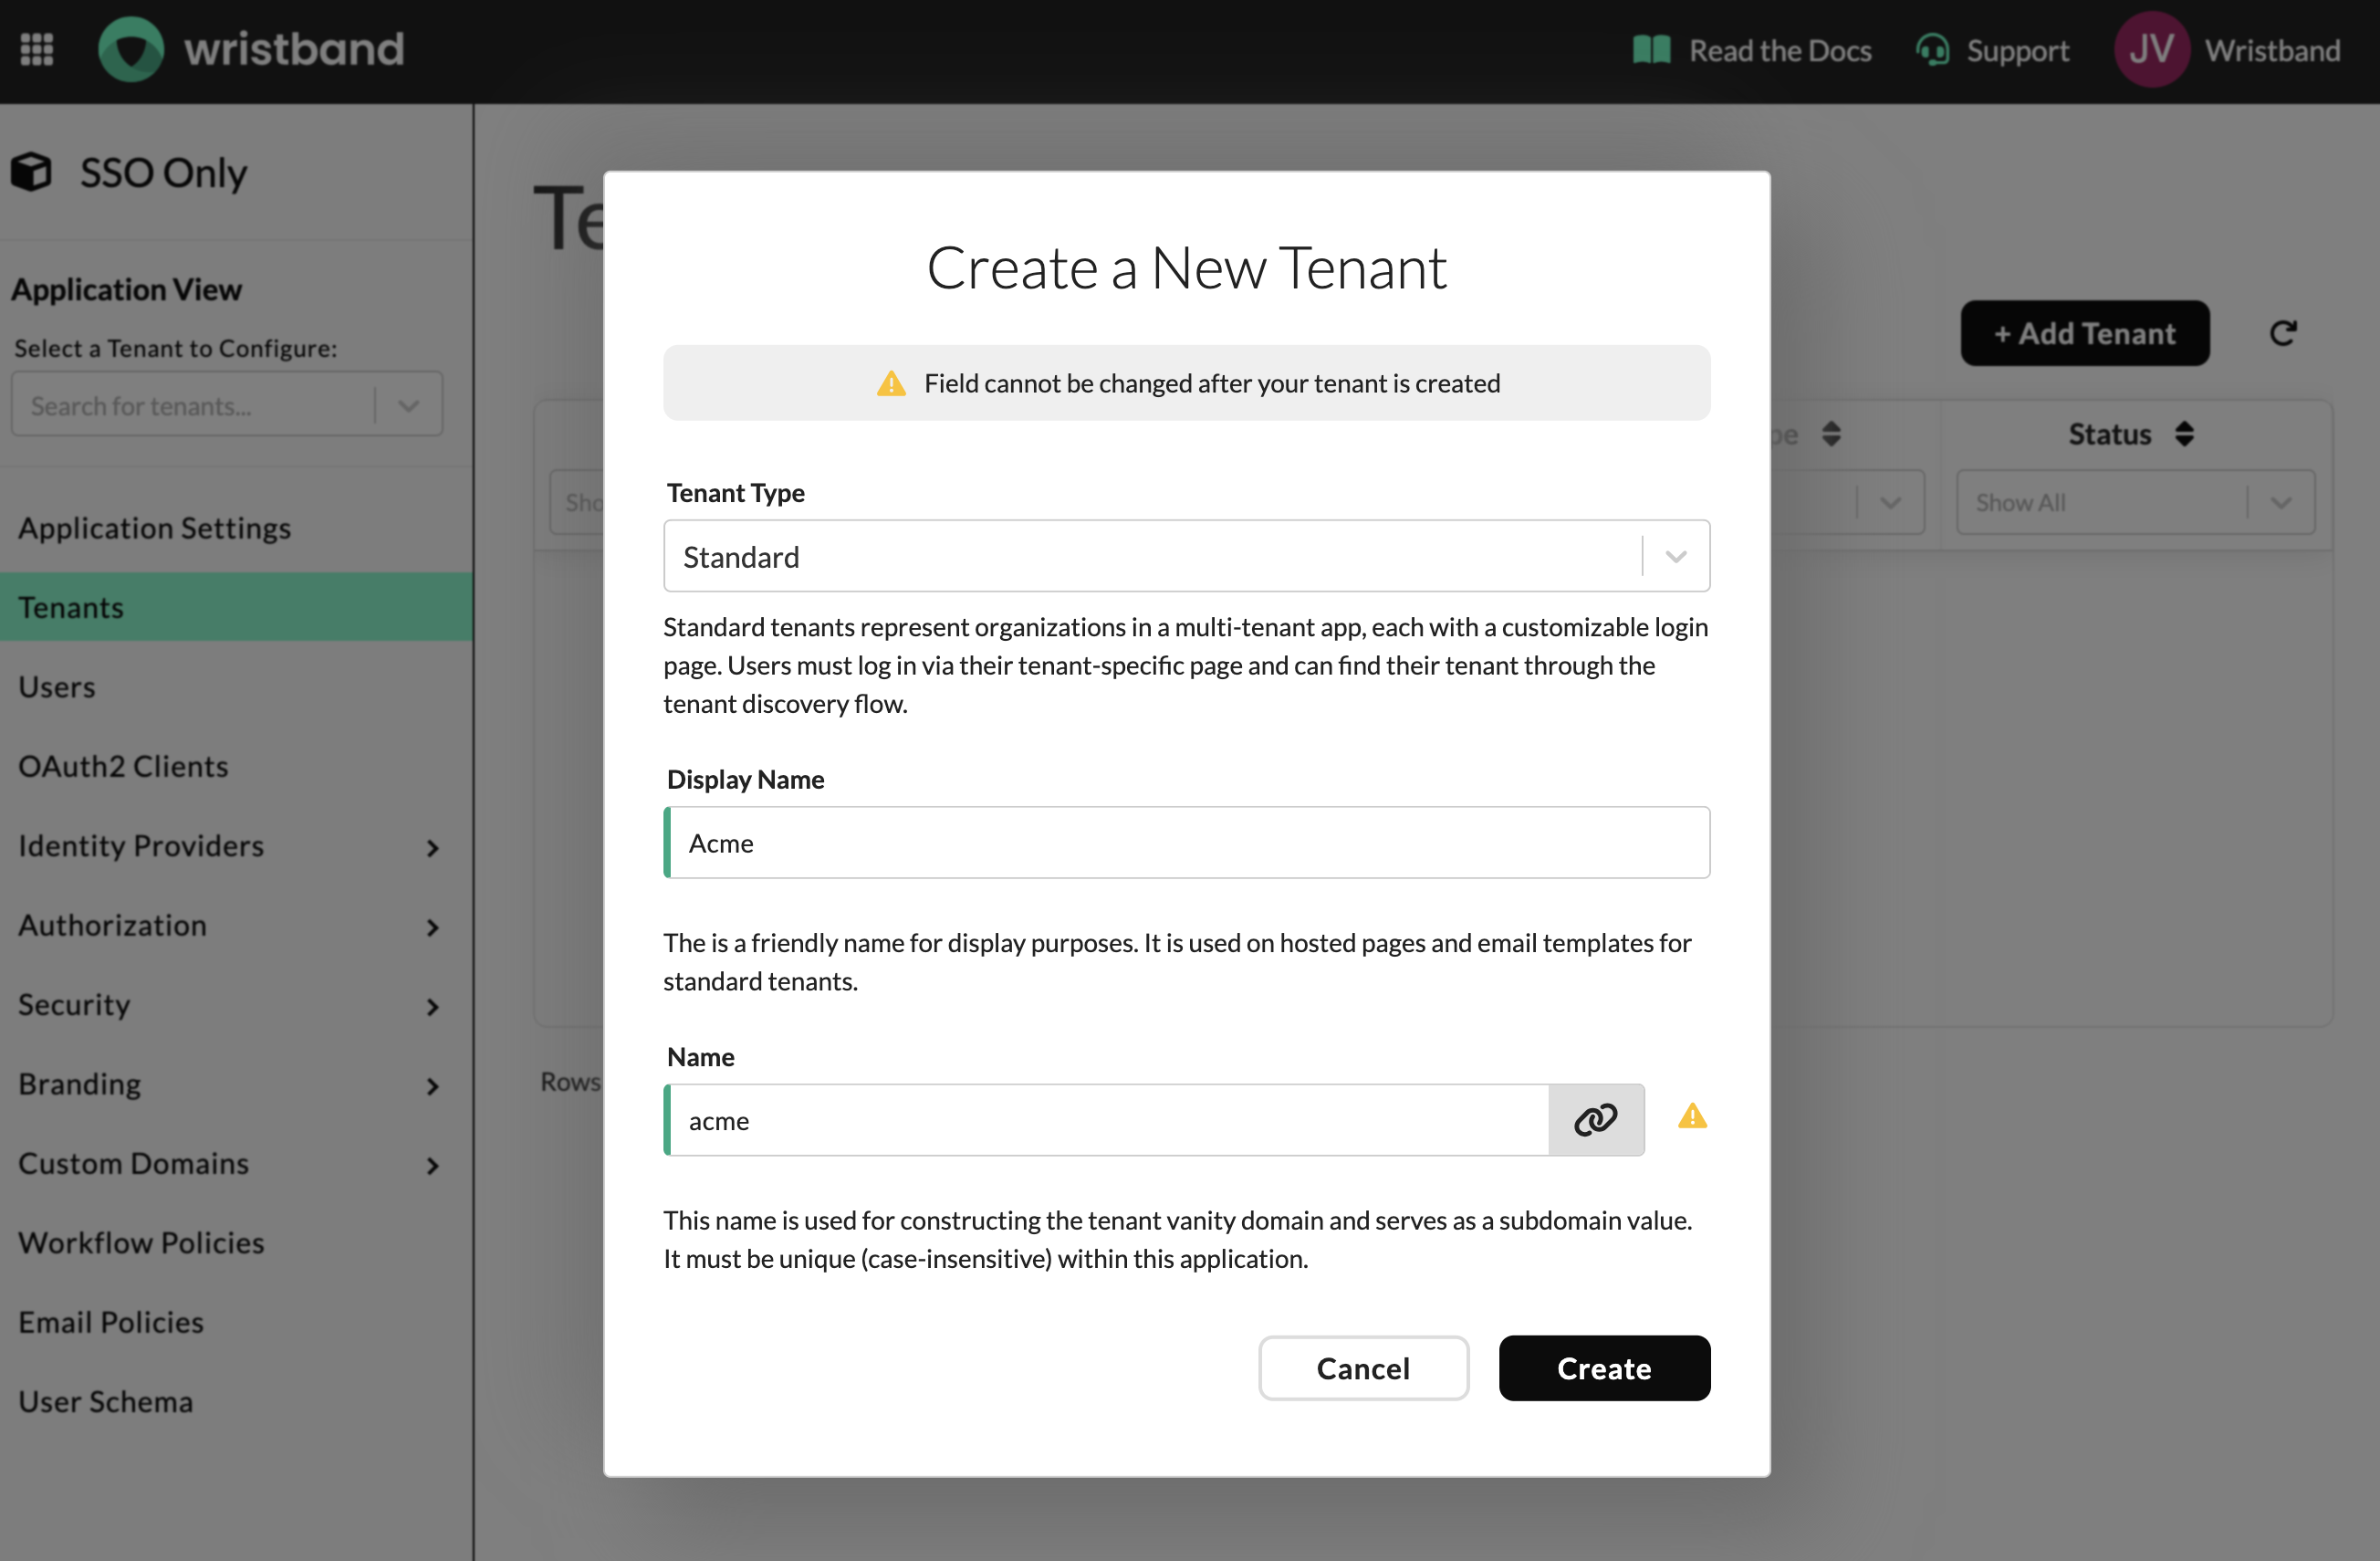
Figure 12: Create a Standard tenant for each enterprise SSO customer.
Enable the Tenant-level IdP Override:
- Open the specific Tenant View in your dashboard.
- Select Identity Providers from the left side navigation menu.
- Locate the toggle at the top of the page for Tenant-Level IdP Override.
- Switch the toggle to enabled.
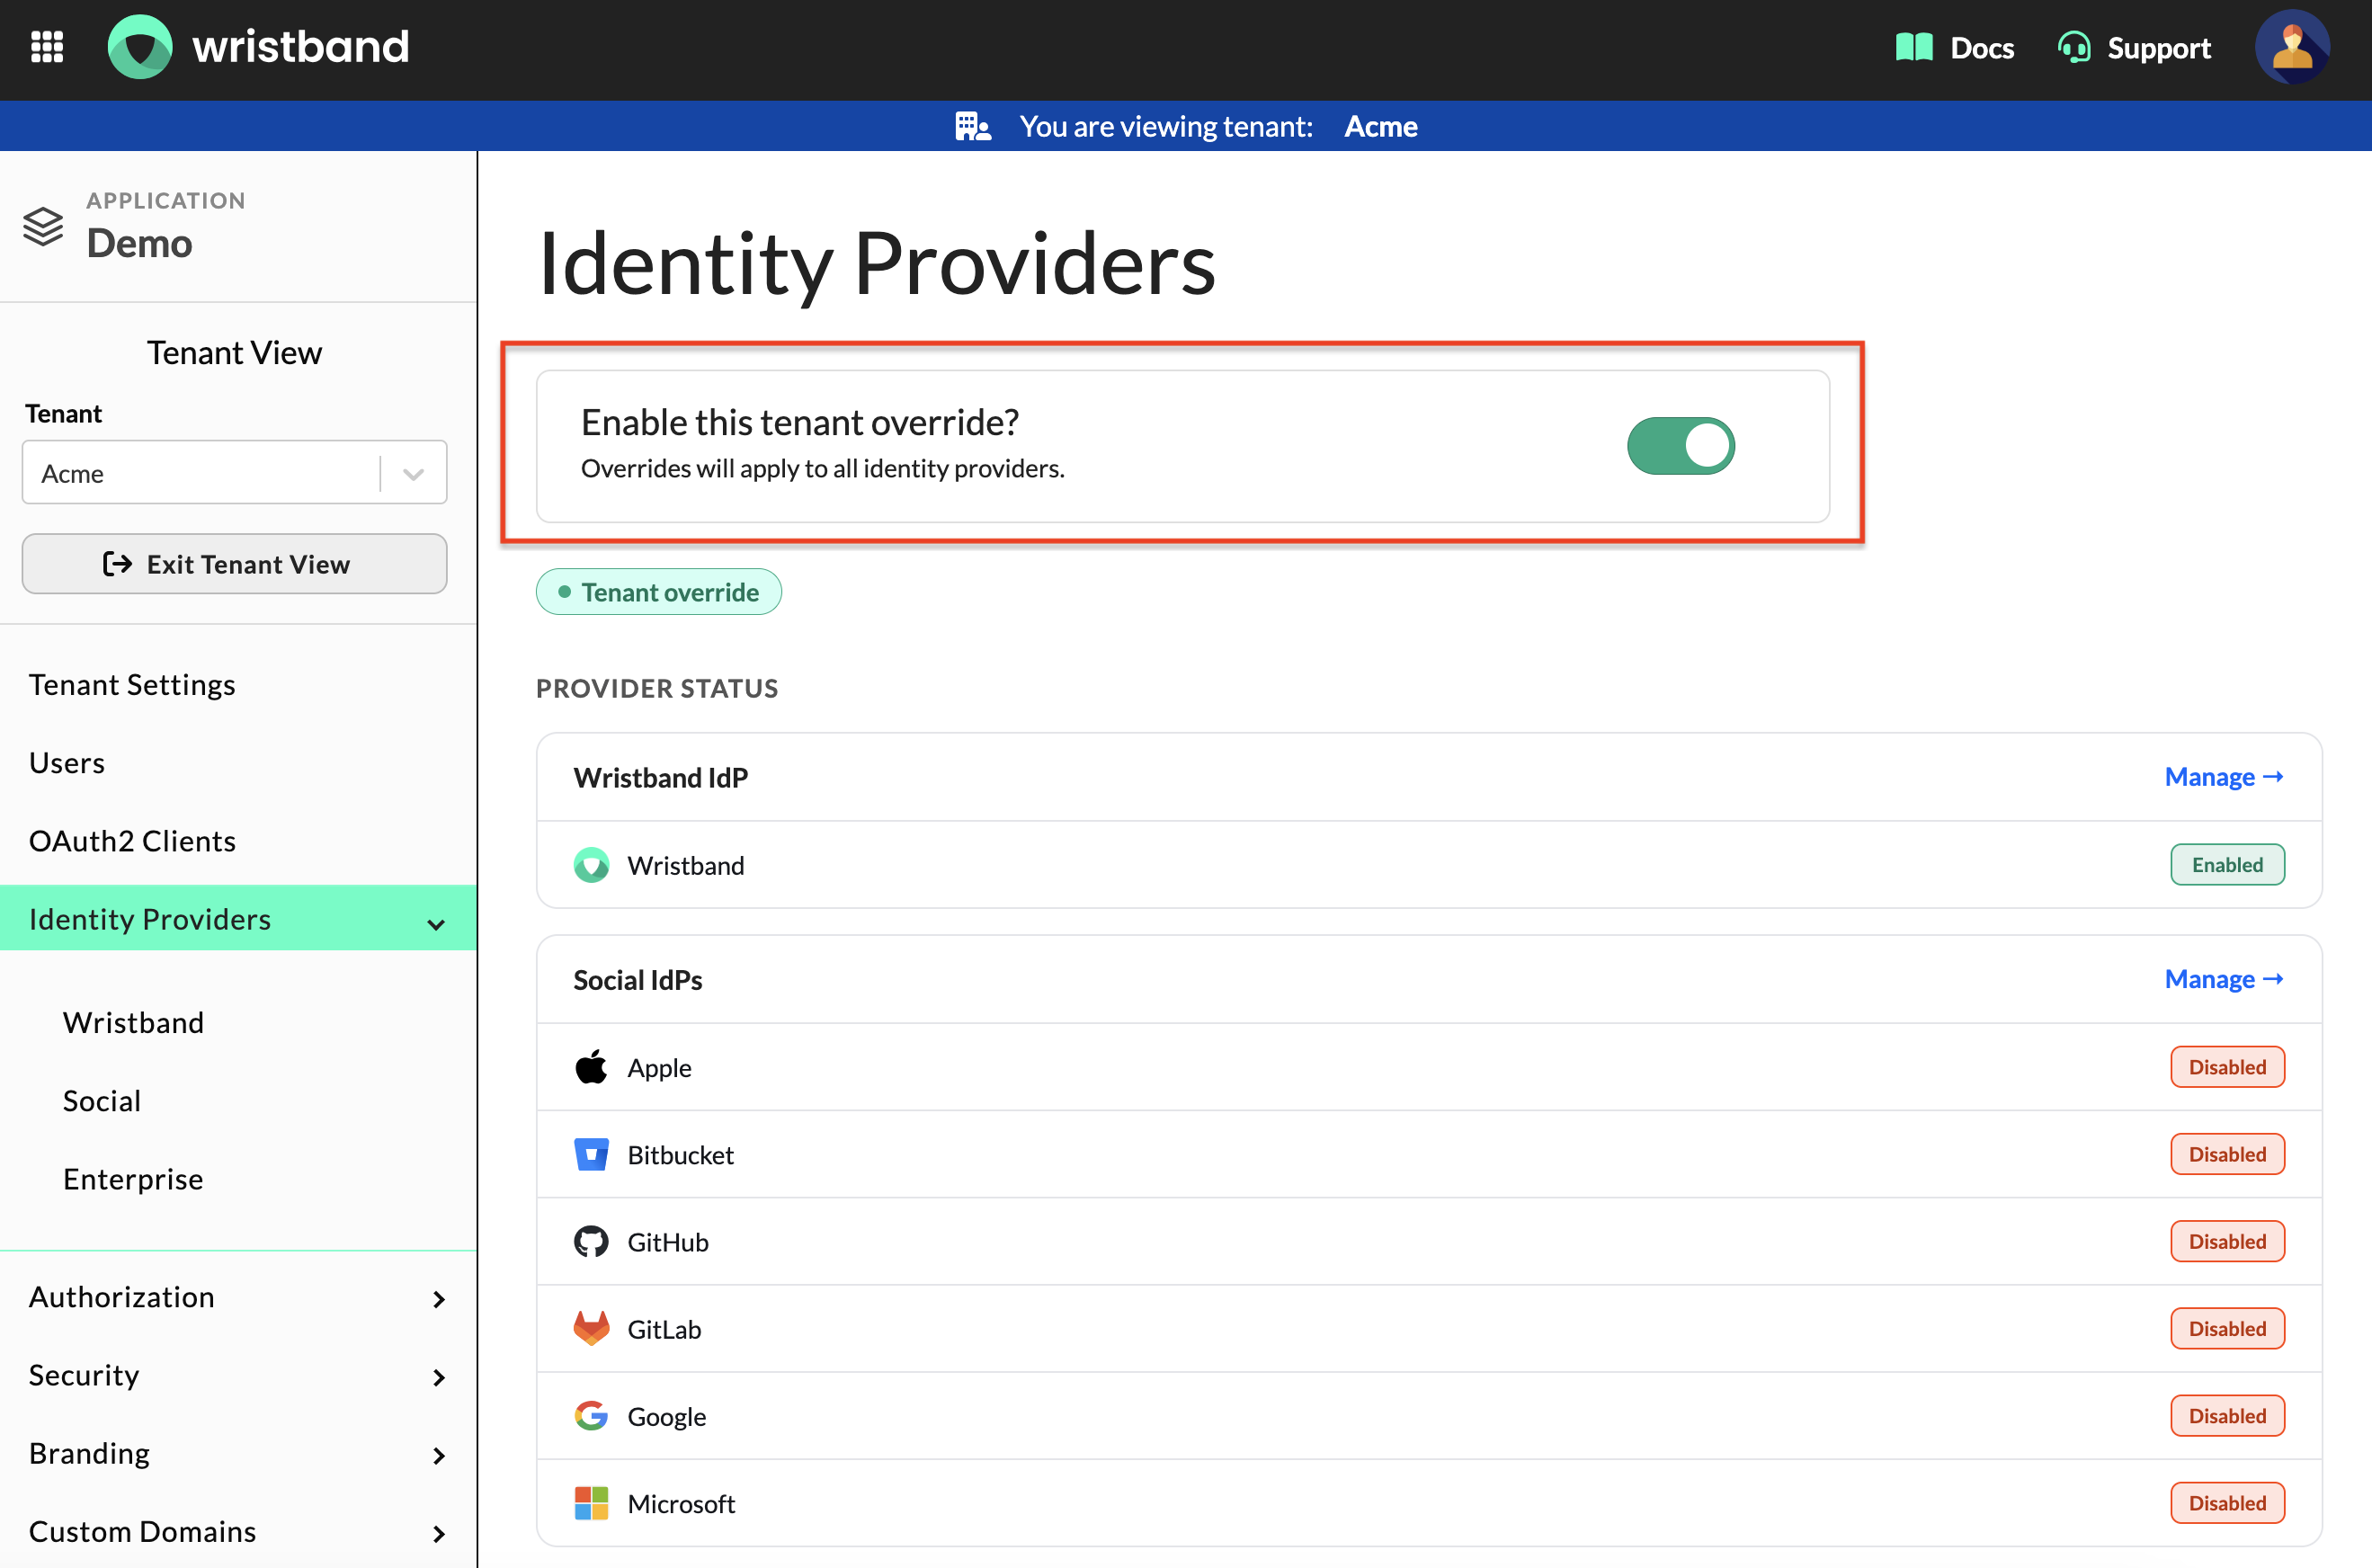
Figure 13: Tenant-level Identity Providers Page: Enable the tenant-level IdP override
Disable the Wristband Identity Provider:
- Stay on the Identity Providers settings page.
- Select the Wristband provider tab or row.
- Toggle the Wristband IdP to disabled.
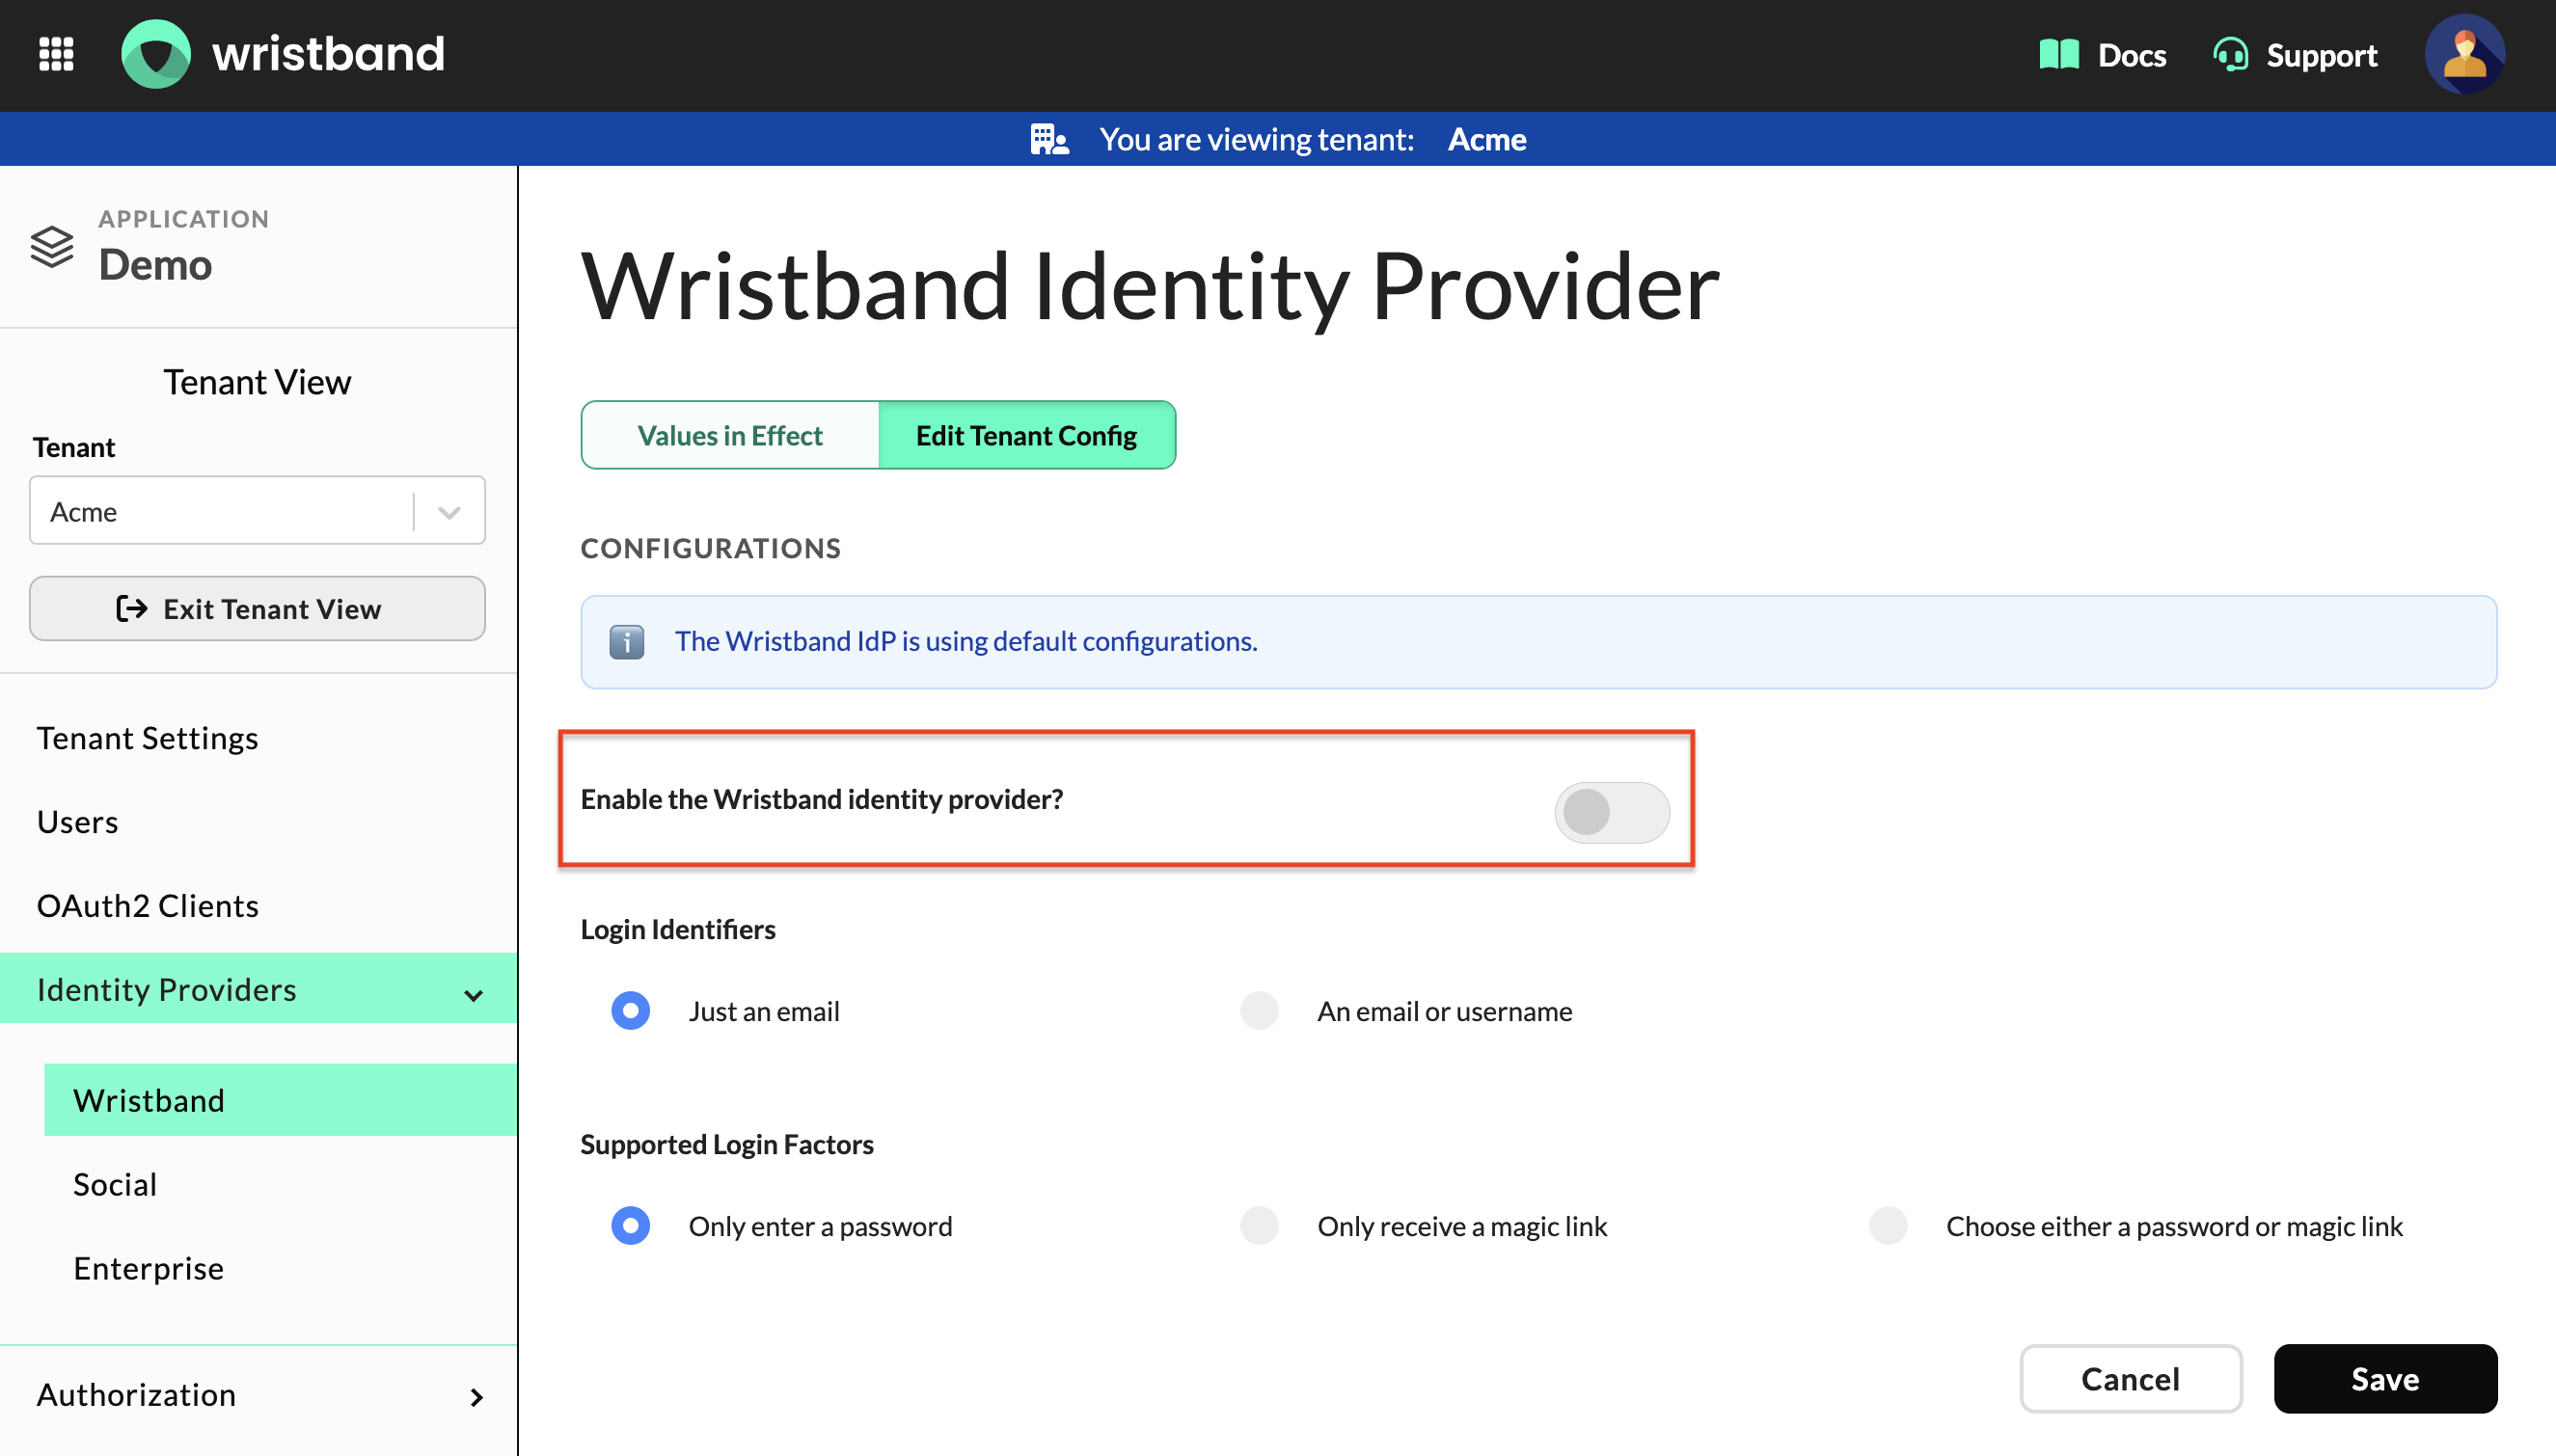
Figure 14: Tenant-level Wristband IdP Page: disable the Wristband IdP
Create an Enterprise Identity Provider:
-
Go to Identity Providers > Enterprise in the Tenant View.
-
Add an enterprise identity provider corresponding to your customer's SSO setup (e.g., Okta, Entra ID).
-
Refer to the Wristband Enterprise IdP Documentation for instructions on how to configure both sides of the handshake.
Note: While this guide covers enterprise SSO, the same configuration can be done for social login providers if needed. Navigate to Identity Providers > Social and follow the relevant setup guide.
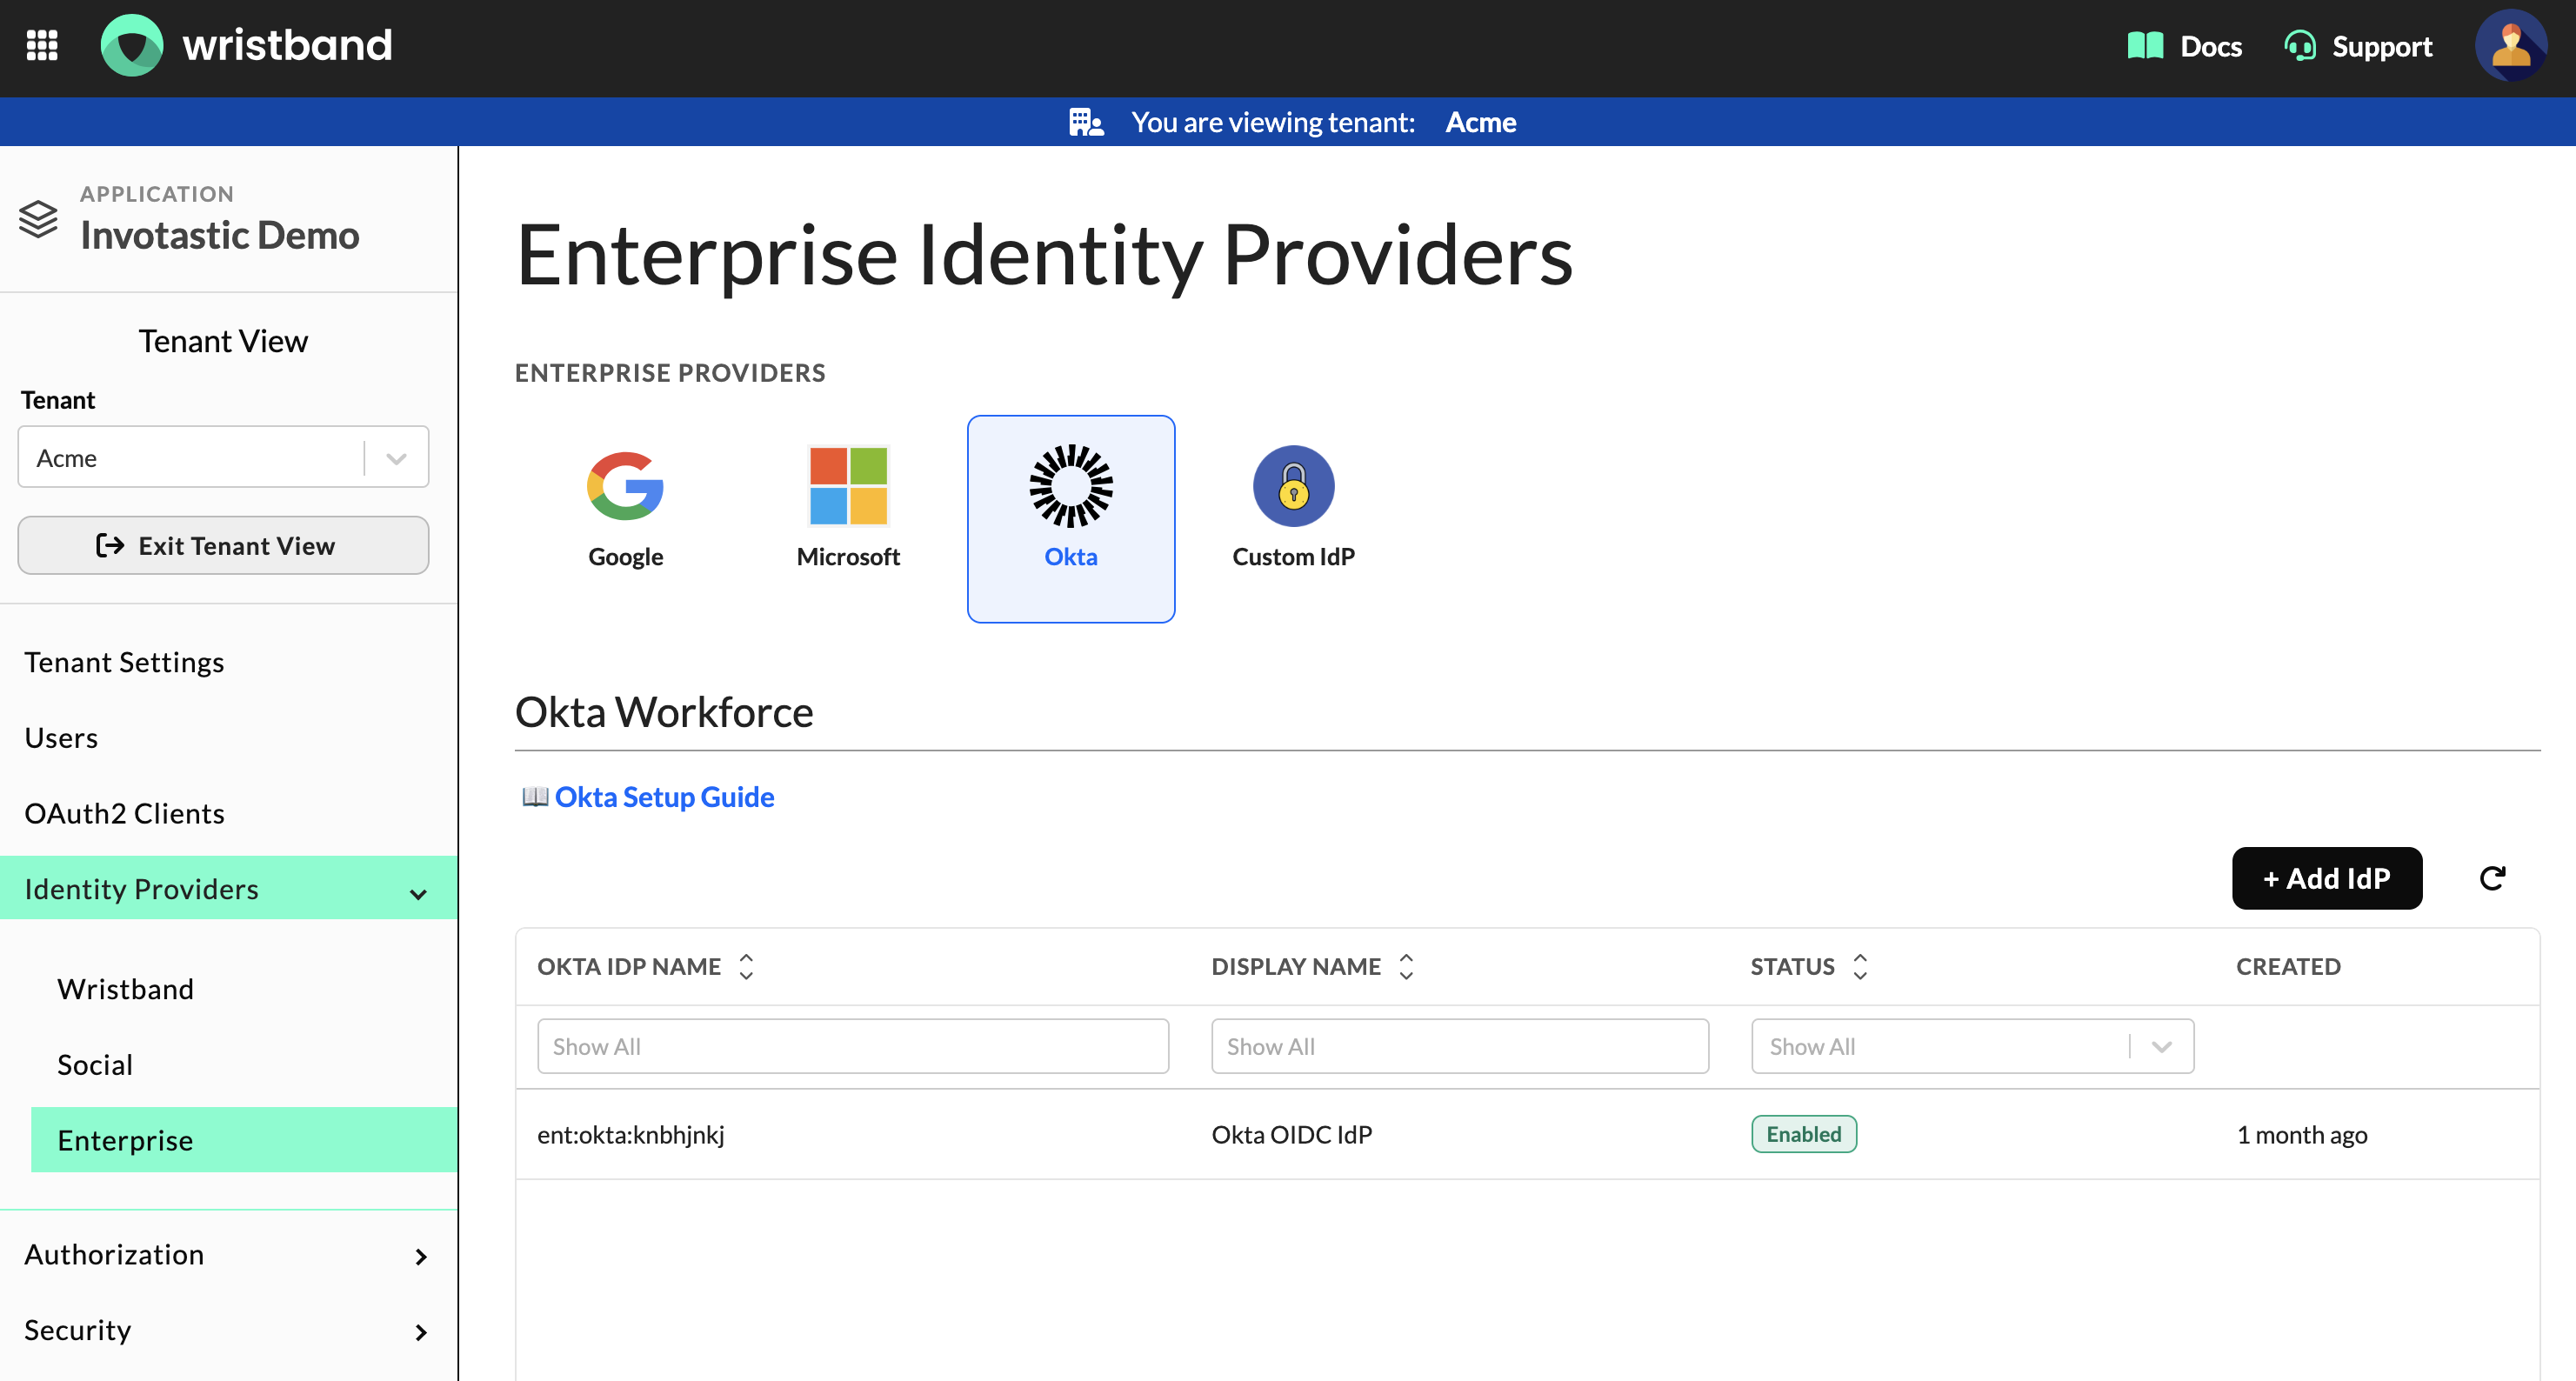
Figure 15: Tenant-level Enterprise IdPs Page: Add an enterprise IdP for your customer's SSO provider
Data Schema
Ensure your application database has these essential tables in place before building the SSO flow.
Tenant Mapping Table
This table maps email domains to their corresponding Wristband tenant and authentication method. Your app uses this on every login to determine whether to route the user through SSO or your existing auth flow. Throughout this guide it is referred to as tenant_mapping, but you can name it anything that fits your conventions.
| Column | Type | Notes |
|---|---|---|
email_domain | string | e.g. acmecorp.com |
tenant_name | string | Name of the Wristband tenant used to construct the Wristband Authorize URL |
User Table
Your user table must include a field to store the IdP's stable external ID. This is used to look up existing users on login and provision new ones on first login. Throughout this guide it is referred to as user, but you can name it anything that fits your conventions.
Note: You can add custom fields to your user table to store enterprise IdP attributes. The available attributes depend on your customer's IdP configuration. You can view the complete list of returned attributes by calling the Fetch External IDP Userinfo endpoint later in this guide.
| Column | Type | Notes |
|---|---|---|
id | uuid | Internal primary key |
external_id | string | Stable unique ID issued by the customer's enterprise IdP (e.g. Okta, Azure AD, etc.); indexed for fast SSO lookup |
company_id | uuid | Your application's internal company/organization ID (not the Wristband tenant identifier). |
email | string | The user's email that is synced from the IdP on each login |
created_at | timestamp | An auto-set timestamp recording when the user was first provisioned in your application |
Tenant Association
Your application must map users to their corresponding Wristband tenants. Choose a data model that fits your application's complexity.
- Dedicated company table: For multi-tenant apps with shared company data, use a dedicated table—such as
companies,organizations, orworkspaces. This centralizes company-level metadata and maps multiple users to a single tenant. - User table: For simpler apps where tenant association is strictly user-level, store the Wristband tenant identifier directly on the user record.
Regardless of the approach, ensure your system can map the Wristband tenant ID to your database entity during the upcoming provisioning step.
Example: dedicated table (e.g., company)
| Column | Type | Notes |
|---|---|---|
id | uuid | Internal primary key |
external_id | string | Maps to the Wristband tenant identifier |
name | string | Company name |
created_at | timestamp | An auto-set timestamp recording when the company was first provisioned in your application |
Example: user table with tenant association
| Column | Type | Notes |
|---|---|---|
id | uuid | Internal primary key |
external_id | string | Stable unique ID issued by the customer's enterprise IdP (e.g. Okta, Azure AD, etc.); indexed for fast SSO lookup |
company_id | uuid | Your application's internal company/organization ID (not the Wristband tenant identifier). |
external_tenant_id | string | Maps to the Wristband tenant identifier |
email | string | The user's email that is synced from the IdP on each login |
created_at | timestamp | An auto-set timestamp recording when the user was first provisioned in your application |
The rest of this guide assumes a dedicated company table. If you are storing tenant IDs directly on the user record, adapt the examples accordingly.
Implementing SSO Login
These steps detail the complete SSO login flow, from initial email entry to the final authenticated application session. Your application self-hosts all login pages and orchestrates the entire process.
1: Email Entry and Tenant Resolution
Build a self-hosted, application-level login page featuring a single email input. This page serves as the entry point for both SSO and non-SSO users. Upon form submission, your application must parse the email domain and query the tenant_mapping table to determine the correct routing path.
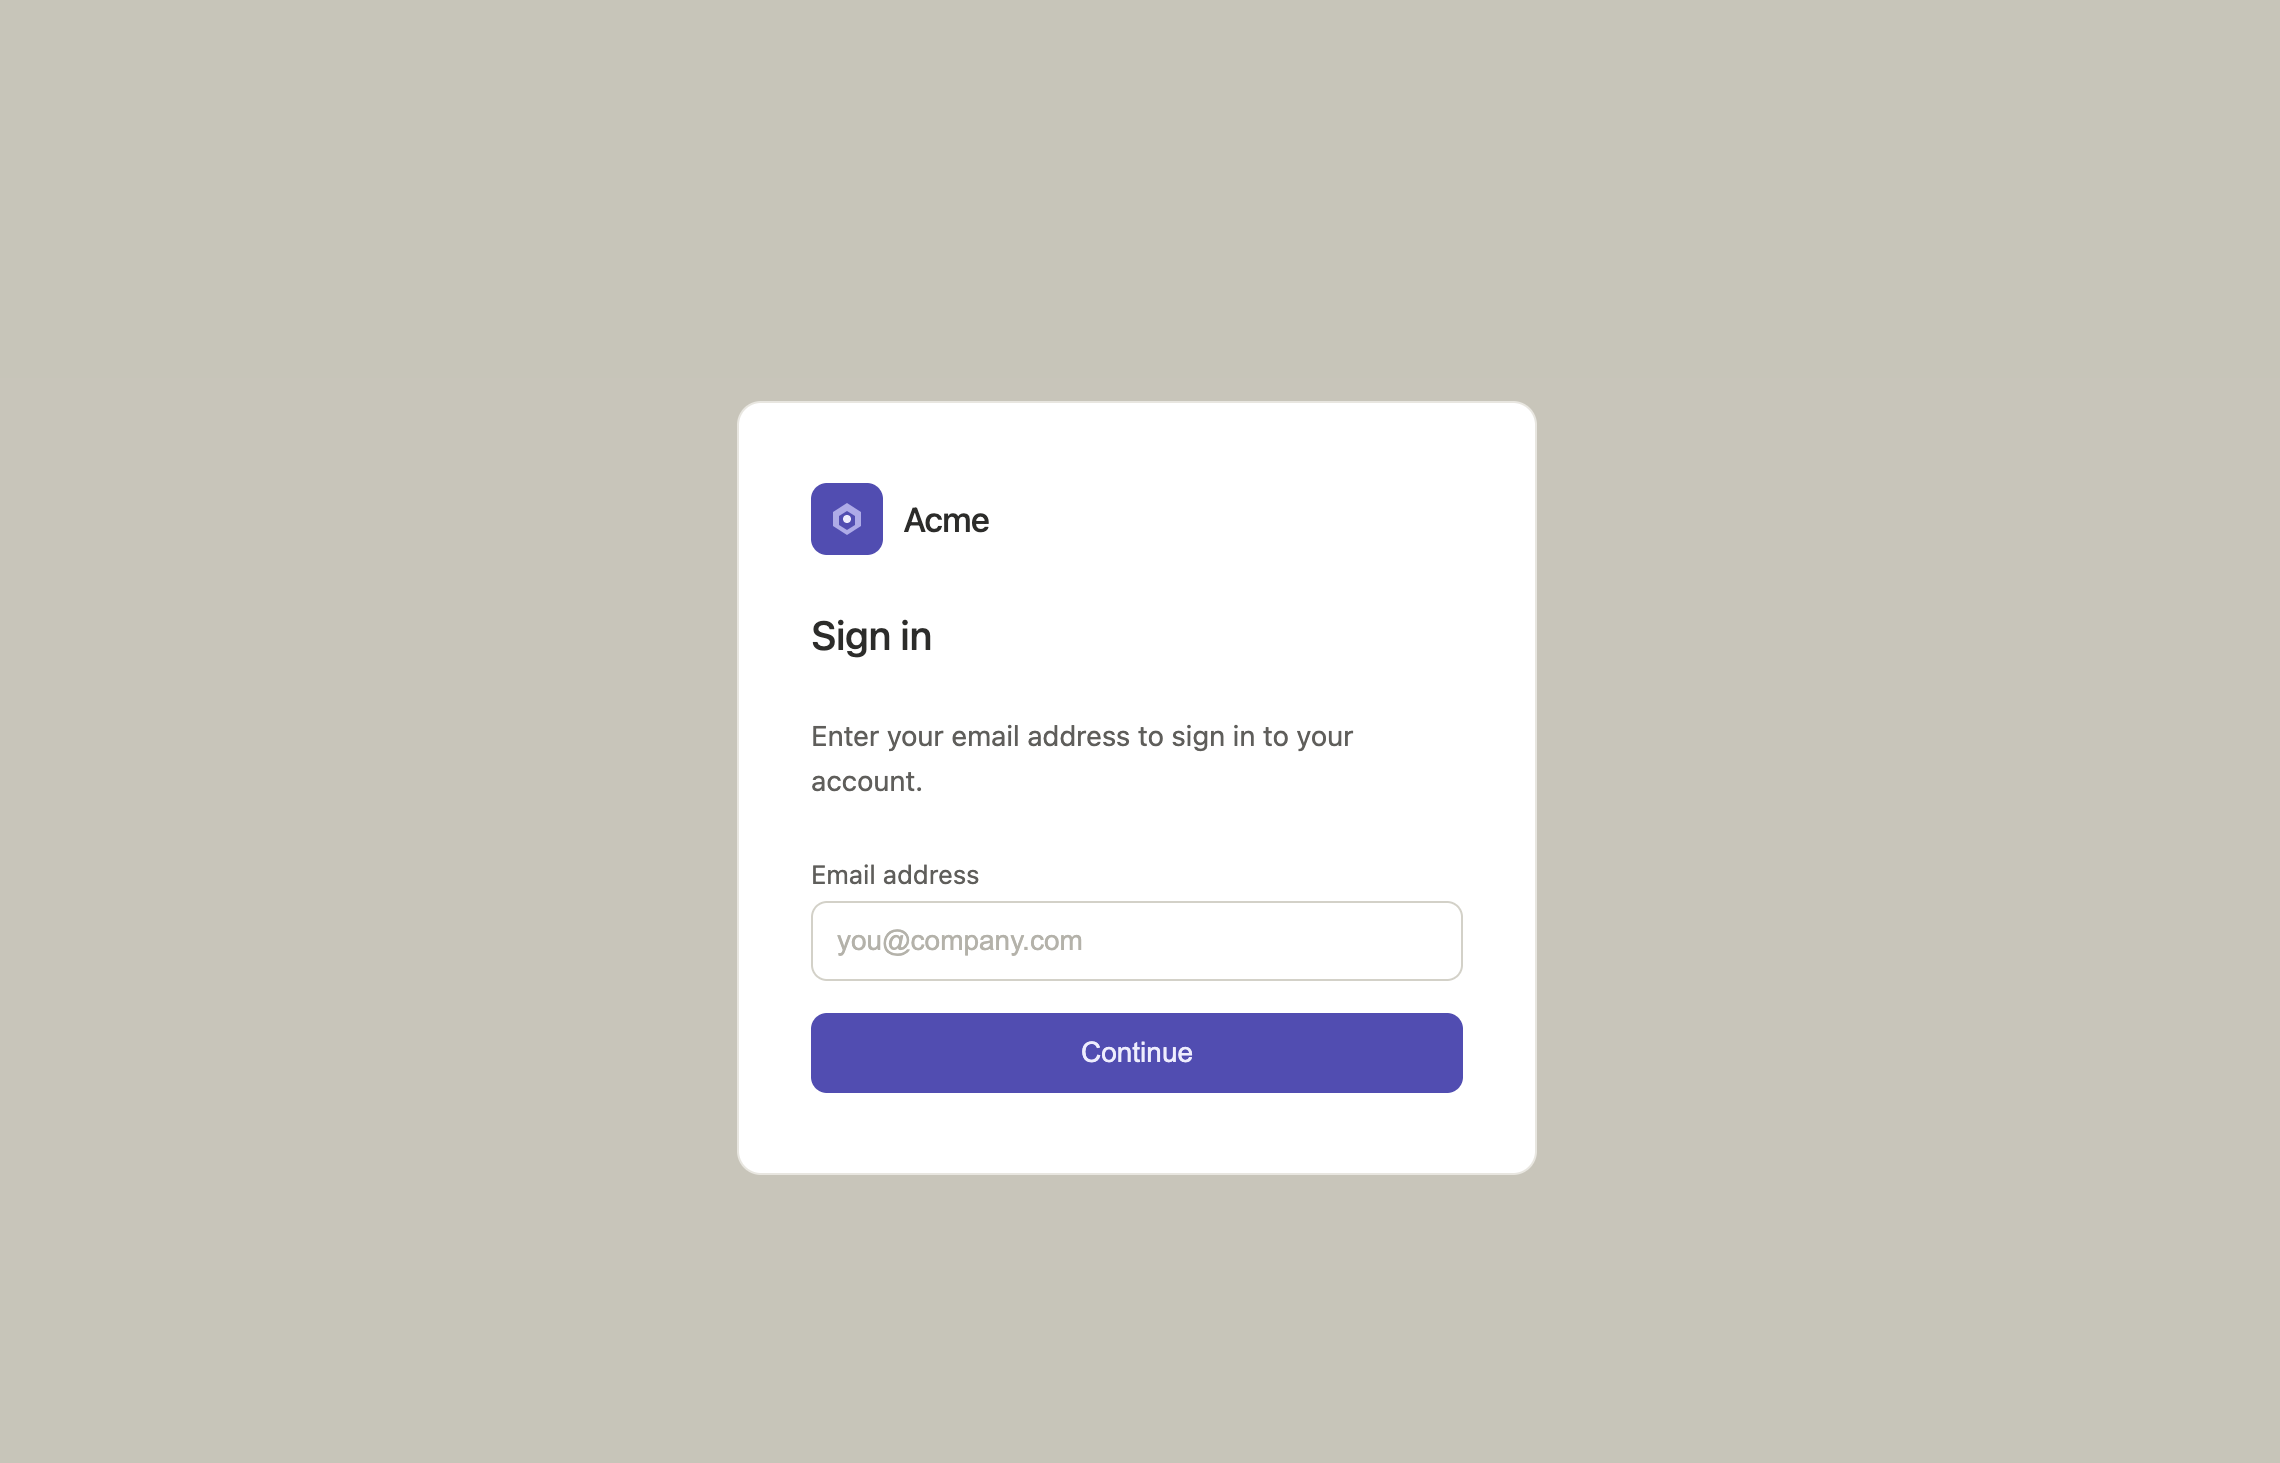
Figure 16: Example of an app-level login page that your application controls and hosts.
If the email domain maps to a specific Wristband tenant, redirect the user to the Wristband Authorize Endpoint using that tenant’s unique vanity domain as the host. Otherwise, if the domain maps to a standard authentication path (e.g., passwords or magic links), route the user through your application's native login flow.
// Handle this logic in a server-side endpoint, not in the browser.
const emailDomain = email.split('@')[1];

// Lookup the email domain/tenant name mapping in your app's database
const tenant_mapping = await db
  .from('tenant_mapping')
  .select('tenant_name')
  .eq('email_domain', emailDomain)
  .single();

if (tenant_mapping) {
  // The tenant vanity domain is constructed by prepending the tenant name to
  // your application's vanity domain (APPLICATION_VANITY_DOMAIN), which you
  // copied from the Application Settings page in the Wristband.
  const appVanityDomain = process.env.APPLICATION_VANITY_DOMAIN;
  const tenantVanityDomain = `${tenant_mapping.tenant_name}-${appVanityDomain}`;

  const oauthParams = new URLSearchParams({
    // CLIENT_ID: the OAuth2 client ID, copied from your Wristband OAuth2 client
    client_id: process.env.CLIENT_ID,
    response_type: 'code',
    scope: 'openid',
    state: crypto.randomBytes(32).toString('base64url'),
  }).toString();

  // Redirect to the Wristband Authorize Endpoint
  redirect(`https://${tenantVanityDomain}/api/v1/oauth2/authorize?${oauthParams}`);
} else {
  // Otherwise, handle existing auth flow (e.g. password, etc.).
}
2: Custom Tenant Login Page Request
After validating the authorize request, Wristband redirects users to the Custom Tenant Login Page URL configured in your Application Settings. Implement a server-side route at this URL to intercept the redirect, extract the authorization request token from the req query parameter, and execute the following sequence:
- Exchange your OAuth2 client credentials for an access token by calling the Wristband Token API. You will need this access token to authenticate all subsequent API requests.
- Send the token to the Wristband Introspect Authorization Request Token API to validate its integrity and extract both the tenant ID and tenant vanity domain.
- Query the Wristband Resolve Tenant Identity Provider Overrides API using the retrieved tenant ID to fetch the active identity provider configured for that user's tenant.
- Redirect the user to the Wristband Authorize External IdP User for Login API, ensuring you format the request using the tenant's specific vanity domain as the host.
Note: This guide assumes a single external IdP configuration per tenant. If your architecture supports multiple identity providers per tenant, you must render an intermediate tenant login page allowing users to select their preferred authentication source.
// Custom Tenant Login Page URL Endpoint
// GET "/auth/tenant-login?req=yJraWQiOiJ4MGFrTVJ..."
export async function GET(request: Request) {
   // 1. Obtain an access token using your Wristband OAuth2 client credentials.
  const basicAuthCredentials = Buffer.from(
    `${process.env.CLIENT_ID}:${process.env.CLIENT_SECRET}`
  ).toString('base64');
  const tokenResponse = await fetch(
    `https://${process.env.APPLICATION_VANITY_DOMAIN}/api/v1/oauth2/token`,
    {
      method: 'POST',
      headers: {
        Accept: 'application/json',
        'Content-Type': 'application/x-www-form-urlencoded',
        Authorization: `Basic ${basicAuthCredentials}`,
      },
      body: new URLSearchParams({ grant_type: 'client_credentials' }),
    }
  );
  const { access_token: accessToken } = await tokenResponse.json();

  // 2. Introspect the authorization request token and parse out the tenant ID.
  const { searchParams } = new URL(request.url);
  const authorizationRequestToken = searchParams.get('req');
  const introspectResponse = await fetch(
    `https://${process.env.APPLICATION_VANITY_DOMAIN}/api/v1/oauth2/authorization-requests/introspect`,
    {
      method: 'POST',
      headers: {
        Accept: 'application/json',
        'Content-Type': 'application/json',
        Authorization: `Bearer ${accessToken}`,
      },
      body: JSON.stringify({ authorizationRequestToken }),
    }
  );
  const {
    active,
    tnt_id: tenantId,
    van_dom: tenantVanityDomain
  } = await introspectResponse.json();
  if (!active) {
    // This should never happen in practice (defensive check). If the authorization
    // request token is invalid, redirect back to your app's login page to start over.
    redirect('/login');
  }

  // 3. Resolve the enabled identity provider and parse out the IdP name.
  const idpResponse = await fetch(
    `https://${process.env.APPLICATION_VANITY_DOMAIN}/api/v1/tenants/${tenantId}/identity-providers/resolve-overrides?status=ENABLED`,
    {
      method: 'GET',
      headers: {
        Accept: 'application/json',
        Authorization: `Bearer ${accessToken}`,
      },
    }
  );
  const { items } = await idpResponse.json();
  const identityProviderName = items[0].item.name;

  // 4. Redirect to the Wristband Authorize External IdP User for Login endpoint.
  const externalIdpParams = new URLSearchParams({
    identity_provider_name: identityProviderName,
    authorization_request_token: authorizationRequestToken,
  }).toString();
  redirect(
    `https://${tenantVanityDomain}/api/v1/external-idp-login/authorize-user?${externalIdpParams}`
  );
}
Wristband then handles the SAML / OIDC handshake with the enterprise IdP so the user can authenticate with their corporate credentials.
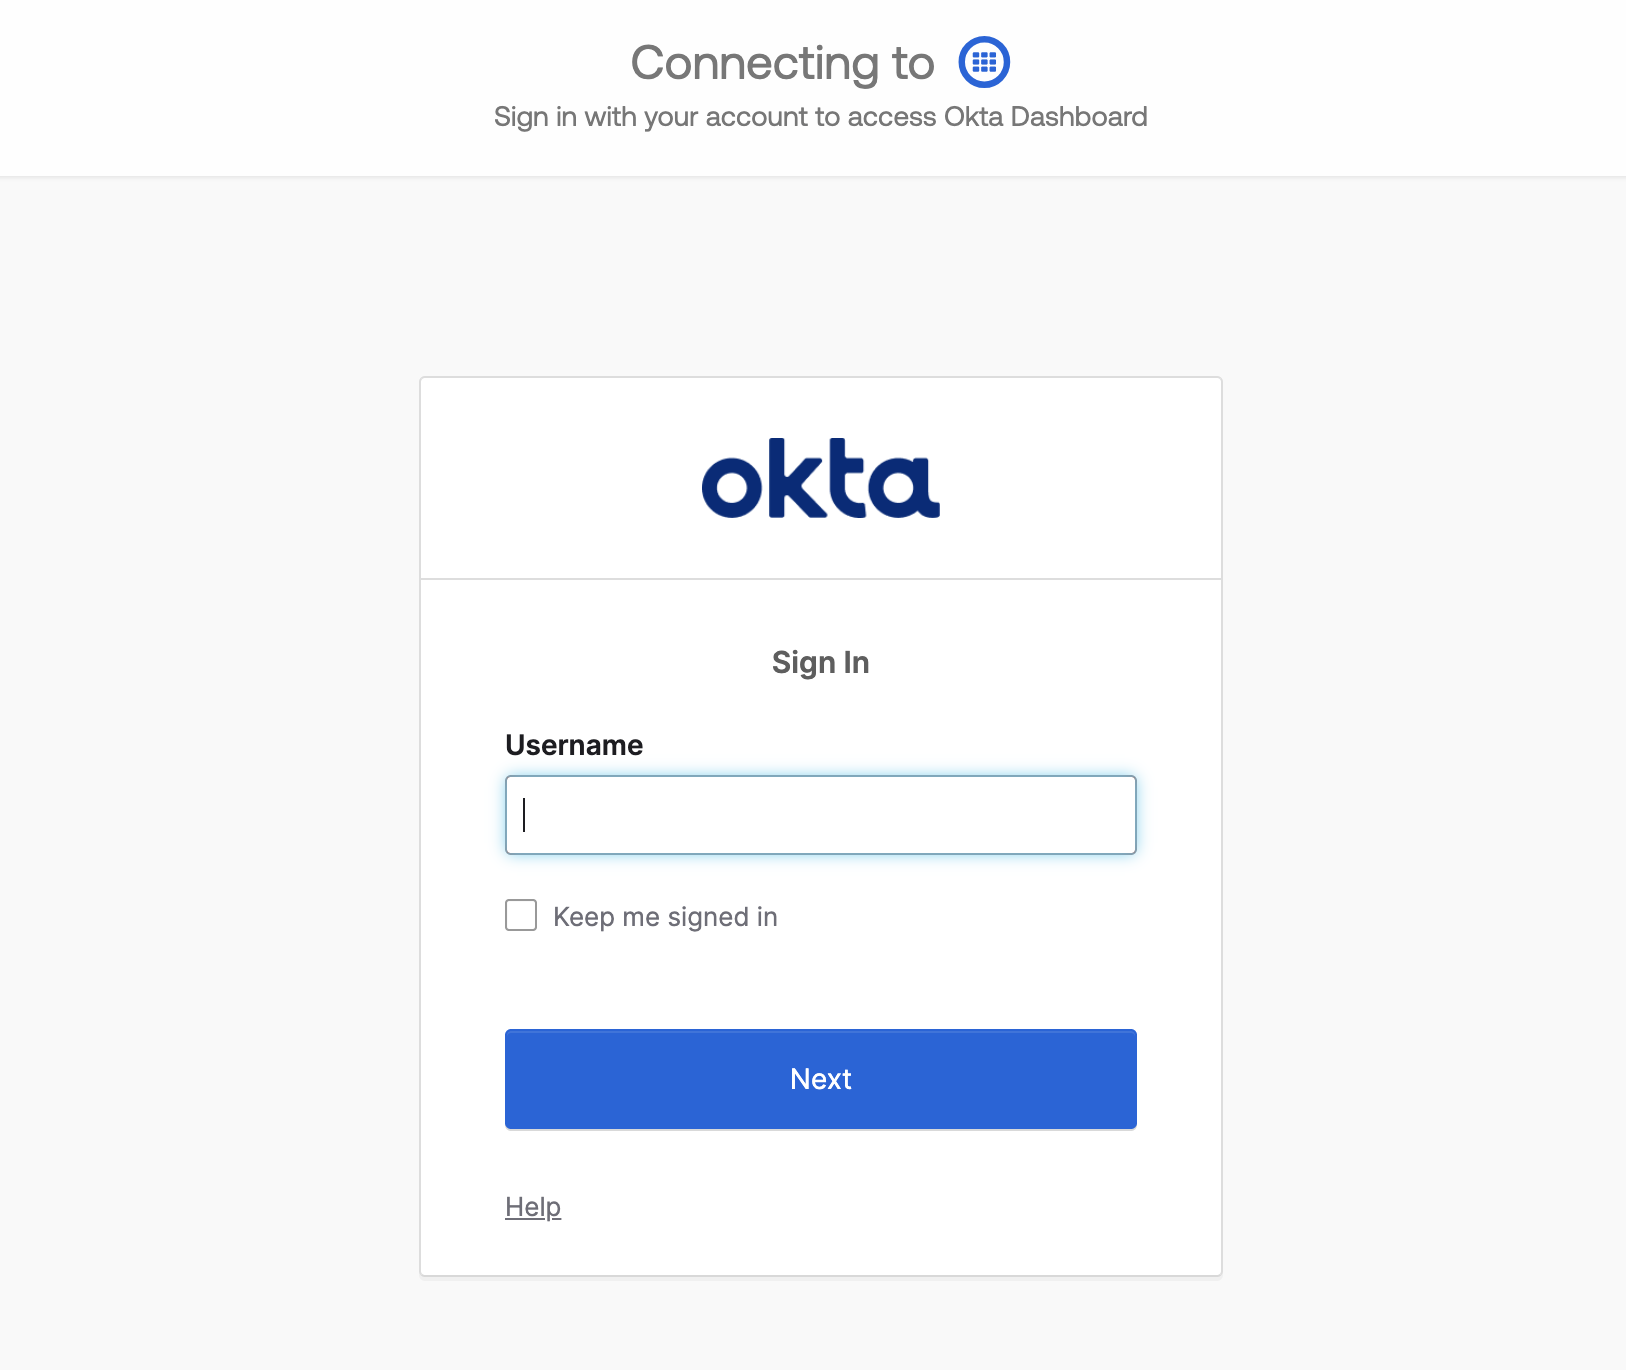
Figure 17: Example enterprise IdP login page; your customers will see their own IdP here.
3: Custom External IdP Login Page Request
Following successful authentication, Wristband redirects the browser to the Custom External IDP Login Page URL specified in your dashboard's Application Settings. You must implement a server-side endpoint at this URL to intercept the redirect and extract the external IDP authorization code from the incoming code query parameter.
This endpoint should handle the following steps:
- Obtain an access token by calling the Wristband Token API using your OAuth2 client credentials.
- Post the code to the Wristband Introspect Login External IDP Auth Code API to validate its integrity and extract both the tenant and Identity Provider (IdP) metadata.
- Call the Wristband Fetch External IDP User Info on Login API to retrieve the user's verified identity profile, including their stable external ID, email, and synchronized profile fields.
- Invalidate the external IDP authorization code by calling the Wristband Complete External IDP Login API to prevent reuse. If not manually revoked, the code expires automatically after 60 minutes. From this point forward, Wristband is no longer involved in the session lifecycle.
- Look up the user in your database by
external_id. If they don't exist yet, provision them by creating a new user record. - Mint a session in your existing auth system and redirect the user into the application.
// External IDP Login Page URL Endpoint
// GET "/auth/sso/callback?code=abc123..."
export async function GET(request: Request) {
  const { searchParams } = new URL(request.url);
  const externalIdpAuthCode = searchParams.get('code');

  // 1. Obtain an access token using your Wristband OAuth2 client credentials.
  const basicAuthCredentials = Buffer.from(
    `${process.env.CLIENT_ID}:${process.env.CLIENT_SECRET}`
  ).toString('base64');
  const tokenResponse = await fetch(
    `https://${process.env.APPLICATION_VANITY_DOMAIN}/api/v1/oauth2/token`,
    {
      method: 'POST',
      headers: {
        Accept: 'application/json',
        'Content-Type': 'application/x-www-form-urlencoded',
        Authorization: `Basic ${basicAuthCredentials}`,
      },
      body: new URLSearchParams({ grant_type: 'client_credentials' }),
    }
  );
  const { access_token: accessToken } = await tokenResponse.json();

  // 2. Introspect the external IDP auth code to validate it.
  const introspectResponse = await fetch(
    `https://${process.env.APPLICATION_VANITY_DOMAIN}/api/v1/external-idp-login/introspect`,
    {
      method: 'POST',
      headers: {
        Accept: 'application/json',
        'Content-Type': 'application/json',
        Authorization: `Bearer ${accessToken}`,
      },
      body: JSON.stringify({ token: externalIdpAuthCode }),
    }
  );
  const { active } = await introspectResponse.json();
  if (!active) {
    // This should not usually happen (defensive check). If the external IDP auth code is
    // invalid, surface an error to the user or send them to an error page.
    redirect('/error');
  }

  // 3. Fetch the verified user identity attributes from the IdP.
  const userinfoResponse = await fetch(
    `https://${process.env.APPLICATION_VANITY_DOMAIN}/api/v1/external-idp-login/fetch-userinfo`,
    {
      method: 'POST',
      headers: {
        Accept: 'application/json',
        'Content-Type': 'application/json',
        Authorization: `Bearer ${accessToken}`,
      },
      body: JSON.stringify({ externalIdpAuthCode }),
    }
  );
  const { externalId, email } = await userinfoResponse.json();

  // 4. Revoke the external IDP auth code so it cannot be reused.
  await fetch(
    `https://${process.env.APPLICATION_VANITY_DOMAIN}/api/v1/external-idp-login/complete`,
    {
      method: 'POST',
      headers: {
        Accept: 'application/json',
        'Content-Type': 'application/json',
        Authorization: `Bearer ${accessToken}`,
      },
      body: JSON.stringify({ externalIdpAuthCode }),
    }
  );

  // ...Wristband is no longer involved from this point onwards...

  // 5. Look up the user in your database by external_id. Provision if they don't exist yet.
  let user = await db
    .from('user')
    .select('id')
    .eq('external_id', externalId)
    .single();
  if (!user) {
    await db.from('user').insert({ external_id: externalId, email });
  }

  // 6. Mint a session in your existing auth system and redirect into your application.
  await yourAuthSystem.createSession({
    userId: user.id,
    email: user.email,
    companyId: user.company_id,
  });
  redirect('/dashboard');
}
Once the session is minted and the user is redirected, the SSO login flow is complete. All subsequent requests are authenticated entirely within your application's native auth system.
Updated 12 days ago