
Backend Server Integration
Learn how to integrate Wristband authentication into web applications using a backend server.
How Backend Server Integration Works
For web applications, the recommended approach for integrating with Wristband is to use a backend server to handle authentication and manage user sessions. This backend can be a traditional web application server, a Backend for Frontend (BFF), or serverless functions.
In this integration pattern, your backend server is responsible for:
- User Authentication: Implementing the endpoints that initiate and complete authentication with Wristband.
- Session Management: Maintaining the user's authenticated state across requests from the browser using a session cookie.
- Authenticated API Requests: Using access tokens to make authenticated requests to Wristband APIs and your application's internal backend APIs on behalf of the user.
This approach allows your application to securely manage access and refresh tokens on the backend without exposing them to client-side JavaScript.
The following diagram illustrates how these components interact.
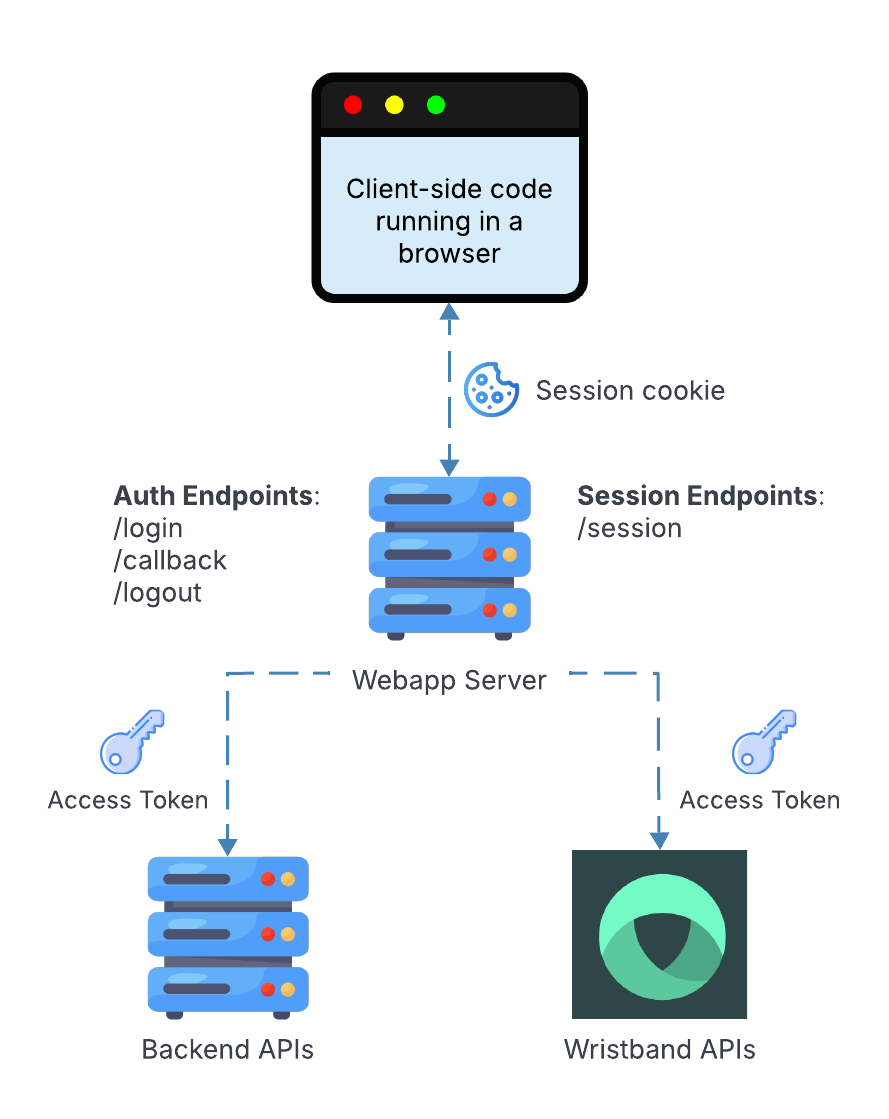
Figure 1: The backend server handles authentication, manages browser sessions, and uses access tokens to call APIs on the user's behalf.
Authentication Endpoints
The authentication endpoints manage the user's login and logout flows by interacting with Wristband's authentication APIs.
- Login Endpoint (
/login): Initiates the login flow by redirecting the browser to Wristband's Authorize Endpoint. Wristband then handles user authentication through its hosted login pages. - Callback Endpoint (
/callback): Handles the redirect from Wristband after successful authentication. It exchanges the authorization code for tokens using Wristband's Token Endpoint, creates an application session, and sets a session cookie in the browser. The user is then redirected to the application's home page or originally requested URL. - Logout Endpoint (
/logout): Terminates the user's application session by clearing the session cookie and invalidating any server-side session data. If a refresh token was issued, the endpoint should also revoke it by calling Wristband's Revoke Token API. Finally, it redirects the browser to Wristband's Logout Endpoint to terminate the user's Wristband authentication session.
Maintaining and Propagating Authenticated State
After a user successfully authenticates with Wristband, your application needs a way to persist their authenticated state across subsequent requests. Without this, each request would be treated independently, requiring the user to reauthenticate before accessing protected resources.
In the Backend Server Integration pattern, authenticated state is maintained and propagated using two mechanisms:
- Session Cookies: Maintain the user's authenticated state between the browser and your application's backend server.
- Access Tokens: Propagate the user's authenticated identity from your application's backend server to Wristband APIs or other internal backend APIs.
Browser to Backend Server: Session Cookies
Upon successful authentication, Wristband redirects the browser to your application's Callback Endpoint, where the backend server creates an application session and sends a session cookie to the browser.
The application session typically stores information about the authenticated user, including their user ID, tenant ID, access token, refresh token (if issued), and access token expiration time. This information allows the backend server to identify the authenticated user, make authenticated API requests on their behalf, and refresh expired access tokens without requiring them to log in again.
The browser automatically includes the session cookie with subsequent requests to your backend server. On each request, the backend uses the cookie to retrieve and validate the user's session, allowing them to remain authenticated across requests.
Application sessions can be managed in two ways:
- Client-Side Sessions: Session data is encrypted and stored directly in the session cookie.
- Server-Side Sessions: Session data is stored in a backend datastore, such as Redis, while the cookie contains a session identifier.
In either approach, the session cookie should be configured with appropriate security attributes, including HttpOnly, Secure, and SameSite.
For more information, see the Session Management documentation.
Backend Server to APIs: Access Tokens
When your backend server needs to make an authenticated request to Wristband or an internal backend API, it can use the access token obtained during the authentication flow to propagate the user's authenticated identity.
The backend server includes the access token in the Authorization header using the Bearer authentication scheme:
Authorization: Bearer <access_token>The receiving API validates the access token to identify the authenticated user and enforce the appropriate authorization rules.
Unlike session cookies, which maintain authenticated state between the browser and your application's backend server, access tokens propagate the user's authenticated identity between trusted backend services.
This separation allows your application to make authenticated API requests without exposing access tokens to client-side JavaScript.
If an access token expires, the backend server can use the user's refresh token, when available, to obtain a new access token without requiring the user to reauthenticate.
Session Endpoint
The Session Endpoint (/session) allows client-side JavaScript to retrieve information about the currently authenticated user.
When the frontend calls this endpoint, the browser automatically includes the application session cookie with the request. The backend server uses this cookie to identify the user's session and returns relevant session information, such as the user's identity, tenant information, and authentication status.
Because the session cookie is configured with the HttpOnly attribute, client-side JavaScript cannot access its contents directly. The Session Endpoint provides a secure way to expose the session information needed by the frontend without exposing sensitive tokens.
Using Access Tokens from the Frontend
In the Backend Server Integration pattern, access tokens are typically stored in the user's application session and managed exclusively by the backend server. This prevents sensitive tokens from being exposed to client-side JavaScript.
However, some application architectures require frontend JavaScript to call protected backend APIs directly. If these APIs use access tokens for authentication, your frontend needs a way to obtain the user's access token.
To support this, you can implement a Frontend Token Endpoint on your backend server. This endpoint retrieves the access token from the authenticated user's application session and returns it to the frontend, allowing JavaScript to make authenticated API requests.
Avoid Exposing Access Tokens to the Frontend Unless NecessaryExposing access tokens to client-side JavaScript increases the risk of token theft through Cross-Site Scripting (XSS) attacks.
Whenever possible, use the Backend-for-Frontend (BFF) pattern, where the frontend communicates with your backend server using a session cookie. The backend then retrieves the access token from the user's session and uses it to make authenticated API requests on their behalf.
This approach keeps access tokens on the server and avoids exposing them to client-side JavaScript.
Frontend Token Endpoint
The Frontend Token Endpoint is an endpoint implemented by your application's backend server that allows frontend clients to retrieve an authenticated user's current access token.
This endpoint is different from Wristband's Token Endpoint, which is responsible for issuing and refreshing tokens. Your application's Frontend Token Endpoint retrieves tokens from the user's existing application session and calls Wristband's Token Endpoint only when a token needs to be refreshed.
When the frontend calls the Frontend Token Endpoint, the browser includes the application session cookie with the request. The backend uses this cookie to identify the user's session and retrieve the associated access token.
The Frontend Token Endpoint performs the following steps:
- Validate the Session: Verify that the user's application session is valid.
- Retrieve the Access Token: Retrieve the access token and its expiration time from the user's session.
- Refresh the Token if Necessary: If the access token has expired or is about to expire, use the refresh token stored in the session to obtain a new access token from Wristband. Update the application session with the refreshed token information.
- Return the Access Token: Return the valid access token and its expiration time to the frontend.
The response should contain only the access token and its expiration time. Refresh tokens should never be returned to the frontend.
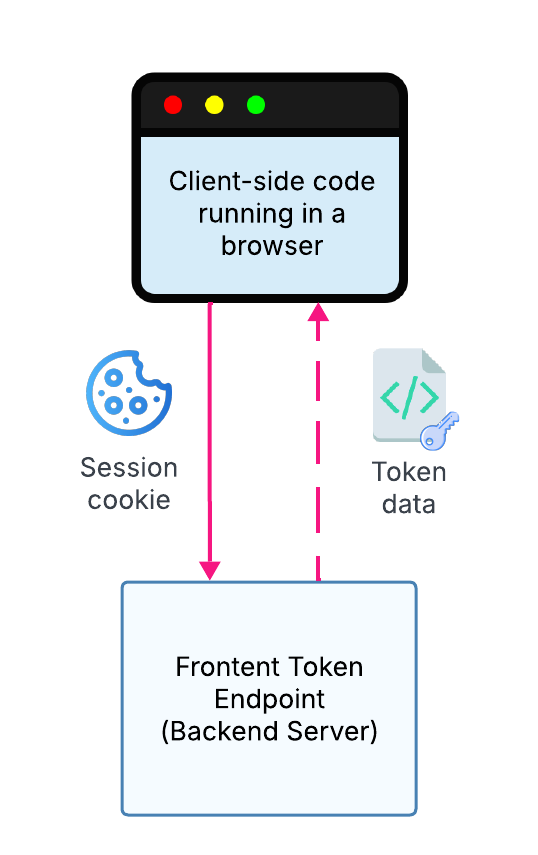
Figure 2: Client-side JavaScript calls the Frontend Token Endpoint to retrieve the user's access token and its expiration time.
Caching Access Tokens in the Frontend
To avoid calling the Frontend Token Endpoint before every API request, your frontend can temporarily cache the access token and its expiration time in JavaScript memory.
Before making an authenticated API request, the frontend checks whether a valid access token is already cached:
- Valid Cached Token: Reuse the cached access token to make the API request.
- Missing or Expired Token: Call the Frontend Token Endpoint to retrieve a valid access token and update the cache.
To prevent tokens from expiring while API requests are being processed, the frontend should consider a cached token expired shortly before its actual expiration time. For example, using a 30-second expiration buffer allows the frontend to proactively retrieve a new token before the current one expires.
Access tokens should only be cached in memory and should not be persisted in browser storage mechanisms such as localStorage or sessionStorage, which increase the risk of token exposure.
The following examples illustrate how frontend JavaScript retrieves, caches, and refreshes access tokens when making authenticated API requests.
End-to-End Examples
Example 1: First Authenticated API Request
When the frontend makes its first authenticated API request, it must retrieve an access token from the backend because no token is currently cached.
The following steps occur:
- The frontend calls the Frontend Token Endpoint. The browser includes the user's application session cookie with the request.
- The backend's session middleware validates the session and ensures that its access token is still valid, refreshing it if necessary.
- The Frontend Token Endpoint returns the access token and its expiration time.
- The frontend caches the access token and expiration time in JavaScript memory.
- The frontend calls the protected backend API, including the access token in the
Authorizationheader using the Bearer authentication scheme. - The backend API validates the access token and performs the appropriate authorization checks.
- If authorized, the API processes the request and returns a response to the frontend.
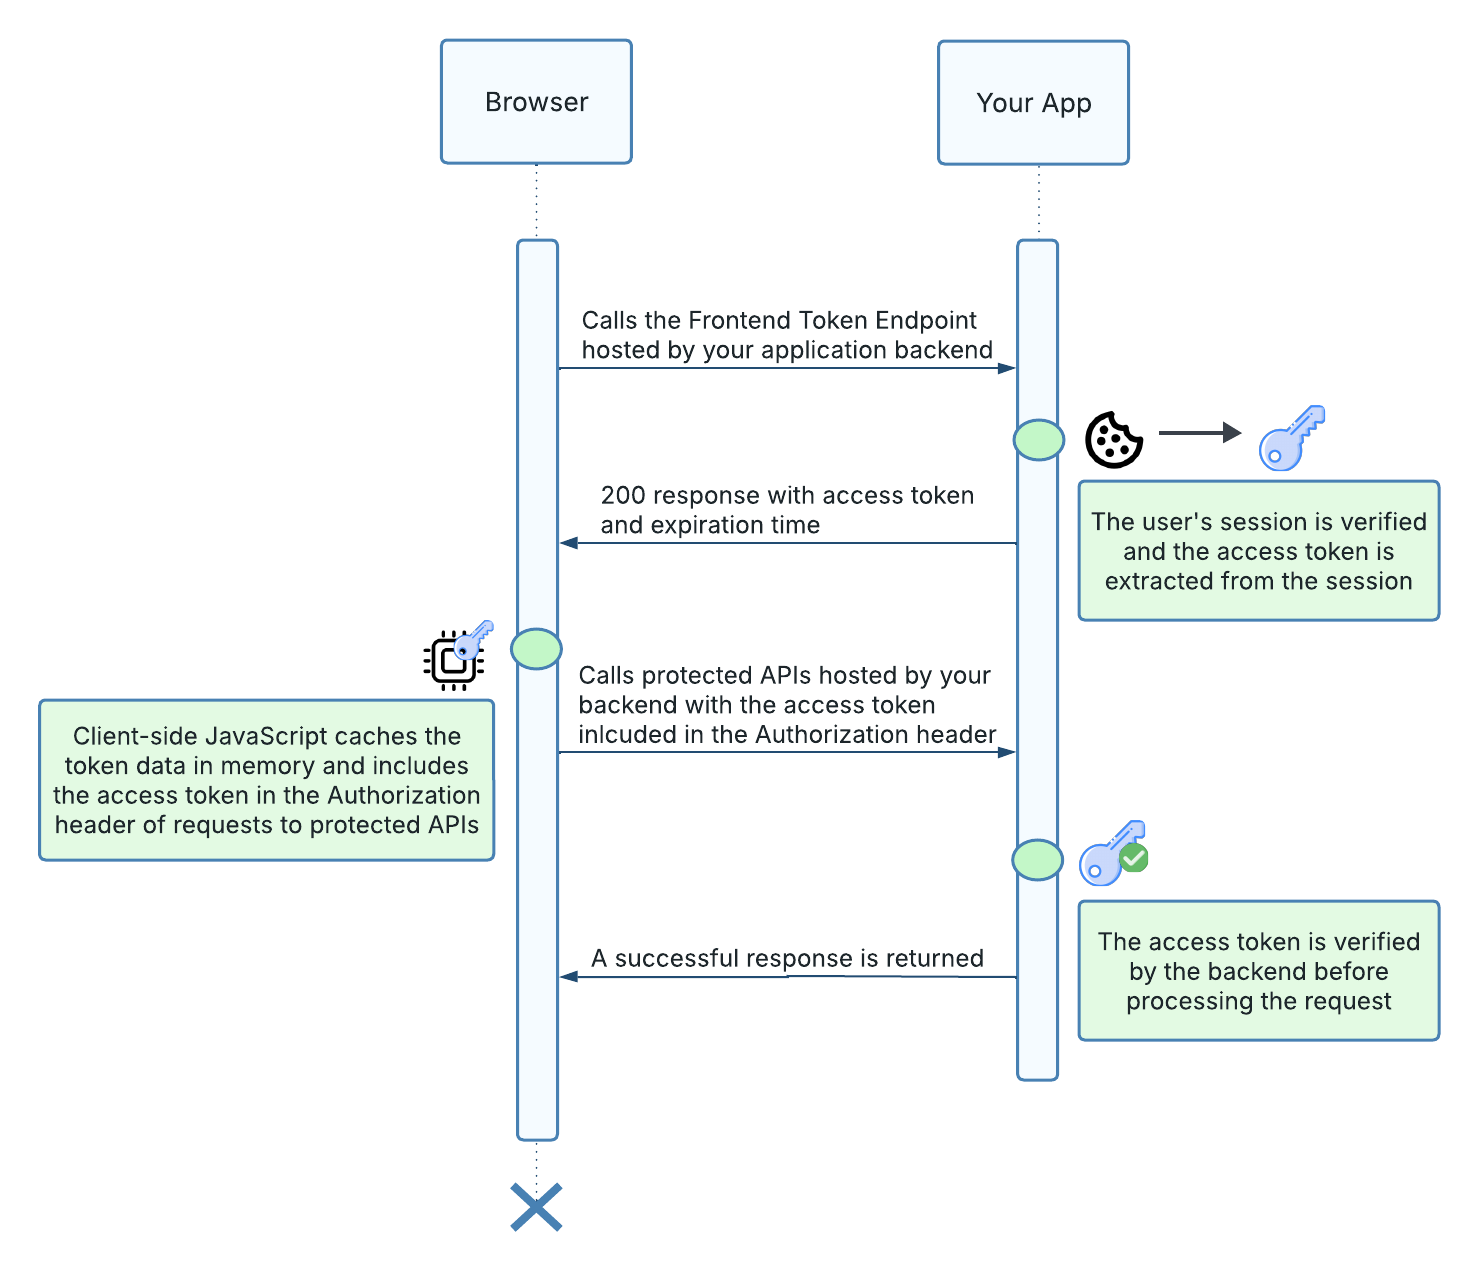
Figure 3: Sequence diagram showing client-side JavaScript making its first authenticated call to a backend API.
Example 2: Subsequent Authenticated API Requests
Once an access token is cached in JavaScript memory, the frontend can reuse it for subsequent API requests until it expires.
The following steps occur:
- The frontend checks the cached access token's expiration time, accounting for the expiration buffer.
- If the token is still valid, the frontend calls the protected backend API, including the cached access token in the
Authorizationheader. - The backend API validates the access token and performs the appropriate authorization checks.
- If authorized, the API processes the request and returns a response to the frontend.
By reusing the cached access token, the frontend avoids unnecessary calls to the Frontend Token Endpoint, reducing network overhead and improving application performance.
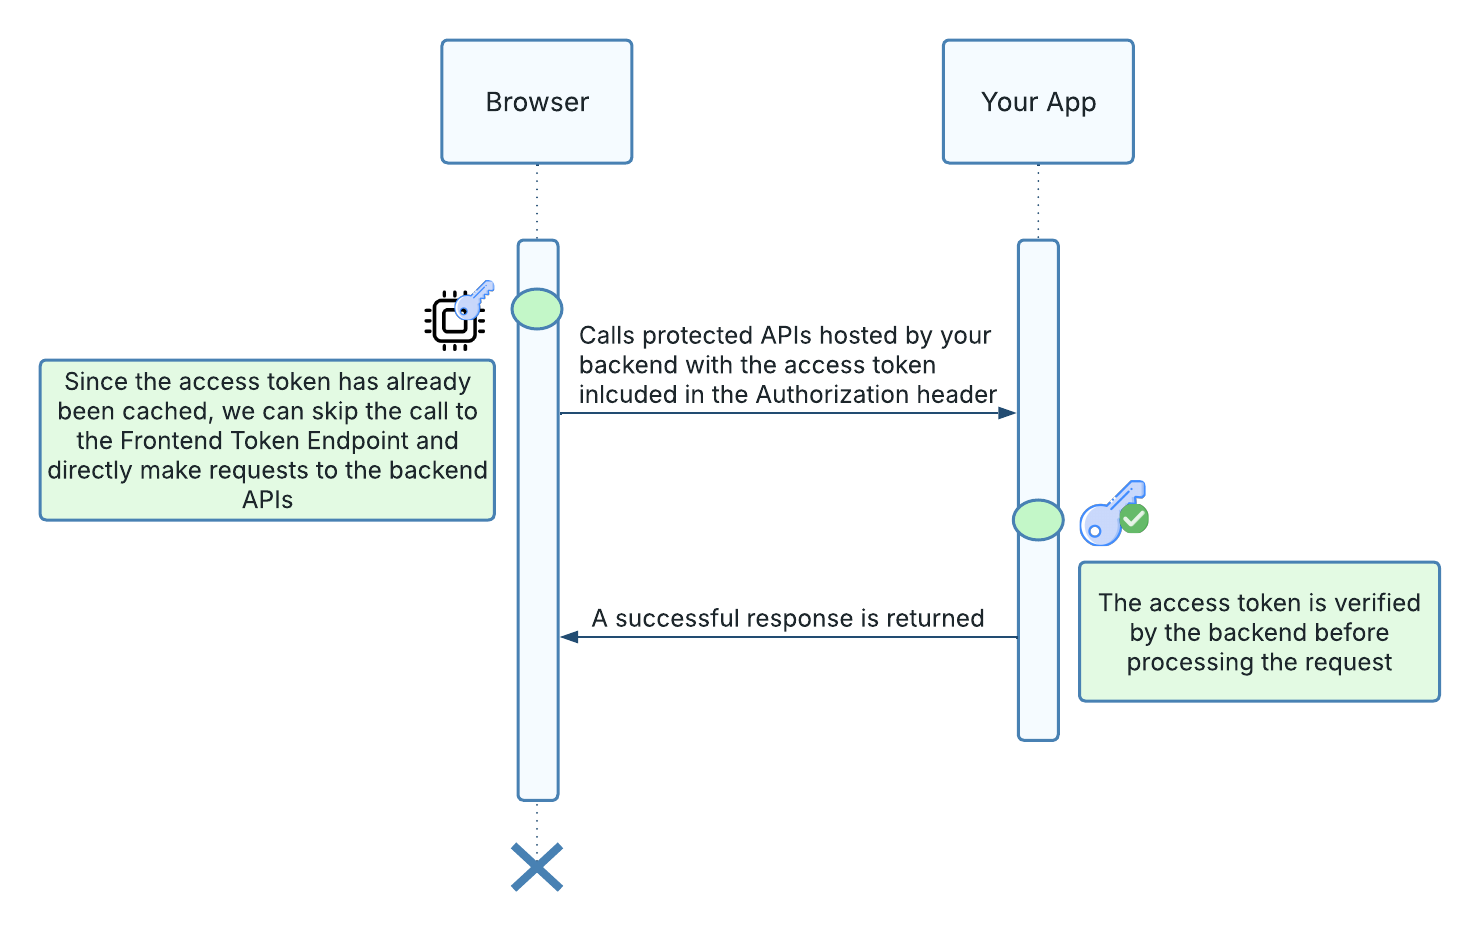
Figure 4: Sequence diagram showing client-side JavaScript making subsequent backend API calls utilizing a cached access token.
Handling Unexpected Token Expiration
Even when a cached access token appears valid, a backend API may reject it because it has expired or is no longer accepted.
If an API returns a 401 Unauthorized response indicating an expired or invalid access token, the frontend can:
- Clear the cached access token.
- Call the Frontend Token Endpoint to retrieve a valid access token.
- Update the in-memory cache with the returned token and expiration time.
- Retry the original API request once using the new token.
If the retry fails, the frontend should stop retrying and handle the authentication error appropriately. If the user's application session is no longer valid, they may need to log in again.
Example 3: API Request with an Expired Access Token
When the cached access token expires, the frontend must retrieve a new access token before making another authenticated API request.
The following steps occur:
- The frontend determines that the cached access token has expired or is approaching expiration by checking its expiration time.
- The frontend calls the Frontend Token Endpoint to retrieve a valid access token.
- The backend's session middleware detects the expired access token and uses the refresh token stored in the user's session to request a new access token from Wristband's Token Endpoint.
- Wristband returns a new access token and expiration information. The backend updates the user's application session with the refreshed token data.
- The Frontend Token Endpoint returns the new access token and its expiration time to the frontend.
- The frontend updates its in-memory cache and proceeds with the original API request using the new access token.
If token refreshing fails because the refresh token has expired or been revoked, the backend should return an authentication error rather than an invalid access token. The frontend can then clear its cached authentication state and initiate the login flow as appropriate.

Figure 5: Sequence diagram showing client-side JavaScript making a call to an authenticated backend API with an expired access token.
Updated 2 days ago