
Native (Mobile / Desktop) Integration
Learn how to integrate Wristband authentication into native mobile and desktop applications, securely manage tokens, and make authenticated API requests.
How Native Integration Works
For native applications running directly on a user's device, such as iOS, Android, macOS, or Windows, the recommended approach is to use the OIDC Authorization Code Flow with PKCE (Proof Key for Code Exchange).
In this integration pattern, your native application is responsible for:
- User Authentication: Initiating and completing authentication with Wristband using a system browser and a registered redirect URI.
- Session Management: Maintaining the user's authenticated state locally using the device's secure storage mechanisms.
- Authenticated API Requests: Using access tokens to make authenticated requests to Wristband APIs and your application's internal backend APIs on behalf of the user.
The following diagram illustrates how these components interact.
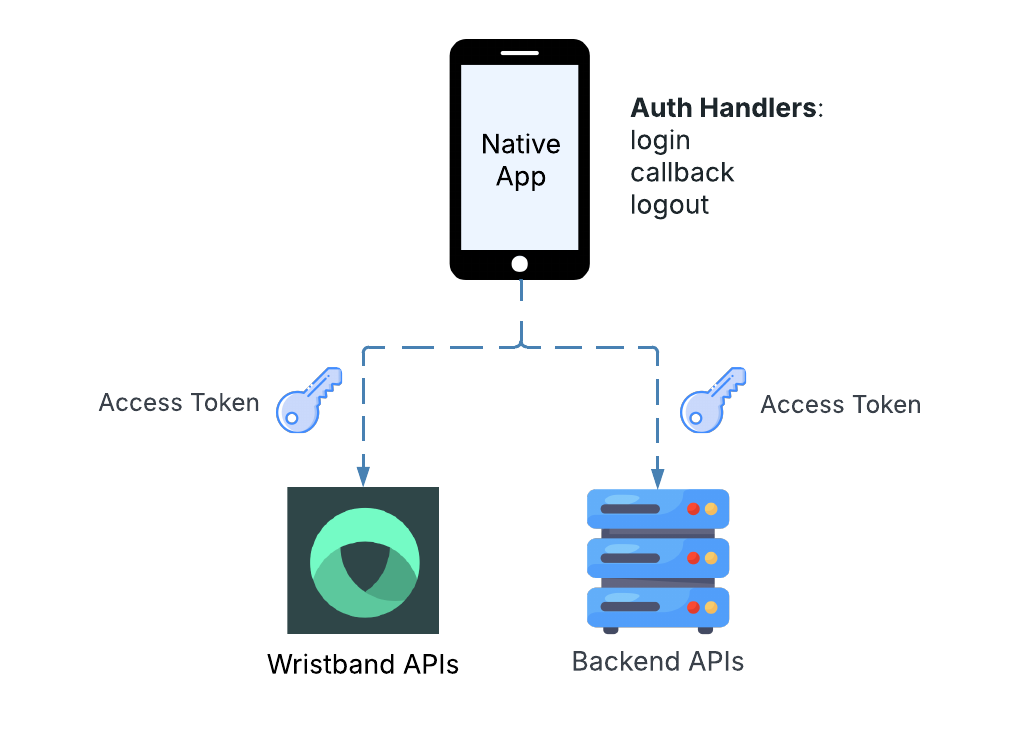
Figure 1: The native application handles authentication through a system browser, securely stores tokens on the device, and uses access tokens to call protected APIs.
Authentication Handlers
Native applications must implement logic to initiate and complete authentication with Wristband. Unlike backend server integrations, which expose HTTP endpoints, native applications typically handle these operations through application functions and registered URI handlers.
The following three handlers are responsible for managing authentication:
- Login Handler: Initiates the login flow by opening Wristband's Authorize Endpoint in a system browser. Wristband then handles user authentication through its hosted login pages.
- Callback Handler: Handles the redirect from Wristband after successful authentication. It exchanges the authorization code for tokens using Wristband's Token Endpoint, retrieves the user's claims, securely stores the tokens, and initializes the application's authenticated state.
- Logout Handler: Terminates the application's local session by clearing stored authentication data. If a refresh token was issued, the handler should also revoke it using Wristband's Revoke Token API. Finally, it opens Wristband's Logout Endpoint in the browser to terminate the user's Wristband authentication session.
Login Handler
The Login Handler initiates authentication by opening Wristband's Authorize Endpoint in a system browser.
Before initiating the authorization request, the application generates a PKCE code verifier and derives a code challenge. The code verifier is temporarily stored by the application so it can be retrieved by the Callback Handler, while the code challenge is included in the authorization request.
The application may also include an optional state parameter to correlate the authorization response with the original request or preserve application-specific context.
Wristband validates the authorization request and presents its hosted login page, where the user completes authentication.
Use a System Browser for AuthenticationNative applications should use a system browser rather than an embedded WebView. This prevents the application from directly accessing user credentials and allows the authentication flow to reuse existing browser authentication sessions where supported.
Callback Handler
After successful authentication, Wristband redirects the browser to the application's registered redirect URI, passing an authorization code and the optional state parameter.
Native applications receive this redirect using platform-supported mechanisms, such as Universal Links, App Links, custom URI schemes, or loopback redirect URIs for desktop applications.
The Callback Handler performs the following steps:
- Validate the Authorization Response: Check for authorization errors and, if a
stateparameter was included in the original request, verify that it matches the expected value. Retrieve the previously stored PKCE code verifier associated with the authentication request. - Exchange the Authorization Code: Call Wristband's Token Endpoint using the
authorization_codegrant type, passing the authorization code, registered redirect URI, and original PKCE code verifier. - Retrieve User Claims: Call Wristband's UserInfo Endpoint using the newly acquired access token to retrieve the authenticated user's claims.
- Store the Tokens: Securely store the access token, ID token, refresh token (if issued), and access token expiration information on the device.
- Initialize the Application Session: Use the retrieved user claims to initialize the application's authenticated state and establish the user's local session.
- Complete Login: Clear the temporary PKCE verifier and other sensitive authorization request data, then navigate the user to the application's authenticated screen or originally requested destination.
Logout Handler
The Logout Handler is responsible for terminating both the application's local authenticated state and the user's Wristband authentication session.
The logout process should perform the following steps:
- Clear Local Authentication State: Delete stored tokens and other sensitive authentication data from the device.
- Revoke the Refresh Token: If a refresh token was issued, call Wristband's Revoke Token API to invalidate it.
- Terminate the Wristband Authentication Session: Open Wristband's Logout Endpoint in the system browser using the appropriate tenant domain.
- Return to the Application: After Wristband completes logout, return the user to the application's login screen using the configured redirect behavior.
Clearing local tokens prevents the application from continuing to use them, while terminating the Wristband authentication session prevents the browser from silently reauthenticating the user through that session.
Maintaining Authenticated State
After a user successfully authenticates with Wristband, your native application needs a way to maintain their authenticated state across application launches and subsequent API requests.
Unlike backend server integrations, which typically manage application sessions using cookies, native applications manage their authenticated state directly on the device using secure storage.
After the Callback Handler completes authentication, the application securely stores the authentication information needed for subsequent requests. This typically includes:
- Access token
- Refresh token (if issued)
- Access token expiration time
- User ID and relevant user information
- Tenant ID and relevant tenant information
Native applications should use platform-provided secure storage mechanisms, such as:
- iOS and macOS: Apple Keychain
- Android: Android Keystore-backed secure storage
- Windows: Windows platform credential-protection APIs
These mechanisms help protect sensitive tokens from unauthorized access and allow the application to restore its authenticated state when relaunched.
Access tokens can be kept in memory while the application is running. Refresh tokens and any other tokens persisted between application launches should be stored using the device's secure storage mechanisms.
Avoid storing authentication tokens in plaintext files, application preferences, logs, or other unprotected storage locations.
Propagating Authenticated State
Once a user is authenticated, the native application needs a way to propagate their authenticated identity to Wristband APIs and your application's internal backend APIs.
In the Native Integration pattern, authenticated state is propagated using access tokens. When making an authenticated API request, the application includes the access token in the Authorization header using the Bearer authentication scheme:
Authorization: Bearer <access_token>
The receiving API validates the access token to identify the authenticated user and enforce the appropriate authorization rules.
If an access token expires, the native application can use its refresh token, when available, to obtain a new access token without requiring the user to reauthenticate.
For more information, see the Refreshing Access Tokens documentation.
Updated 9 days ago