Add Auth Endpoints
Learn how to implement the authentication endpoints required for Wristband integration.
Implementing authentication with the Wristband Auth SDK requires four primary endpoints. These endpoints handle the OAuth 2.1 and OpenID Connect flow, exchange authorization codes for tokens, and maintain your application's session cookies.
- Login Endpoint
- Callback Endpoint
- Logout Endpoint
- Session Endpoint
Create a dedicated file for these endpoints, such as /Endpoints/AuthEndpoints.cs, to keep your authentication logic separate from your other application routes.
Login Endpoint
The Login Endpoint starts the authentication flow. It uses the Wristband SDK to build an authorization request and redirects the user to Wristband's Authorize Endpoint. Wristband then redirects the user to the hosted login page for authentication.
The example below shows how to implement the Login Endpoint using the Wristband SDK.
// AuthEndpoints.cs

using Microsoft.AspNetCore.Builder;
using Microsoft.AspNetCore.Http;
using Wristband.AspNet.Auth;

public static class AuthEndpoints
{
    public static WebApplication MapAuthEndpoints(this WebApplication app)
    {
        // Login Endpoint - route can be whatever you prefer
        app.MapGet("/auth/login", async (
            HttpContext ctx,
            IWristbandAuthService wristbandAuth) =>
        {
            // Call the Wristband Login() method which will return a URL that
            // should be used to redirect to Wristband's hosted login page.
            var wristbandAuthorizeUrl = await wristbandAuth.Login(ctx, null);
            return Results.Redirect(wristbandAuthorizeUrl);
        });

        // ...

        return app;
    }
}
Callback Endpoint
After the user successfully authenticates, Wristband redirects them to your application's Callback Endpoint. Call wristbandAuth.Callback() to process the authentication response and retrieve a CallbackResult object containing the user's tokens and claims.
To initialize the user's session, call the HttpContext.CreateSessionFromCallback() extension method and pass the CallbackResult object as the argument.
The following example shows how to implement the Callback Endpoint using the Wristband SDK.
// AuthRoutes.cs (continued)

using Microsoft.AspNetCore.Builder;
using Microsoft.AspNetCore.Http;
using Wristband.AspNet.Auth;

public static class AuthEndpoints
{
    public static WebApplication MapAuthEndpoints(this WebApplication app)
    {
        // ...

        // Callback Endpoint - route can be whatever you prefer
        app.MapGet("/auth/callback", async (
            HttpContext ctx,
            IWristbandAuthService wristbandAuth) =>
        {
            // Call the Wristband Callback() method to check if the user
            // successfully authenticated. If the user did authenticate successfully,
            // the user's tokens and claims can be retrieved from the callbackResult.
            var callbackResult = await wristbandAuth.Callback(ctx);

            // For some edge cases, the SDK requires a redirect to restart the login flow.
            if (callbackResult.Type == CallbackResultType.RedirectRequired)
            {
                return Results.Redirect(callbackResult.RedirectUrl);
            }

            // Create a session for the authenticated user. If needed, custom fields can
            // be stored in the session using the customClaims parameter of the
            // CreateSessionFromCallback() extension method.
            ctx.CreateSessionFromCallback(callbackResult.CallbackData);

            // Once the Callback Endpoint has completed, we redirect to your app's
            // default return URL (typically your app's home page) or to an explicit
            // return URL, if one was specified in the original login request.
            var returnUrl = callbackResult.CallbackData.ReturnUrl;
            return Results.Redirect(returnUrl ?? "<replace_with_a_default_url>");
        });

        // ...

        return app;
    }
}
Logout Endpoint
When a user logs out of your application, the Logout Endpoint must clear all authenticated state associated with the user. To do this, it must:
- Clear the application's local session.
- Revoke the user's refresh token.
- Redirect the user to Wristband's Logout Endpoint to end their Wristband authentication session.
The example below shows how to implement the Logout Endpoint using the Wristband SDK.
// AuthRoutes.cs (continued)

using Microsoft.AspNetCore.Builder;
using Microsoft.AspNetCore.Http;
using Wristband.AspNet.Auth;

public static class AuthEndpoints
{
    public static WebApplication MapAuthEndpoints(this WebApplication app)
    {
        // ...

        // Logout Endpoint - route can be whatever you prefer
        app.MapGet("/auth/logout", async (
            HttpContext ctx,
            IWristbandAuthService wristbandAuth) =>
        {
            // Wristband provides convenient HttpContext extension methods for getting
            // all the necessary session data needed to perform the logout operation.
            var logoutConfig = new LogoutConfig
            {
                RefreshToken = ctx.GetRefreshToken(),
                TenantCustomDomain = ctx.GetTenantCustomDomain(),
                TenantName = ctx.GetTenantName(),
            };

            // Use Wristband's extension method to clear your app's local session.
            ctx.DestroySession();

            // Call the Wristband Logout() method. This will revoke any refresh tokens
            // associated with the user and return a Response to redirect to Wristband's
            // Logout Endpoint. Redirecting to Wristband's Logout Endpoint will terminate
            // Wristband's auth session associated to the user. When Wristband is done
            // logging out the user it will redirect back to your application's login
            // URL or to an explicitly provided redirect URL.
            var wristbandLogoutUrl = await wristbandAuth.Logout(ctx, logoutConfig);
            return Results.Redirect(wristbandLogoutUrl);
        });

        // ...

        return app;
    }
}
Session Endpoint
The Session Endpoint verifies that an incoming request contains a valid session. If the session is valid, the endpoint returns the user's session data.
The frontend typically uses this endpoint to:
- Determine whether the user has a valid session.
- Access the user's session data in the browser.
The following example shows how to implement the Session Endpoint using the Wristband SDK.
// AuthRoutes.cs (continued)

using Microsoft.AspNetCore.Builder;
using Microsoft.AspNetCore.Http;
using Wristband.AspNet.Auth;

public static class AuthEndpoints
{
    public static WebApplication MapAuthEndpoints(this WebApplication app)
    {
        // ...

        // Session Endpoint - route can be whatever you prefer.
        app.MapGet("/auth/session", async (
            HttpContext ctx,
            IWristbandAuthService wristbandAuth) =>
        {
            // Call the Wristband GetSessionResponse() extension method to extract the
            // user's session data and populate a SessionResponse. If needed, you can
            // add additional data to the SessionResponse by using the `metadata`
            // parameter of the GetSessionResponse() method.
            var sessionResponse = ctx.GetSessionResponse();
            return Results.Ok(sessionResponse);
        })
        .RequireWristbandSession(); // Enforces that a valid session cookie is present in the request

        return app;
    }
}
Map Auth Endpoints
After implementing the authentication endpoints, map them in your application's Program.cs file.
// Program.cs (continued)

// ...

app.UseAuthentication();
app.UseAuthorization();
app.UseWristbandSessionMiddleware();


// ADD: Your API routes must go after your auth middlewares
app.MapAuthEndpoints();

app.Run();
Register Your Login Endpoint and Callback Endpoint With Wristband
Wristband redirects users to your application's Login Endpoint and Callback Endpoint during several authentication flows. To enable these redirects, configure both endpoint URLs in the Wristband Dashboard by updating the following settings:
- Application Login URL
- Client Redirect URIs
The sections below explain how to configure each setting.
Updating the Application Login URL
To update the Application Login URL, follow these steps.
- From the Dashboard Home Page, select the appropriate application.
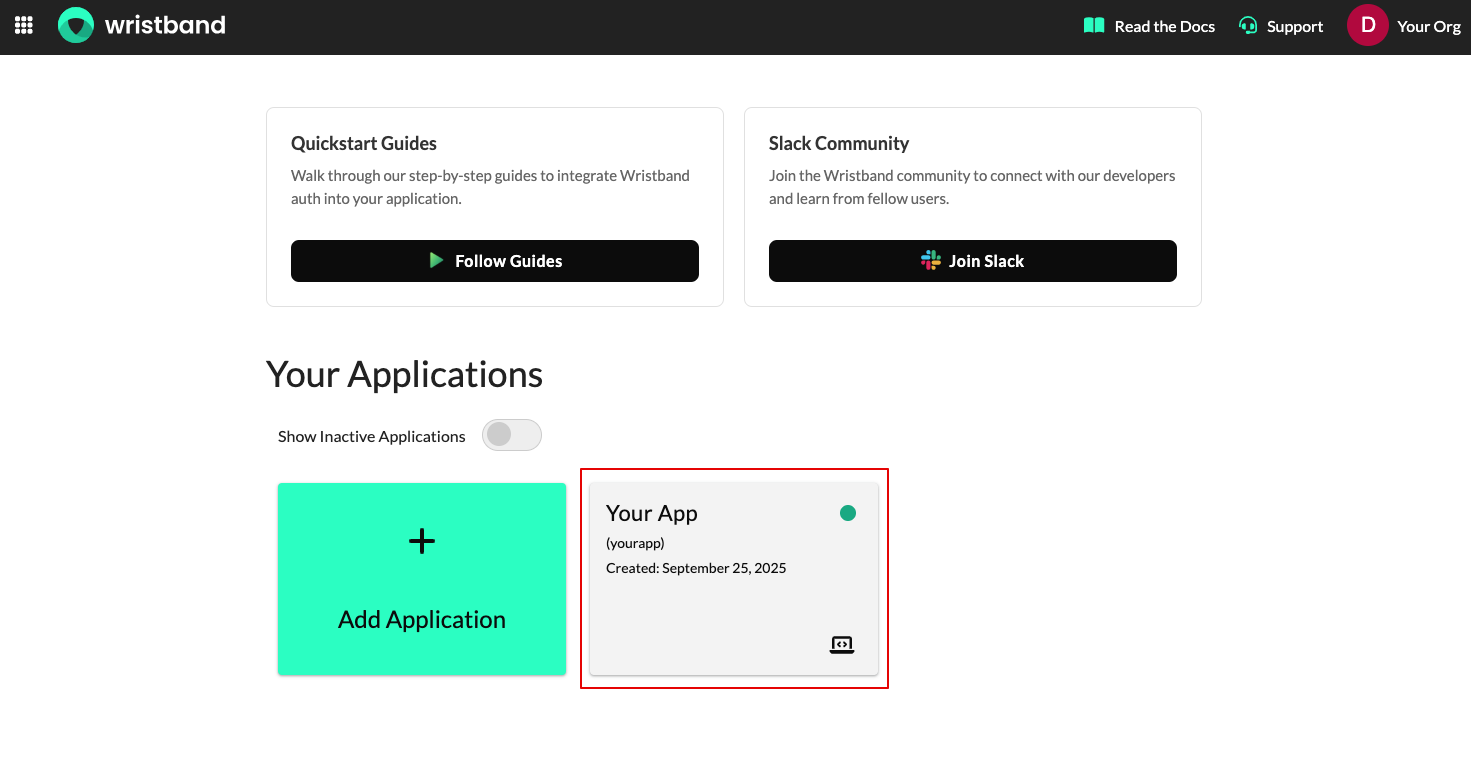
Figure 1: Select your Wristband application.
- On the Application Settings page, locate the Login URL field and set it to the URL of your application's Login Endpoint. Click Save when finished.
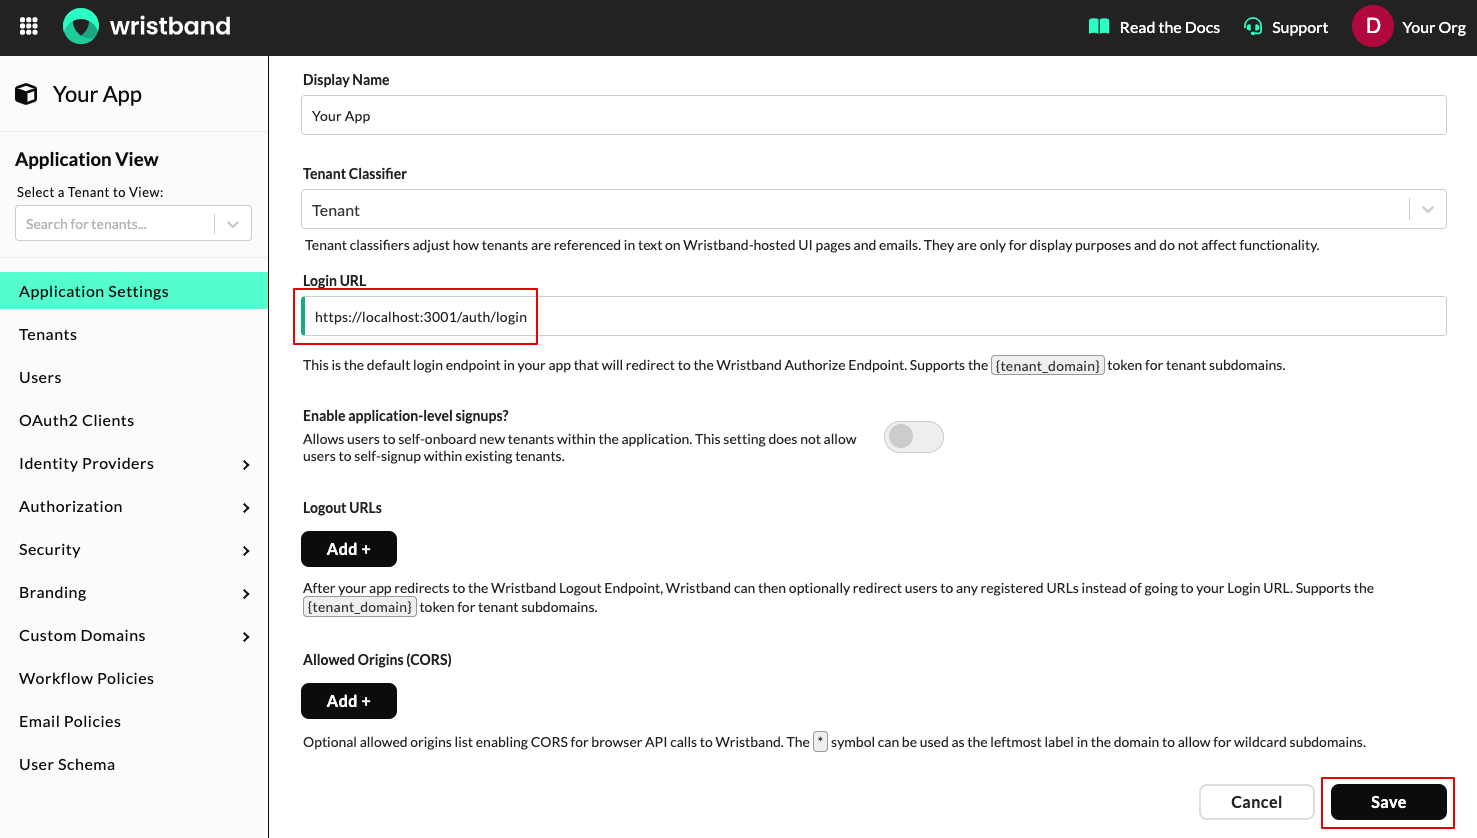
Figure 2: Configure the application Login URL.
Updating the Client Redirect URIs
To update the Client Redirect URIs, follow these steps.
- Select OAuth2 Clients from the left navigation bar, then select the client whose ID matches the client ID registered with the SDK.
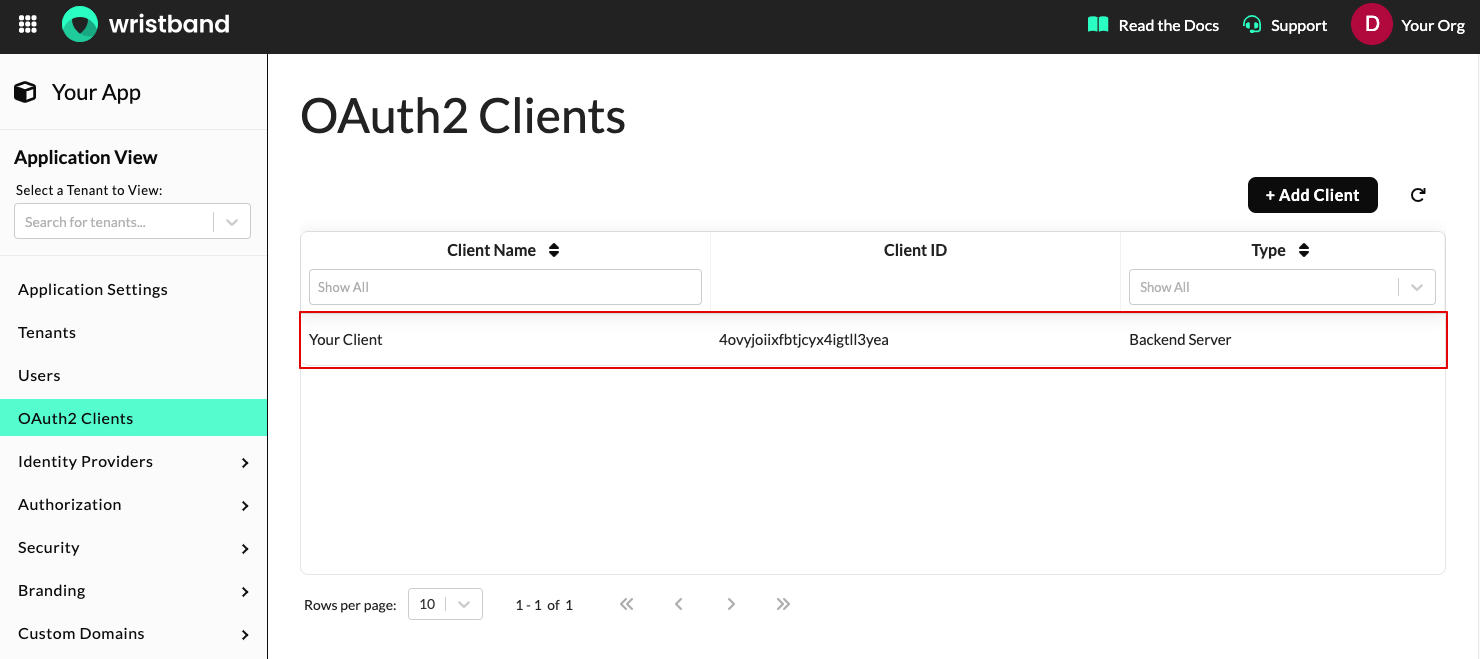
Figure 3: Select the matching OAuth2 client.
- On the Edit Client page, go to the Redirect URIs section and click Add +. Enter the URL of your application's Callback Endpoint, then click Save.
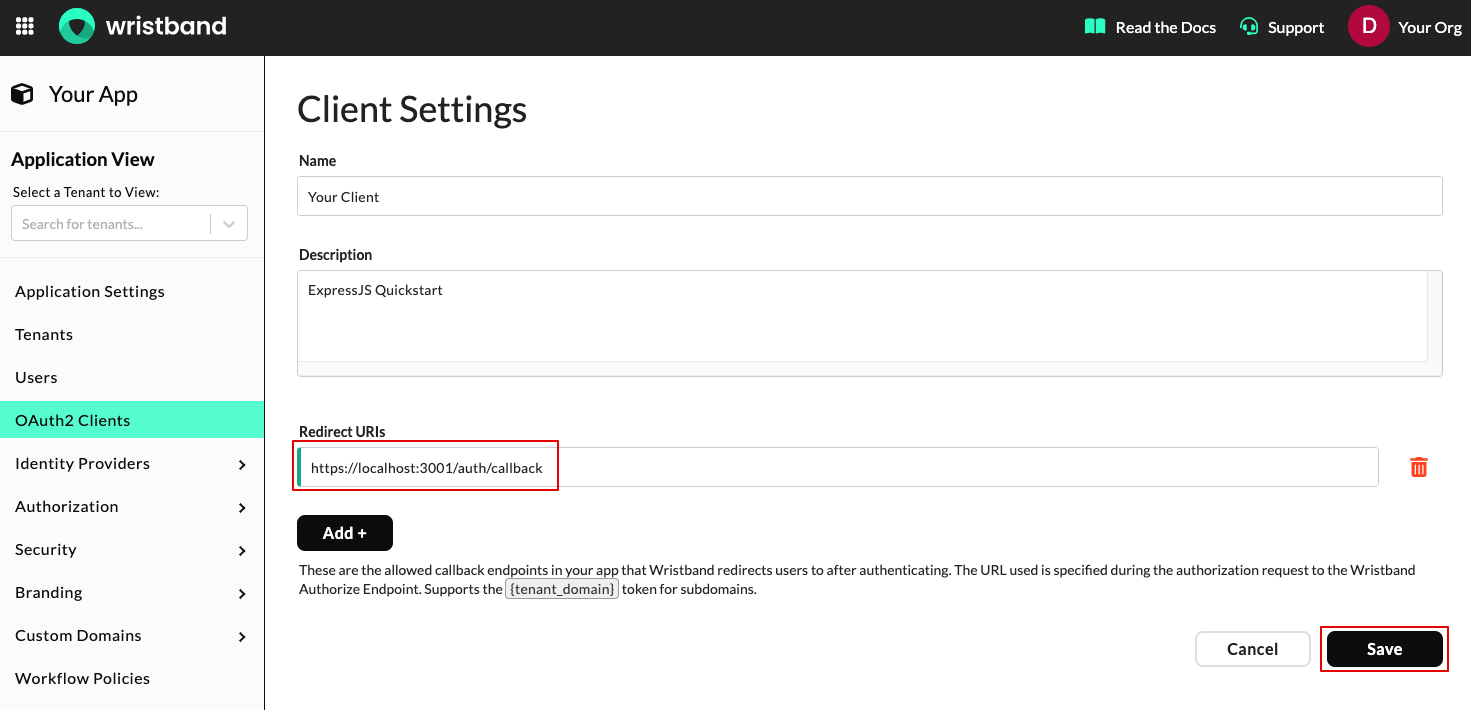
Figure 4: Add the Callback Endpoint as a Redirect URI.
Updated 8 days ago
What’s Next
With your application's authentication endpoints in place, let's verify that they're working correctly.