Add Auth Endpoints
How to implement the necessary auth endpoints to integrate your application with Wristband.
To set up user authentication using Wristband, configure the django-auth SDK inside your Django URL configuration to handle these three core endpoints:
- Login Endpoint: Triggers authentication by sending users to Wristband's hosted login page.
- Callback Endpoint: Receives the secure tokens from Wristband once the user logs in successfully.
- Logout Endpoint: Destroys the local application session and ends the global Wristband session.
Create a dedicated file (e.g., src/your_app/auth_views.py) for your authentication endpoints to keep your security logic neatly separated from the rest of your application routes.
Login Endpoint
Your application's Login Endpoint handles the initial authentication request. It securely constructs the authorization request, stores any necessary state, and redirects the user to Wristband's Authorize endpoint. From there, users are routed to Wristband-hosted login pages to safely complete their sign-in.
The following code snippet demonstrates how to implement this redirect using the official Wristband SDK.
# your_app/auth_views.py

from django.http import HttpRequest, HttpResponse
from django.views.decorators.http import require_GET
from wristband.django_auth import (
    LogoutConfig,
    RedirectRequiredCallbackResult,
    session_from_callback,
)
from .wristband import wristband_auth

# Login Endpoint
@require_GET
def login_endpoint(request: HttpRequest) -> HttpResponse:
    # Call the Wristband login() method which will generate the response that
    # should be used to redirect to Wristband's Authorize Endpoint.
    return wristband_auth.login(request)

...
Callback Endpoint
Upon successful authentication, Wristband redirects to your Callback Endpoint. Call wristband_auth.callback() to retrieve the user's tokens and claims, then hydrate your session with session_from_callback(). Finally, use wristband_auth.create_callback_response() to complete the flow and return a Django response equipped with the correct headers and cookies.
Below is the updated code snippet utilizing the Wristband Python Auth SDK to properly implement the Callback Endpoint in Django.
# your_app/auth_views.py (continued)

...

# Callback Endpoint
@require_GET
def callback_endpoint(request: HttpRequest) -> HttpResponse:
    # Call the Wristband callback() method to check if the user
    # successfully authenticated. If the user did authenticate successfully,
    # the user's tokens and claims can be retrieved from the CallbackResult.
    callback_result = wristband_auth.callback(request)

    # For some edge cases, such as if an invalid grant was passed to the token
    # API, the SDK will return a redirect URL. Your code should redirect to it
    # in order to restart the login flow.
    if isinstance(callback_result, RedirectRequiredCallbackResult):
        return wristband_auth.create_callback_response(request, callback_result.redirect_url)

    # Create a session for the authenticated user. If needed, custom fields can
    # be stored in the session using the custom_fields parameter of the
    # session_from_callback() function.
    session_from_callback(request, callback_result.callback_data)

    # Once the Callback Endpoint has completed, redirect to your app's
    # default return URL (typically your app's home page) or to an explicit
    # return URL, if one was specified in the original login request.
    app_url = callback_result.callback_data.return_url or "<replace-with-default-app-url>"
    return wristband_auth.create_callback_response(request, app_url)

...
Logout Endpoint
When a user logs out of your application, ensure that all authenticated state associated with the user is cleared. The Logout Endpoint performs three tasks:
- Clears the application's local session state.
- Revokes any refresh tokens associated with the user.
- Redirects the user to Wristband's Logout Endpoint to terminate the user's Wristband authentication session.
The following code snippet demonstrates how to use Wristband's SDK to implement the Logout Endpoint.
# your_app/auth_views.py (continued)

...

# Logout Endpoint
@require_GET
def logout_endpoint(request: HttpRequest) -> HttpResponse:
    # Get all the necessary session data needed to perform the logout operation.
    logout_config = LogoutConfig(
        refresh_token=request.session.get("refresh_token"),
        tenant_name=request.session.get("tenant_name"),
    )

    # Clear your application's local session.
    request.session.flush()

    # Call the Wristband logout() method. This will revoke any refresh tokens
    # associated with the user and return a Response to redirect to Wristband's
    # Logout Endpoint. Redirecting to Wristband's Logout Endpoint will terminate
    # Wristband's auth session associated to the user. When Wristband is done
    # logging out the user it will redirect back to your application's login
    # URL or to an explicitly provided redirect URL.
    return wristband_auth.logout(request, logout_config)

...
Map Auth Endpoints
Once the authentication endpoints are implemented, include them in your Django application's URL configuration:
# your_app/urls.py

from django.urls import path
from . import auth_views

app_name = 'your_app'

# Roue path values can be whatever you prefer
urlpatterns = [
    path('auth/login/', auth_views.login_endpoint, name='login'),
    path('auth/callback/', auth_views.callback_endpoint, name='callback'),
    path('auth/logout/', auth_views.logout_endpoint, name='logout'),
    # Your other application URLs...
]
Don't forget to include your app's URLs in your project's main URL configuration:
# your_project/urls.py

from django.urls import path, include

urlpatterns = [
    path('', include('your_app.urls')),
]
Register Your Login Endpoint and Callback Endpoint With Wristband
Wristband redirects users to your application's Login Endpoint and Callback Endpoint during several authentication flows. To enable these redirects, configure both endpoint URLs in the Wristband Dashboard by updating the following settings:
- Application Login URL
- Client Redirect URIs
The sections below explain how to configure each setting.
Updating the Application Login URL
To update the Application Login URL, follow these steps.
- From the Dashboard Home Page, select the appropriate application.
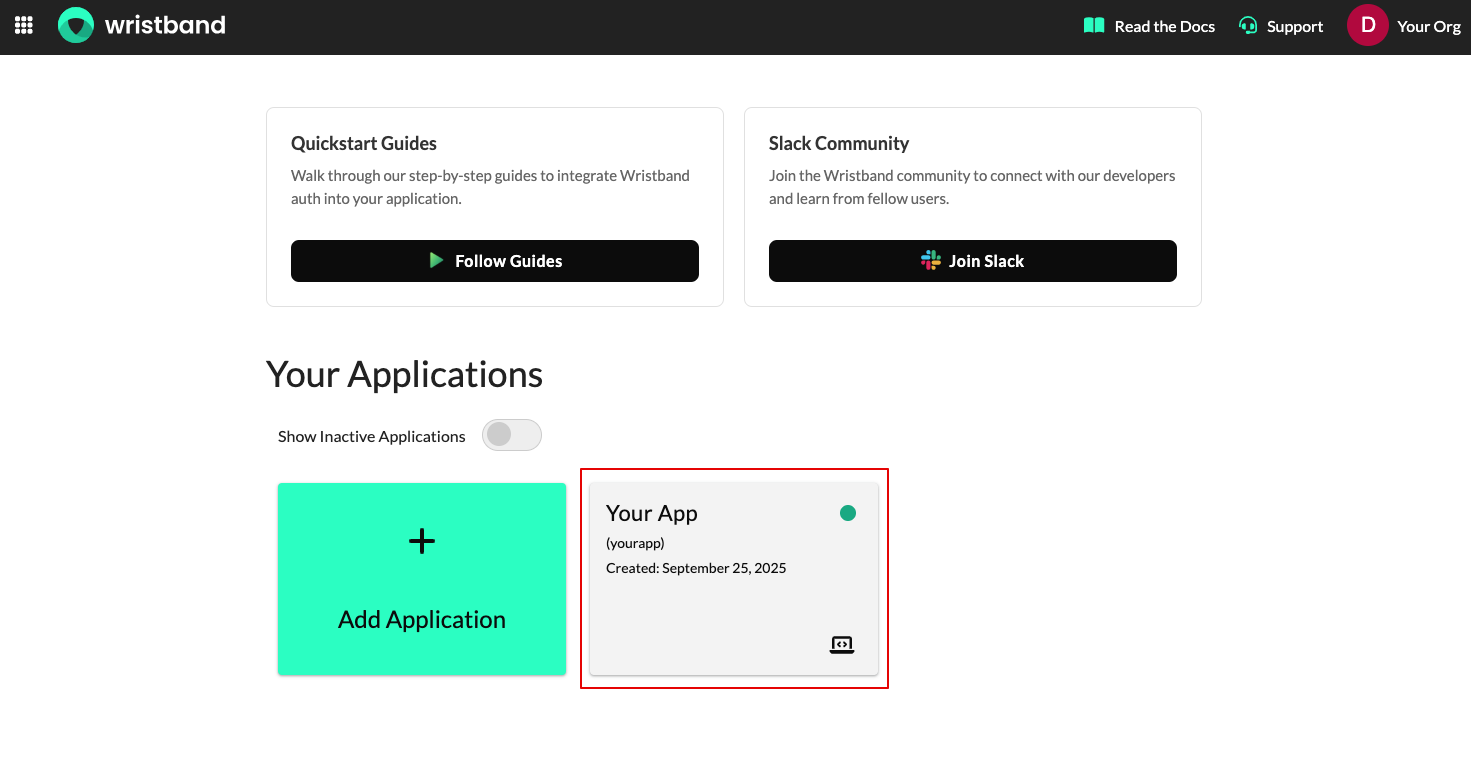
Figure 1: Select your Wristband application.
- On the Application Settings page, locate the Login URL field and set it to the URL of your application's Login Endpoint. Click Save when finished.
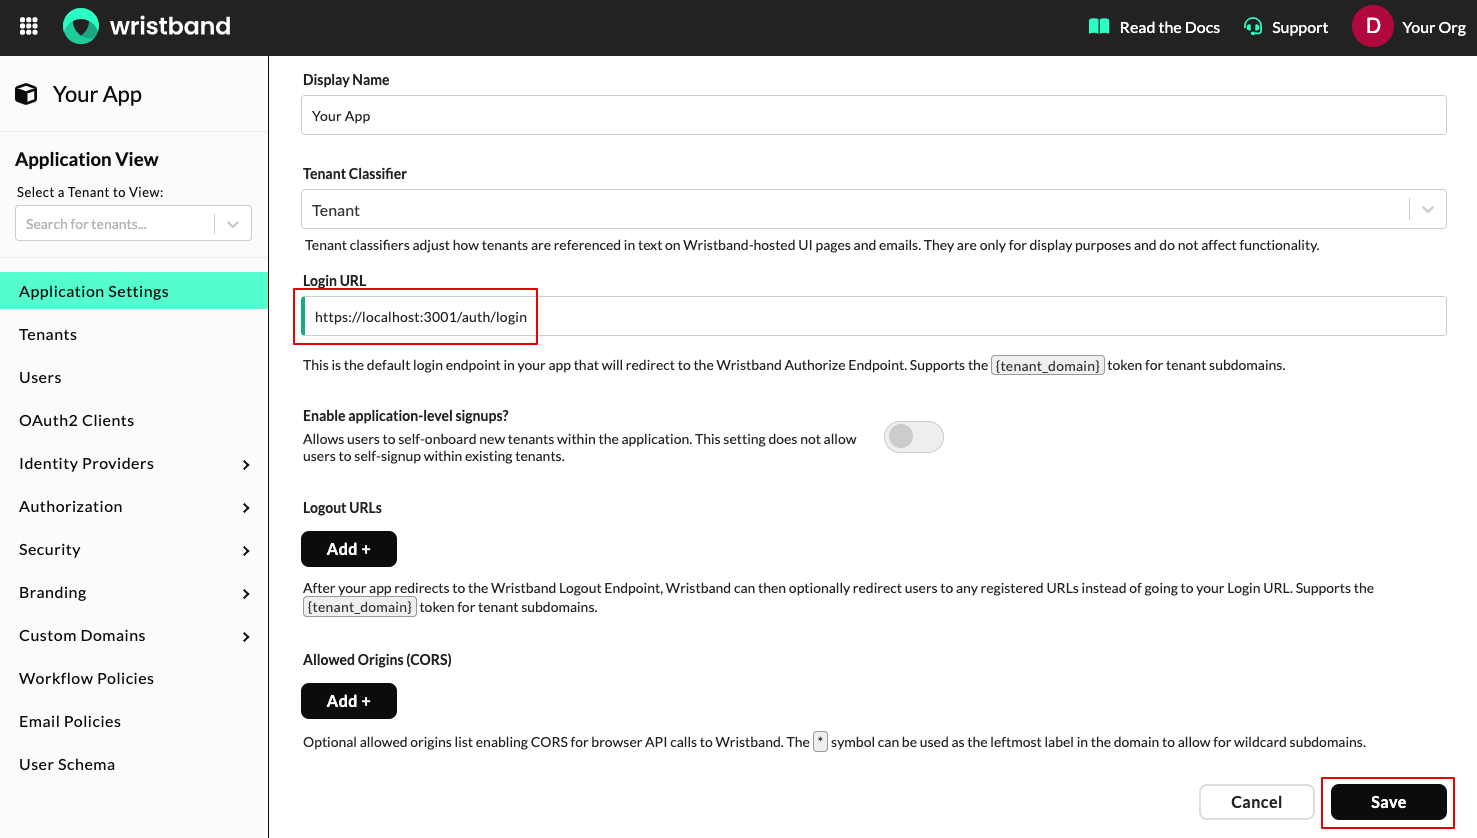
Figure 2: Configure the application Login URL.
Updating the Client Redirect URIs
To update the Client Redirect URIs, follow these steps.
- Select OAuth2 Clients from the left navigation bar, then select the client whose ID matches the client ID registered with the SDK.
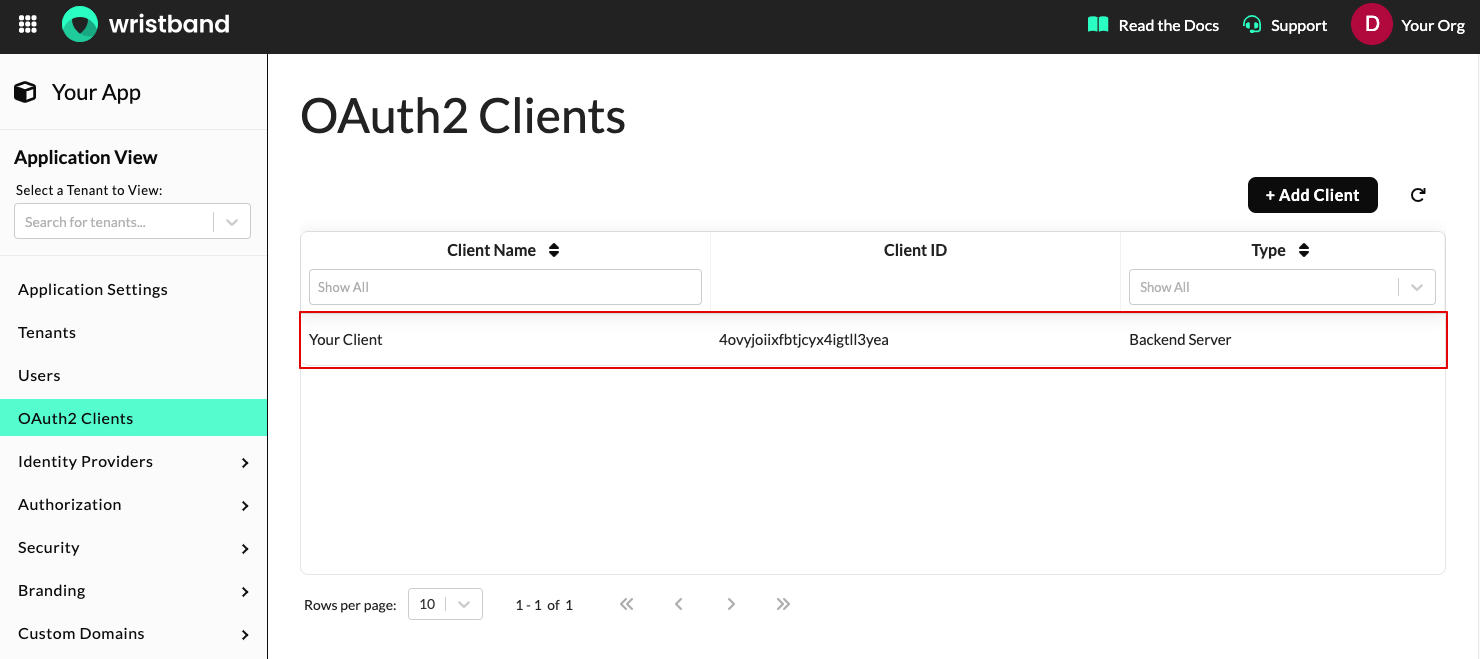
Figure 3: Select the matching OAuth2 client.
- On the Edit Client page, go to the Redirect URIs section and click Add +. Enter the URL of your application's Callback Endpoint, then click Save.
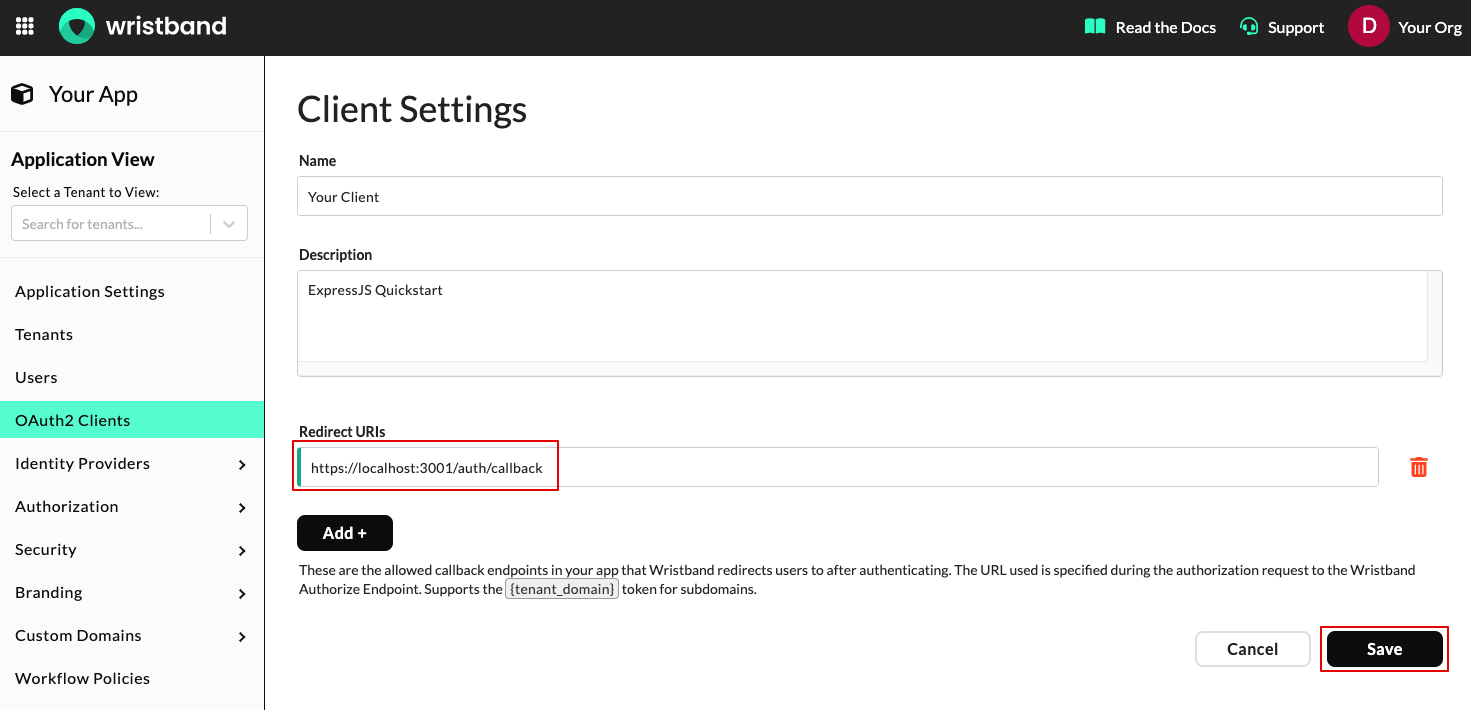
Figure 4: Add the Callback Endpoint as a Redirect URI.
Updated 12 days ago
What’s Next
With your application's authentication endpoints in place, let's verify that they're working correctly