
Applications
Learn about Wristband applications and how to create, configure, and manage them through the Wristband Dashboard.
Overview
Applications are the top-level resources in Wristband. Each application contains its own tenants, users, identity providers, OAuth2 clients, and authentication configurations.
Applications are logically isolated from one another, allowing you to manage separate products or deployment environments independently. For example, you can create separate Wristband applications for development and production, ensuring that configuration changes and testing activities do not affect your production users.
Using Applications to Represent Environments
You can create separate Wristband applications for each of your deployment environments, such as development, staging, and production. Each application maintains its own resources and configuration, providing isolation between environments.
For example, a development application can be used for local testing, while a separate production application handles live user authentication.
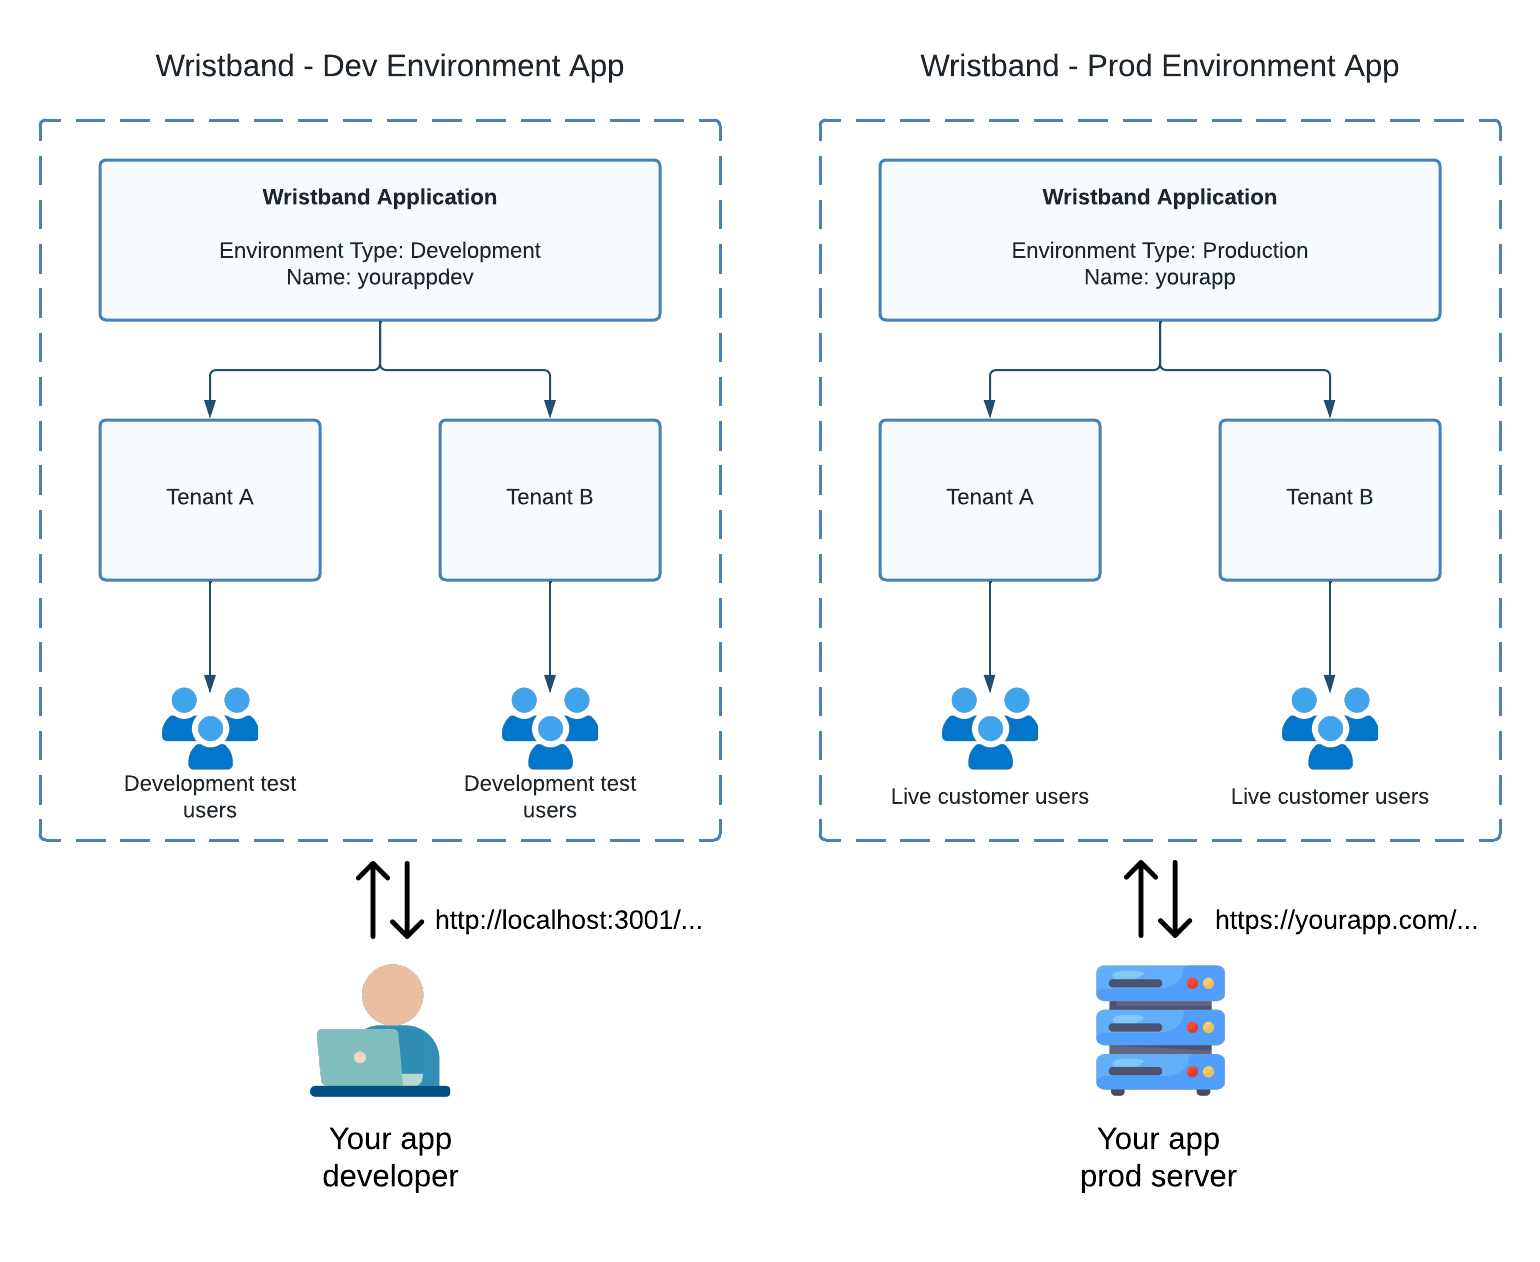
Figure 1: Separate applications isolate development and production environments.
Each application has an environment type that determines which security policies and URL validation rules apply. See Environment Types for more information.
Using Applications to Represent Products
If your organization manages multiple products, you can create a separate Wristband application for each one. This allows each product to maintain its own tenants, users, authentication settings, and other resources independently.
For example, a company offering both a developer platform and a financial services application can use separate Wristband applications for each product.
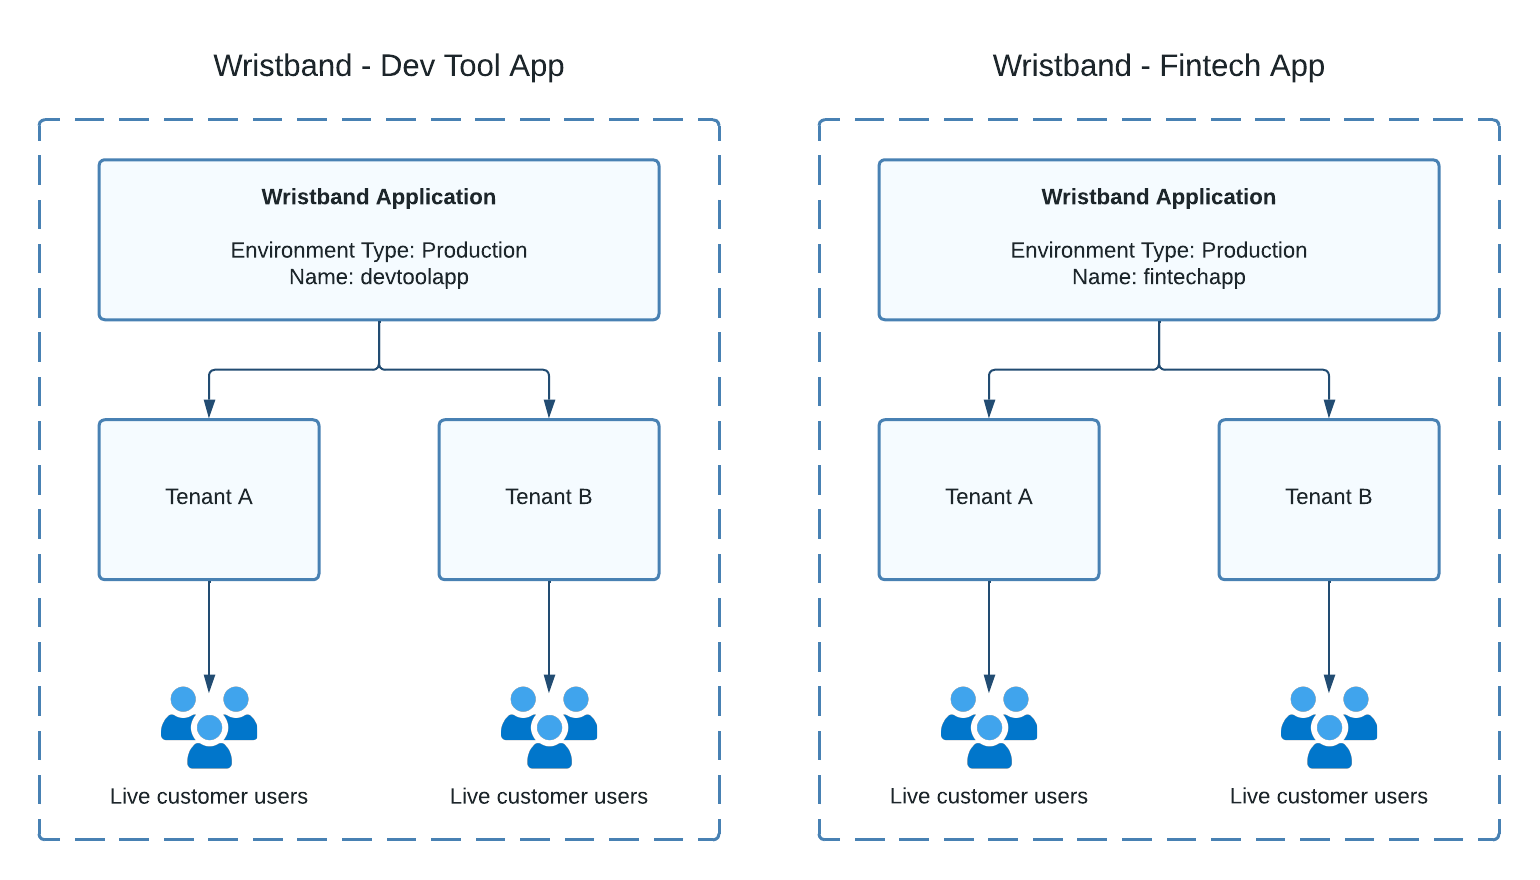
Figure 2: Separate applications isolate independent product lines.
Using Applications to Represent Products and Environments
You can combine these approaches by creating separate Wristband applications for each product and deployment environment.
For example, an organization with two products can maintain dedicated development and production applications for each, ensuring complete logical isolation across products and environments.
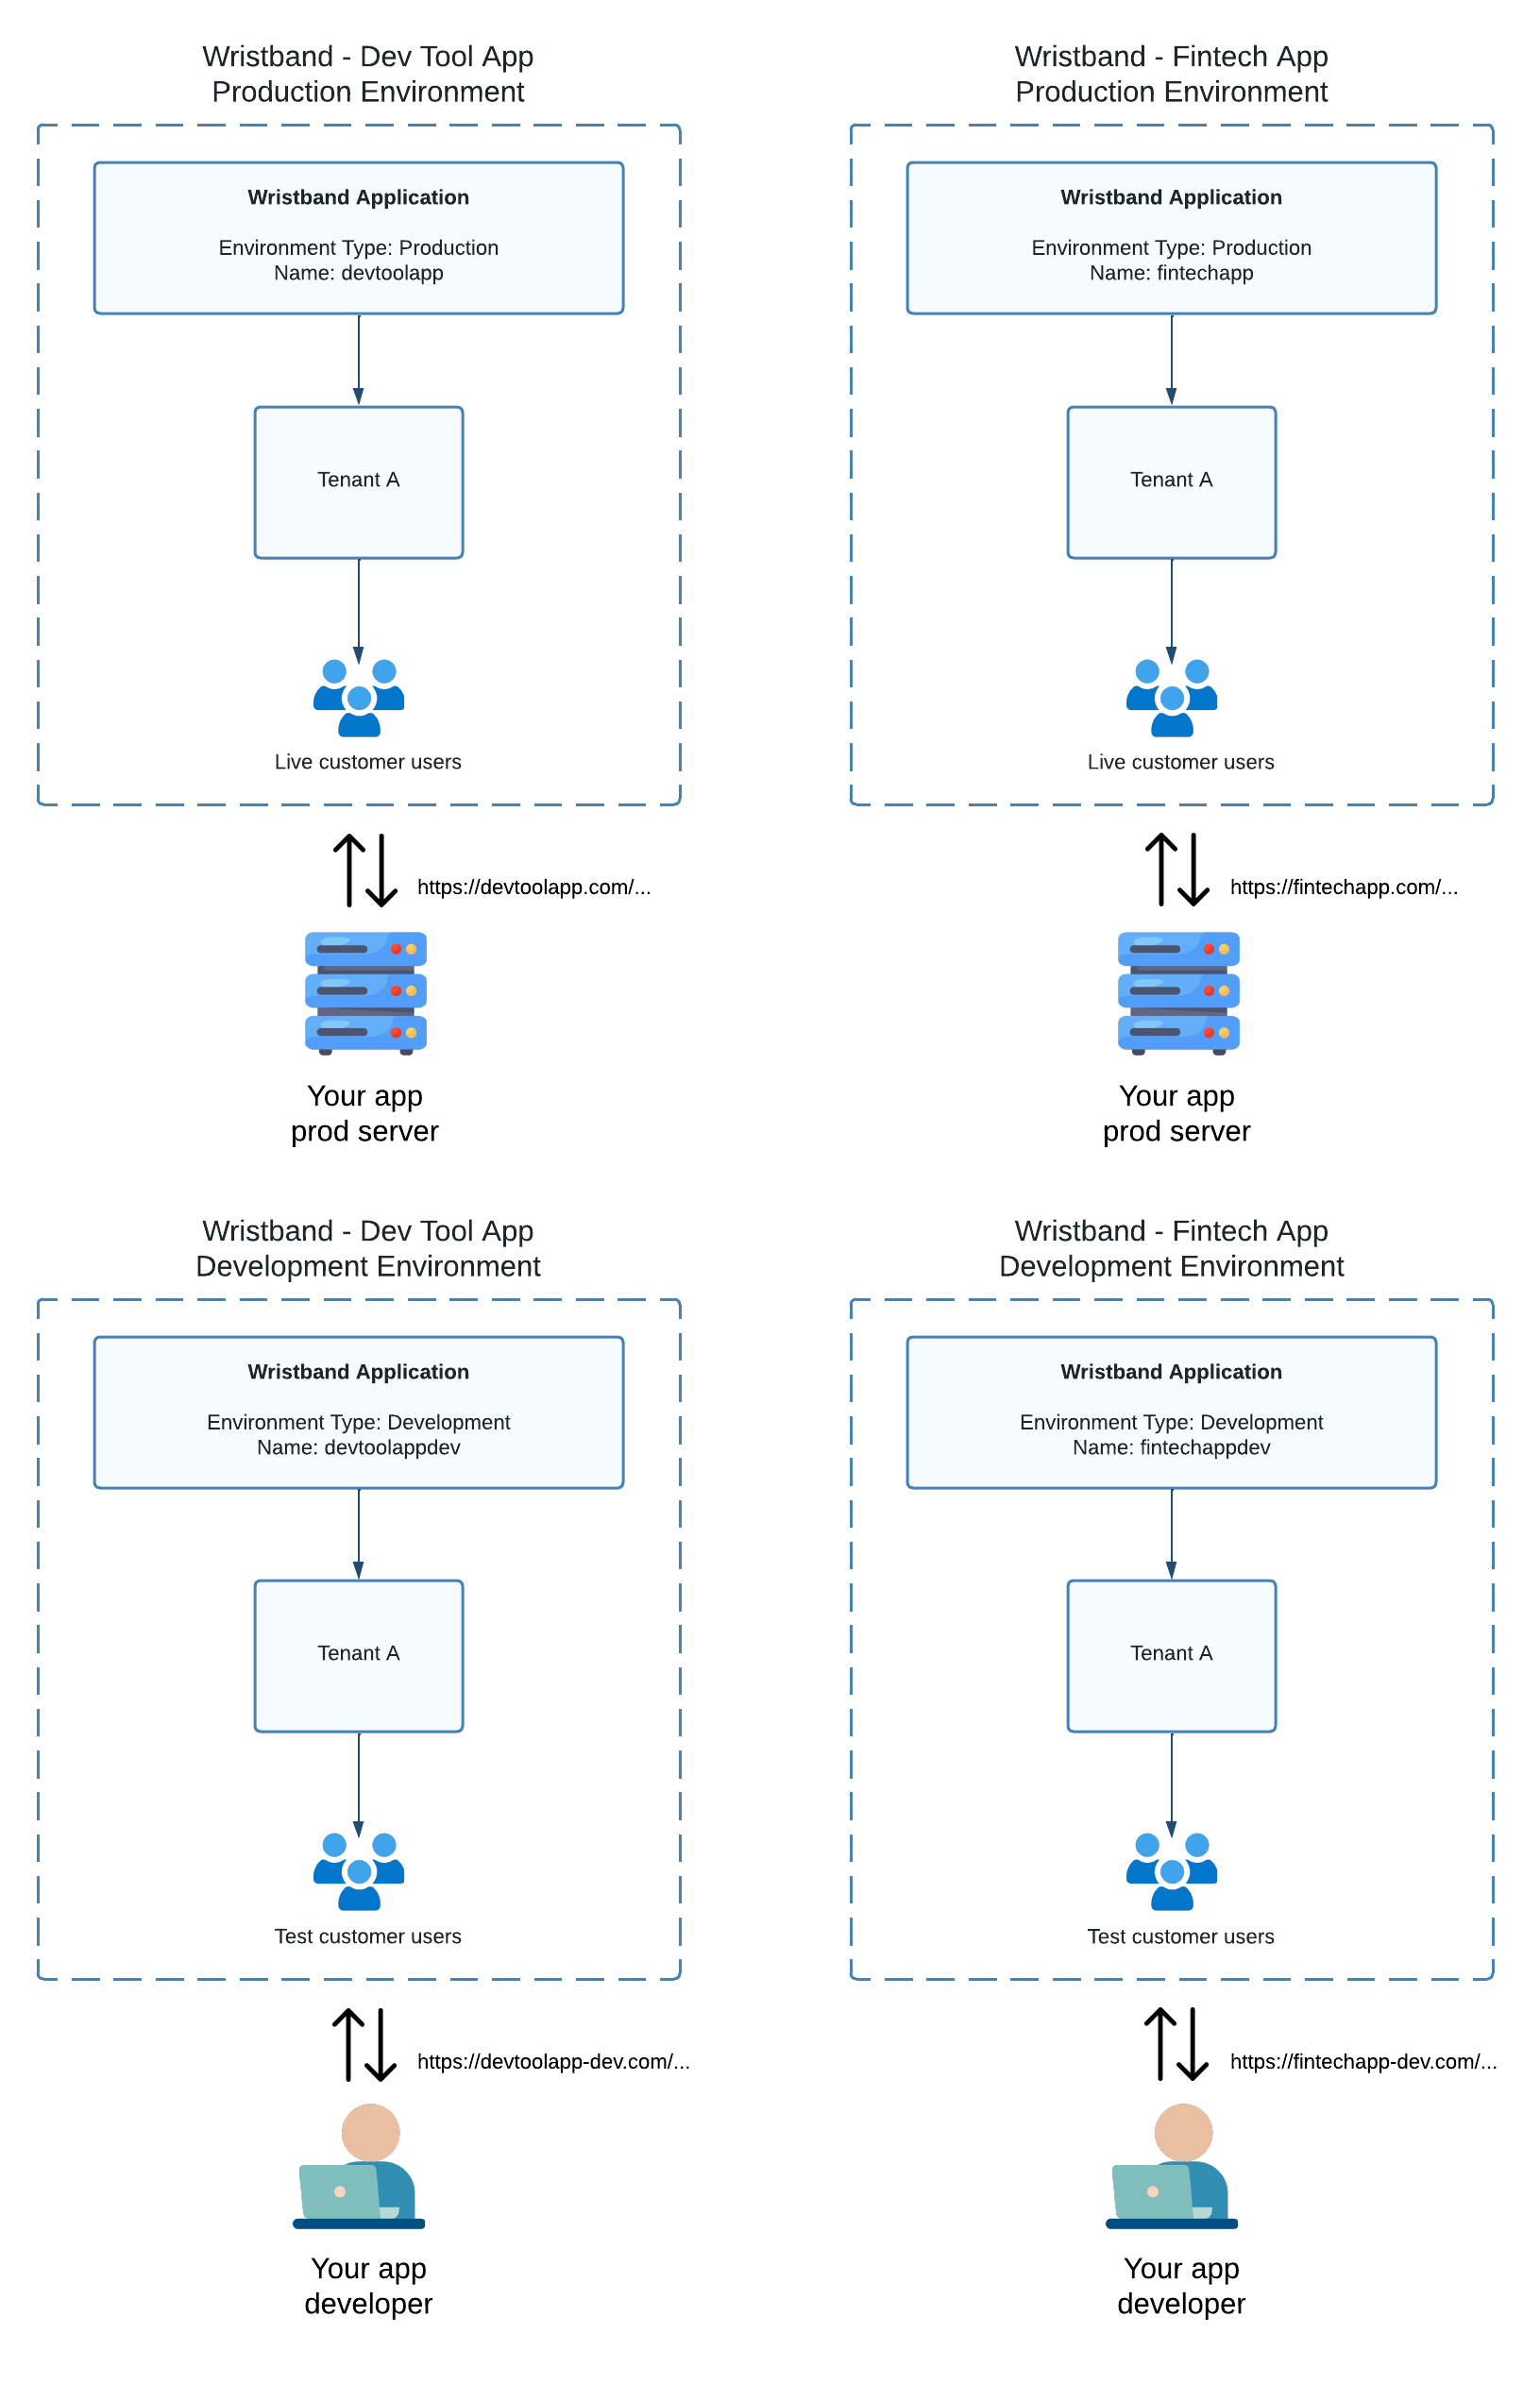
Figure 3: Applications can represent each product and its development and production environments.
Environment Types
When creating a Wristband application, you must select one of the following environment types:
- Development (
DEVELOPMENT): Intended for local development, testing, and other non-production environments. - Production (
PRODUCTION): Intended for applications serving production users.
The environment type determines which URL validation rules and security policy restrictions apply to the application.
URL Validation
Wristband applies different URL validation requirements based on an application's environment type. Development applications allow more flexible URL configurations to support local testing, while Production applications enforce stricter requirements to ensure secure authentication flows.
- Development: Allows HTTP URLs and loopback addresses, such as
localhost, to support local development and testing. - Production: Requires authentication-related URLs, including login URLs, redirect URIs, logout URLs, and custom page URLs, to use HTTPS with valid domain names. Loopback addresses are not permitted.
Security Policy Restrictions
Wristband enforces different security policy restrictions based on an application's environment type.
For example, Development applications allow login CAPTCHA enforcement to be disabled at the application level for testing purposes, while Production applications require application-level CAPTCHA enforcement to remain enabled.
Environment Type Cannot Be ChangedAn application's environment type is immutable and cannot be changed after creation. Be sure to select the appropriate environment type when creating your application.
Login URL
The Login URL identifies your application's Login Endpoint, which is responsible for initiating authentication by redirecting the user's browser to Wristband's Authorize Endpoint.
Wristband uses this URL to redirect users to your application during certain authentication flows. For example, after a user completes signup or accepts an invitation, Wristband redirects them to your application's Login Endpoint to automatically log them in.
For more information, see Implementing Authentication Endpoints in Your Application.
Unconfigured Login URL
If your application's Login URL has not been configured, Wristband uses a default placeholder page. Authentication flows that require a redirect to your application's Login Endpoint will display this page instead.
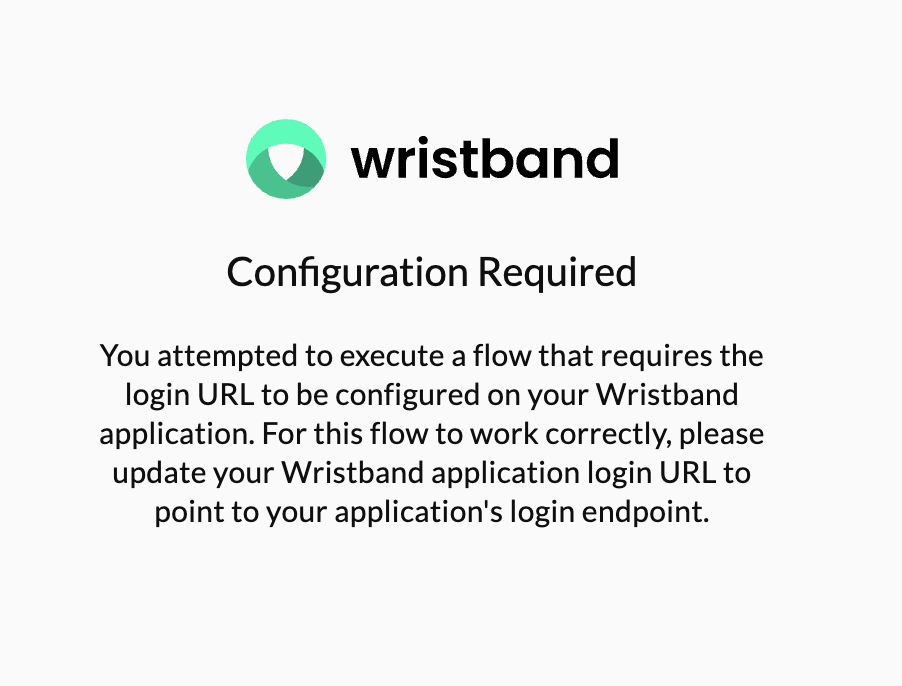
Figure 4: Default placeholder page displayed when the application's Login URL is not configured.
If you encounter this page, configure your application's Login URL to point to your application's Login Endpoint.
Tenant Subdomain Support
For applications that use tenant-specific subdomains, the Login URL can include the {tenant_name} placeholder to dynamically construct a login URL for each tenant.
The {tenant_name} placeholder must appear as the leftmost label in the hostname.
For example, consider the following Login URL:
https://{tenant_name}.yourapp.com/auth/loginWhen Wristband redirects a user belonging to the tenant org1, it replaces the placeholder with the tenant's name:
https://org1.yourapp.com/auth/loginIf Wristband needs to redirect to the Login URL without a tenant context, it removes the tenant subdomain and uses the root domain:
https://yourapp.com/auth/loginLogout URLs
By default, Wristband redirects users to your application's Login URL after logout. You can customize this behavior by registering additional Logout URLs.
To redirect users to a registered Logout URL, provide the redirect_url query parameter when calling Wristband's Logout Endpoint.
The redirect_url value must match a registered Logout URL. If an unregistered URL is provided, Wristband returns an error.
Tenant Subdomain Support
For applications that use tenant-specific subdomains, registered Logout URLs can include the {tenant_name} placeholder to support redirects across multiple tenants.
The {tenant_name} placeholder must appear as the leftmost label in the hostname.
For example, you can register the following Logout URL:
https://{tenant_name}.yourapp.com/auth/logout_callbackWhen calling the Logout Endpoint, pass the registered URL with the {tenant_name} placeholder intact in the redirect_url parameter. Do not replace the placeholder with the actual tenant name.
After completing logout, Wristband replaces the placeholder with the tenant's name. For example, a user belonging to the tenant org1 is redirected to:
https://org1.yourapp.com/auth/logout_callbackThis allows a single registered Logout URL to support multiple tenant subdomains.
Tenant Classifier
The tenant classifier determines the terminology Wristband uses when referring to tenants on hosted pages and in transactional emails. This allows you to align Wristband's user-facing language with the terminology used in your application.
The following tenant classifiers are supported:
- Account
- Company
- Organization
- Team
- Tenant (default)
- Workspace
For example, if you select Organization, Wristband's hosted pages will use the term "organization" instead of "tenant" when referring to a user's tenant.
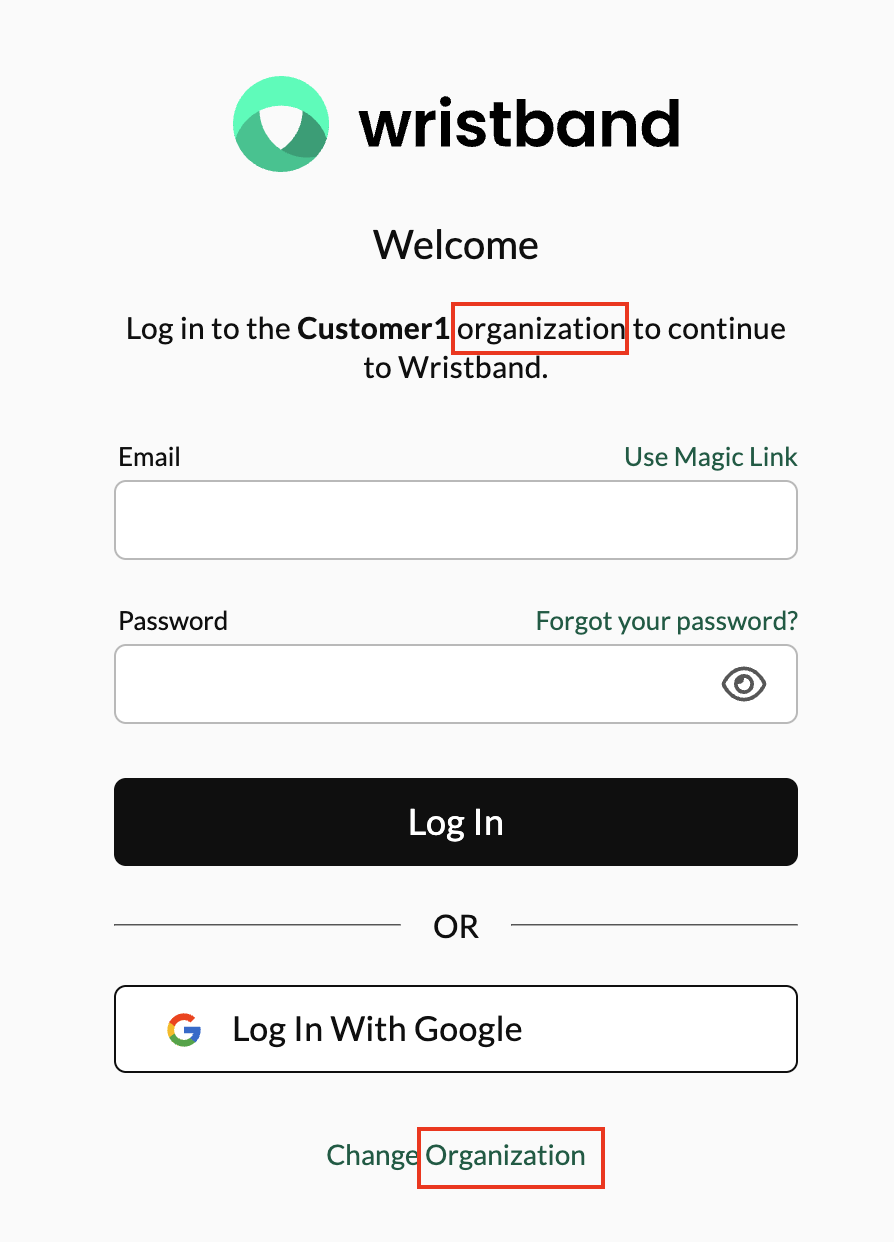
Figure 5: Hosted login page using Organization as the tenant classifier.
Tenant Classifier Only Affects Display TextThe tenant classifier only changes user-facing terminology on Wristband's hosted pages and in transactional emails. It does not affect the underlying tenant model, API resource names, or identifiers.
Cross-Origin Resource Sharing (CORS)
Cross-Origin Resource Sharing (CORS) allows browser-based applications hosted on different origins to access Wristband's APIs.
You can configure an allowlist of origins that are permitted to make cross-origin browser requests to Wristband.
When a browser sends a cross-origin request, Wristband checks the request's Origin header against the configured allowed origins:
- Allowed Origin: Wristband includes the appropriate CORS response headers, allowing the browser to access the response.
- Disallowed Origin: Wristband omits the CORS response headers, preventing the browser from accessing the response.
Wildcard Subdomain Support
Allowed origins can include the * wildcard as the leftmost label in the hostname to support multiple subdomains.
For example, the following allowed origin:
https://*.yourapp.comMatches origins such as:
https://org1.yourapp.com
https://org2.yourapp.com
The wildcard does not match the base domain (https://yourapp.com). To allow requests from the base domain, you must register it separately.
Enabling Application-Level Signups
Application-level signup allows users to self-register by creating a new tenant and an initial user account within your Wristband application.
When application-level signup is disabled, users cannot create new tenants through the hosted signup flow. Instead, tenants and their initial users must be provisioned manually.
The application-level signup page is accessible at the following URL:
https://<application_vanity_domain>/signupIf application-level signup is disabled, users attempting to access this URL will see an error page, as shown below.
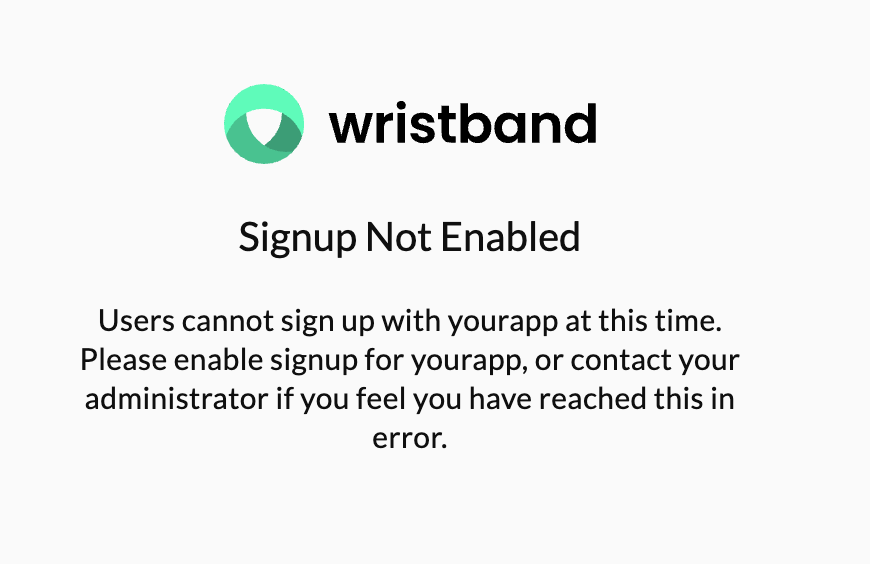
Figure 6: Error page displayed when application-level signup is disabled.
Enabling Application-Level Authorization Requests
When application-level authorization requests are enabled, your application can initiate authentication by calling Wristband's Authorize Endpoint using the application's vanity domain.
Wristband determines which tenant the user wants to access based on the authorization request:
- With
tenant_hint: Wristband identifies the specified tenant and directs the user to its login page without requiring tenant discovery. - Without
tenant_hint: Wristband initiates tenant discovery, allowing the user to identify their tenant before proceeding to its login page.
When application-level authorization requests are disabled, authorization requests must use a tenant vanity domain. Wristband identifies the tenant from the domain and directs the user to its login page without requiring tenant discovery.
Tenant vanity domains can be used regardless of whether application-level authorization requests are enabled.
Application Name vs. Display Name
When creating an application, you must specify an application name that uniquely identifies it within Wristband. The name must be a valid DNS label without hyphens and must be unique across applications, regardless of capitalization. It is also used to construct the application's vanity domain.
The display name is a user-friendly name used to identify the application on Wristband's hosted pages and in transactional emails.
Application Names Cannot Be ChangedAn application's name is immutable and cannot be changed after creation. However, its display name can be updated at any time.
Deactivating an Application
Deactivating an application prevents its users and OAuth2 clients from authenticating and blocks the creation of new resources, including tenants, users, and OAuth2 clients.
All existing application data and resources are preserved. You can reactivate a deactivated application at any time to restore normal functionality.
Deleting an Application
Deleting an application permanently removes the application and all its associated data and resources, including tenants, users, and OAuth2 clients.
Managing Applications With Wristband's Dashboard
You can create, configure, and manage applications through the Wristband Dashboard. The following sections explain how to perform common application management tasks.
Creating an Application
To create a new Wristband application:
- From the Dashboard Home page, click Add Application.
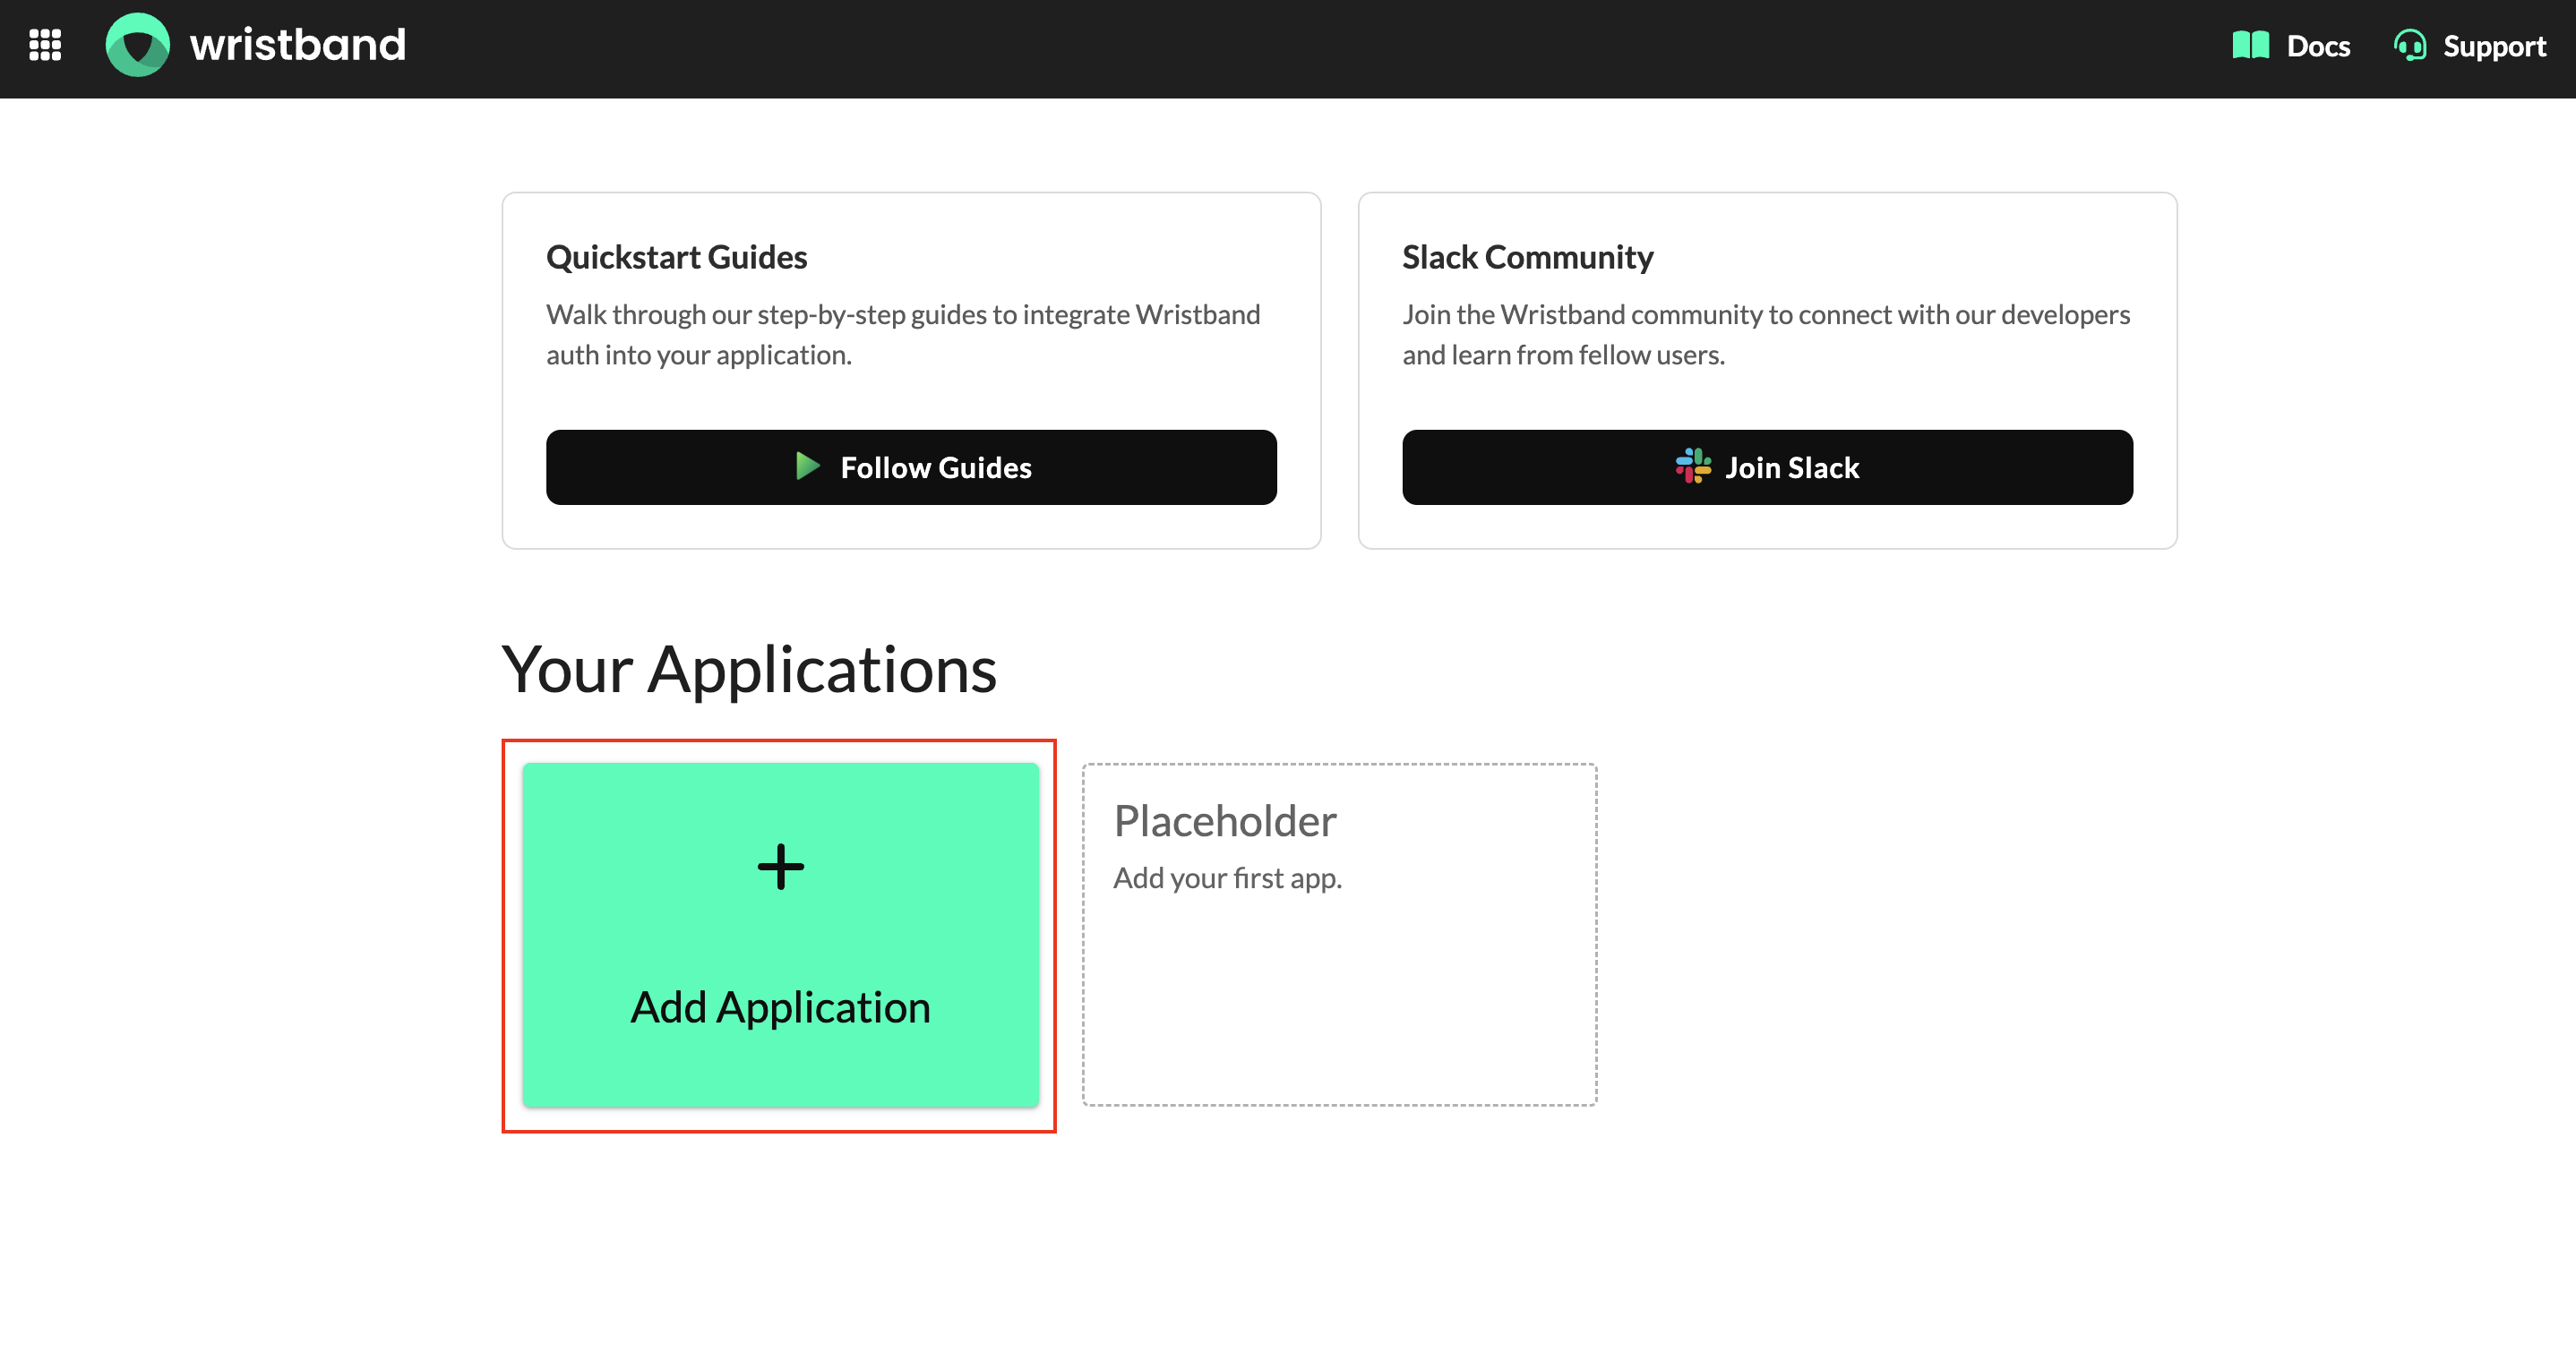
Figure 7: Create a new application from the Dashboard Home page.
- In the Create App modal, select one of the following options:
- Try a Demo: Creates a preconfigured demo application that you can run locally to explore Wristband's authentication capabilities. See Setting Up a Demo App for more information.
- Quickstart: Creates an application and provisions the resources needed to complete a framework-specific authentication quickstart.
- Create App Manually: Creates an application from scratch, allowing you to configure its settings and resources yourself.
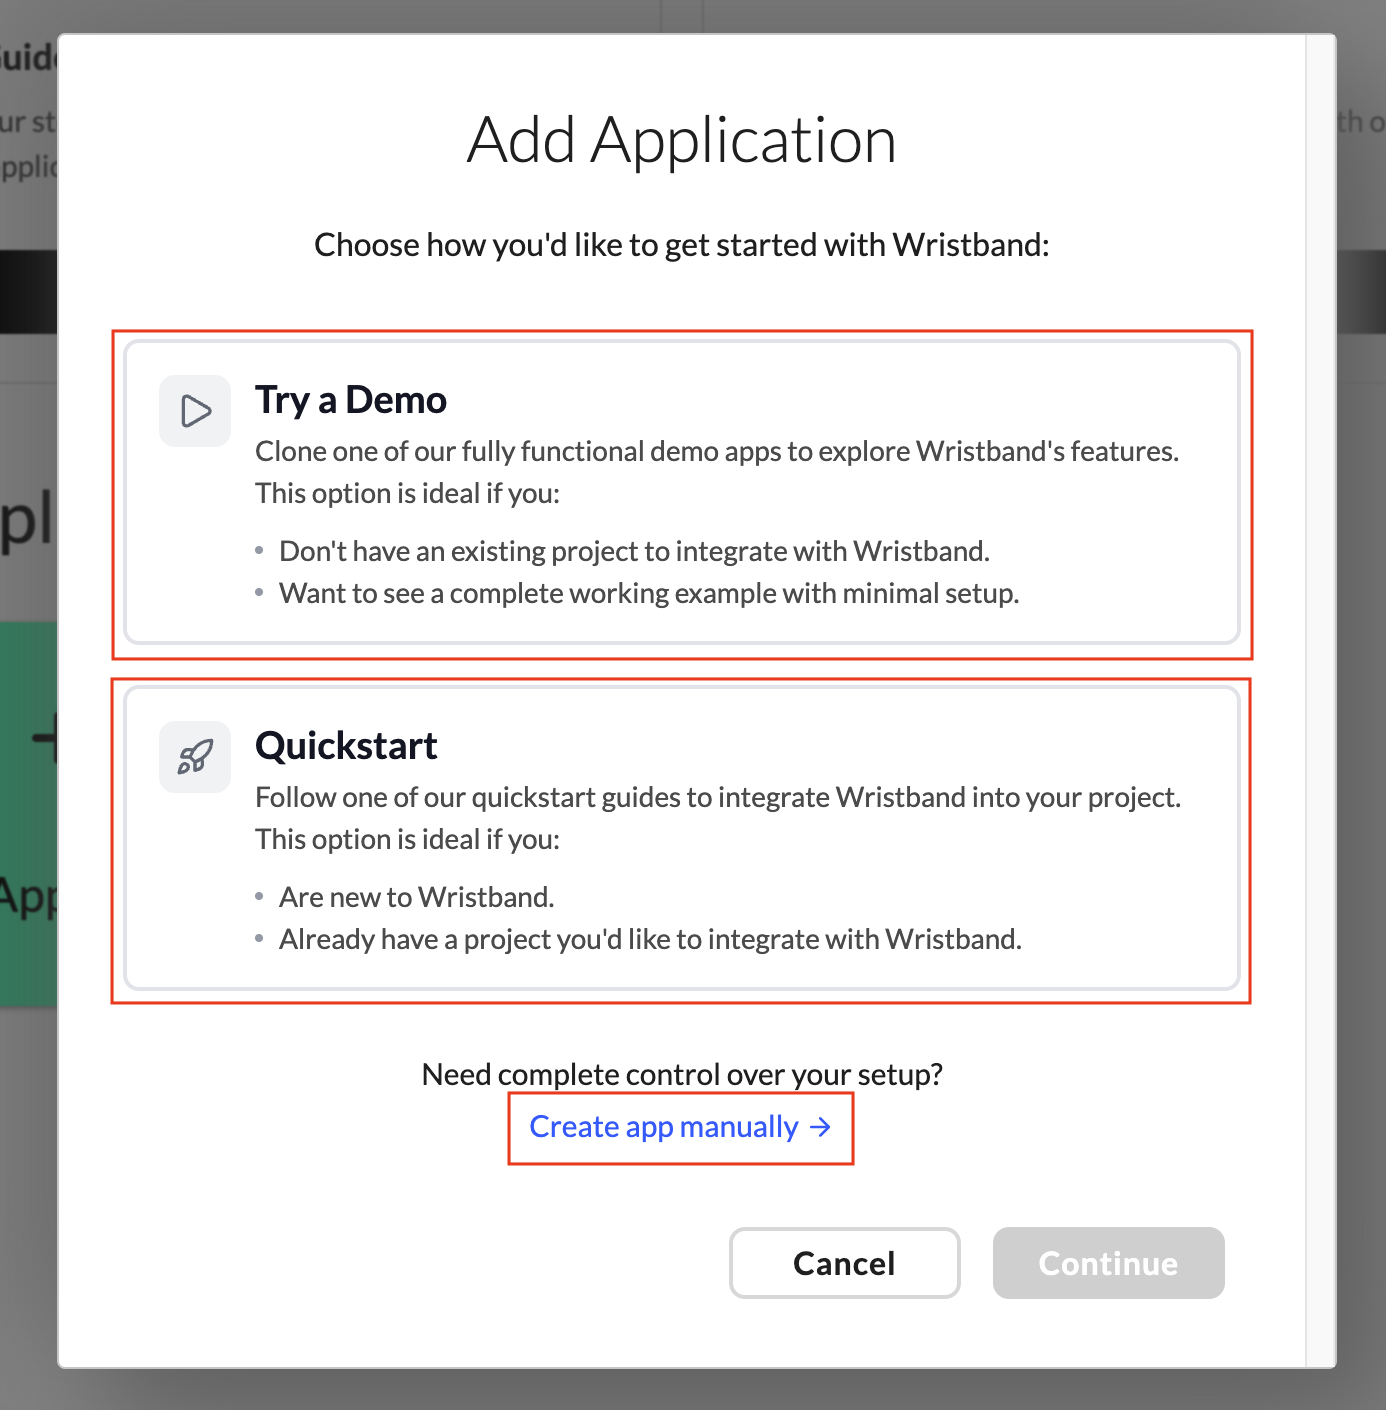
Figure 8: Choose how you want to create your Wristband application.
Creating an Application Manually
If you select Create App Manually, you must provide the following information:
- Display Name: A user-friendly name displayed on Wristband's hosted pages and in transactional emails. This value can be updated after creation.
- Name: A unique application identifier used to construct its vanity domain. This value cannot be changed after creation.
- Environment Type: Determines whether Development or Production URL validation and security policy restrictions apply. This value cannot be changed after creation.
For more information, see Application Name vs. Display Name and Environment Types.
Once you've entered the required information:
- Click Create to provision your application.
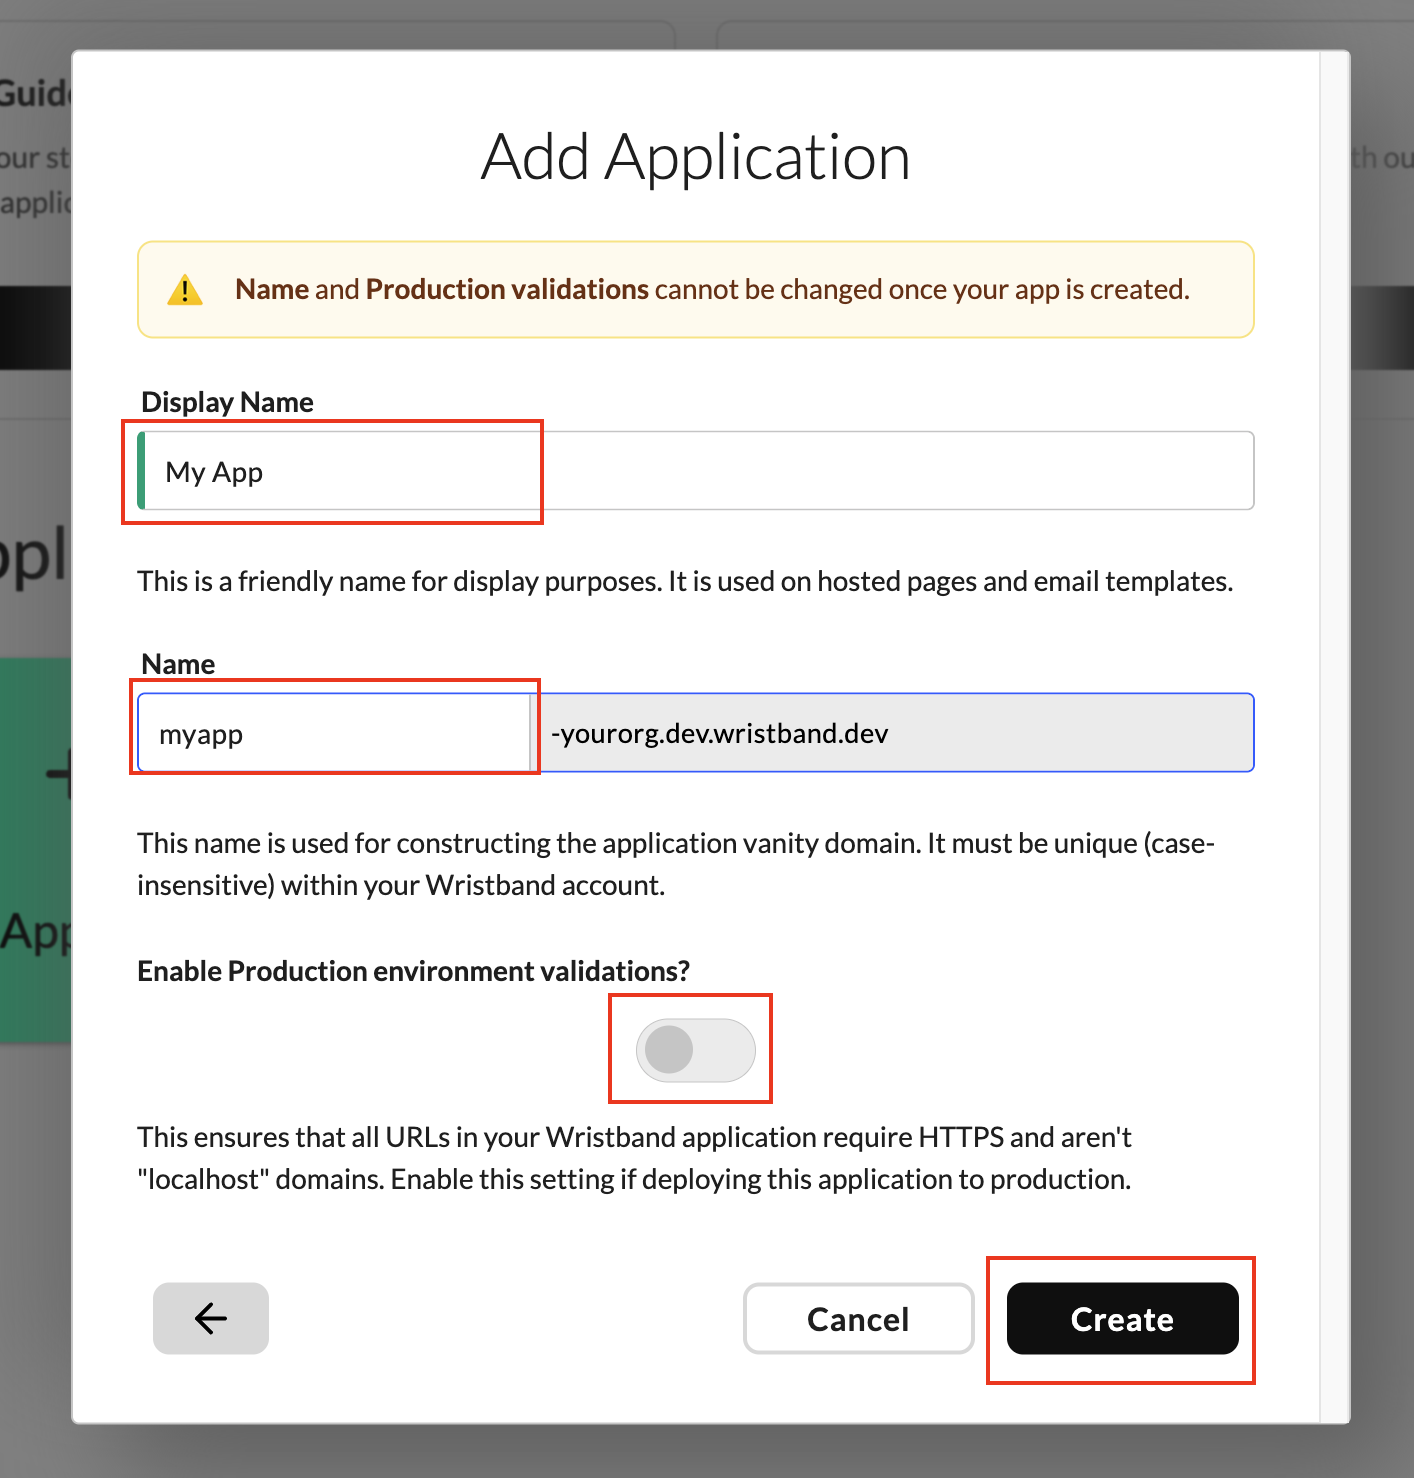
Figure 9: Enter the required information to create an application manually.
- After the application is created, click Configure App to navigate to its Application Settings page.
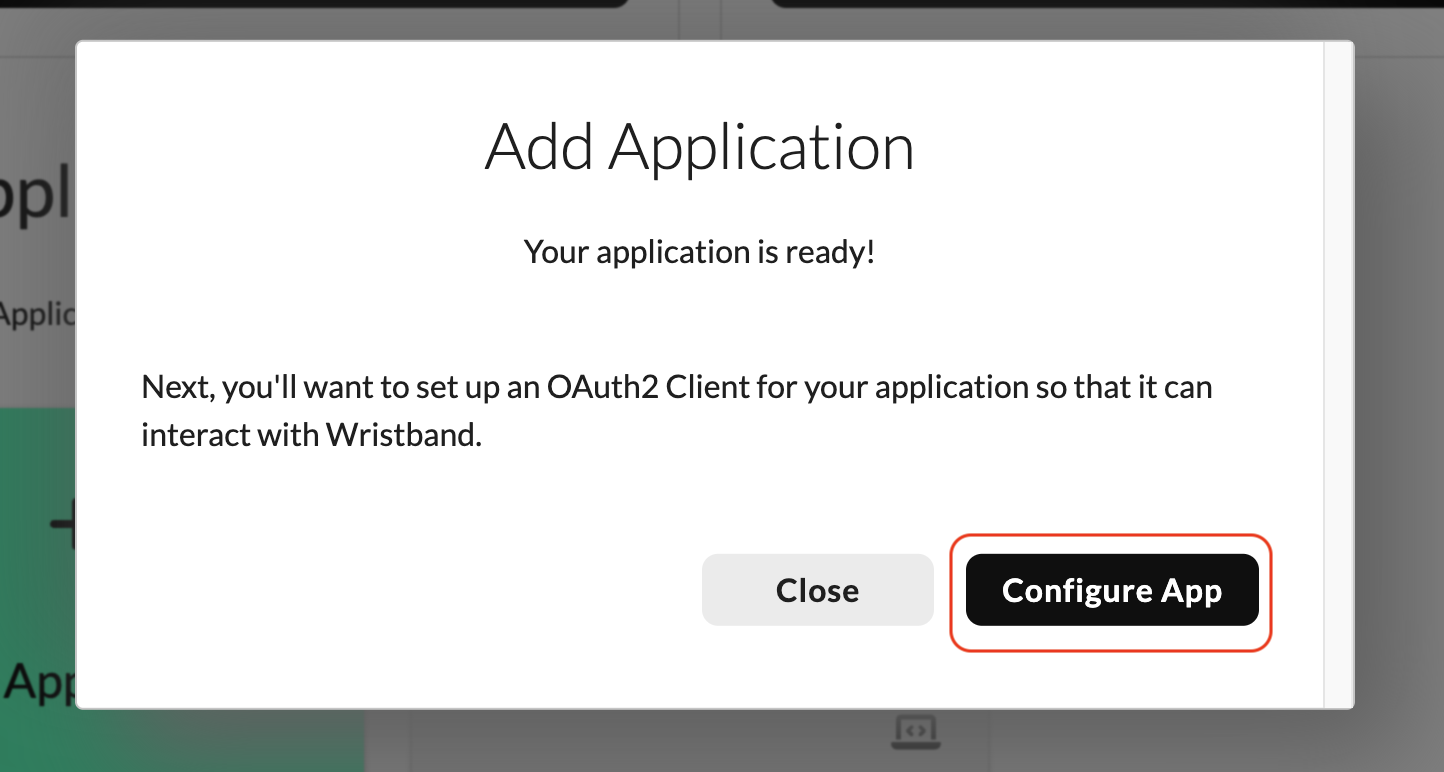
Figure 10: Navigate to the Application Settings page after creating an application.
Configuring an Application
You can manage an application's authentication settings and other configurations through the Wristband Dashboard.
To access an application's settings, select the application from the Dashboard Home page. This opens its Application Settings page.
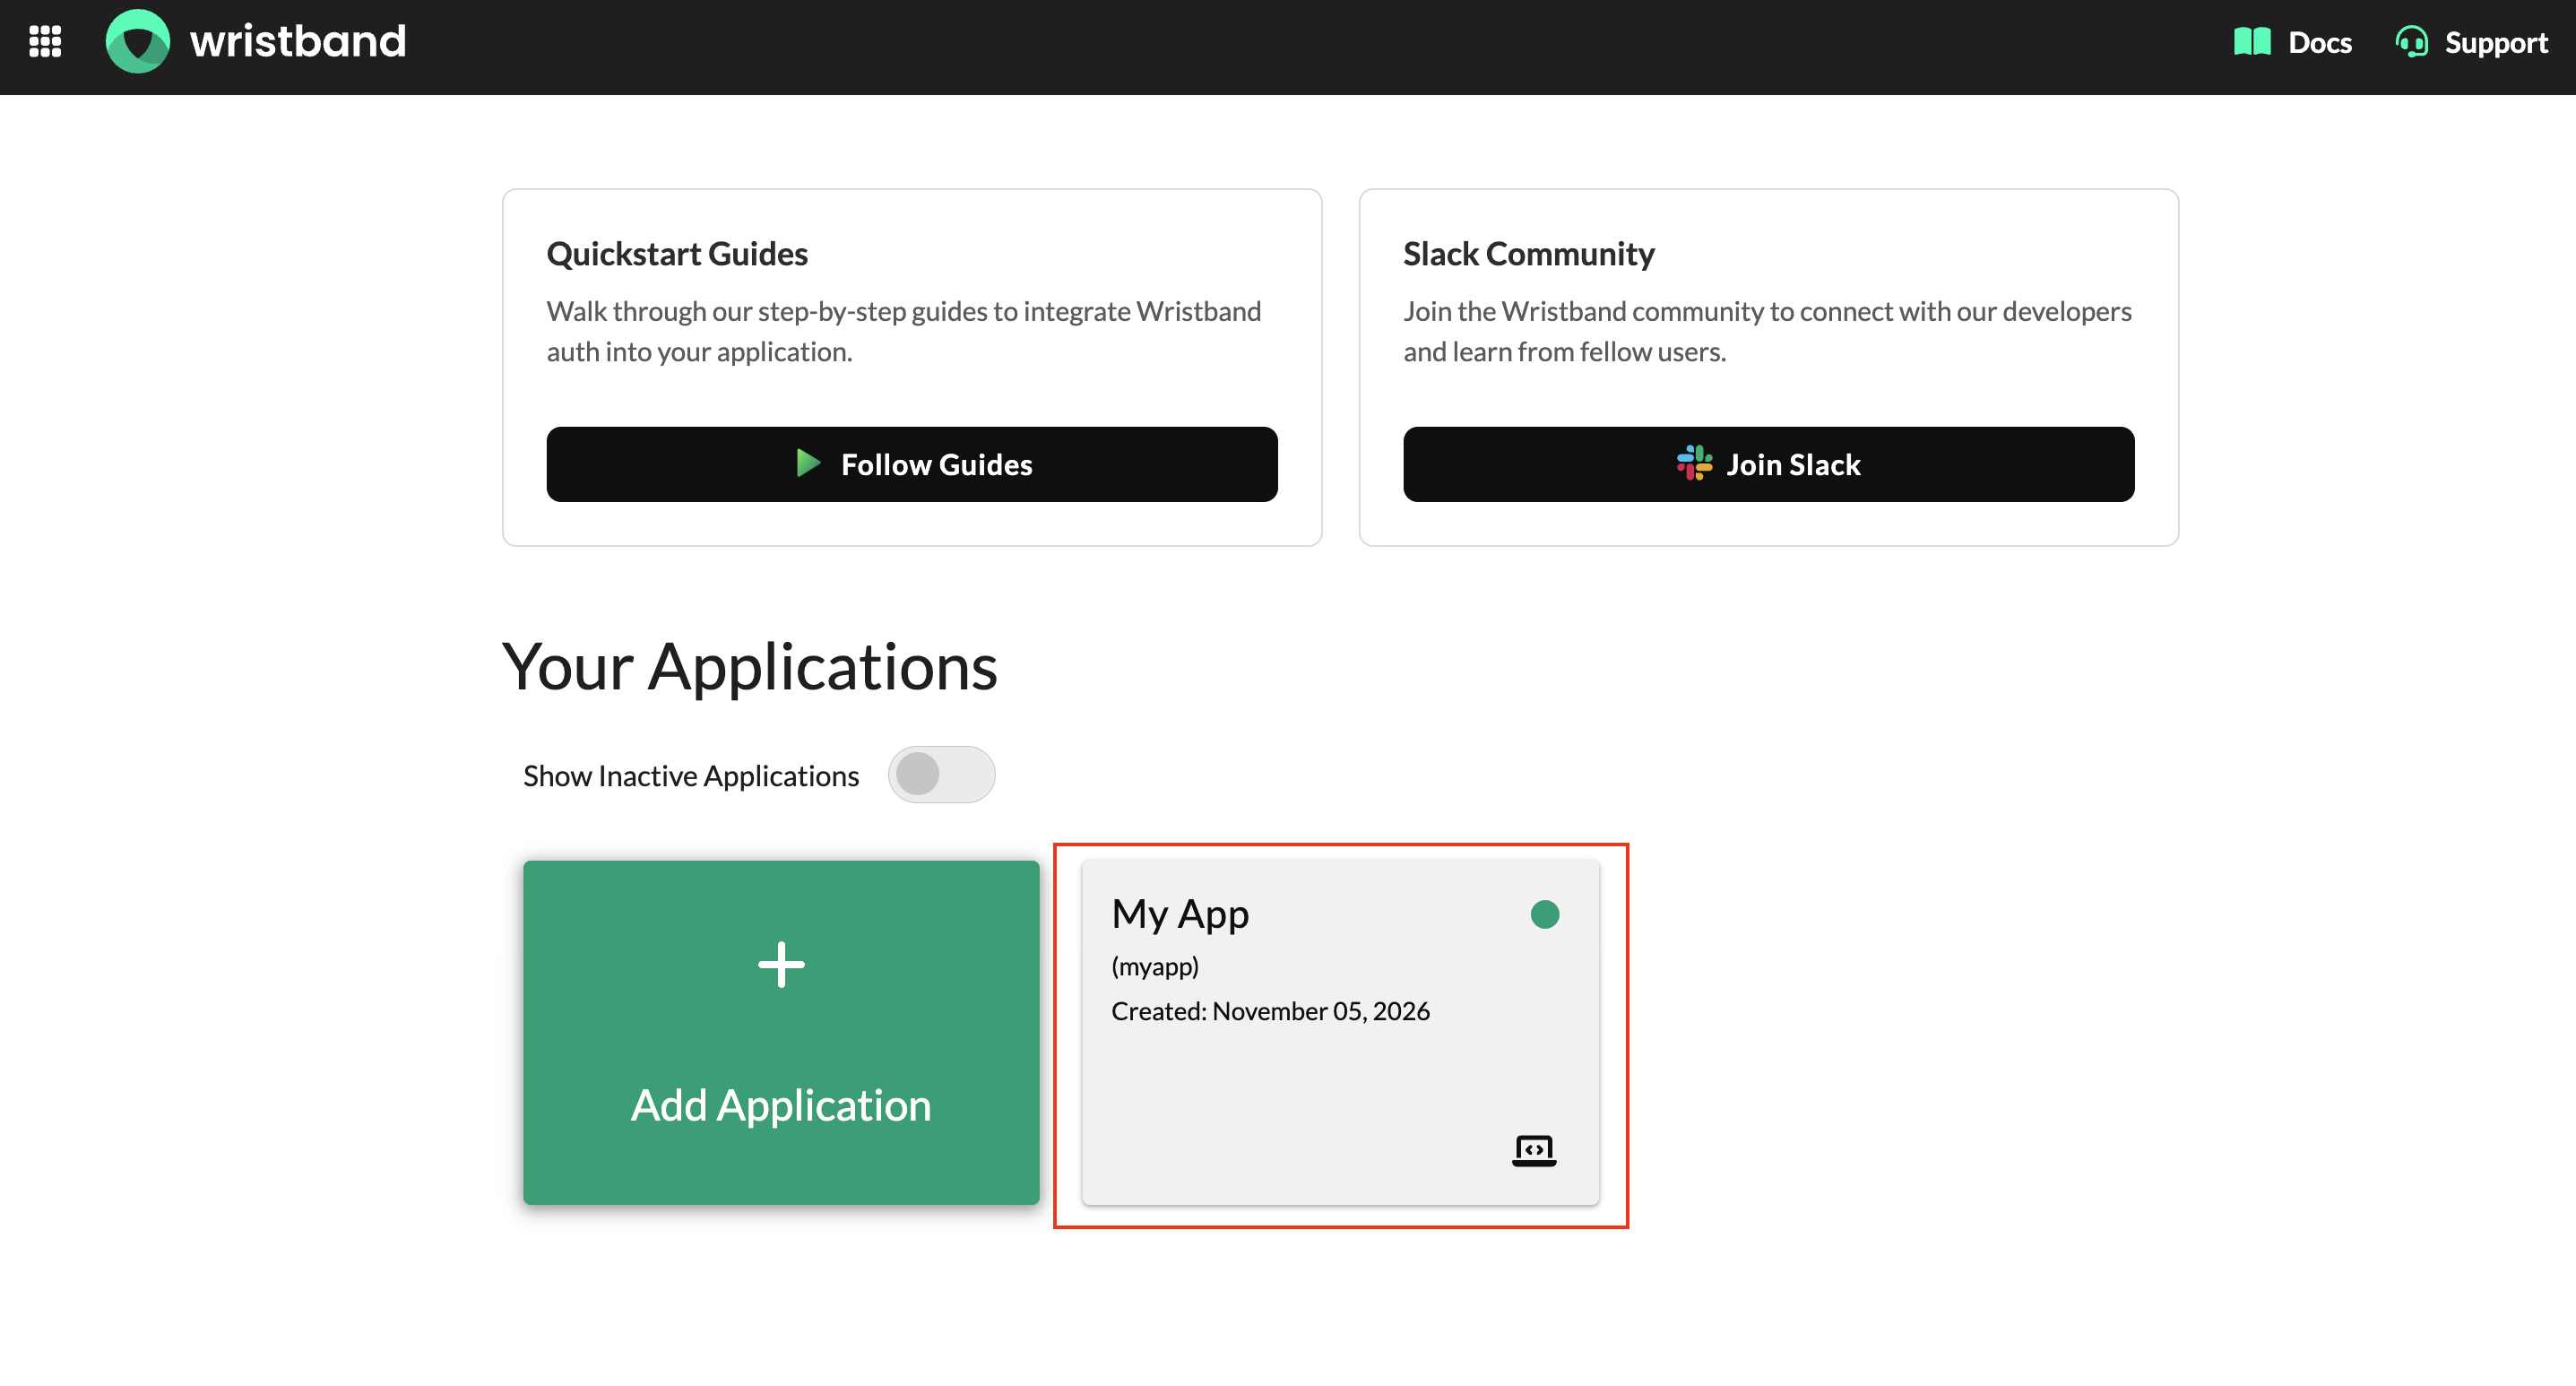
Figure 11: Select an application from the Dashboard Home page to manage its settings.
Configuring the Login URL
Your application's Login URL must point to its Login Endpoint to support authentication flows that redirect users back to your application.
To configure the Login URL:
- On the Application Settings page, locate the Login URL field.
- Enter the URL of your application's Login Endpoint.
- Click Save to apply your changes.
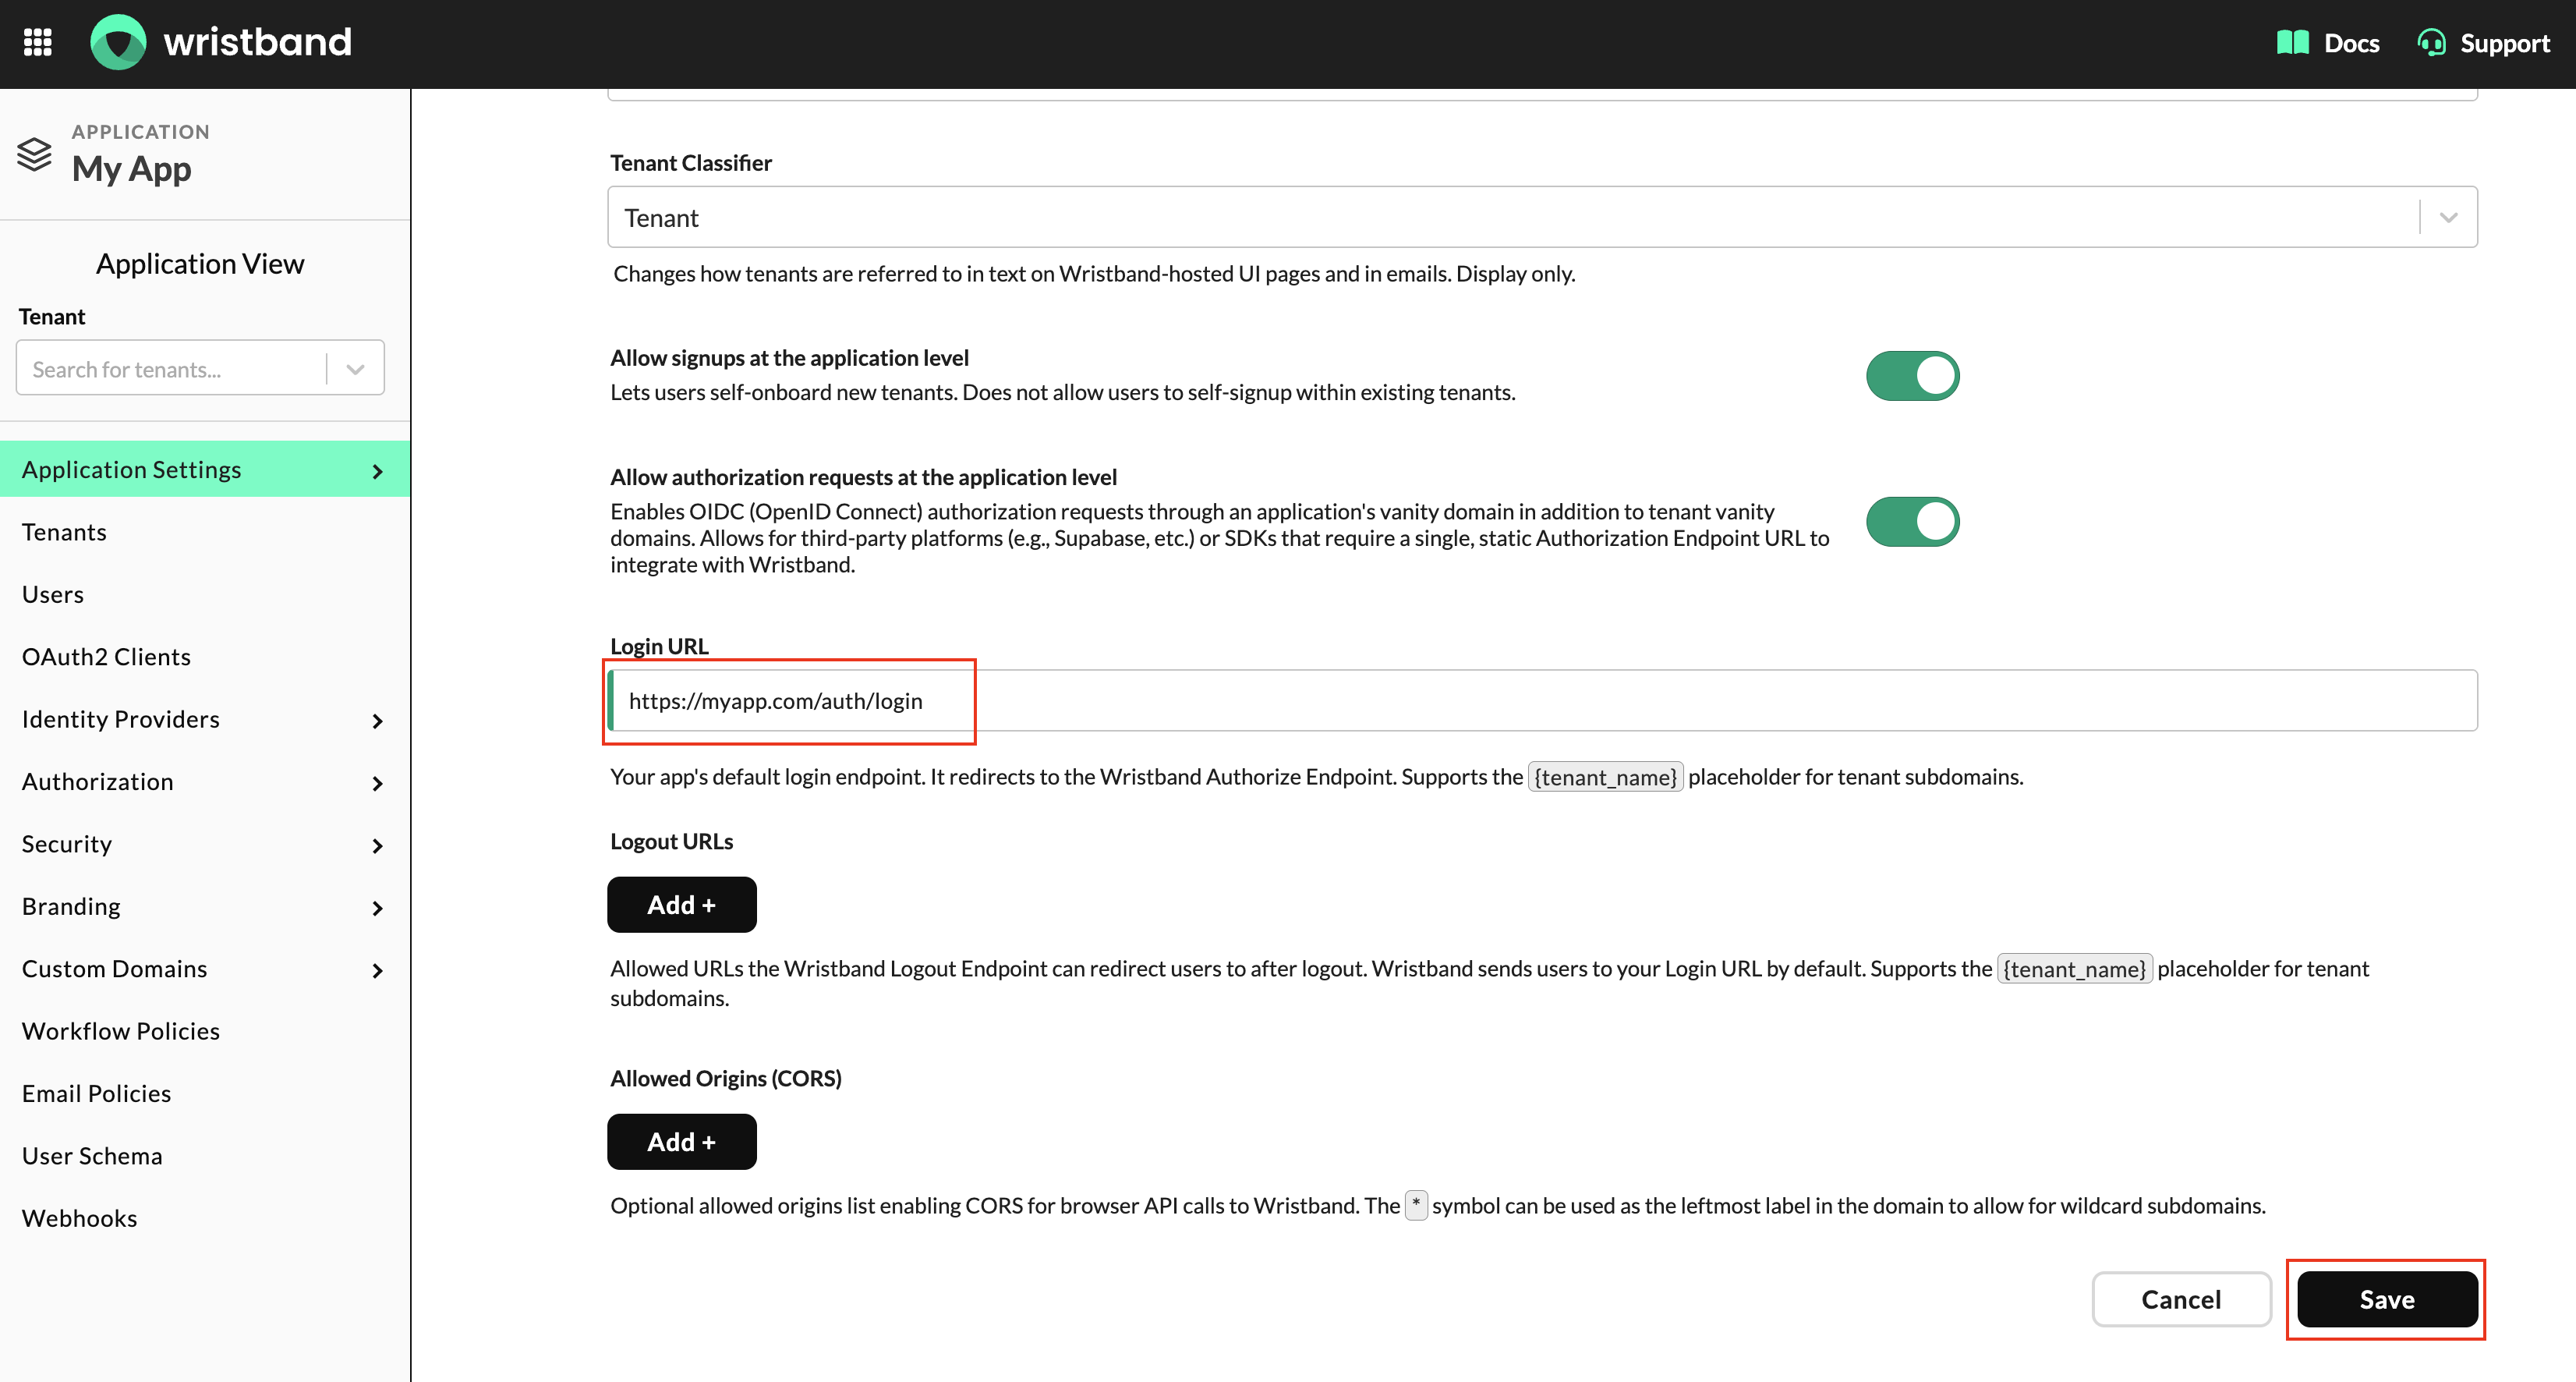
Figure 12: Configure your application's Login URL.
For more information, see the Login URL section.
Configuring Logout URLs
You can register Logout URLs to redirect users to locations other than your application's default Login URL after logout.
To configure Logout URLs:
- On the Application Settings page, locate the Logout URLs section.
- Click Add to register a new Logout URL.
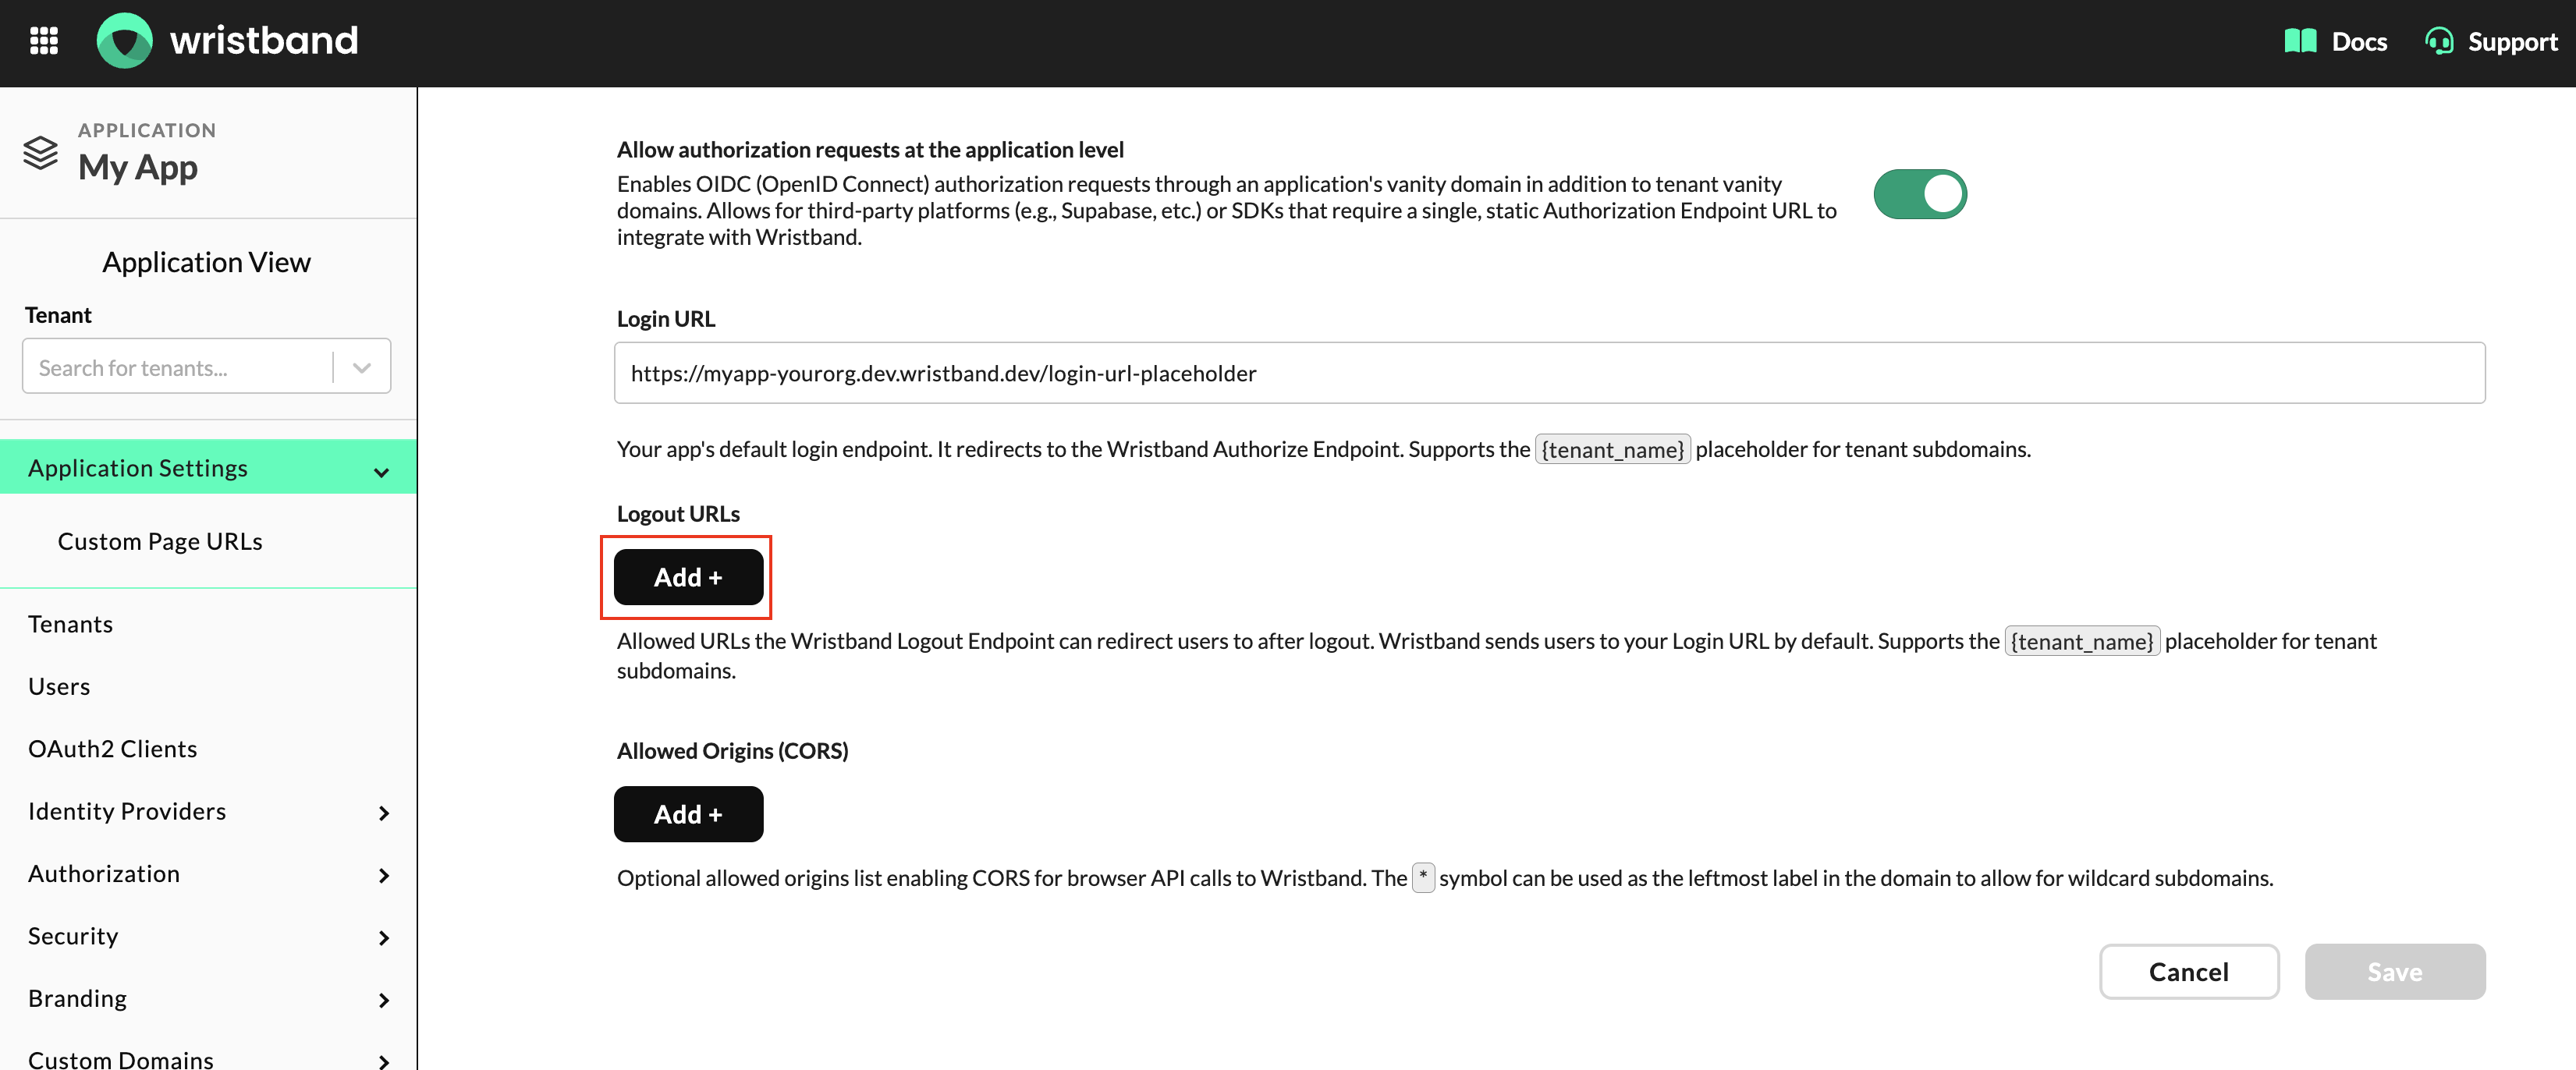
Figure 13: Add a new logout URL in the Application Settings page.
- Enter the URL where users should be redirected after logout.
- Repeat these steps for any additional Logout URLs.
- Click Save to apply your changes.
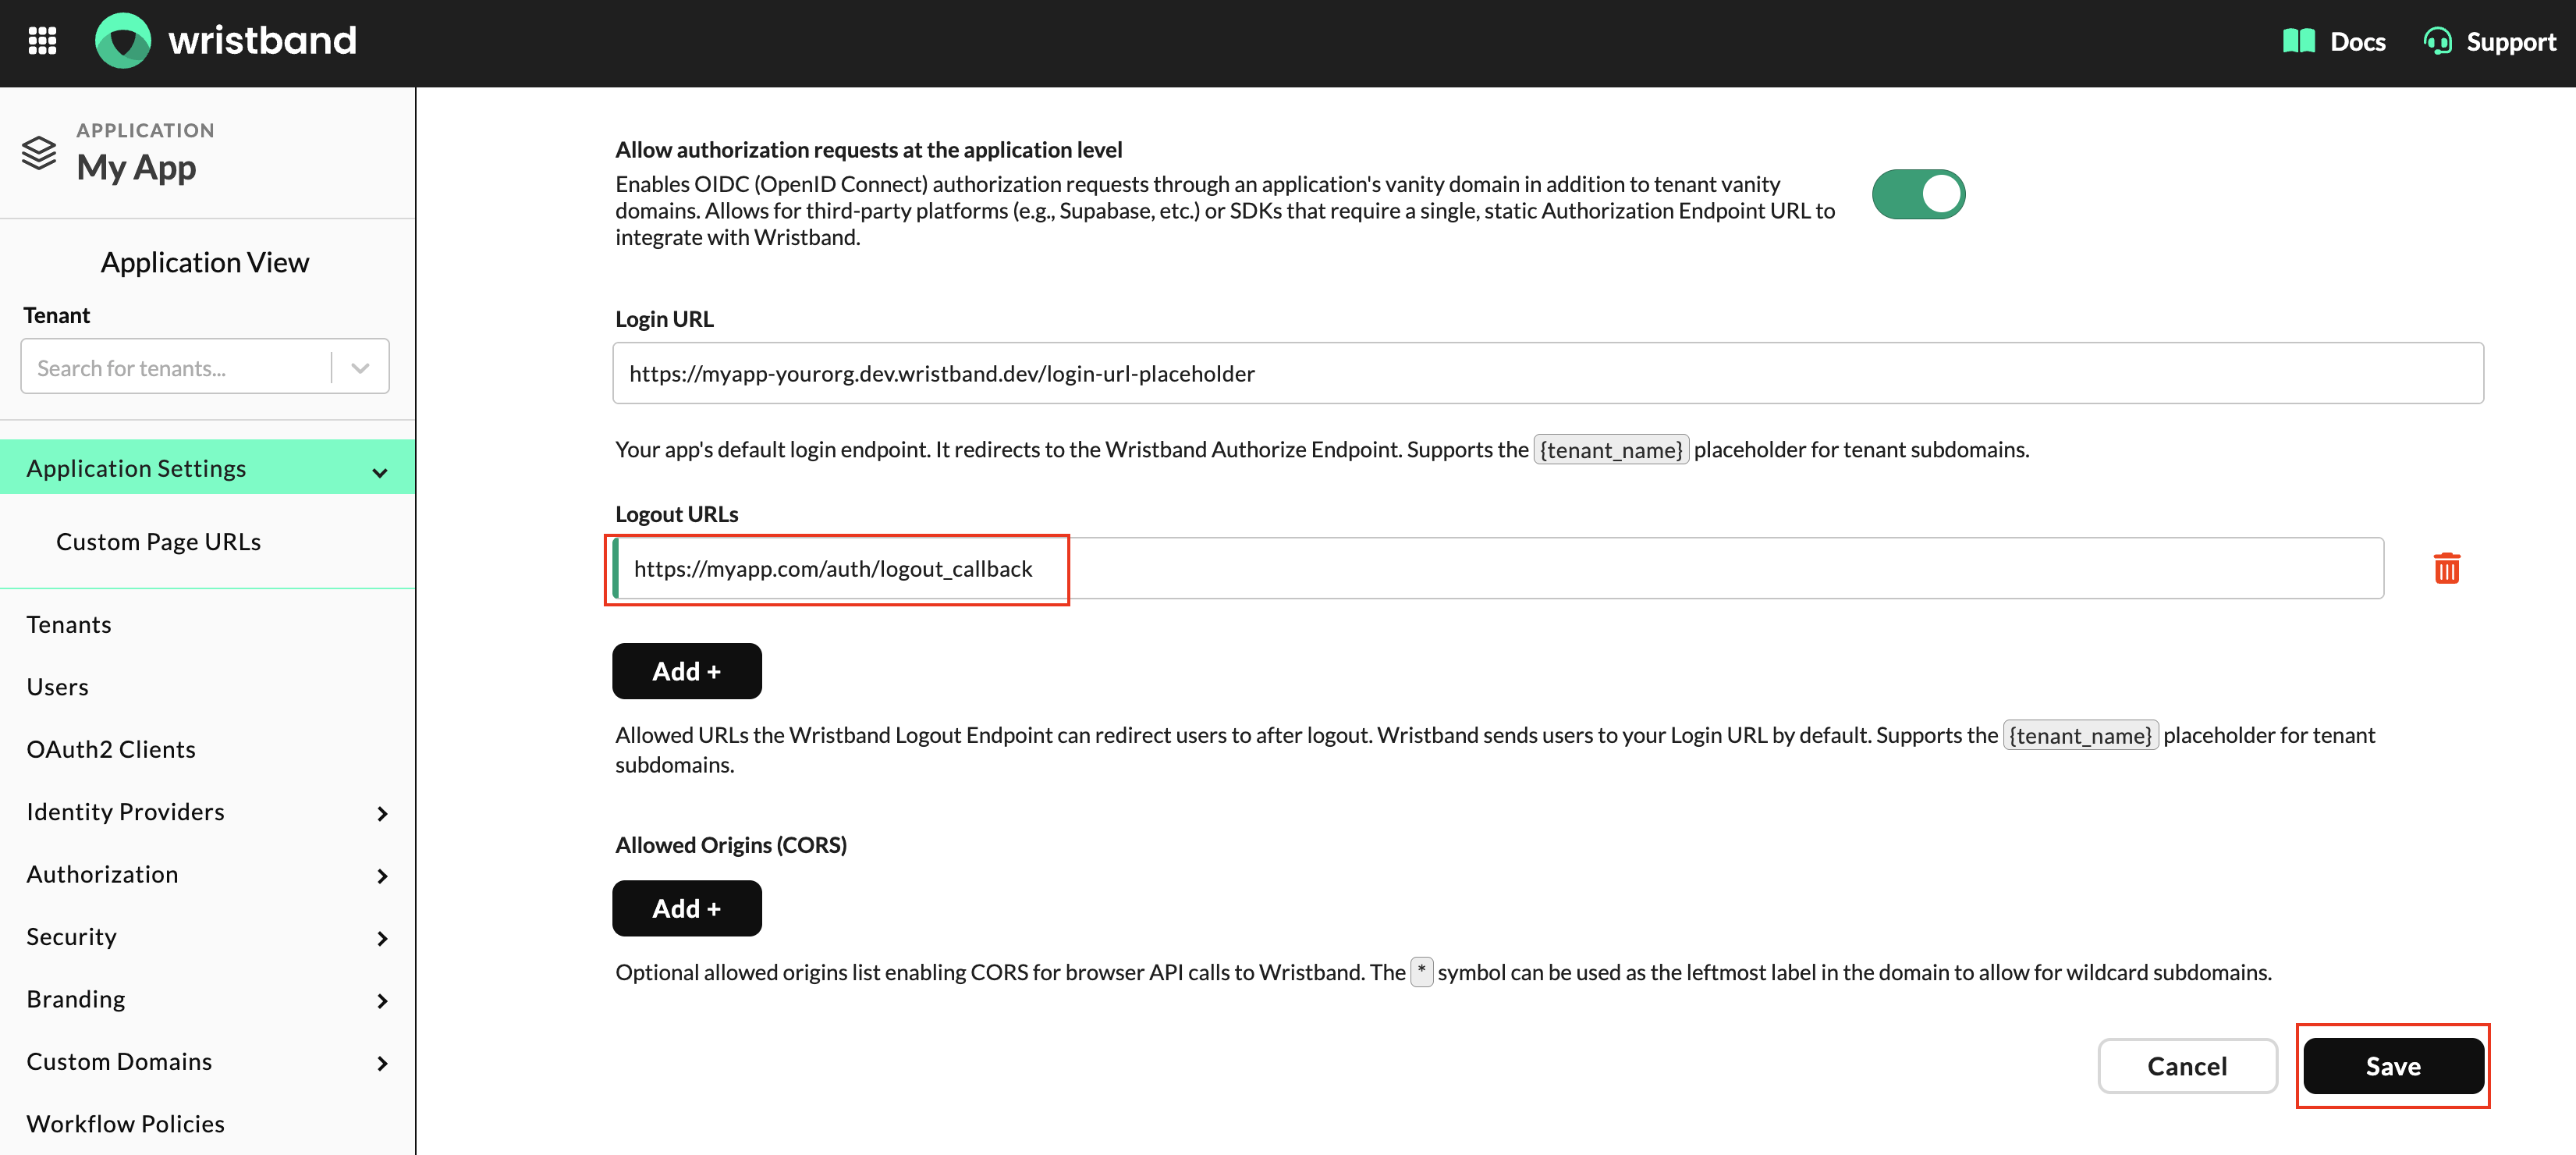
Figure 14: Configure the allowed logout URLs for your application.
For more information, see the Logout URLs section.
Configuring Cross-Origin Resource Sharing (CORS)
If your frontend makes cross-origin API requests directly to Wristband from a browser, you must configure the application's allowed origins.
To configure CORS:
- On the Application Settings page, locate the Allowed Origins (CORS) section.
- Click Add to register a new allowed origin.
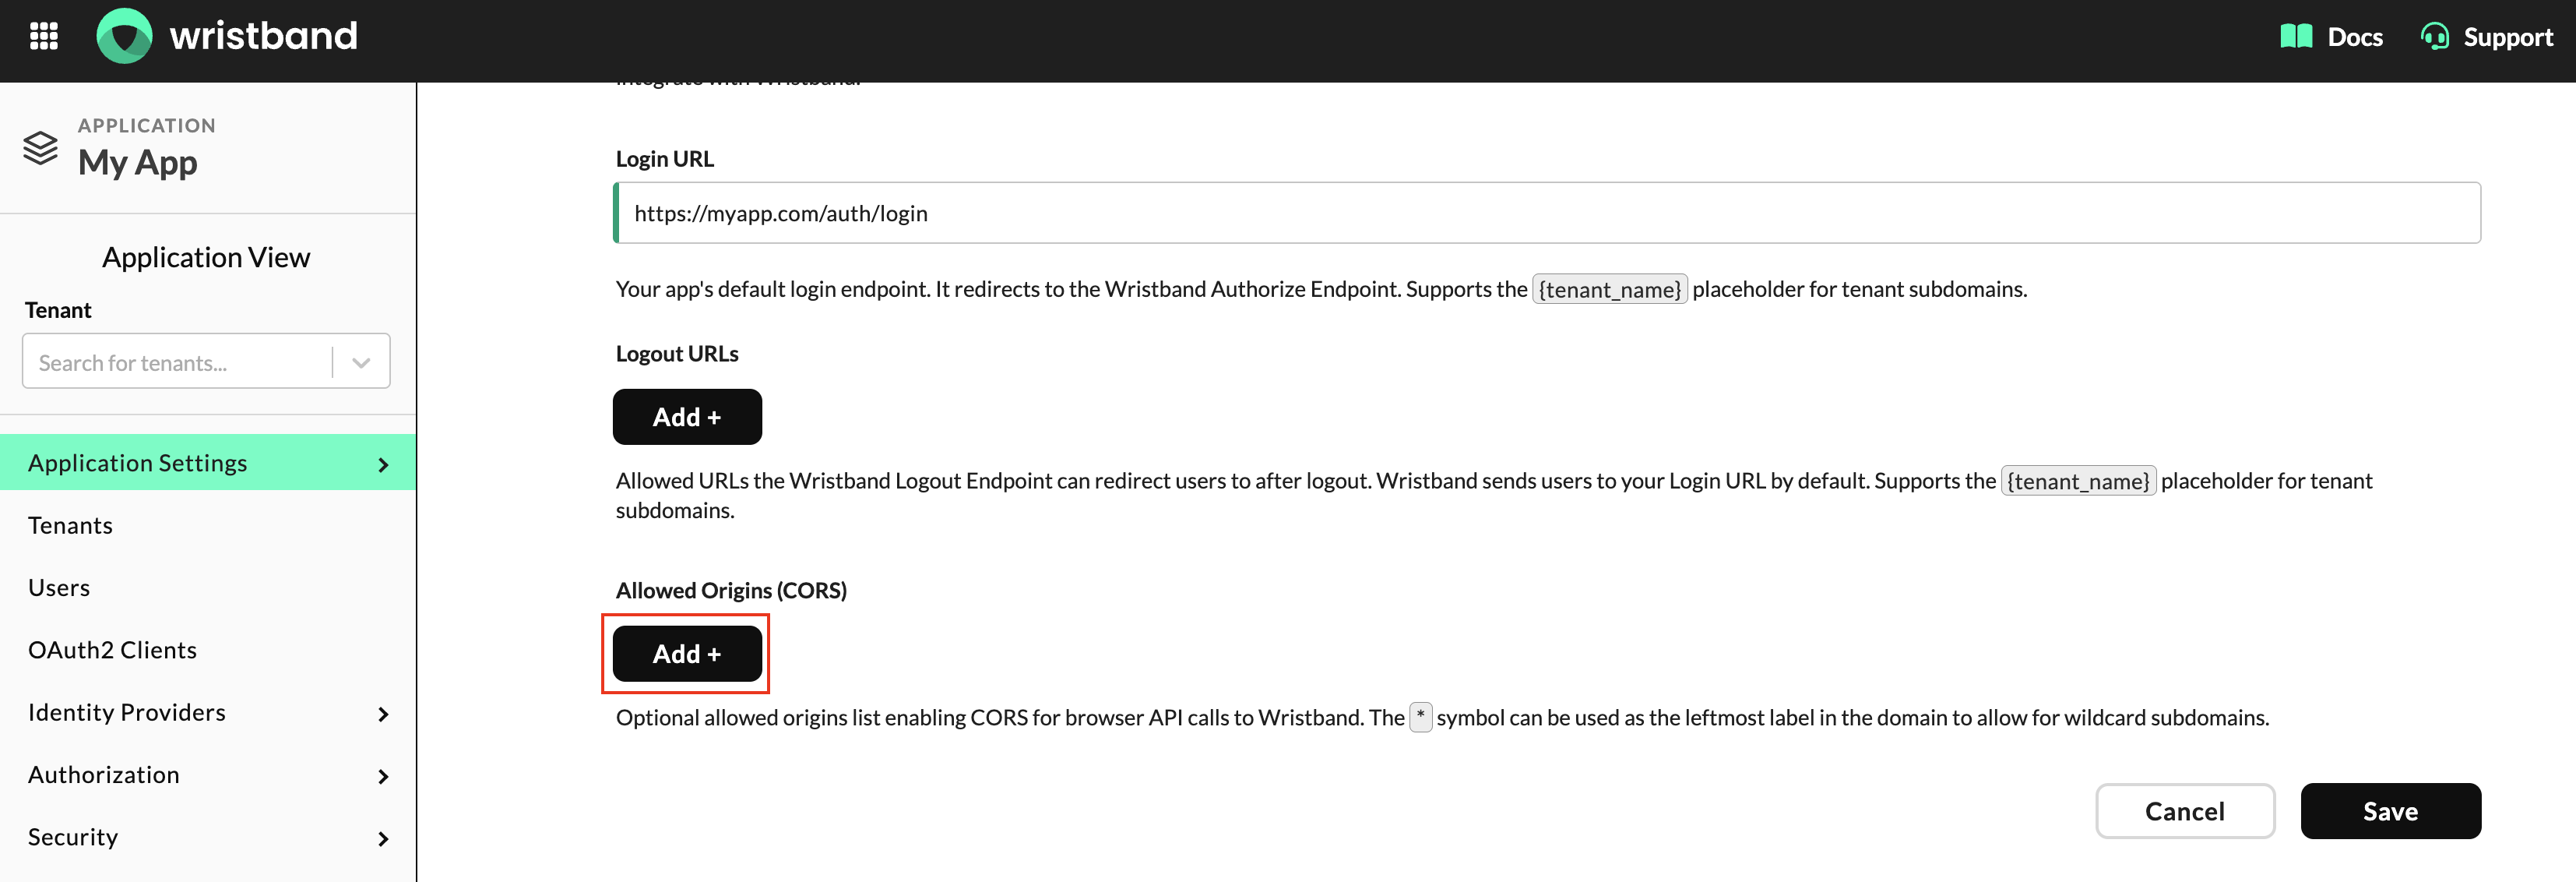
Figure 15: Add an allowed origin to your application's CORS configuration.
- Enter the origin from which your frontend will make requests to Wristband's APIs.
- Repeat these steps for any additional origins.
- Click Save to apply your changes.
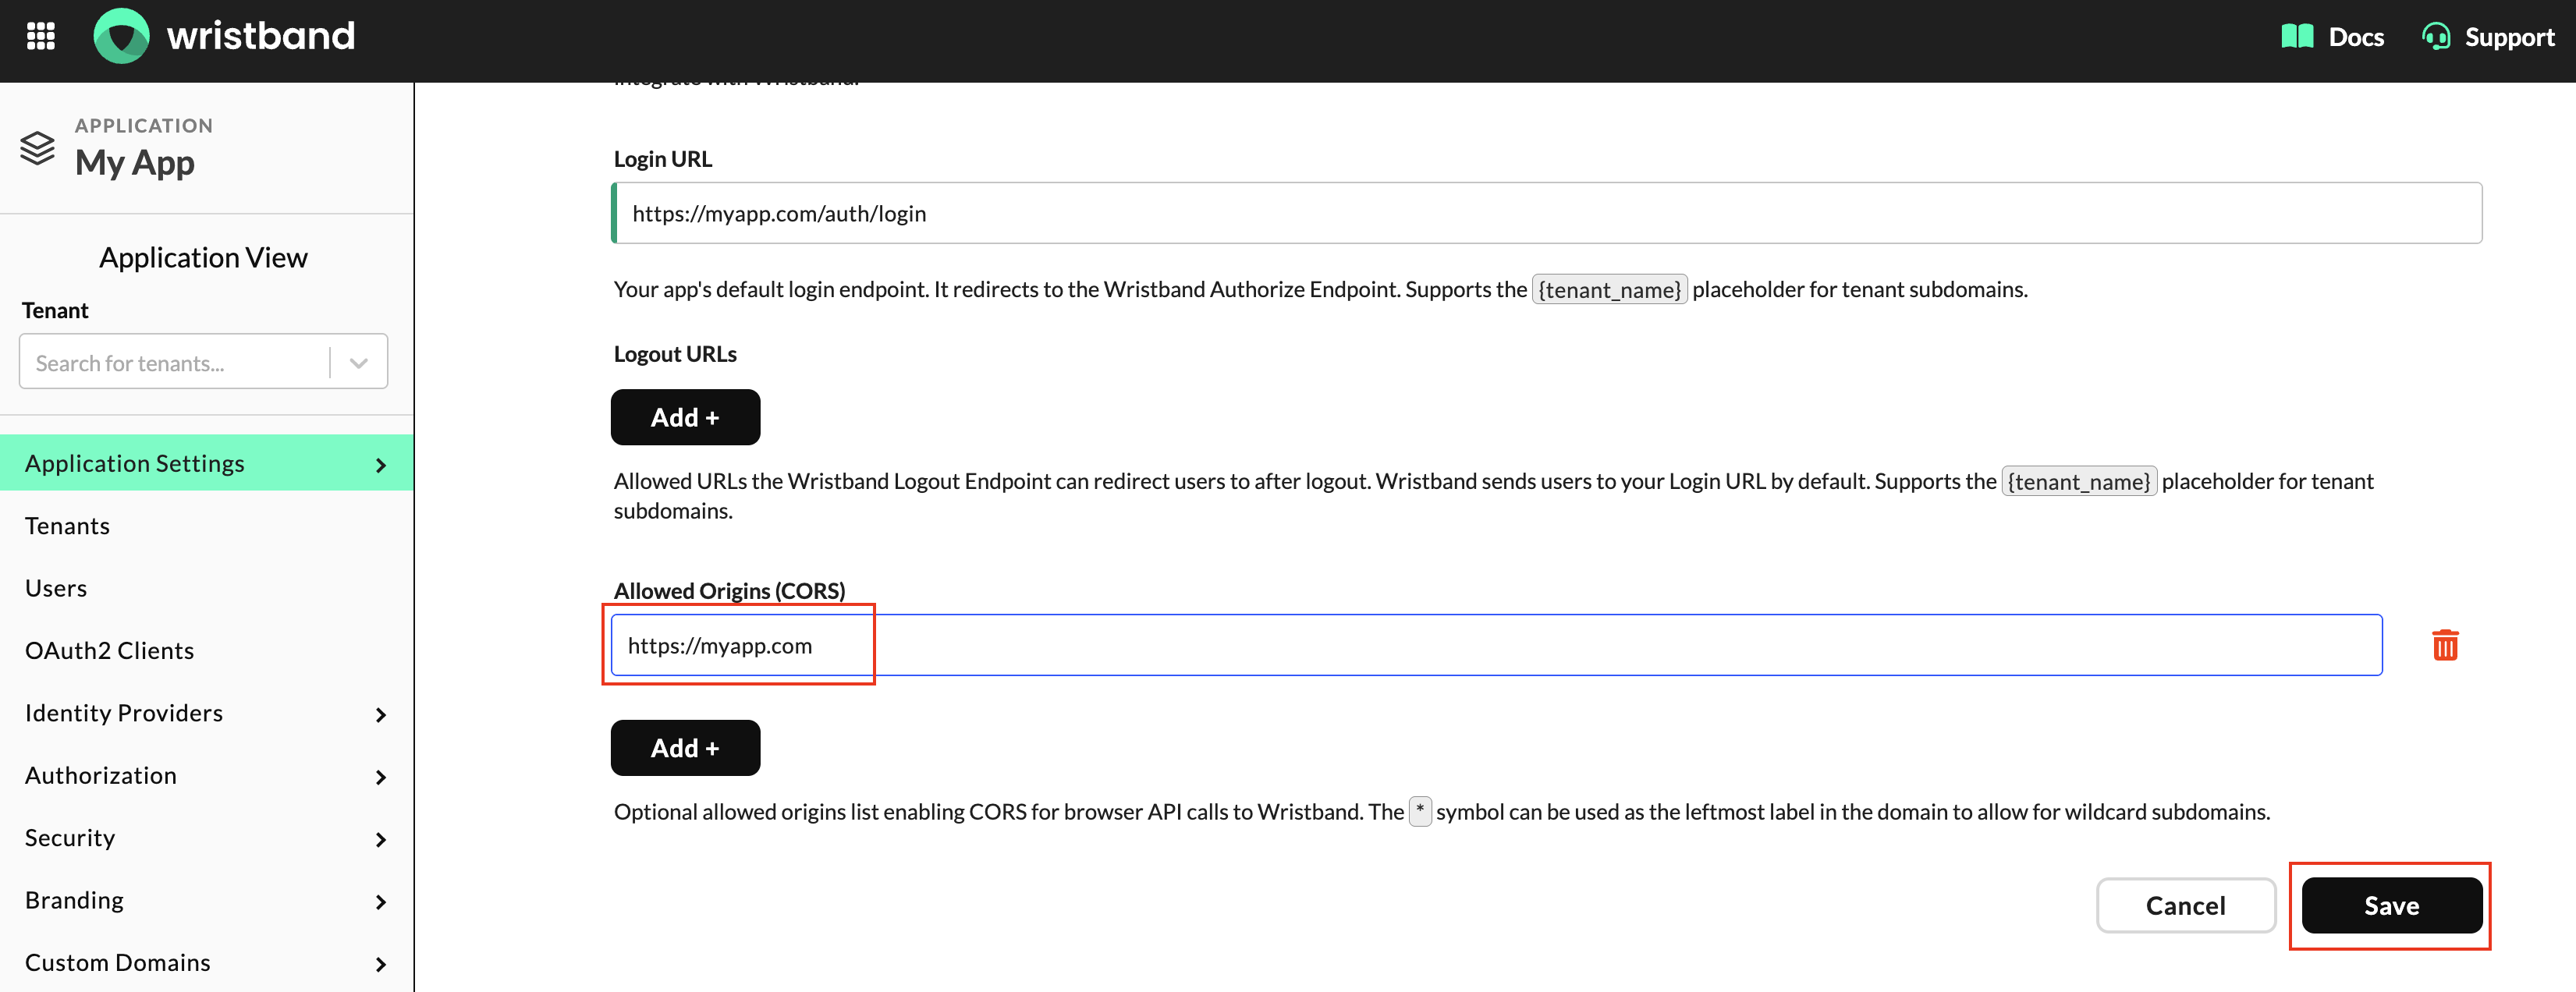
Figure 16: Configure the allowed origins for your Wristband application.
CORS Is Only Required for Cross-Origin Browser RequestsYou only need to configure allowed origins when browser-based applications make cross-origin requests directly to Wristband's APIs. Backend-to-backend API requests do not require CORS configuration.
For more information, see Cross-Origin Resource Sharing (CORS).
Configuring Application-Level Signup
You can enable or disable application-level signup through the Application Settings page.
To configure application-level signup:
- On the Application Settings page, locate the Allow signups at the application level toggle.
- Enable the toggle to allow users to create new tenants through the hosted signup flow, or disable it to prevent tenant self-registration.
- Click Save to apply your changes.
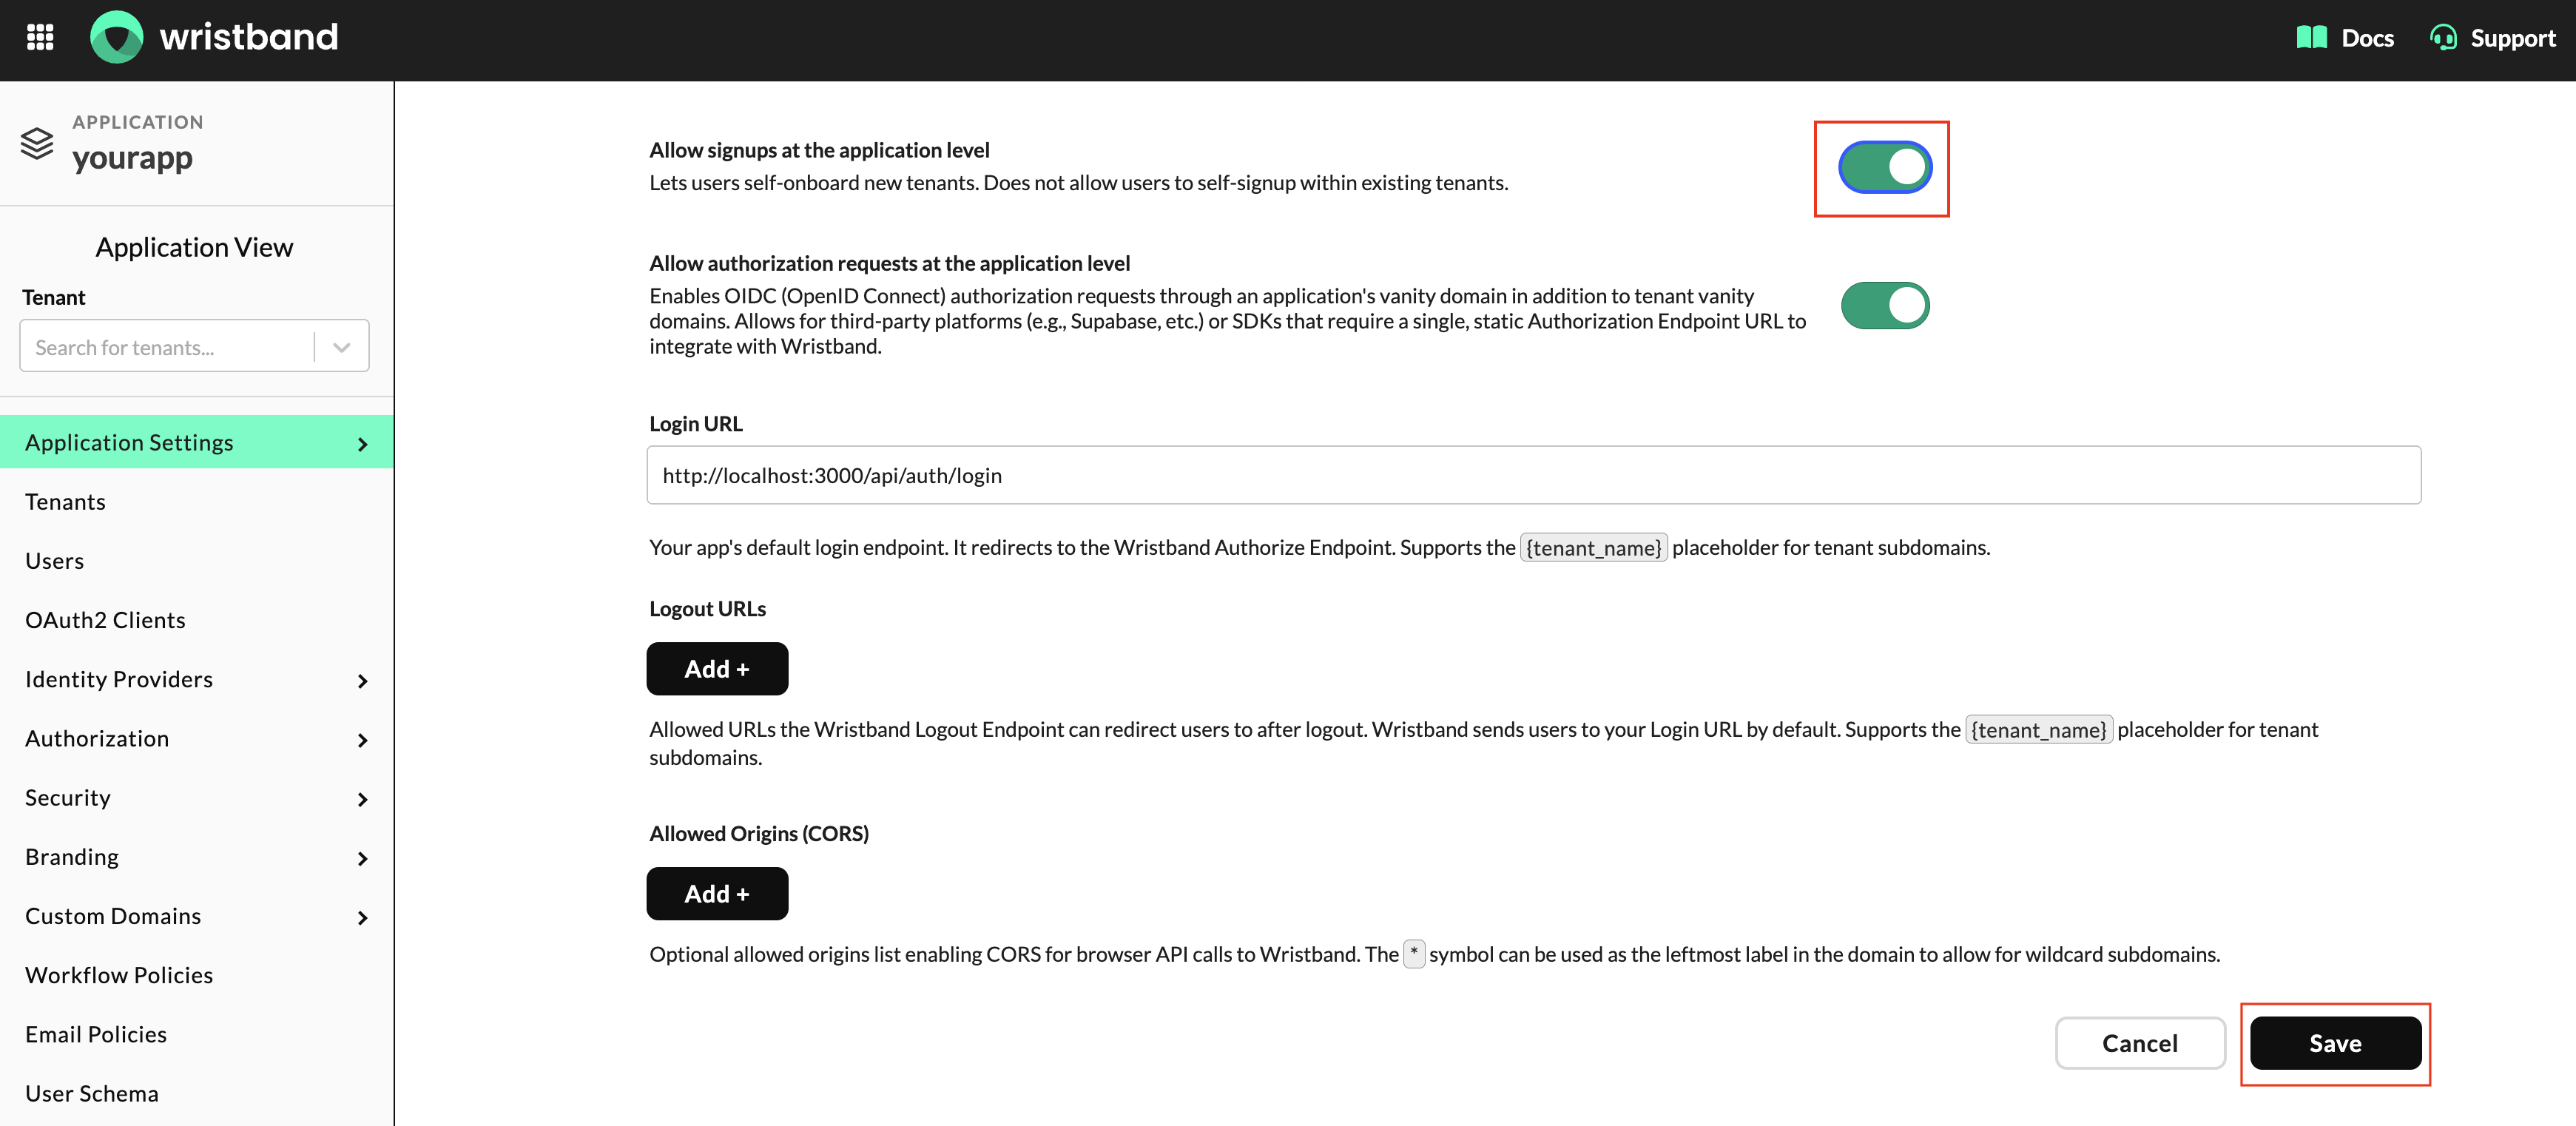
Figure 17: Enable or disable application-level signup.
For more information, see Enabling Application-Level Signups.
Configuring Application-Level Authorization Requests
You can enable or disable authorization requests through your application's vanity domain using the Application Settings page.
To configure application-level authorization requests:
- On the Application Settings page, locate the Allow authorization requests at the application level toggle.
- Enable the toggle to allow authorization requests through the application's vanity domain, or disable it to require authorization requests to use tenant vanity domains.
- Click Save to apply your changes.
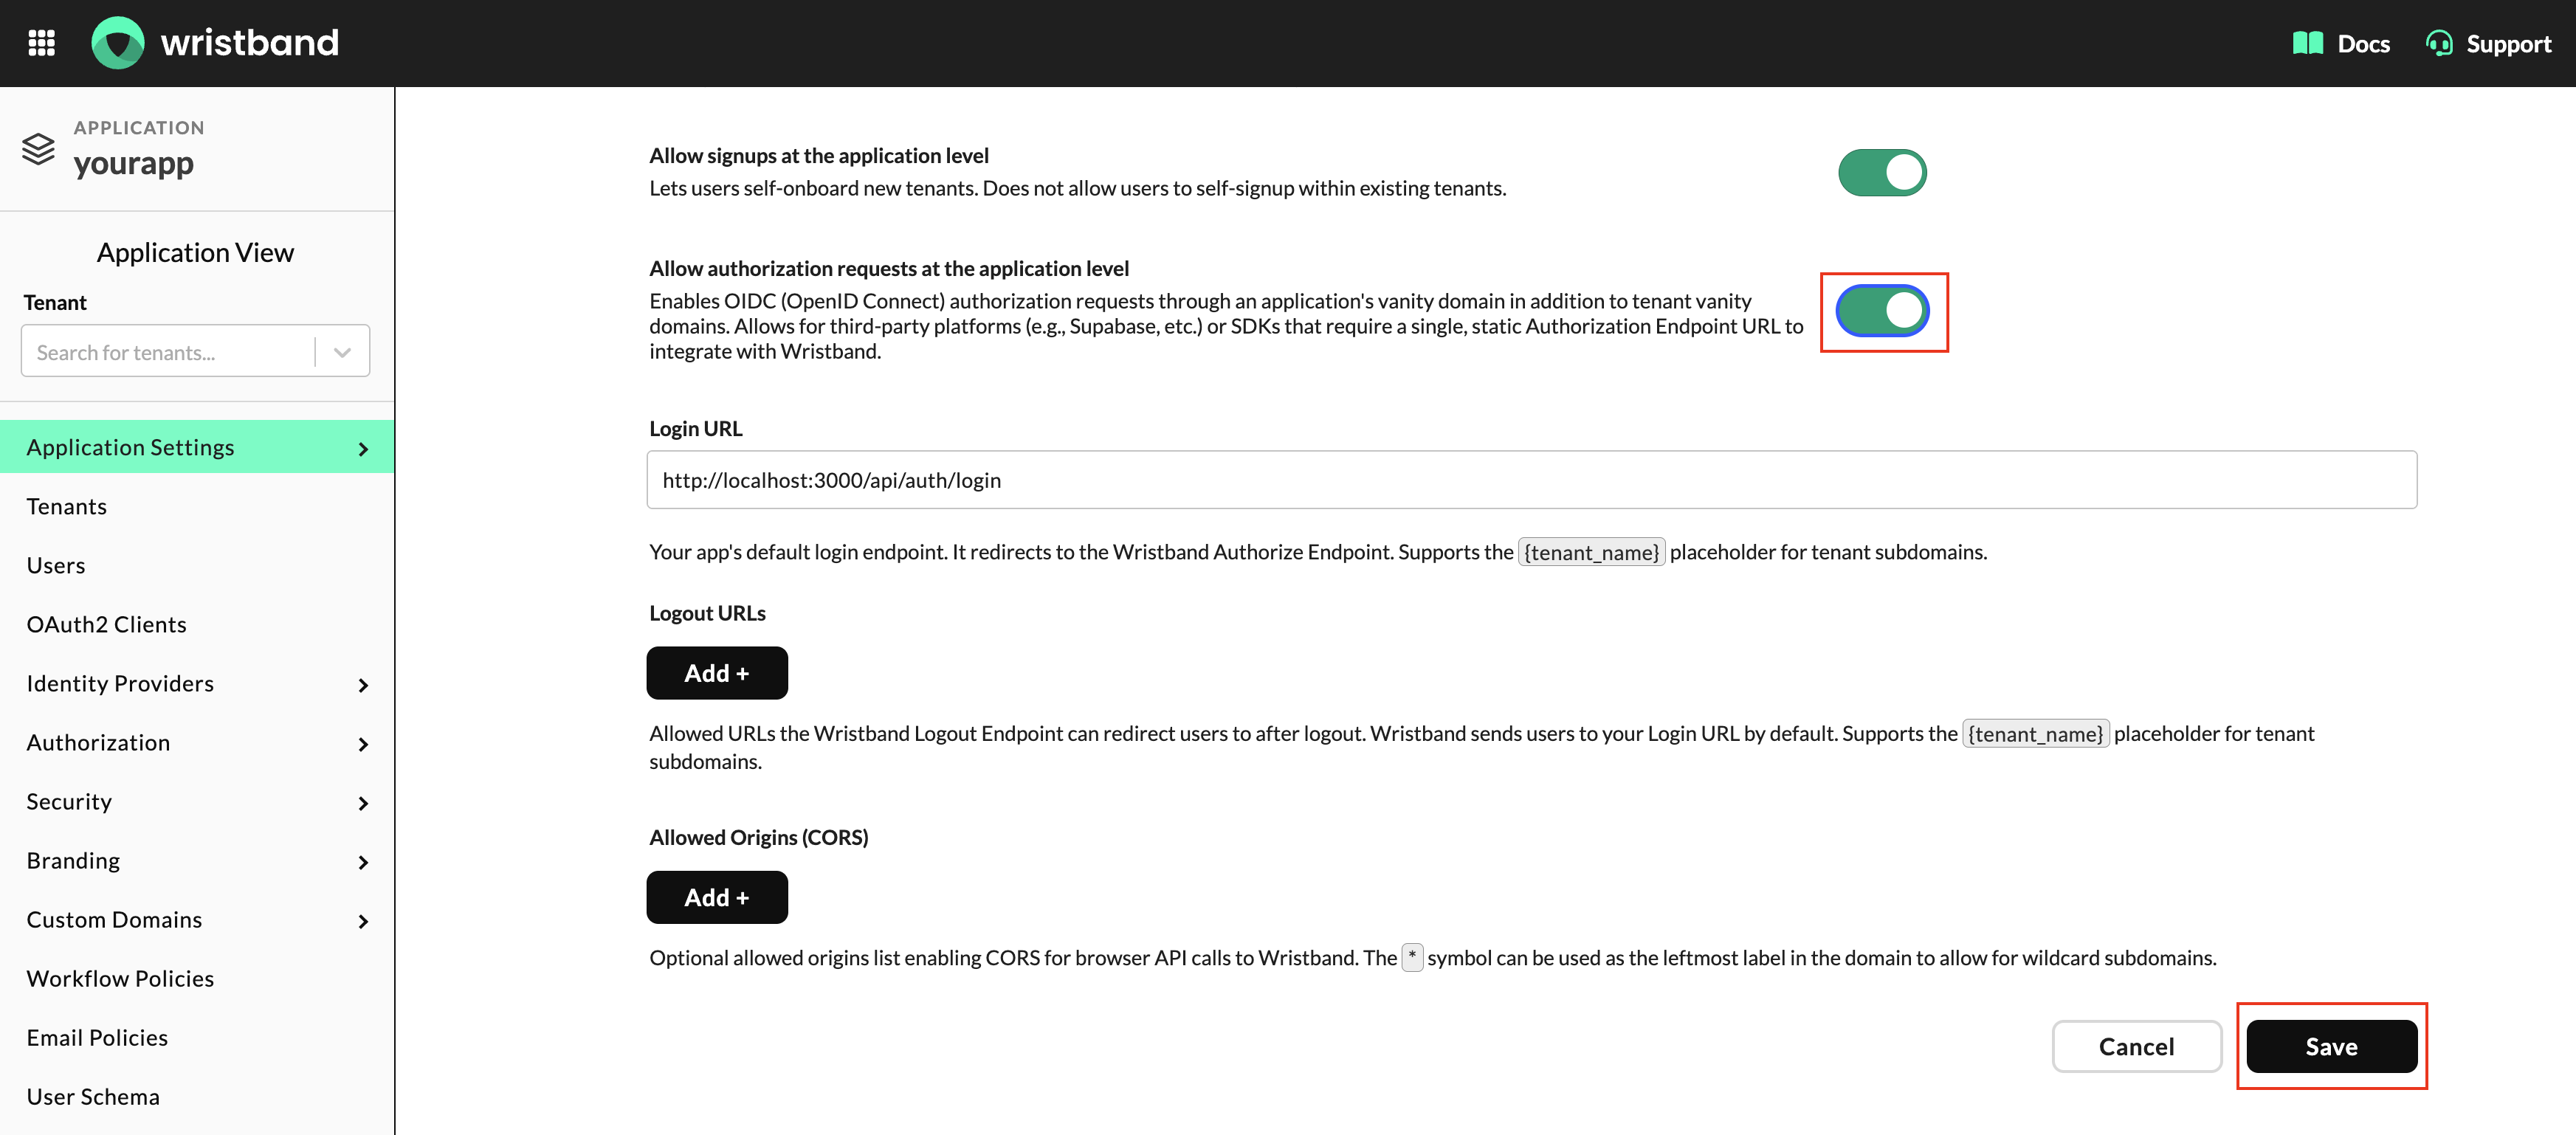
Figure 18: Enable or disable application-level authorization requests.
For more information, see Enabling Application-Level Authorization Requests.
Viewing Application Details
You can view your application's identifying information and configuration details directly from the Wristband Dashboard.
To view your application's details:
- On the Application Settings page, locate the application information panel at the top of the page.
- Review the following application details:
- ID: The unique identifier assigned to your Wristband application, used when interacting with certain Wristband APIs.
- Name: The application's unique name within your Wristband account.
- Default Vanity Domain: The default domain assigned to your application by Wristband, used to construct application-level authentication URLs and other Wristband API URLs.
- Active Custom Domain: The application's active custom domain, if one has been configured.
- Environment Type: The application's designated environment, such as Development or Production.
- Creation Time: The date and time the application was created.
- Last Modified Time: The date and time the application was last updated.
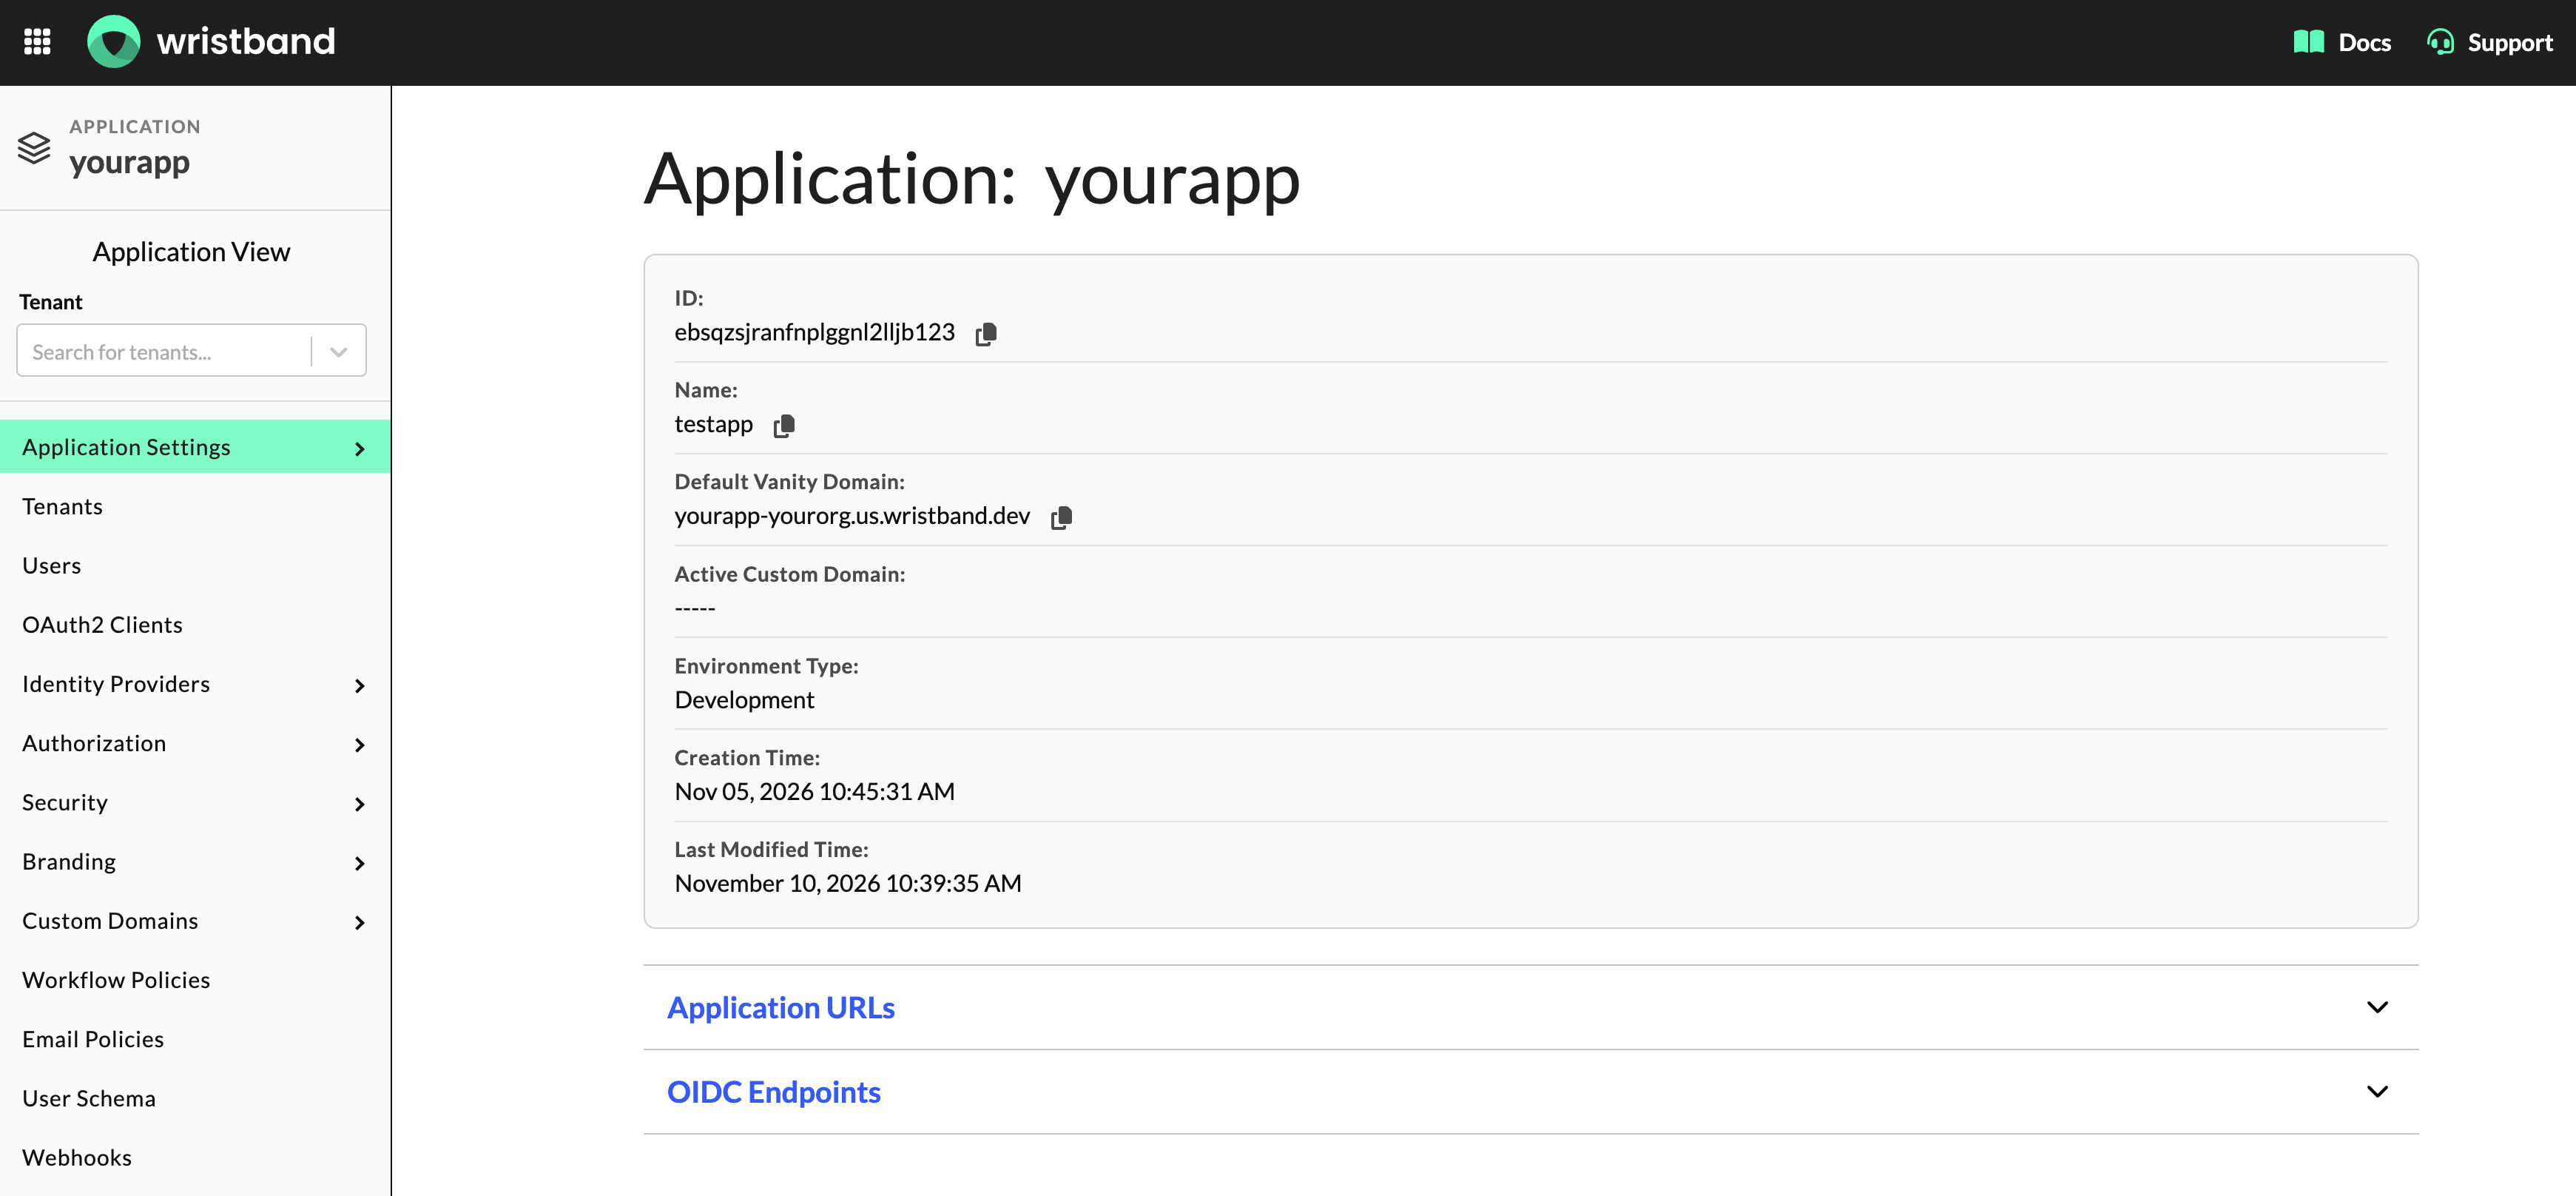
Figure 19: Viewing application details in the Wristband Dashboard.
Viewing Application Login and Signup URLs
You can view, copy, and open your application's login and signup URLs directly from the Wristband Dashboard.
To view these URLs:
- On the Application Settings page, expand the Application URLs section.
- Locate the following URLs:
- Application-level Signup URL: Directs users to Wristband's hosted signup page, where they can create a new tenant and an initial user account.
- Application-level Login URL: Directs users to Wristband's tenant discovery page, where they can identify the tenant they want to access.
- Click the copy icon next to either URL to copy it to your clipboard, or click the open icon to open it in a new browser tab.
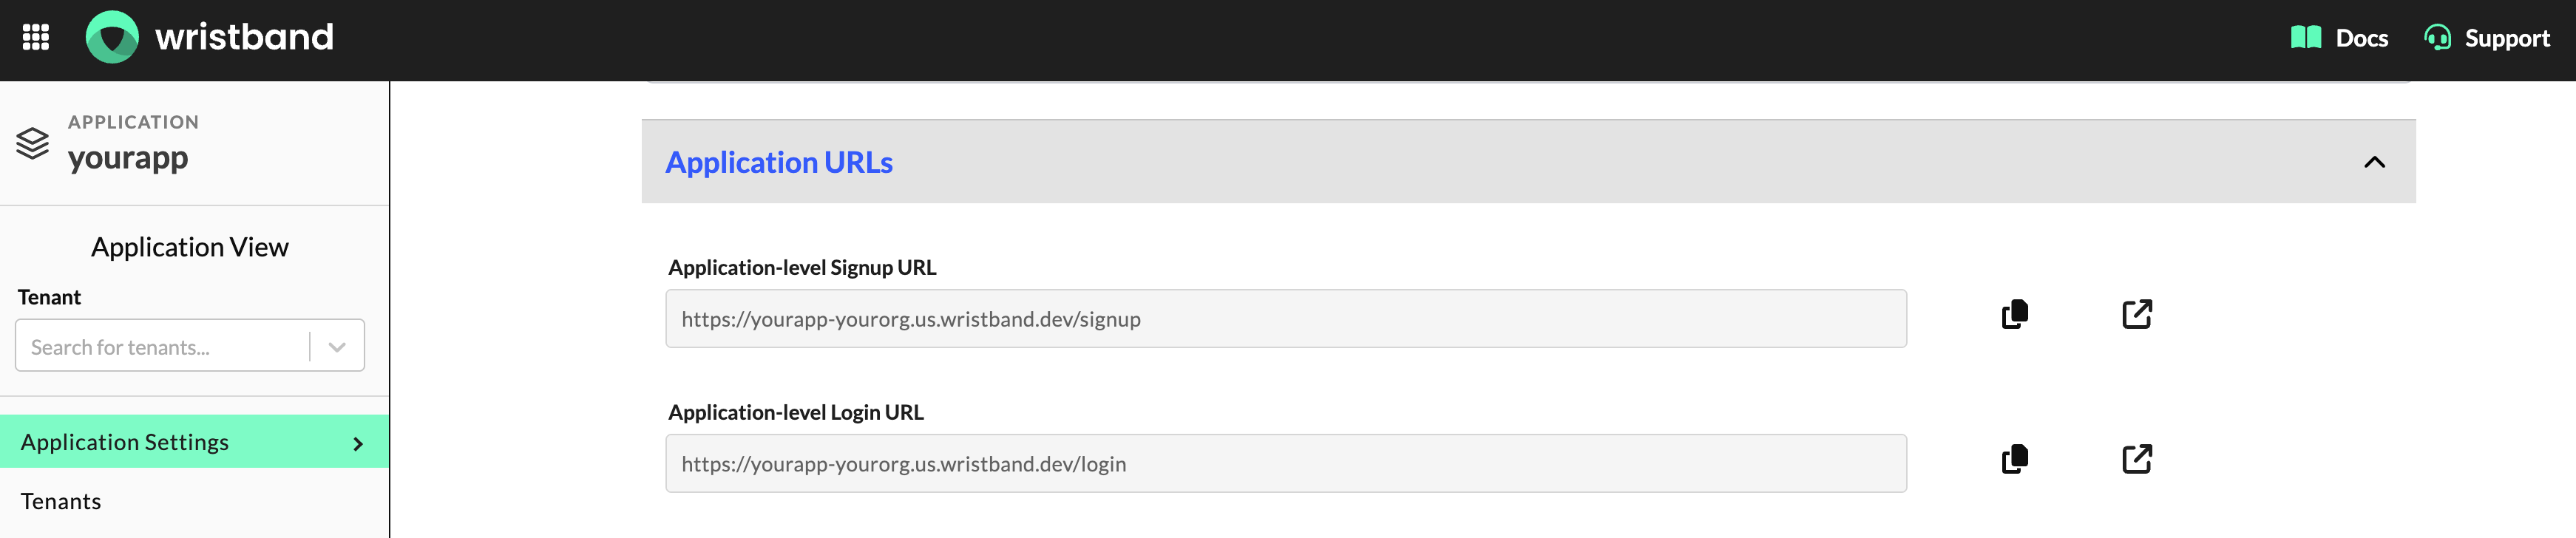
Figure 20: Viewing application-level login and signup URLs.
Application-Level Signup RequirementsApplication-level signup must be enabled to access the hosted signup page. If disabled, navigating to the Application-level Signup URL will display an error page.
See Enabling Application-Level Signups for more information.
Application-Level Login RequirementsThe Application-level Login URL directs users to the tenant discovery page. After a user selects a tenant, Wristband redirects them to your application's configured Login URL to initiate authentication.
Your application's Login URL must point to your application's Login Endpoint. If it is not configured correctly, users will encounter an error page after selecting their tenant.
See the Login URL section for more information.
Viewing OIDC Endpoints
You can view and copy your application's OpenID Connect (OIDC) endpoint URLs directly from the Wristband Dashboard. These endpoints are used to integrate your application with Wristband's authentication services.
To view your application's OIDC endpoints:
- On the Application Settings page, expand the OIDC Endpoints section.
- Select one of the following tabs:
- Application: Displays application-level endpoint URLs. This tab is only available when application-level authorization requests are enabled.
- Tenant: Displays tenant-level endpoint URLs. Select a tenant from the Resolve for tenant dropdown to view its Authorization URL and OIDC Configuration URL.
- Click the copy icon next to any endpoint URL to copy it to your clipboard.
Application-Level OIDC Endpoints
When the Application tab is selected, the Dashboard displays the OIDC endpoint URLs associated with your application.
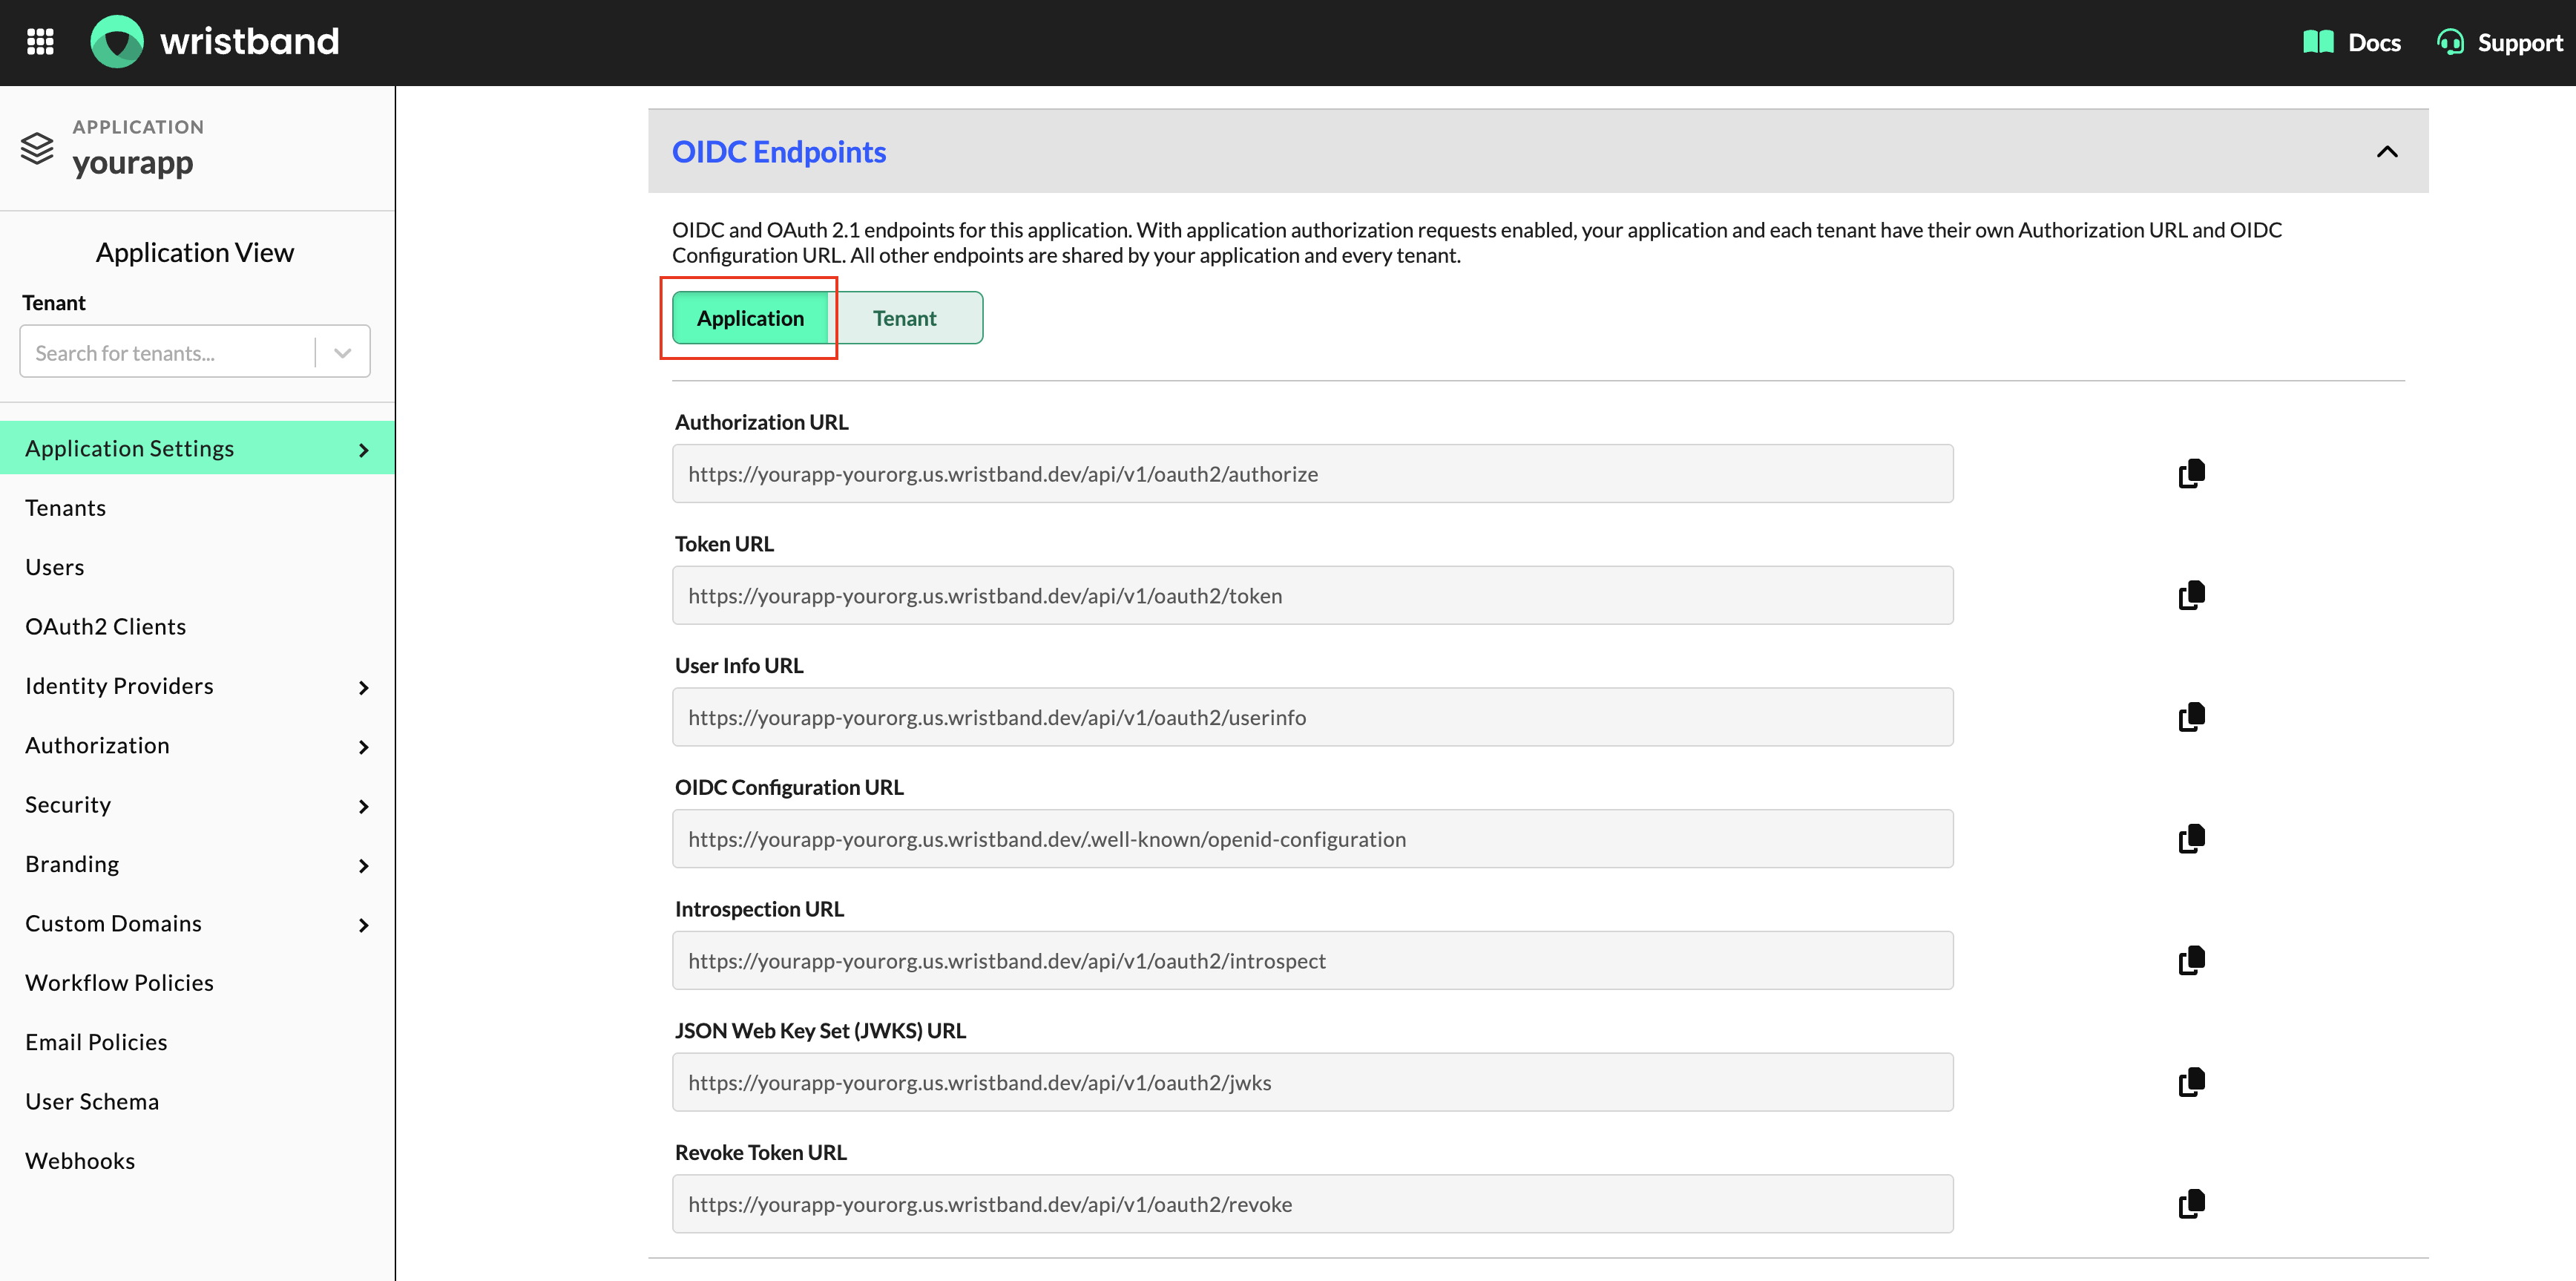
Figure 21: Application-level OIDC endpoints.
Tenant-Level OIDC Endpoints
When the Tenant tab is selected, you can view the OIDC endpoint URLs associated with a specific tenant. You must select a tenant from the Resolve for tenant dropdown before its Authorization URL and OIDC Configuration URL become visible.
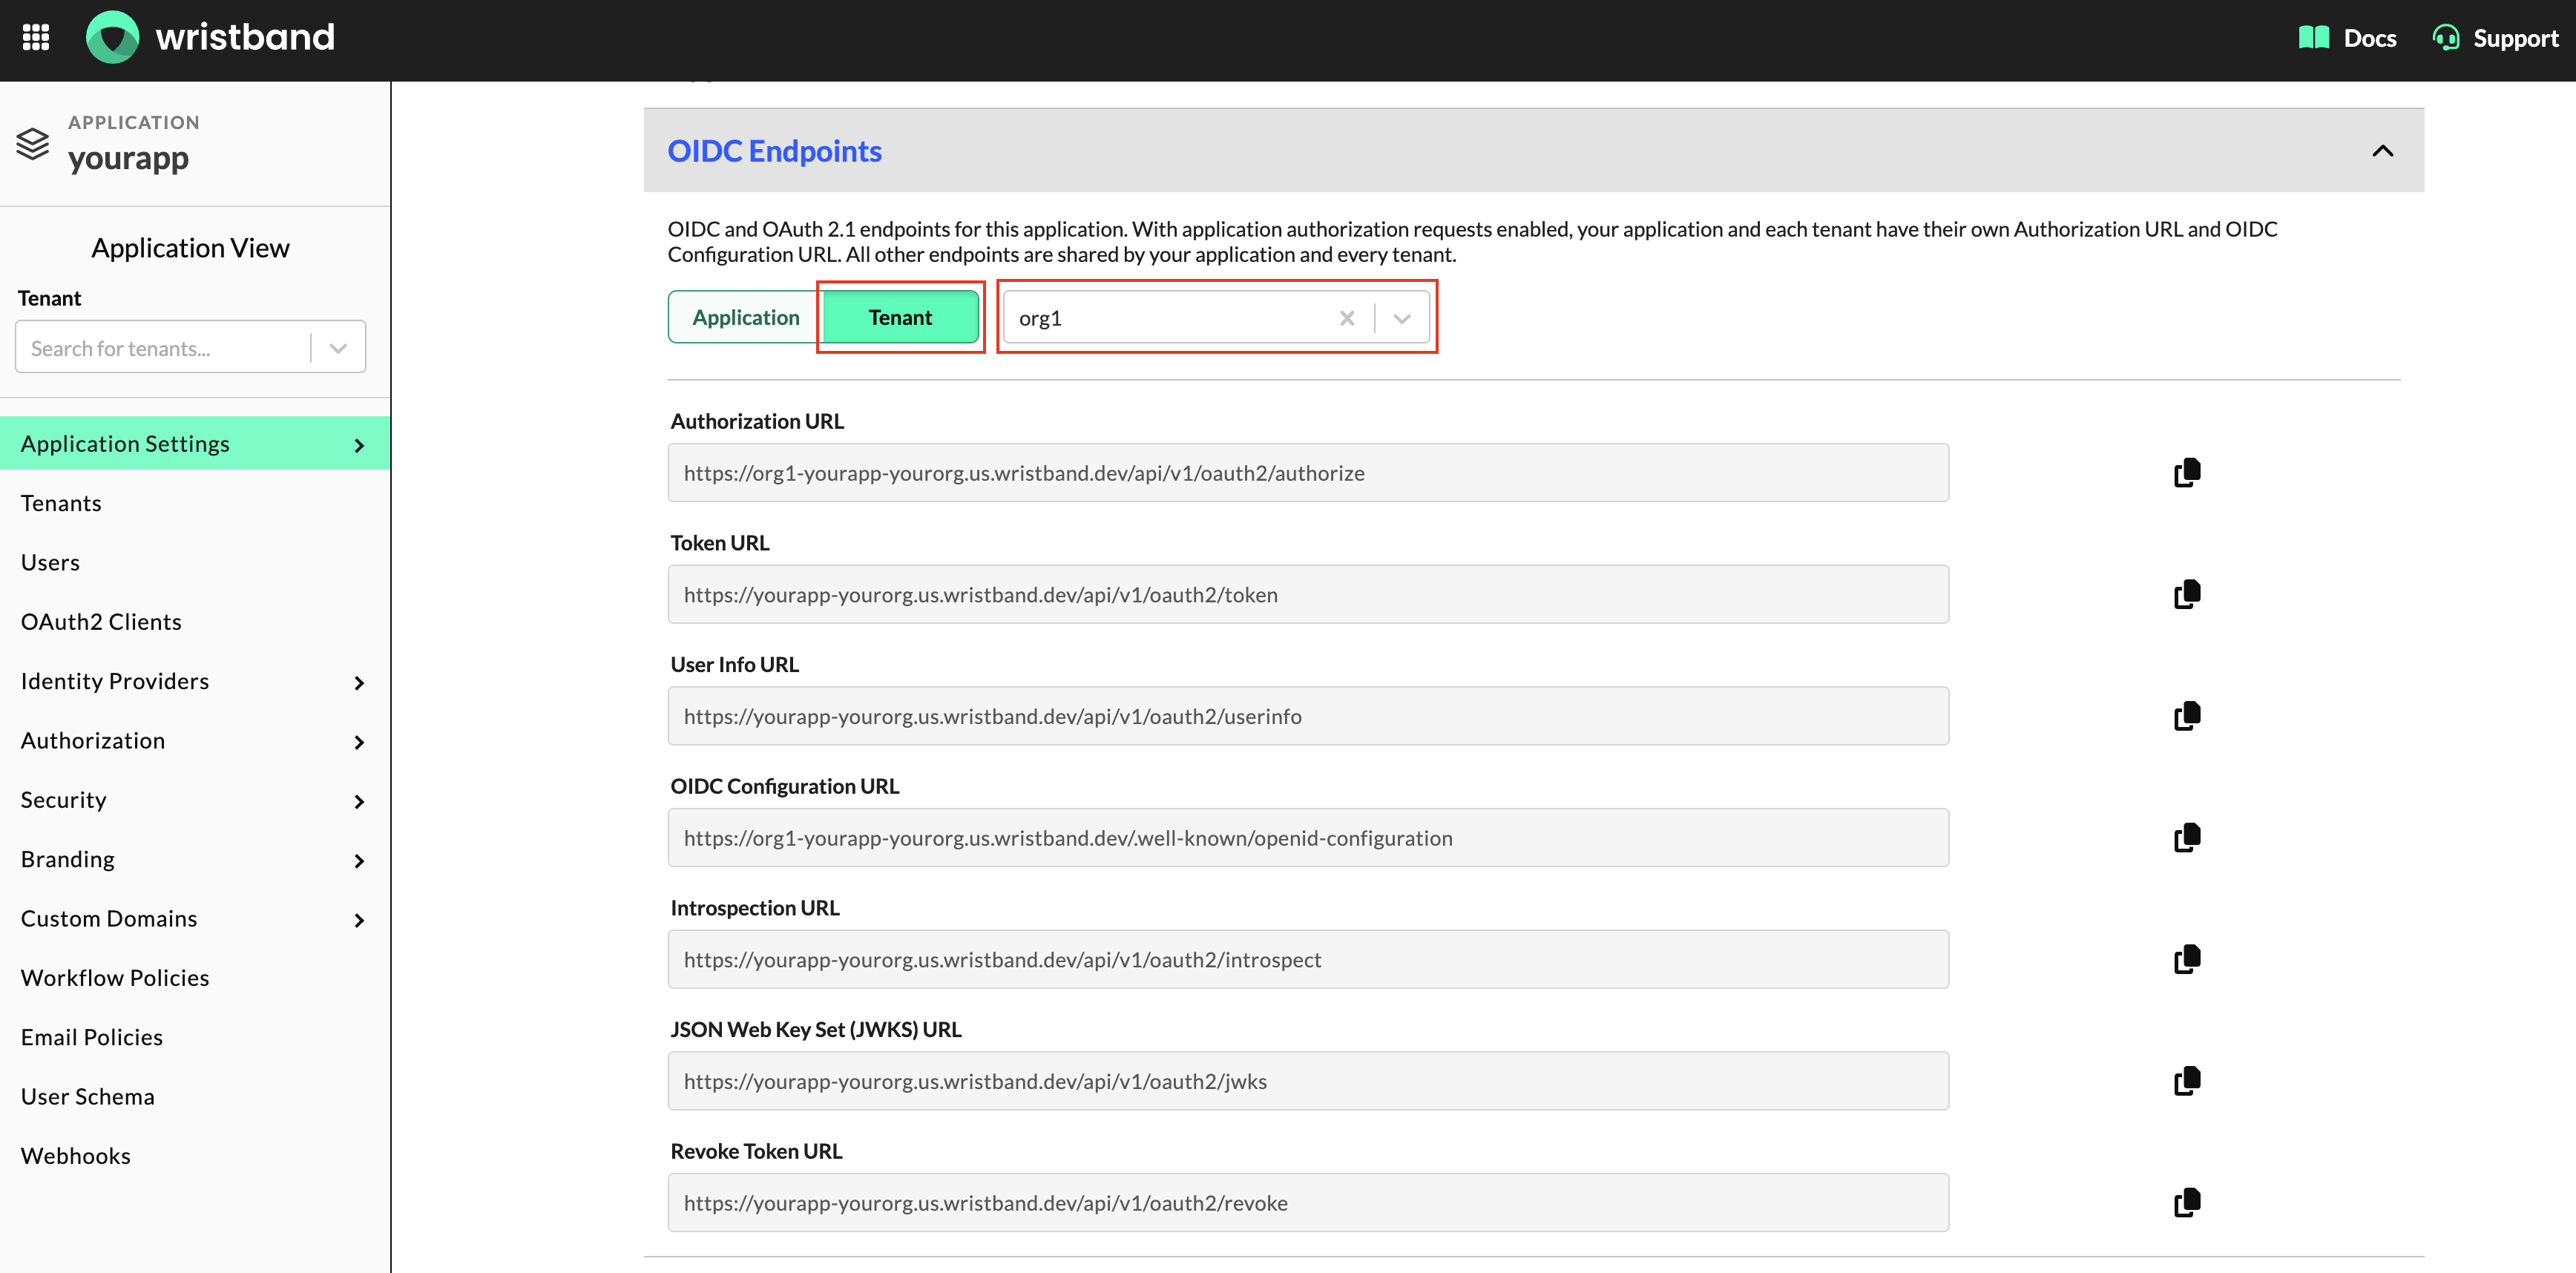
Figure 22: Tenant-level OIDC endpoints.
Application-Level vs. Tenant-Level EndpointsEach tenant has its own Authorization URL and OIDC Configuration URL. When application-level authorization requests are enabled, the application also has its own versions of these endpoints.
All other endpoints, including the Token, User Info, Introspection, JWKS, and Revoke Token endpoints, are shared across the application and its tenants.
Activating and Deactivating an Application
You can activate or deactivate an application through the Wristband Dashboard. The available action depends on the application's current status.
To activate or deactivate an application:
- On the Application Settings page, locate the Status Settings section.
- Depending on the application's current status:
- Active: Click Deactivate to change the application's status to
INACTIVE. - Inactive: Click Activate to change the application's status to
ACTIVE.
- Active: Click Deactivate to change the application's status to
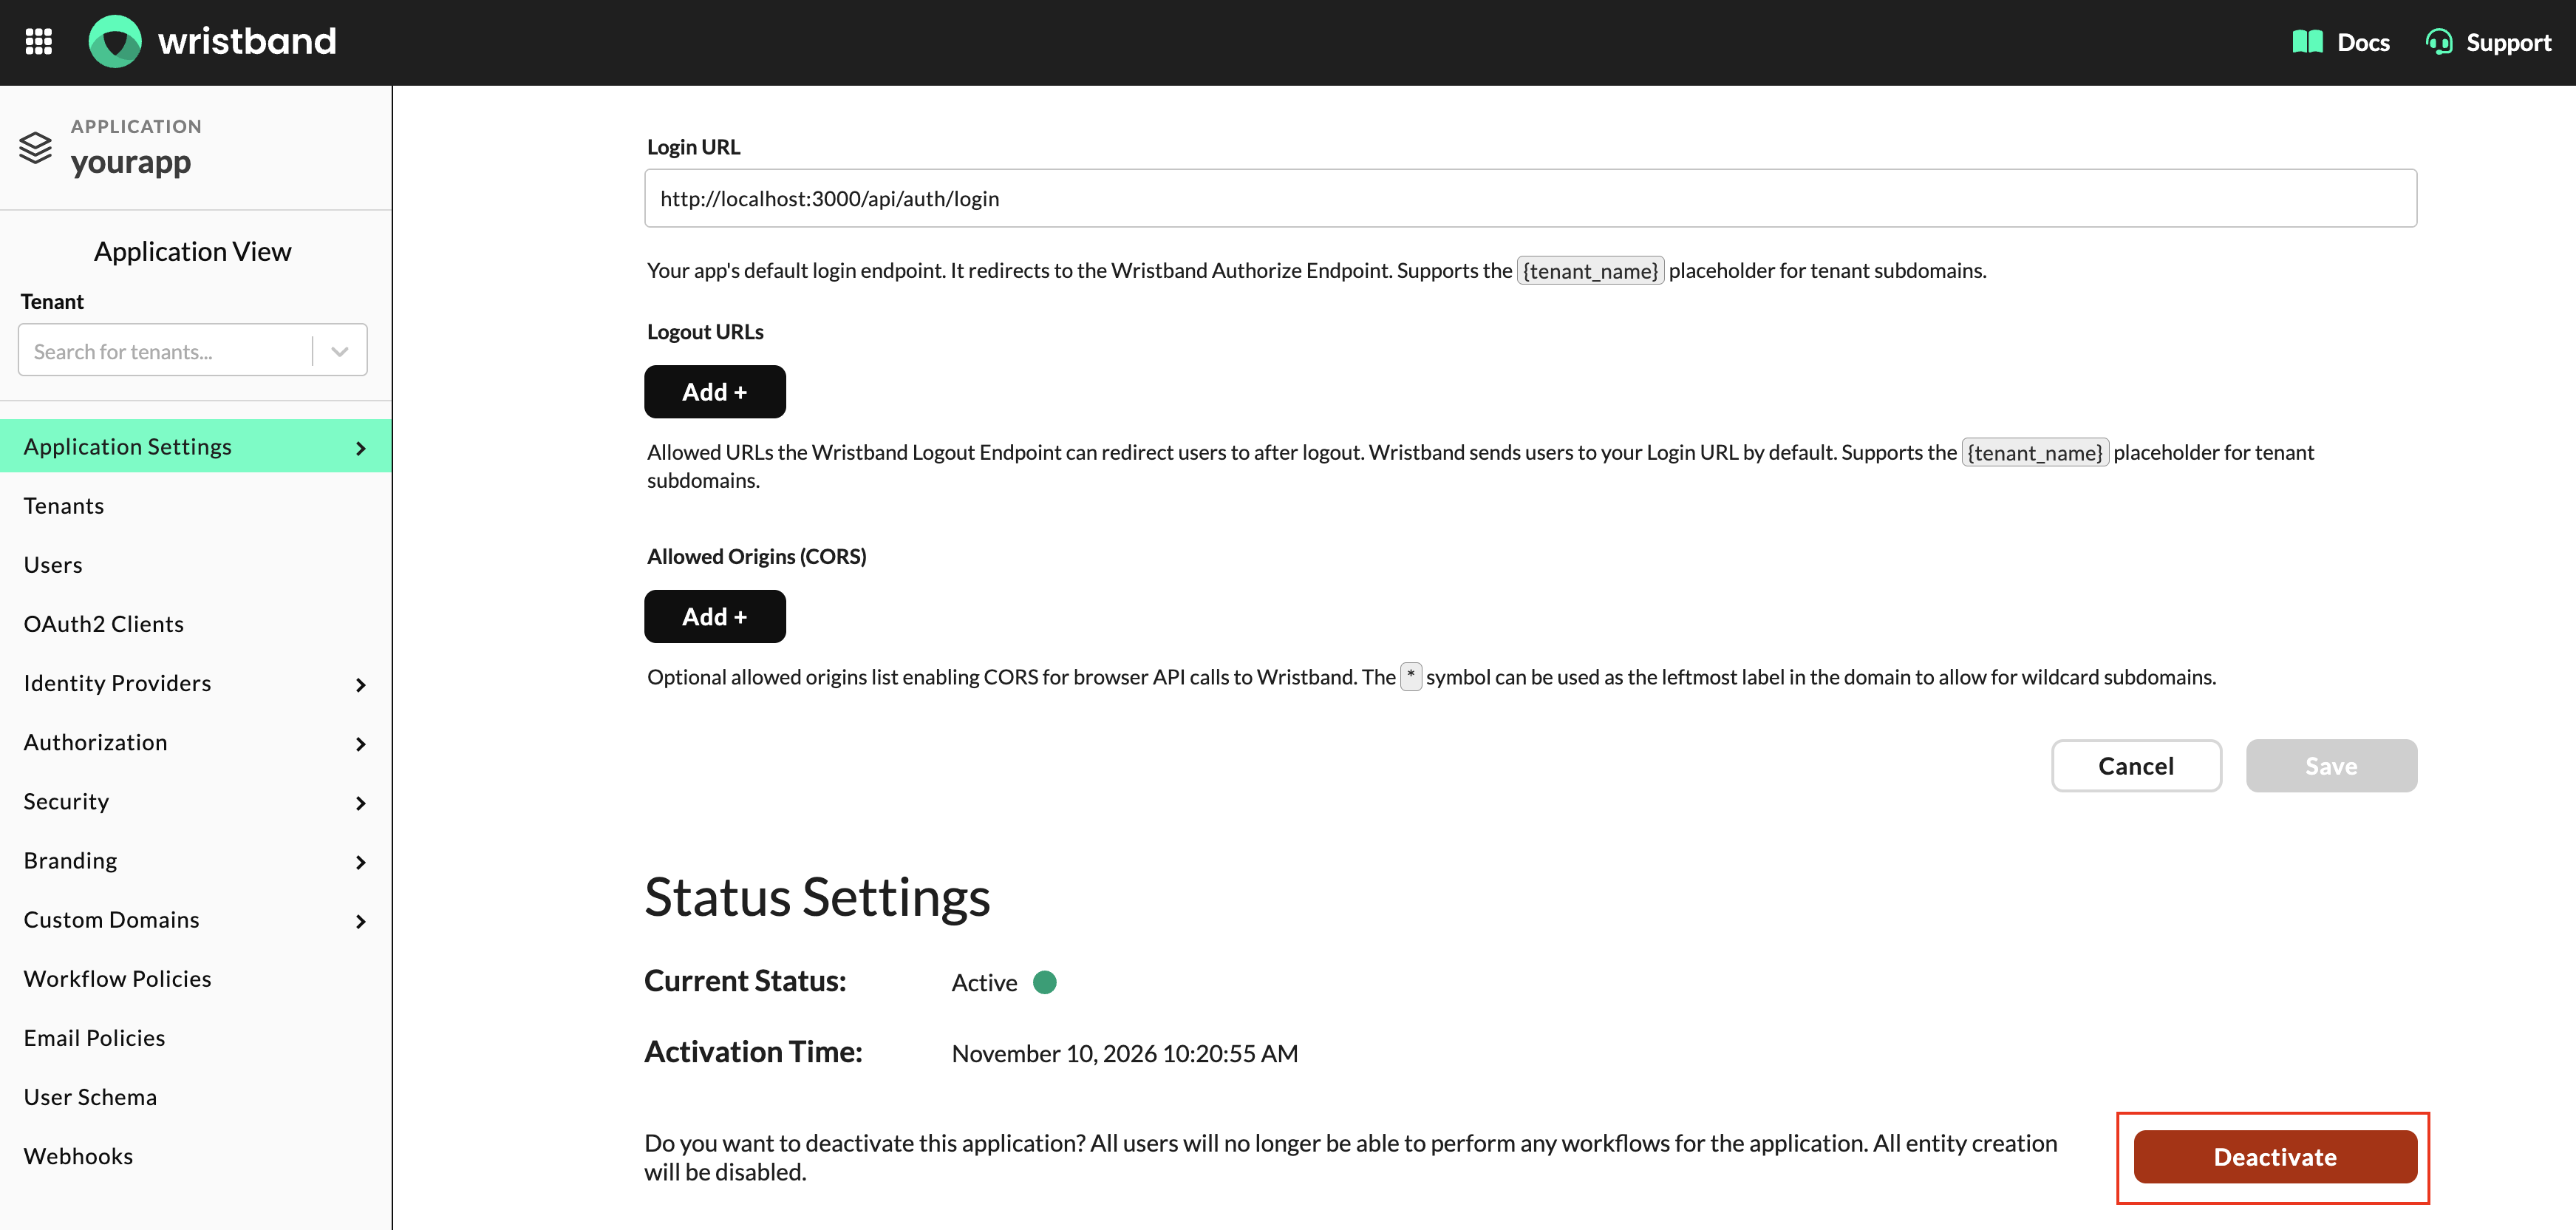
Figure 23: Deactivating an application.
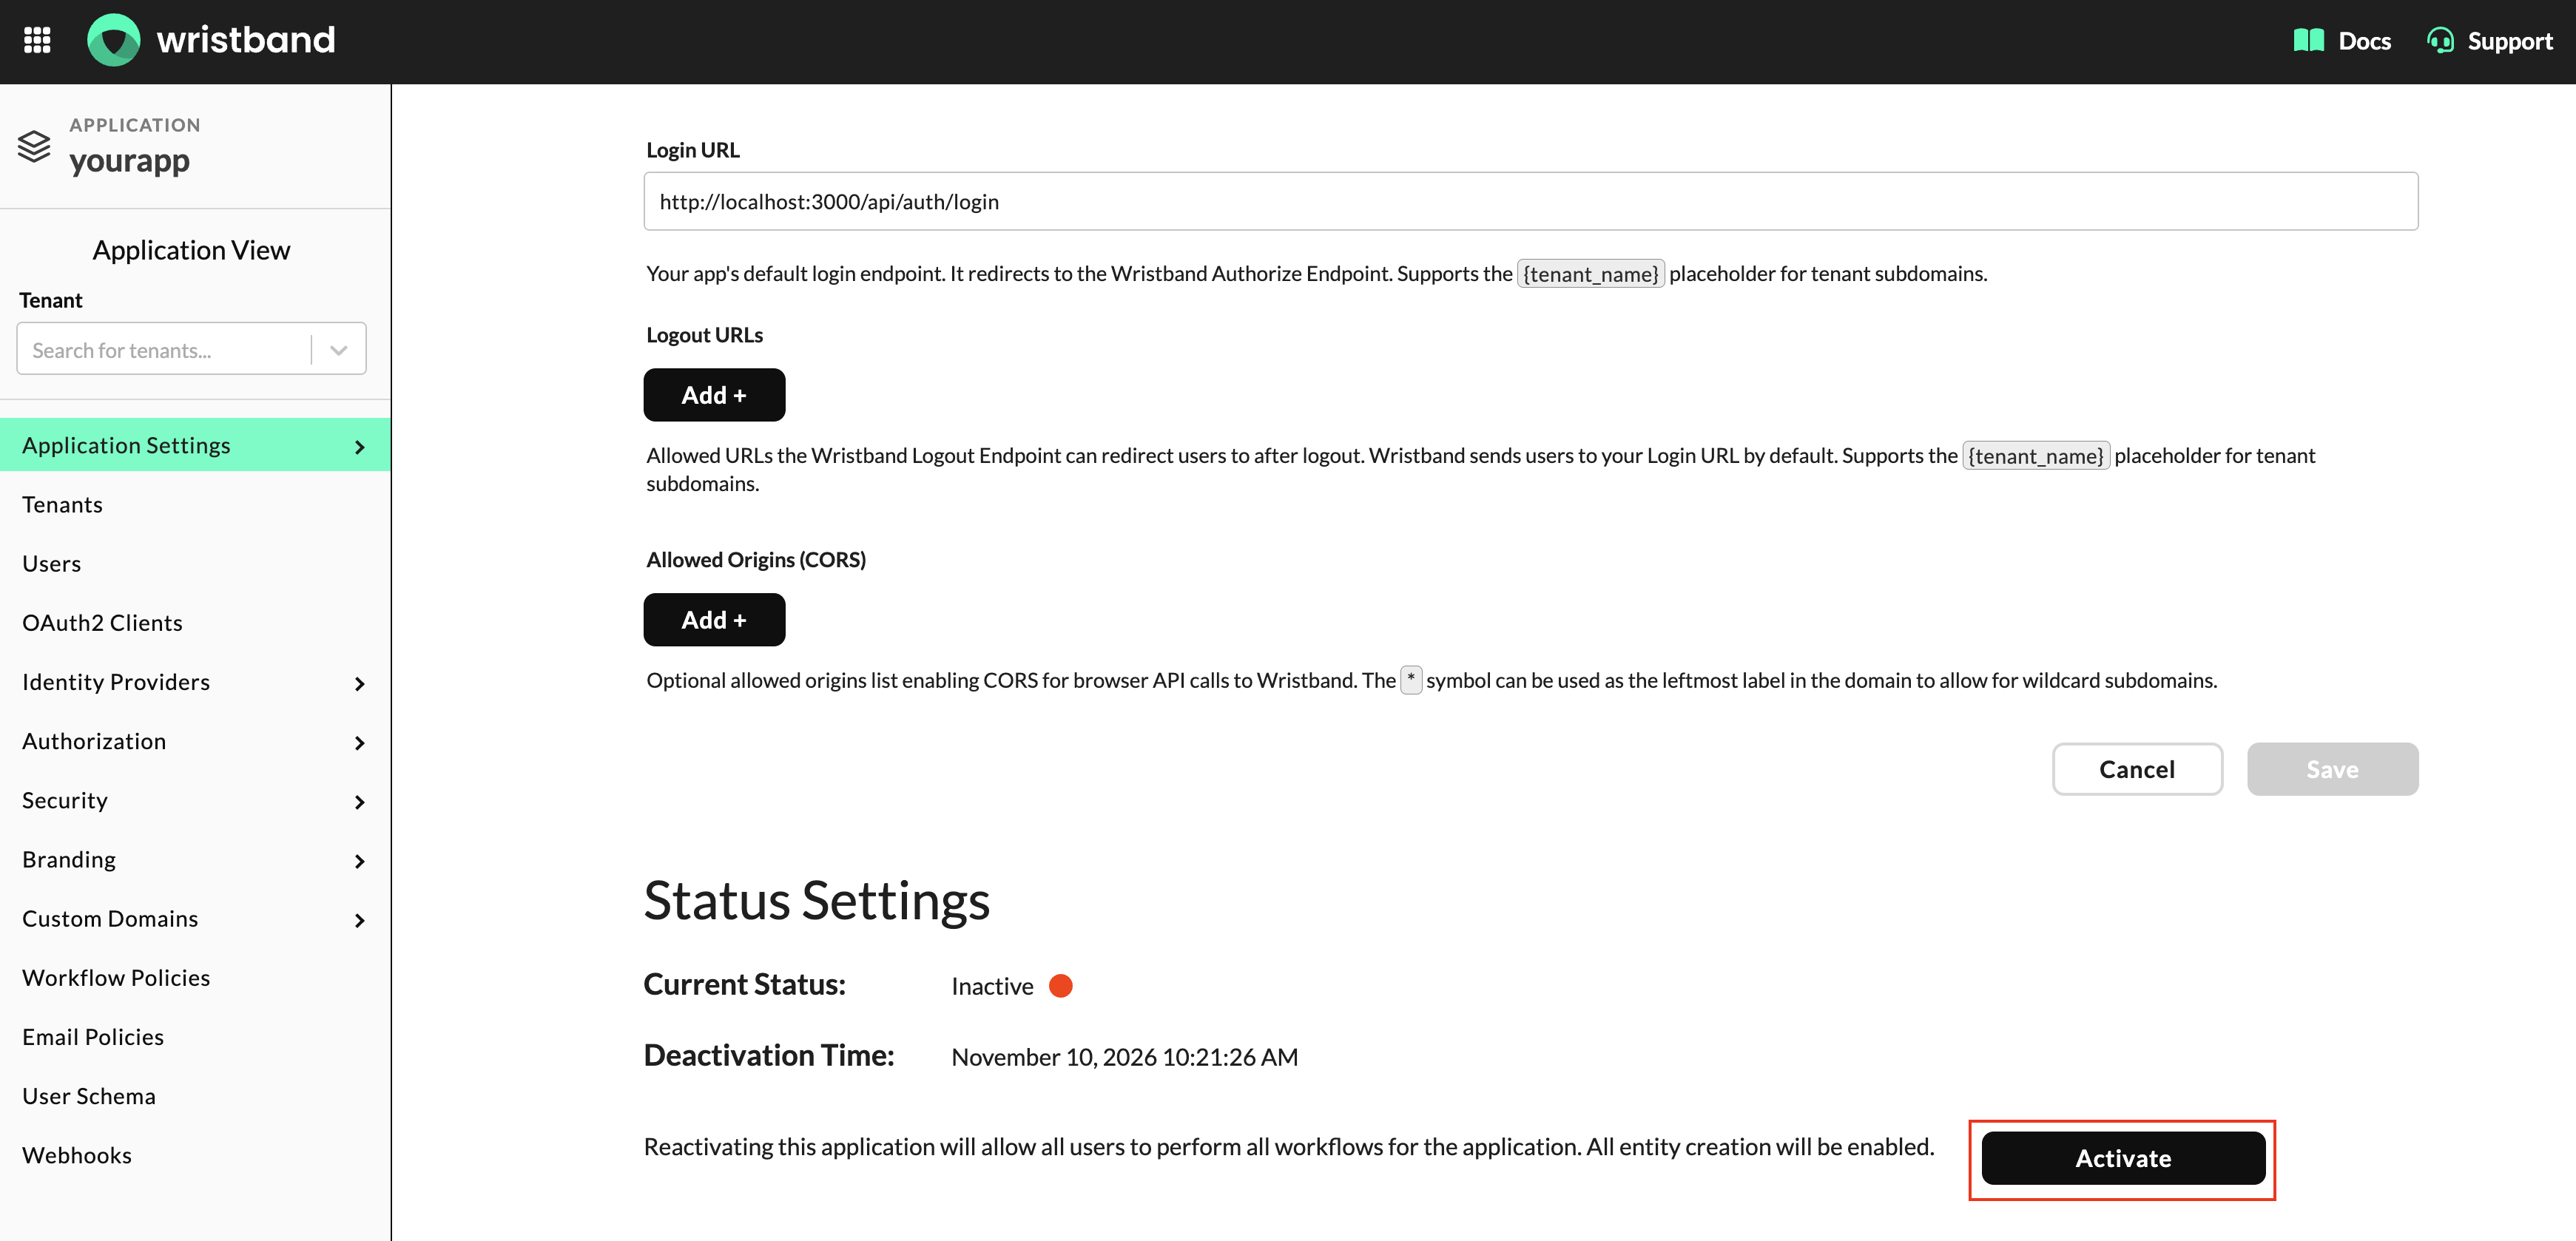
Figure 24: Activating an application.
For more information about how deactivation affects authentication and application resources, see Deactivating an Application.
Deleting an Application
You can permanently delete an application and all its associated resources through the Wristband Dashboard.
To delete an application:
- On the Application Settings page, locate the Delete Application button.
- Click Delete Application.
- Follow the confirmation prompt to permanently delete the application.
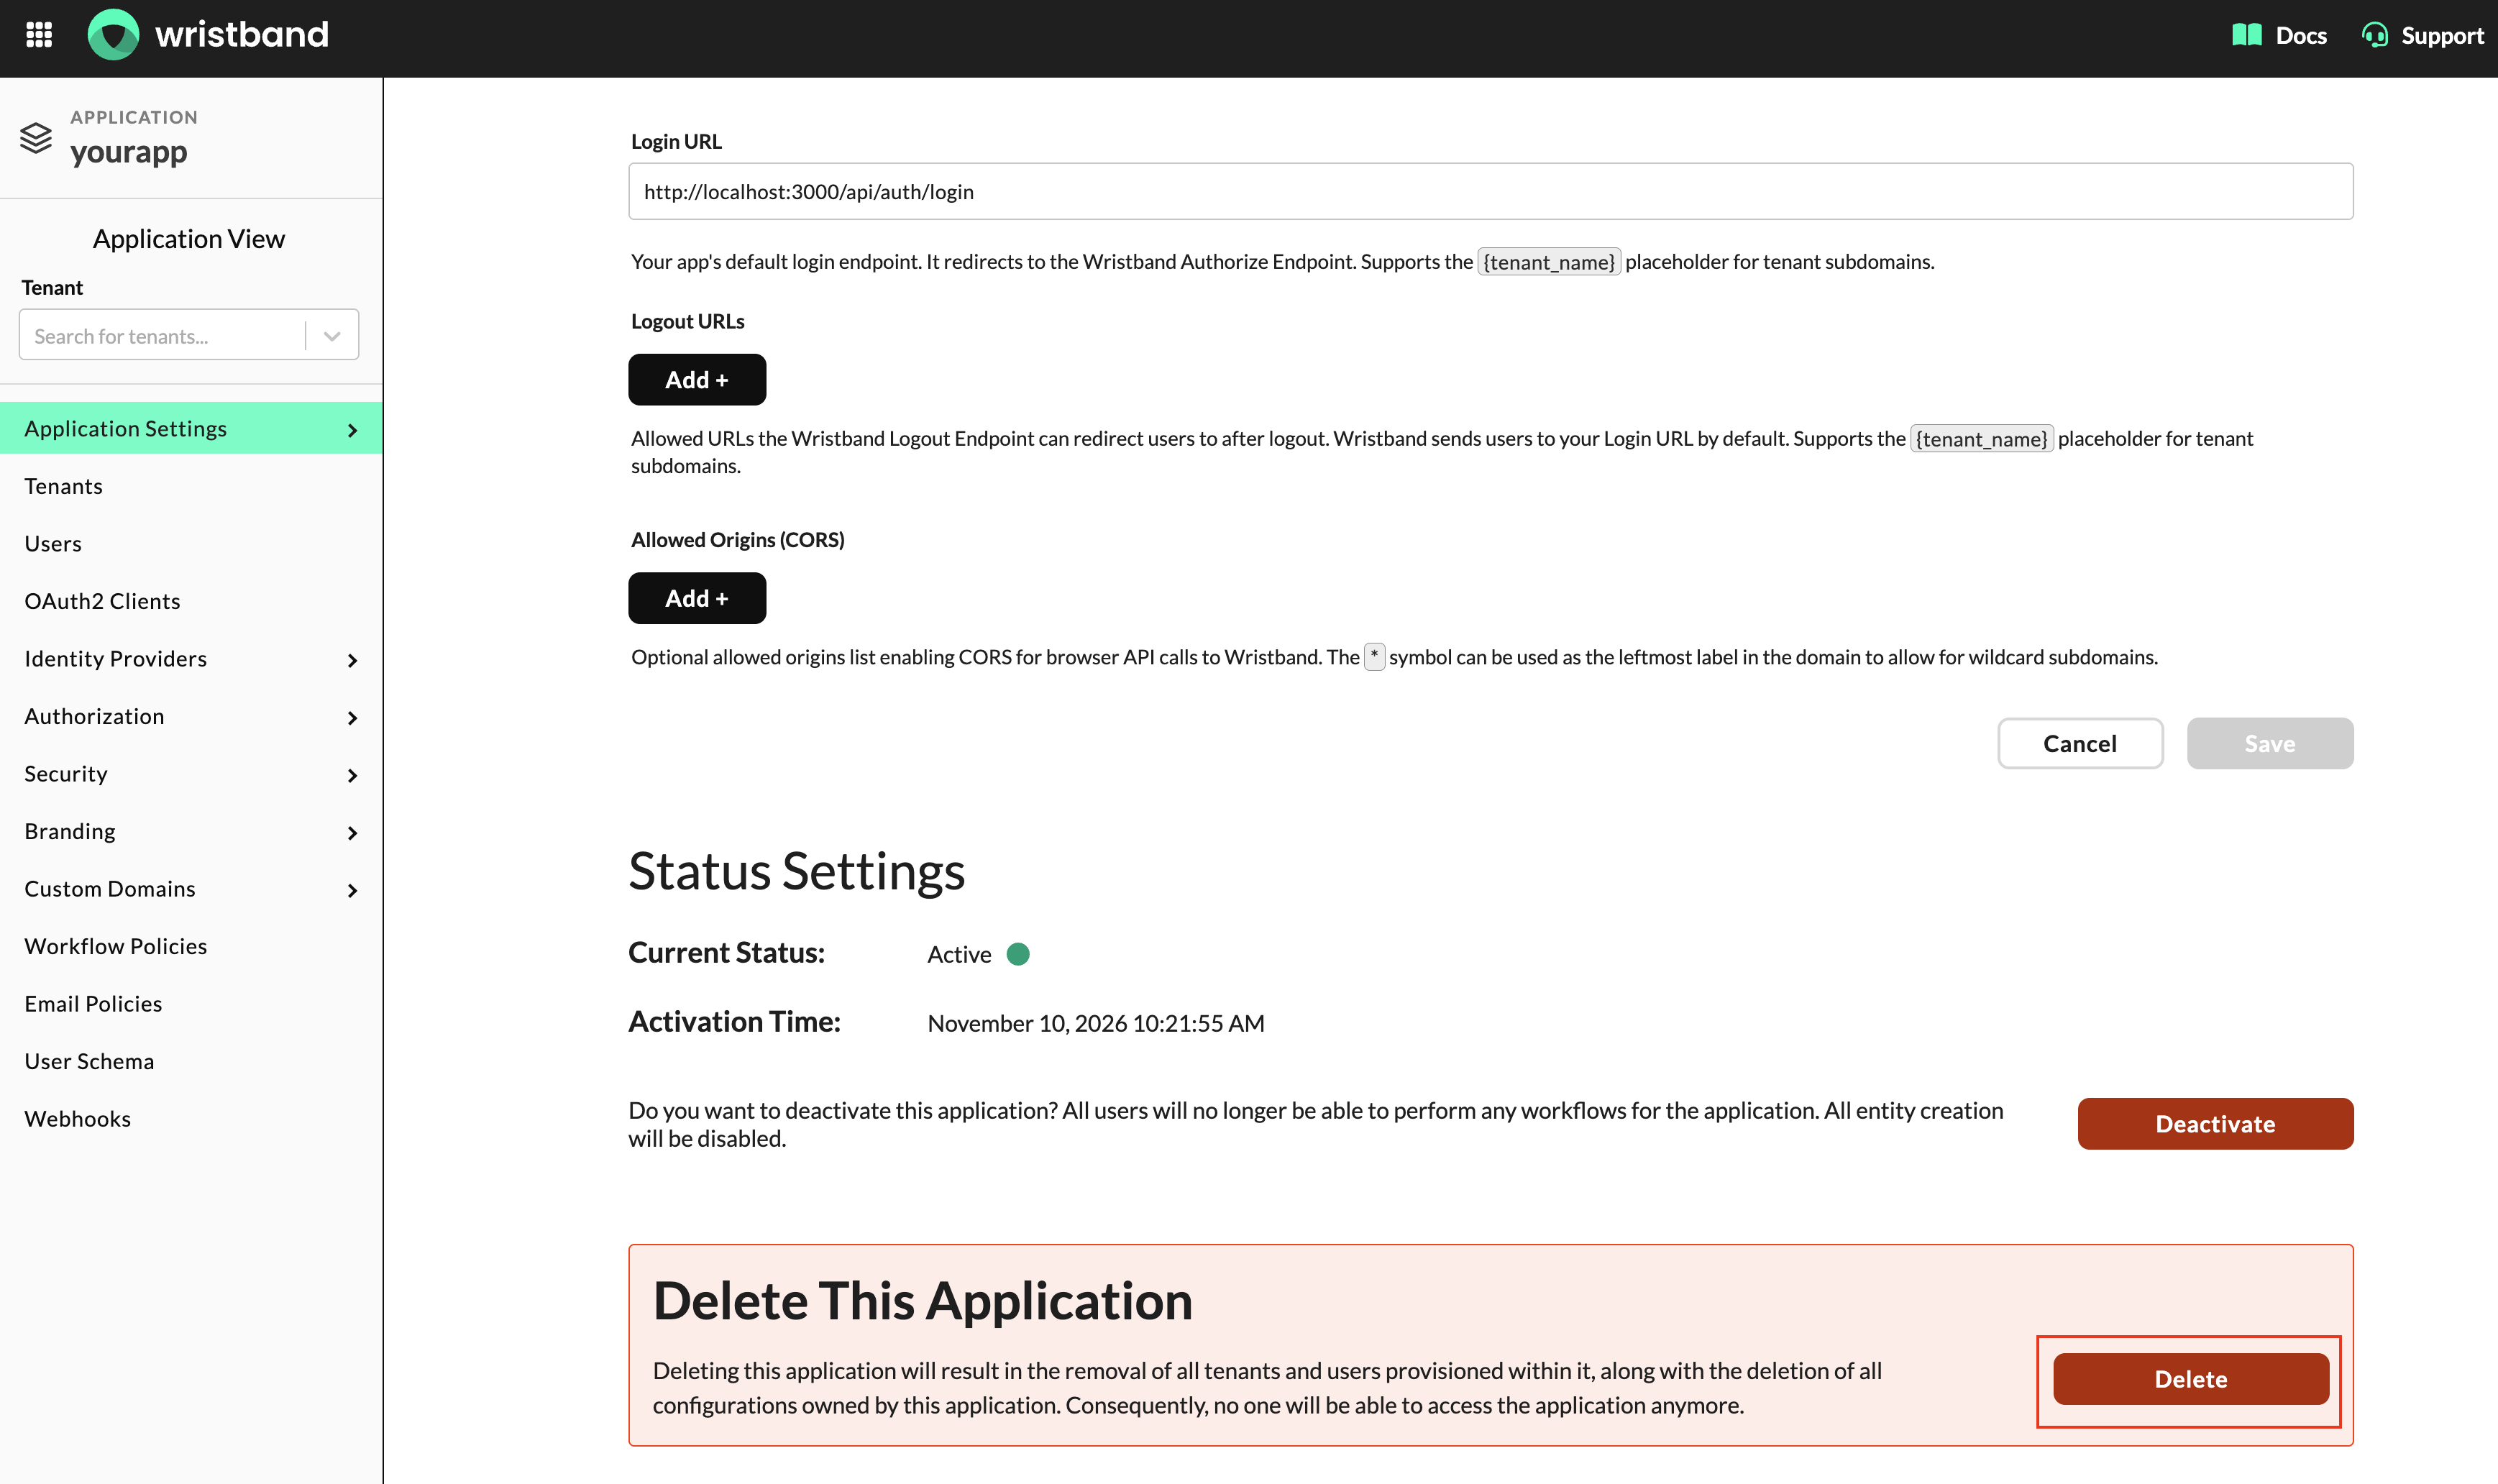
Figure 25: Deleting an application.
Deleting an Application Cannot Be UndoneDeleting an application permanently removes all associated data and resources, including tenants, users, and OAuth2 clients. This action cannot be undone.
Updated 5 days ago