Add Auth Endpoints
Learn how to create the necessary auth endpoints needed to integrate your application with Wristband.
To implement login and logout flows with Wristband, you'll need to use the Wristband SDK to create the following four endpoints in your Next.js application:
- Login Endpoint
- Callback Endpoint
- Logout Endpoint
- Session Endpoint
Login Endpoint
The Login Endpoint initiates login requests to Wristband. It constructs the authorization request and redirects the user to Wristband's Authorize Endpoint. From there, the user is directed to Wristband's hosted login page to complete the login process.
Below is a code snippet showing how to use Wristband's SDK to implement the Login Endpoint.
// src/pages/api/auth/login.ts

import type { NextApiRequest, NextApiResponse } from 'next';
import { wristbandAuth } from 'src/wristband';

// Login Endpoint
export default async function loginEndpoint(req: NextApiRequest, res: NextApiResponse) {
  if (req.method !== 'GET') {
    res.status(405).end();
    return;
  }

  // Call the Wristband login() method which will return a URL that should
  // be used to redirect to Wristband's hosted login page.
  const authorizeUrl = await wristbandAuth.pagesRouter.login(req, res);
  res.redirect(authorizeUrl);
}
Callback Endpoint
After the user successfully authenticates, Wristband redirects to your application's Callback Endpoint. Calling wristbandAuth.pagesRouter.callback() returns a CallbackResult object containing the user's tokens and claims.
To initialize the user's session, invoke thesession.fromCallback() function passing in the callback data as a parameter. This will hydrate the session with the user's claims and tokens. Finally, save the session by calling session.save().
Below is a code snippet showing how to use Wristband's SDK to implement the Callback Endpoint.
// src/pages/api/auth/callback.ts

import type { NextApiRequest, NextApiResponse } from 'next';
import { getSession, wristbandAuth } from 'src/wristband';

// Callback Endpoint
export default async function callbackEndpoint(req: NextApiRequest, res: NextApiResponse) {
  if (req.method !== 'GET') {
    res.status(405).end();
    return;
  }

  // Call the Wristband callback() method to check if the user
  // successfully authenticated.  If the user did authenticate successfully,
  // the user's tokens and claims can be retrieved from the CallbackResult.
  const callbackResult = await wristbandAuth.pagesRouter.callback(req, res);
  const { callbackData, redirectUrl, type } = callbackResult;

  if (type === 'redirect_required') {
    res.redirect(redirectUrl);
    return;
  }

  // Create a session for the authenticated user. If needed, custom fields can
  // be stored in the session using the customFields parameter of the
  // fromCallback() method.
  const session = await getSession(req, res);
  session.fromCallback(callbackData);
  await session.save();

  // Once the Callback Endpoint has completed,  we redirect to your app's
  // default return URL (typically your app's home page) or to an explicit
  // return URL, if one was specified in the original login request.
  res.redirect(callbackData.returnUrl || '<replace_with_a_default_return_url>');
}
Logout Endpoint
When a user logs out of your application, you must ensure that all authenticated state associated with the user is cleared. The Logout Endpoint needs to perform three tasks to accomplish this:
- Clear the application's local session state.
- Revoke any refresh tokens associated with the user.
- Redirect to Wristband's Logout Endpoint to terminate the user's Wristband auth session.
Below is a code snippet showing how to use Wristband's SDK to implement the Logout Endpoint.
// src/pages/api/auth/logout.ts

import type { NextApiRequest, NextApiResponse } from 'next';
import { getSession, wristbandAuth } from 'src/wristband';

// Logout Endpoint
export default async function logoutEndpoint(req: NextApiRequest, res: NextApiResponse) {
  if (req.method !== 'GET') {
    res.status(405).end();
    return;
  }

  // Get all the necessary session data needed to perform the logout operation.
  const session = await getSession(req, res);
  const logoutConfig = {
    refreshToken: session.refreshToken,
    tenantName: session.tenantName,
  };

  // Clear your application's local session.
  session.destroy();

  // Call the Wristband logout() function and use the returned URL to redirect
  // to Wristband's Logout Endpoint.  This will delete Wristband's session
  // that is associated to the authenticated user.  When Wristband is done
  // logging out the user it will redirect back to your application's login
  // URL or to the explicitly provided redirect URL.
  const wristbandLogoutUrl = await wristbandAuth.pagesRouter.logout(req, res, logoutConfig);
  res.redirect(wristbandLogoutUrl);
}
Session Endpoint
The Session Endpoint verifies that an incoming request contains a valid session and, if so, returns a response that includes the user's session data. This endpoint is used primarily by the frontend for the following two purposes:
- To allow the frontend to determine whether the user has a valid session.
- To provide the frontend with the user's session data for use within the browser.
Below is a code snippet showing how to use Wristband's SDK to implement the Session Endpoint.
// src/pages/api/auth/session.ts

import type { NextApiRequest, NextApiResponse } from 'next';
import { getSession } from 'src/wristband';

// Session Endpoint
export default async function sessionEndpoint(req: NextApiRequest, res: NextApiResponse) {
  if (req.method !== 'GET') {
    res.status(405).end();
    return;
  }

  // Call the getSessionResponse() method to extract the user's
  // session data and populate a SessionResponse. If needed, you can add
  // additional data to the SessionResponse by using the metadata parameter
  // of the getSessionResponse() method.
  const session = await getSession(req, res);
  const sessionResponse = session.getSessionResponse({ email: session.email });

  // The session response should never be cached by the browser.
  res.setHeader('Cache-Control', 'no-store');
  res.setHeader('Pragma', 'no-cache');
  res.status(200).json(sessionResponse);
}
Register Your Login Endpoint and Callback Endpoint With Wristband
For several authentication flows, Wristband will need to redirect to your application's Login Endpoint and Callback Endpoint. Therefore, we need to inform Wristband of the URLs for these two endpoints. To do that, we'll need to update the following two fields within the Wristband dashboard:
- Application Login URL
- Client Redirect URIs
In the sections below, we'll go over how to update these two fields.
Updating the Application Login URL
To update the Application Login URL, follow these steps.
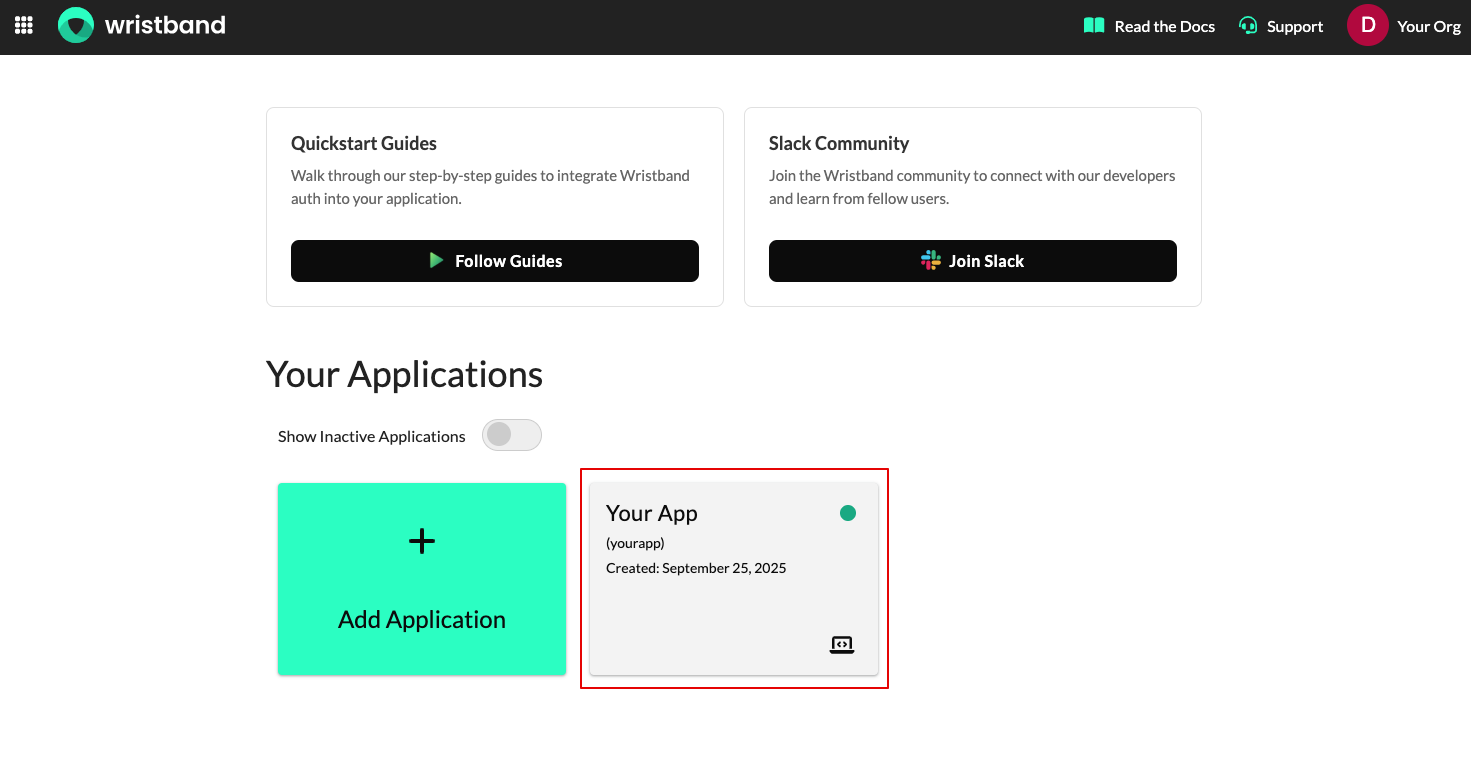
- From the Dashboard Home Page, select the appropriate application.
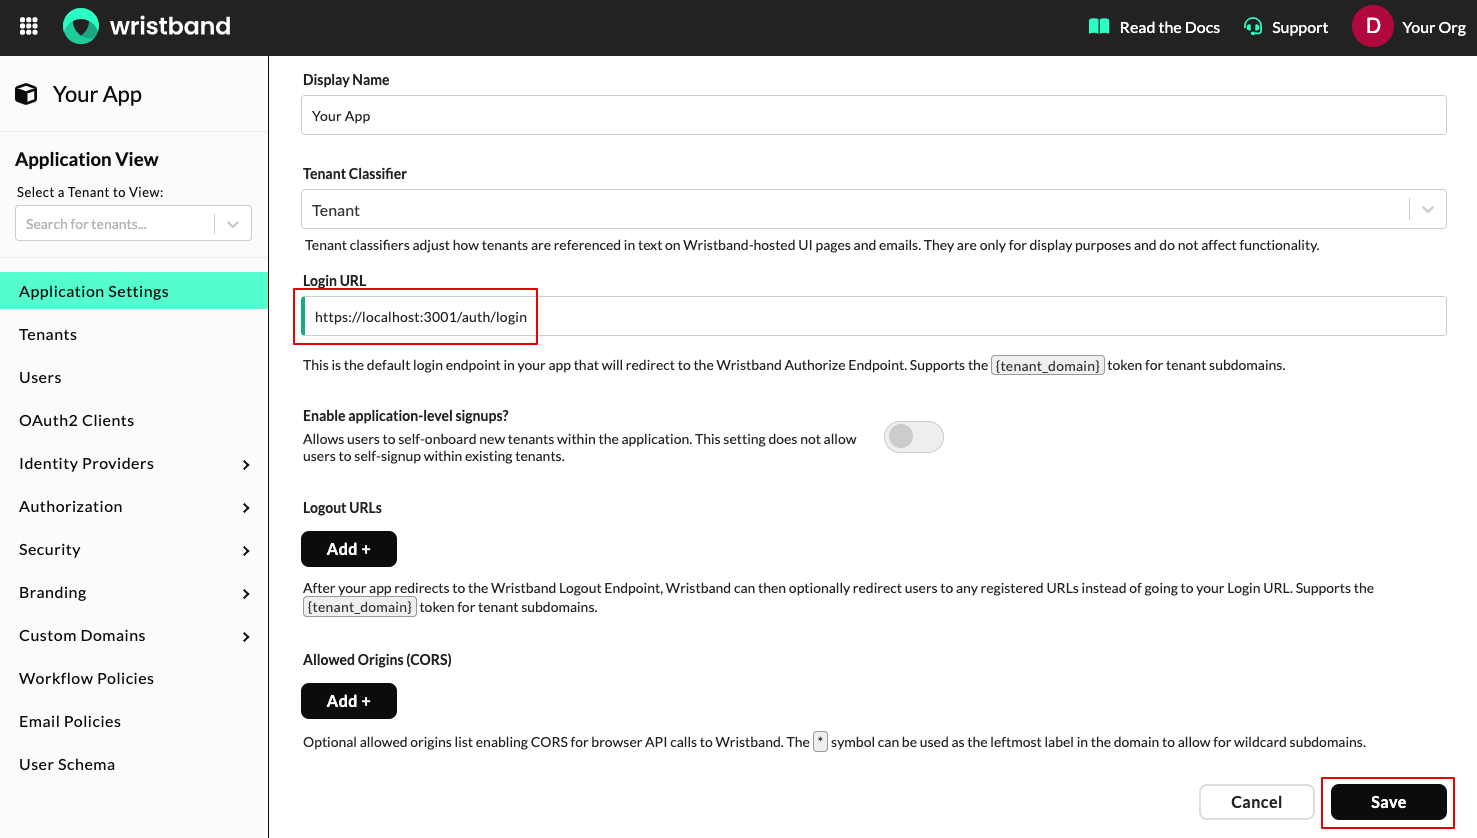
- Next, on the Application Settings page, locate the Login URL field and set its value to the URL of your application's Login Endpoint. When you are finished, click the "Save" button.
Updating the Client Redirect URIs
To update the Client Redirect URIs, follow these steps.
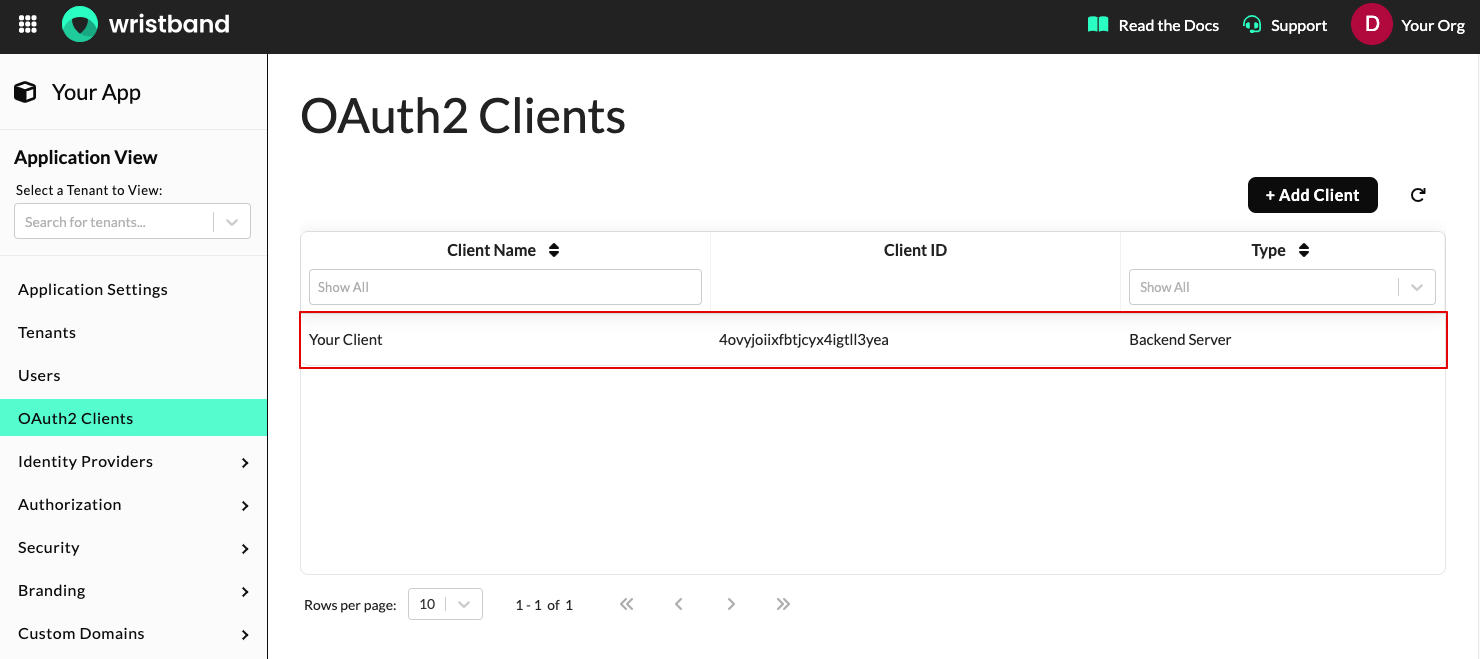
- Select "OAuth2 Clients" from the left navigation bar, then select the client whose ID matches the client ID that was registered with the SDK.
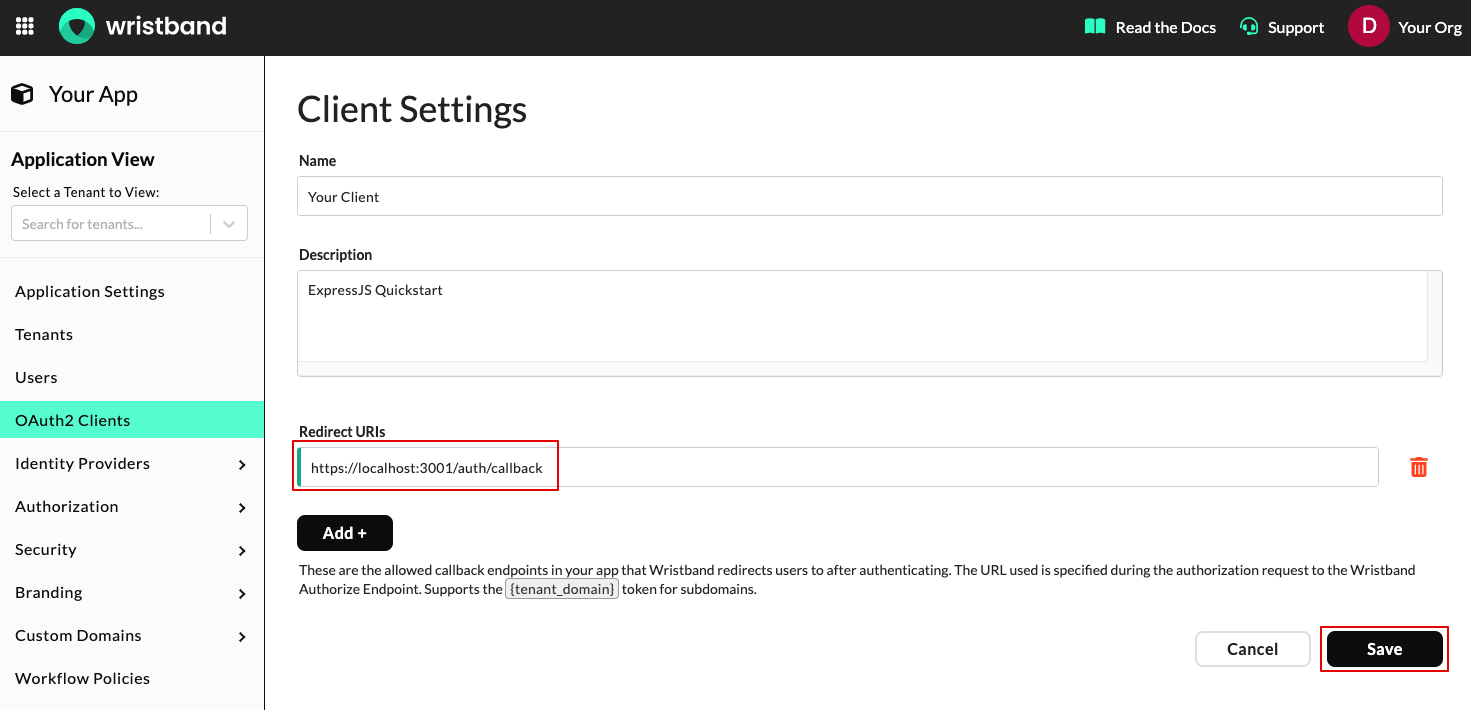
- On the Edit Client page, navigate to the Redirect URIs section and click the "Add+" button. Then enter the URL of your application's Callback Endpoint. When you are finished, click the "Save" button.
Updated about 2 months ago
What’s Next
Before testing these authentication endpoints, you'll need to set up auth middleware to secure your Session Endpoint.