
SSO-Only User Deprovisioning
Give customers the power to instantly revoke application access while keeping Wristband entirely data-free.
SSO-Only Integrations OnlyThis guide covers user deprovisioning for SSO-only integrations (where your application manages and stores its own users).
In an SSO-only integration, Wristband solely brokers the login handshake, leaving your application to own the resulting session and access tokens. Consequently, revoking access in an organization's IdP blocks future logins but does not terminate active sessions. Affected users retain access until their session expires or you explicitly deprovision them
Similar to our core User Deprovisioning workflow, you can build a custom API layer—referred to in this guide as a wrapper API—that allows customers to trigger deprovisioning directly without your manual intervention.
The sections below detail how to design and implement this wrapper API.
Confirm Requirements Before BuildingOnly consider building a wrapper API if your customer requires automated, self-service deprovisioning and that requirement isn't negotiable.
How the Wrapper API Works
When your customer calls your exposed deprovision endpoint, their system won't have a Wristband userId since it never interacts with Wristband directly. Instead, the request will use whatever identifier exists on their side, such as an externalId or email.
Your endpoint should:
- Authenticate the incoming customer request.
- Validate the target user's
externalIdoremailfrom the request. - Deactivate or delete that user directly in your own system.
Wristband manages this first step: authenticating the customer.
Already Have Your Own API Keys?If your application already has an API key system, you can reuse it instead, and skip 1) Create a Tenant-Level M2M Client for Your Customer and 2) Create a Token Endpoint Wrapper API entirely. Be aware that Wristband would not be involved, and authenticating incoming requests would be entirely your responsibility.
The rest of this page assumes you're using a Wristband tenant-level M2M client to authenticate your customer instead.
Here's how that looks end to end:
%%{init: {'themeVariables': {'fontSize': '16px'}}}%%
sequenceDiagram
    participant Customer as Customer's backend
    participant Wrapper as Your wrapper API
    participant Token as Wristband Token Endpoint

    Customer->>Wrapper: Token request (client creds)
    Wrapper->>Token: Proxy request
    Token-->>Wrapper: Access token
    Wrapper-->>Customer: Access token

    Customer->>Wrapper: Deprovision request (Bearer token)
    Wrapper->>Wrapper: Validate token
    Wrapper->>Wrapper: Deactivate or delete user
    Wrapper-->>Customer: 200 or 204
1) Create a Tenant-Level M2M Client for Your Customer
To authenticate customer requests to your wrapper API, provision a Wristband tenant-level M2M client for them. Your customer will use this clientId and clientSecret to fetch access tokens from Wristband and include them in each request header. Your wrapper API must validate these tokens before processing the payload.
Follow the instructions in Tenant-Level Clients to create one. Because this client only verifies the customer's identity to your wrapper API, it does not require any Wristband resource permissions.
Once generated, share the following credentials with your customer through a secure channel:
| Field | Description |
|---|---|
| Client ID | The clientId of the tenant-level M2M client you created for this customer. |
| Client Secret | The clientSecret of the tenant-level M2M client you created for this customer. |
2) Create a Token Endpoint Wrapper API
Since your customer's system cannot call Wristband directly, your wrapper API must act as a bridge for token generation.
- Expose a custom token exchange endpoint for your customer.
- Accept their tenant-level M2M credentials.
- Proxy the request directly to Wristband's Token Endpoint.
- Return the generated access token back to your customer.
Suggested Spec
The following specification is a suggested implementation. The exact design is completely up to you.
Request
POST /api/v1/auth/token HTTP/1.1
Host: yourapp.com
Content-Type: application/json

{
  "clientId": "abc123",
  "clientSecret": "def456"
}
Headers
| Name | Required | Description |
|---|---|---|
Content-Type | Yes | Must be application/json. |
Body
| Field | Type | Required | Description |
|---|---|---|---|
clientId | string | Yes | The clientId of the tenant-level M2M client you issued to this customer. |
clientSecret | string | Yes | The clientSecret of the tenant-level M2M client you issued to this customer. |
Response
HTTP/1.1 200 OK
Content-Type: application/json

{
  "accessToken": "eyJhbGciOiJSUzI1NiIsInR5cCI6IkpXVCJ9...",
  "expiresIn": 1800
}
HTTP Response Codes
| Status | Description |
|---|---|
200 OK | The credentials were valid, and an access token is included in the response body. |
400 Bad Request | The request body was missing clientId or clientSecret. |
401 Unauthorized | The clientId and clientSecret combination was invalid. |
Code Example
For example, a TypeScript function that proxies the request to Wristband's Token Endpoint:
async function handleTokenRequest(clientId: string, clientSecret: string) {
  const credentials = Buffer.from(`${clientId}:${clientSecret}`).toString('base64');

  const response = await fetch(`https://${process.env.APPLICATION_VANITY_DOMAIN}/api/v1/oauth2/token`, {
    method: 'POST',
    headers: {
      Authorization: `Basic ${credentials}`,
      'Content-Type': 'application/x-www-form-urlencoded',
    },
    body: 'grant_type=client_credentials',
  });

  if (!response.ok) {
    throw new Error(`Failed to get token: ${response.status}`);
  }

  const { access_token, expires_in } = await response.json();
  return { accessToken: access_token, expiresIn: expires_in };
}
3) Create a Deprovision Endpoint Wrapper API
Because your users live entirely in your own system, this endpoint doesn't need to resolve a Wristband userId. It only requires enough information to find the user in your database, such as an externalId (matching their IdP identifier) or the user's email.
Suggested Spec
The following specification is a suggested implementation. The exact design is completely up to you.
Request
POST /api/v1/users/deprovision HTTP/1.1
Host: yourapp.com
Authorization: Bearer eyJhbGciOiJSUzI1NiIsInR5cCI6IkpXVCJ9...
Content-Type: application/json

{
  "email": "[email protected]"
}
Headers
| Name | Required | Description |
|---|---|---|
Authorization | Yes | A Bearer token authenticating your customer's call. See Validate Your Customer's Requests. |
Content-Type | Yes | Must be application/json. |
Body
| Field | Type | Required | Description |
|---|---|---|---|
externalId | string | Conditionally | Whatever identifier you use to look up the user in your own system. Required if email isn't provided. |
email | string | Conditionally | The user's email address. Required if externalId isn't provided. |
NoteThe request payload must include exactly one identifier: either
externalIdor
Response
HTTP/1.1 204 No ContentHTTP Response Codes
| Status | Description |
|---|---|
204 No Content | The user was successfully deprovisioned |
400 Bad Request | The request body was missing required fields, or included both externalId and email. |
401 Unauthorized | The Bearer token was missing, invalid, or failed tenant validation. |
404 Not Found | No user was found matching the provided identifier. |
Validate Your Customer's Requests
In your deprovision endpoint, use a Wristband JWT SDK to validate the incoming access token. Because the deprovision endpoint payload does not contain an explicit customer or tenant identifier, use the token's tnt_id (tenant ID) claim to safely identify the caller.
For reference, here is what a decoded access token looks like for a tenant-level M2M client:
{
  "sub": "sqi7mel4prbixj62rlruslyi64",
  "tnt_id": "ffioj5rc3bd6rnwr7jxhvycfoa",
  "van_dom": "invotastic-demo-wristband.us.wristband.dev",
  "iss": "https://invotastic-demo-wristband.us.wristband.dev",
  "sub_kind": "tenant_client",
  "exp": 1785197092,
  "app_id": "vl6jdobxy5gafkr3dvztbvzrue",
  "iat": 1785110692,
  "jti": "5hbgvgrlejglplvwokwttvazha",
  "client_id": "sqi7mel4prbixj62rlruslyi64"
}
After successfully verifying the token's signature, you can trust the tnt_id claim and use it to look up the corresponding customer record in your database.
Code Example
For example, you can use the TypeScript JWT SDK to validate the token and extract the tenantId:
import { createWristbandJwtValidator } from '@wristband/typescript-jwt';

// Create once and reuse across requests.
const wristbandJwtValidator = createWristbandJwtValidator({
  wristbandApplicationVanityDomain: process.env.APPLICATION_VANITY_DOMAIN!,
});

async function validateCustomerRequest(authorizationHeader: string): Promise<string> {
  // Pull the raw Bearer token out of the Authorization header.
  const token = wristbandJwtValidator.extractBearerToken(authorizationHeader);

  // Verify the token's signature, issuer, and expiration.
  const result = await wristbandJwtValidator.validate(token);

  if (!result.isValid) {
    throw new Error(`Invalid token: ${result.errorMessage}`);
  }

  // A valid signature means this tnt_id can be trusted as the calling customer's tenant.
  const tenantId = result.payload?.tnt_id;
  if (!tenantId) {
    throw new Error('Token is missing a tenant ID');
  }

  return tenantId;
}
Mapping by Tenant Name
The token's tnt_id claim identifies the customer by their Wristband tenant ID. If your system tracks customers using the Wristband tenant name instead of the ID, you must explicitly include the tenant's name in the access token.Because the tenant name is not included by default, you can add it as a custom claim:
- Navigate to Security → Token Settings in the Application View.
- Create a new custom claim using the
tenant.namepath expression. - Assign it a claim name of your choosing (such as tnt_name).
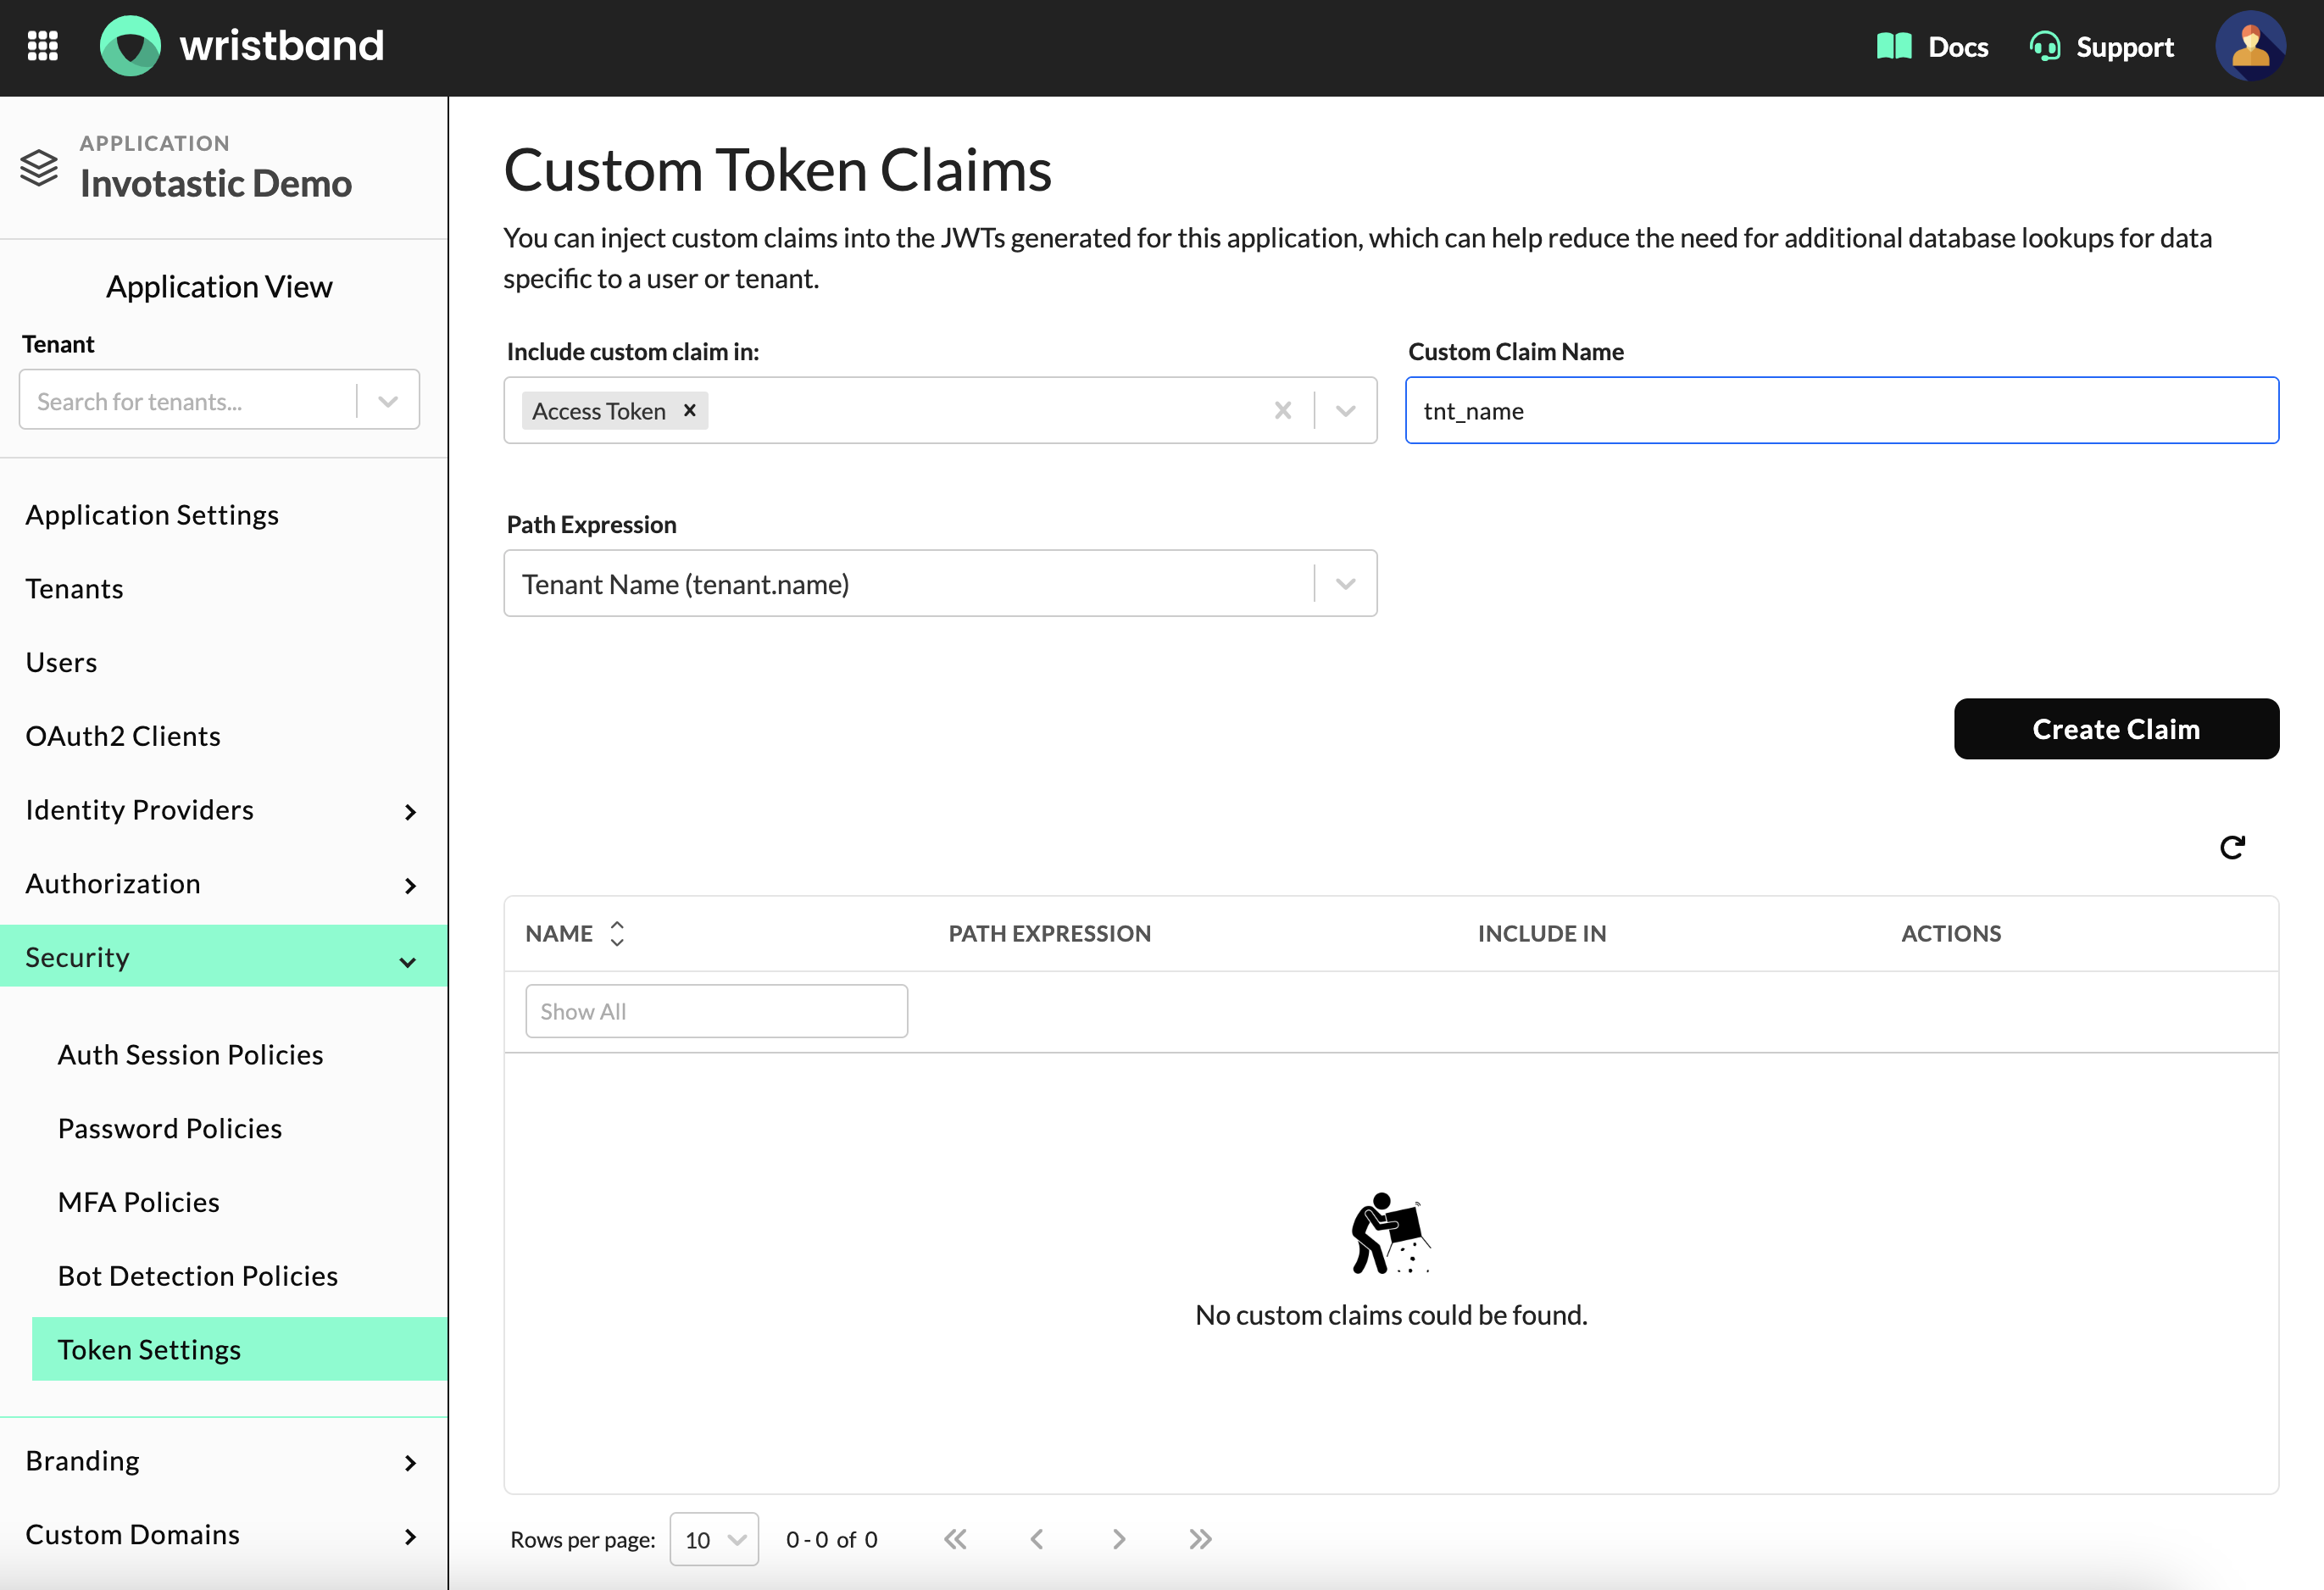
Token Settings: Add a custom claim using the tenant.name path expression.
Once configured, it appears nested under custom_claims in the token payload. For example:
{
  "sub": "sqi7mel4prbixj62rlruslyi64",
  "tnt_id": "ffioj5rc3bd6rnwr7jxhvycfoa",
  "van_dom": "invotastic-demo-wristband.us.wristband.dev",
  "iss": "https://invotastic-demo-wristband.us.wristband.dev",
  "sub_kind": "tenant_client",
  "exp": 1785197092,
  "app_id": "vl6jdobxy5gafkr3dvztbvzrue",
  "iat": 1785110692,
  "jti": "5hbgvgrlejglplvwokwttvazha",
  "client_id": "sqi7mel4prbixj62rlruslyi64",
  "custom_claims": {
    "tnt_name": "acme"
  }
}
Deprovision the User
Once the request is validated, locate the user in your database using the provided externalId or email, and either deactivate or delete their record. This step relies entirely on your application's internal business logic—Wristband is not involved in this process.
Your wrapper API does not need to support both actions. You can choose a single strategy (deactivation or deletion) and design your endpoint around it. If you want to support both, you must provide a way for the client to specify the action, such as:
- Exposing separate endpoints for each action.
- Utilizing different HTTP methods (e.g., PATCH vs. DELETE).
- Including a flag or field in the request body
Putting It All Together
Below is a complete, framework-agnostic TypeScript example combining both the token proxy and deprovision endpoints. Written as plain functions, you can easily drop this logic into Express, Next.js, Fastify, or any HTTP framework you use.
Additional LanguagesFor other languages and frameworks, refer to Authentication SDKs for the full list of available JWT validation SDKs.
import { createWristbandJwtValidator } from '@wristband/typescript-jwt';

const VANITY_DOMAIN = process.env.APPLICATION_VANITY_DOMAIN!;

// JWT validator used to validate the customer's incoming access tokens.
const wristbandJwtValidator = createWristbandJwtValidator({
  wristbandApplicationVanityDomain: VANITY_DOMAIN,
});

// Validates a customer's incoming request and returns the tenant it belongs to.
async function validateCustomerRequest(authorizationHeader: string): Promise<string> {
  const token = wristbandJwtValidator.extractBearerToken(authorizationHeader);
  const result = await wristbandJwtValidator.validate(token);

  if (!result.isValid) {
    throw new Error(`Invalid token: ${result.errorMessage}`);
  }

  const tenantId = result.payload?.tnt_id;
  if (!tenantId) {
    throw new Error('Token is missing a tenant ID');
  }

  return tenantId;
}

// Deprovisions a user identified by either externalId or email.
export async function deprovisionUser(
  authorizationHeader: string,
  externalId: string | undefined,
  email: string | undefined
) {
  if ((!externalId && !email) || (externalId && email)) {
    throw new Error('Provide exactly one of externalId or email');
  }

  const tenantId = await validateCustomerRequest(authorizationHeader);

  // NOTE: This is where you look up and deactivate or delete the user in
  // your own system. Scope the lookup to `tenantId` if your data model
  // supports it.
  await yourOwnUserStore.deactivateOrDelete({ tenantId, externalId, email });
}
(Optional) Client Secret Rotation
Because your customer holds a long-lived client secret for their tenant-level M2M client, you can allow them to rotate it on their own schedule without manual intervention.
The secret rotation workflow functions exactly the same way as it does for Wristband-stored users. Please refer to Client Secret Rotation in our primary User Deprovisioning guide for the complete specification and code example. While the underlying user deprovisioning methods differ, the rotation mechanics are identical.
Updated 6 days ago