Custom SAML SSO
This guide details how to set up a custom SAML 2.0 SSO integration in Wristband.
Wristband's Custom SAML IdP integration allows you to connect any SAML 2.0-compliant identity provider to a tenant, enabling SSO for your customer. Use this when the identity provider you need isn't covered by one of Wristband's named enterprise integrations (e.g., Google Workspace, Microsoft Entra ID, Okta Workforce), or when you need direct control over the SAML configuration for a provider.
👤 This guide involves two personas:
- Wristband Admin: The developer/operator who has access to the Wristband dashboard and is setting up the integration for your customer's tenant
- Customer IdP Admin: The IT or identity admin on your customer's side who has access to their organization's identity provider (e.g., Okta, Ping Identity, etc.)
Each step below will call out which persona should be completing the corresponding step.
Step 1: Create the Custom IdP in Wristband
Persona to Perform This Step → Wristband Admin
In this step, you will create the Custom SAML IdP record in Wristband for the tenant.
At the end of this step, the Customer IdP Admin will need the following from the Wristband Admin in order to complete step 2:
- SP Entity ID
- ACS URL
1.1: Enable the Tenant Override for Identity Providers
- In the Wristband dashboard, enter Tenant View for the tenant.
- Navigate to
Identity Providers > Enterprise. - If not already enabled, turn on the "Enable this tenant override?" toggle at the top of the page.
Important: Enabling this override affects all identity provider types for this tenant, not just your custom SAML IdP.
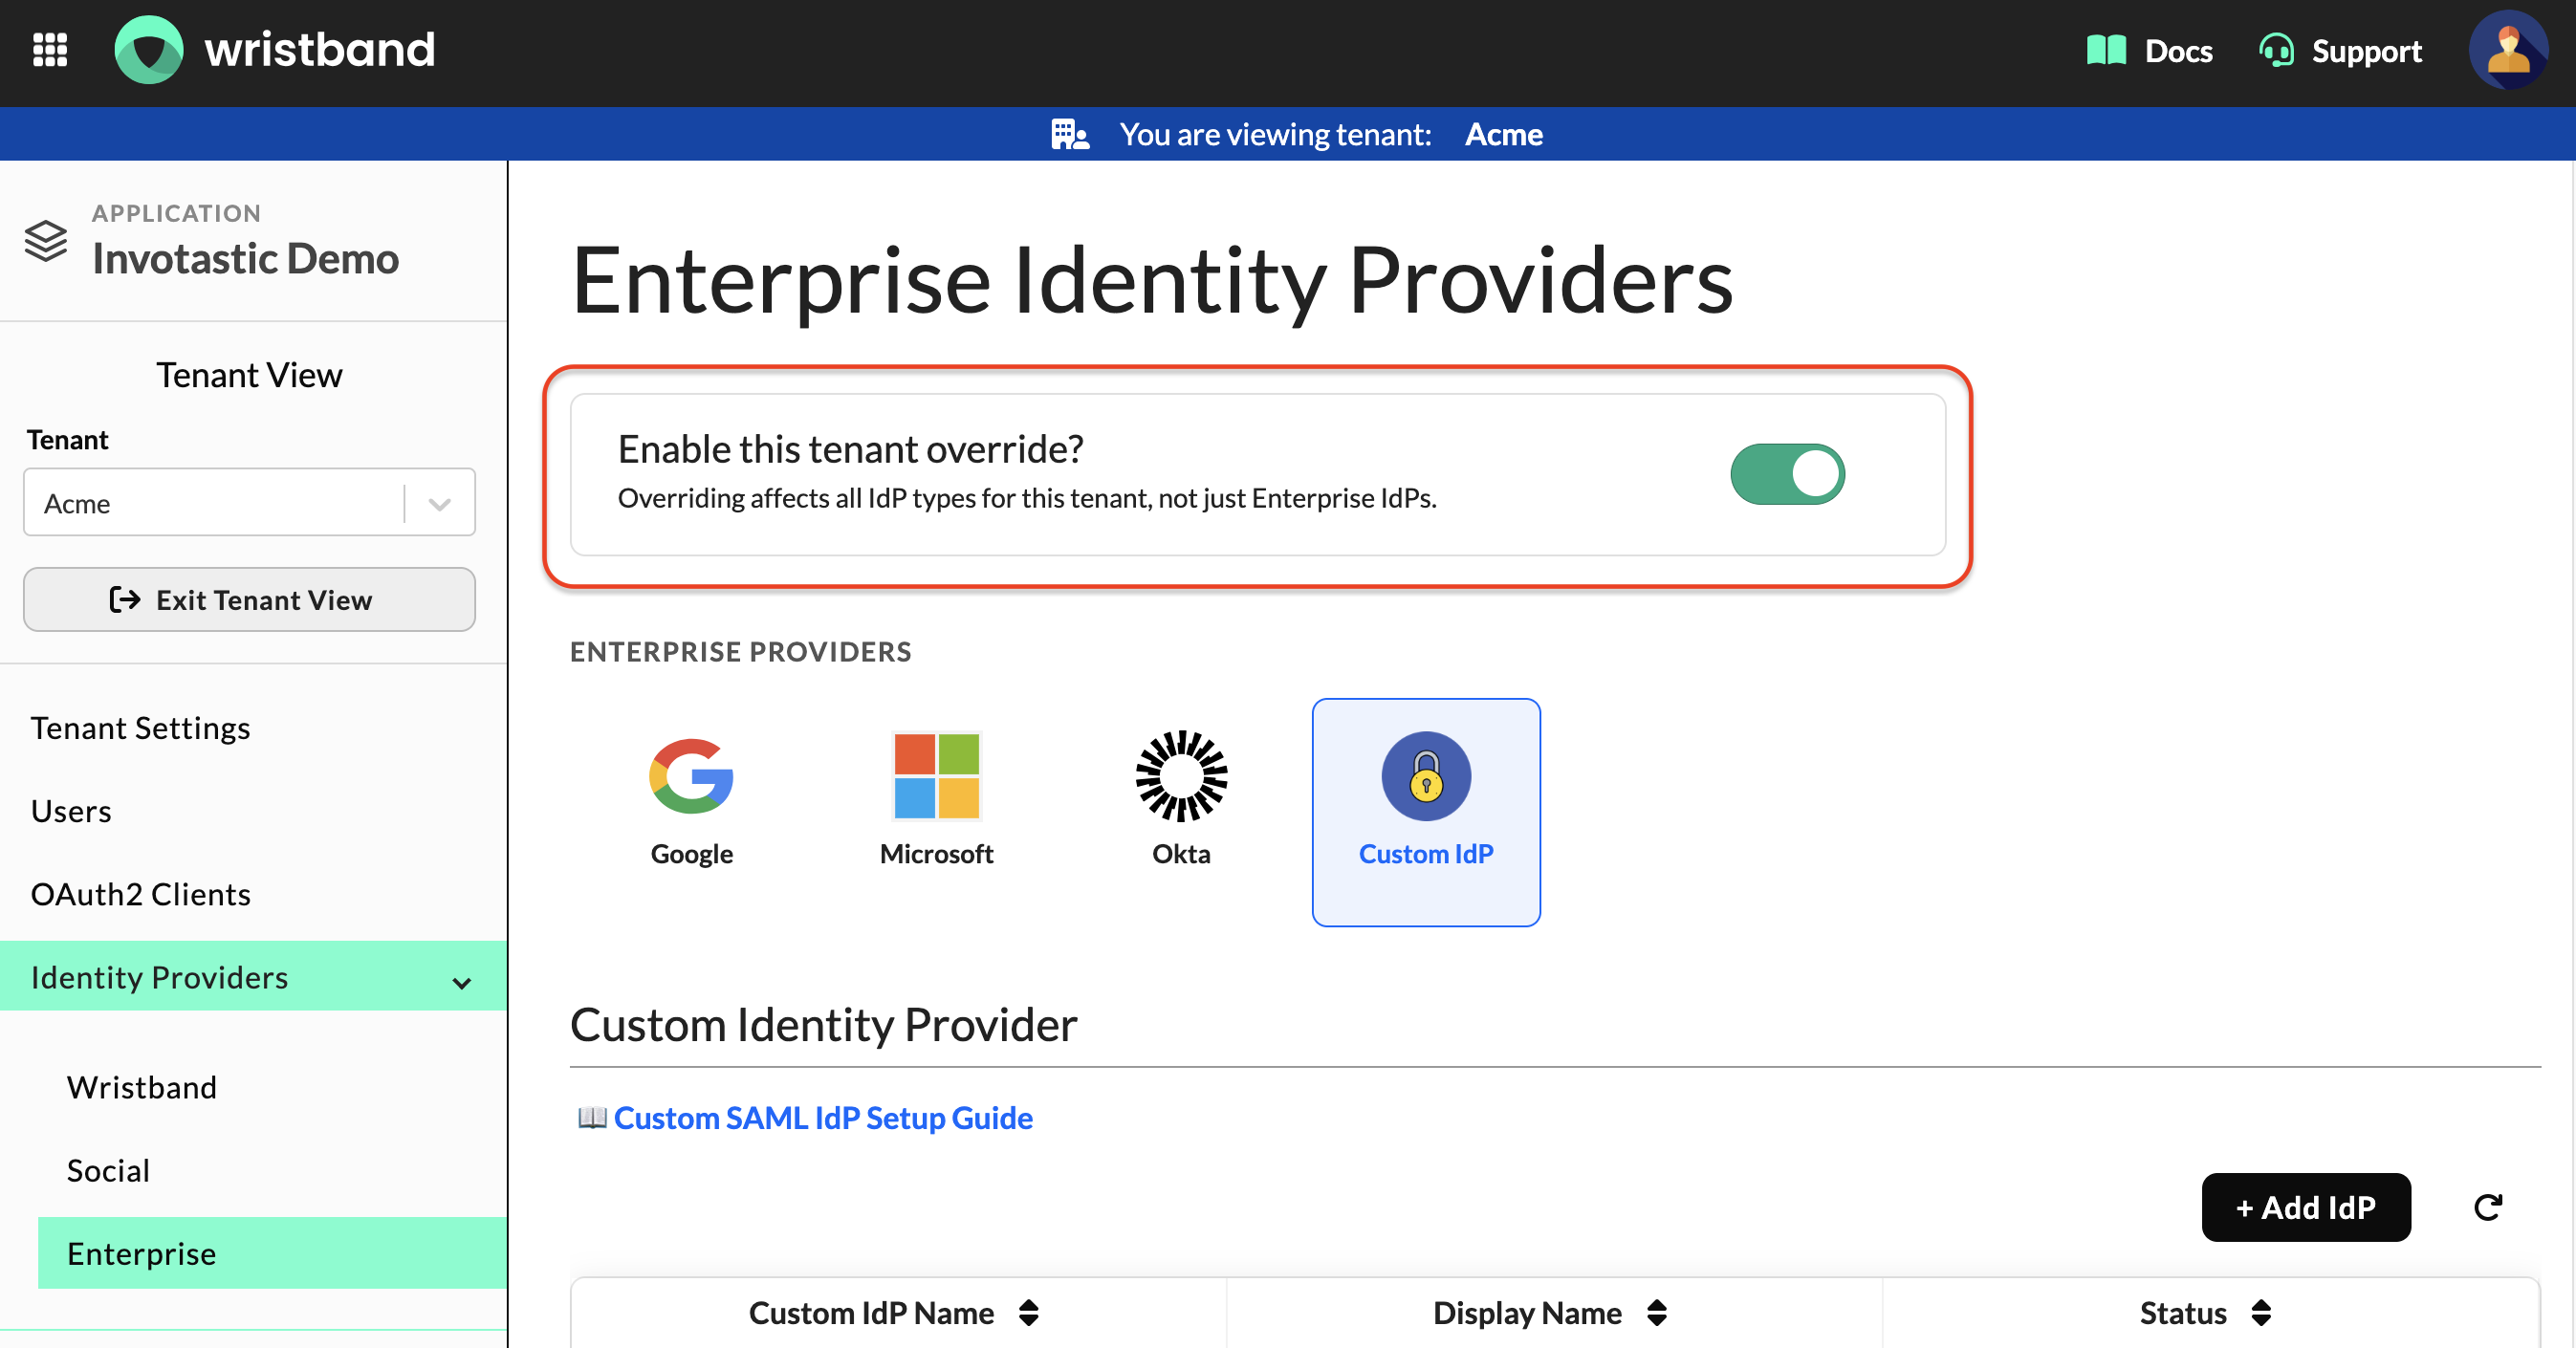
Enterprise Identity Providers page with tenant override toggle enabled
1.2: Create the Custom SAML IdP
While still on the "Enterprise Identity Providers" page, select the "Custom IdP" tab and click the "Create IdP" button.
In the "Create New Enterprise IdP" modal, fill out the following fields:
- IdP Name: A unique identifier for this IdP within the tenant. The name will be prefixed with
ent:custom:automatically. You only need to provide the suffix (e.g.,my-saml-idp). - Display Name: The name shown to users on any Wristband-hosted UI (e.g.,
My SAML IdP).
Important: IdP Name Is Immutable and cannot be modified after the IdP is created.
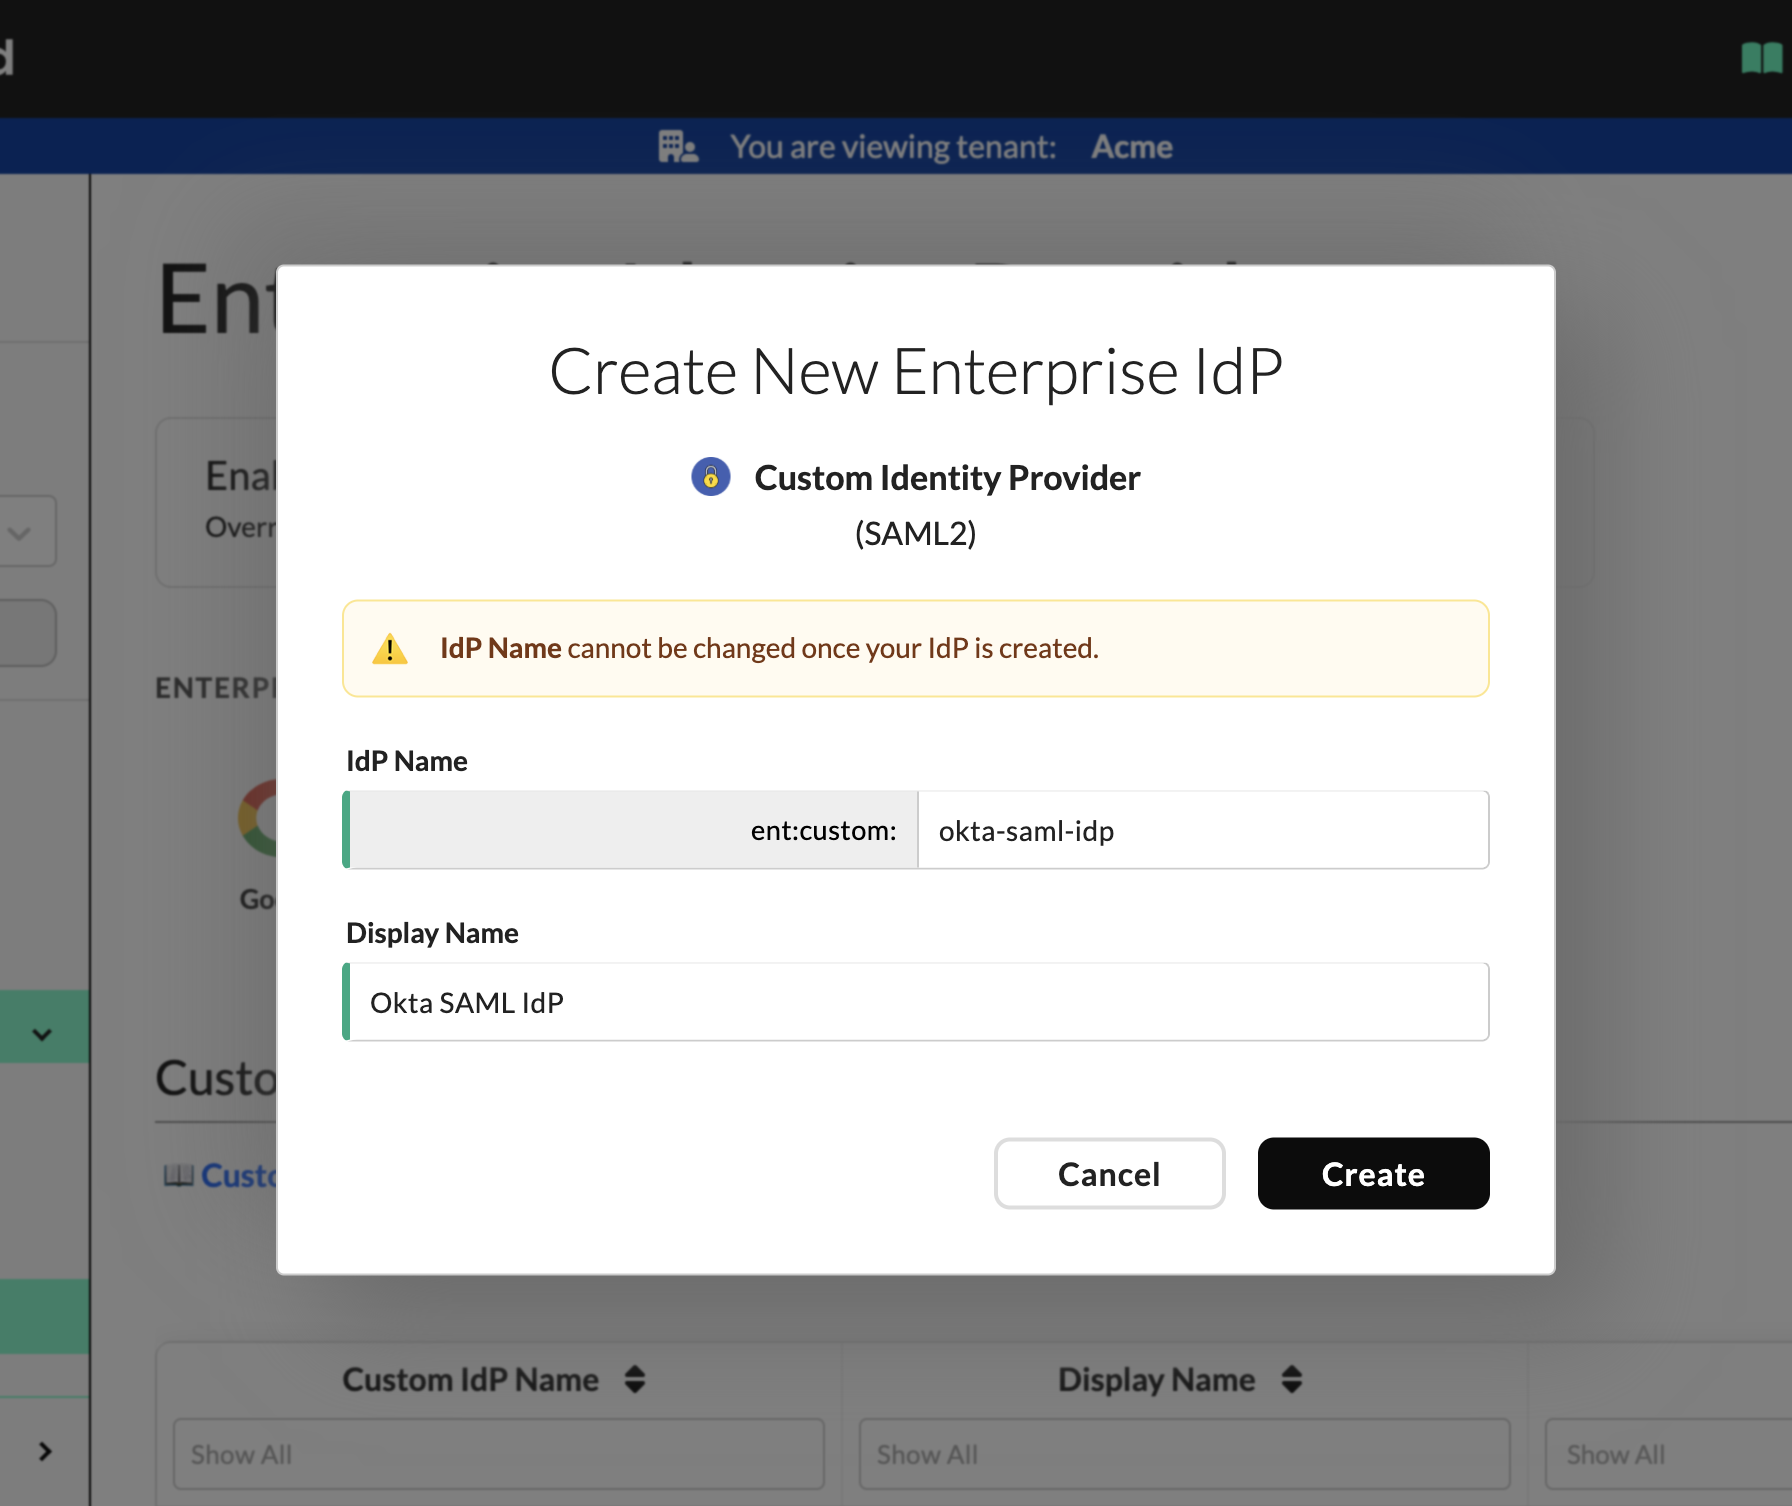
Wristband: Create New Enterprise IdP modal with Custom IdP
Click "Create" button. A success screen will appear displaying the Wristband SAML service provider details you will need to configure your identity provider:
- SP Entity ID: Wristband's unique identifier as a SAML service provider.
- ACS URL: The endpoint Wristband uses to receive SAML assertions from your IdP.
Copy both values before proceeding; you will need them to configure your identity provider in the next step.
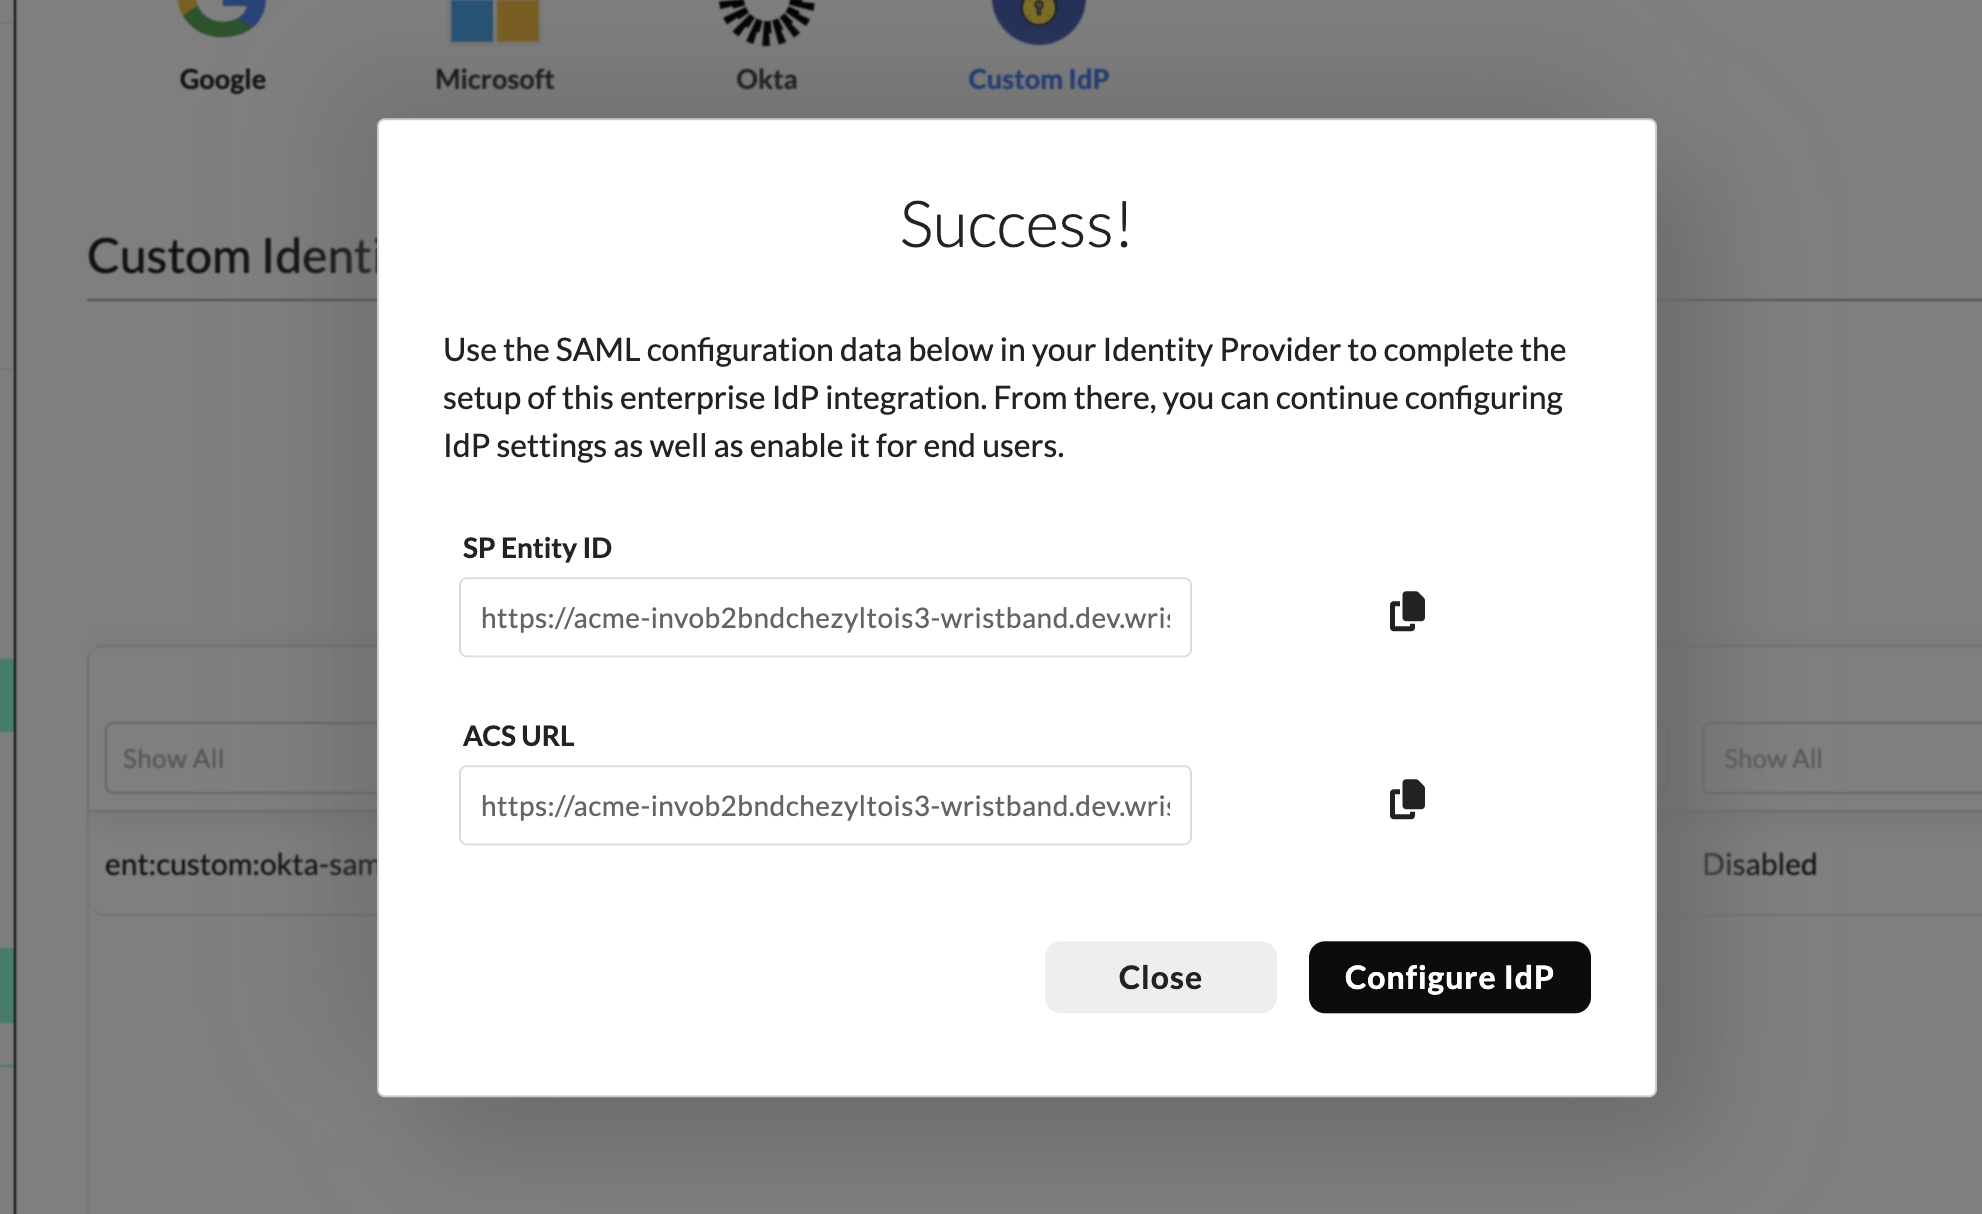
Wristband: Success modal screen showing SP Entity ID and ACS URL for Custom IdP
Once the values are copied, click "Configure IdP" to go directly to the IdP settings page. You will return to this page to finish Wristband configuration in step 3.
Handoff: Wristband Admin → Customer IdP AdminAt this point, share the following values with your Customer IdP Admin before proceeding to the next step:
- SP Entity ID
- ACS URL
Step 2: Configure Your Customer's Identity Provider
Persona to Perform This Step → Customer IdP Admin
In this step, your customer's IdP admin will create a SAML 2.0 application in their identity provider using the "SP Entity ID" and "ACS URL" from Step 1, as well as configure attribute and group mappings.
At the end of this step, the Wristband Admin will need the following from the Customer IdP Admin in order to complete the integration in step 3:
- The Metadata URL
- Configured attribute names
- Group names
Using Okta as the ExampleThis step uses Okta as a concrete example of how to configure your identity provider, but the same pattern applies to any SAML 2.0-compliant IdP. Refer to your IdP's documentation for the corresponding fields and configuration steps on their side.
Note: Not all identity providers expose a metadata URL. Wristband also supports uploading a SAML metadata XML file or manually entering the required values (Entity ID, SSO URL, and Signing Certificate) directly so you can complete the integration regardless of what your IdP provides.
2.1: Configure a SAML Application
Open your Okta Admin dashboard and do the following:
- Navigate to
Applications > Applicationsin the side navigation. - Click the "Create App Integration" button.
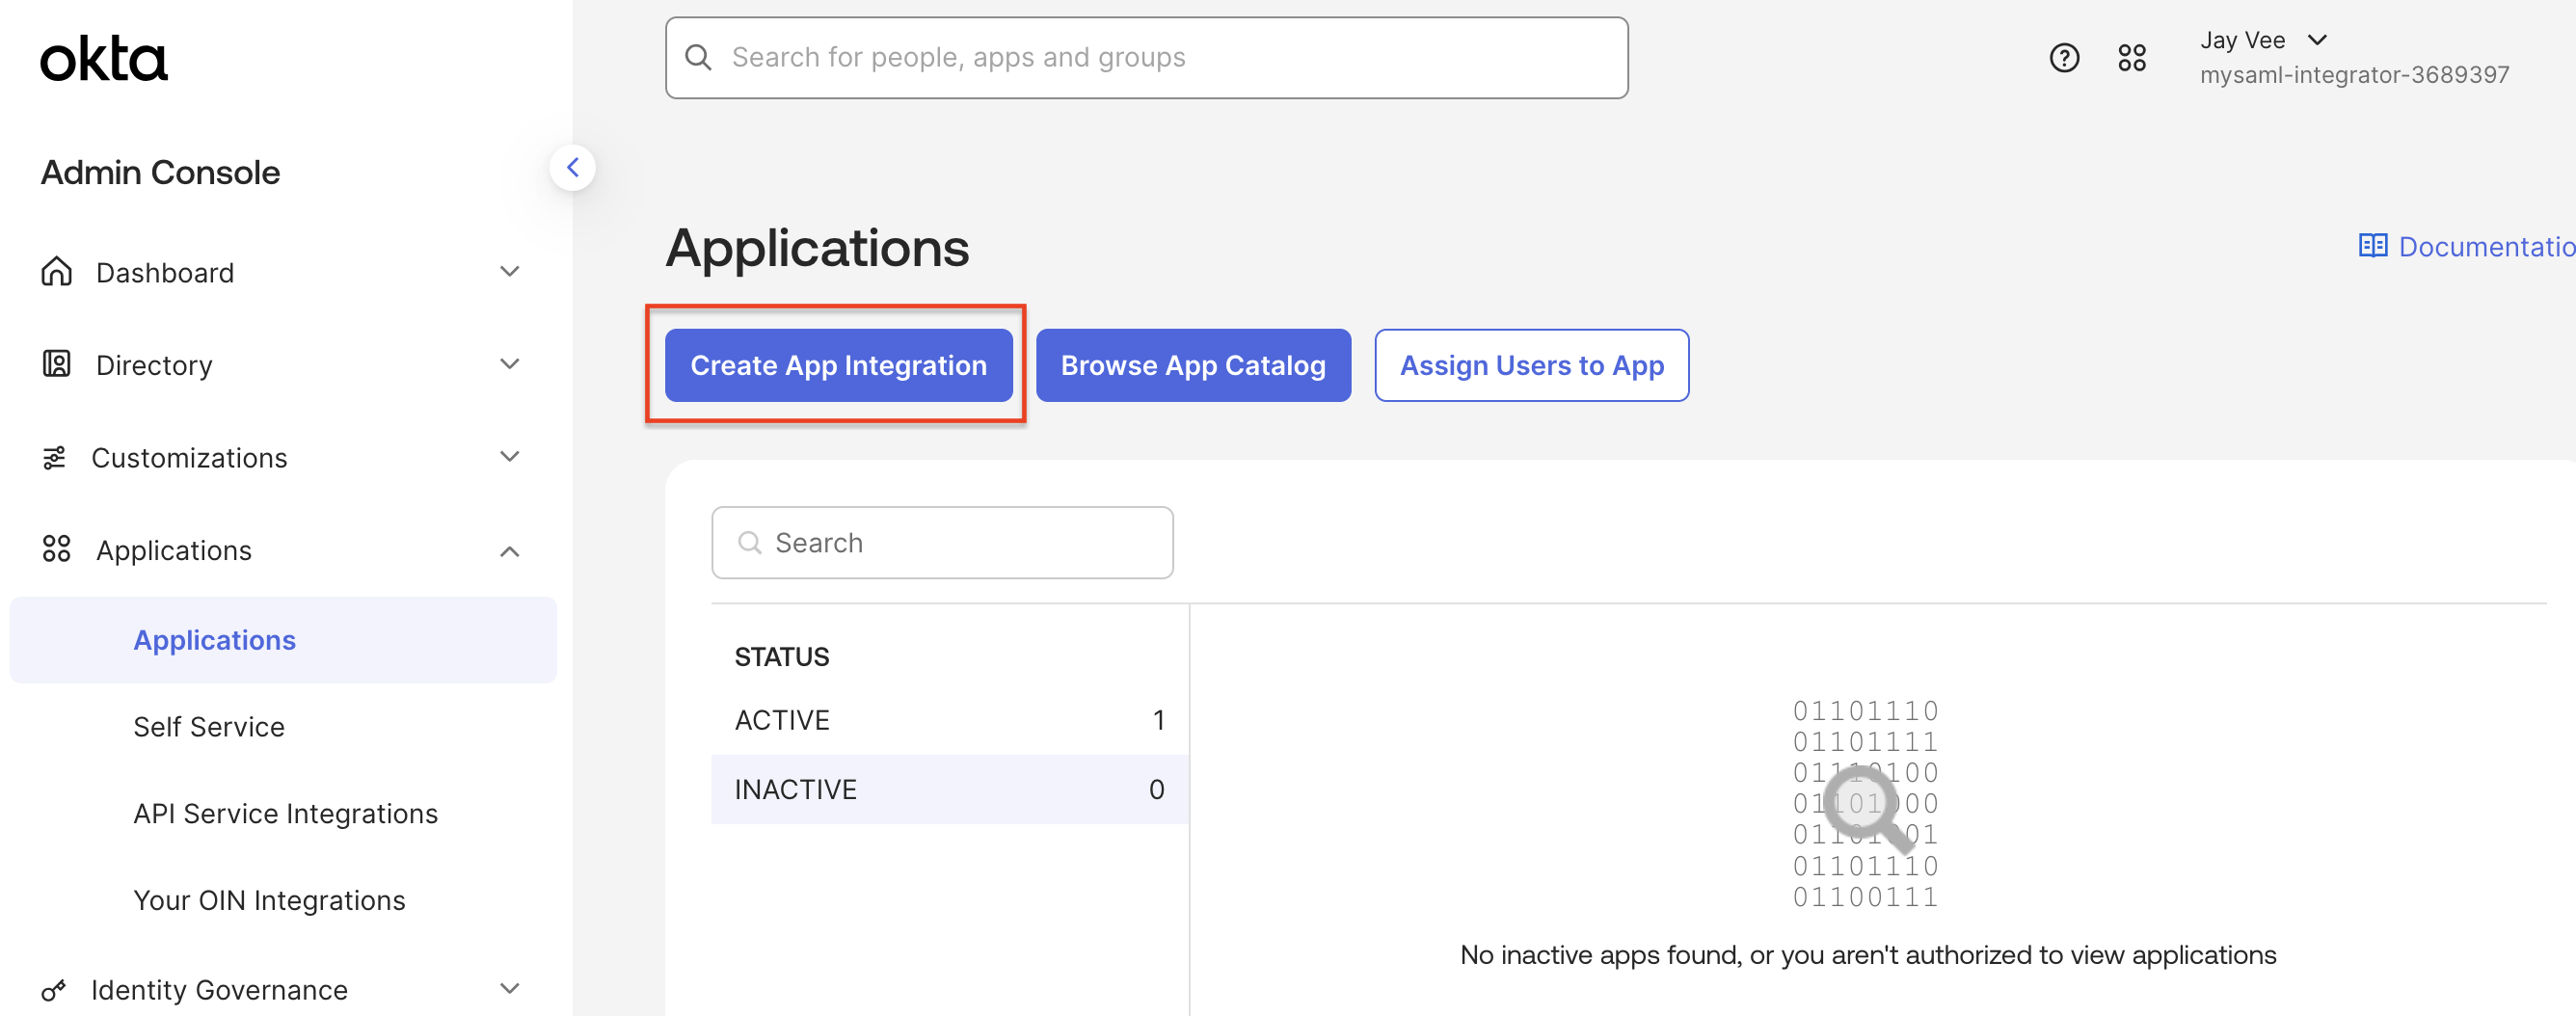
Okta: Applications UI with the Create App Integration button
This will open the Create App Integration modal. Select SAML 2.0 as the sign-in method and click the "Next" button.
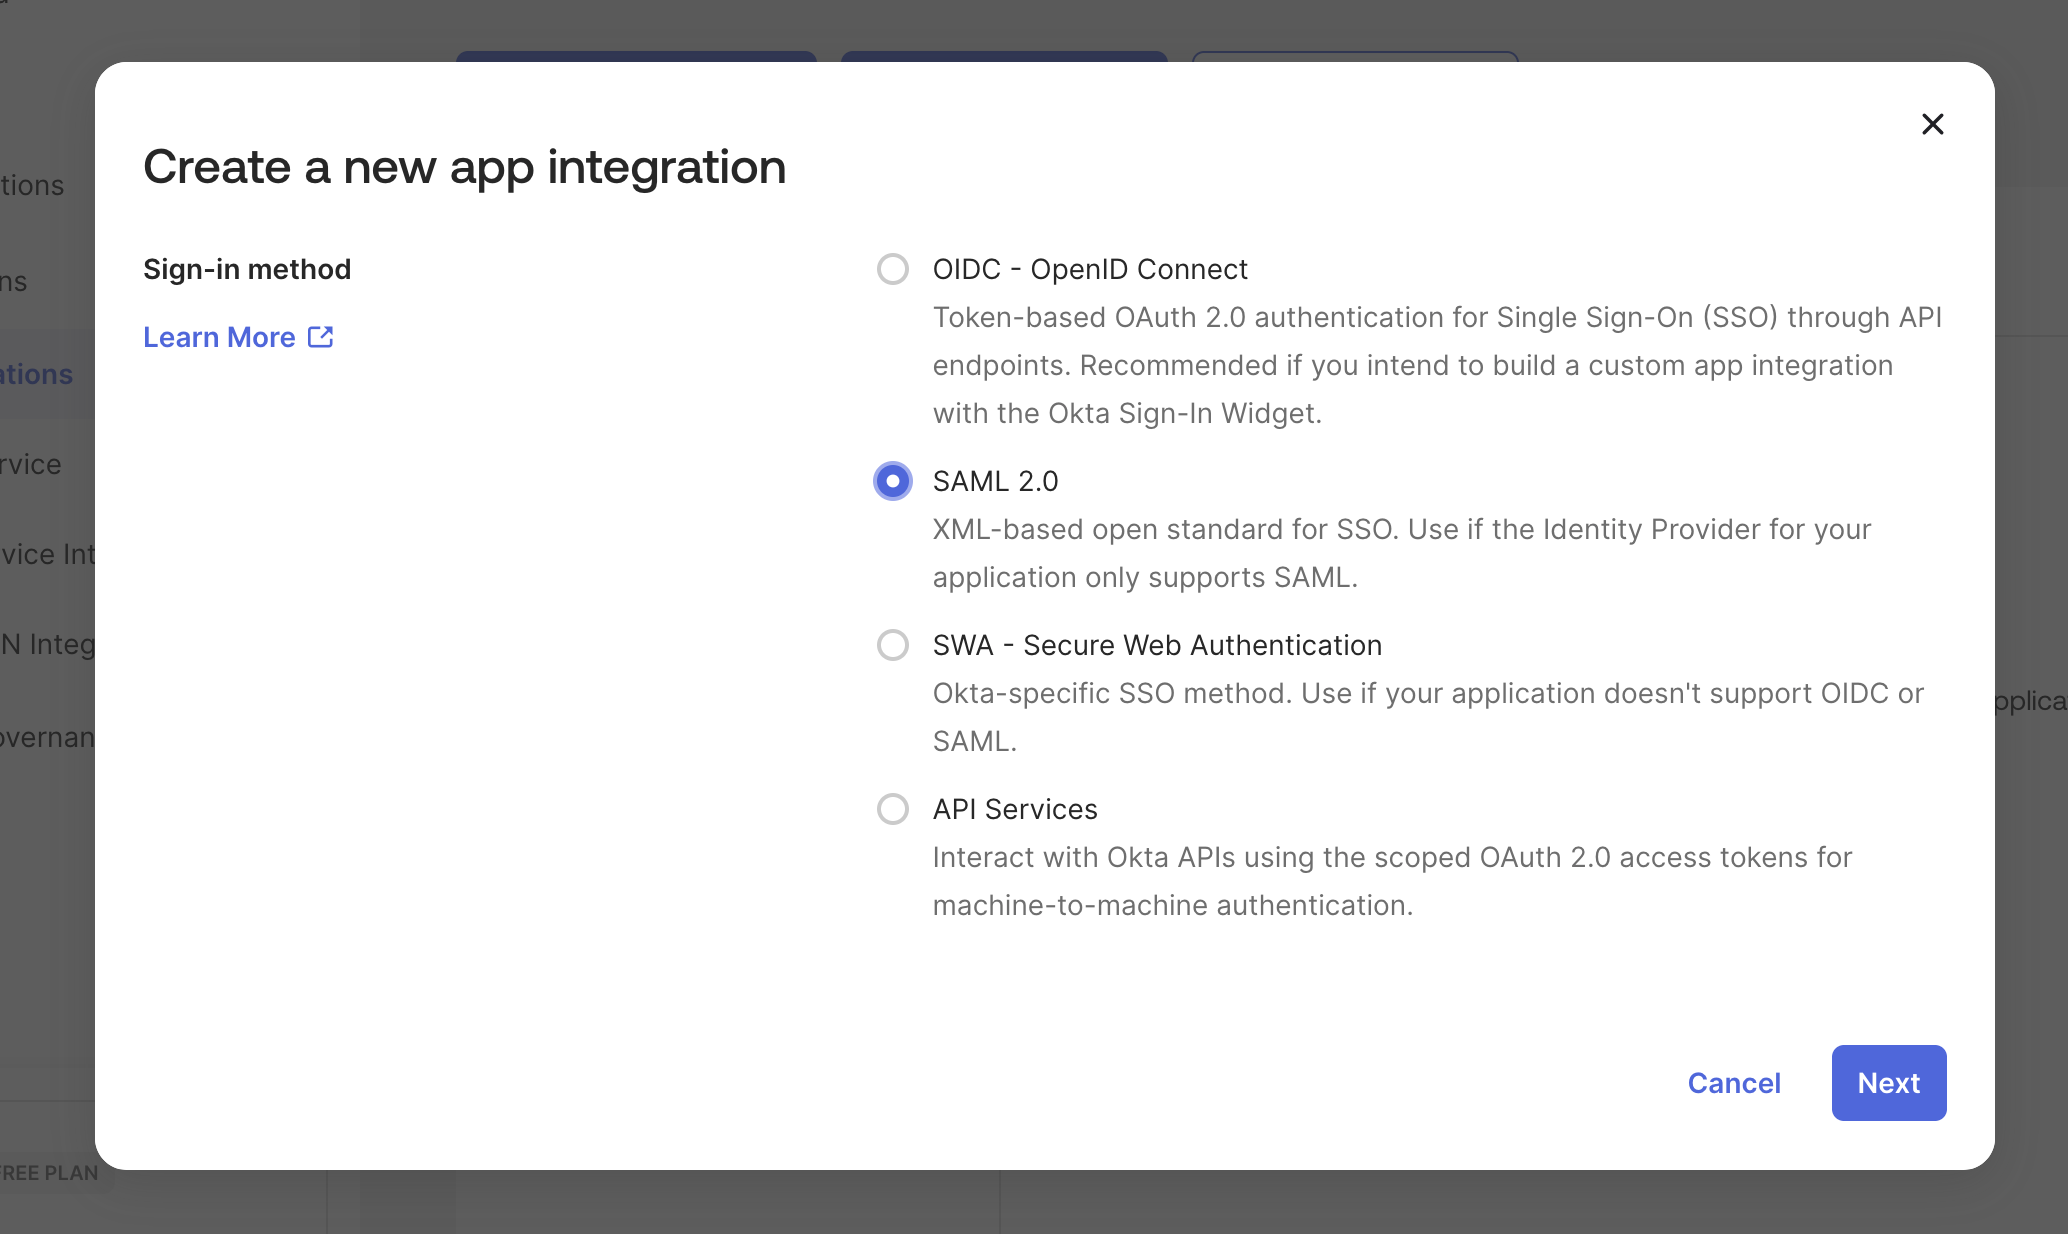
Okta: Create New App integration Modal with SAML 2.0 selected
This opens the Create SAML Integration wizard. On the "General Settings" tab, fill in the following:
- App name: Any appropriate name for the integration.
- App logo: (Optional) Used as the application icon displayed to users in the Okta dashboard.
- App visibility: Leave unchecked unless you want to hide the application icon from users in the Okta dashboard.
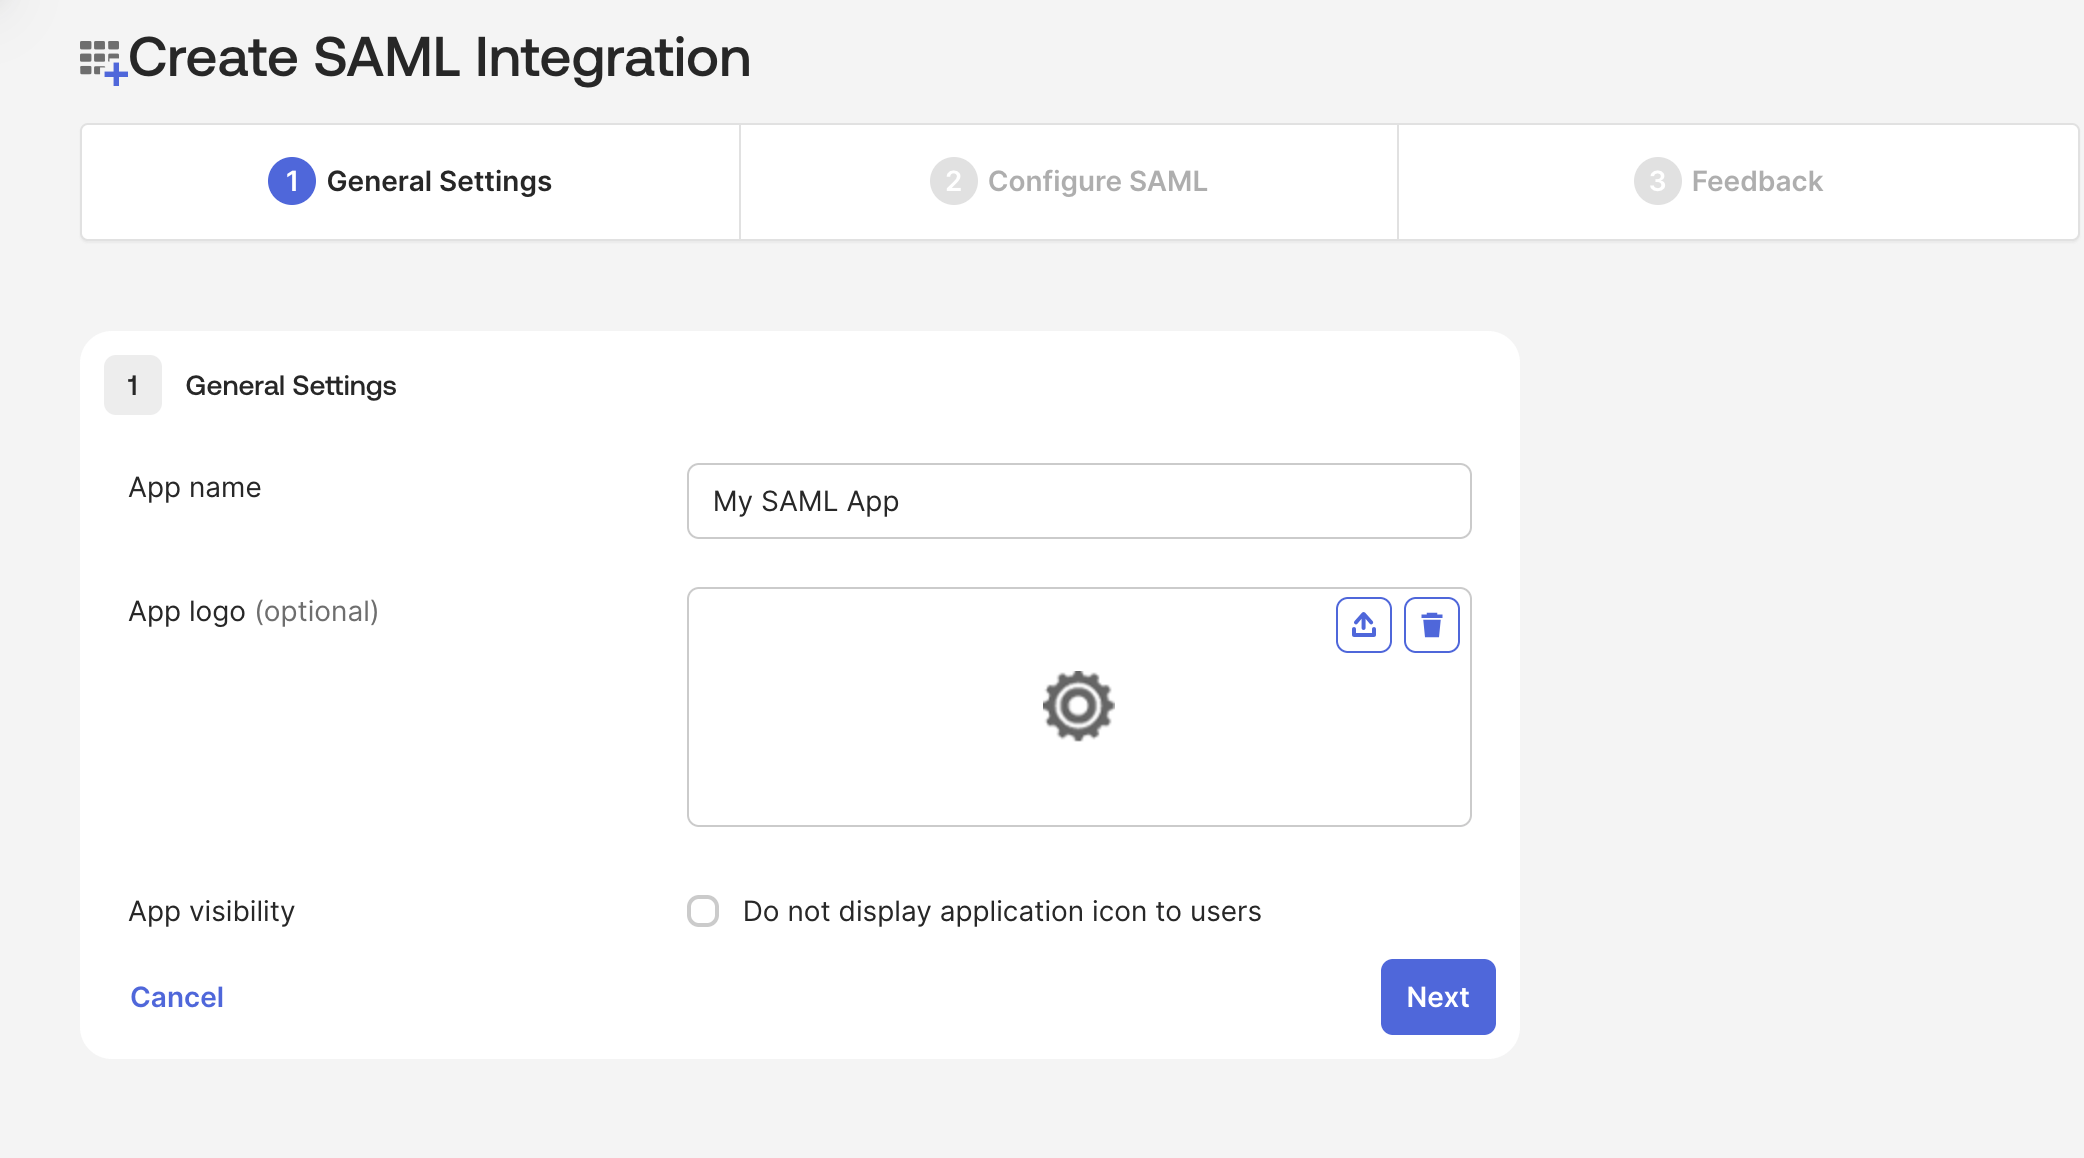
Okta: SAML Integration Wizard, General Settings tab
Click the "Next" button to go to the "Configure SAML" tab, and fill in the following under "SAML Settings":
- Single sign-on URL (ACS URL): Paste the ACS URL from the previous step. Leave "Use this for Recipient URL and Destination URL" checked.
- Audience URI (SP Entity ID): Paste the SP Entity ID from the previous step.
- Default RelayState: Leave blank.
- Name ID format: Select
EmailAddress. - Application username: Select
Email. - Update application username on: Leave as
Create and update.
Optionally, you can click "Preview the SAML Assertion" to verify the XML that will be generated from the information you entered above.
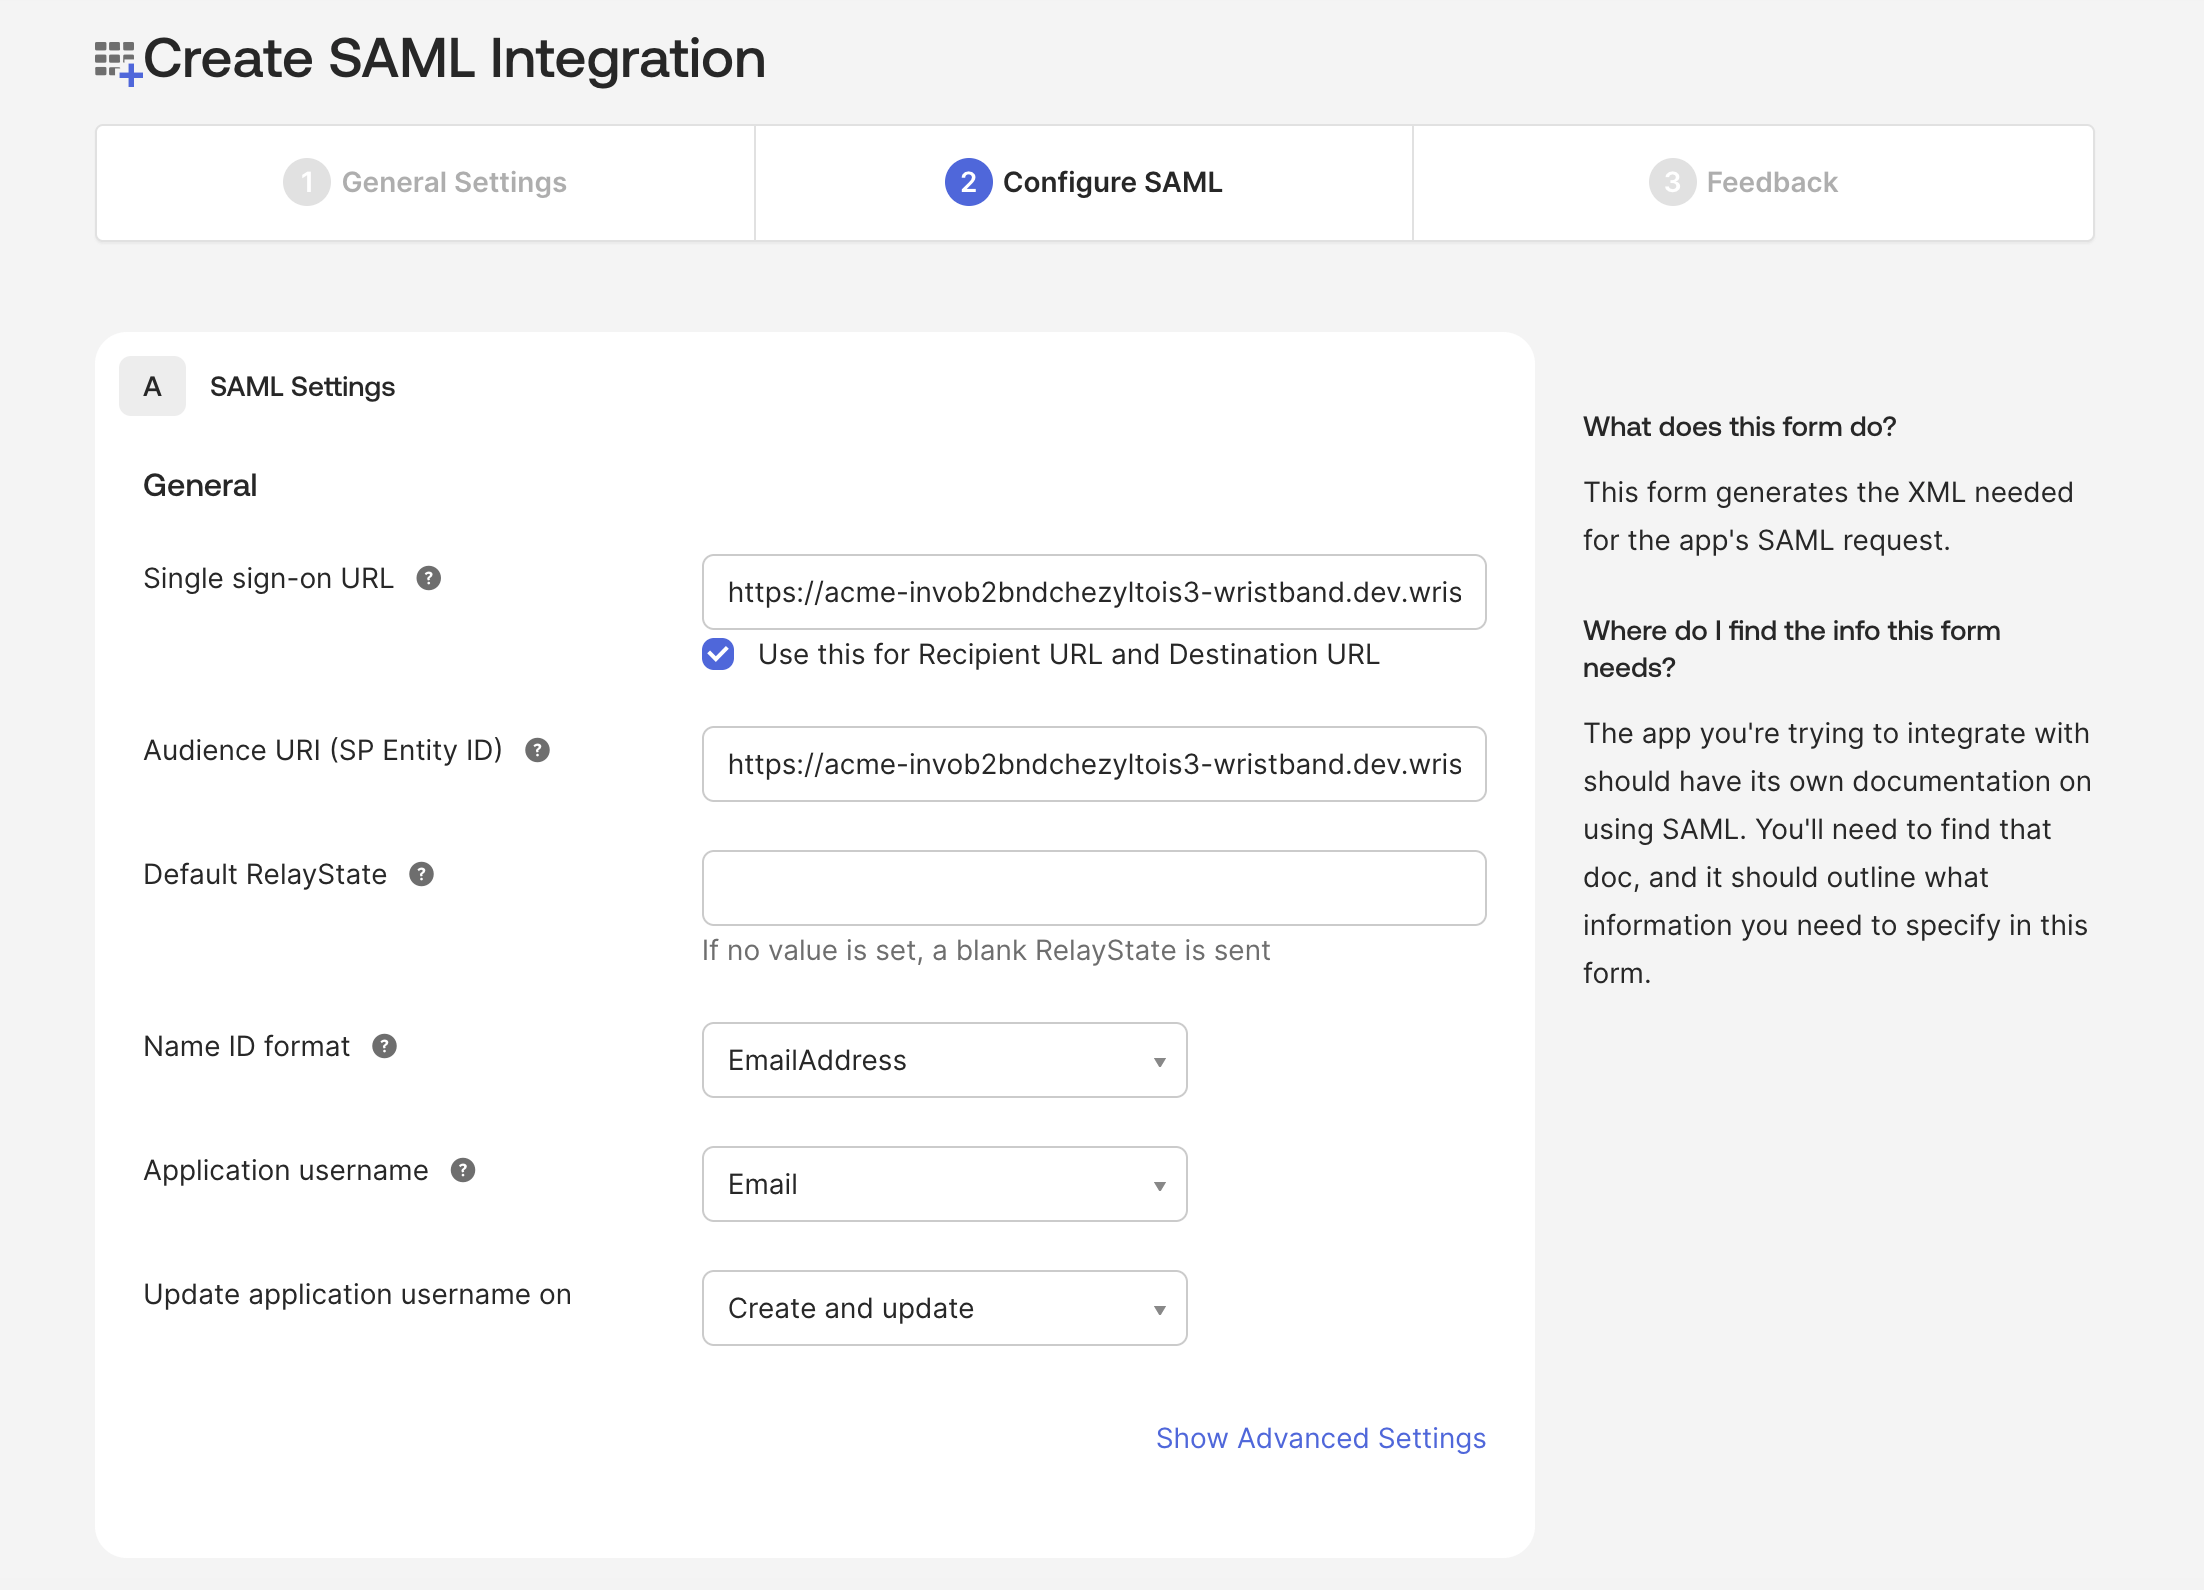
Okta: SAML Integration Wizard, Configure SAML tab
Click the "Next" button to go to the "Feedback" tab. The entire "Feedback" tab is optional.
Click the "Finish" button to skip this part. Your Okta SAML app is now created and you will be taken to the app's Sign On tab.
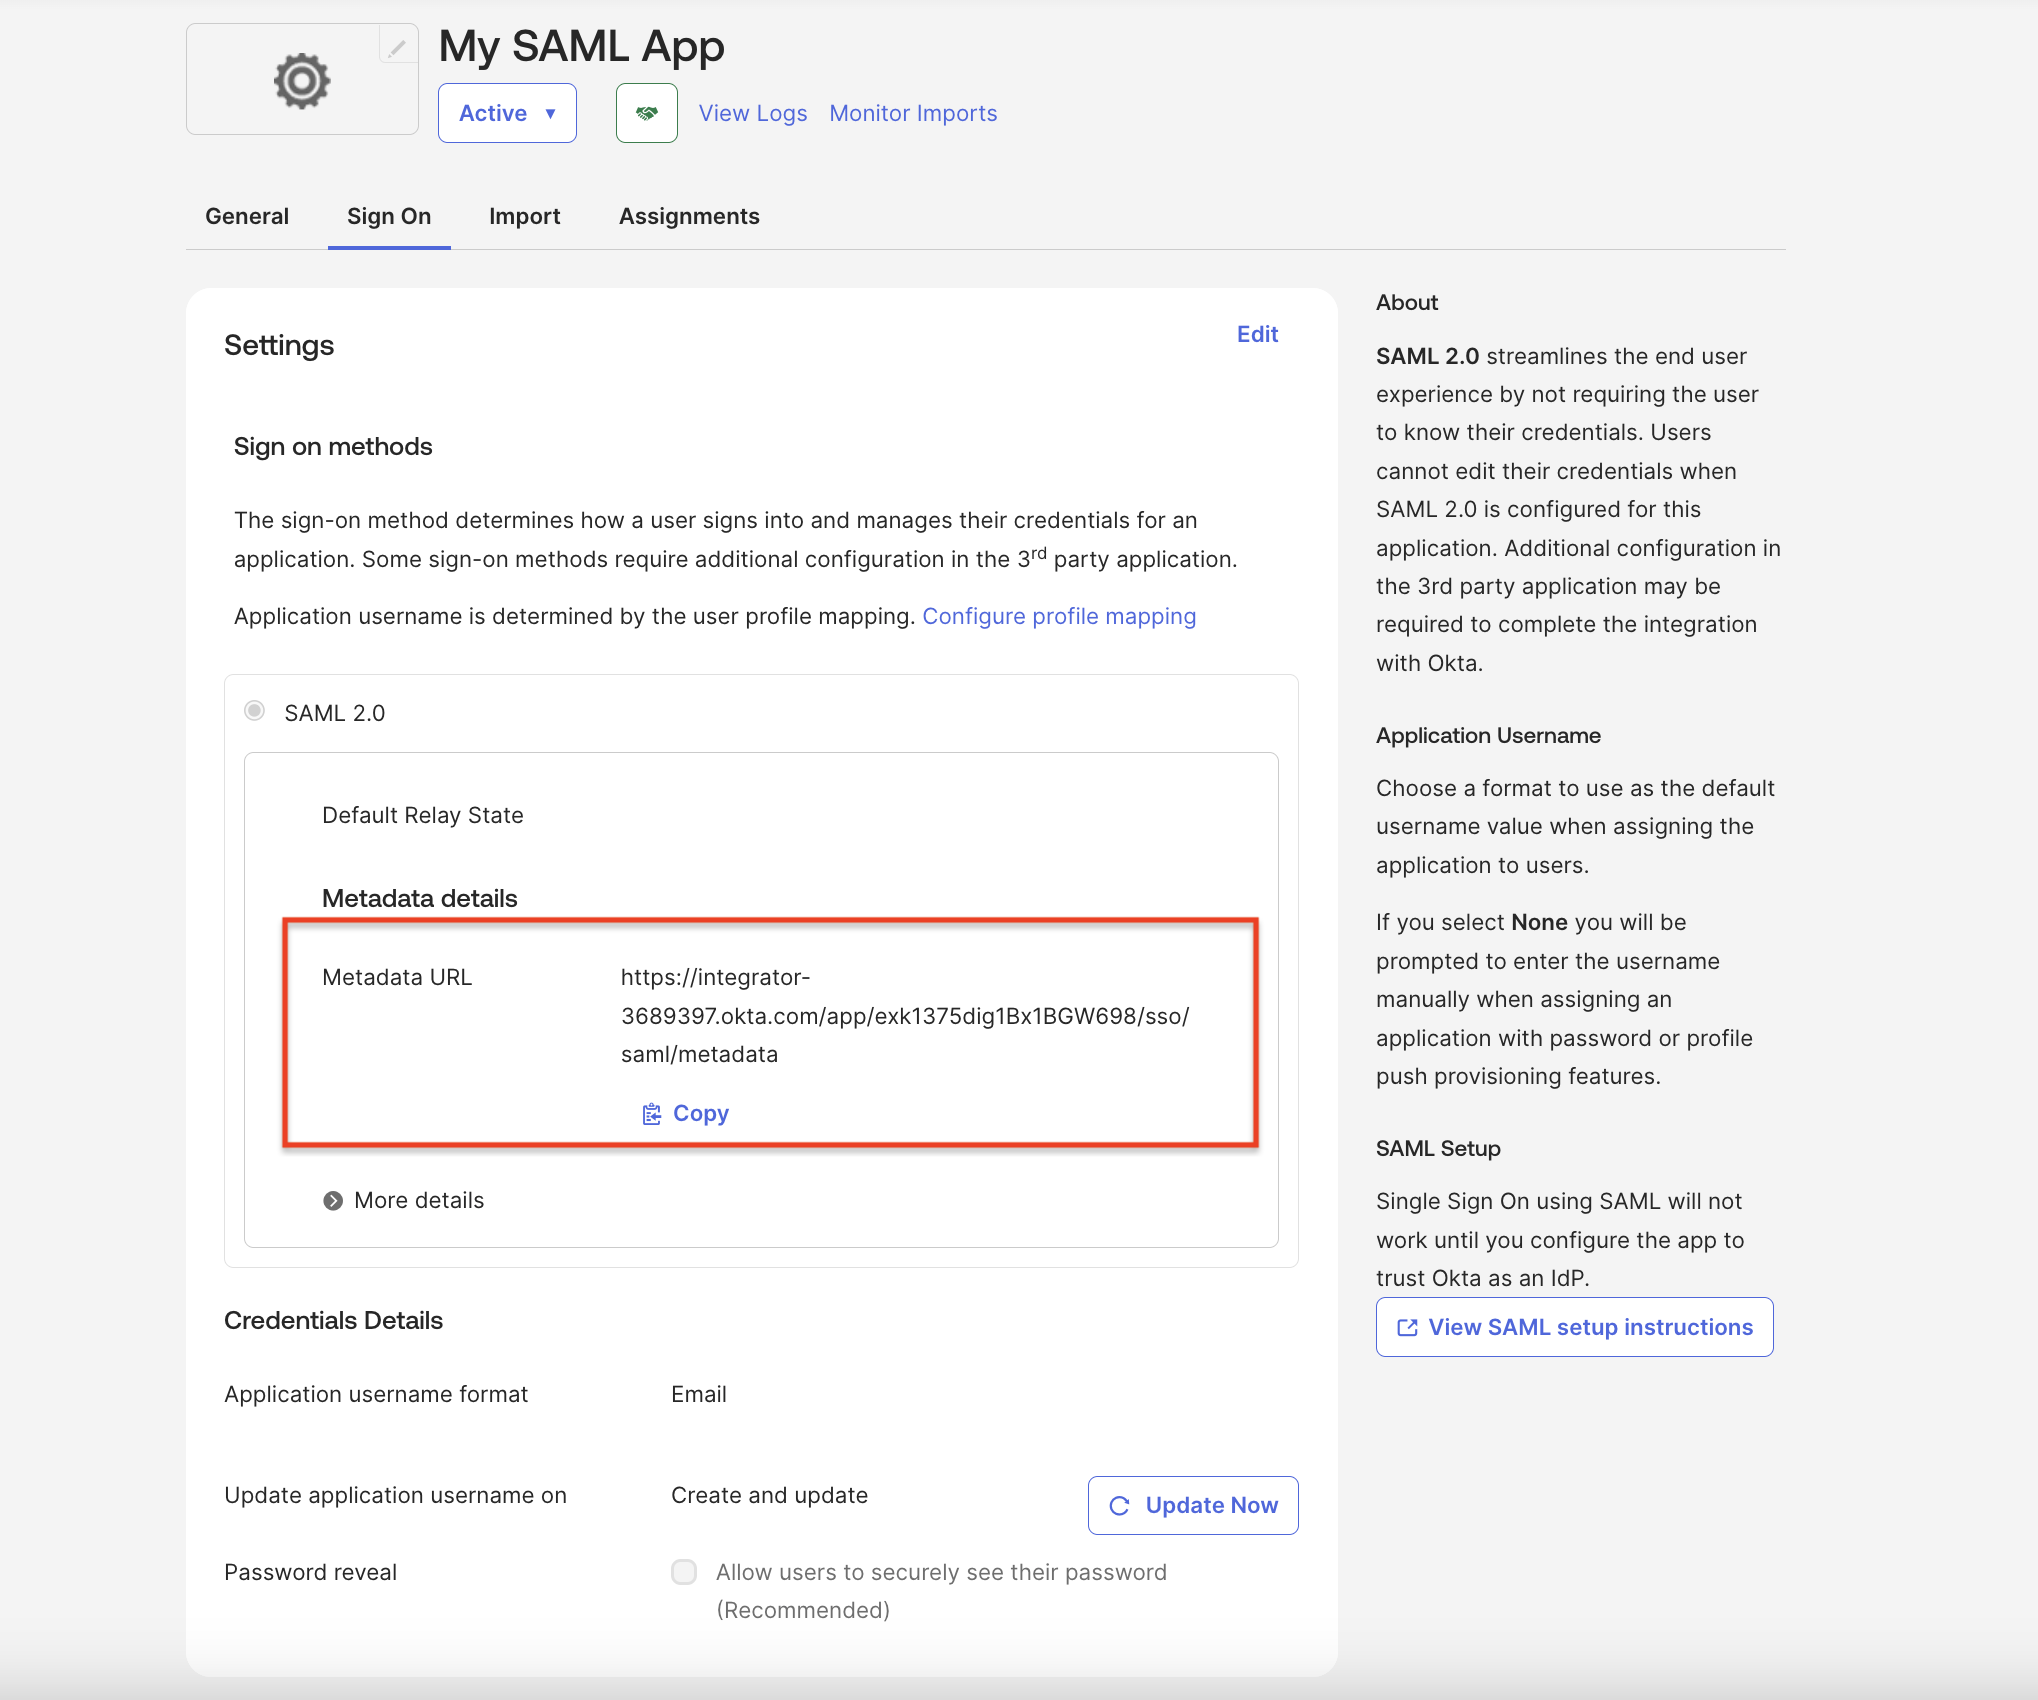
Okta: App "Sign On" tab showing Metadata URL
From the "Sign On" tab, copy the "Metadata URL" under the "Metadata details" section, as you will need it in the next step.
2.2: Configure User Attribute Mappings
In your IdP's SAML attribute statements, map your directory attributes to the corresponding Wristband user schema fields. The email attribute is the only required mapping. The following attributes are available to map:
| IdP Attribute | Wristband User Schema Field |
|---|---|
email (required) | |
| First name | givenName |
| Last name | familyName |
| Full name | fullName |
| Phone number | phoneNumber |
| Birthdate | birthdate |
In Okta, attribute mapping is configured on the "Sign On" tab of your app after creation. Navigate to the "Sign On" tab and scroll to the "Attribute Statements" section. Click the "Add expression" button for each attribute you want to map.
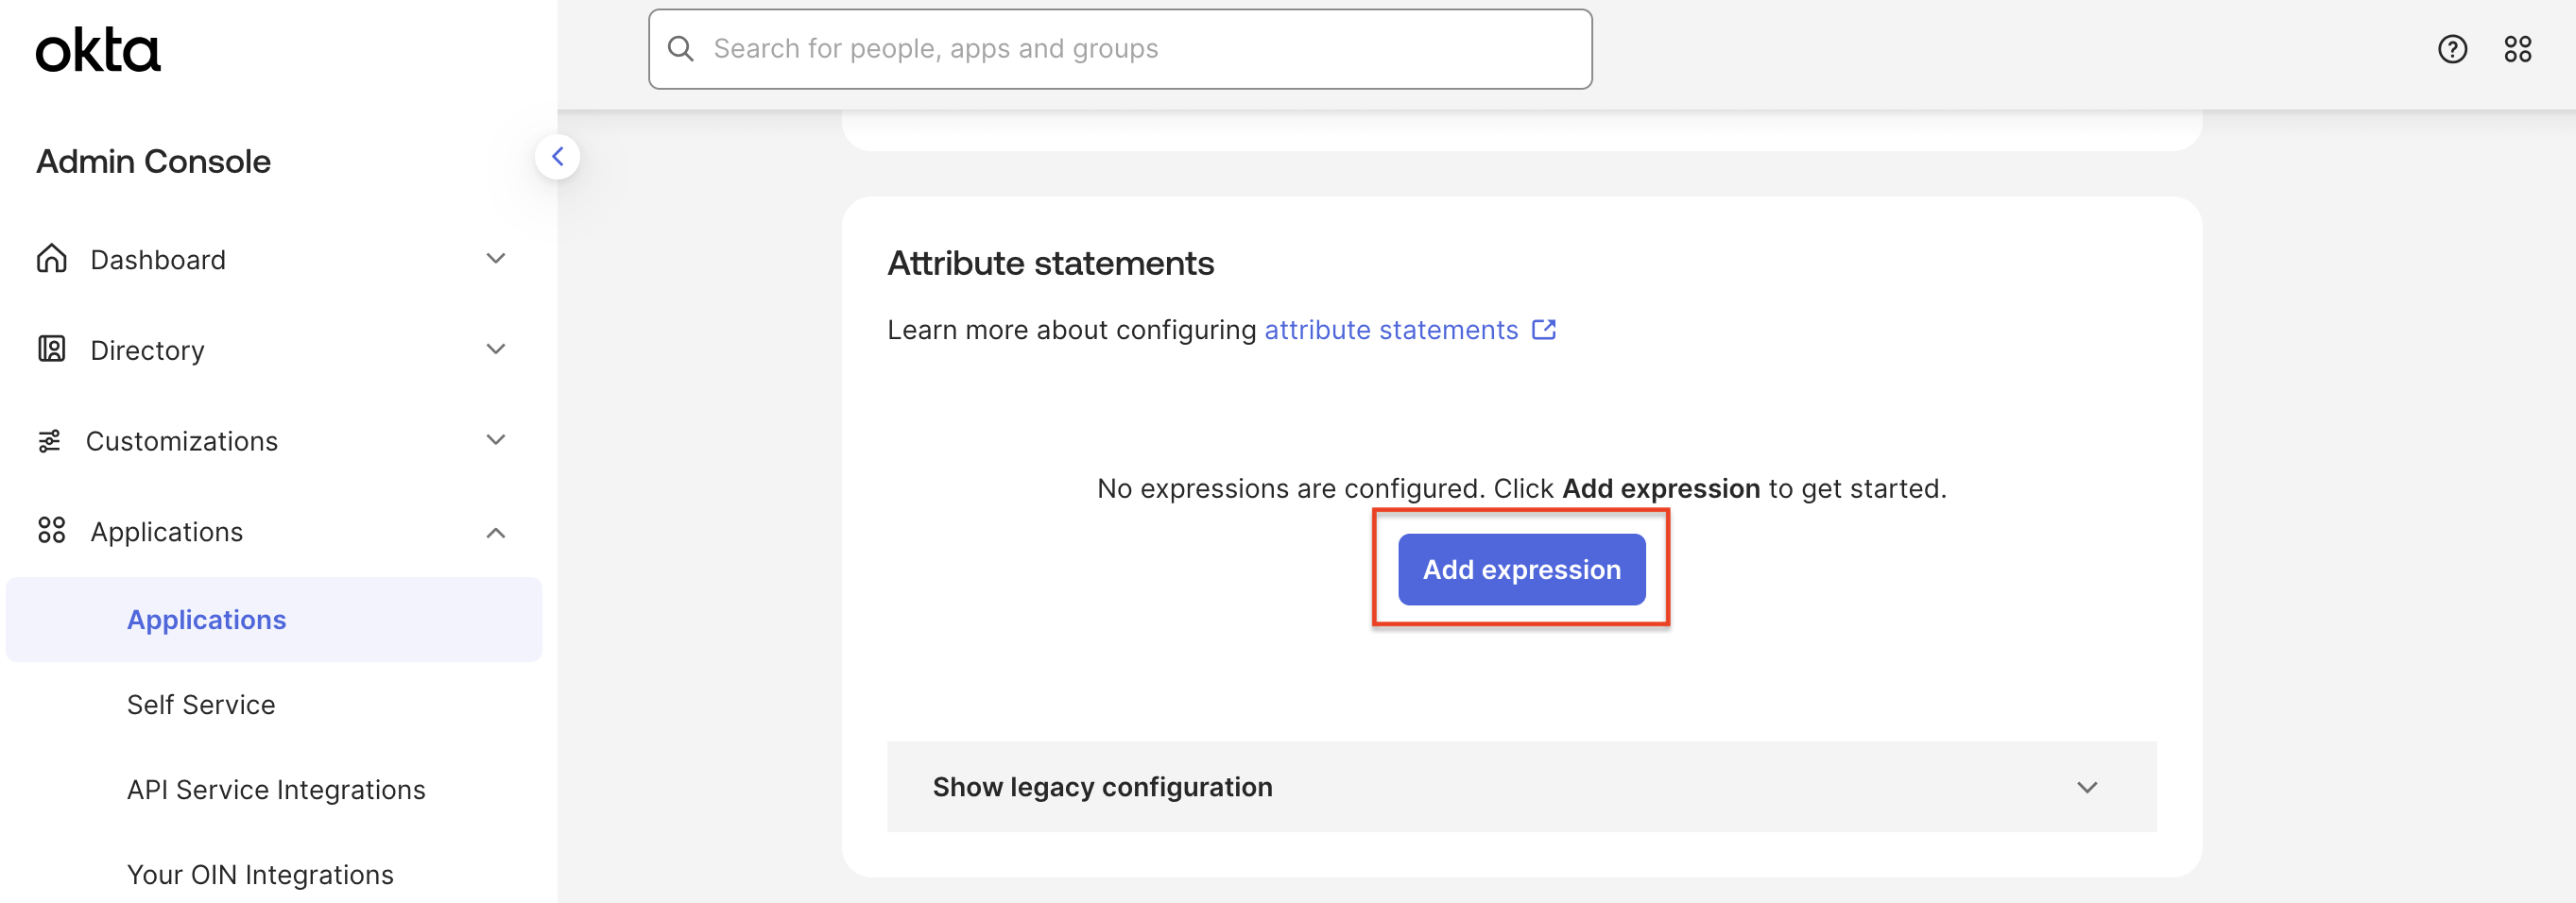
Okta: Sign On tab, Attribute Statements section with Add expression button
In the "Add expression" modal, fill in the following:
- Name: The Wristband user schema field name (e.g.,
email, etc.). - Expression: The Okta Expression Language value for the corresponding user profile attribute (e.g.,
user.profile.email).

Okta: Add expression modal showing email attribute mapping
Click the "Save" button to store that mapping.
Repeat for each attribute you want to sync. Common mappings are:
| Name (Wristband field) | Expression (Okta) |
|---|---|
| user.profile.email | |
| givenName | user.profile.firstName |
| familyName | user.profile.lastName |
| phoneNumber | user.profile.primaryPhone |
From the "Sign On" tab, copy the names of your configured Okta expressions as you will need them in the next step.
2.3: Configure the Groups Attribute Mapping
Groups in Other Identity ProvidersHow group information is passed in a SAML assertion varies by IdP. Refer to your IdP's documentation for the equivalent configuration. Wristband expects group names to be passed as a multi-value
groupsattribute in the SAML assertion.
In Okta, you need to pass group names in the SAML assertion. On the "Sign On" tab of your app, scroll to the "Attribute Statements" section and click the "Add expression" button.
In the "Add expression" modal, fill in the following:
- Name:
groups - Expression:
user.getGroups({'group.type': {'OKTA_GROUP'}}).![profile.name]. This returns an array of native Okta group objects the user belongs to, then extracts just the name of each group. You will later configure Wristband's role mapping to control which of these groups actually map to roles in your application.
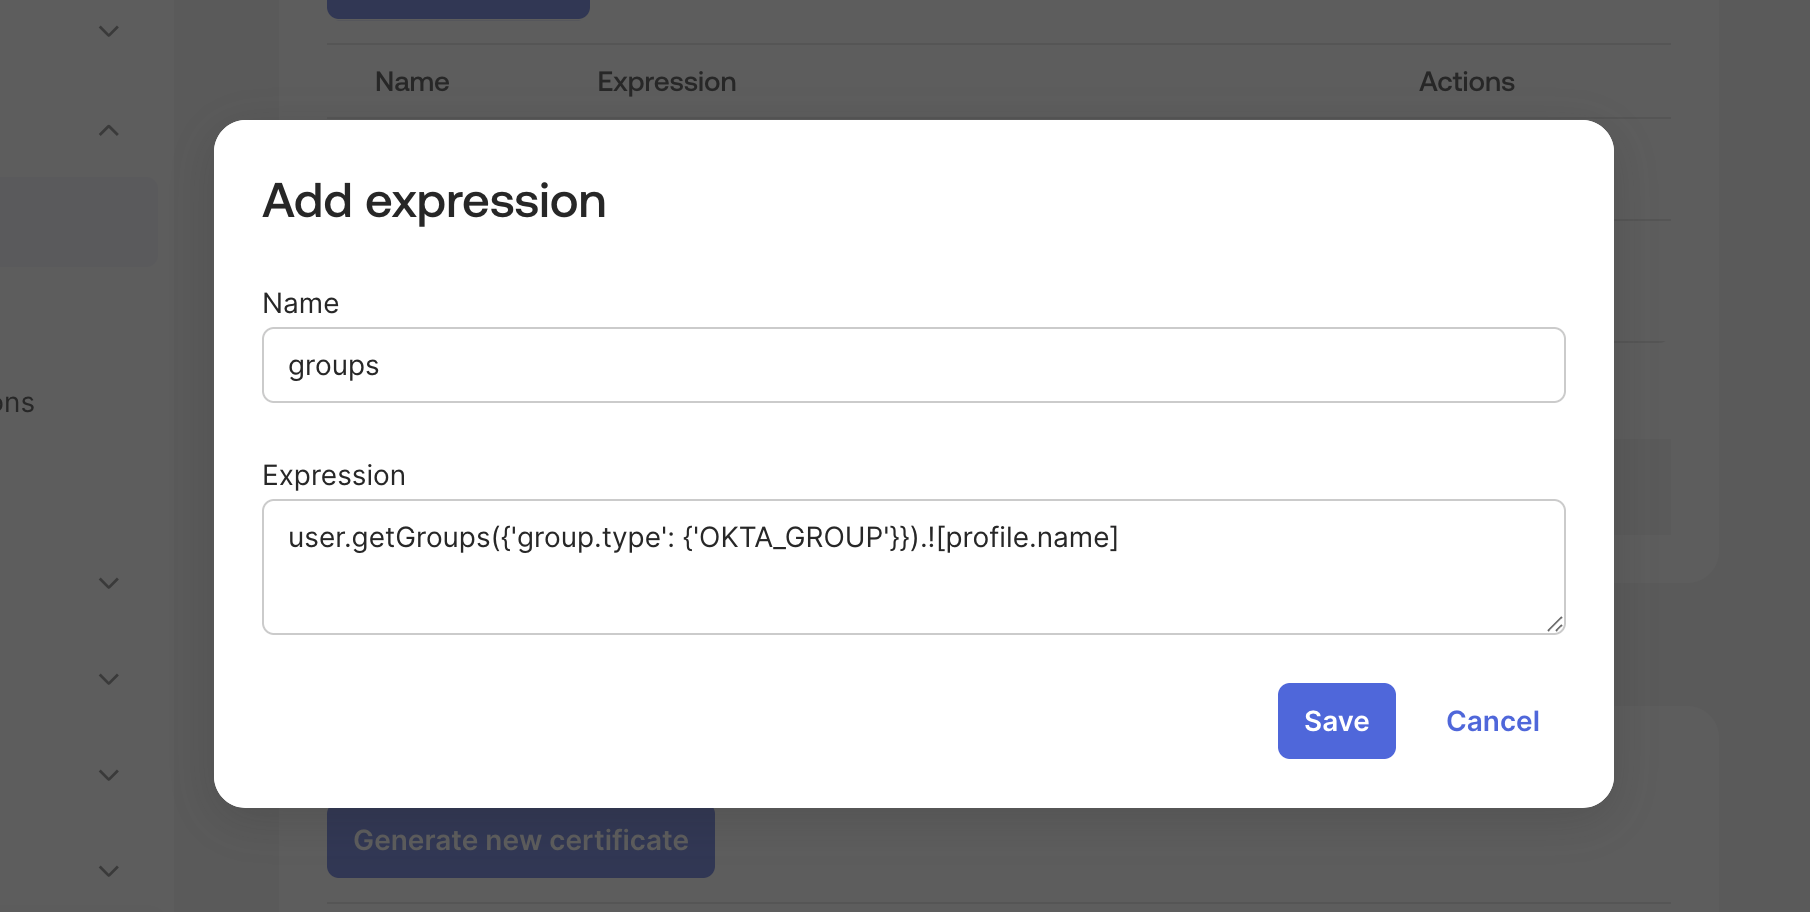
Okta: Add expression modal showing groups attribute mapping
Click the "Save" button to store that mapping.
For any Okta groups that should map to roles in the Wristband application, make sure to copy their exact names as you will need them in the next step. You can find them by navigating to Directory > Groups in the Okta Admin Console.
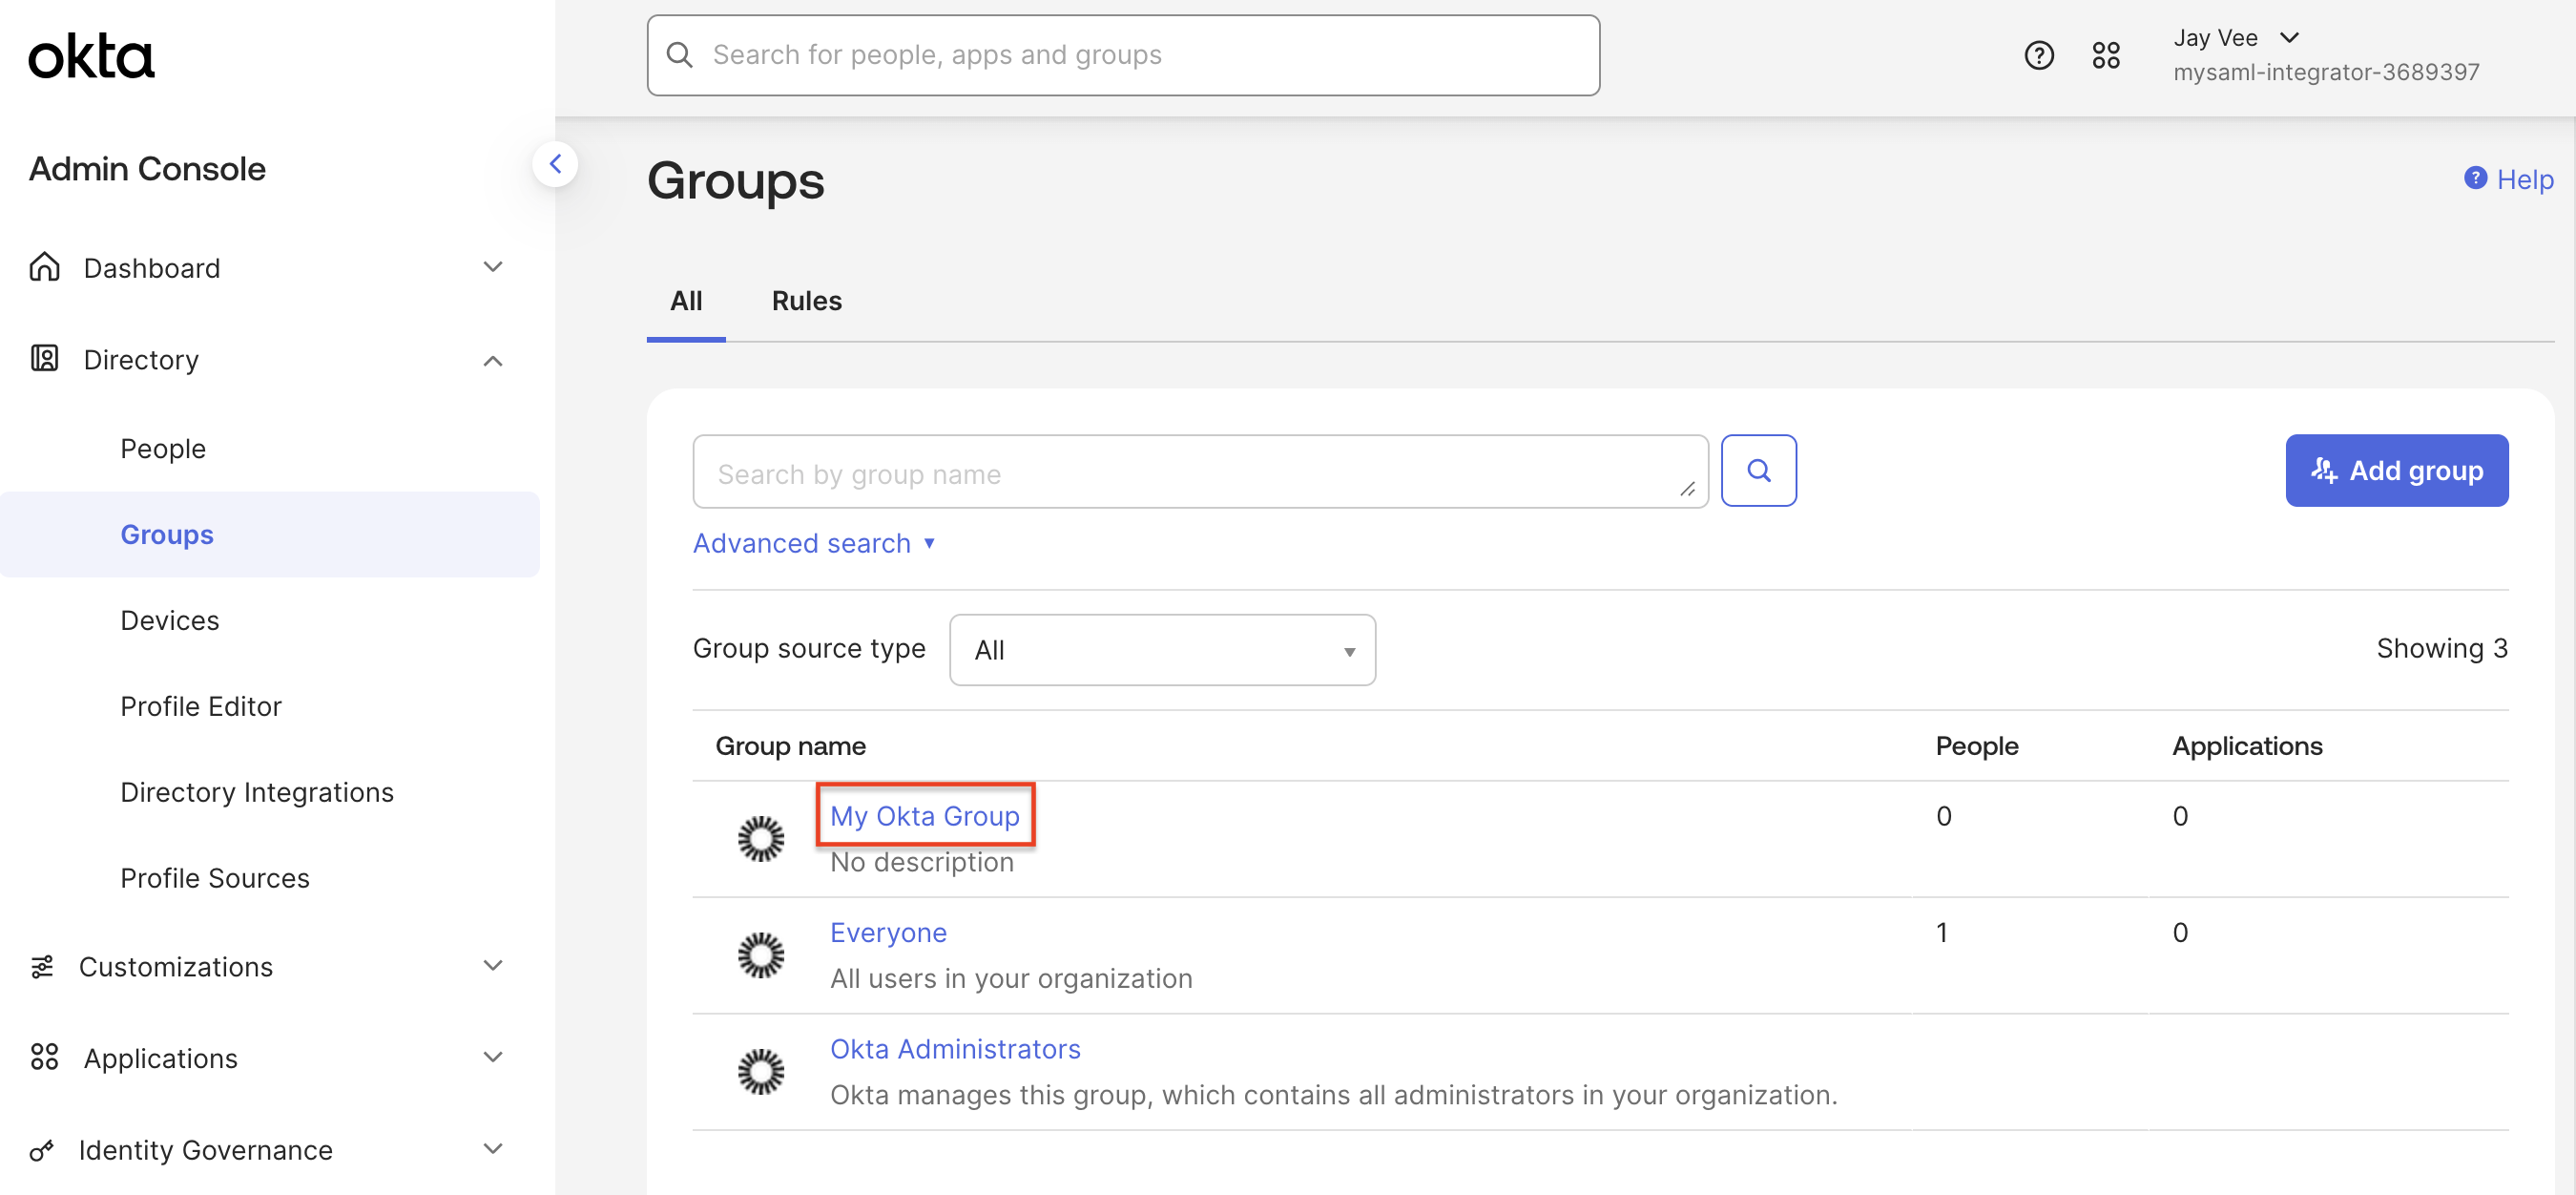
Okta: Group names listed in the Directory should be shared with the Wristband Admin for role mapping
That completes the configuration of the customer's identity provider.
Handoff: Customer IdP Admin → Wristband AdminAt this point, share the following values with your Wristband Admin before proceeding to the next step:
- Metadata URL (or metadata XML file) from your IdP
- Attribute names you configured (e.g.,
givenName, etc.)- Group names from your IdP that should map to roles in Wristband
Step 3: Complete the Wristband Configuration
Persona to Perform This Step → Wristband Admin
In this step, you will complete the Wristband side of the integration using the metadata and configuration details provided by your Customer IdP Admin in Step 2.
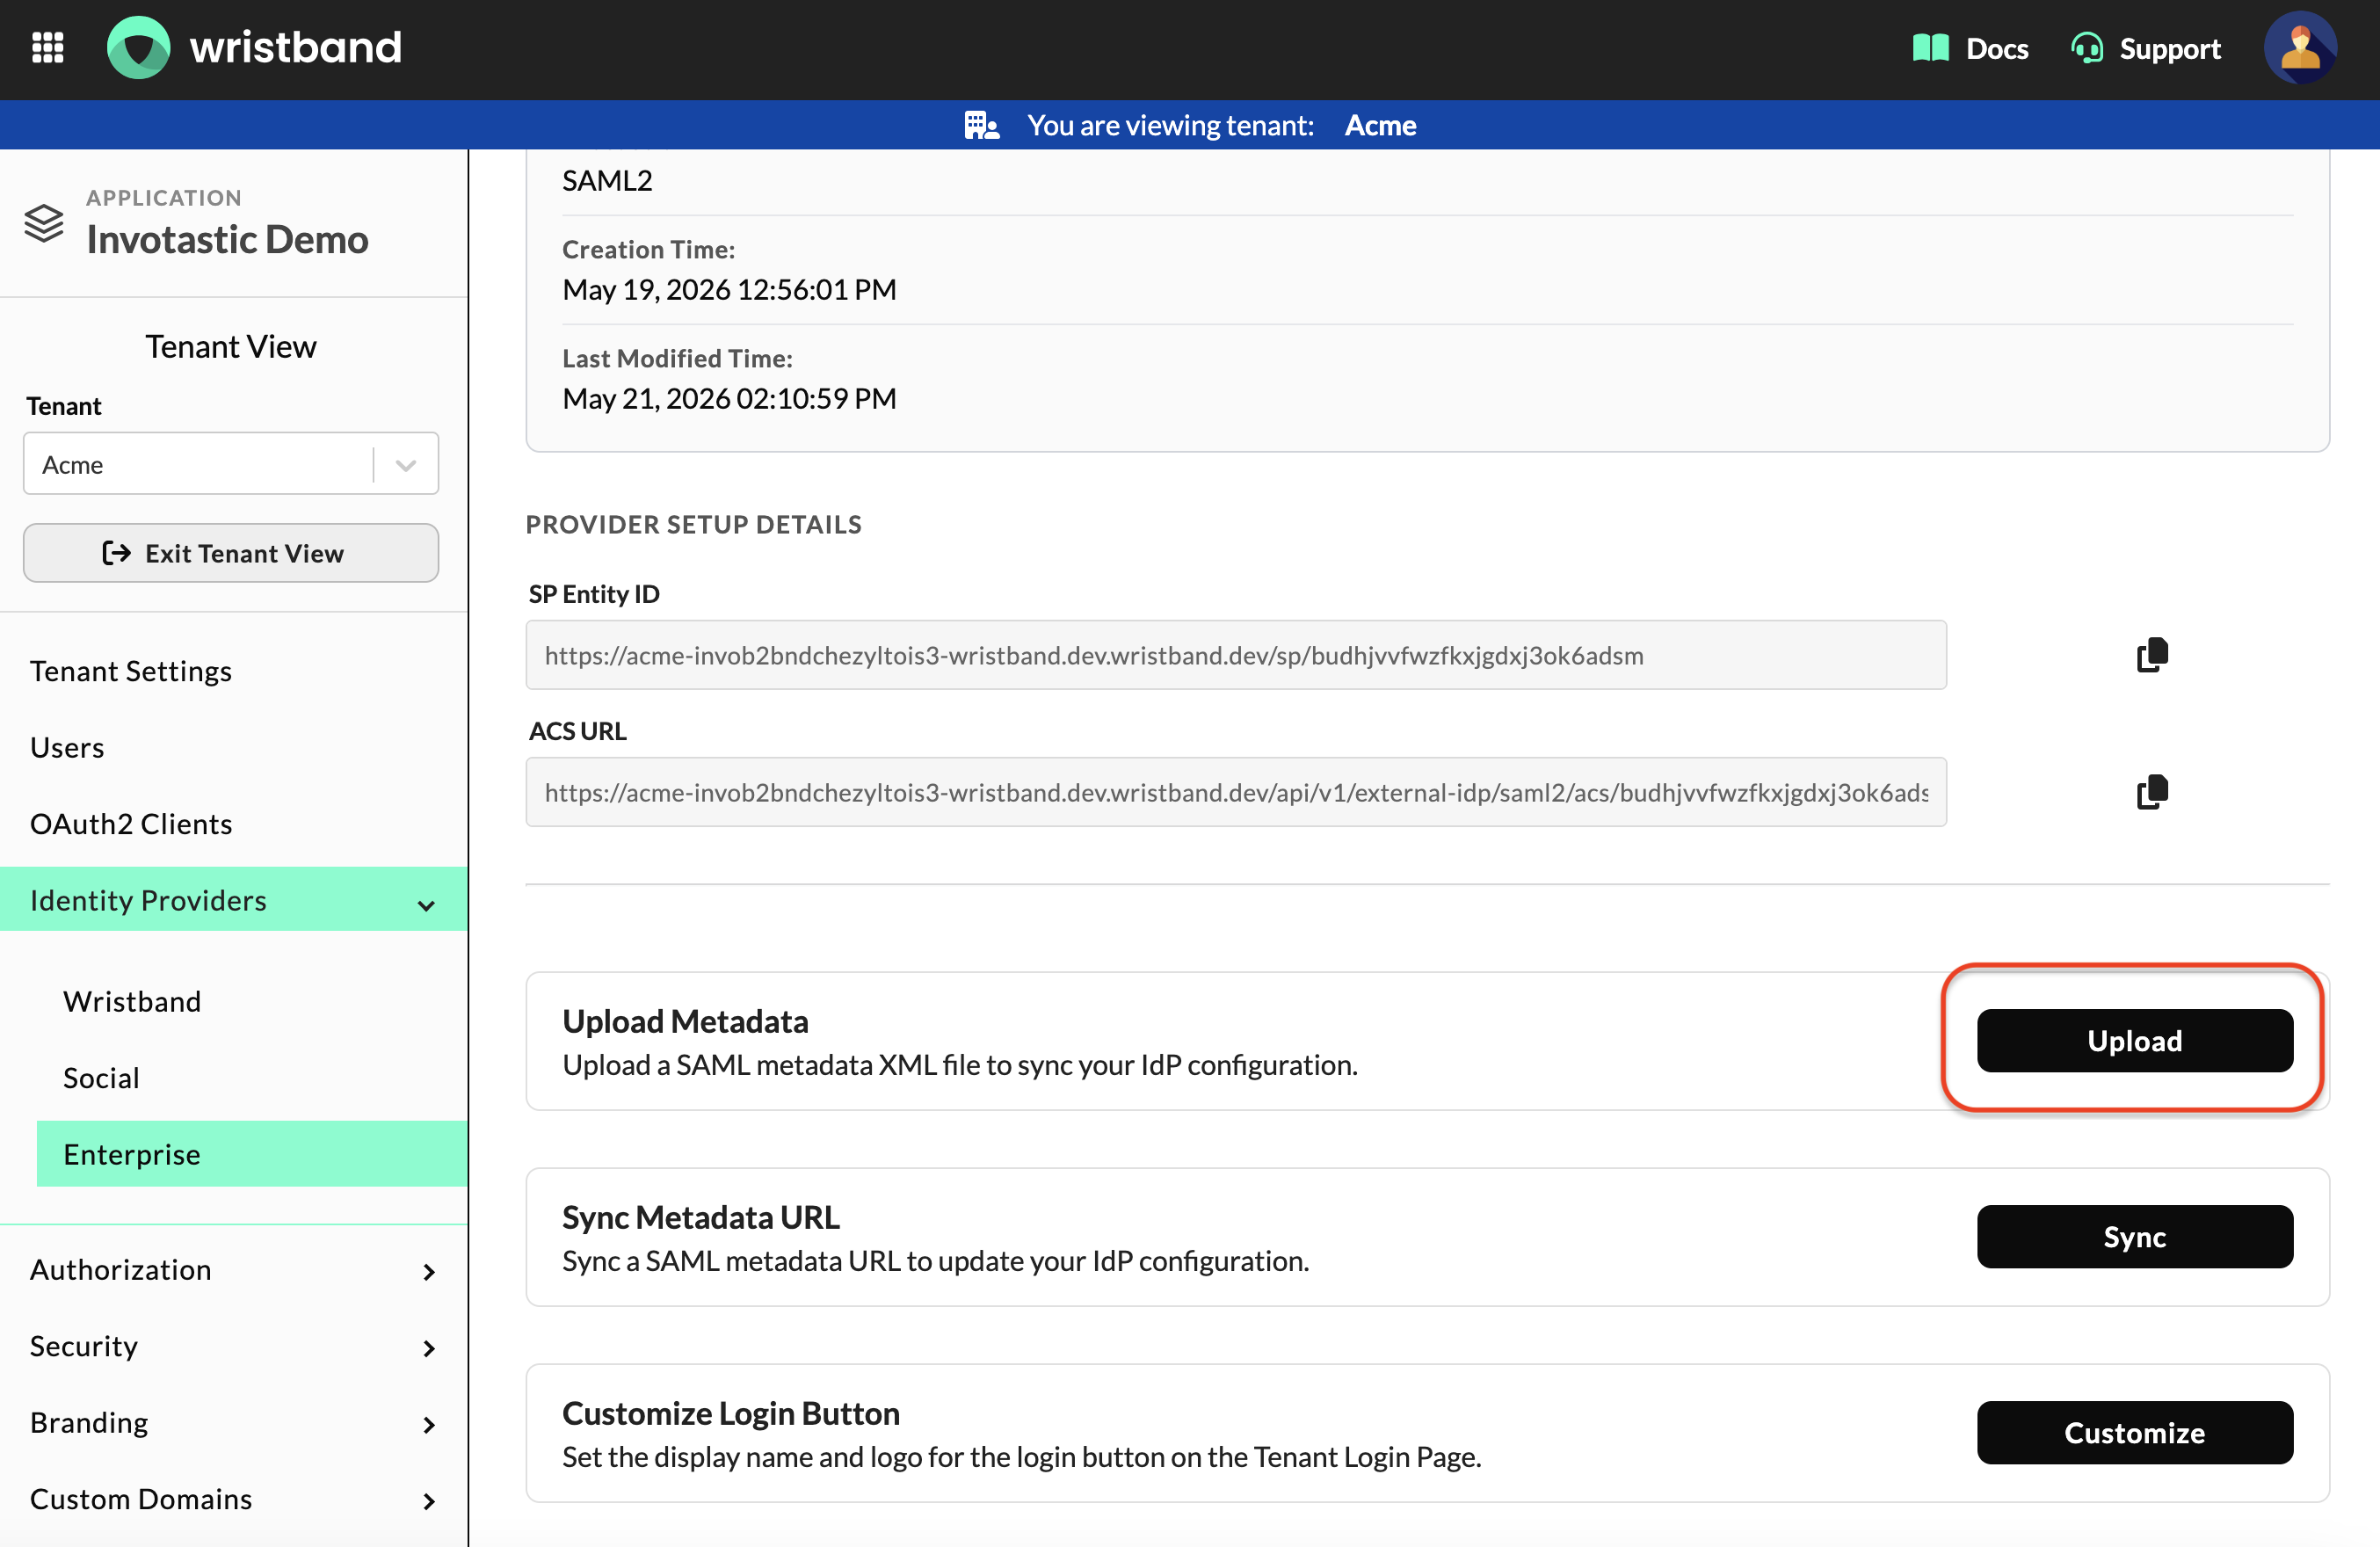
3.1. Provide Your IdP Metadata to Wristband
Return to the Wristband IdP settings page from step 1 to provide your IdP's metadata. Wristband supports three ways to do this depending on what your IdP provides:
- Metadata URL Sync (follow this approach for the Okta example in this guide)
- Metadata XML Upload
- Manual Form Entry
Option A: Metadata URL Sync
Following the Okta ExampleIf you have been following the Okta example in this guide (in Step 2), use the Metadata URL Sync option here and skip the following sub-sections:
- Metadata XML Upload
- Manual Form Entry
To fetch the SAML configuration directly from the customer's IdP metadata endpoint, click the "Sync" button towards the top of the page.
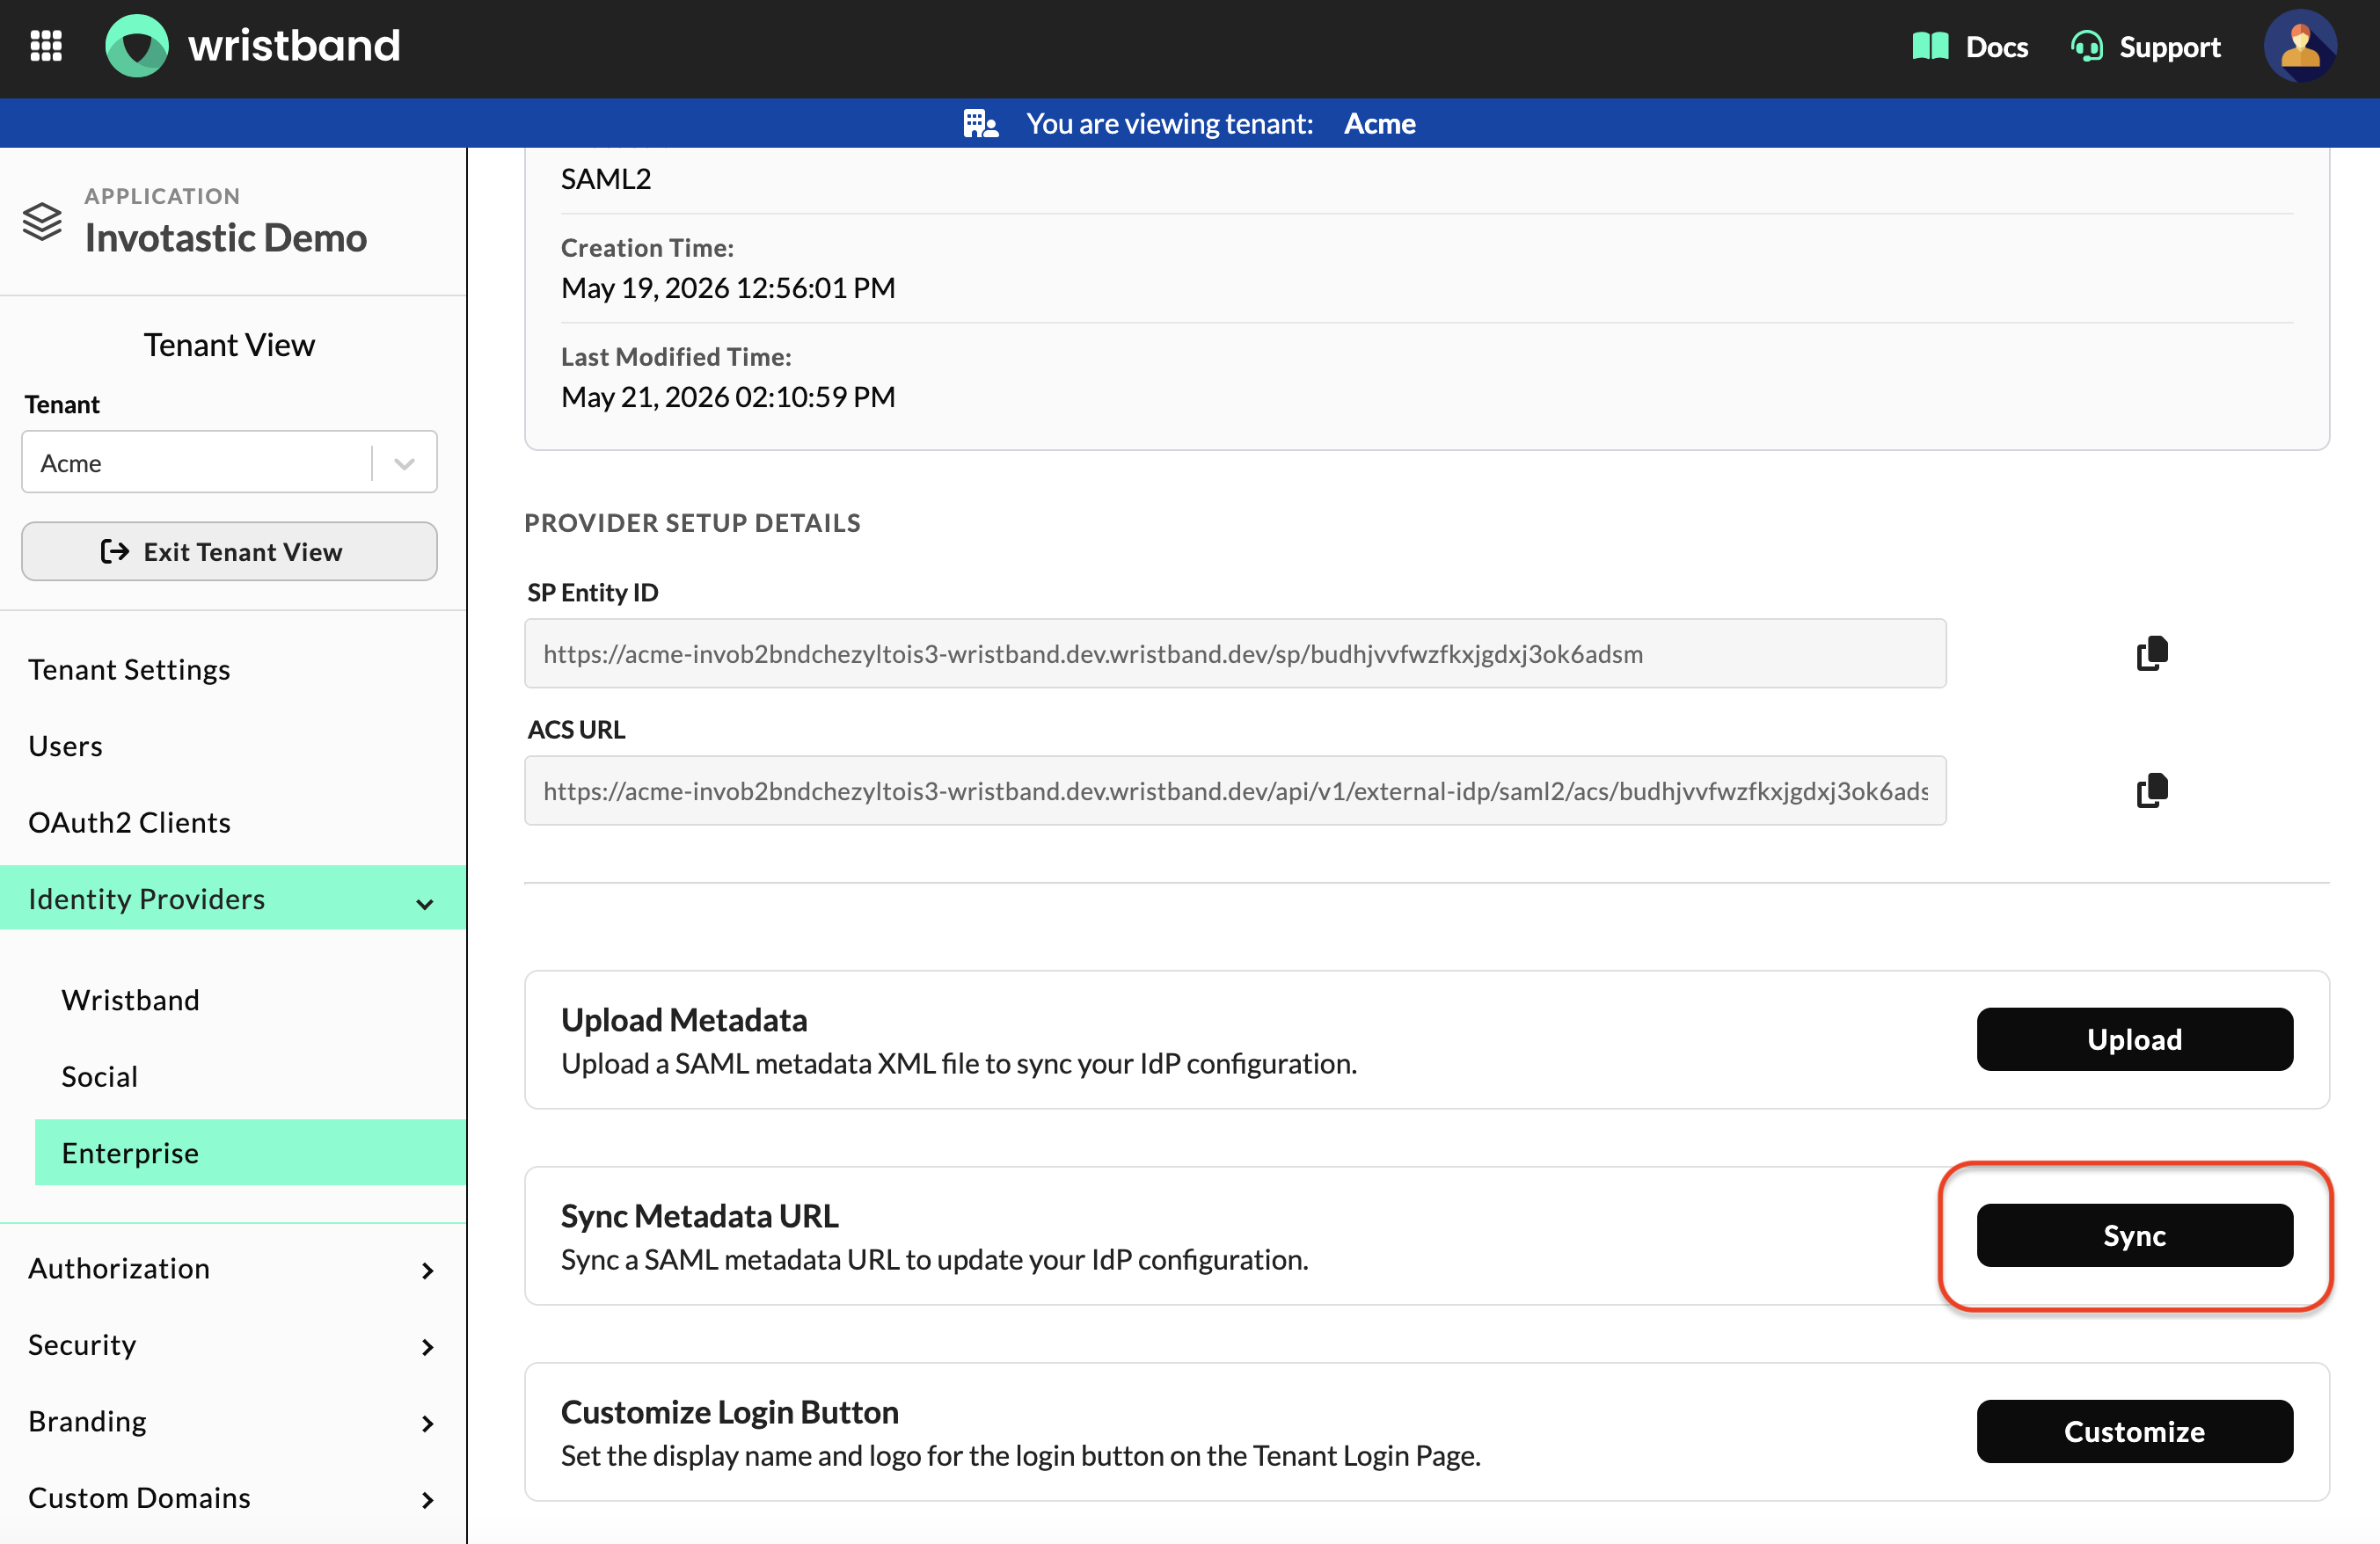
Wristband: Edit Custom IdP Page showing the Sync Metadata URL modal button
In the modal, provide the metadata URL from you customer's IdP admin and click the "Sync" button.
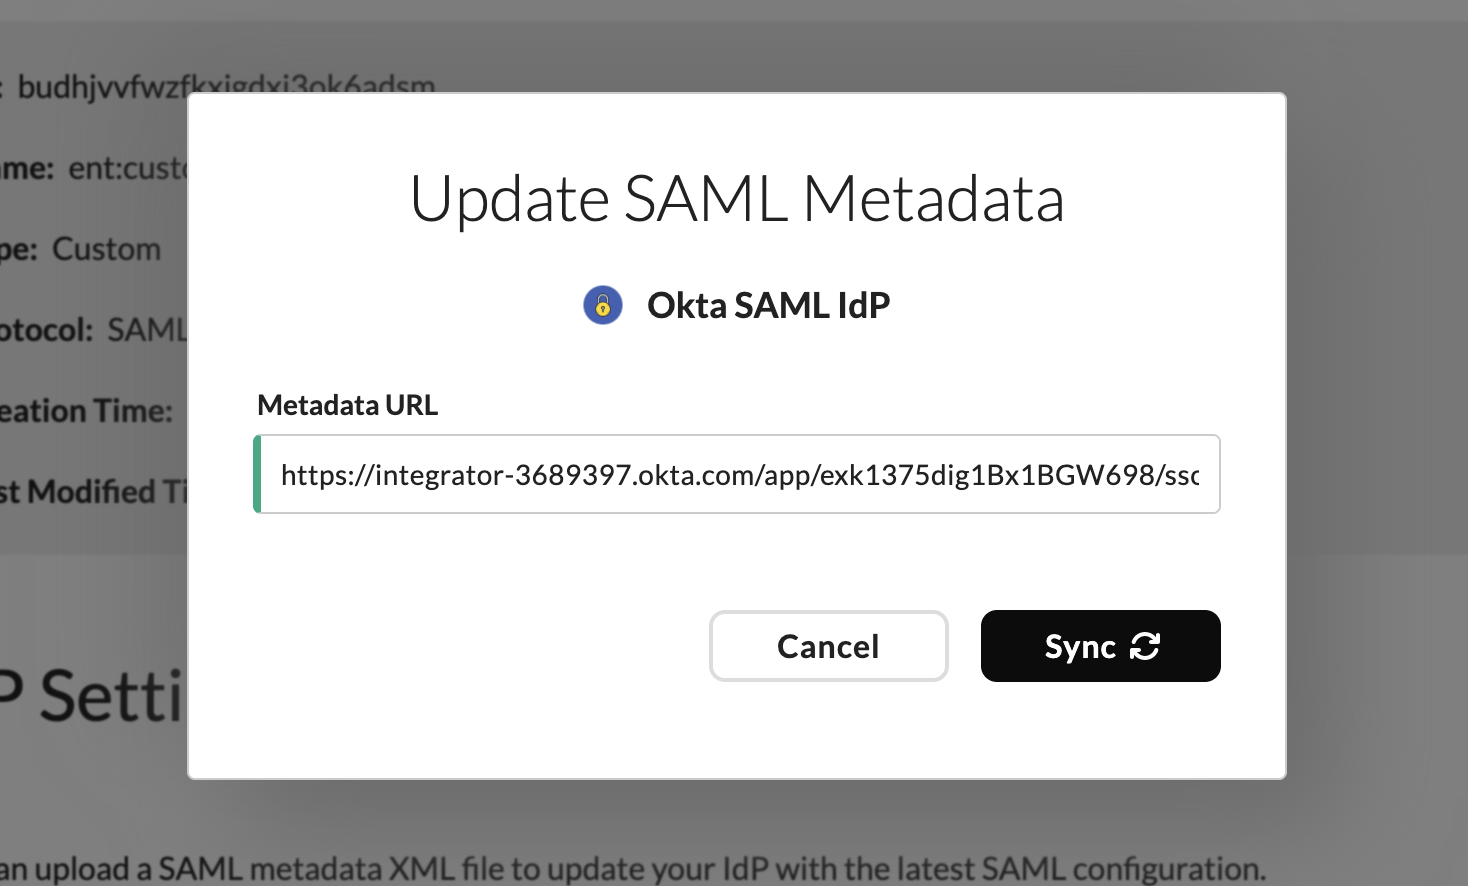
Wristband: Sync SAML Metadata URL modal
All settings form fields and signing certificates should now show values on the IdP page in the Wristband dashboard.
Option B: Metadata XML Upload
To upload a SAML metadata XML file downloaded from your customer's IdP, click the "Upload" button towards the top of the page.
Wristband: Edit Custom IdP Page showing the Upload Metadata XML modal button
In the modal, click the "Choose File" button to provide a SAML metadata .xml file downloaded from your customer's IdP. Then, click the "Update" button.
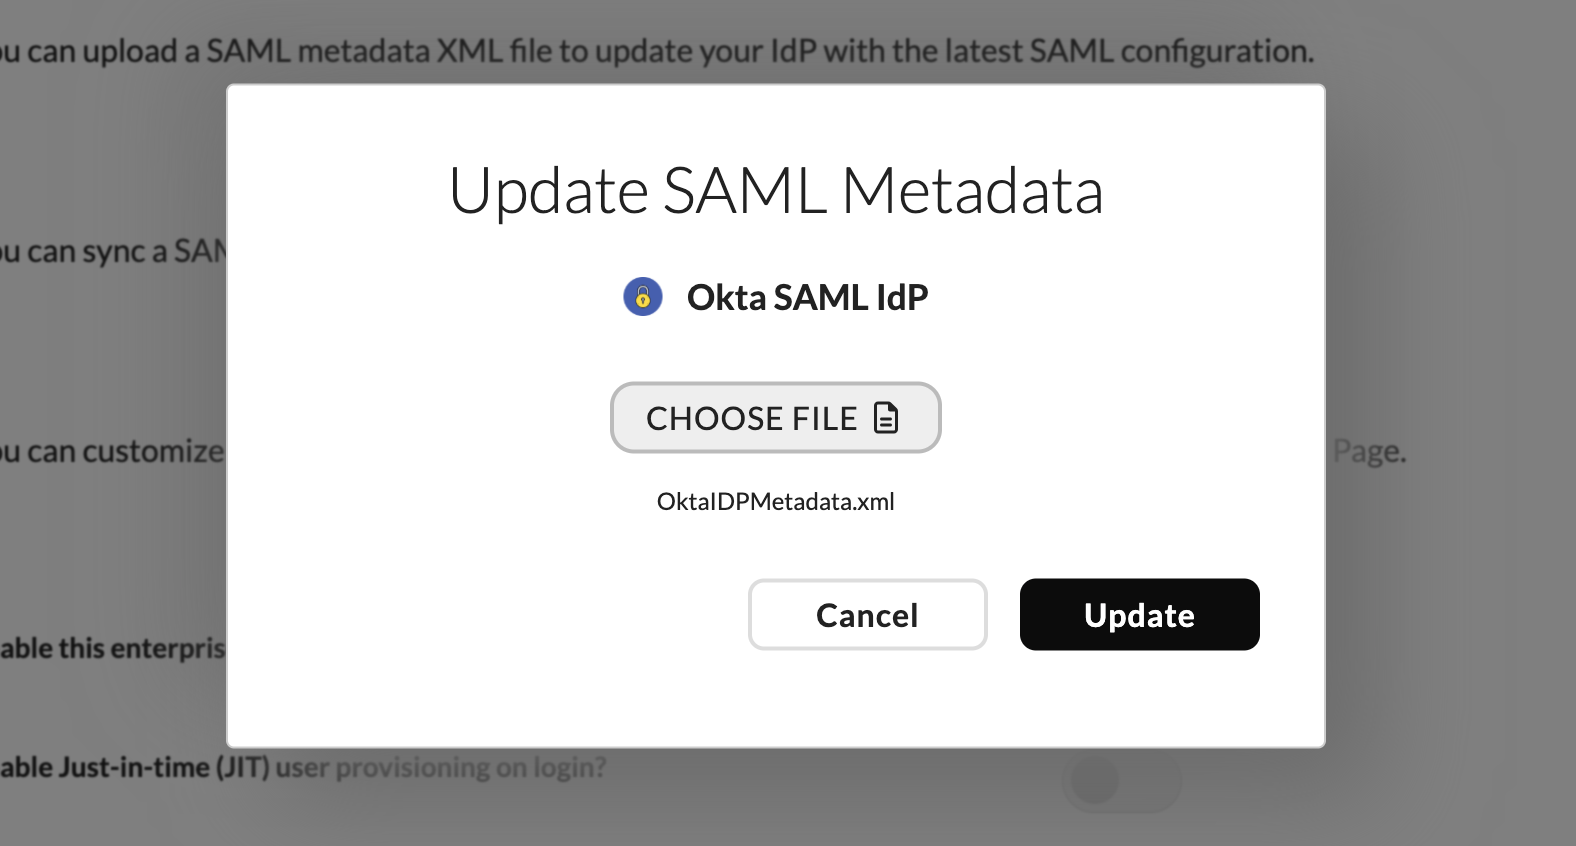
Wristband: Upload SAML Metadata XML modal
All settings form fields and signing certificates should now show values on the IdP page in the Wristband dashboard.
Option C: Manual Form Entry
For any IdP's that don't provide either a metadata URL or a metadata XML file, you can manually enter the customer's IdP metadata values.
Scroll to the bottom of the "IdP Settings" form section. Enter the following values and click the "Save" button:
- Entity ID: The customer IdP's unique identifier.
- SSO URL: The SAML endpoint that the customer's IdP uses to handle login requests.

Wristband: IdP Settings form showing Entity ID and SSO URL fields
Next, scroll down to the "Signing Certificates" section and click the "Add Certificate" button.
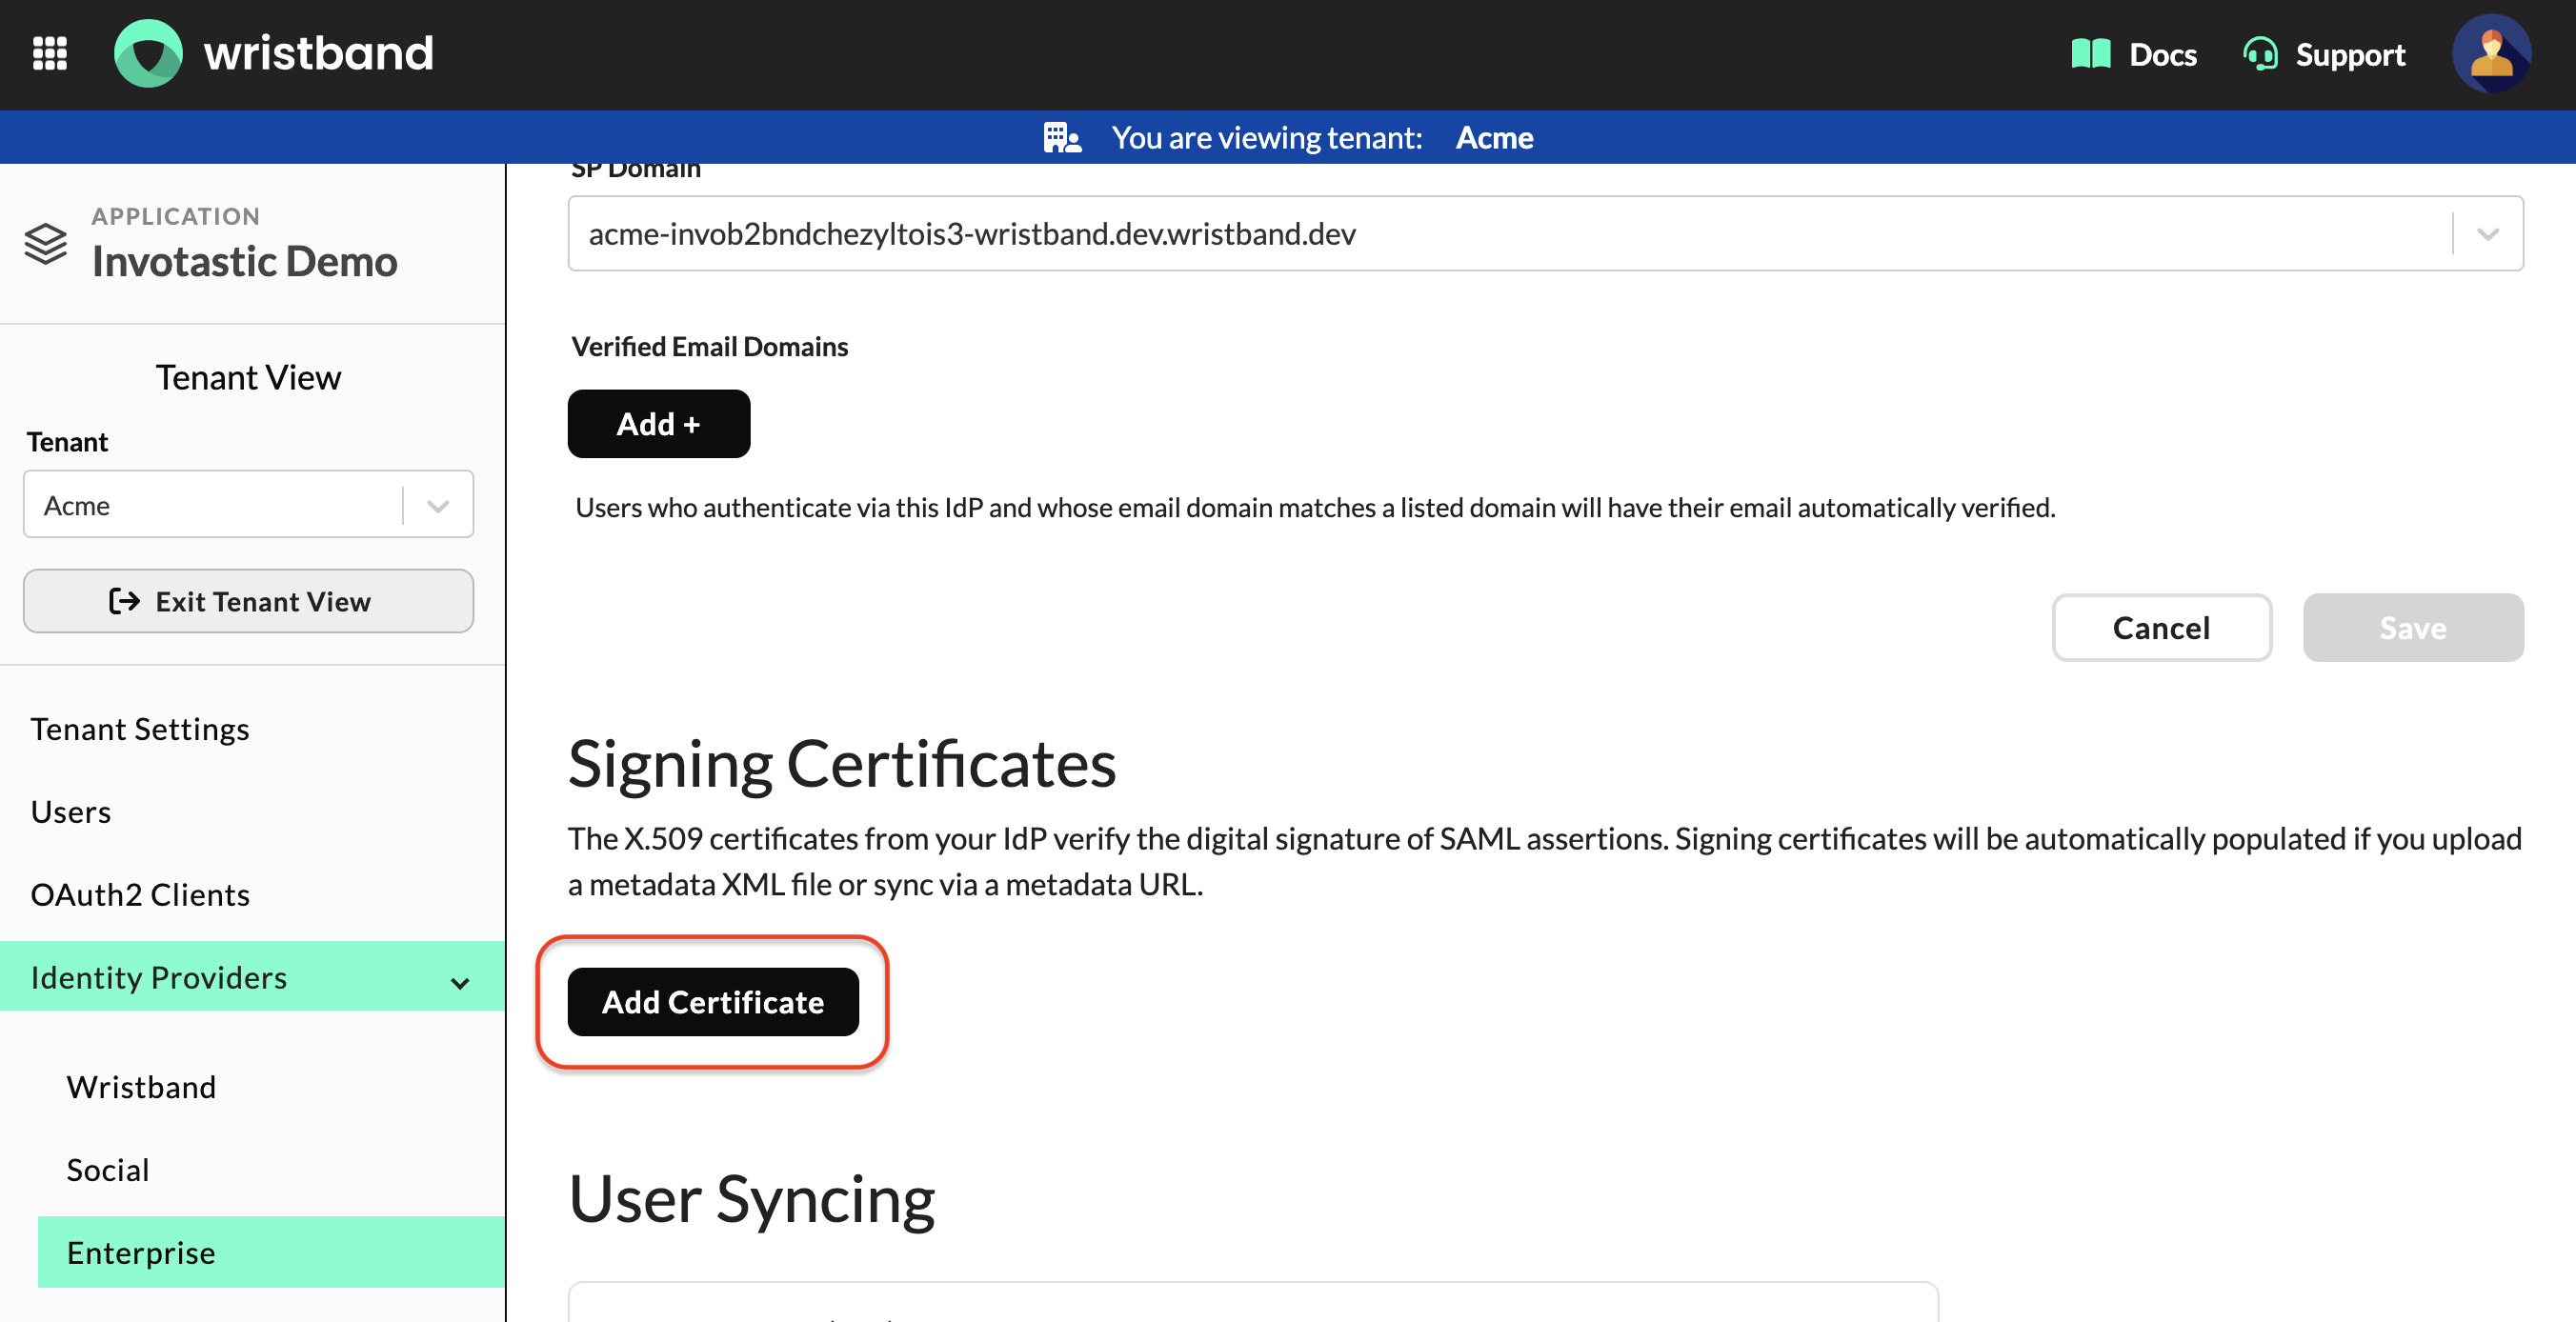
Wristband: Signing Certificates section with Add Certificate button
In the modal, you can either click the "Choose File" button to upload the IdP's X.509 signing certificate, or alternatively you can manually copy and paste the value in the form field at the bottom.
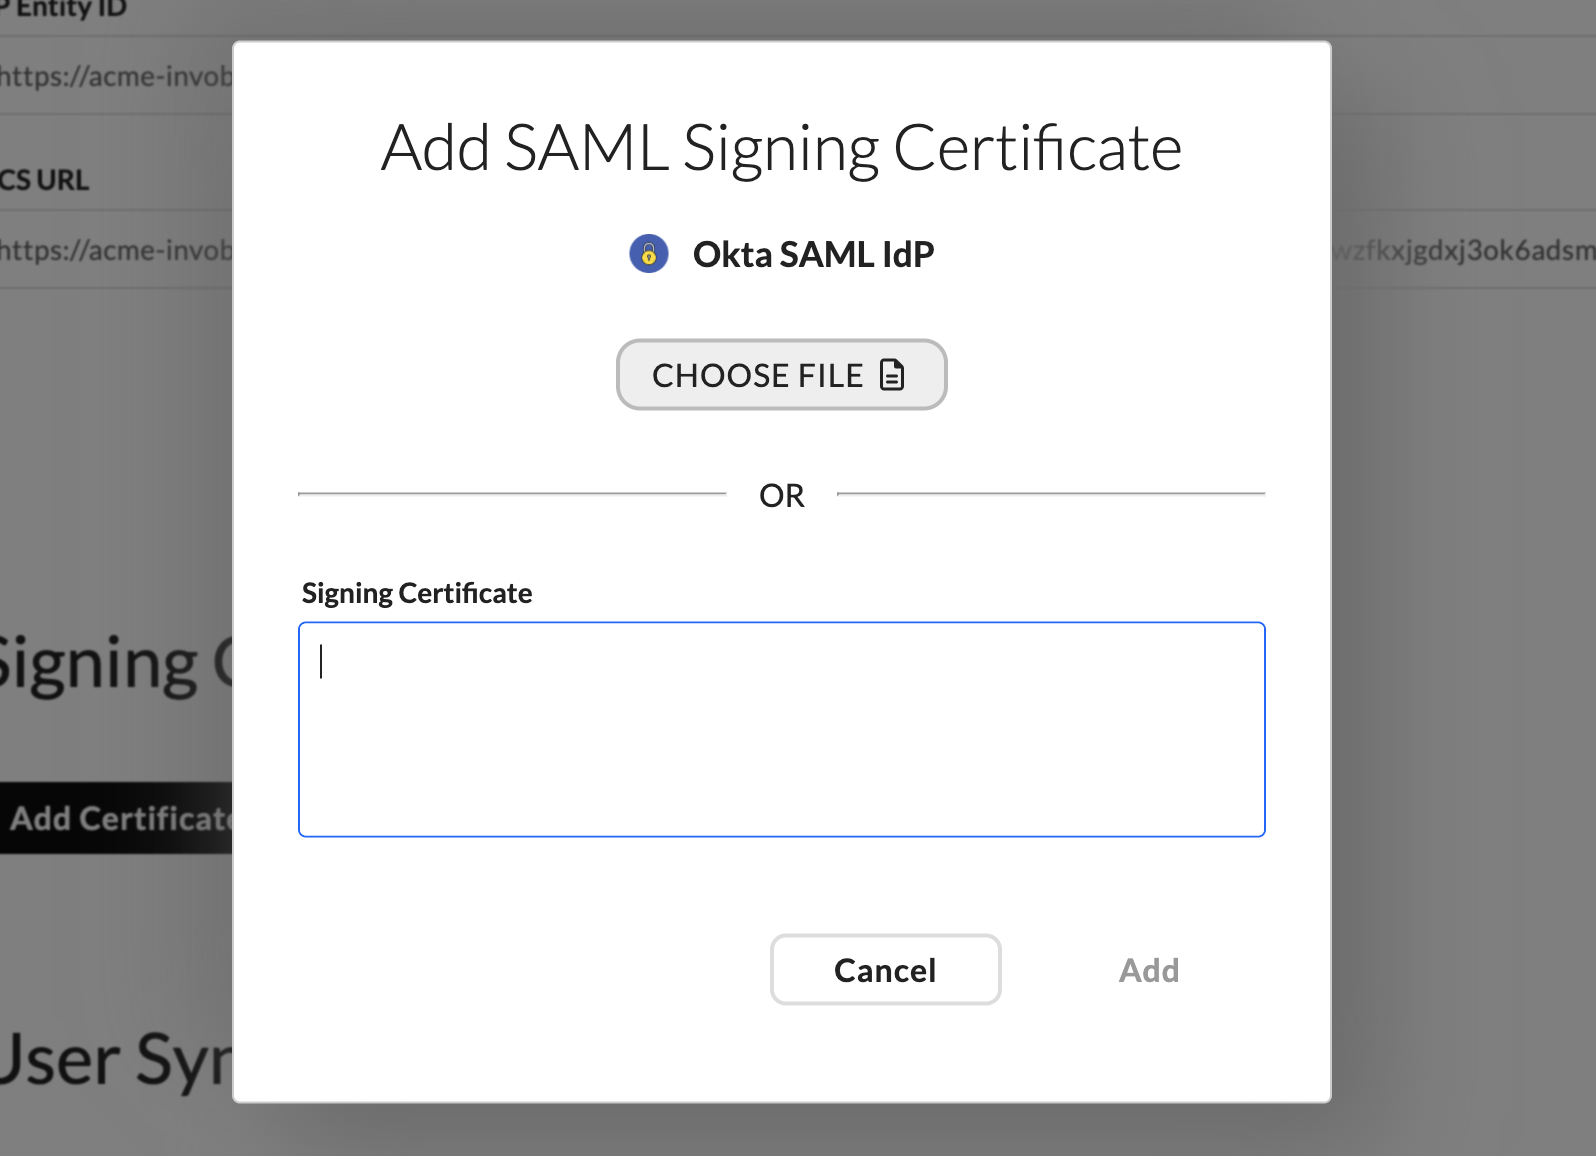
Wristband: Add Certificate modal showing file upload and manual paste options
Click the "Add" button to save the certificate. All SAML metadata has now successfully been provided to Wristband.
3.2. Enable and Configure IdP Settings
With your metadata in place, configure the remaining settings on the IdP settings page and enable the IdP for the tenant.
First, enable the IdP by toggling on "Enable Identity Provider". This is required for users to authenticate via this IdP. Note that this toggle will be greyed out until Entity ID, SSO URL, and Signing Certificate are all provided.

Wristband: IdP settings page with Enable enterprise identity provider toggle
Additionally, the following IdP settings are available depending on your needs:
- Allow IdP-initiated SSO: Enable this if you want users to be able to initiate login directly from your customer's IdP dashboard (e.g., Okta App dashboard) rather than from Wristband-hosted tenant login page.
- Verified Email Domains: Add the email domains associated with this IdP (e.g.,
acme.com). When a user authenticates via this IdP, Wristband will automatically mark their email as verified if their email domain matches one of the domains in this list.
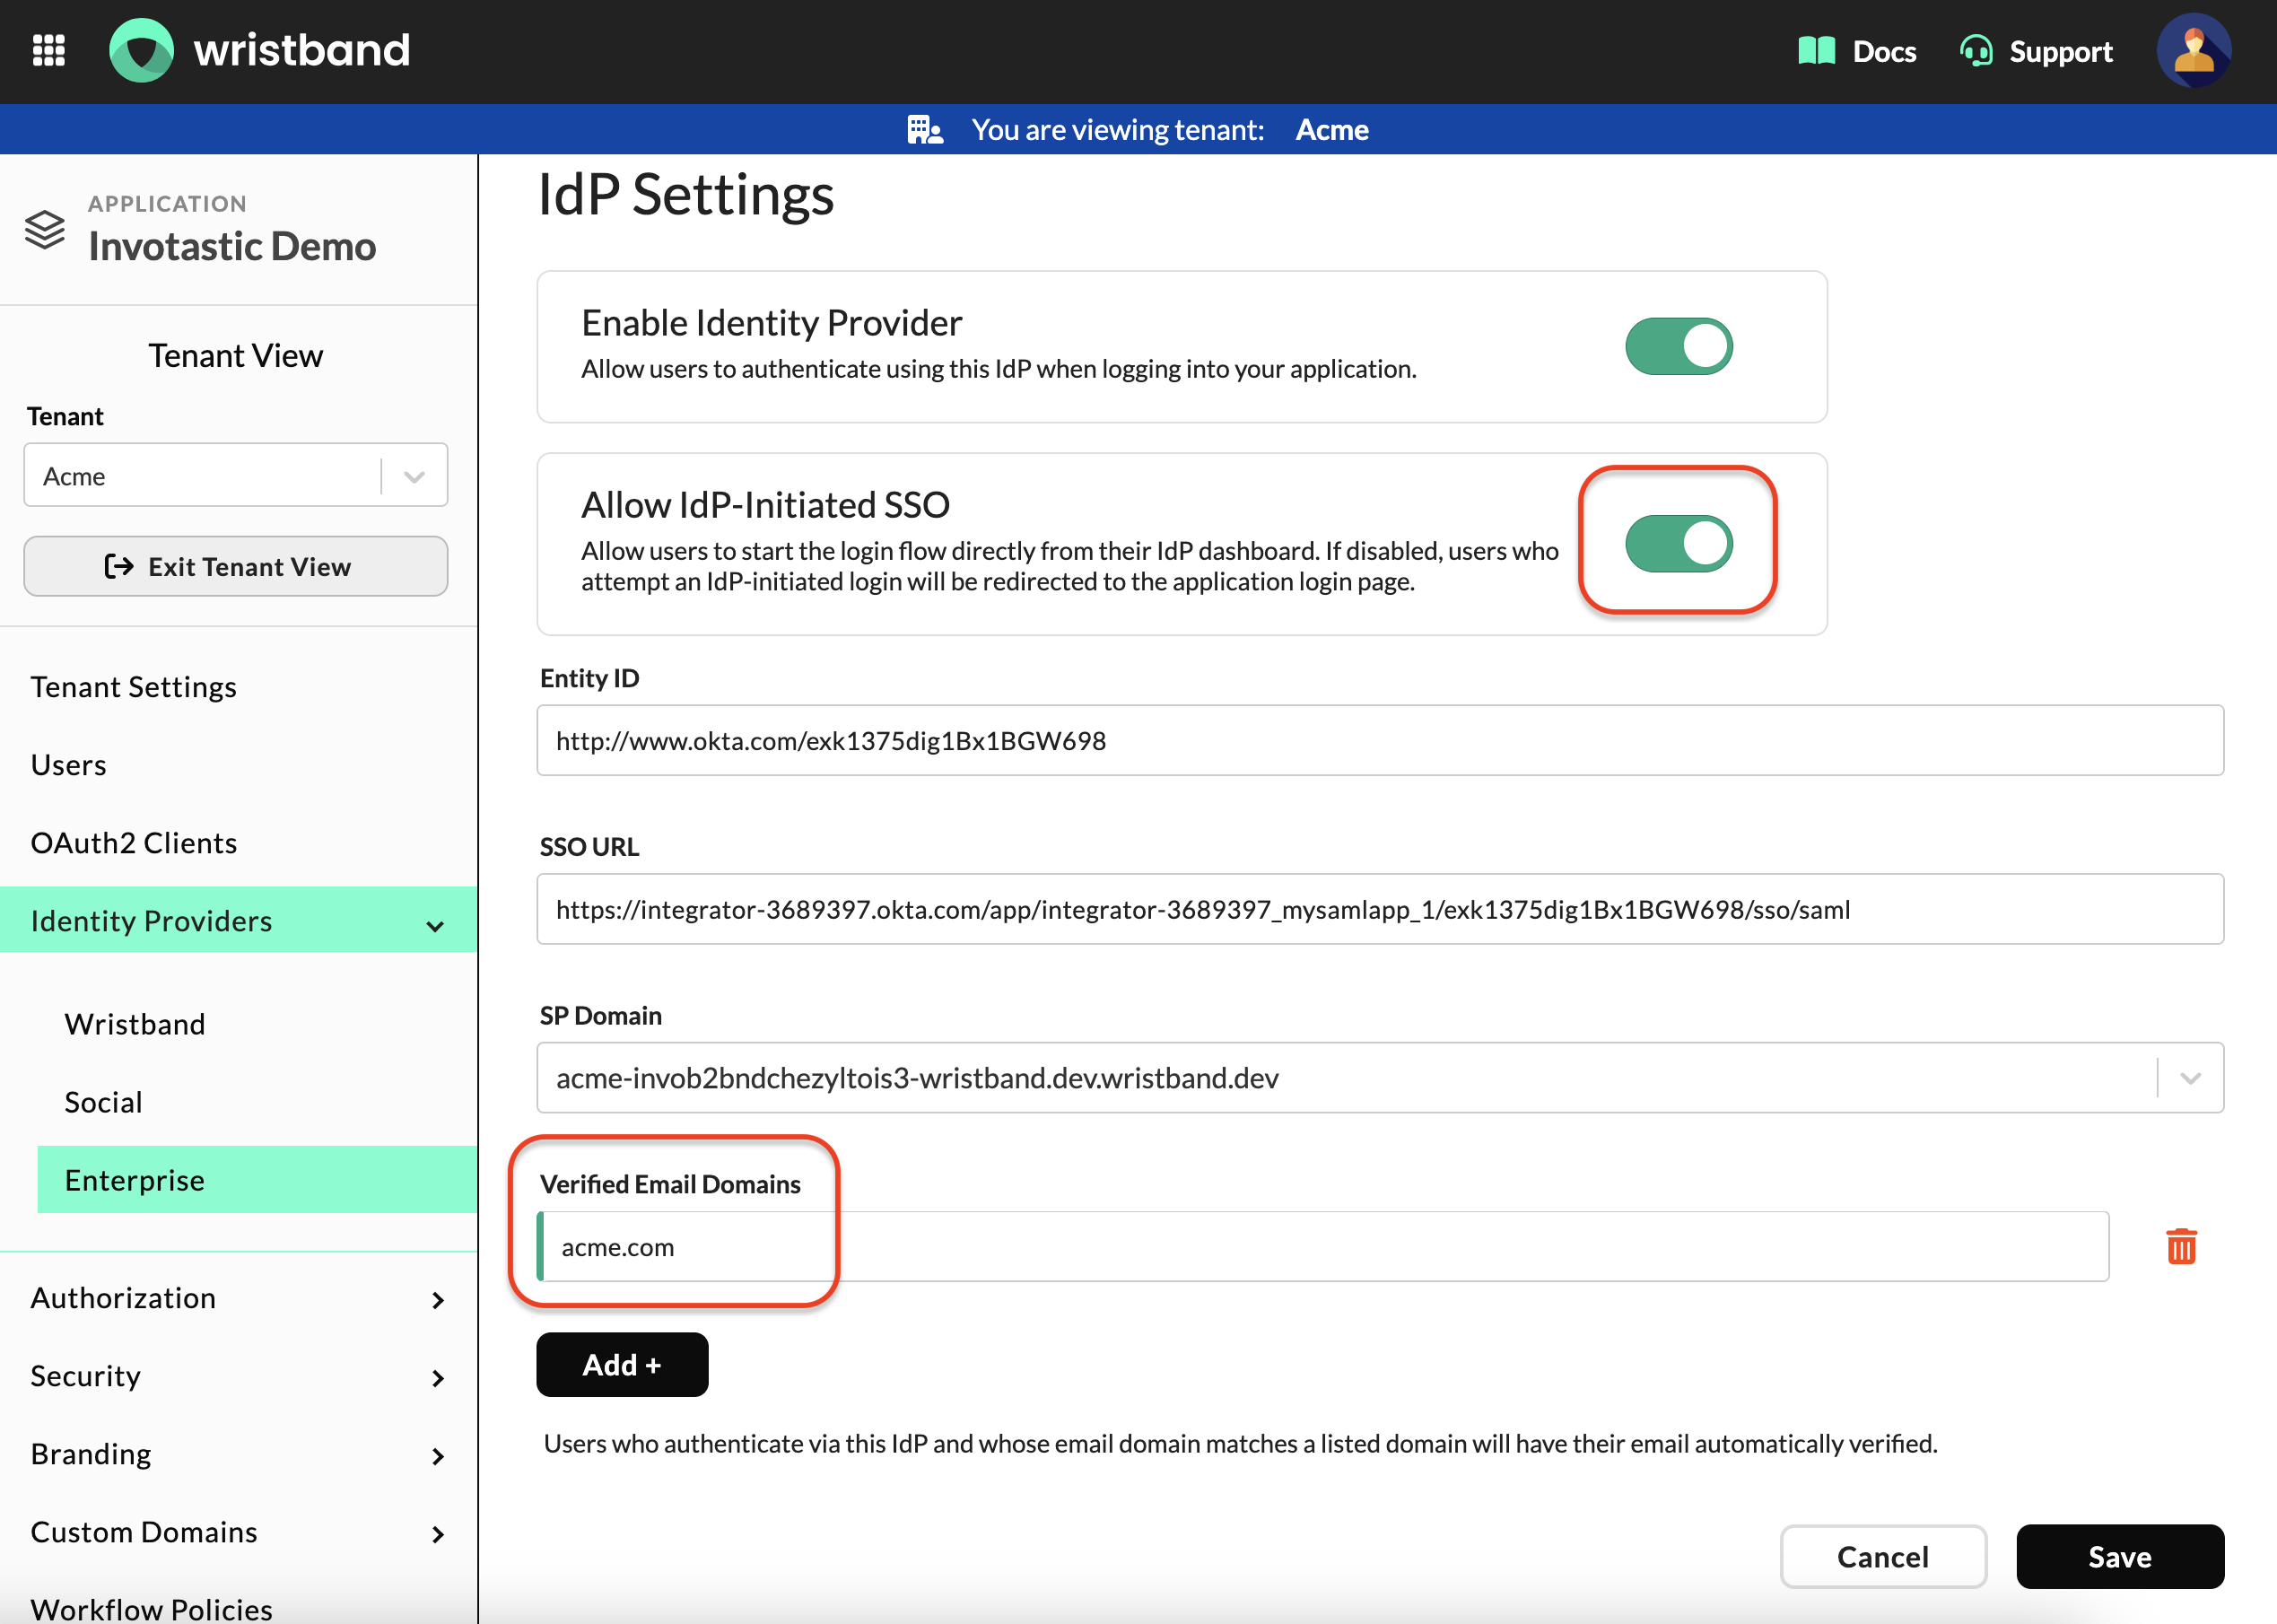
Wristband: IdP settings page showing additional configuration options
3.3. Configure User Syncing
Scroll down on the IdP settings page to the "User Syncing" section. This section has three parts that work together to control how user attributes from your customer's IdP are handled in Wristband:
- Just-In-Time (JIT) Provisioning
- Attribute Mapping
- Attribute Syncing
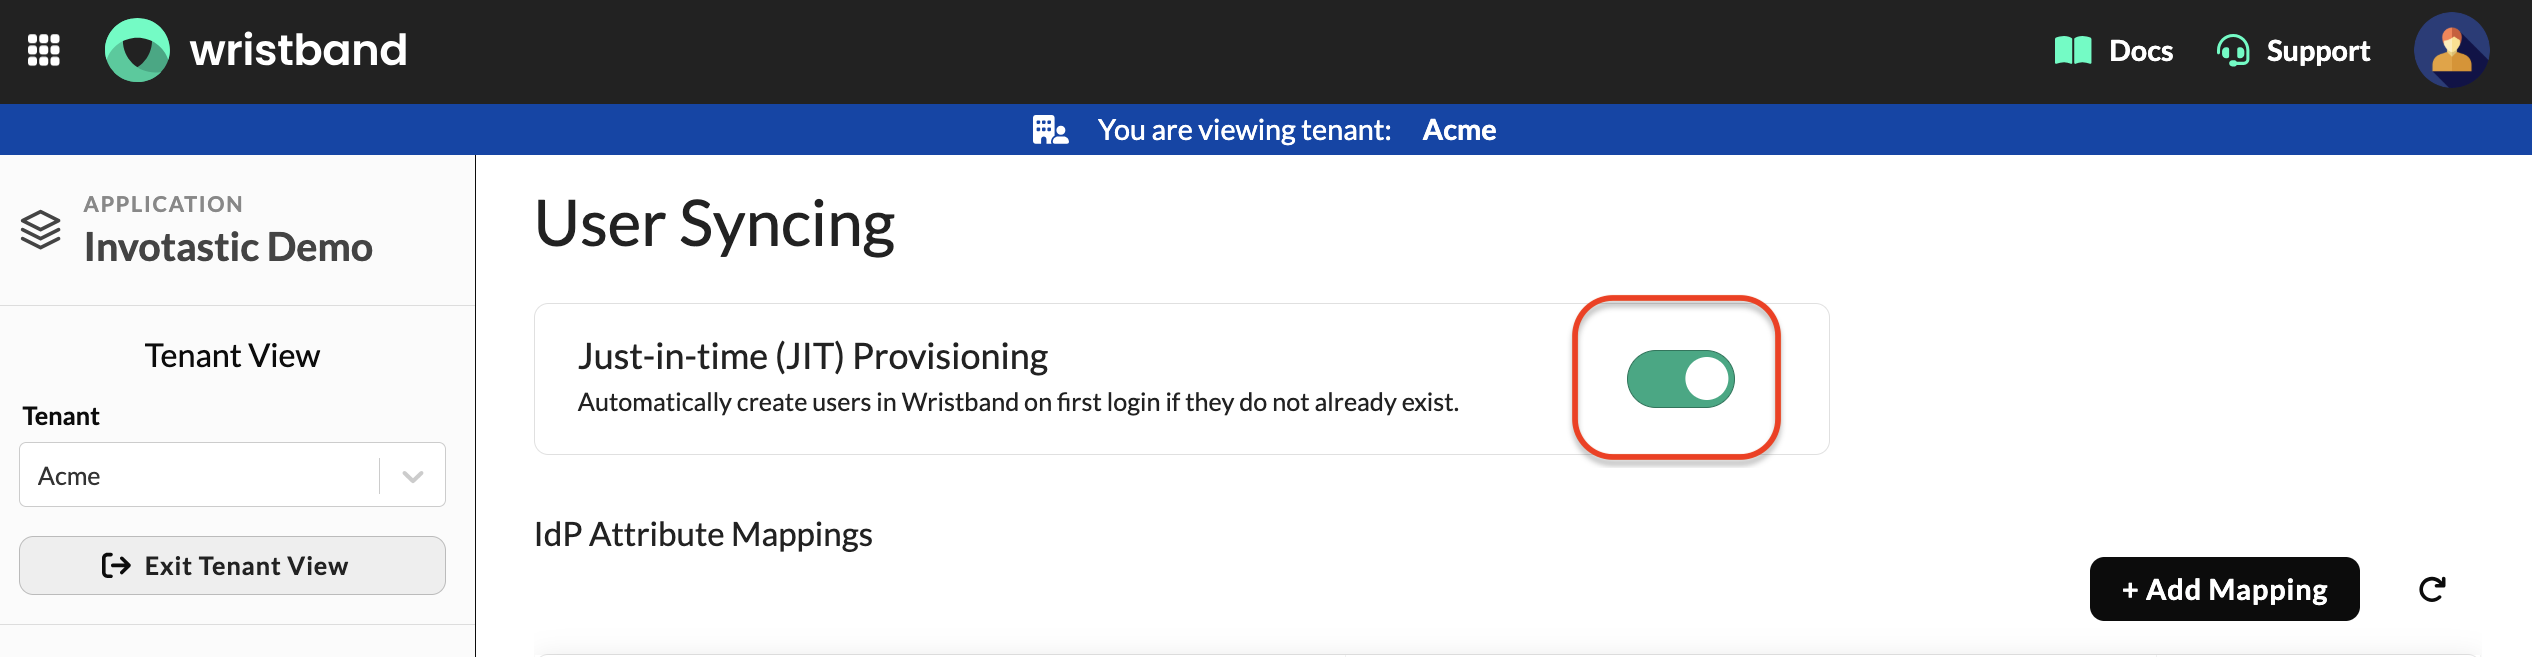
Just-In-Time (JIT) Provisioning
Enable the Just-in-time (JIT) Provisioning toggle if you want Wristband to automatically create a user record the first time a user logs in via this IdP. Enable this if Wristband is your source of truth for users and you do not want to pre-provision users in Wristband. If you are using an SSO-Only Integration, then leave this disabled since user provisioning will be handled within your own application.
Wristband: User Syncing section showing the JIT Provisioning toggle.
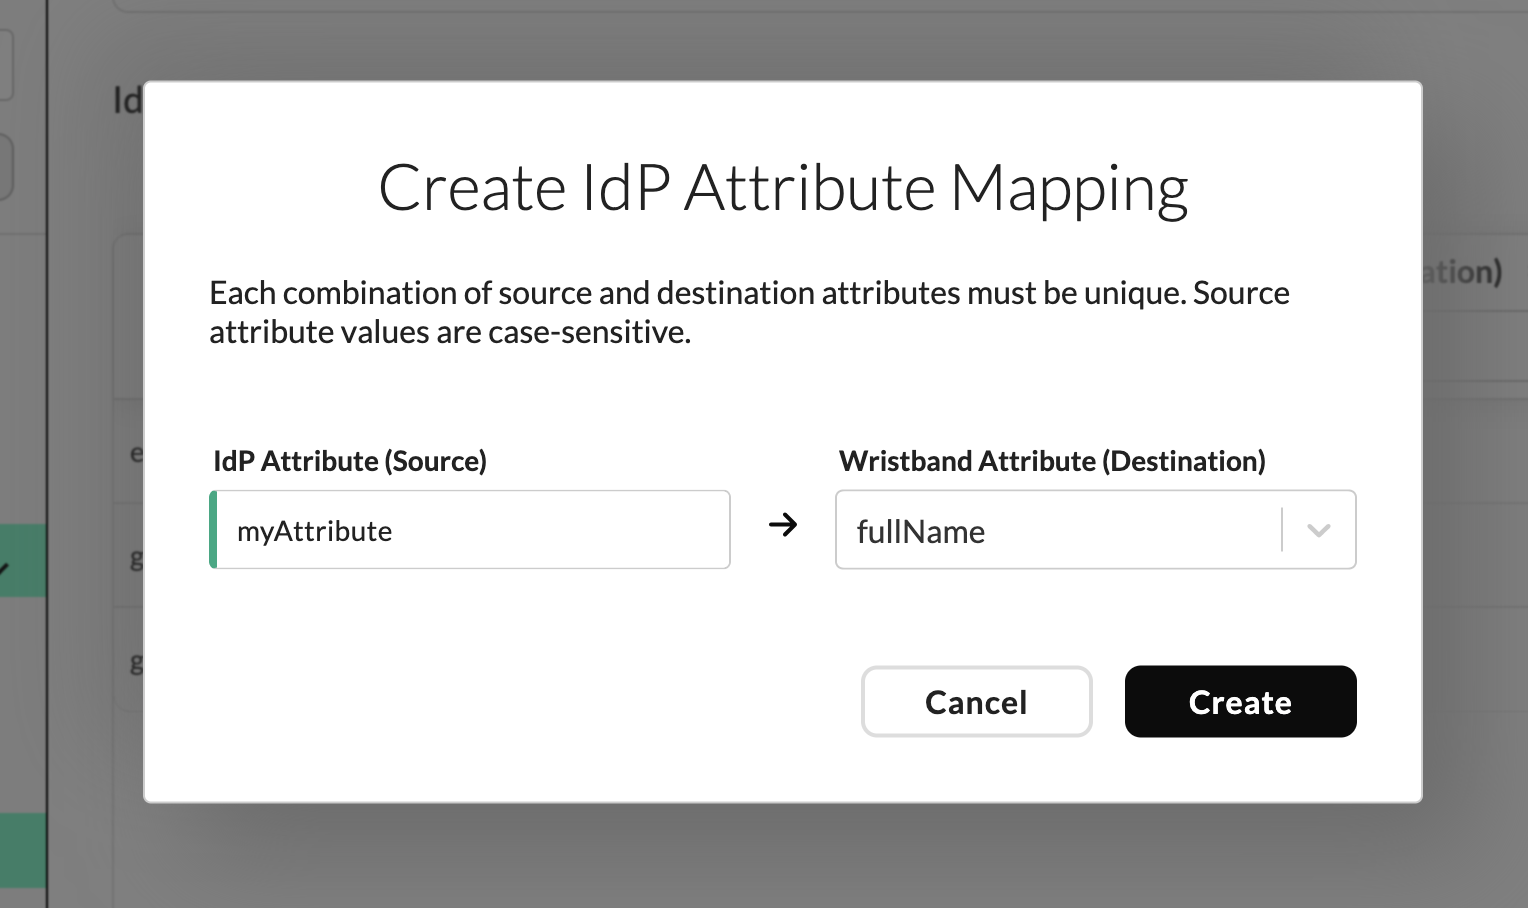
IdP Attribute Mapping
Next, map the attribute names coming from your customer's IdP (Source Attribute) to the corresponding Wristband user schema fields (Destination Attribute). The Source Attribute values should match the attribute names configured in your customer's IdP in Step 2.
Click the + Add Mapping button for each mapping you want to add. Enter the source attribute name and select the destination attribute from the dropdown, then click the "Add Mapping" button.
Wristband: Create IdP Attribute Mapping modal, showing the IdP Attribute (Source) and Wristband Attribute (Destination) fields.
NameID Attribute Mapping
The NameID from the IdP SAML response will automatically be mapped to the Wristband user's Id attribute. If you need to map the Wristband user's Id attribute to a different claim, you can do so by creating a new attribute mapping using Id as the destination attribute and providing a different source attribute.
Note
It's not allowed to use the
NameIDfrom the SAML response as a source attribute in an attribute mapping. TheNameIdcan only be mapped to the Wristband user'sIdattribute.
Attributes to Sync for User Provisioning
Select the Wristband user attributes you want to keep in sync with your customer's IdP on every login. Only attributes that were configured in Step 2 should be selected here.
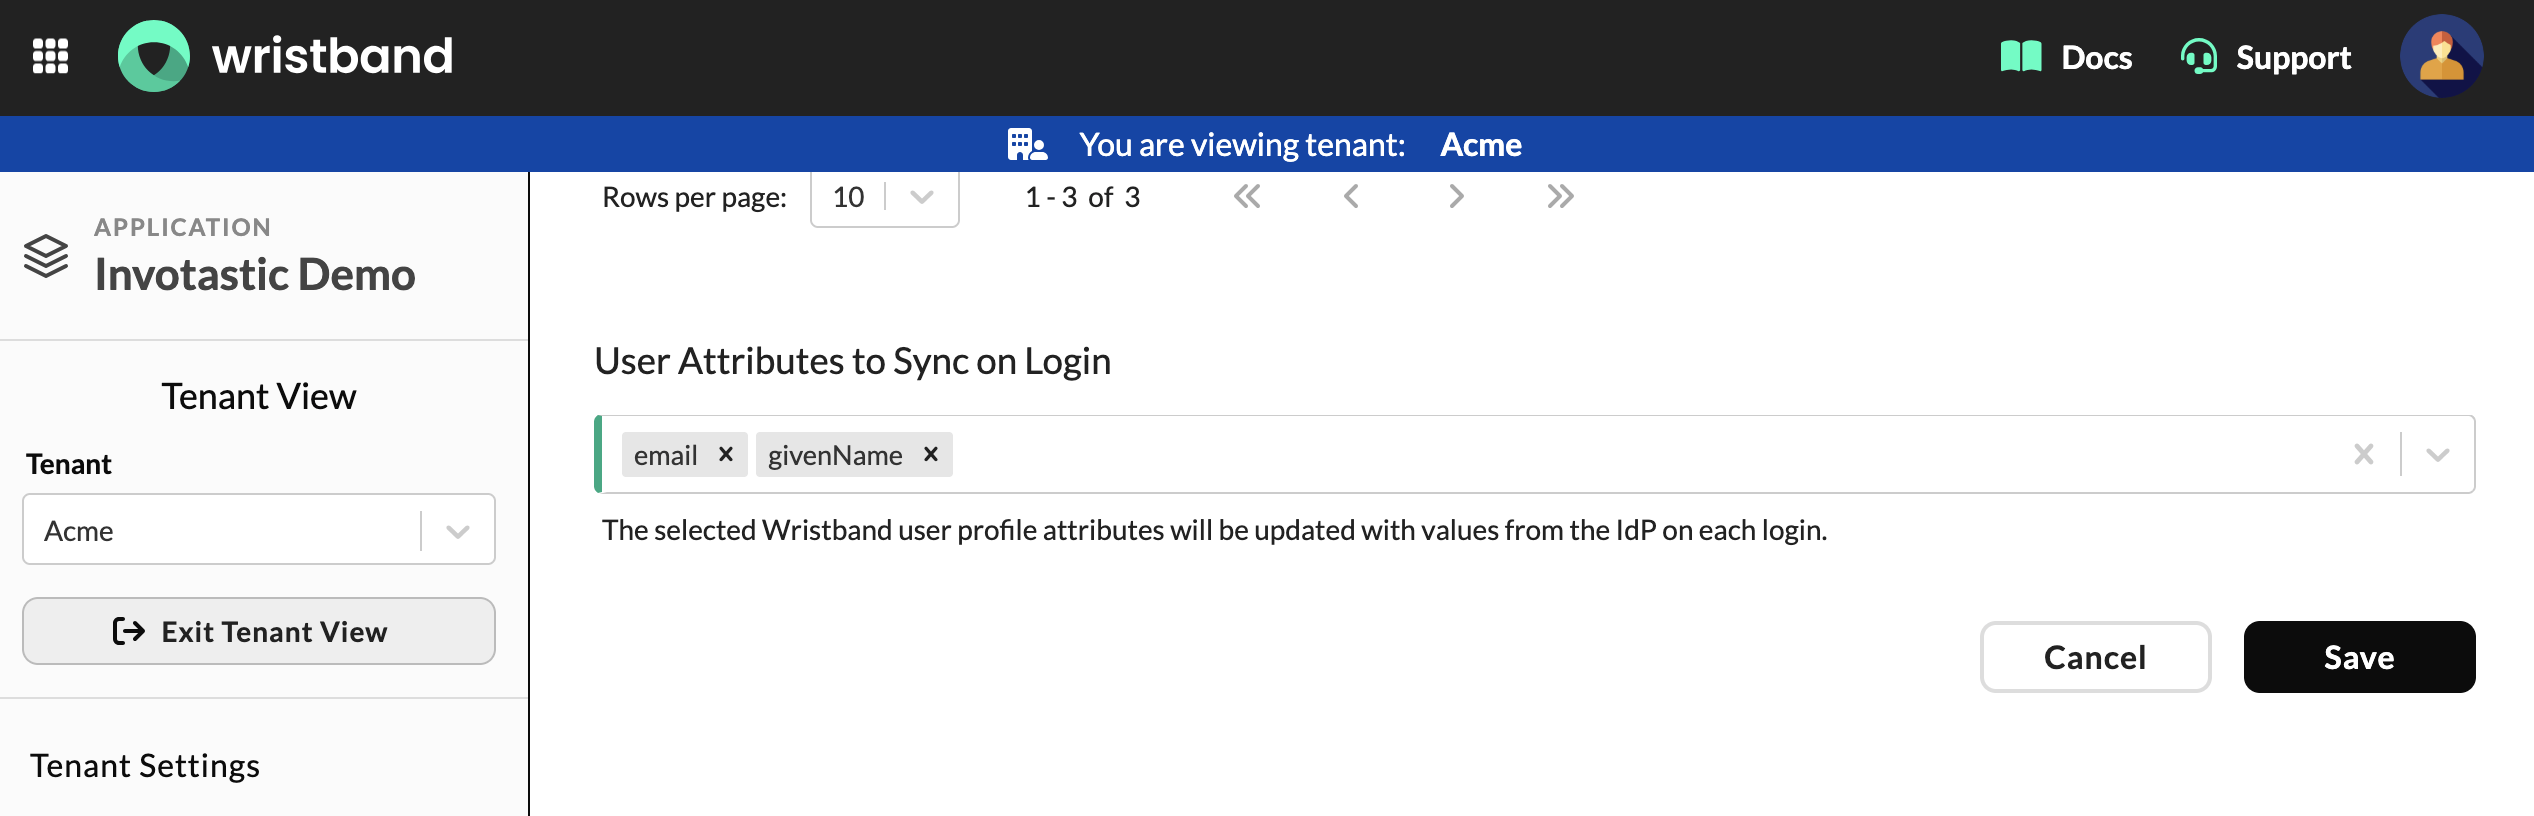
Wristband: User Attributes to Sync on Login selector showing email and givenName selected.
Select each desired attribute from the dropdown and click the "Save" button.
3.4. Configure Role Mapping
Navigate to the Role Mapping section. Enable the Role Mapping toggle to automatically assign Wristband roles on login based on IdP group membership. This is required if you configured a groups claim in Step 2.
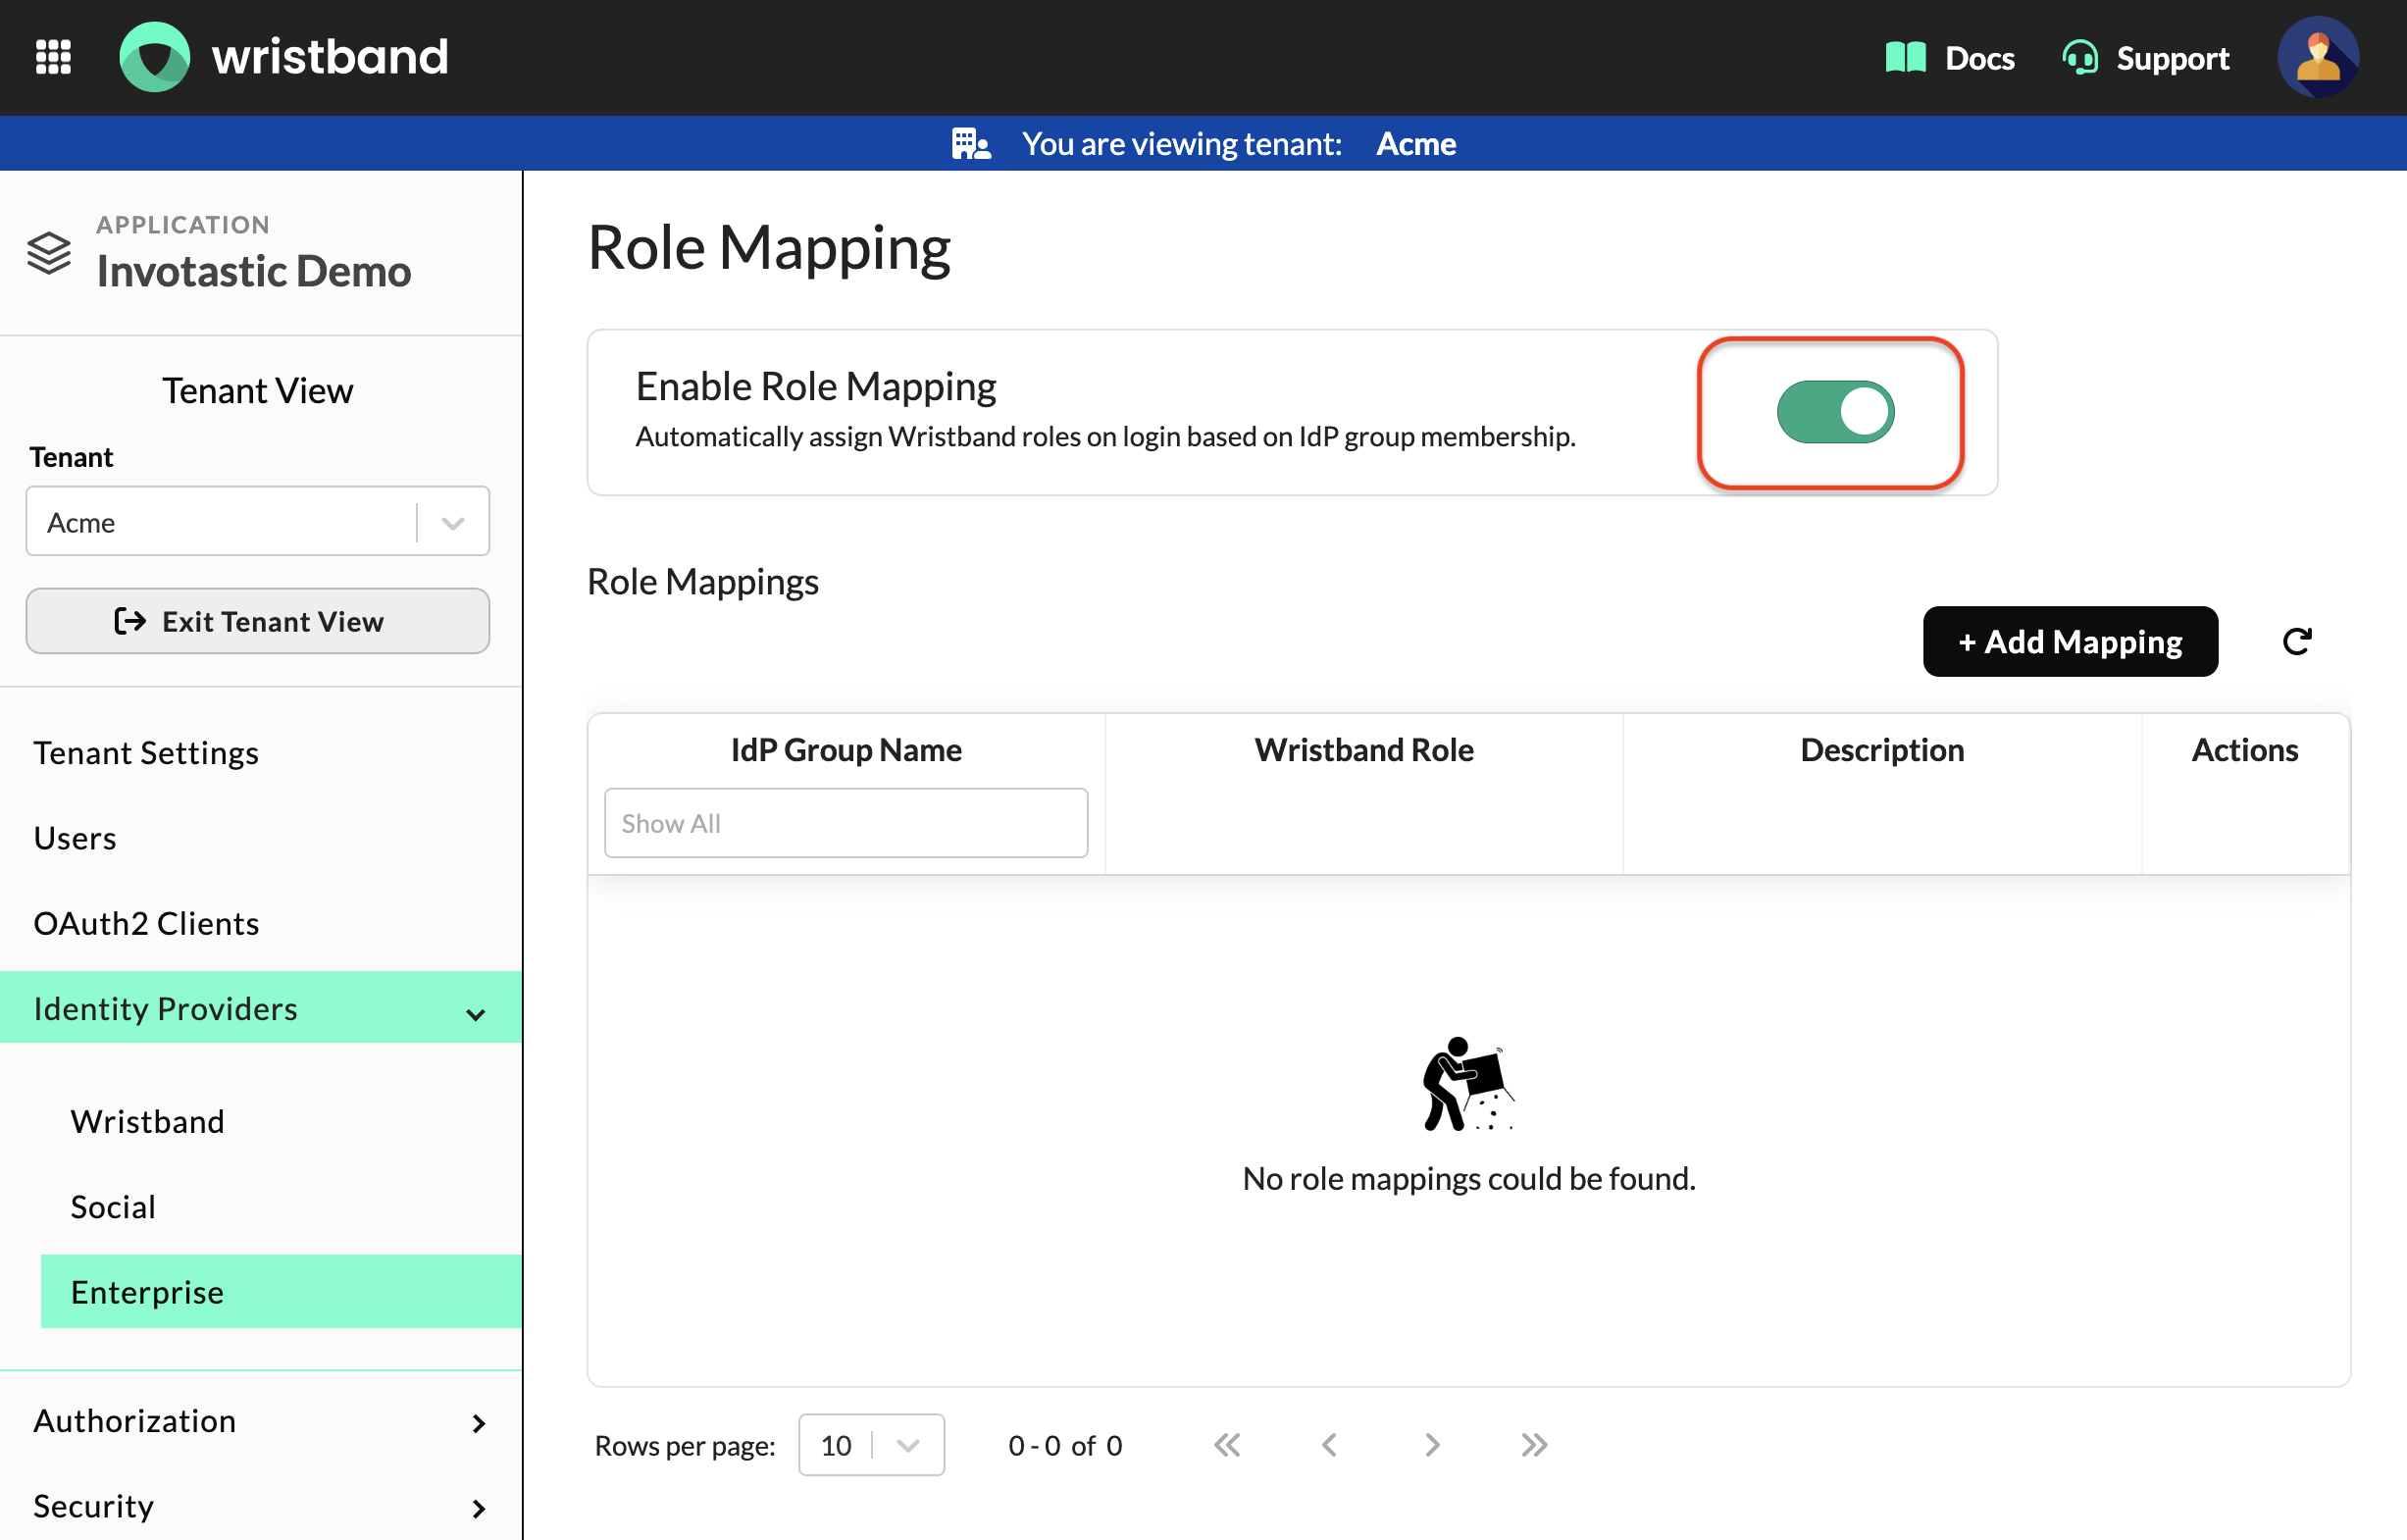
Wristband: Role Mapping section showing the Enable Role Mapping toggle and Role Mappings table.
To add a mapping, click the + Add Mapping button. In the Create IdP Role Mapping modal, enter the exact group name from your customer's IdP in the IdP Group Name field, select the corresponding Wristband role from the Wristband Role dropdown, and click the Create button.
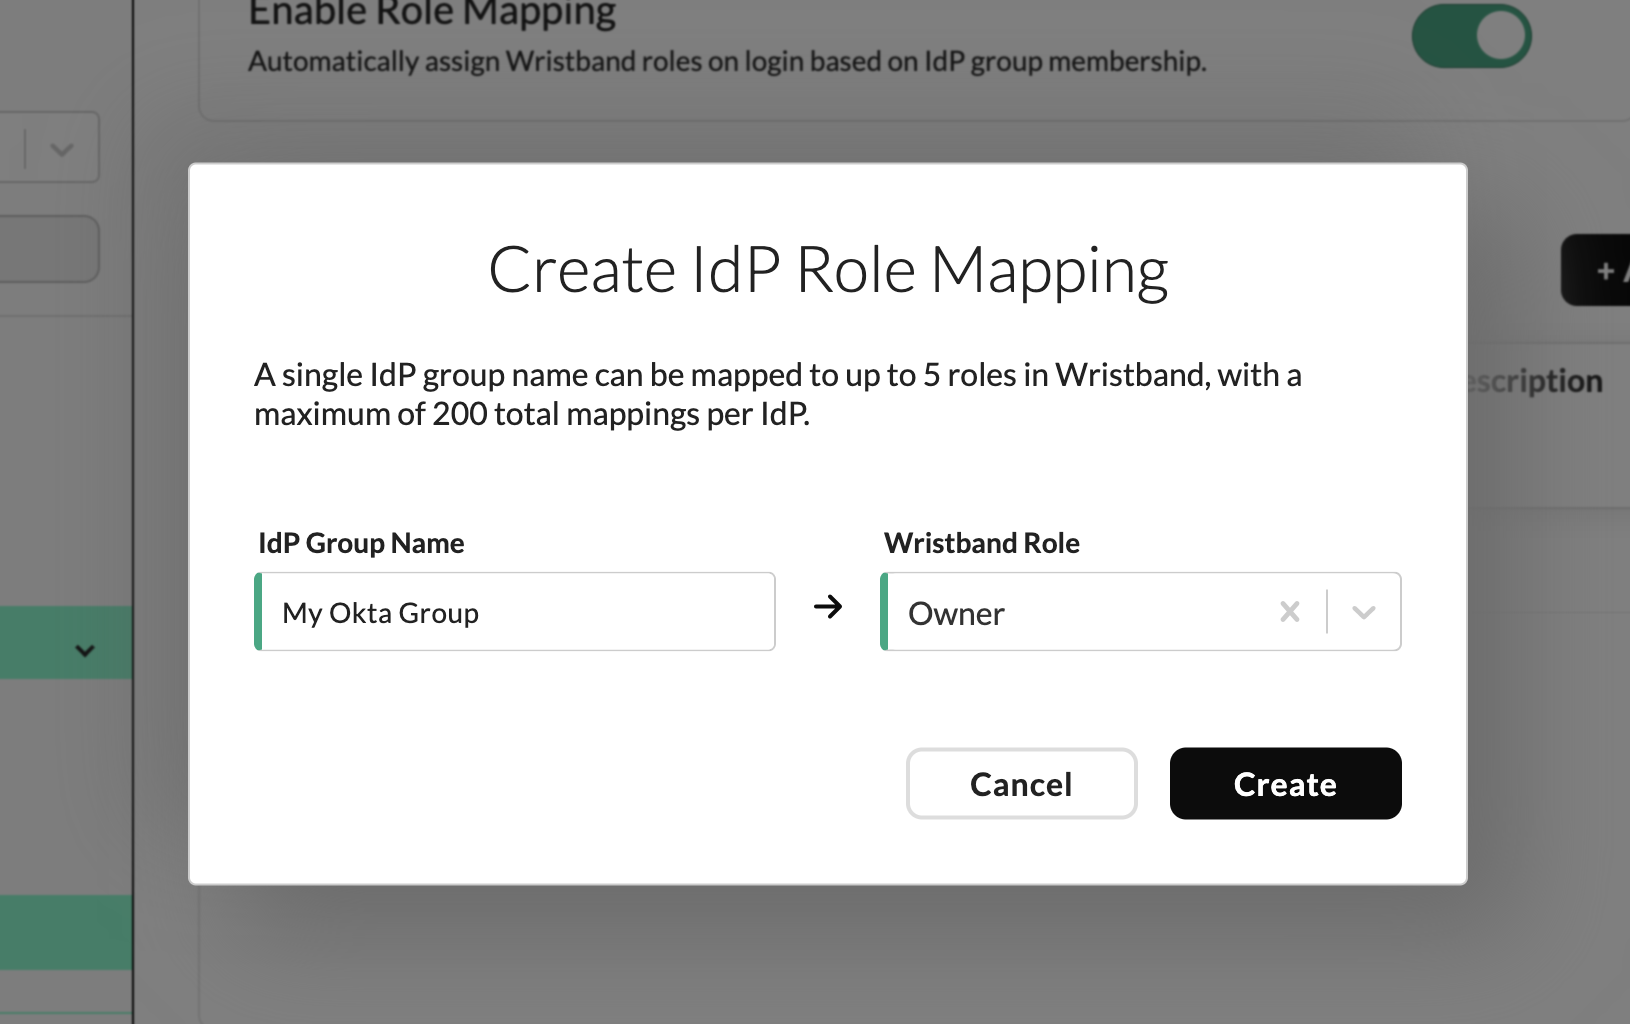
Wristband: Create IdP Role Mapping modal, showing the IdP Group Name and Wristband Role fields.
Repeat for each group that should map to a role in your application.
3.5. Customize the Login Button (Optional)
To customize the appearance of the SSO login button shown to users on the Wristband-hosted login pages, click the "Customize" button at the top of the IdP settings page.
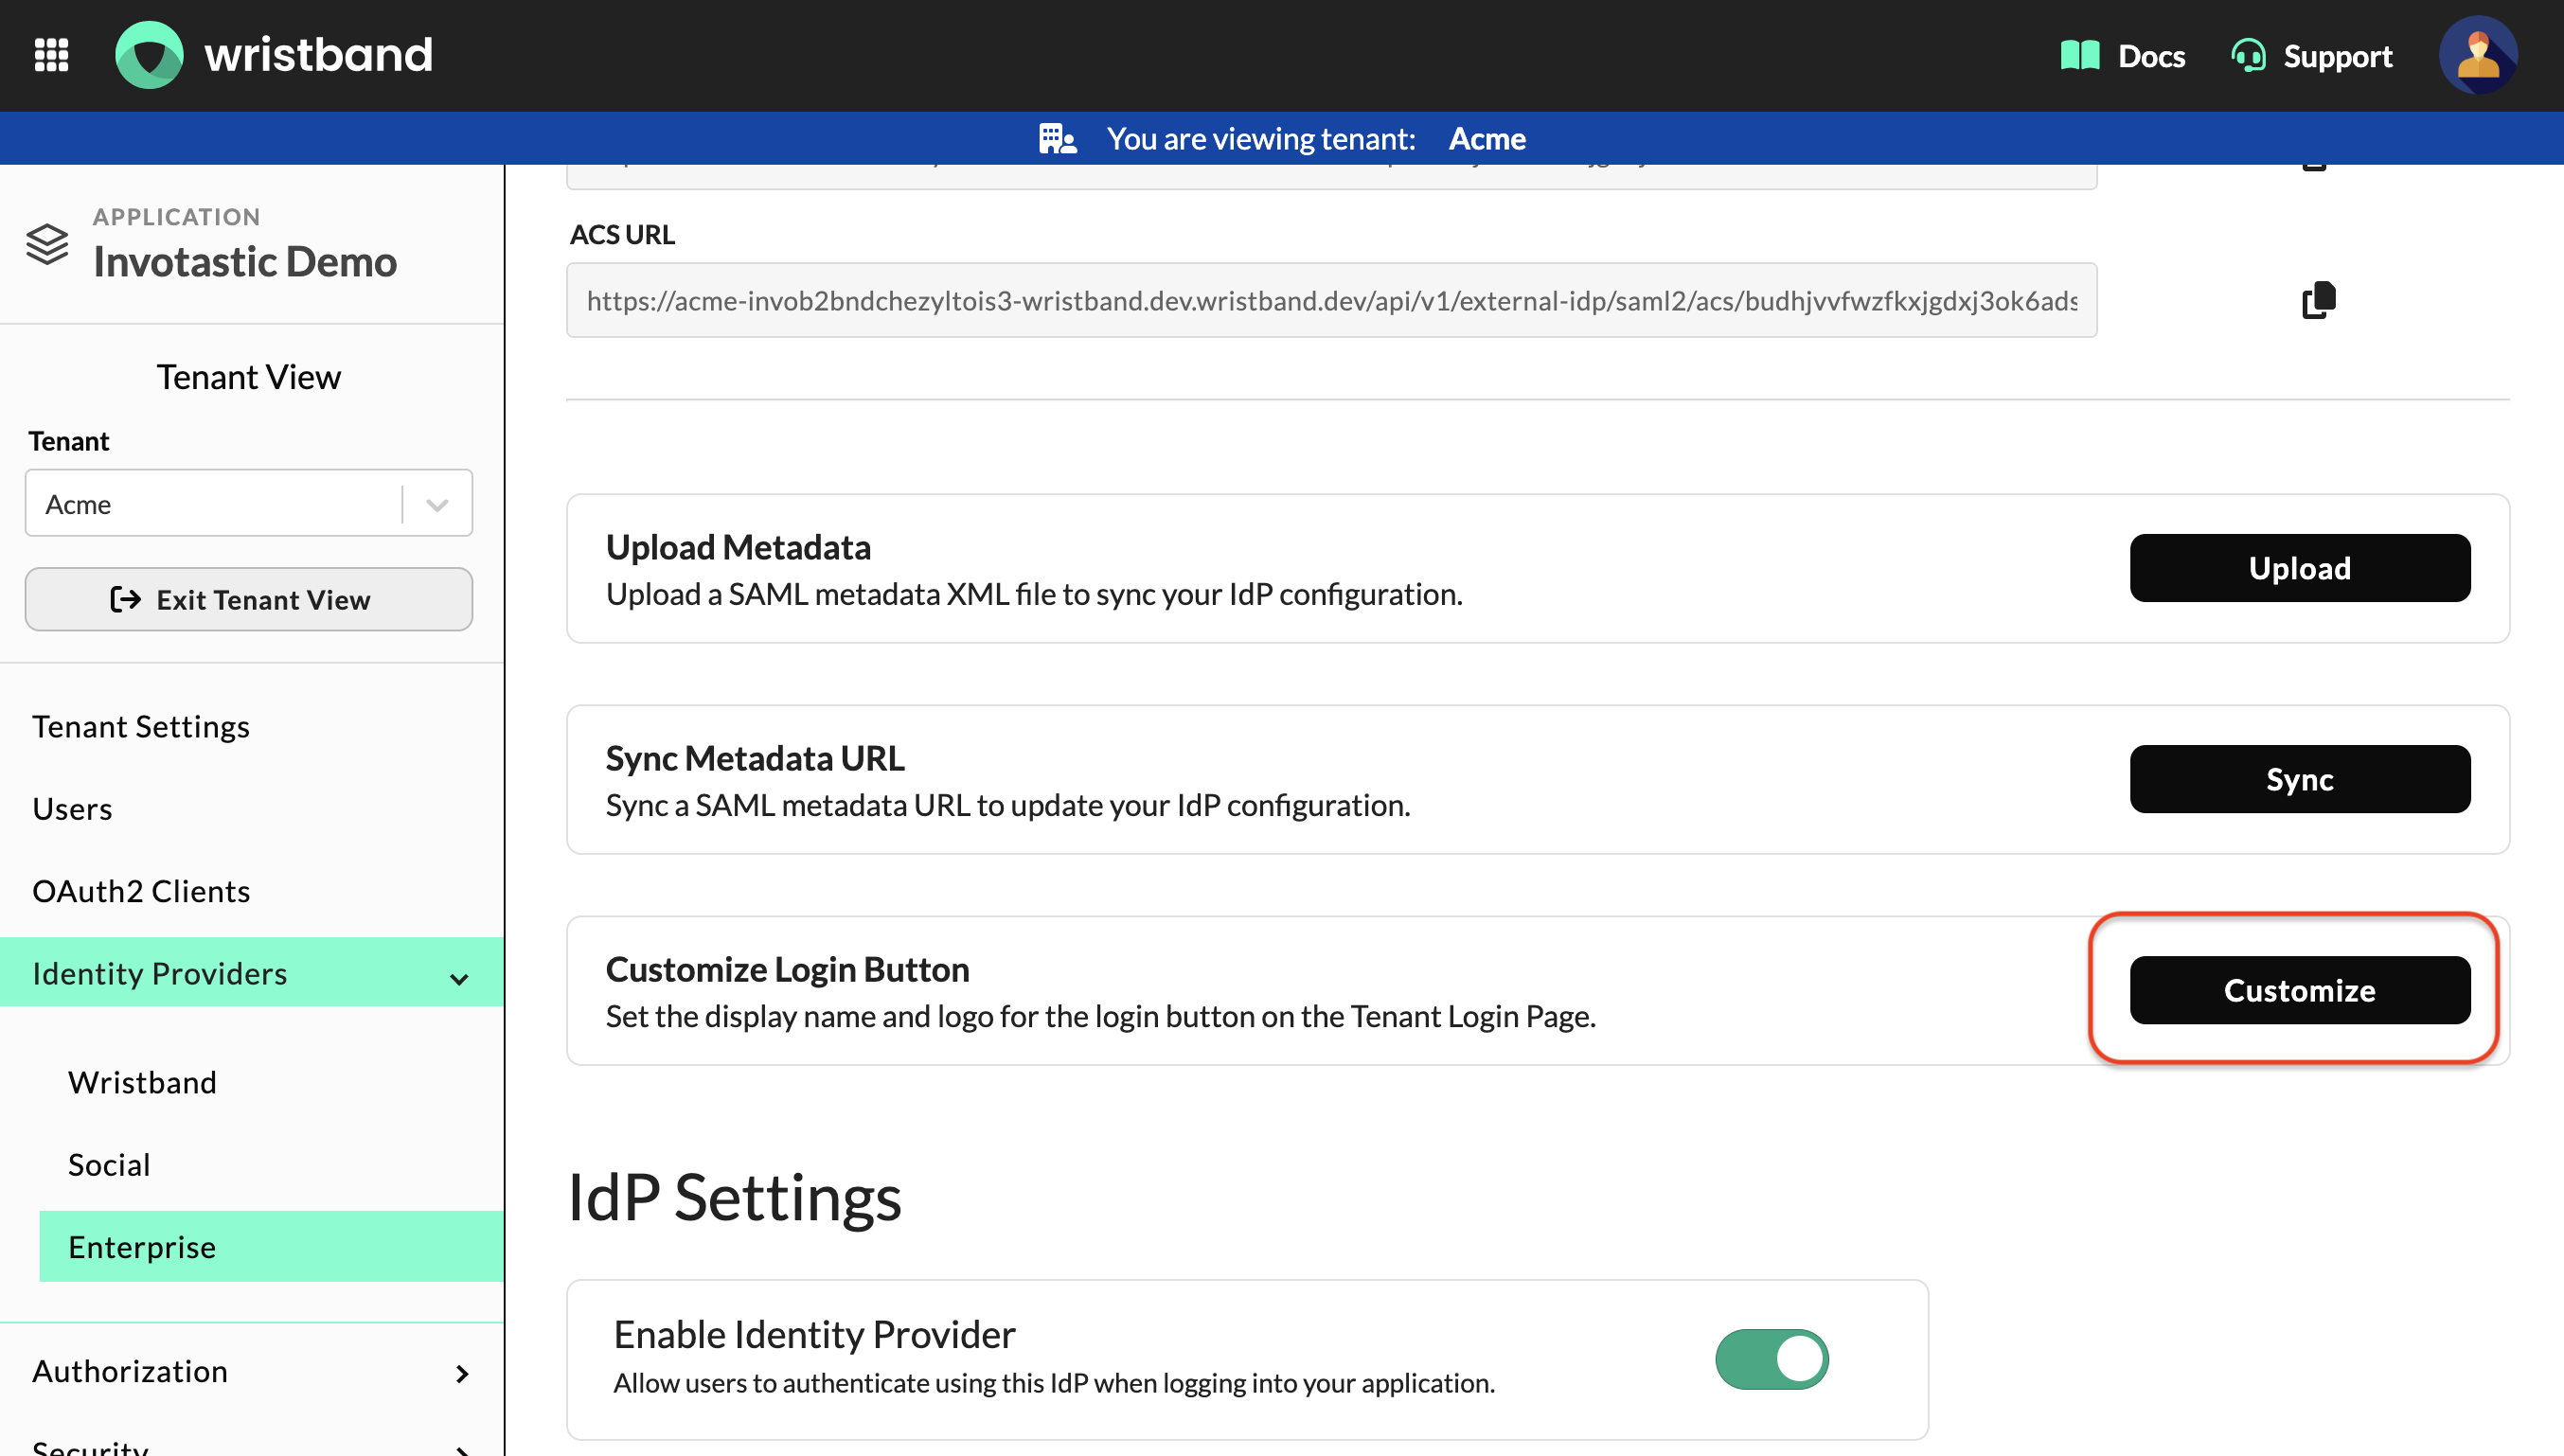
Wristband: IdP Settings page with the Customize button highlighted
This opens the "Customize Your Custom IdP" modal, which includes a live preview of how the login button will appear to users. Fill in the following fields:
- Display Name: The text shown on the login button.
- Logo URL: A publicly accessible URL for the logo displayed on the button. SVG format is recommended; the logo will render at 20x20 px.
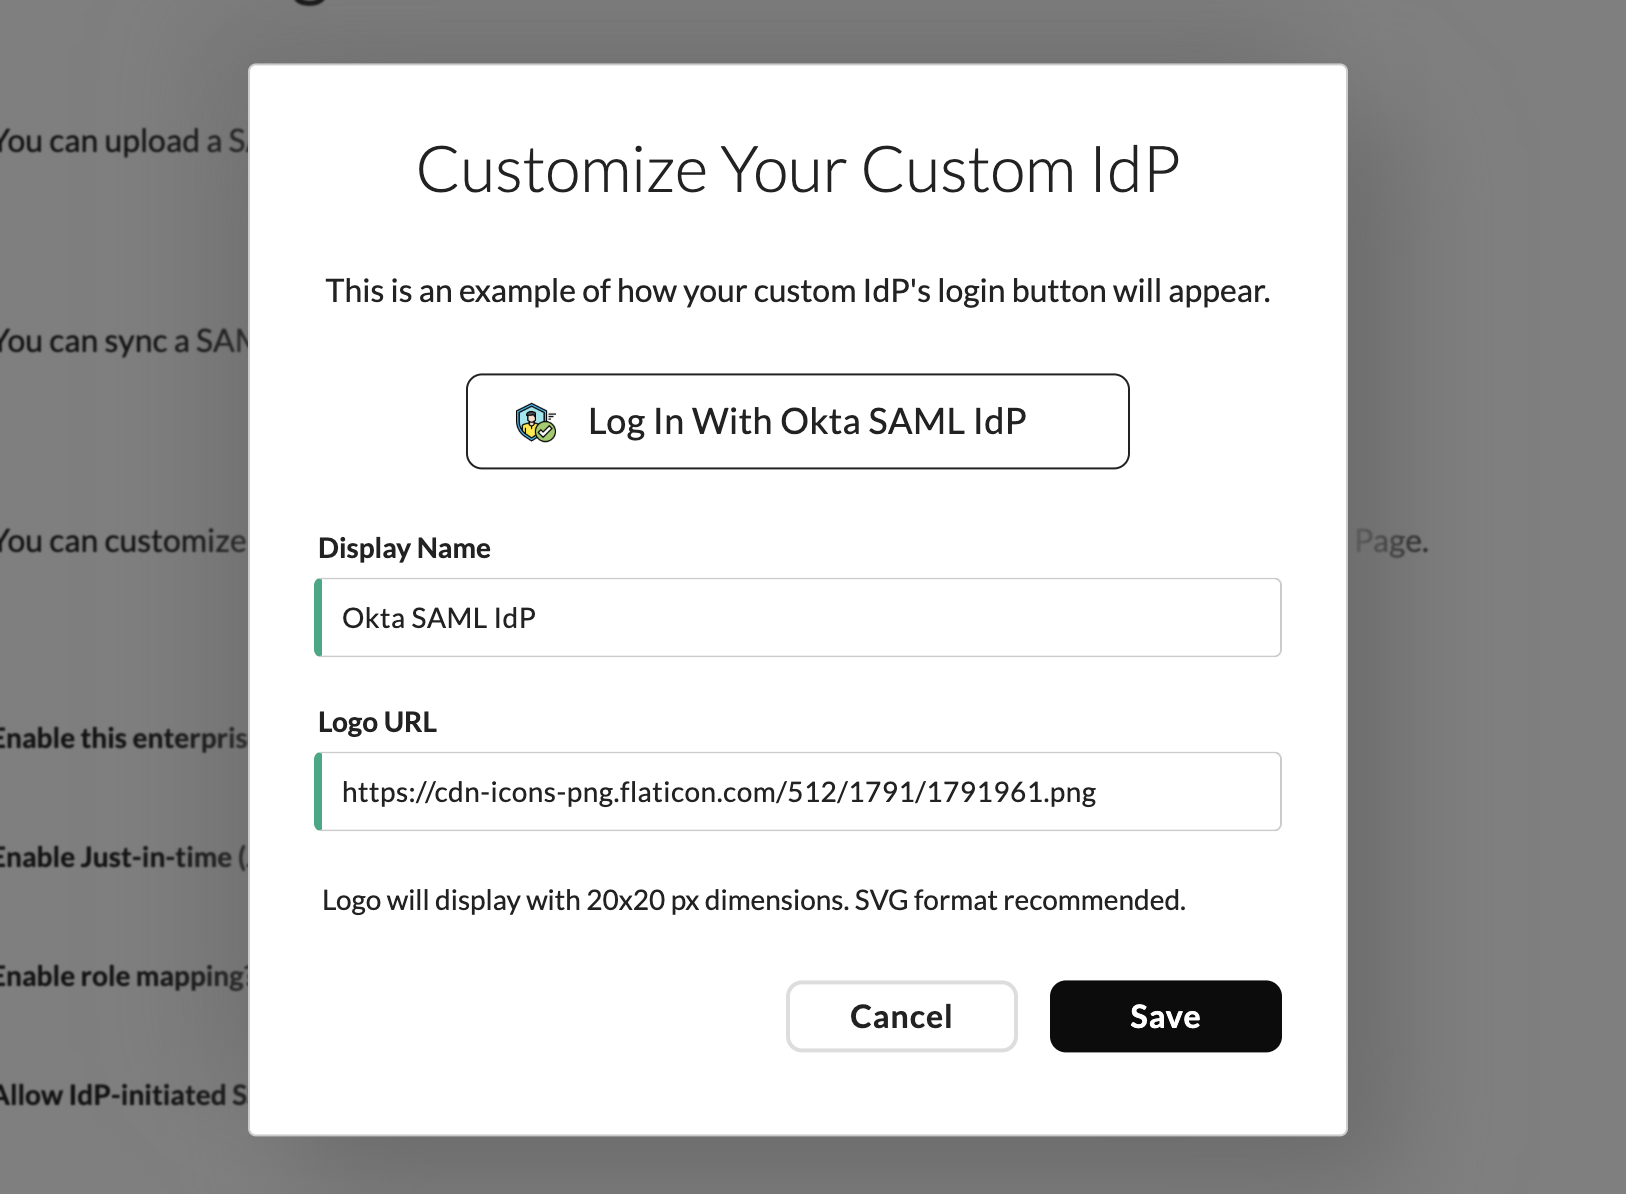
Wristband: Customize Your Custom IdP modal showing login button preview
Click "Save" to apply your changes.
The custom SAML SSO integration is now complete! Users will see the SSO login button on the Tenant-level Login Page.
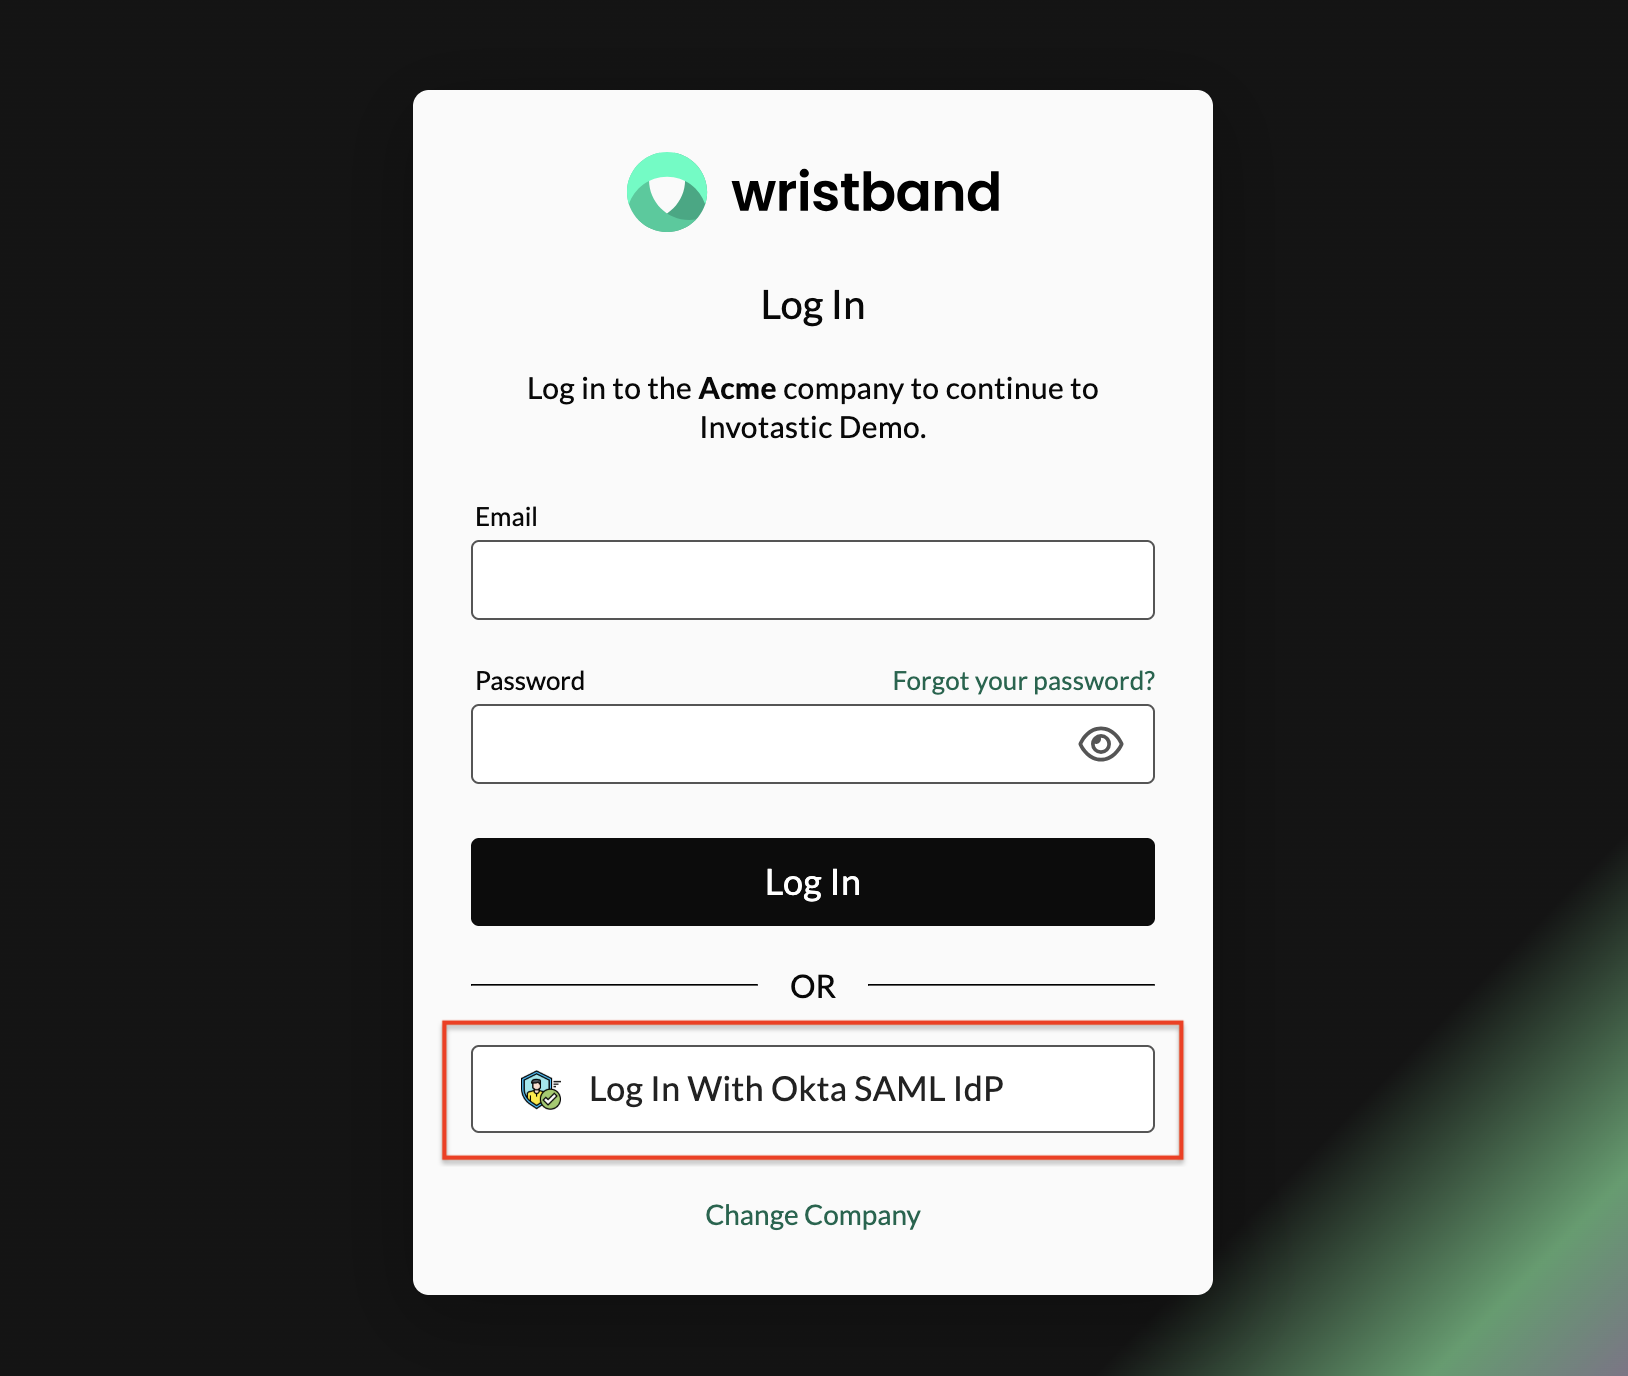
Wristband: Tenant login page showing the custom SAML IdP login button
Step 4: Test the Integration
Persona to Perform This Step → Wristband Admin
With the integration fully configured, verify that the end-to-end SSO login flow is working correctly, that user attributes are syncing as expected, and that group-to-role mappings are being applied on login.
4.1. Determine Your Testing Approach
Before testing, determine whether you can run the login flow independently or need to involve your Customer IdP Admin.
If your customer's IdP offers a free developer tier (e.g. Okta, which offers a free Okta Developer Account), you can spin up your own test instance, configure the SAML app yourself, and validate the integration independently before involving your customer. This is a useful first sanity check, but you should still run a final test with your customer's actual IdP once they are fully set up.
If your customer's IdP does not offer a free developer tier, skip the independent testing and coordinate directly with your Customer IdP Admin to run the test login. Ask them to:
- Assign a test user to the SAML app in their IdP
- Initiate a login through the Wristband-hosted tenant login page
- Install SAML-Tracer and share the raw SAML assertion from the POST to the ACS URL
You can then inspect the shared assertion and verify the Wristband dashboard in the steps below.
4.2. Install SAML-Tracer
Install the SAML-Tracer browser extension for Chrome or Firefox. This tool lets you inspect the SAML assertion returned by your customer's IdP during the login flow, which is essential for verifying that attributes and groups are being passed correctly.
4.3. Set Up a Test User in Your IdP
Make sure your test user is set up correctly in your IdP before initiating a login:
- The user exists in your IdP's directory
- The user is assigned to the SAML app
- The user is a member of any groups you want to test role mapping with
- Those groups are also assigned to the SAML app
4.4. Run the Login Flow
Open the SAML-Tracer extension in your browser. Then, initiate a login through your application depending on how your SSO integration is configured:
- Standard SP-initiated flow: Initiate a login through the Wristband-hosted tenant login page using your test user's credentials.
- IdP-initiated flow: If you enabled "Allow IdP-initiated SSO" in the Wristband dashboard in Step 3, initiate login directly from your IdP's application dashboard (e.g. the Okta app tile) or app embed link. Refer to your IdP's documentation for how to launch an IdP-initiated SAML login.
- SSO-Only Integration: If your application follows the SSO-Only Integration pattern, initiate the login flow through your application's own login entry point
4.5. Inspect the SAML Assertion
In SAML-Tracer, find the POST request to your ACS URL and click the "SAML" tab to inspect the decoded assertion. Verify that:
StatusCodeisSuccess- The
emailattribute is present with the correct value - Any additional attributes you configured (e.g.,
givenName, etc.) are present with the correct values - The
groupsattribute is present and contains the expected group names
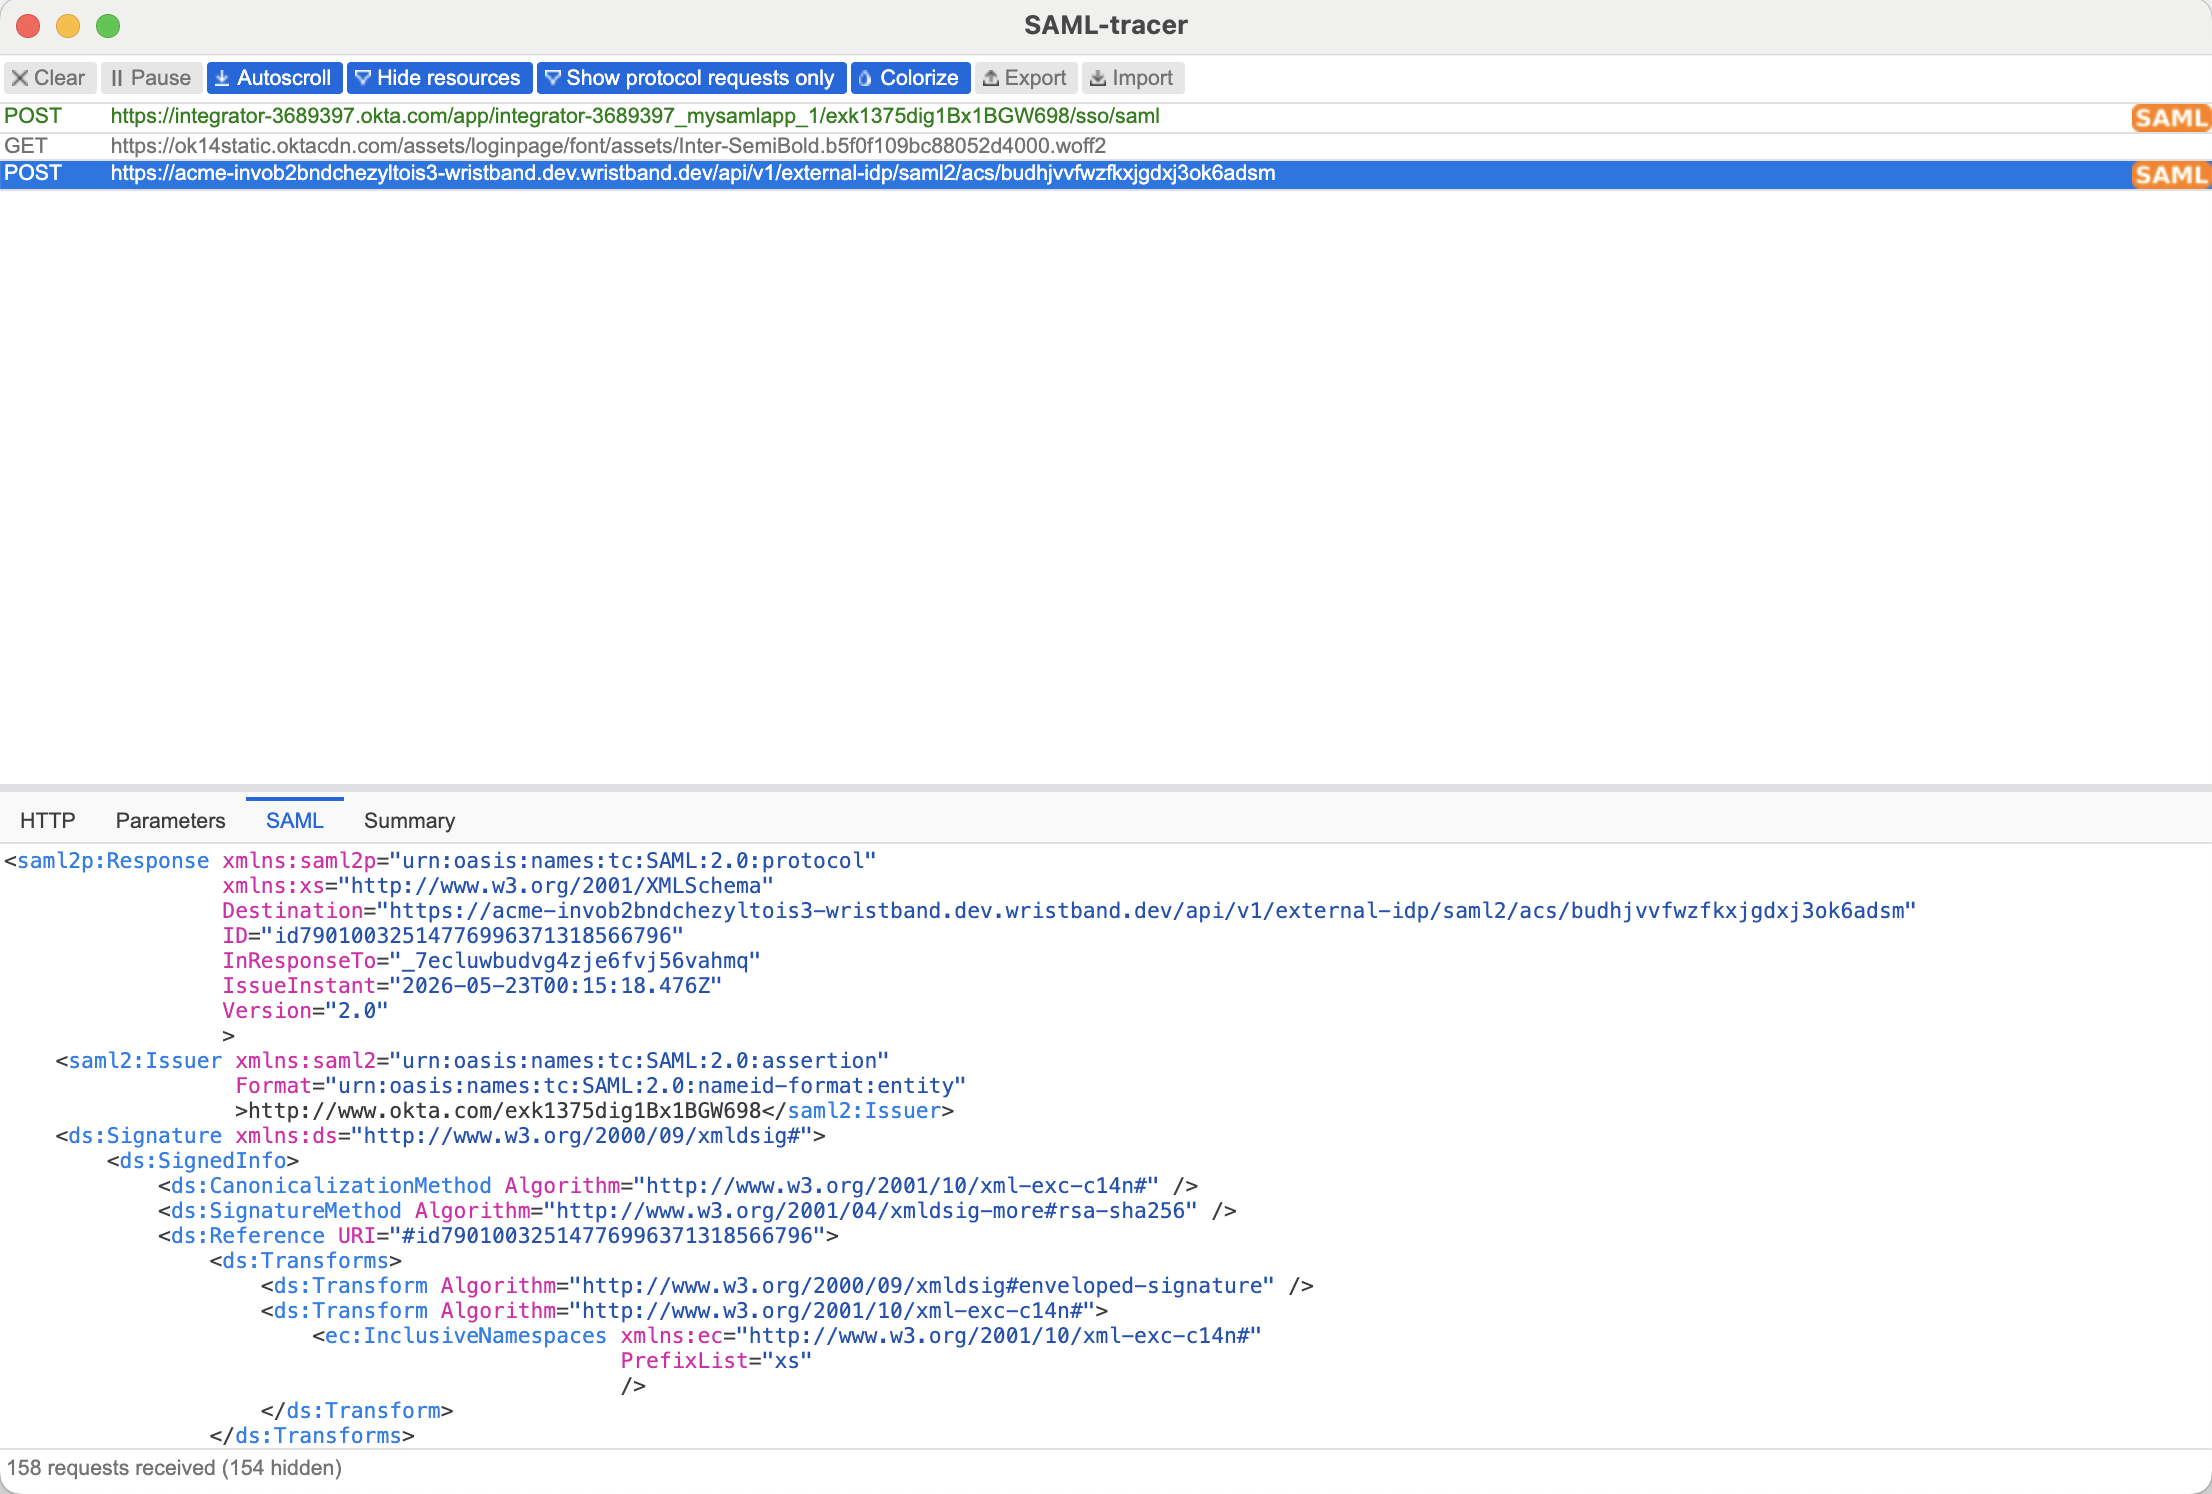
SAML-Tracer: POST to ACS URL selected with SAML tab showing decoded assertion
4.6. Verify in the Wristband Dashboard
SSO-Only IntegrationIf your application follows the SSO-Only Integration pattern, user records are managed by your own application rather than Wristband. JIT provisioning will not apply and users will not appear in the Wristband dashboard. Instead, verify the login result within your own application.
In the Wristband dashboard, navigate to the tenant's Users page and confirm:
- The user was created via JIT provisioning (if enabled)
- User attributes (e.g., email, first name, etc.) are populated correctly
- The expected Wristband role is assigned based on the group mapping
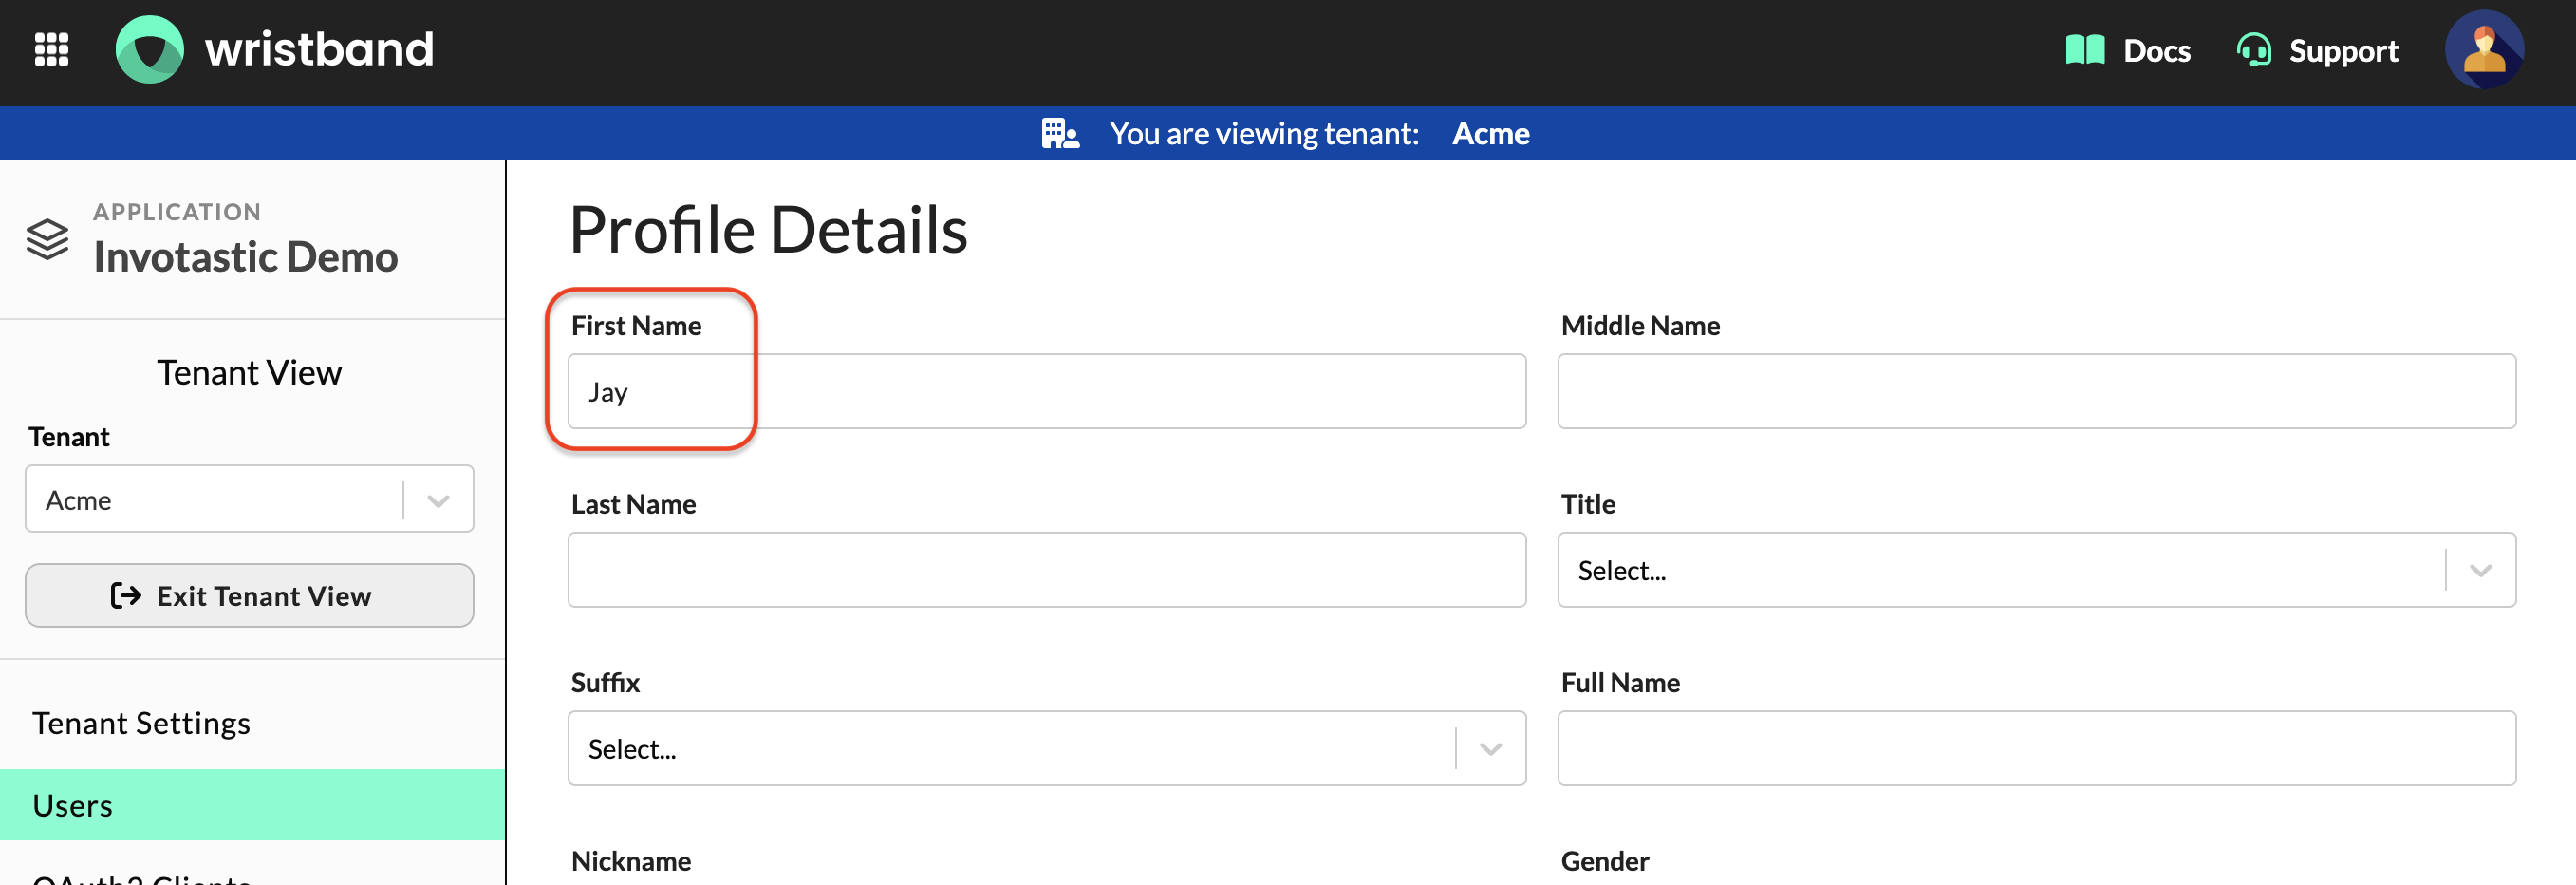
Wristband: Edit User Page, Profile Details form with First Name populated via attribute syncing
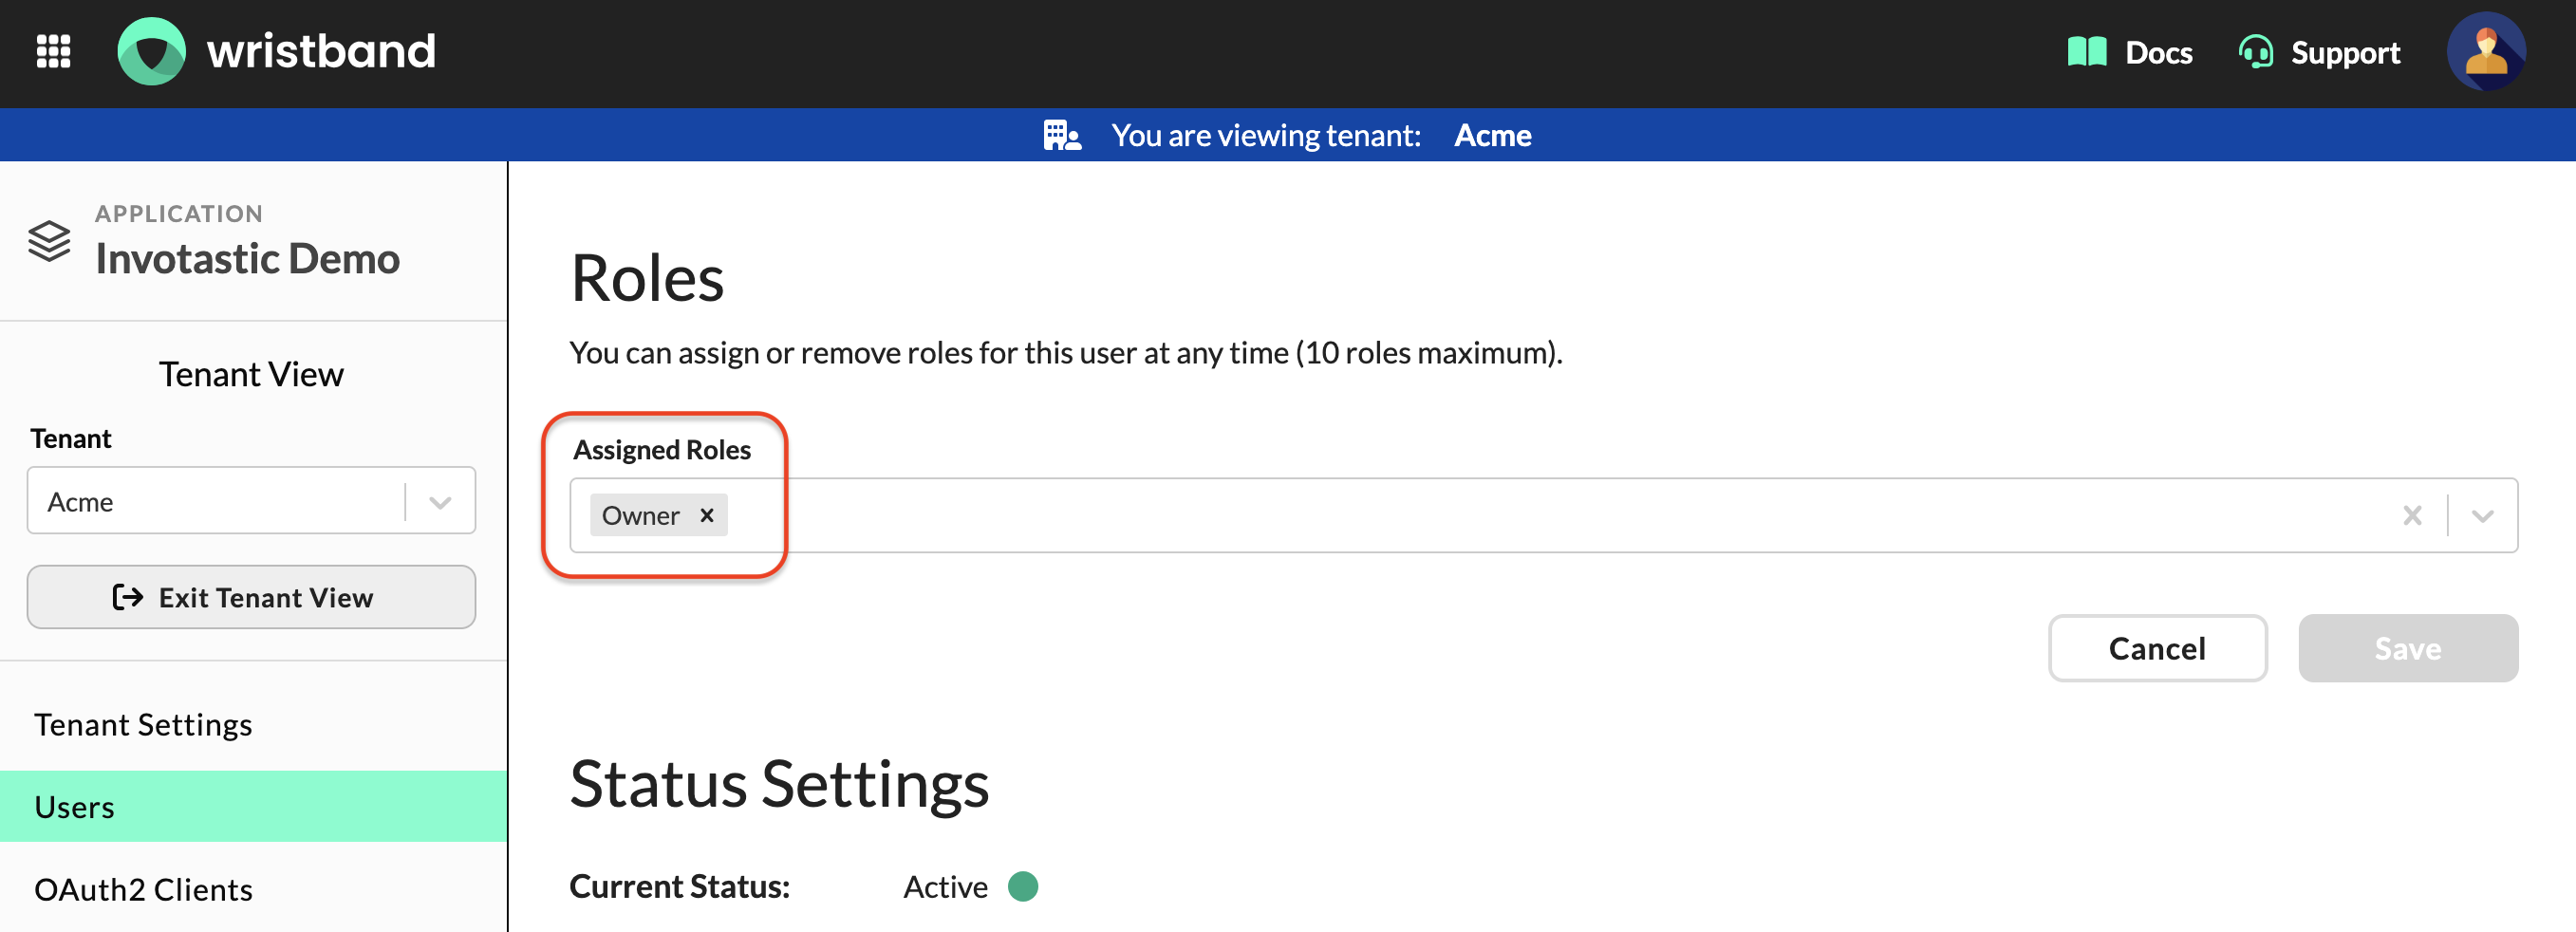
Wristband: Edit User Page, Roles form with Owner role assigned via group role mapping
Updated 24 days ago