Consuming Events
Learn how to consume webhook events published to your endpoints.
Verifying Webhook Events
When your endpoint receives an incoming webhook event, it must verify the event to ensure it's valid. There are two main steps to verifying a webhook event.
- Signature Verification - The signature of each webhook event must be verified to ensure the event came from Svix and hasn't been tampered with. If signature verification is not performed, any malicious actor could publish fake events to your endpoint.
- Timestamp Verification - Each webhook event contains a timestamp indicating when the webhook was sent. If this value is too far in the past, the event should be rejected to prevent replay attacks (a replay attack is when a valid payload is intercepted and retransmitted to your endpoint).
Svix provides prebuilt libraries for verifying webhook events in a wide variety of languages. Please refer to their How To Verify Webhooks documentation for more information on how to use their webhook verification libraries. If you're using a language that doesn't have a Svix webhook verification library, please refer to their Manual Webhook Verification guide.
Indicating Successful Event Consumption to Svix
Your webhook endpoints must indicate to Svix that an event has been successfully processed by returning a 2xx (status code 200-299) response within a reasonable time frame (15s). Returning any other status code will be treated as a failure.
Automatic Failure Retry Policy
Svix uses a predefined retry schedule to attempt to deliver failed webhook events. Below are the retry delays for each successive failure:
- Immediately
- 5 seconds
- 5 minutes
- 30 minutes
- 2 hours
- 5 hours
- 10 hours
- 10 hours (in addition to the previous)
After the above retry attempts conclude, the message will be marked as "Failed" for this endpoint.
Manual Retries
You can use the Svix Consumer Application Portal to manually retry messages at any time. To retry messages, select "Endpoints" from the left navigation menu and then select the endpoint whose messages you'd like to retry from the endpoints list. Next, select the "Replay" button, then select the set of messages you'd like to retry from the dropdown.
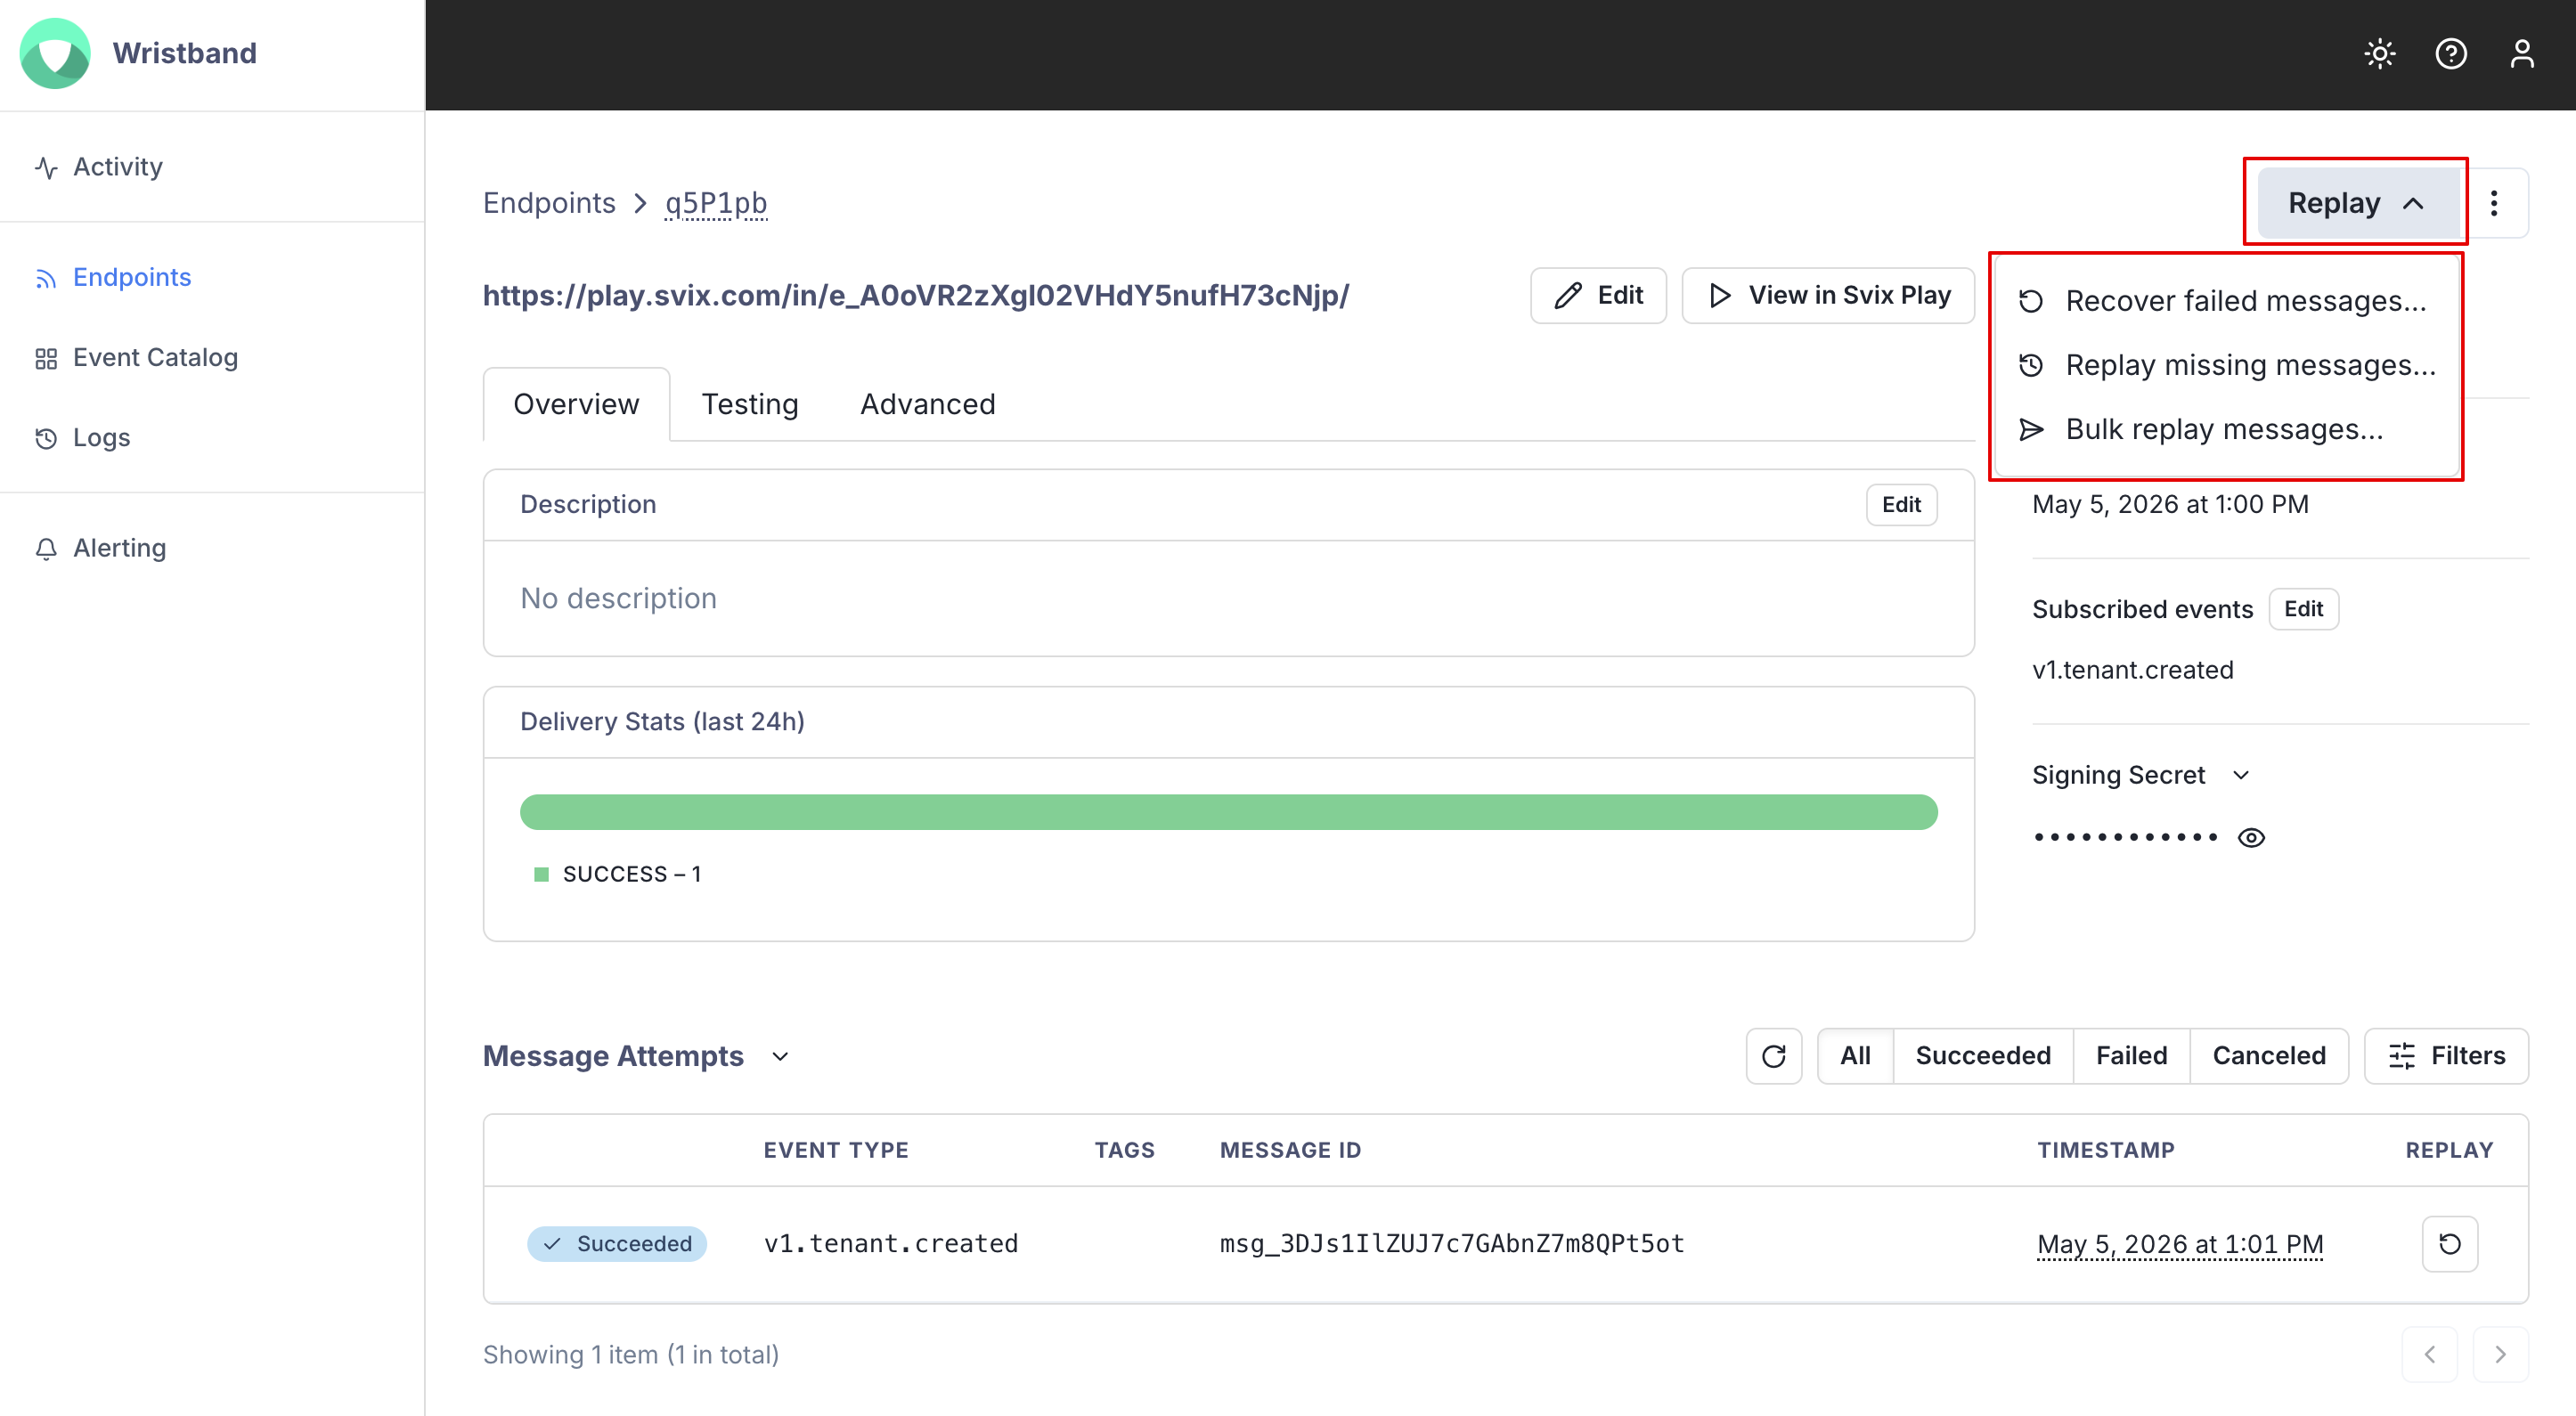
Figure 1. Screenshot showing how to manually replay a bulk set of messages.
Individual messages can also be retried by selecting the replay button next to the message attempt.
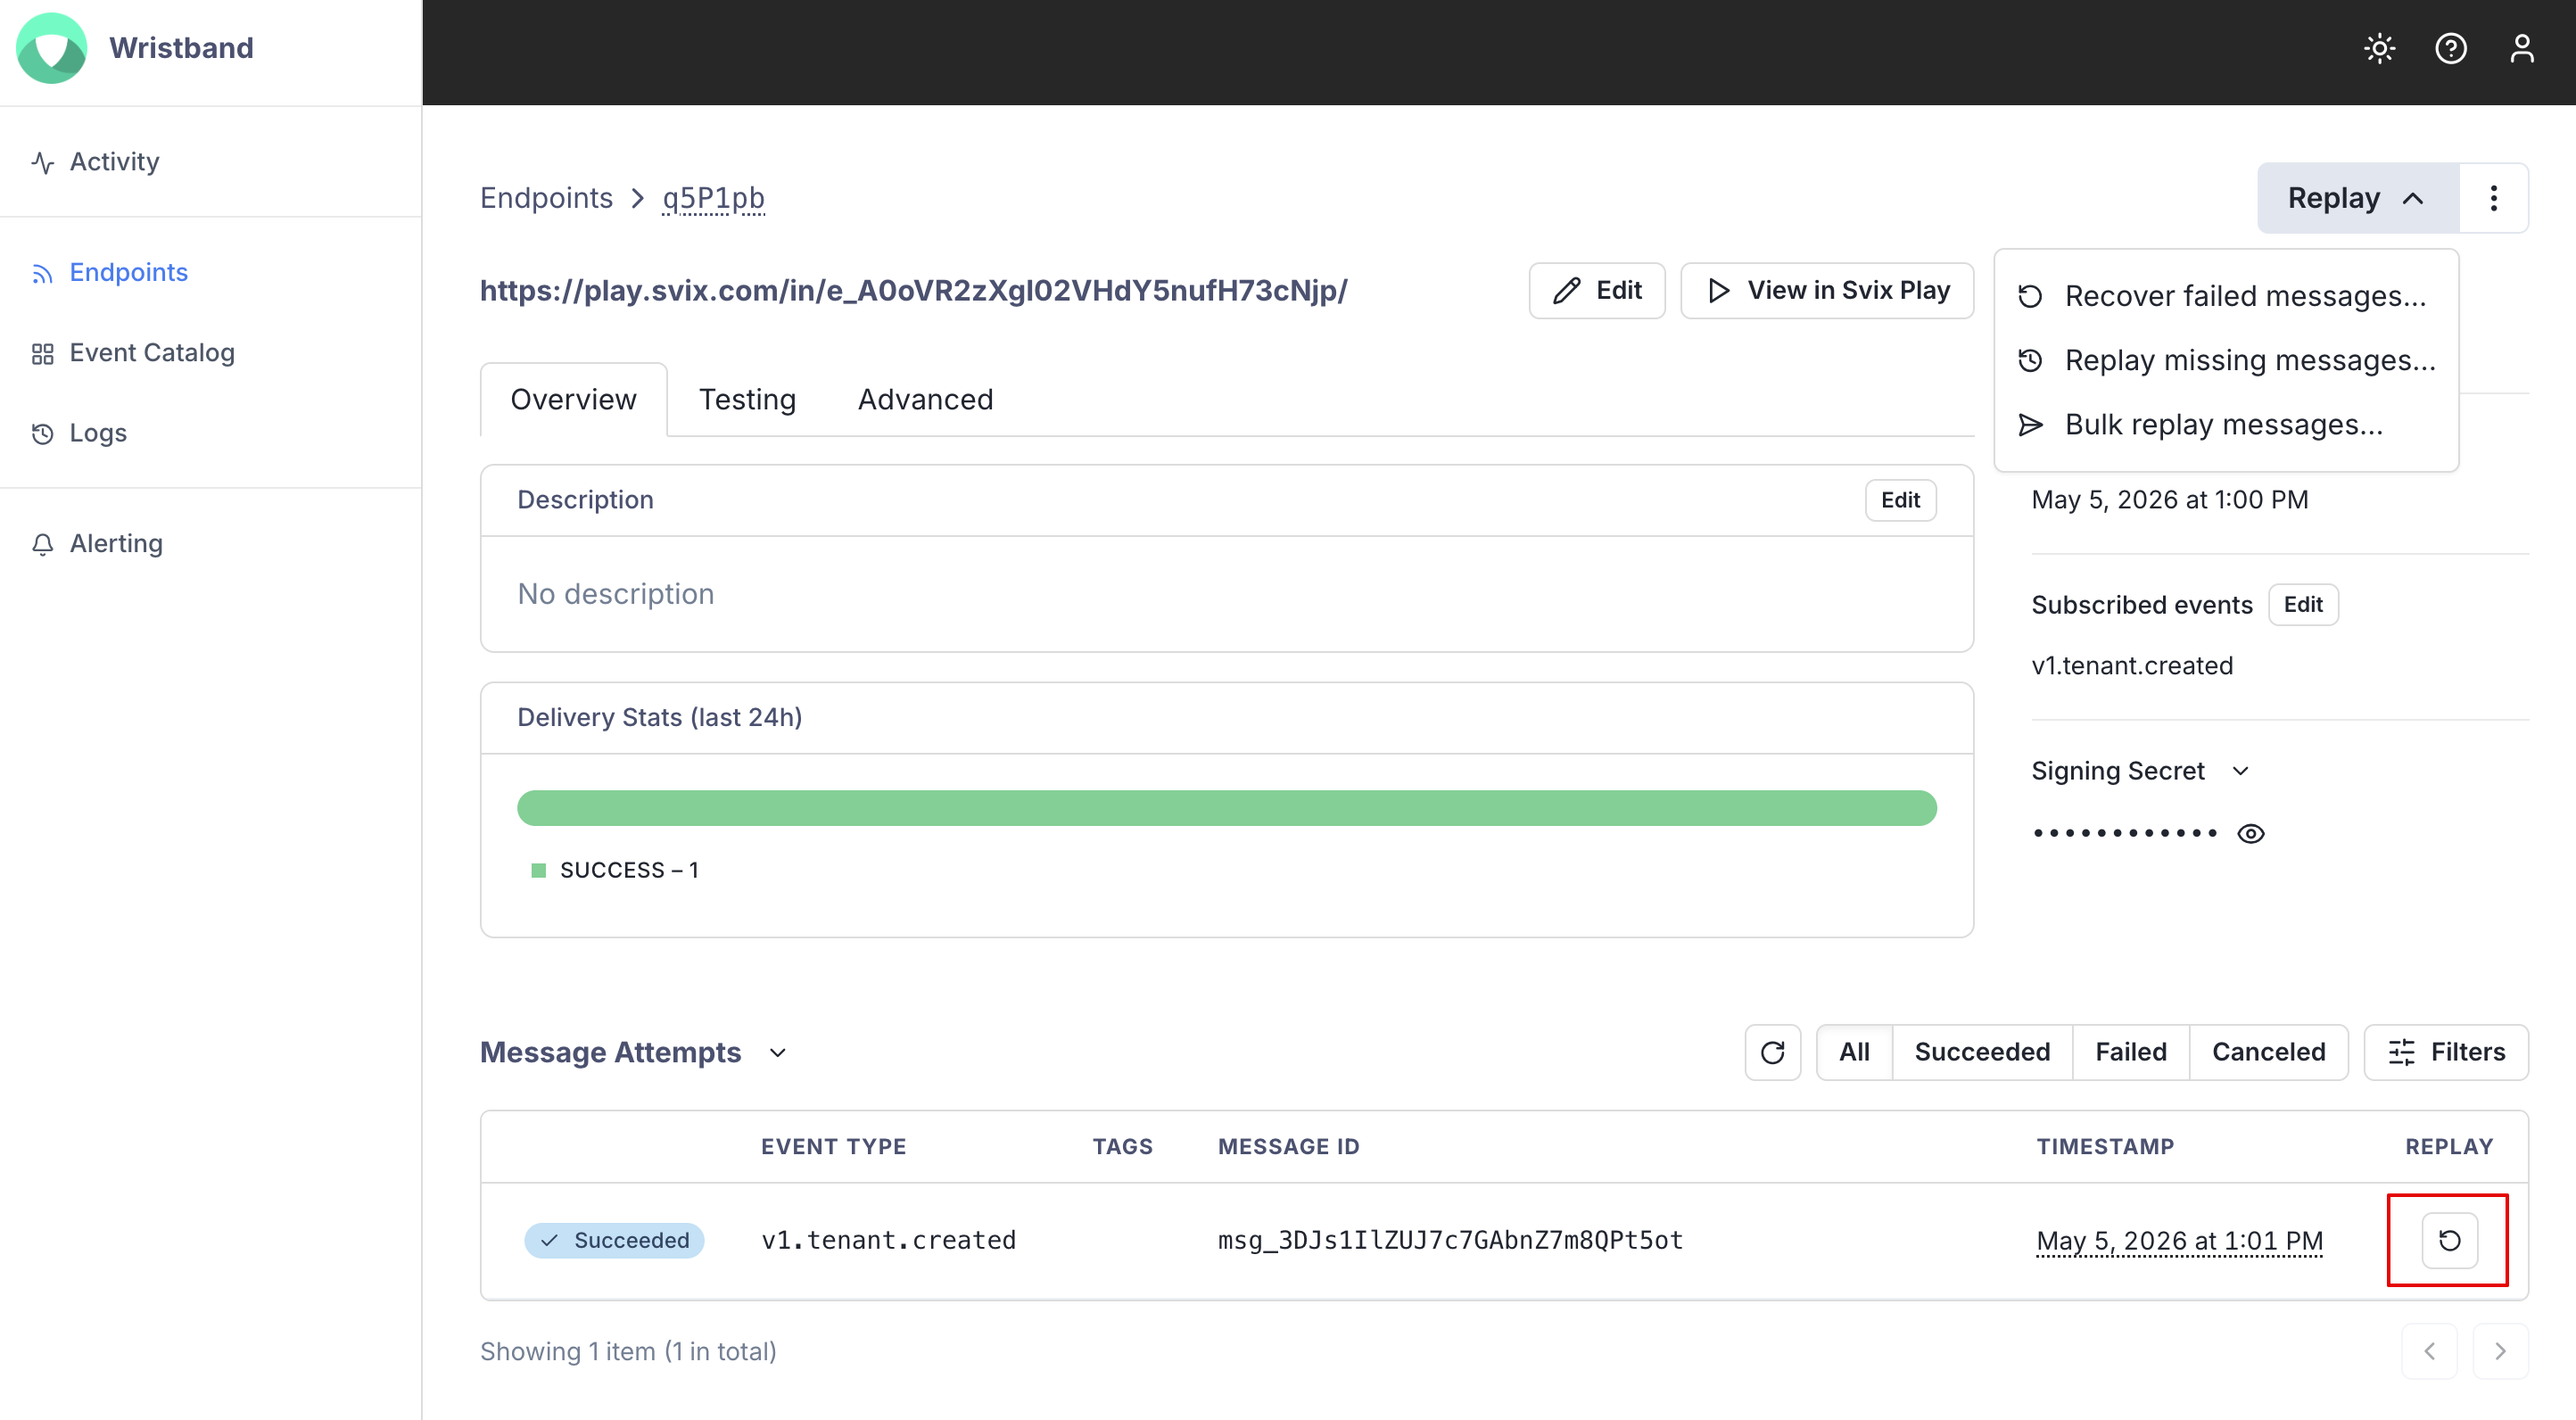
Figure 2. Screenshot showing how to manually replay a single message.
Disabling Failing Endpoints
If all attempts to a specific endpoint fail for a period of 5 days, the endpoint will be disabled. To re-enable a disabled endpoint, go to the Svix Consumer App Portal, select "Endpoints" from the left navigation menu, find the endpoint you'd like to re-enable from the endpoints list, and select "Enable Endpoint" from the options menu.
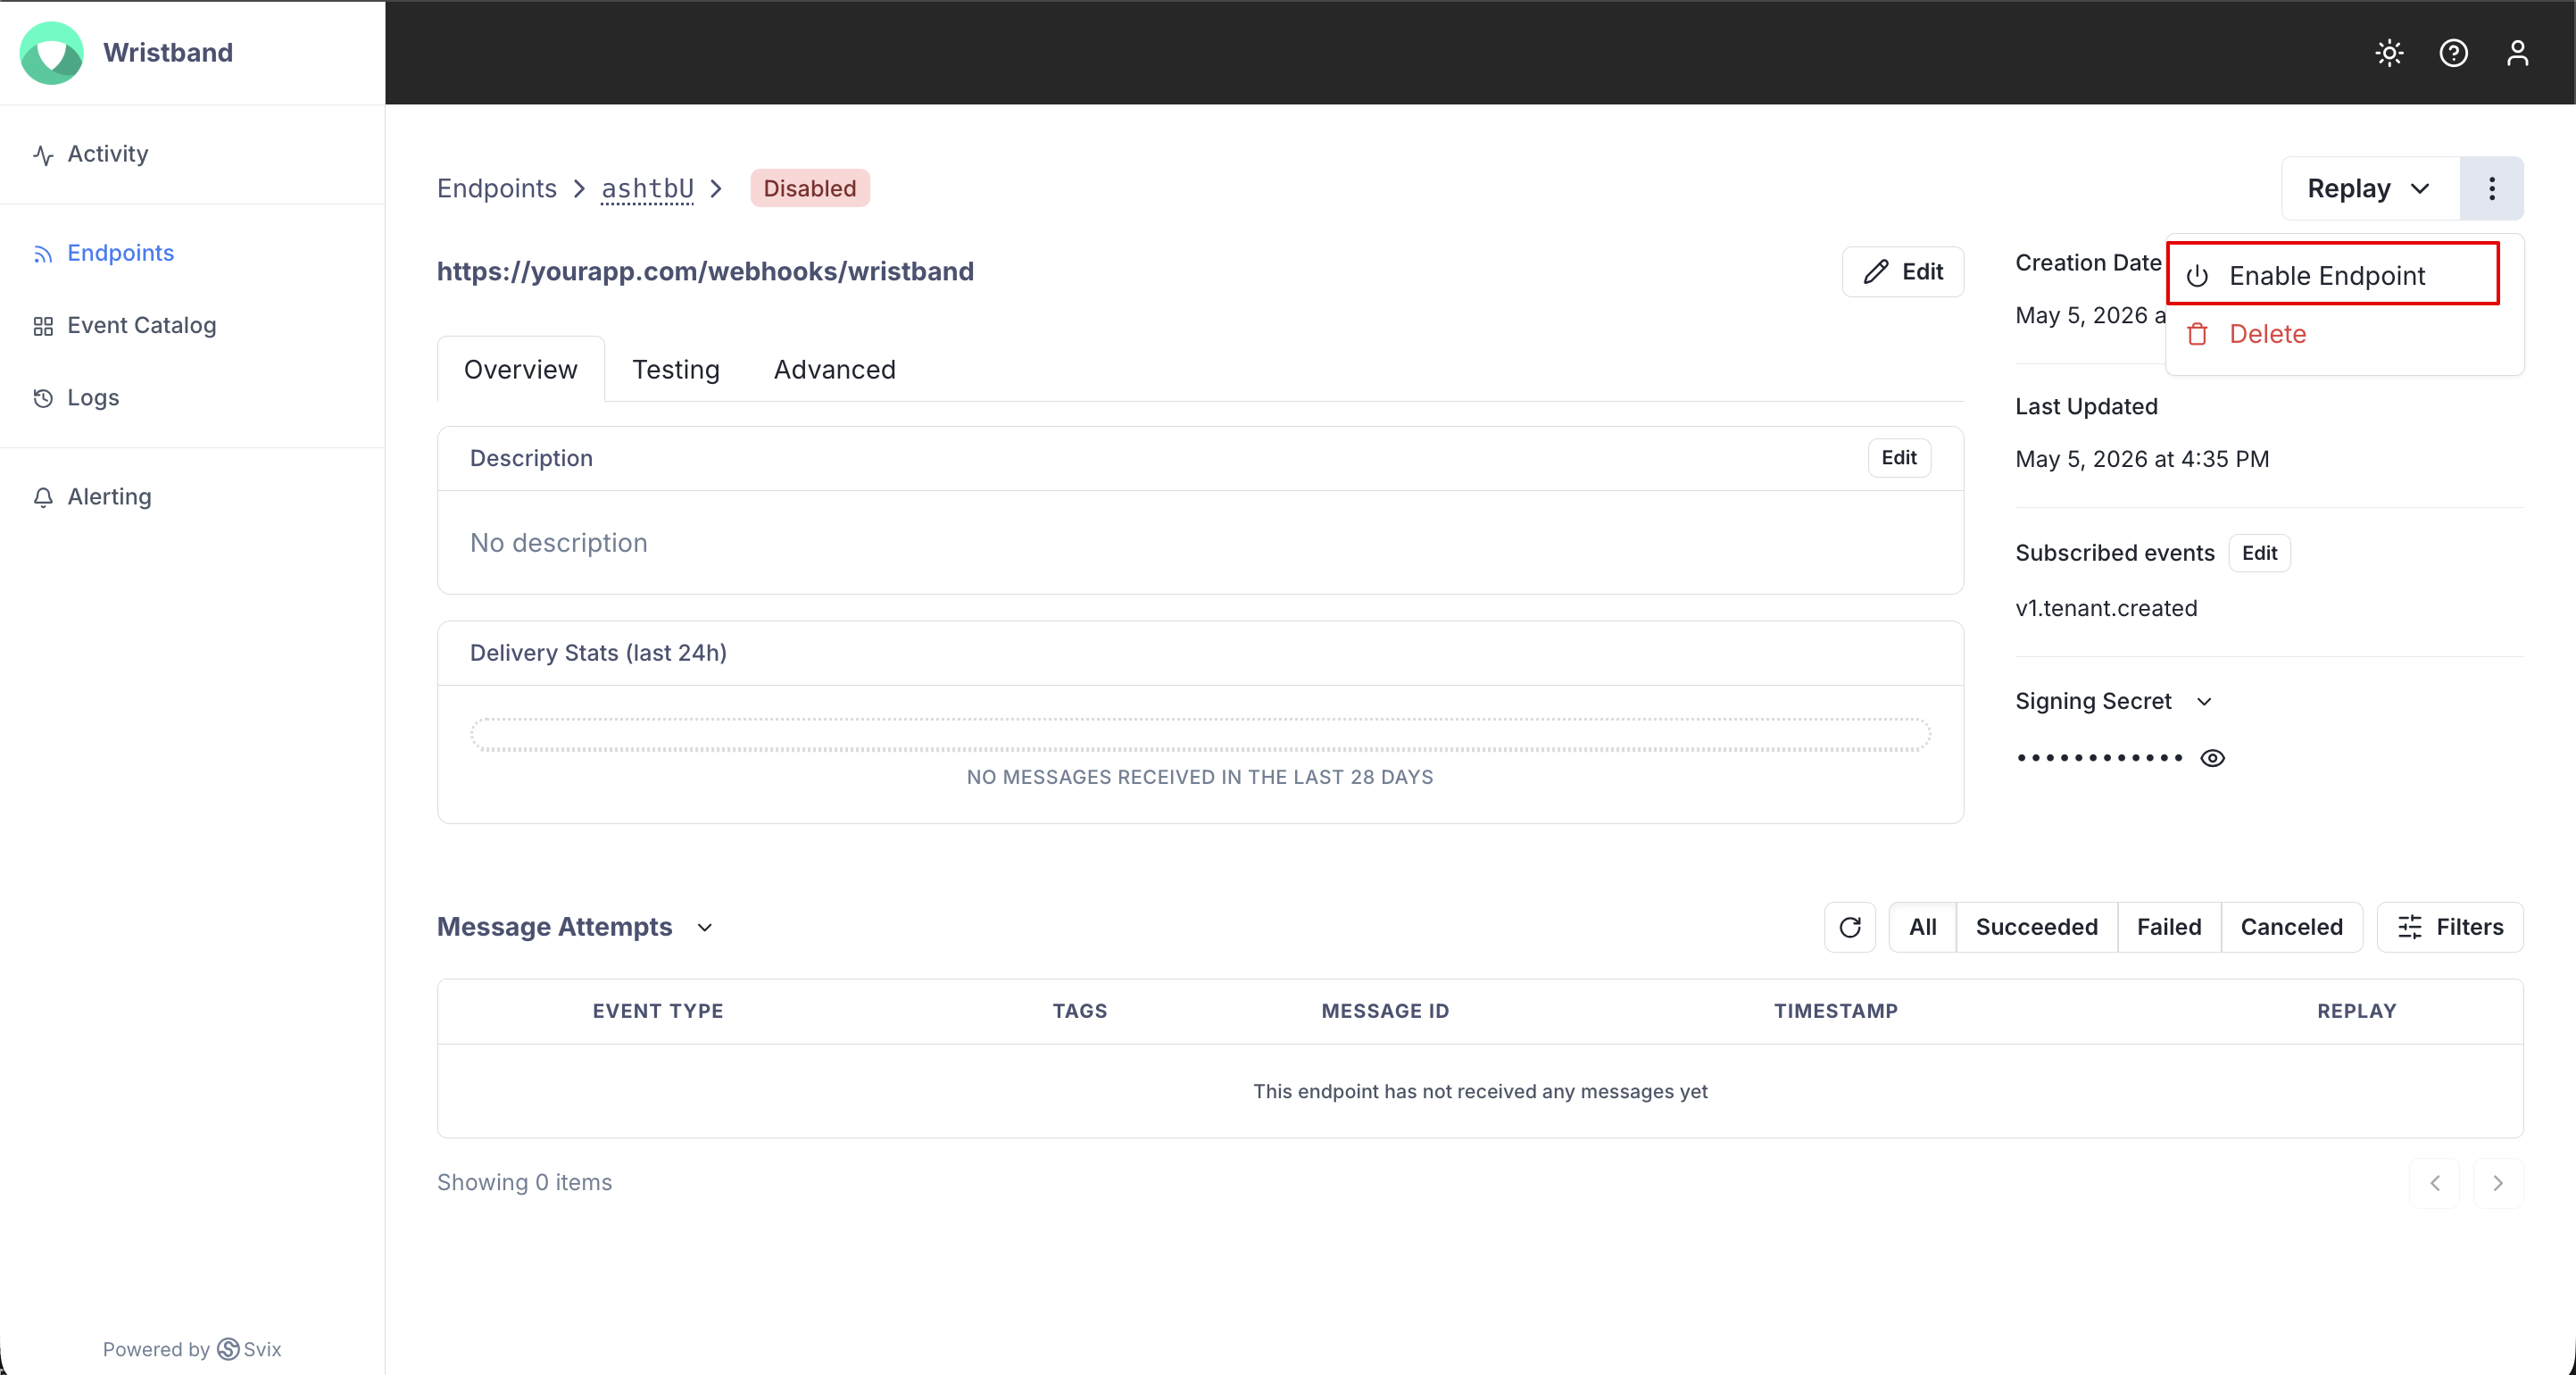
Figure 3. Screenshot showing how to enable a disabled endpoint.
After re-enabling your endpoint, you'll likely need to replay the webhook events that occurred while it was disabled. For more information on manually replaying messages, see the Manual Retries section above.
Consuming Webhook Events on Your Local Machine
To consume webhook events from your local machine, you'll need to use the Svix CLI listen command. For example, if you wanted to consume events on a local endpoint with URL: http://localhost:8080/webhooks/wristand, you would run the following command:
svix listen http://localhost:8080/webhooks/wristbandRunning this command would produce output that looks like the following:
Webhook relay is now listening at
https://play.svix.com/in/c_pSbznmV2KCg38CY7zYpFBUktsgl/

All requests on this endpoint will be forwarded to your local url:
http://localhost:8080/webhooks/wristband

View logs and debug information at
https://play.svix.com/view/c_pSbznmV2KCg38CY7zYpFBUktsgl/
To disable logging run "svix listen --no-logging"
Next you'll need to create a new endpoint using the play.svix.com URL output from the command. For the above example, the URL you'd use to create the endpoint would be https://play.svix.com/in/c_pSbznmV2KCg38CY7zYpFBUktsgl.
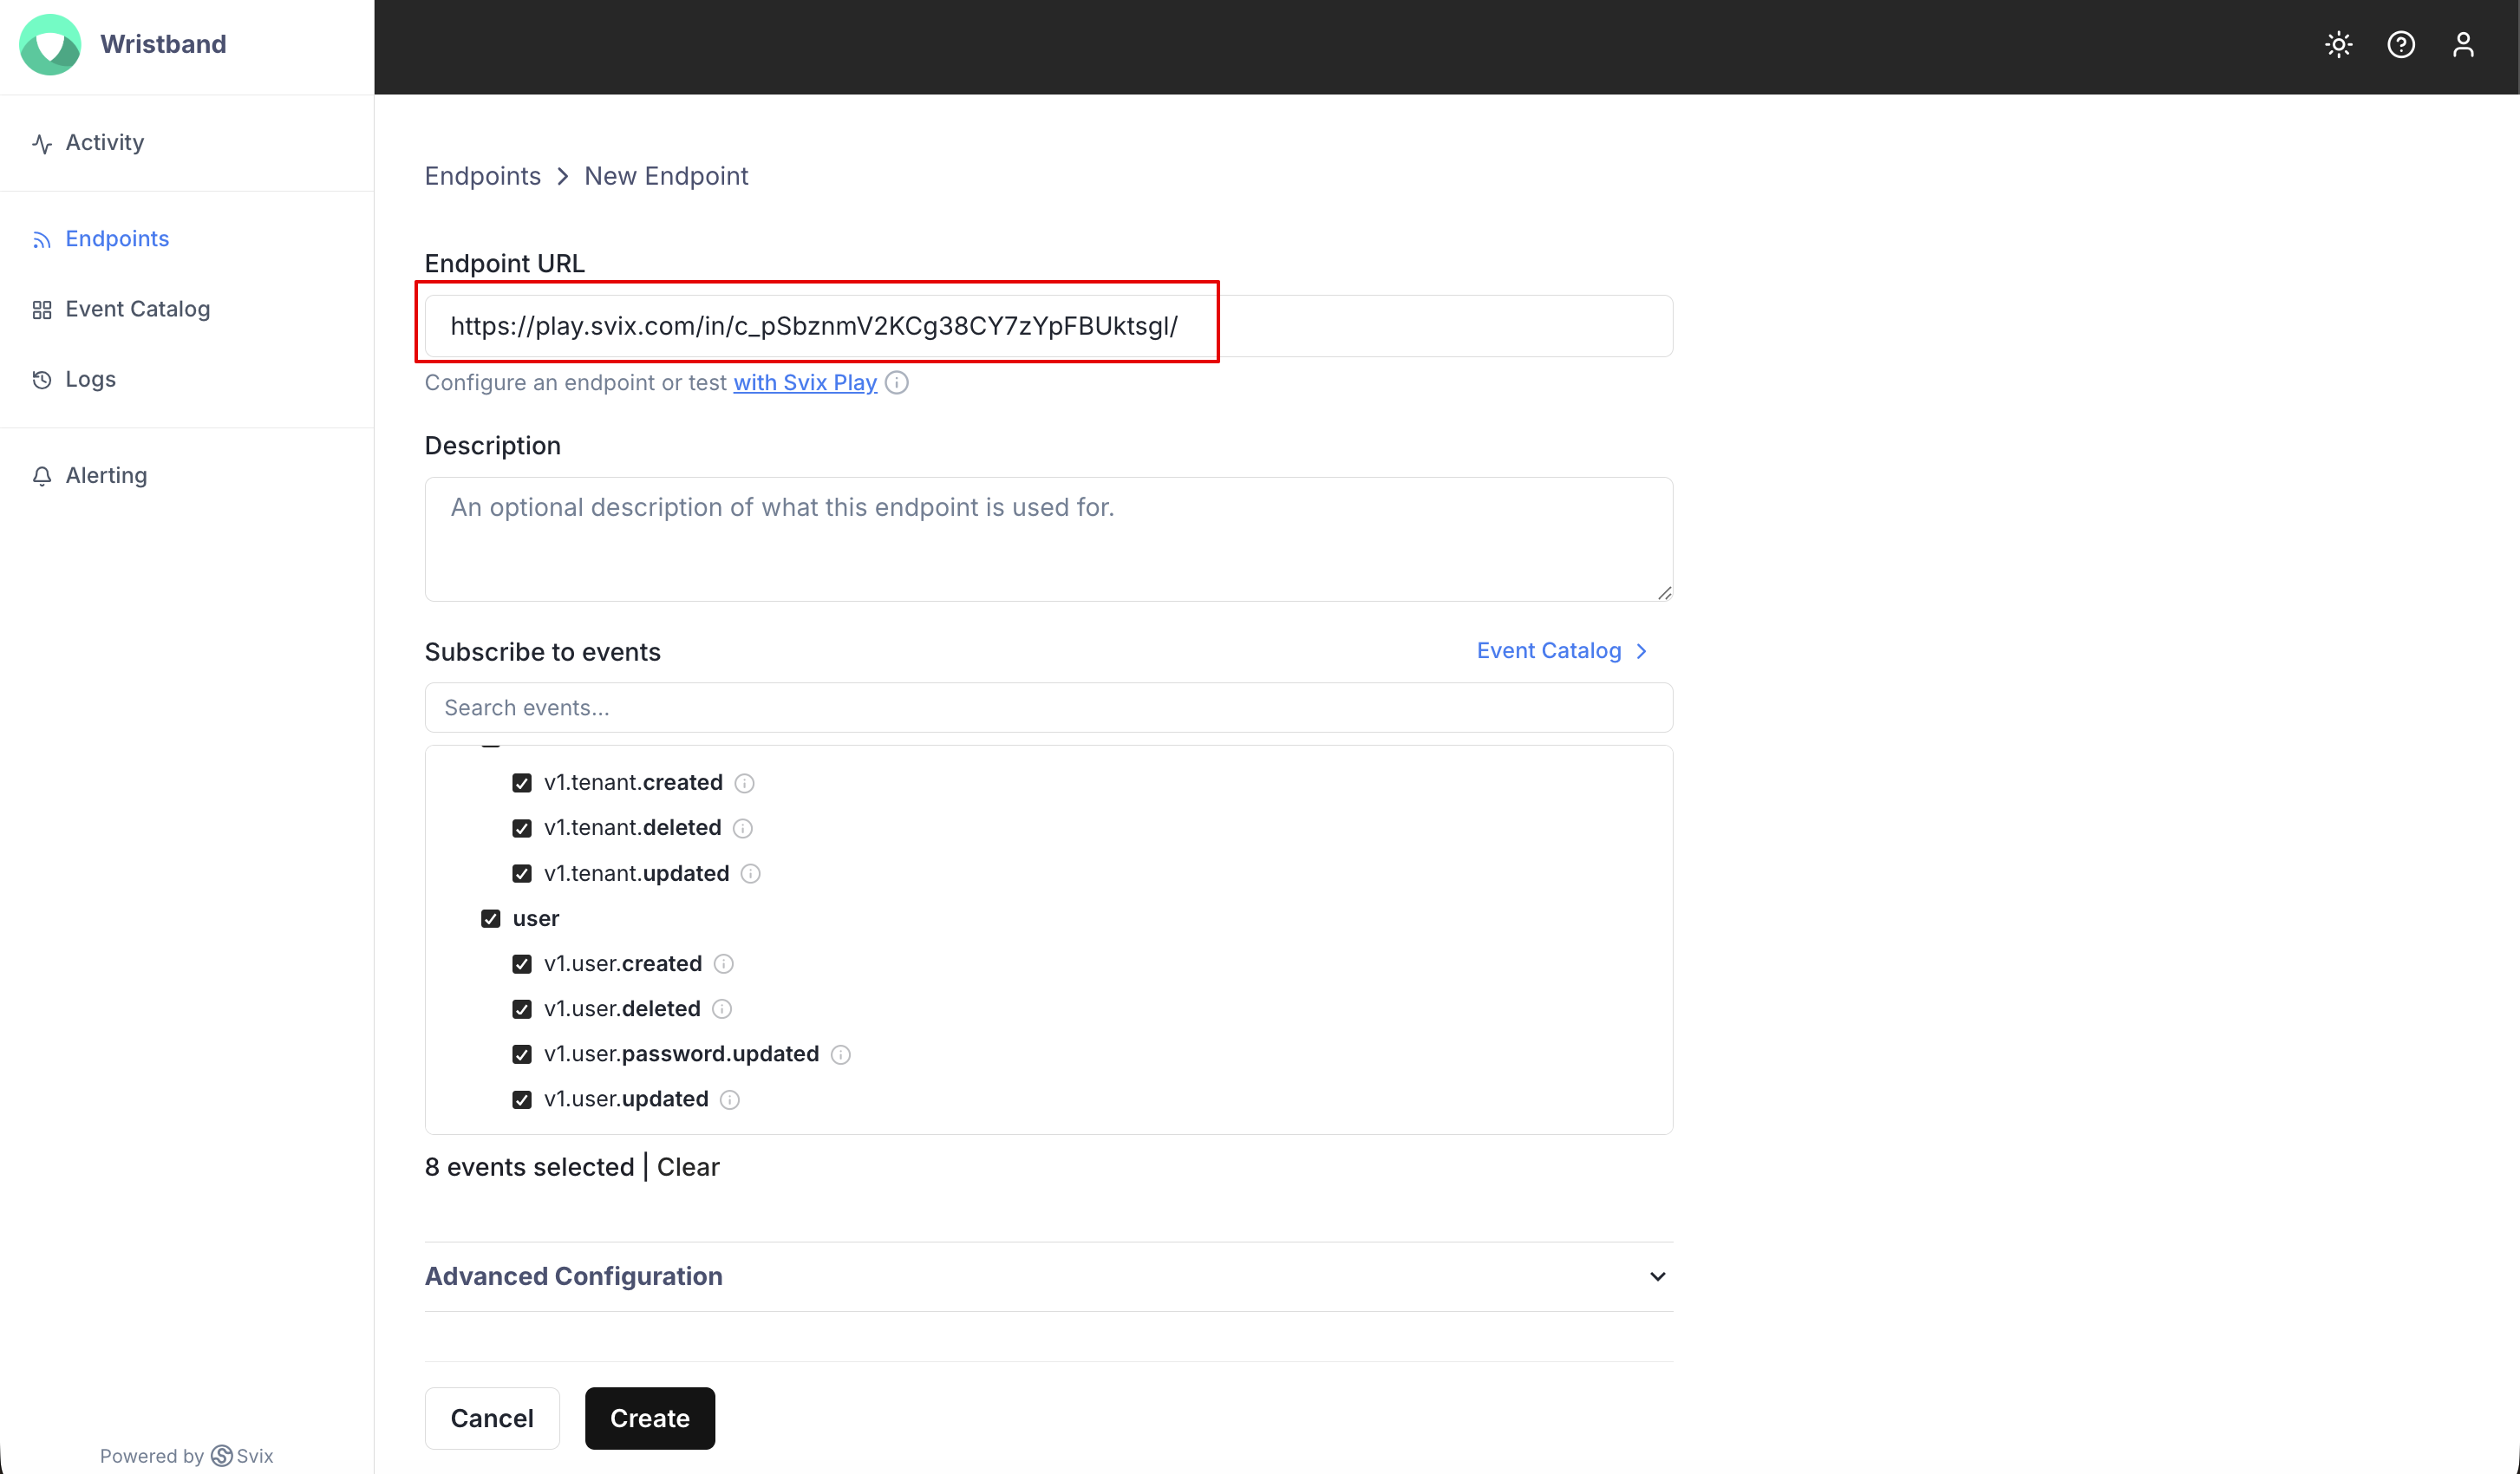
Figure 4. Screenshot showing how to create a new endpoint using the URL output from the Svix CLI listen command.
After the endpoint is created, any webhook events sent to this endpoint will get forwarded to http://localhost:8080/webhooks/wristband.
Troubleshooting
Listed below are some common reasons why your webhook endpoint is failing:
- Not using the raw payload body - This is the most common issue. When generating the signed content, Svix uses the raw string body of the message payload. If you convert JSON payloads into strings using methods like
stringify, different implementations may produce different string representations of the JSON object, which can lead to discrepancies when verifying the signature. It's crucial to verify the payload exactly as it was sent, byte-for-byte or string-for-string, to ensure accurate verification. - Missing the secret key - From time to time, we see people simply using the wrong secret key. Remember that keys are unique to endpoints.
- Sending the wrong response codes- When Svix receives a response with a 2xx status code, it's interpreted as a successful delivery even if you indicate a failure in the response payload. Make sure to use the right response status codes so Svix knows when messages are supposed to succeed vs. fail.
- Responses timing out - Svix will consider any message that fails to send a response within 15 seconds a failed message. If your endpoint is also processing complex workflows, it may time out, resulting in failed messages. In this case, as a best practice, your endpoint should simply receive the message and add it to a queue for asynchronous processing, so you can respond promptly and avoid being timed out.
Updated 3 months ago