Login: Self-Hosted UI
You can host your own Login UI page and orchestrate Wristband API calls to deliver a fully custom multi-tenant auth experience.
If you intend to self-host the Login Page, you can configure Wristband to reference the URLs where your pages are located. Wristband will then direct users to your pages wherever they need to be presented during the login flow.
Note: All example flow diagrams below demonstrate a Backend Server OAuth2 Client type. The other client types can be inserted into the Login Workflow in a similar manner by following the examples and patterns laid out in the Integration Patterns documentation.
Configuration
Depending on which pages you intend to self-host, configure the relevant settings in the Wristband Dashboard.
Custom Page URLs
Under Application Settings → Custom Page URLs in the Application View of the Wristband Dashboard, set the following fields to the locations of your self-hosted pages:
- Tenant Login Page URL: The location of your self-hosted Tenant-level Login Page. Supports the
{tenant_name}placeholder for tenant subdomains. - External IdP Login Page URL: The location of your self-hosted External IdP Login Page. Wristband redirects users here after they authenticate with an external IdP, passing along the External IdP authorization code needed to complete the login flow. Supports the
{tenant_name}placeholder for tenant subdomains.
Note: To self-host the application-level Login Page used for tenant discovery, see Tenant Discovery: Self-Hosted UI.
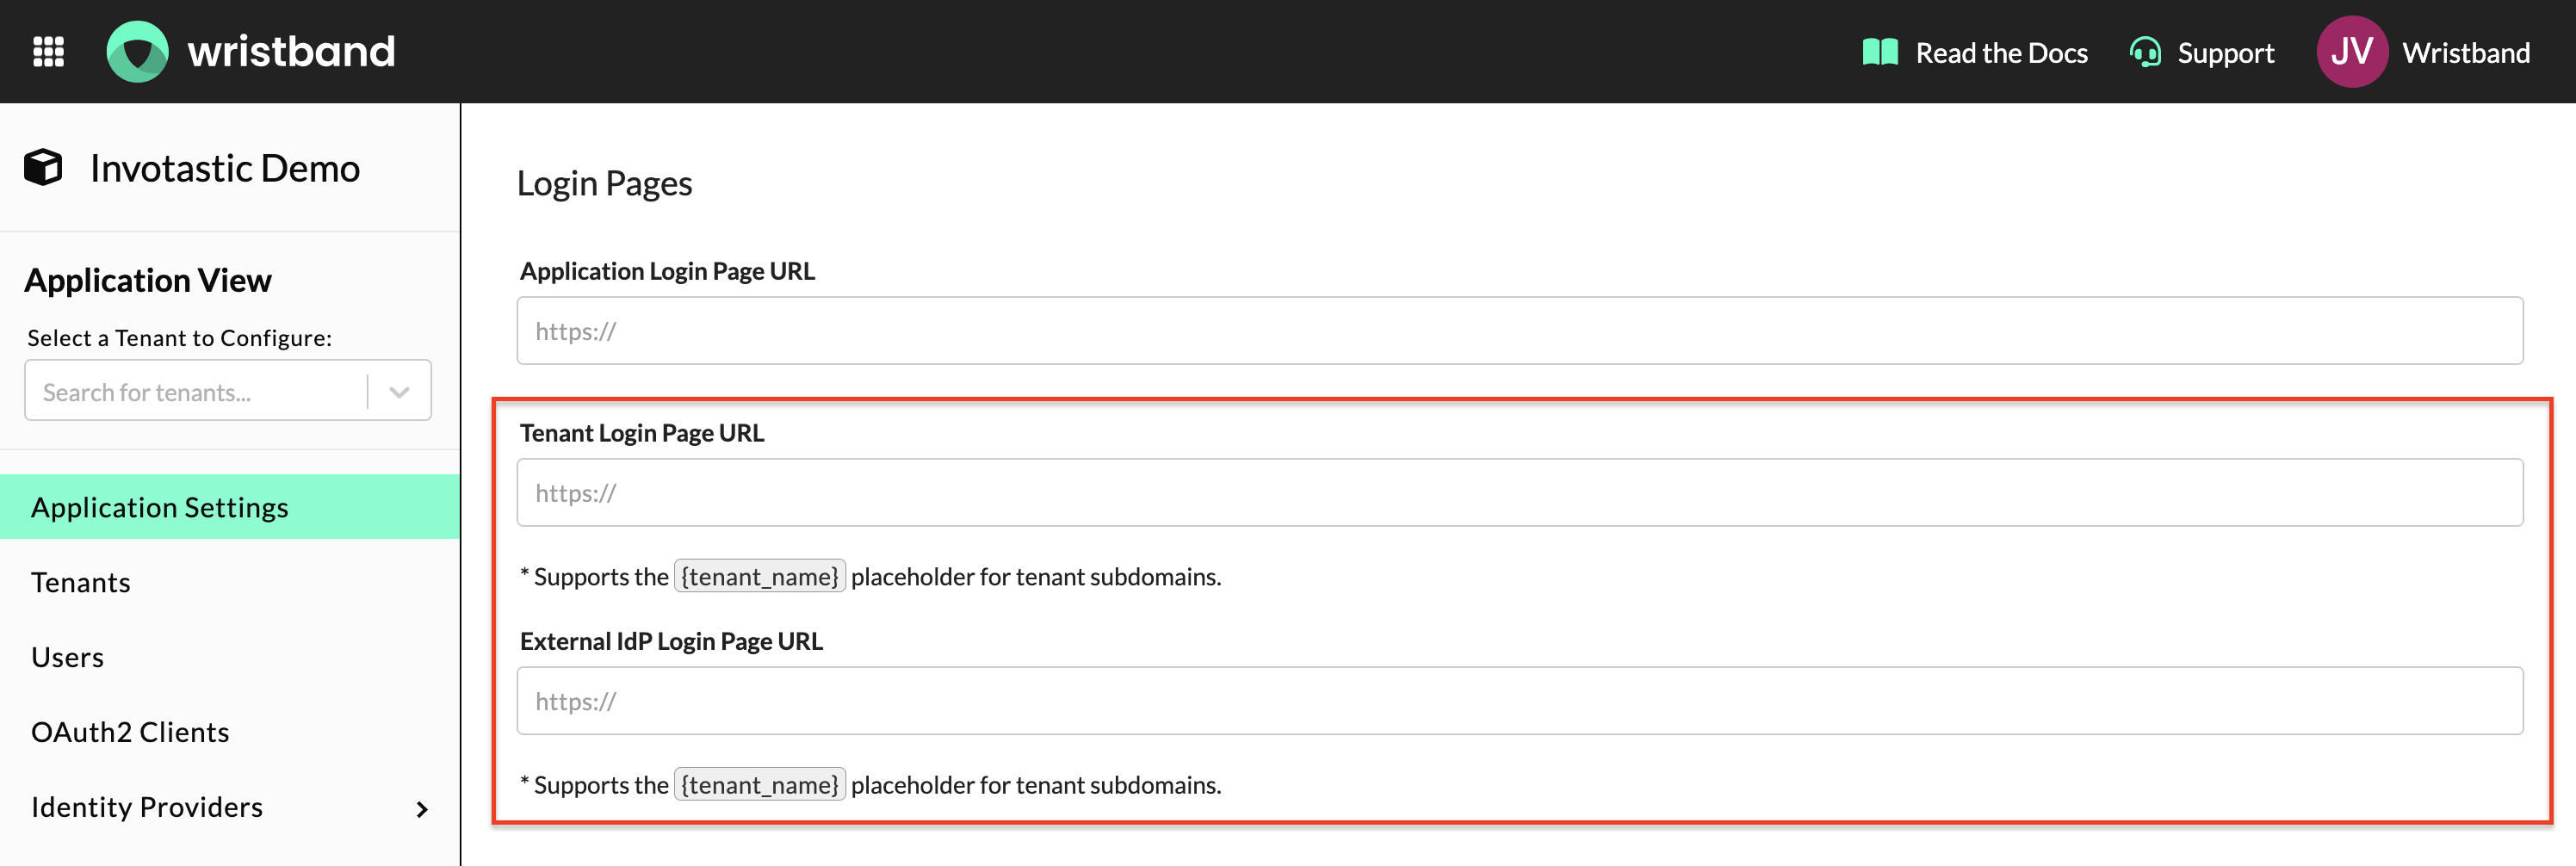
Tenant Login Page URL and External IdP Login Page URL fields in Application Settings → Custom Page URLs
Email Policies
Under Email Policies in the Application View of the Wristband Dashboard, set the Action Link URL for the Magic Link Login email template to the location of your self-hosted Verify Magic Link Page. Wristband sends this URL in the magic link email when a user requests to log in via magic link.
Note: This only applies when the Wristband Identity Provider is enabled for the tenant and the Magic Link auth factor is configured.
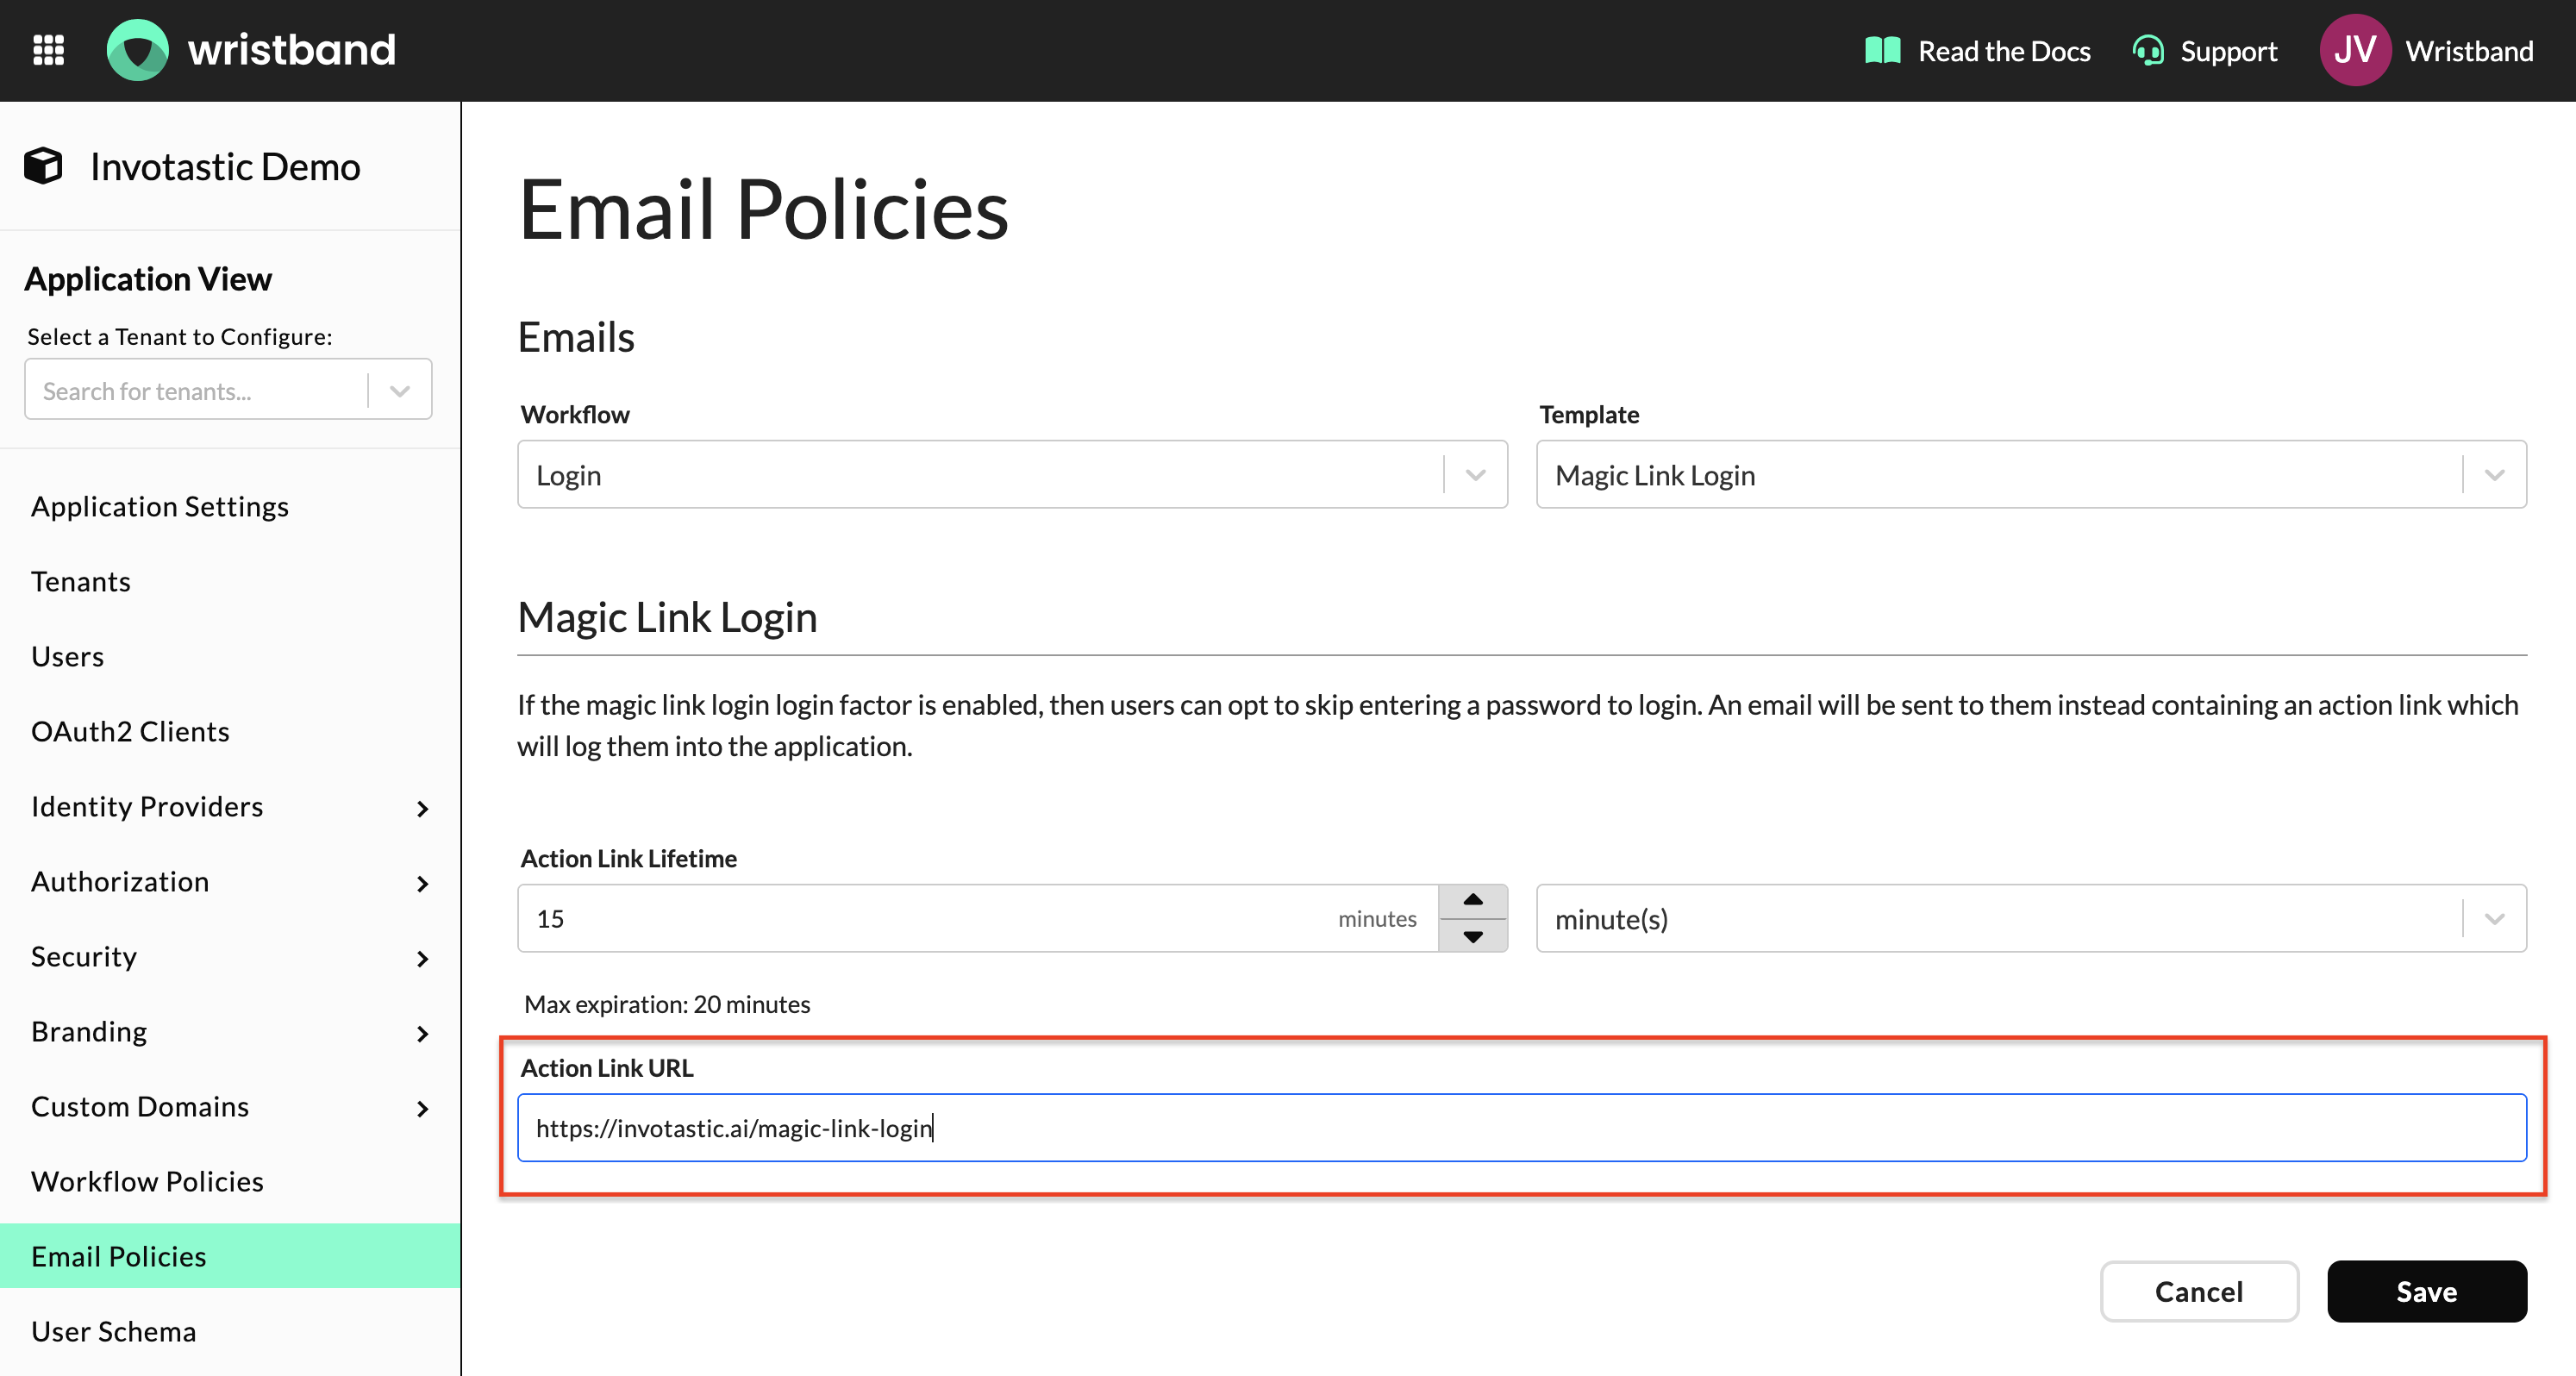
Magic Link Login Action Link URL field in Email Policies
Wristband Identity Provider
The default login factor for the Wristband Identity Provider is Password Login, but you can opt to configure Magic Link Login instead. Additionally, you have the flexibility to enable both Password Login and Magic Link Login simultaneously. When both are active, the end user can choose the preferred method on the Login Page.
Password Login
At a high level:
- The user clicks on the Login button either on your website or within your application.
- The user gets sent to the Login Endpoint implemented by your application.
- Your application creates an Authorization Request and redirects the user to the Wristband Authorize Endpoint.
- Wristband validates and records the Authorization Request and then subsequently redirects the user to your application's self-hosted Login Page.
- The user provides their credentials on the Login Page to authenticate.
- Your application calls the Wristband Verify Password for Login API to verify the user's password.
- Upon successful authentication, your application then redirects the user to the Wristband Create Auth Session for Password Login API to create a Wristband Authentication Session for the user.
- The user is redirected to your application's Callback Endpoint with an authorization code.
- The Callback Endpoint will call Wristband's Token Endpoint to exchange the authorization code for an access token.
- The Callback Endpoint will establish an application session for the end user. The session contains the access token and refresh token (and optionally the ID token and/or any other useful user data). A session cookie is generated by the server.
- The Callback Endpoint redirects the user into your application's entry point of choice (e.g., the home page).

Magic Link Login
At a high level:
- The user clicks on the Login button either on your website or within your application.
- The user gets sent to the Login Endpoint implemented by your application.
- Your application creates an Authorization Request and redirects the user to the Wristband Authorize Endpoint.
- Wristband validates and records the Authorization Request and then subsequently redirects the user to your application's self-hosted Login Page.
- The user clicks the Login button, which triggers a call to the Wristband Request Magic Link for Login API.
- The Login Page will show a message telling the user to check their inbox for a Magic Link Email.
- The user will click on the Magic Link within the email that was sent from Wristband.
- The user is sent to your application's self-hosted Verify Magic Link Page, where a call to the Wristband Verify Magic Link API is triggered to authenticate the user.
- Upon successful authentication, your application then redirects the user to the Wristband Create Auth Session for Magic Link Login API to create a Wristband Authentication Session for the user.
- The user is redirected to your application's Callback Endpoint with an authorization code.
- The Callback Endpoint will call Wristband's Token Endpoint to exchange the authorization code for an access token.
- The Callback Endpoint will establish an application session for the end user. The session contains the access token and refresh token (and optionally the ID token and/or any other useful user data). A session cookie is generated by the server.
- The Callback Endpoint redirects the user into your application's entry point of choice (e.g., the home page).

External Identity Provider Login
External Identity Providers refer to any identity provider that is not Wristband. This includes both Social Login Providers and Enterprise Single Sign-On (SSO) Providers. Before you enable an External Identity Provider for your authentication method, you should refer to the setup instructions for your given identity provider.
Configuring Identity Providers Documentation:
External IDP Login Examples
The example diagrams below demonstrate External IDP Login using Google as the provider. From the point of view of Wristband, the flow is essentially the same when using other External Identity Providers as well.
At a high level:
- The user clicks on the Login button either on your website or within your application.
- The user gets sent to the Login Endpoint implemented by your application.
- Your application creates an Authorization Request and redirects the user to the Wristband Authorize Endpoint.
- Wristband validates and records the Authorization Request and then subsequently redirects the user to your application's self-hosted Login Page.
- The user clicks the Login with Google button, which triggers a call to the Wristband External IDP Authorize Endpoint.
- Wristband redirects the user to Google's account login page.
- The user submits their Google credentials.
- Google redirects the user to the Wristband External IDP Callback Endpoint (which can be found in the "Identity Providers" section of the Wristband Dashboard for your given IDP), where Wristband creates an External IDP Authorization Code required for completing authentication.
- The user is sent to your application's self-hosted External IDP Login Page -- along with the External IDP authorization code -- where a call to the Wristband Verify User for External IDP Login API is triggered to authenticate the user.
- Upon successful authentication, your application then redirects the user to the Wristband Create Auth Session for External IDP Login API to create a Wristband Authentication Session for the user.
- The user is redirected to your application's Callback Endpoint with an authorization code.
- The Callback Endpoint will call Wristband's Token Endpoint to exchange the authorization code for an access token.
- The Callback Endpoint will establish an application session for the end user. The session contains the access token and refresh token (and optionally the ID token and/or any other useful user data). A session cookie is generated by the server.
- The Callback Endpoint redirects the user into your application's entry point of choice (e.g., the home page).

Enterprise SSO with JIT Provisioning
When Just In Time (JIT) Provisioning is enabled for an enterprise external identity provider, the login workflow changes after the user authenticates with the external IDP. Despite workflow policy configurations or other conditions, the SSO login workflow with JIT provisioning follows a common sequence up to a certain point. At a high level, this represents the shared portion of the sequence of events:

No Email Verification Required

Email Verification with One-Time Password

Email Verification with Asynchronous Email Confirmation

Updated 3 months ago