
Add Auth Endpoints
Configure the essential login, callback, and logout endpoints required to integrate with Wristband.
Leverage the Wristband SDK to register the four core routes necessary for managing user authentication and session termination in your FastAPI application:
- Login Endpoint
- Callback Endpoint
- Logout Endpoint
- Session Endpoint
Create a dedicated file for these endpoints (e.g., src/routes/auth_routes.py) to keep your authentication logic isolated and clean.
Login Endpoint
The Login Endpoint initiates authentication requests by constructing an authorization payload and redirecting the user to Wristband's Authorize Endpoint. From there, users are seamlessly routed to the Wristband-hosted login page to complete the sign-in process.
The following code snippet demonstrates how to implement the Login Endpoint using the Wristband SDK:
# src/routes/auth_routes.py

# Imports you'll need for all auth endpoints
from fastapi import APIRouter, Depends, Request, Response
from wristband.fastapi_auth import (
  CallbackResult,
  get_session,
  LogoutConfig,
  RedirectRequiredCallbackResult,
  SessionResponse,
  TokenResponse
)
from auth.wristband import require_session_auth, wristband_auth

router = APIRouter()

# Login Endpoint
@router.get('/login')
async def login(request: Request) -> Response:
    # Call the Wristband login() method which will generate the Response that
    # should be used to redirect to Wristband's Authorize Endpoint.
    return await wristband_auth.login(request)

...
Callback Endpoint
The Callback Endpoint handles incoming OAuth 2.0 redirection payloads from Wristband. Executing wristband_auth.callback() resolves the authorization code exchange, yielding a CallbackResult instance with the user's claims and access tokens.
Leverage the get_session dependency to fetch the request session context. Populate this session with incoming tokens and claims via session.from_callback(). To finalize the OAuth exchange, return the result of wristband_auth.create_callback_response() , which structures the proper cookies and response headers into a native FastAPI Response.
The following code snippet demonstrates how to implement the Callback Endpoint using the Wristband SDK:
# src/routes/auth_routes.py (continued)

# ...

# Callback Endpoint - The get_session dependency provides access to the
# session object without performing validations on the session.
@router.get('/callback')
async def callback(request: Request, session: Session = Depends(get_session)) -> Response:
    # Call the Wristband callback() method to check if the user
    # successfully authenticated.  If the user did authenticate successfully,
    # the user's tokens and claims can be retrieved from the CallbackResult.
    callback_result: CallbackResult = await wristband_auth.callback(request)

    # For some edge cases, such as if an invalid grant was passed to the token
    # API, the SDK will return a redirect URL. Your code should redirect to it
    # in order to restart the login flow.
    if isinstance(callback_result, RedirectRequiredCallbackResult):
        return await wristband_auth.create_callback_response(
            request,
            callback_result.redirect_url,
        )

    # Create a session for the authenticated user. If needed, custom fields can
    # be stored in the session using the custom_fields parameter of the
    # from_callback() method.
    session.from_callback(callback_result.callback_data)

    # Once the Callback Endpoint has completed, redirect to your app's
    # default return URL (typically your app's home page) or to an explicit
    # return URL, if one was specified in the original login request.
    app_url = callback_result.callback_data.return_url or "<replace-with-default-app-url>"
    return await wristband_auth.create_callback_response(request, app_url)

...
Logout Endpoint
Session termination requires a complete tear-down of the user's authenticated state. The Logout Endpoint handles this lifecycle event by performing three specific actions:
- Clear the application's local session state.
- Revoke any refresh tokens associated with the user.
- Redirect to Wristband's Logout Endpoint to terminate the user's Wristband auth session.
The following code snippet demonstrates how to implement the Logout Endpoint using the Wristband SDK:
# src/routes/auth_routes.py (continued)

...

# Logout Endpoint
@router.get('/logout')
async def logout(request: Request, session: Session = Depends(get_session)) -> Response:
    # Get all the necessary session data needed to perform the logout operation.
    logout_config = LogoutConfig(
        refresh_token=session.refresh_token,
        tenant_custom_domain=session.tenant_custom_domain,
        tenant_name=session.tenant_name,
    )

    # Clear your application's local session.
    session.clear()

    # Call the Wristband logout() method. This will revoke any refresh tokens
    # associated with the user and return a Response to redirect to Wristband's
    # Logout Endpoint.  Redirecting to Wristband's Logout Endpoint will terminate
    # Wristband's auth session associated to the user.  When Wristband is done
    # logging out the user it will redirect back to your application's login
    # URL or to an explicitly provided redirect URL.
    return await wristband_auth.logout(request, logout_config)

...
Session Endpoint
This endpoint provides a session validation check for incoming network requests, returning the authenticated user's session payload. It serves two core frontend use cases:
- To allow the frontend to determine whether the user has a valid session.
- To provide the frontend with the user's session data for use within the browser.
The following code snippet demonstrates how to implement the Session Endpoint using the Wristband SDK:
# src/routes/auth_routes.py (continued)

...

# Session Endpoint - The `require_session_auth` dependency verifies that the
# request has a valid session and also provides access to the session object.
@router.get("/session")
async def get_session_response(session: Session = Depends(require_session_auth)) -> SessionResponse:
    # Call the Wristband get_session_response() method to extract the user's
    # session data and populate a SessionResponse. If needed, you can add
    # additional data to the SessionResponse by using the metadata parameter
    # of the get_session_response() method.
    return session.get_session_response()
Map Auth Endpoints
After defining your auth endpoints, make sure to include the new routing module within your core FastAPI main.py file.
# src/main.py
from fastapi import FastAPI
from wristband.fastapi_auth import SessionMiddleware
from routes.auth_routes import router as auth_router # <-- NEW

def create_app() -> FastAPI:
    app = FastAPI()

    app.add_middleware(SessionMiddleware, secret_key="<your-generated-secret>")

    # NEW: Include auth routes - path prefix can be whatever you prefer.
    app.include_router(auth_router, prefix="/auth")

    # Your other application setup...
Register Your Login Endpoint and Callback Endpoint With Wristband
Wristband requires the URLs for your Login and Callback Endpoints to execute authentication flows successfully. To configure these redirection targets, update the following two fields inside your Wristband dashboard settings:
- Application Login URL
- Client Redirect URIs
The next sections detail the specific steps required to configure these field values.
Updating the Application Login URL
To configure the Application Login URL, complete the following steps:
- Go to the Dashboard Home Page and select your application.
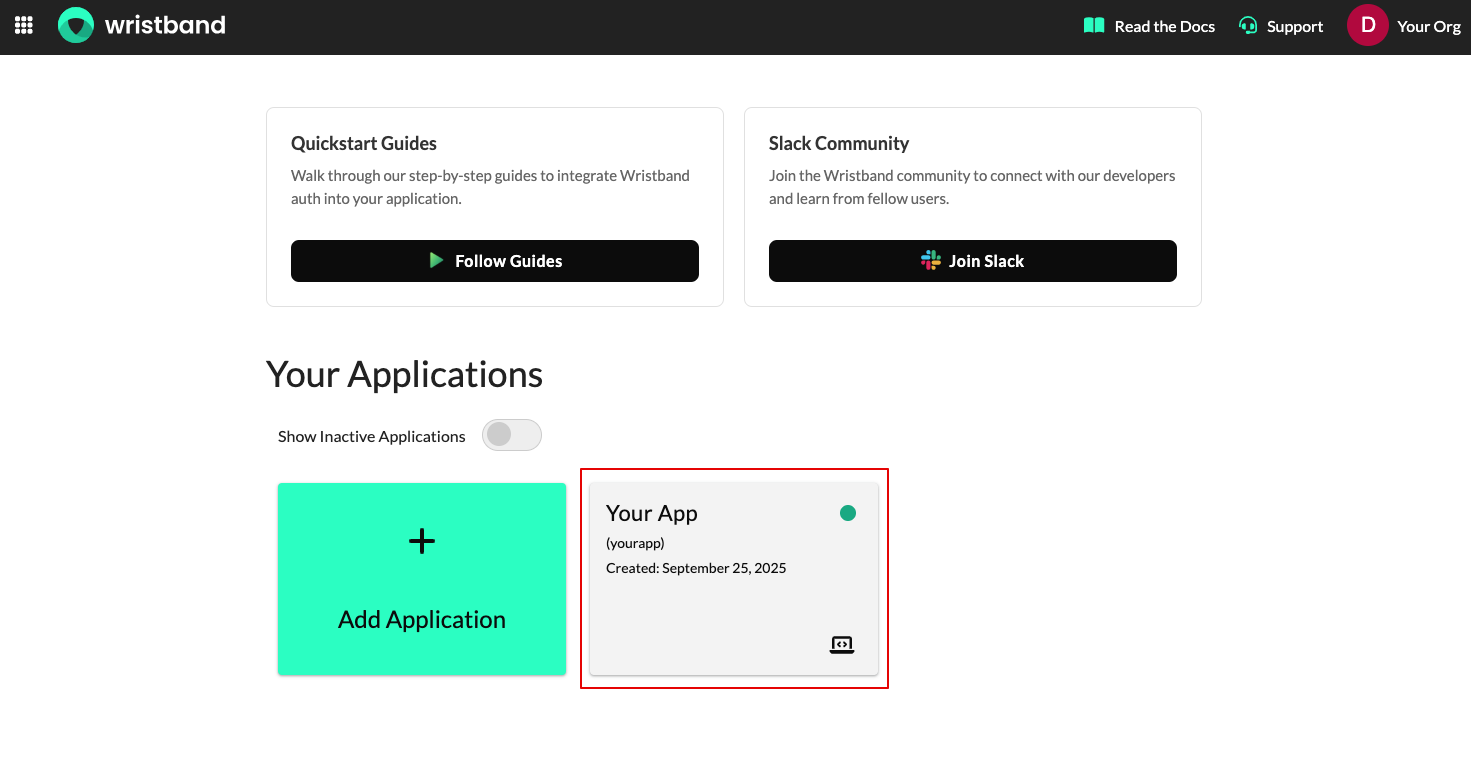
Figure 1: Select your Wristband application.
- Locate the Login URL field under Application Settings, input the URL for your application's Login Endpoint, and click the Save button to apply changes.
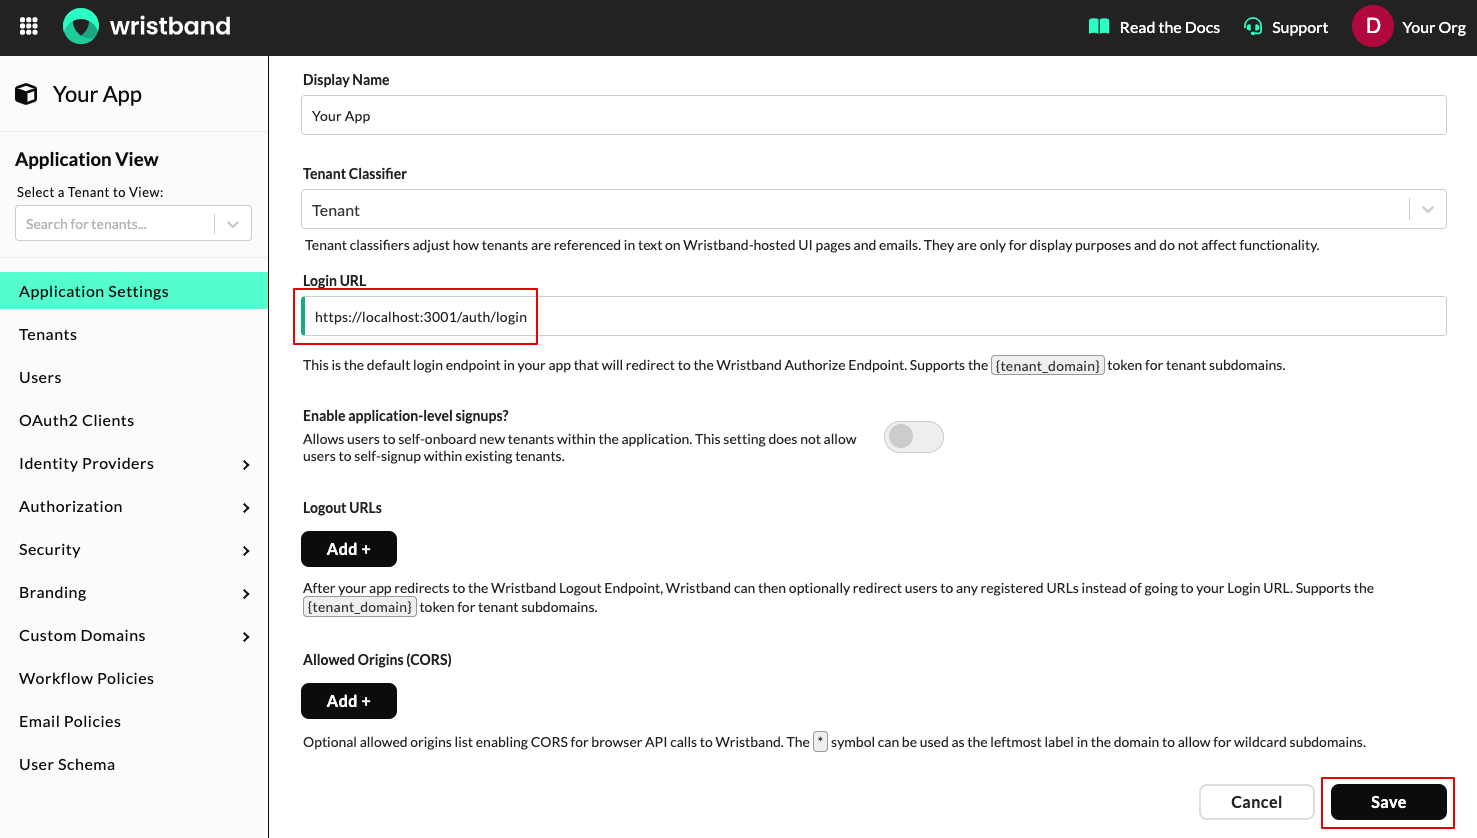
Figure 2: Configure the application Login URL.
Updating the Client Redirect URIs
Follow these steps to update your Client Redirect URIs:
- Access the OAuth2 Clients section from the left navigation panel and open the client instance configured with your matching SDK client ID.
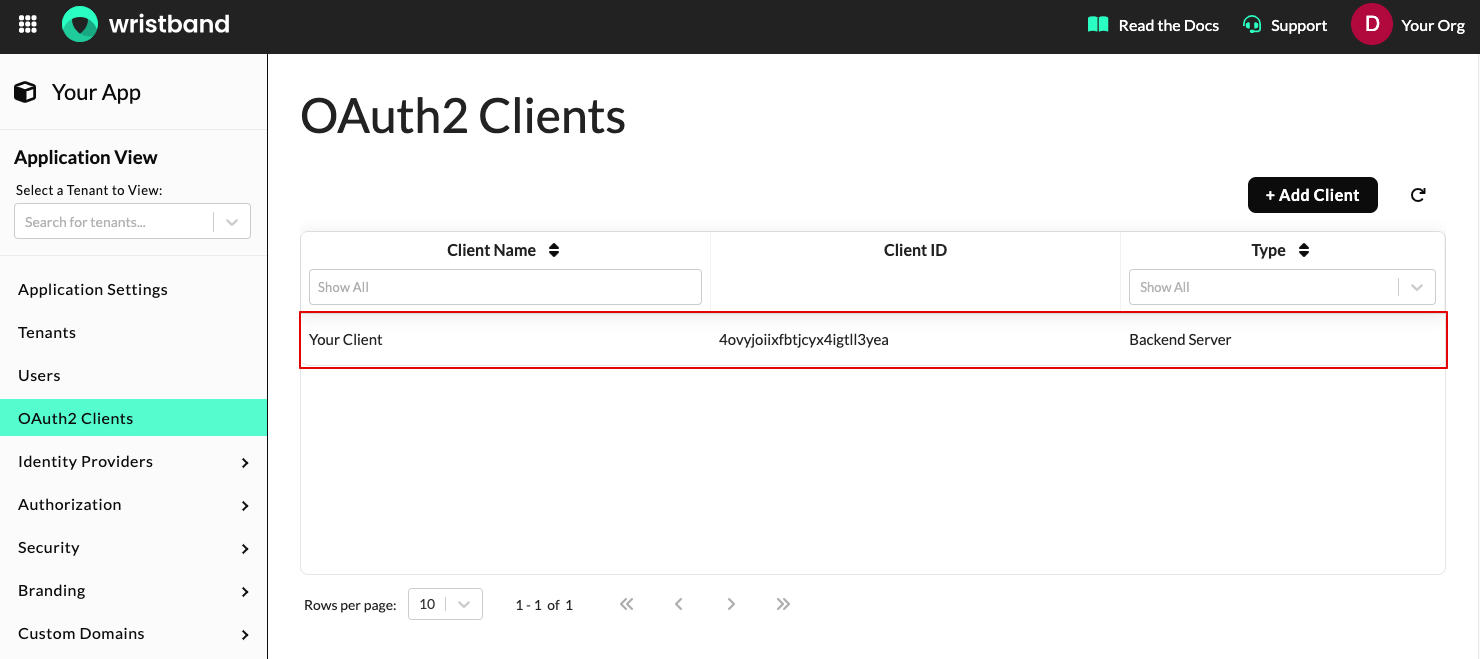
Figure 3: Select the matching OAuth2 client.
- In the Edit Client interface, append your application's Callback Endpoint URL to the Redirect URIs field using the Add+ option, then commit your changes by clicking Save.
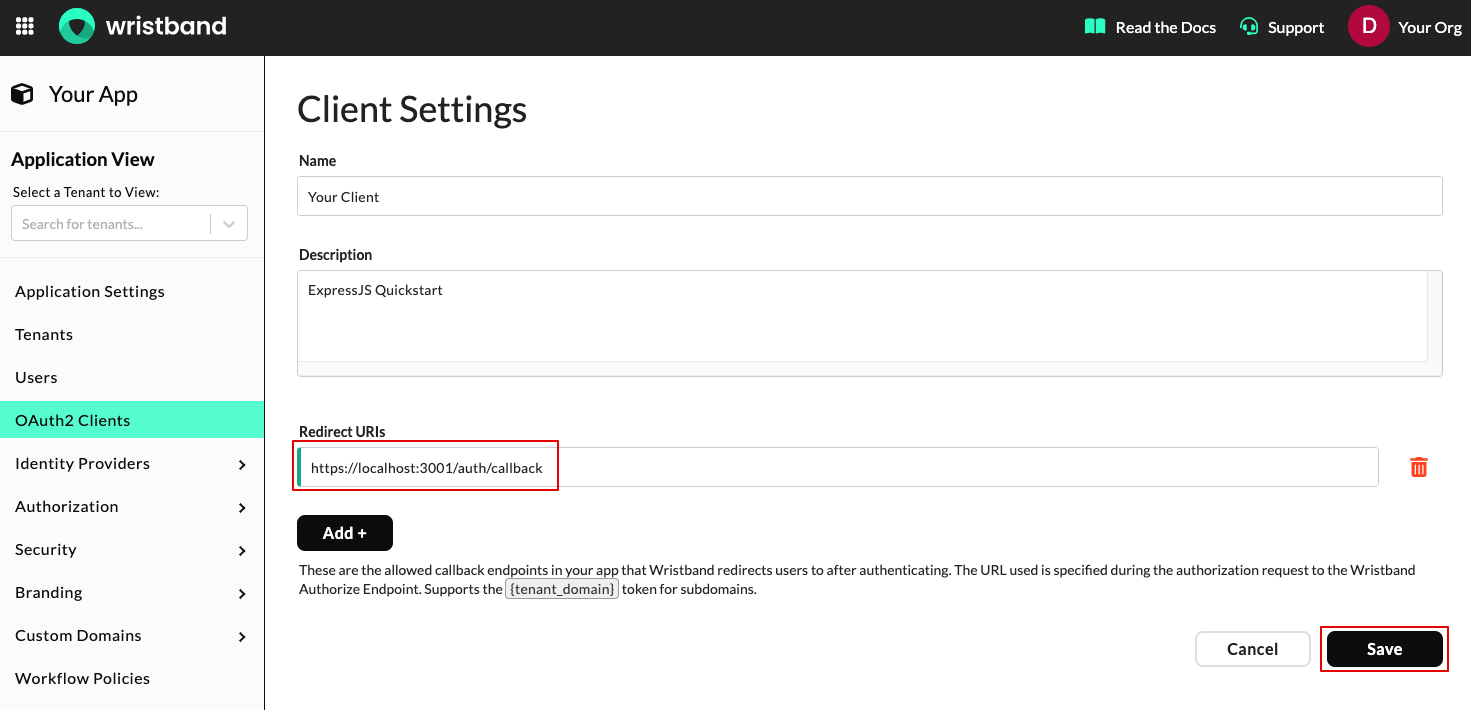
Figure 4: Add the Callback Endpoint as a Redirect URI.
Updated about 2 months ago
What’s Next
With your application's authentication endpoints in place, let's verify that they're working correctly.