Users
Users are the representation of human individuals accessing your application.
Users are a core entity in most applications. They represent the people interacting with your system and are central to both authentication and authorization flows.
Every user in Wristband must belong to a tenant and have an association with an identity provider that is responsible for managing the user's identity. When users authenticate using Wristband, your application can retrieve information about the user by calling Wristband's APIs. For example, the Get User Info API returns identity claims for the authenticated user, while the Get Permission Info API provides a list of the user’s assigned permissions. With this information, your application can identify the user and perform authorization checks to ensure they only access permitted data.
In the sections below, we'll cover the key aspects of managing users within your application.
User Attributes
Every user has a set of attributes that provide details about the user. Out-of-the-box Wristband supports the following user attributes:
| User Attribute | Required | Unique | Description |
|---|---|---|---|
| ✅ | ✅ | The user's primary email address. | |
| emailVerified | ✅ | ❌ | A boolean indicating whether the user's email has been verified or not. |
| username | Required only if the username is configured as a login identifier for the user's associated identity provider | ✅ | A unique identifier chosen by the user. |
| externalId | Required only if the user is associated with an external identity provider. | ✅ | A unique identifier that is maintained in an external system. |
| fullName | ❌ | ❌ | The user’s full name, including middle name, titles, and suffixes (e.g., "Ms. Barbara Jane Jensen, III”). |
| givenName | ❌ | ❌ | The user's given name (i.e., first name). |
| familyName | ❌ | ❌ | The user's family name (i.e., last name). |
| middleName | ❌ | ❌ | The user's middle name. |
| honorificPrefix | ❌ | ❌ | Honorific prefix (i.e., Mr., Mrs., Dr., etc.). |
| honorificSuffix | ❌ | ❌ | Honorific suffix (i.e., Jr., Sr., MD, etc.). |
| nickname | ❌ | ❌ | A nickname given to the user. |
| displayName | ❌ | ❌ | The primary textual label by which this user is usually displayed by the application when presenting it to end-users. |
| pictureUrl | ❌ | ❌ | URL of the user’s profile picture. |
| gender | ❌ | ❌ | The user’s gender as described by the user. |
| birthdate | ❌ | ❌ | The user's birthday. |
| phoneNumber | ❌ | ❌ | The user's primary phone number. |
| preferredLanguage | ❌ | ❌ | The user's preferred language. |
| locale | ❌ | ❌ | The locale determines how localized content, such as currency, date and time formats, numerical representations, etc., should be rendered. |
| timeZone | ❌ | ❌ | The user's timezone. |
| status | ✅ | ❌ | The user's current status. |
Configuring Required Attributes
The required user attributes can be customized by modifying the user schema at either the application or the tenant level. Changes made to the user schema at the application level apply to all users within the application, while tenant-level changes affect only users under that specific tenant.
Below is a list of all user attributes whose optionality can be configured:
- birthdate
- familyName
- fullName
- givenName
- phoneNumber
- username
Attribute Uniqueness
For user attributes that are required to be unique (e.g., email, username, and external ID), the uniqueness scope encompasses both the tenant and the identity provider. For example, two distinct users can exist with the same email address as long as they belong to different tenants.
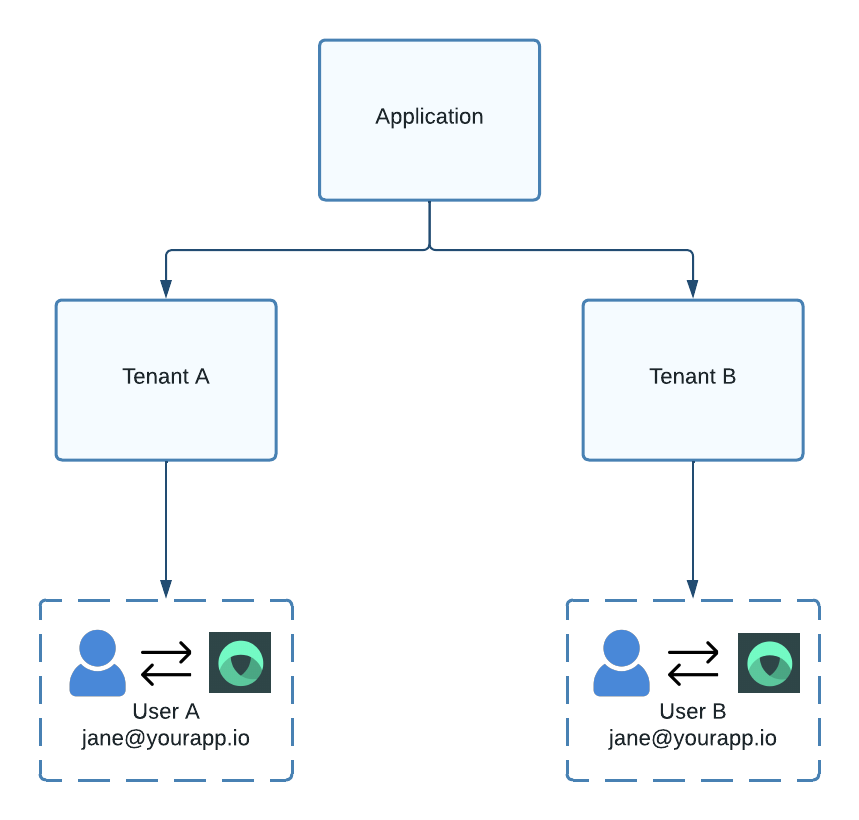
Figure 1. Model showing users with the same email address co-existing in different tenants.
However, attempting to create two users with identical email addresses under the same tenant and identity provider will fail, as a user's email address must be unique within a single tenant and identity provider.

Figure 2. Two users with duplicate emails can't exist under the same tenant and IdP.
But two users with the same email address can exist under a single tenant if they belong to different IdPs.
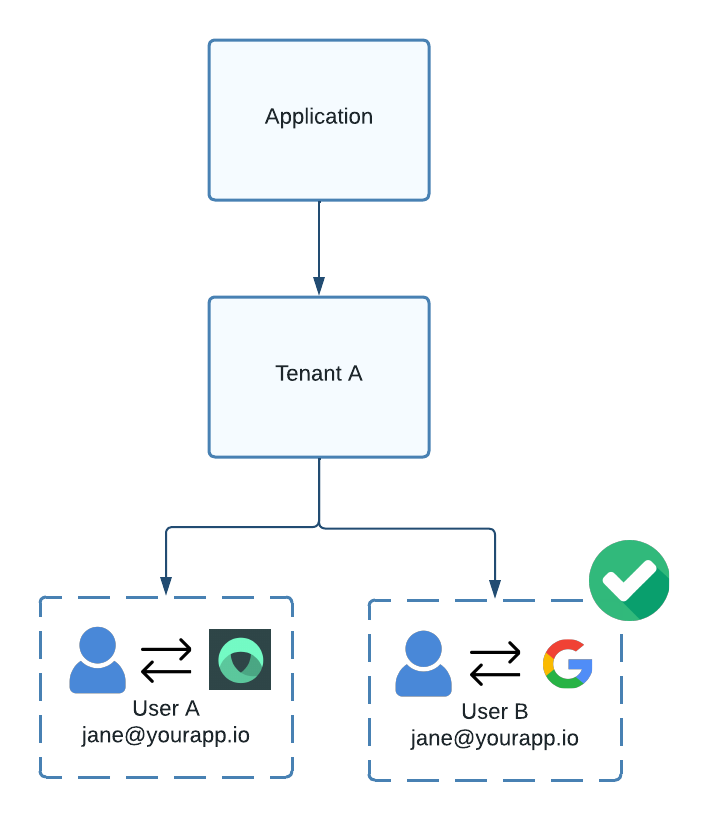
Figure 3. Two users can exist under the same tenant with duplicate emails if they belong to different IdPs.
Custom Metadata
In addition to the standard attributes, Wristband users support the following two fields that can be used to add custom metadata:
- publicMetadata: Allows for storing custom metadata that is accessible to end users. For example, the
publicMetadatacould be used to persist information such as user preferences, additional profile fields, etc. - restrictedMetadata: Allows for storing custom metadata that isn't accessible by end users. For example, the
restrictedMetadatacould be used to persist a user's Stripe customer ID for billing.
Both the publicMetadata and restrictedMetadata user fields accept a JSON object as a value, as shown in the following example:
"restrictedMetadata": {
  "stripeCustomerId": "1234",
},
"publicMetadata": {
  "favoriteFoods": ["chicken", "steak"],
  "occupation": "Software Engineer"
}
Custom Metadata Limits
The JSON objects used for custom metadata have the following restrictions:
-
The max size of the JSON is 4KB.
-
The max nested object depth is 3.
-
The maximum number of top-level fields within an object is 15.
-
Field names must match the following regex pattern:
^[a-zA-Z]([-_]?[a-zA-Z0-9]+)*$. -
Nesting arrays directly within each other is not permitted. For example, the following value is not allowed:
{
  "notAllowed": [[1, 2], [3, 4]],
}
Whereas, the following is allowed:
{ "allowed": [ { "nestedList": [1, 2] }, { "nestedList": [3, 4] } ] } -
The object fields are case-insensitive, and if duplicate field names are provided, then the last value written will win.
Email Verification
Email verification confirms that a person owns the email address associated with their user. For authentication platforms like Wristband, this is a critical step, since temporary credentials, such as one-time passwords, are delivered via email. If a user’s email is incorrect, these credentials could be sent to the wrong person, potentially allowing unauthorized access. To prevent this, along with other security issues, Wristband requires email verification for several of its authentication flows.
Flows That Depend on Email Verification
The following flows depend on a user's email being verified to work correctly:
- Password Reset: The password reset email won't be sent to the user unless their email has been verified.
- Magic Link Login: The magic link email won't be sent to the user unless their email has been verified.
- Tenant Discovery With Email Resolution: To resolve a user's tenant by their email, an active user must exist within the tenant with a matching email address that has been verified.
Methods For Verifying a User's Email
Because email verification is essential to several authentication flows, Wristband offers multiple methods for verifying a user's email address:
- Dedicated Email Verification Flow: With this flow, you can send an email to a user's email address containing a link that the user can click to verify their email address.
- User Activation Flow: When users sign up, you can require them to complete an email activation flow. This will ensure that the user's email has been verified before they can access your application.
- Change Email Flow: When users change their email, an email will be sent to the user's new email containing a link that the user must click to verify their new email address.
- Email Invitation Flows: When email invitations are used to onboard users, if the user is provisioned with the same email address that was used to deliver the invitation, then the user's email will be marked as verified.
- Syncing From External Identity Providers: If a user is provisioned in Wristband through an external identity provider (IdP), for example, if the user signs up using an external IdP or goes through an enterprise IdP JIT provisioning flow, then Wristband will use information about the user sent from the external IdP to determine if the user's email is verified. For instance, if a user is created through a JIT provisioning flow with Okta as the IdP, and Okta provides a claim saying that the user's email has been verified, then the user will be created in Wristband with the email synced from Okta, and the email will be marked as verified. If the user's email verification status can't be determined from the IdP or the IdP specifies that the user's email is not verified, then Wristband can fallback to performing the email verification itself.
- Manual Verification via Wristband's Dashboard: Through Wristband's dashboard, administrators can explicitly update the email verification status for a user.
- Programmatic Verification via Wristband's APIs: Using Wristband's Create User API or Patch User API, the email verification status can be programmatically modified for a user.
User Status
Users in Wristband have a status attribute that determines the state the user is in and what actions they are allowed to take in that state. The following table lists all possible user statuses:
| User Status | Description | Allowed State Transitions |
|---|---|---|
ACTIVE | In this state, the user has been activated and can successfully authenticate using Wristband. | INACTIVE |
INACTIVE | In this state, the user has been deactivated and can no longer authenticate using Wristband. | ACTIVE |
PENDING_INVITE_ACTIVATION | This state indicates that the user has been provisioned as part of an invitation flow but has not yet accepted their activation email to complete the activation process. Users in this state won't be able to authenticate using Wristband. | ACTIVE, INACTIVE |
PENDING_SIGNUP_ACTIVATION | This state indicates that the user has been provisioned as part of a self-signup flow but has not yet accepted their activation email to complete the activation process. Users in this state won't be able to authenticate using Wristband. | ACTIVE, INACTIVE |
PROVISIONED | This is the default status assigned to a user when they are first created. In this state, users will not be allowed to authenticate using Wristband. This state is useful if you need to perform some setup on the user before allowing them to log in to your application. | ACTIVE, INACTIVE, PENDING_INVITE_ACTIVATION, PENDING_SIGNUP_ACTIVATION |
Onboarding Users
Wristband provides multiple methods for onboarding users onto your application. The sections below outline each supported approach.
Tenant Signup
The Tenant Signup Flow allows users to self-register within a specific tenant. Users initiate the Tenant Signup Flow by navigating to the tenant signup URL, which has the following format: https://<tenant_vanity_domain>/signup. On the tenant signup page, users will be asked to enter required user attributes and set their credentials. After completing the signup process, the user will be provisioned under the tenant that they signed up for, and they will be able to log in to that specific tenant.
The Tenant Signup Flow can be enabled on a per-tenant basis, allowing each tenant to control how users are provisioned. It can also be restricted to allow signups only from email addresses that match domains specified in a tenant's allowedSignupEmailDomains list. This feature can be used to restrict user sign-up to only those who possess a specific company email address.
To learn more about the Tenant Signup Flow, refer to the Signup Workflow documentation.
Application Signup
The Application Signup Flow is similar to the Tenant Signup Flow, except that a new tenant is created under the application, and the user will be assigned to this new tenant. To create the new tenant, the Application Signup Flow requires the user to provide a unique name for the tenant, in addition to the required user attributes and credentials. Users initiate the Application Signup Flow by navigating to the application signup URL, which has the following format: https://<application_vanity_domain>/signup. The Application Signup Flow can be disabled for cases where tenant creation needs to be manually controlled.
To learn more about the Application Signup Flow, refer to the Signup Workflow documentation.
New User Invitation
The New User Invitation Flow allows administrators to invite individuals to join a specific tenant. Invitations can be sent via email or shared directly through a generated link. Once the invitation is accepted, the user is provisioned under the corresponding tenant.
When invitations are created, administrators can also specify the roles that should be assigned to the user when they accept the invite. Wristband will automatically assign those roles to the user during the user provisioning process.
To learn more about the New User Invitation Flow, refer to the New User Invitation Workflow documentation.
Manual Provisioning via Wristband's Dashboard
Through Wristband's dashboard, administrators can manually provision new users for a specific tenant. When a user is first created through the dashboard, their status will be PROVISIONED, their email will not be verified, and they will not have a password set. In this state, the user will not be able to authenticate successfully into your application. Therefore, to complete the onboarding process, you can send the user an Existing User Invitation Email. When the user accepts the email invitation, their status will be set to ACTIVE, their email will be marked as verified, and they will be prompted to set their password (assuming password is enabled as a login factor). After completing the invitation process, the user will be able to log in to your application.
Note, instead of sending an Existing User Invitation Email, a Wristband administrator can manually set the user's status to ACTIVE and also mark their email as verified. However, the administrator can't directly set the user's password. Therefore, in this case, the user would have to go through the Password Reset Flow to set their password.
To learn more about the Existing User Invitation Flow, refer to the Existing User Invitation Workflow documentation.
Just-in-Time (JIT) Provisioning
Just-in-Time (JIT) provisioning allows users to be automatically created when they successfully authenticate through an enterprise identity provider (IdP). This streamlines onboarding for organizations that manage employee identities with providers like Okta or Microsoft Entra. Instead of provisioning each user manually, accounts are created automatically the first time a user logs in via the enterprise IdP.
For more information on JIT Provisioning, refer to the JIT Provisioning documentation.
Programmatic Provisioning via Wristband's APIs
Users can be provisioned programmatically using Wristband's APIs. This can be useful for cases where you need to do a bulk import of users or integrate the user provisioning process into your application.
To create users via the API, refer to the Wristband Create User API.
Assigning Roles to Users
Roles can be assigned to users to help enforce authorization decisions within your application. Listed below are the various methods available for assigning roles to users.
- Role Assignment Policies: Role assignment policies can be used to automatically assign roles to users for the following use cases:
- Signup: A list of default roles can be specified that will automatically be assigned to users when they complete the signup flow.
- Enterprise Identity Provider Role Mapping: You can specify default roles to assign to users who sign up or log in via an enterprise identity provider with role mapping enabled, but roles can’t be derived from the user’s claims provided by the enterprise identity provider.
- Manually via the Wristband Dashboard: Administrators can manually assign roles to users through the Wristband dashboard. Likewise, when sending out user invitations, administrators can specify the roles that should be assigned to the user upon acceptance of the invitation.
- Enterprise Identity Provider Role Mappings: When configuring an enterprise IdP, role mappings can be created so that users in Wristband are automatically assigned roles based on user claims synced from the enterprise IdP. For example, you can specify that if users belong to a certain group within the enterprise IdP, then they should be assigned a specific role within Wristband.
To learn more, please refer to the Role Mappings documentation. - Programatically via Wristband's APIs: The following APIs can be used to manage the roles assigned to users programmatically:
Managing Users With Wristband's Dashboard
The Wristband dashboard provides a comprehensive set of tools for managing your application's users. The sections below highlight the dashboard's core user management features.
Adding Users
Users can be manually added to a tenant by clicking "Users" from the left navigation menu and then clicking the "Add User" button.
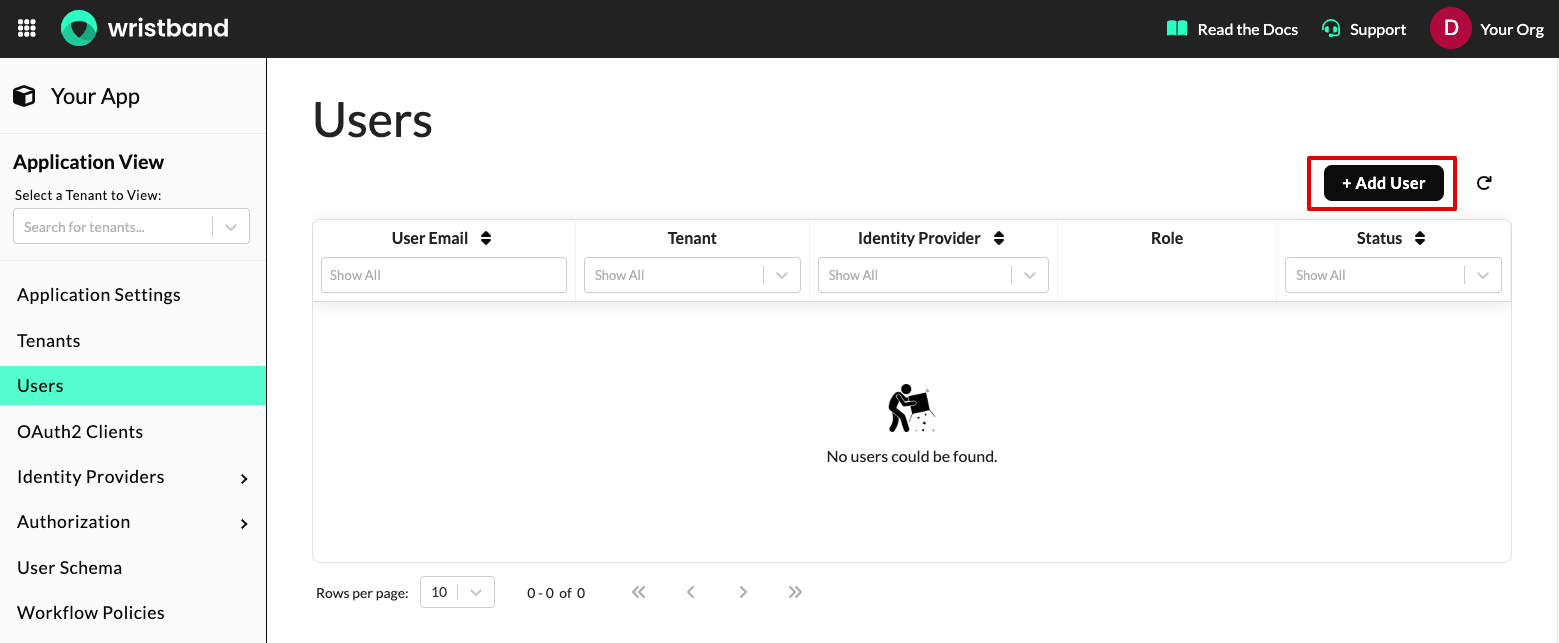
Dashboard screenshot showing the location of the "Add User" button.
After clicking the "Add User" button, a modal will appear, prompting you to provide the required information to create the user.
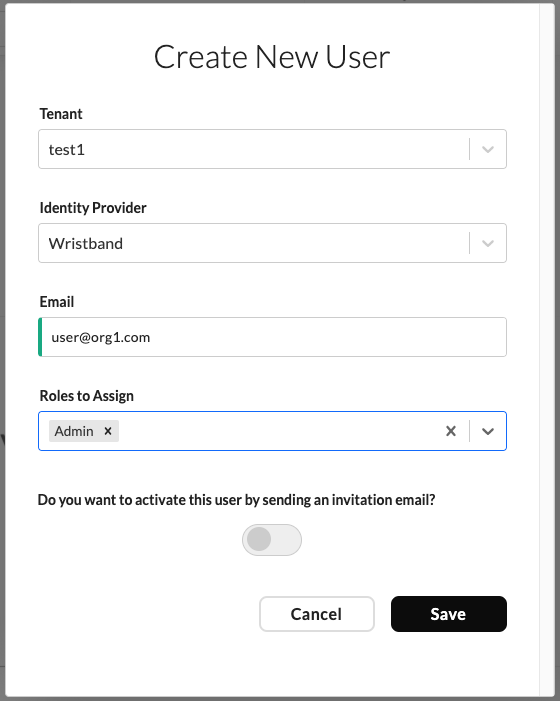
Dashboard screenshot of the add user modal.
When users are provisioned through the create user modal, they initially have a status of PROVISIONED, their email is unverified, and they don't have a password. As such, users in this state won't be able to authenticate successfully using Wristband. To get the user into an active state, you can optionally send an Existing User Invitation Email to the user. When the user clicks the link inside the Existing User Invitation Email, the following actions will be performed:
- The user will be prompted to set a new password (if passwords are enabled as a login factor).
- The user's status will be set to
ACTIVE. - The user's email will be marked as verified.
If you choose not to send an Existing User Invitation Email, you can also manually set the user's status to ACTIVE and mark their email as verified. You won't be able to set the user's password directly, but the user can update it themselves by going through the Password Reset Flow once their status has been set to ACTIVE and their email has been verified.
Editing Existing Users
You can edit a user by clicking "Users" from the left navigation menu and then clicking the user you want to edit from the users table.
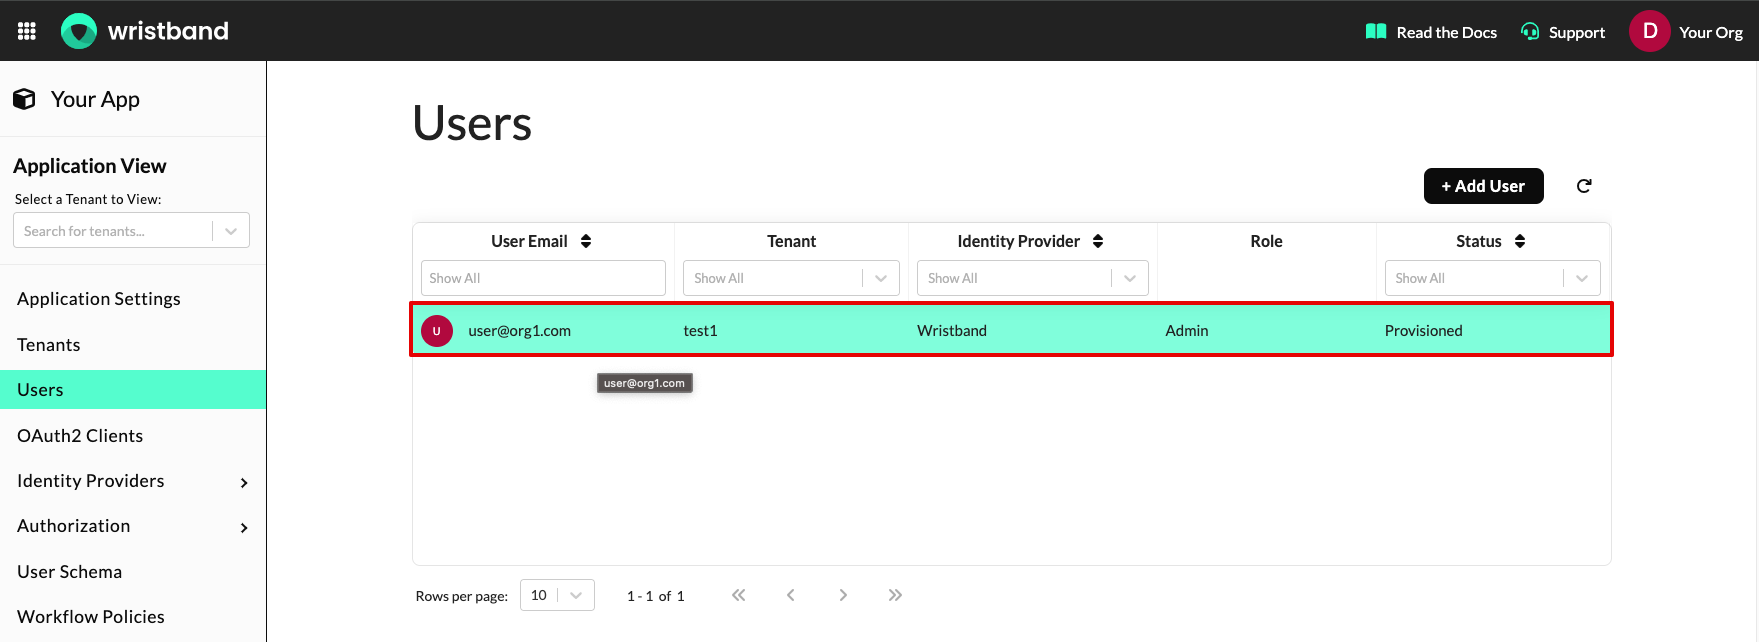
Dashboard screenshot showing how to select a user to edit.
On the user details page, you can freely modify any of the user's profile attributes.
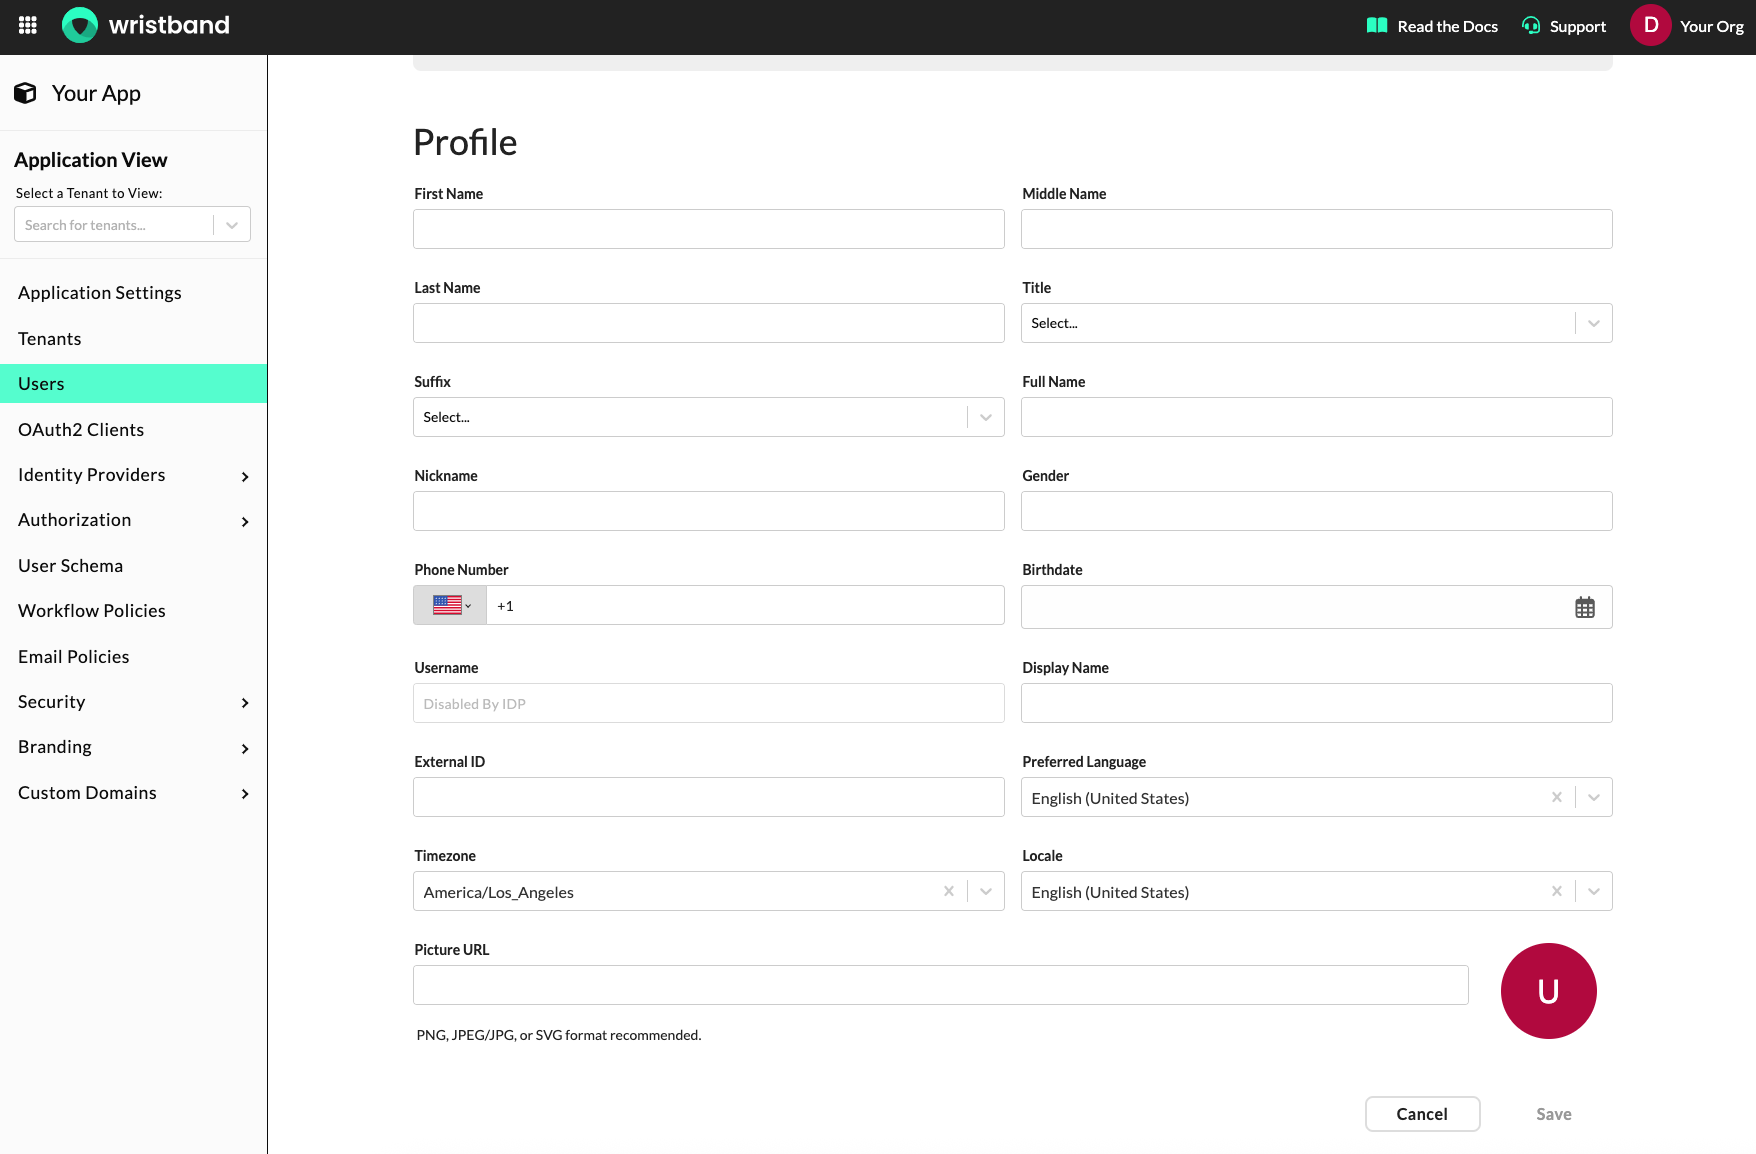
Dashboard screenshot showing the user details page.
Updating Custom Metadata
In addition to updating the user's standard fields, you can also update the custom metadata associated with a user. The public metadata and restricted metadata fields can accept any valid JSON object, as long as they abide by the limits specified in the Custom Metadata Limits section.
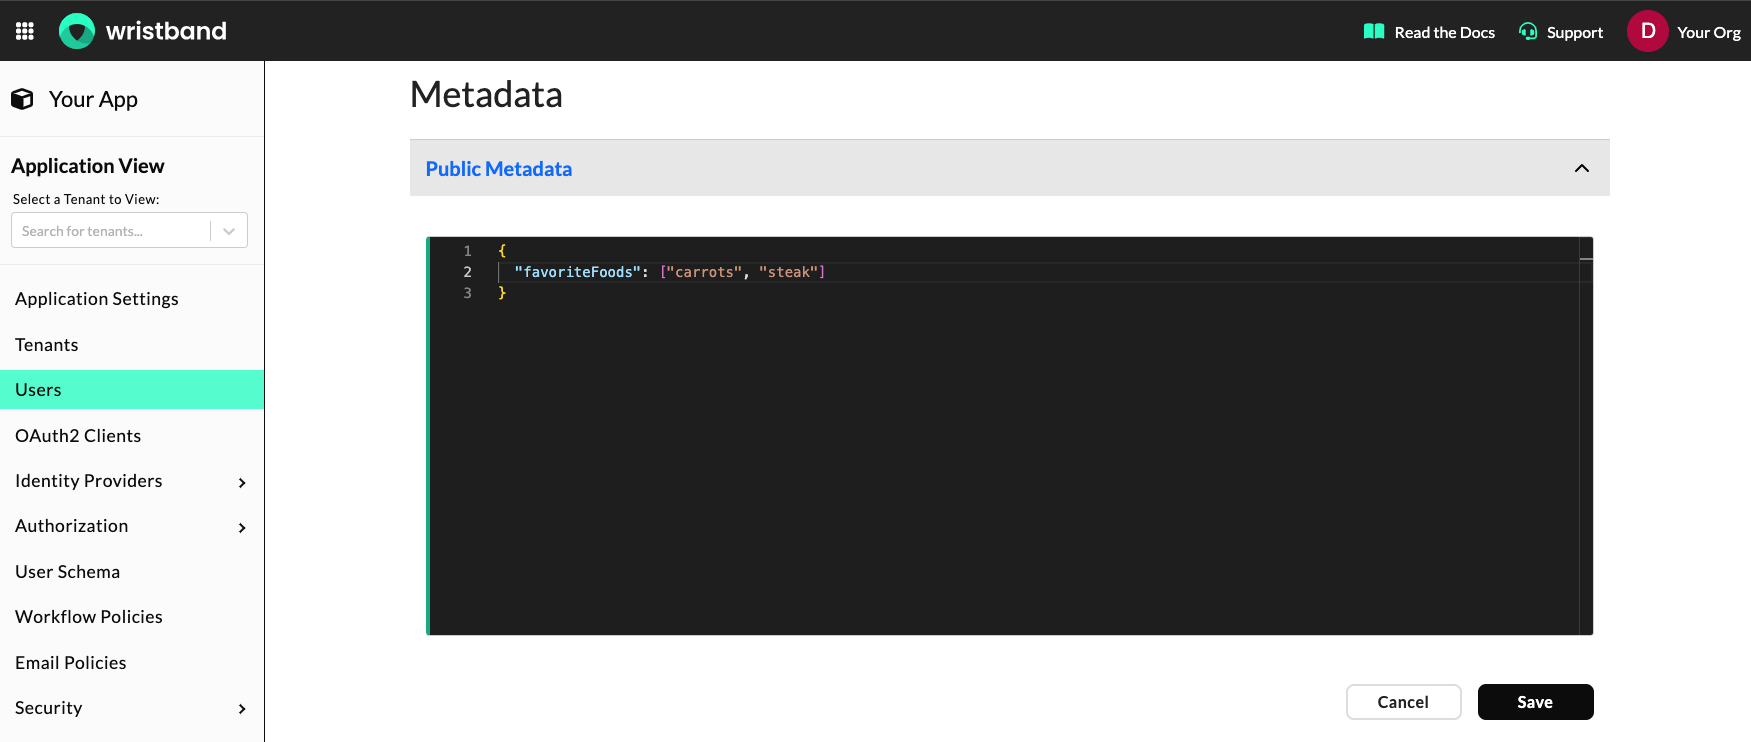
Dashboard screenshot showing how to modify custom metadata.
Verifying the User's Email Address
If a user's email is not verified, on the user details page, you'll see a "Verify Email" button.
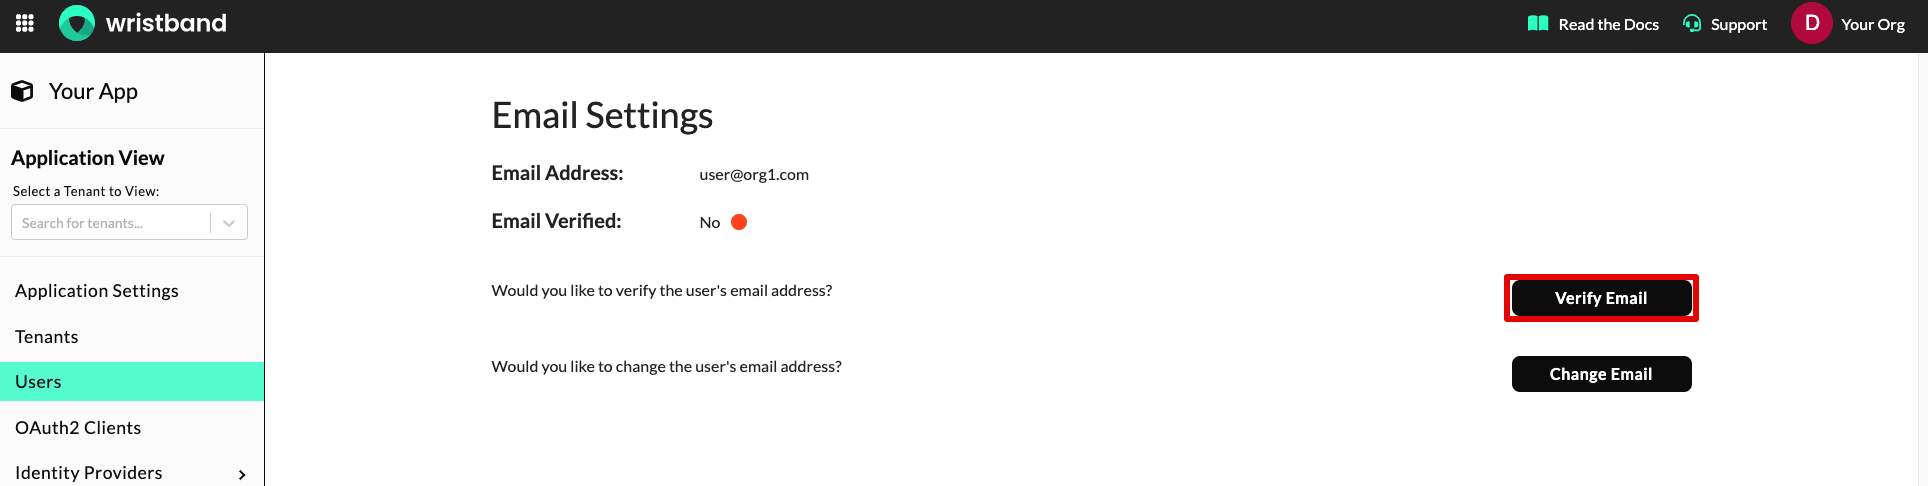
Dashboard screenshot showing the "Verify Email" button.
If you click the "Verify Email" button, you'll be presented with the following options for verifying the user's email:
- Immediate Verification: If this option is selected, the user's email will be immediately marked as verified without sending a verification email.
- Send a Verification Email: If this option is selected, then a verification email will be sent to the user's current email address. The user will then need to click the link in the email to complete the verification process. Note, this option can only be used if the user has an
ACTIVEstatus.
Changing a User's Email Address
On the user details page, you can also change a user's email address by clicking the "Change Email" button.
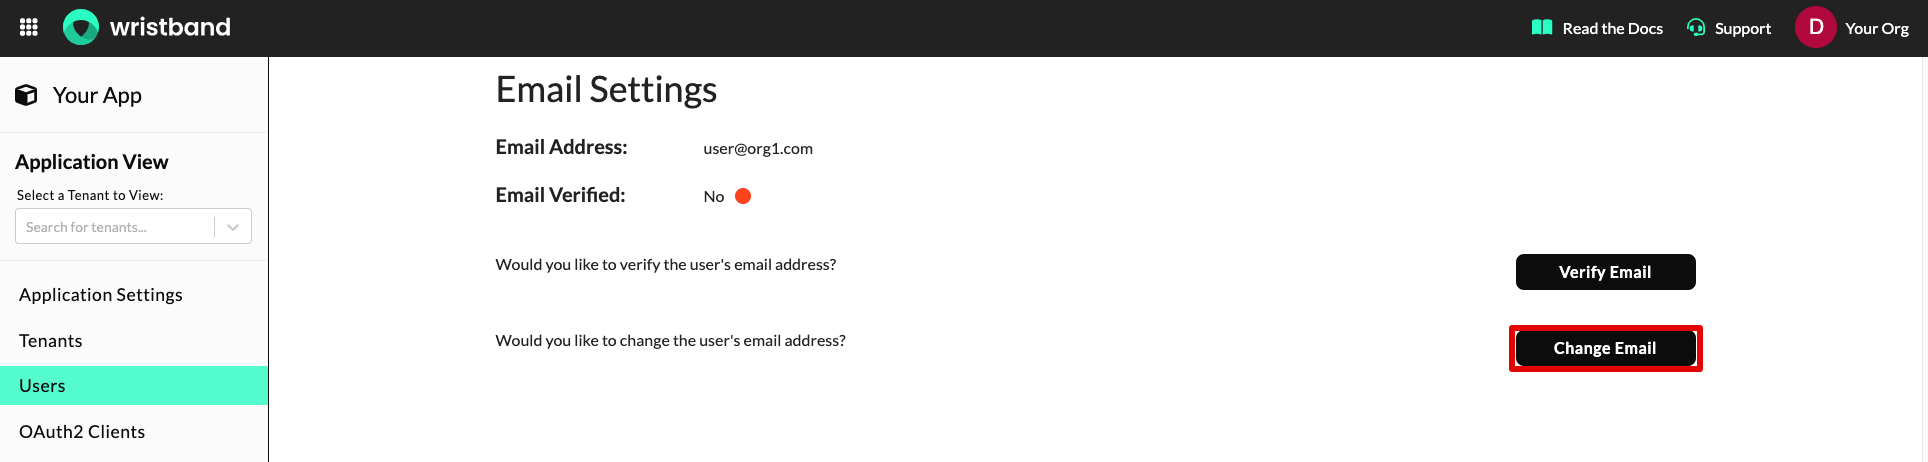
Dashboard screenshot showing the "Change Email" button.
When you click the "Change Email" button, you'll be prompted to enter the user's new email address and select how the new email address should be verified. Below is a list of the different methods that can be used to verify the user's email:
- Skip Verification: If this option is selected, the user's email will be changed to the new address, but it will be marked as unverified.
- Immediate Verification: If this option is selected, the user's email address will be updated to the new one, and it will be immediately marked as verified.
- Send a Confirmation Email: If this option is selected, the user will receive a confirmation email at their new address. The email address will not be updated until the user clicks the link in that email. Once clicked, the user's email attribute will be updated and marked as verified. Note, this option can only be used if the user has an
ACTIVEstatus.
Assigning Roles
To assign roles to the user, scroll down to the "Roles" section. There, you'll see a multi-select dropdown that can be used to modify the roles assigned to a user.
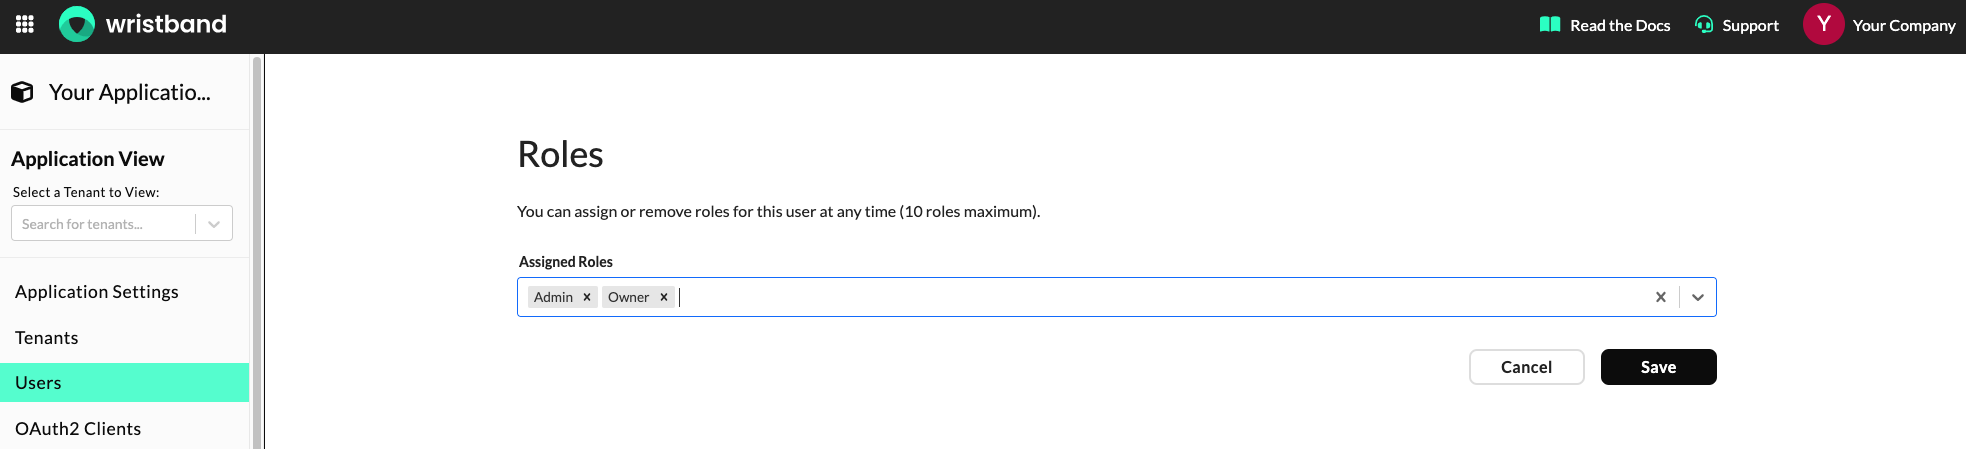
Dashboard screenshot showing the "Roles" section.
Managing the User's Status
On the user details page, you can also invoke certain operations depending on the user's status. In the sections below, we'll cover all the operations that can be performed on a user based on their current state.
Operations For Users In a Provisioned State
- Send an Invitation Email: This will trigger an Existing User Invitation Email to be sent to the user's email address.
- Activate User: Sets the user's status to
ACTIVE. - Deactivate User: Sets the user's status to
INACTIVE.
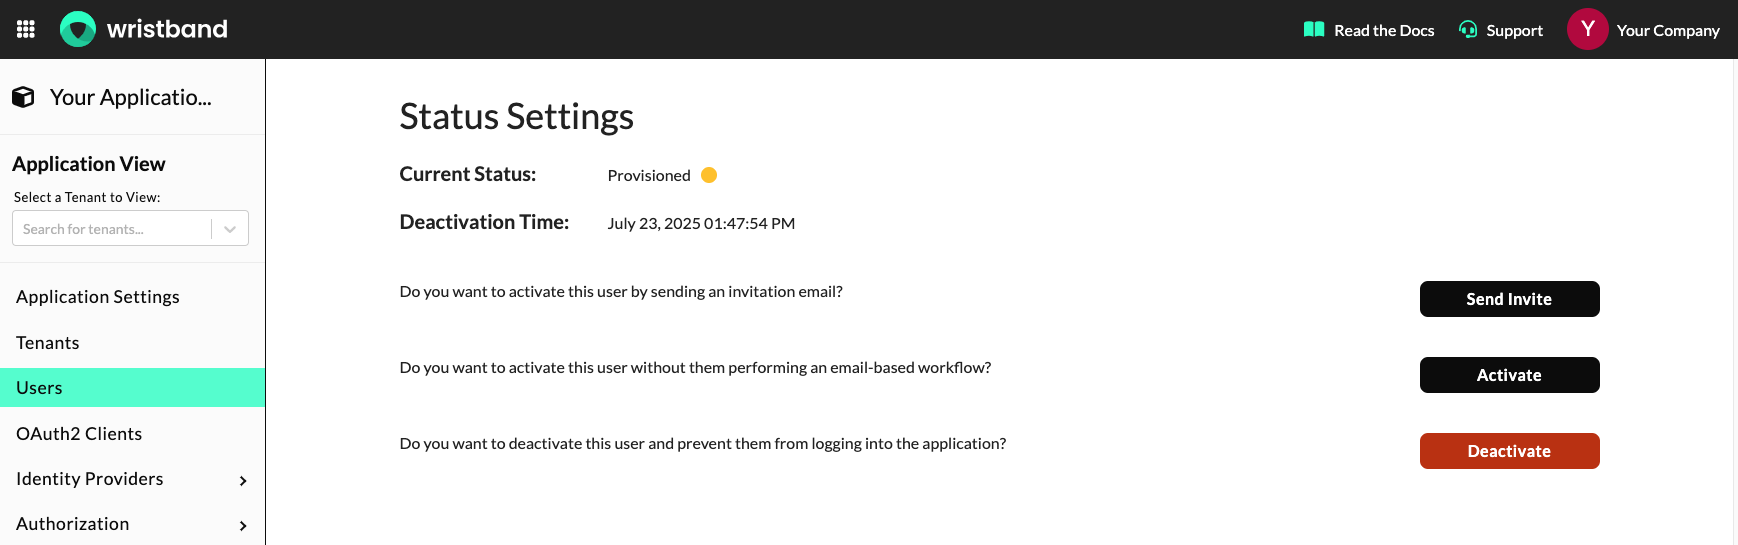
Dashboard screenshot showing the operations that can be performed on a user in a provisioned state.
Operations For Users In a Pending Signup Activation State
- Send Activation Email: Resends the User Activation Email to the user. This can be useful for cases where the user didn't complete the activation step and no longer has a valid activation email.
- Activate User: Sets the user's status to
ACTIVE. - Deactivate User: Sets the user's status to
INACTIVE.
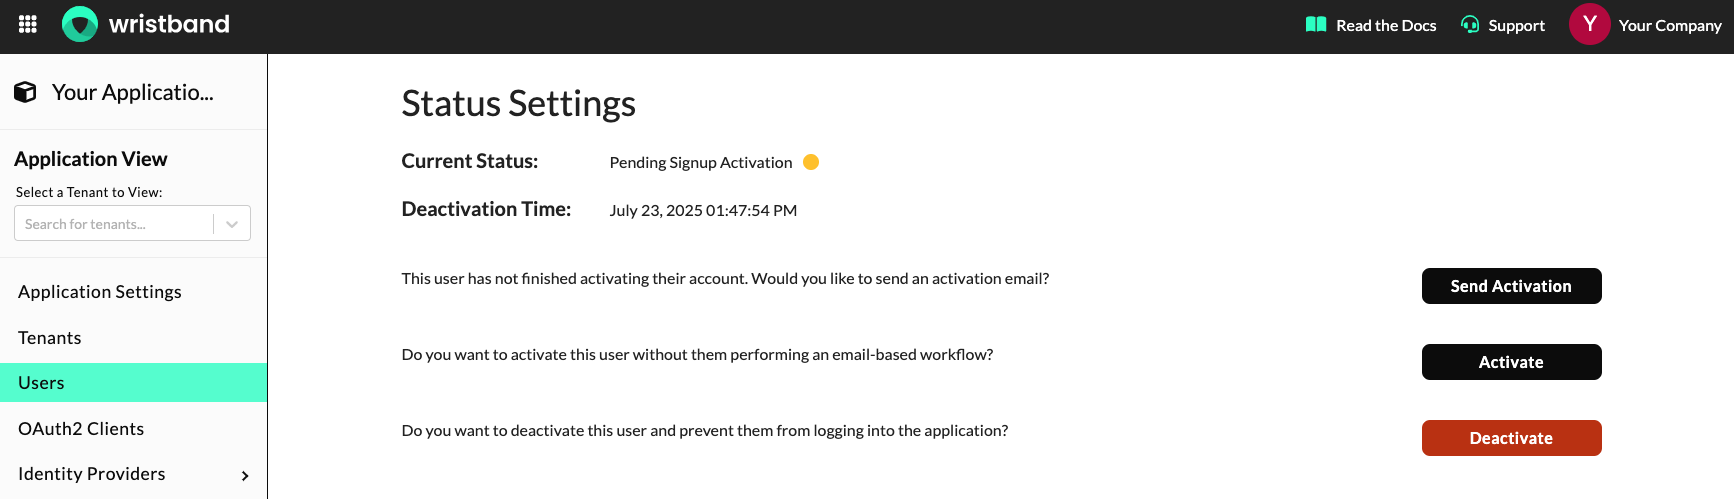
Dashboard screenshot showing the operations that can be performed on a user in a pending signup activation state.
Operations For Users In a Pending Invite Activation State
- Send Activation Email: Resends the User Activation Email to the user. This can be useful for cases where the user didn't complete the activation step and no longer has a valid activation email.
- Activate User: Sets the user's status to
ACTIVE. - Deactivate User: Sets the user's status to
INACTIVE.
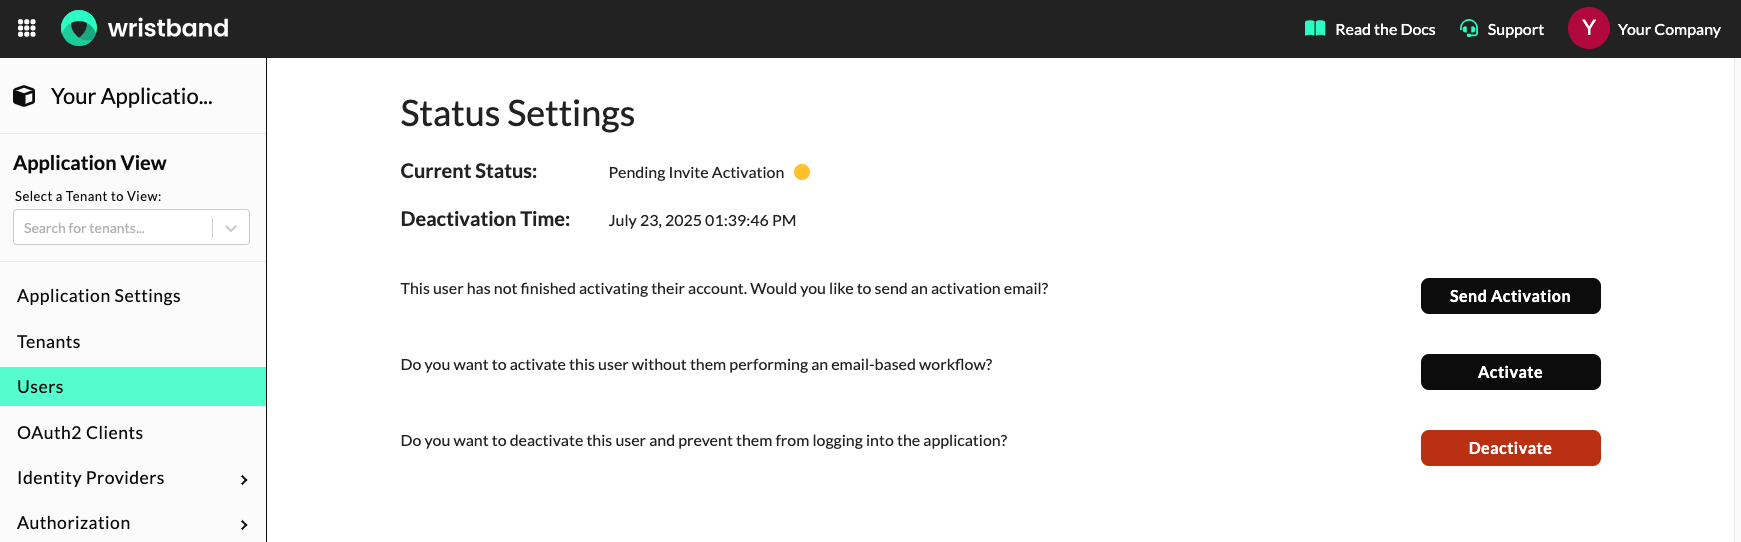
Dashboard screenshot showing the operations that can be performed on a user in a pending invite activation state.
Operations For Users In an Active State
- Deactivate User: Sets the user's status to
INACTIVE.
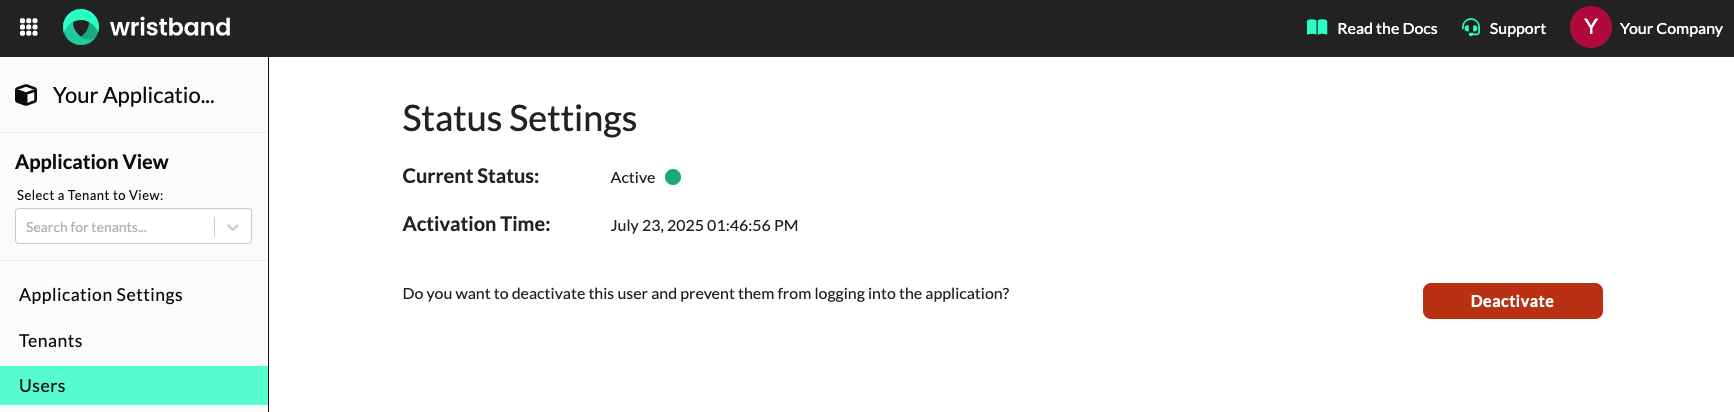
Dashboard screenshot showing the operations that can be performed on a user in an active state.
Operations For Users In an Inactive State
- Send an Invitation Email: This will trigger an Existing User Invitation Email to be sent to the user's email address.
- Activate User: Sets the user's status to
ACTIVE.
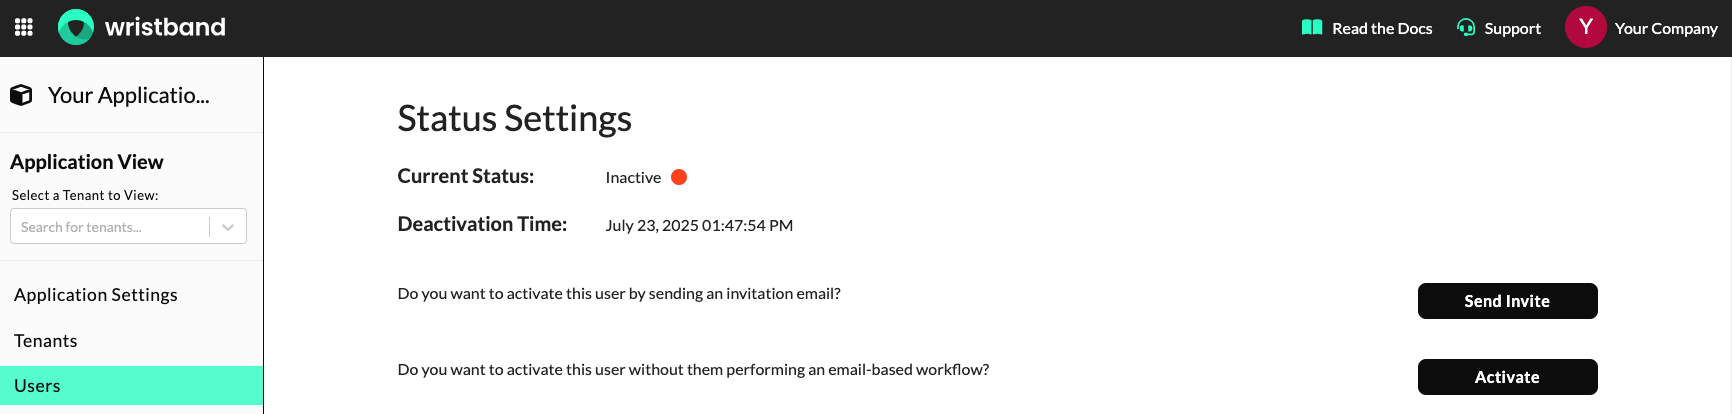
Dashboard screenshot showing the operations that can be performed on a user in an inactive state.
Viewing the User's Active Refresh Tokens
On the user details page, you can view all the active refresh tokens associated with a user by scrolling to the "Active Refresh Tokens" section.
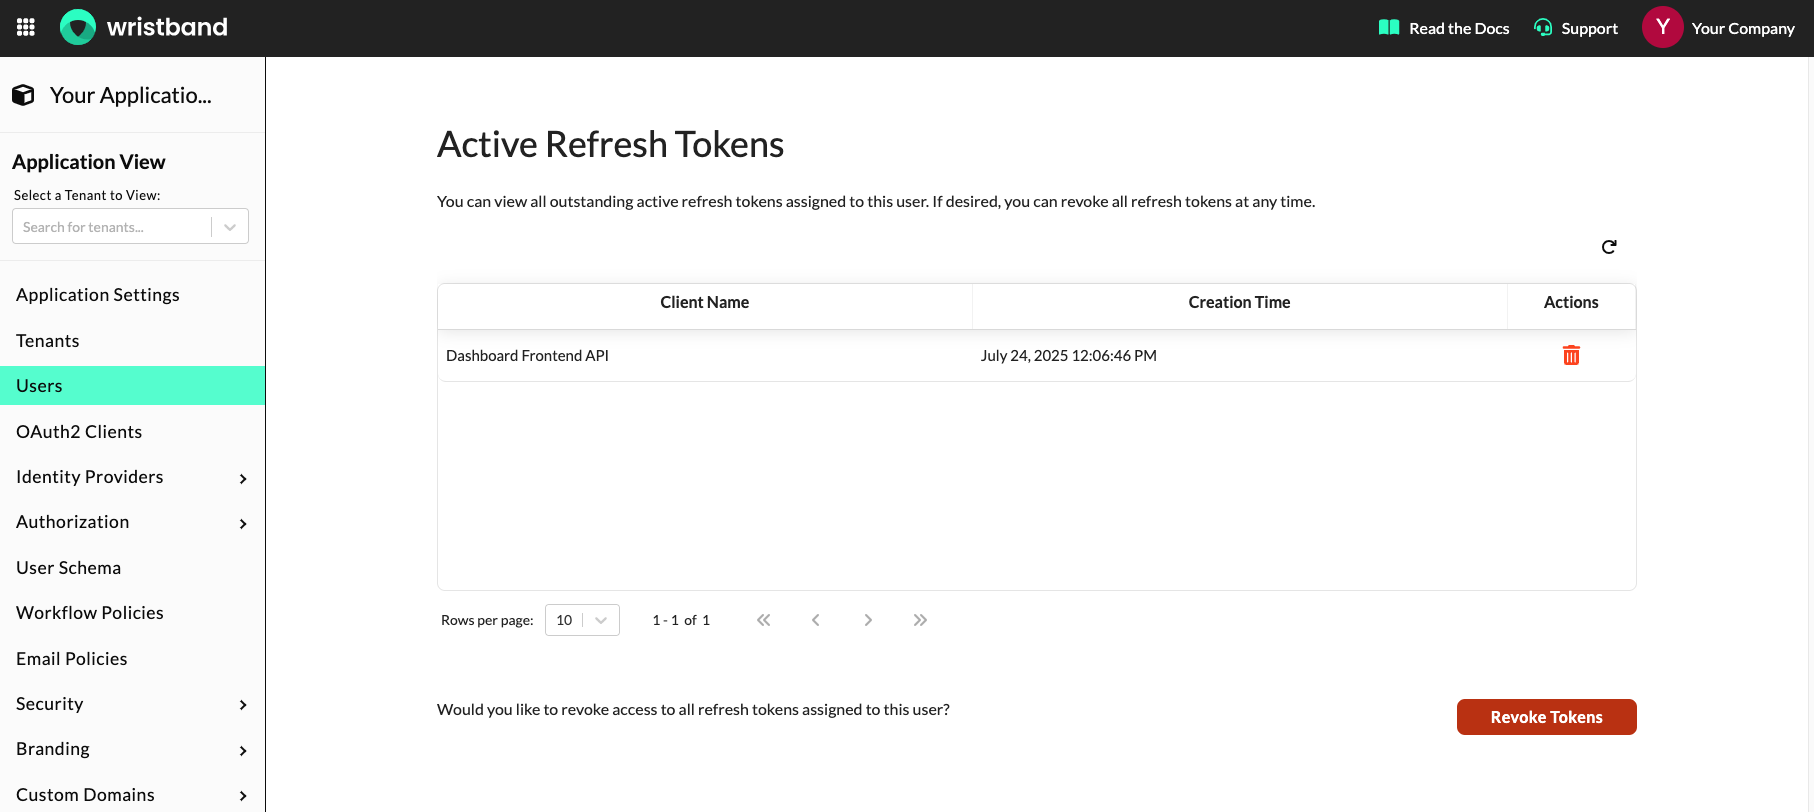
Dashboard screenshot showing the "Active Refresh Tokens" section.
Within the "Active Refresh Tokens" section, you can also revoke individual refresh tokens by clicking the trash can icon or revoke all the refresh tokens associated with the user by clicking the "Revoke Tokens" button.
Viewing the User's Active Auth Sessions
On the user details page, you can view all the active auth sessions associated with a user by scrolling to the "Active Auth Sessions" section.
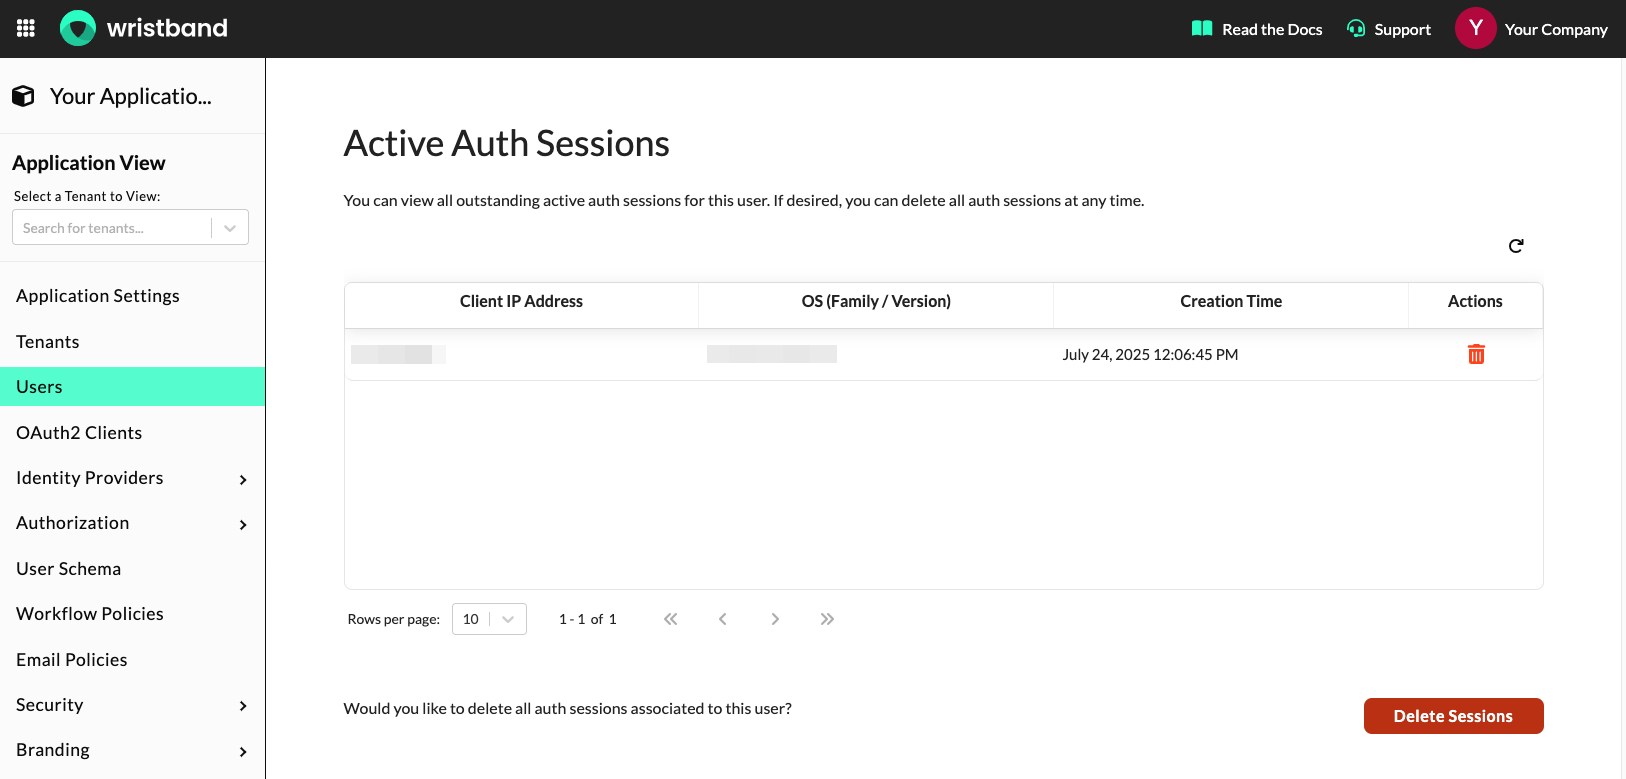
Dashboard screenshot showing the "Active Auth Sessions" section.
Within the "Active Auth Sessions" section, you can also delete individual auth sessions by clicking the trash can icon or delete all the auth sessions associated with the user by clicking the "Delete Sessions" button.
Deleting the User
From the user details page, you can also delete the user by clicking the "Delete" button at the bottom of the page.
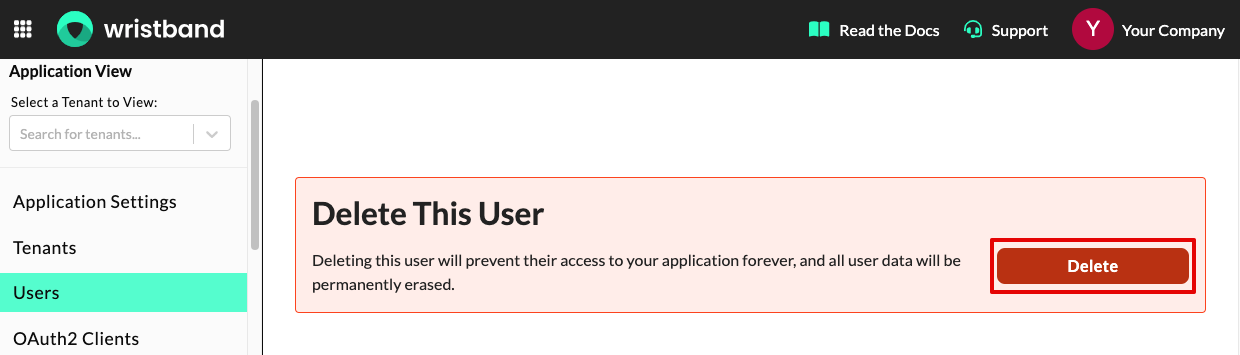
Dashboard screenshot showing the delete user button.
Inviting New Users
New users can be invited into a tenant by clicking "Users" from the left navigation menu and then scrolling to the "New User Invitations" section.
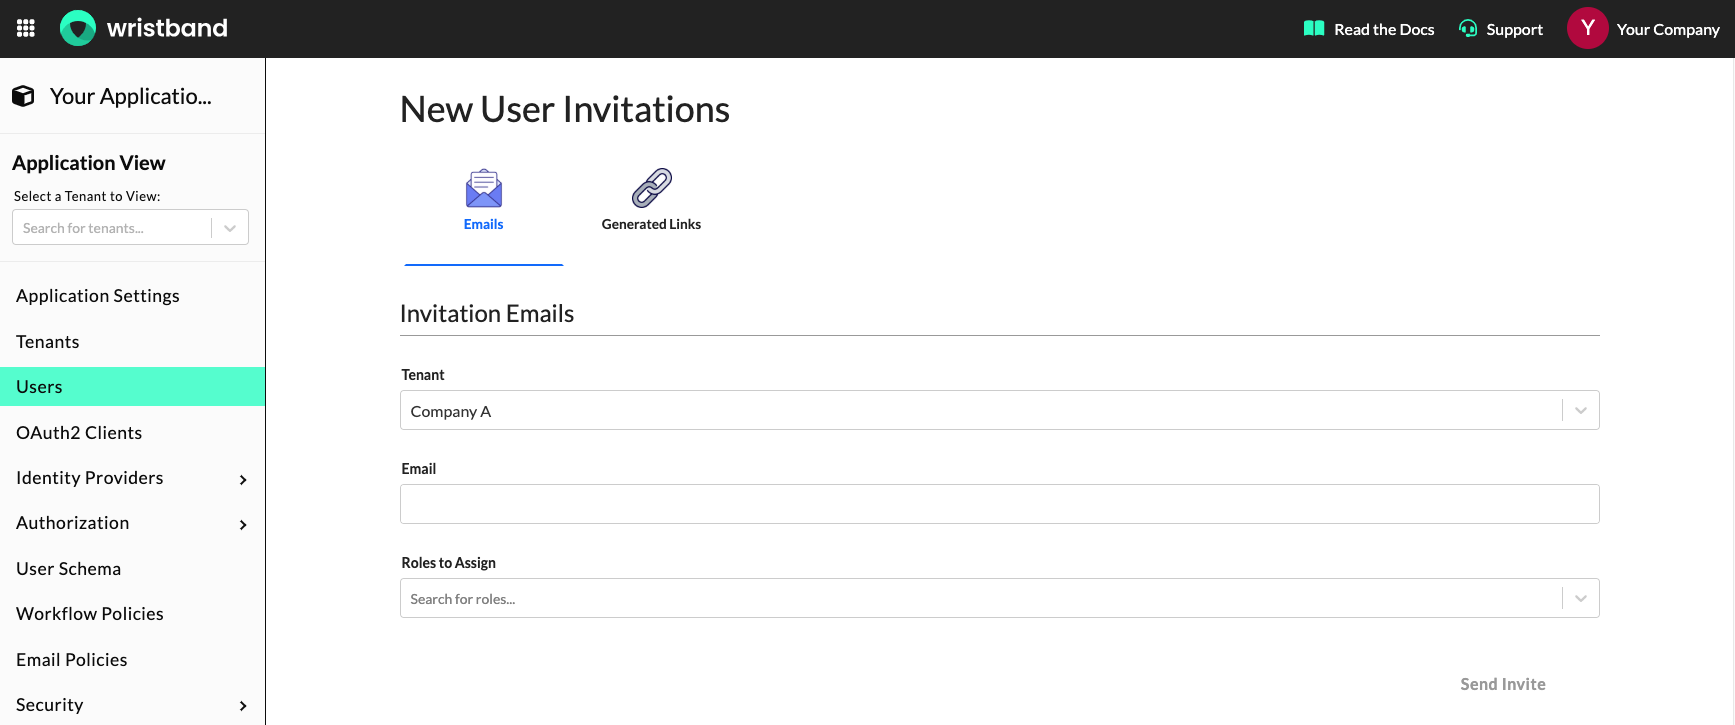
Dashboard screenshot showing the "New Users Invitations" section for the Application View.
Under the "New User Invitations" section, you'll see the following two options for inviting users:
- Emails: This option enables you to send a New User Invitation Email to an email address of your choice. If you're sending an invitation from the Application View, you'll also need to specify the tenant to which the user should be invited. Optionally, you can also specify roles that should be assigned to the user when they accept the invite.
- Generated Links: This option enables you to create an invitation link that can be shared with users via a text-based communication channel (e.g., Slack). The invitation links can only be used once and have an expiration period that can be configured in the New User Invitation Workflow Policy. When you generate the invitation link, you'll need to specify the invitee's name, which is used to identify the link. Also, when generating the invitation link from the Application View, you must specify the tenant to which the user should be invited. Furthermore, you can optionally specify roles that should be assigned to the user when they accept the invite.
Managing Active Invitations
The Wristband dashboard also displays all currently active invitations, for both emails and links. For invitation emails, you'll have the ability to resend the email; whereas, for invitation links, you'll have the ability to regenerate the link. For both invitation links and emails, you'll have the option to cancel the invite.
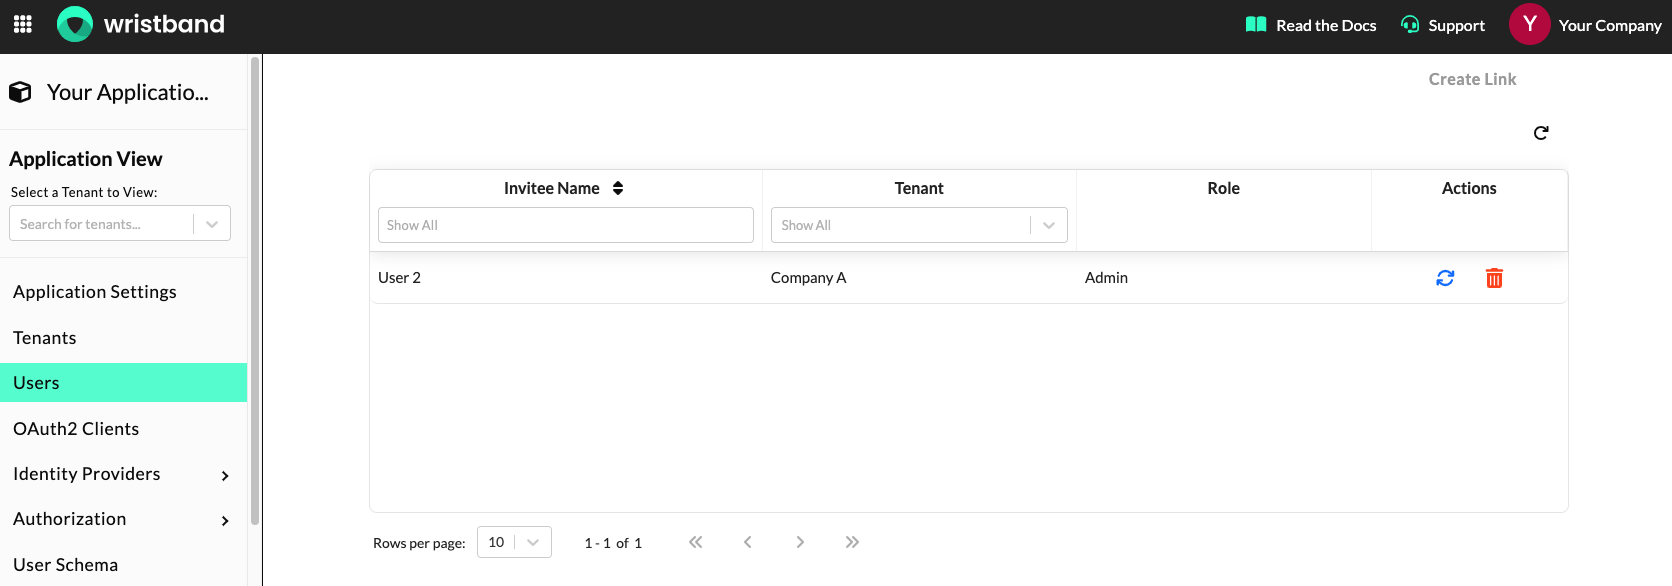
Dashboard screenshot showing the new user invitation links table.
Updating the User Schema
The required user fields can be configured by modifying the user schema. To navigate to the User Schema UI, click "User Schema" in the left navigation menu. The scope of the user schema changes depends on whether you are in the Application View or Tenant View. If you're in the Application View, the user schema changes will apply to all users within the application. However, if you're in the Tenant View, the user schema changes will only apply to users in that tenant. Also, remember that you must explicitly enable the User Schema Tenant Override Toggle for tenant-level user schema changes to take effect.
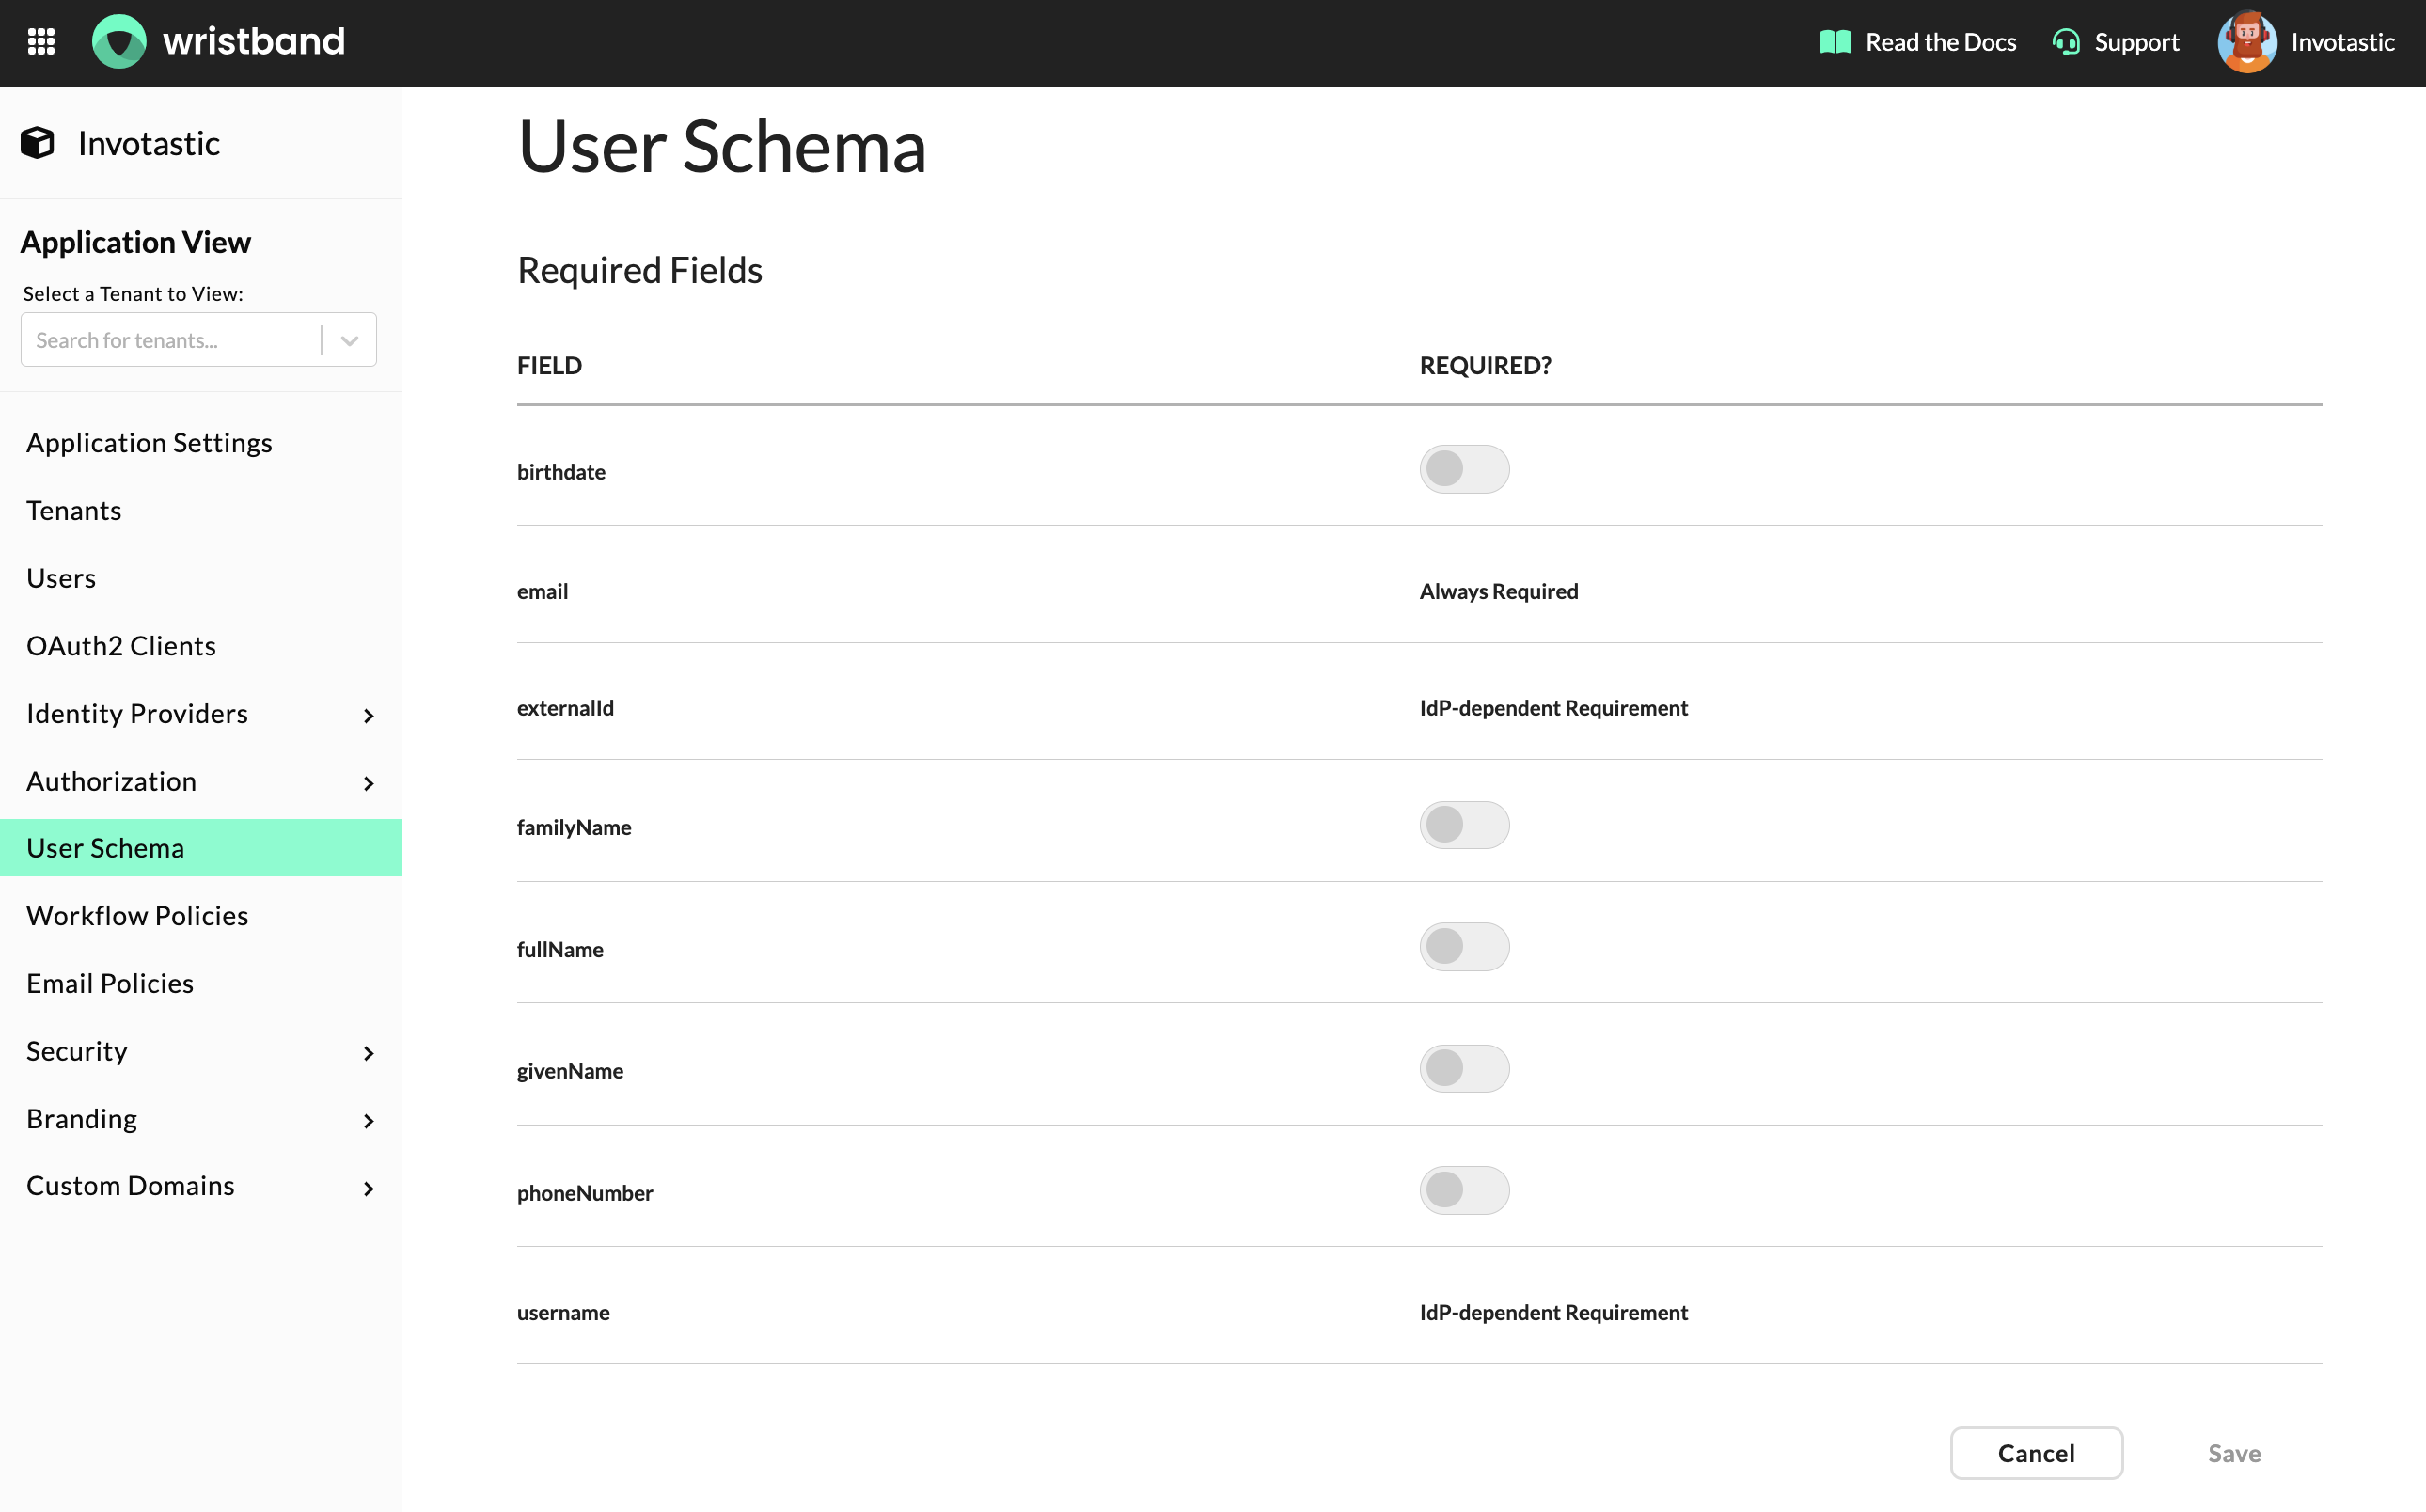
Dashboard screenshot showing the User Schema UI.
Updated 5 months ago