Authenticating API Requests With Bearer Tokens
Learn how to authenticate backend API requests using Bearer tokens.
For backend APIs, a common approach for authenticating incoming requests is to use a bearer token. Bearer tokens are strings passed in the Authorization request header using the Bearer authentication scheme. Using bearer tokens for authentication has the following benefits:
- Stateless Authentication: Bearer tokens don't require persisting state on the server. All information needed to authenticate the request is encapsulated in the token itself. To authenticate a request, you can simply add the token to the
Authorizationrequest header. - Cross-Domain Support: Unlike session cookies, which have restrictions regarding how they can be sent for cross-site requests, bearer tokens can be sent freely between different domains (assuming CORS is enabled on the APIs). This makes them ideal for APIs that might need to be accessed from third-party clients.
- User-Agent Agnostic: Bearer tokens can be easily sent from any user agent, including browsers, native applications, and servers. This is in contrast to session cookies, which require the use of a browser to send the cookie from the client to the server.
- Flexible Formatting: Since bearer tokens are just strings, they can be formatted in any manner. Typically, the bearer token will be formatted as a JWT, which can include tamper-proof claims regarding the authenticated principal.
Bearer Tokens Are Not a Replacement for Session CookiesWhile bearer tokens are great for authenticating APIs, they are not a replacement for session cookies. Session cookies should still be used to maintain the user's authenticated state between the frontend running in the browser and the backend. Listed below are reasons why session cookies are beneficial for authenticating requests between the browser and the backend.
- Improved Security: Without session cookies, you'd have to store the bearer token within the browser, for example, in localStorage. Once tokens are stored within the browser, they can be accessed by malicious JavaScript, making them susceptible to XSS attacks. Session cookies, if configured correctly, are impervious to XSS attacks.
- Automatically Included in Browser Requests: Session cookies are automatically included in every request made by the browser; whereas with bearer tokens, you need to explicitly add them to the
Authorizationheader of each request.- On-Demand Revocation: Since bearer tokens are stateless, they are not easily revoked. Typically, an expiration time is encoded into the bearer token, and it becomes invalid only when this expiration time is reached. Server-side sessions, on the other hand, can be revoked immediately by deleting the server-side state.
Now that we've reviewed why bearer tokens are useful for authenticating backend API requests, let's dive into the implementation details. In the sections below, we'll explain how to validate access tokens (a type of bearer token used in OAuth 2.0 and OIDC) issued by Wristband at your API endpoints. We'll also show how to retrieve the access token from your frontend for cases where it needs to make direct requests to your backend APIs.
Access Token Validation
To authenticate requests to your backend APIs using Wristband's access tokens, you'll need to add a JWT validation middleware that performs the following actions:
- Extracts the access token from the
Authorizationheader. - Verifies the signature of the access token.
- Ensure the access token's claims are valid.
Extract Access Token From Authorization Header
The first thing your JWT validation middleware will need to do is extract the access token from the Authorization header. The Authorization header should be using the Bearer authentication scheme as shown below. The access token is the string following the word Bearer.
Authorization: Bearer eyJraWQiOiJxdG90dDV0NGZ2YXU3bHAzems1ZGl6YnBqdSIsInR5cCI6ImF0K0pXVCIsImFsZyI6IlJTMjU2In0.eyJzdWIiOiJwYmlhZnN1dDdqZzUzanZqanAzbzR1Z3VmdSIsImlkcF9uYW1lIjoid3Jpc3RiYW5kIiwidmFuX2RvbSI6Imludm9iMmJuZGNoZXp5bHRvaXMzLXdyaXN0YmFuZC5kZXYud3Jpc3RiYW5kLmRldiIsImFtciI6WyJwd2QiXSwiaXNzIjoiaHR0cHM6Ly9pbnZvYjJibmRjaGV6eWx0b2lzMy13cmlzdGJhbmQuZGV2LndyaXN0YmFuZC5kZXYiLCJjbGllbnRfaWQiOiJ1dXZ4Mmx6ZHp2aGhqY2E1cGU3bmVqd3dkeSIsInRudF9pZCI6IjZxbjNtb3Z4M2ZndGxvaDJxanV0NXM0bmhhIiwic2NvcGUiOiJvcGVuaWQgb2ZmbGluZV9hY2Nlc3MgZW1haWwiLCJhdXRoX3RpbWUiOjE3NTI0MzgzNDgsInN1Yl9raW5kIjoidXNlciIsImV4cCI6MTc1MjQ0MDE0OCwiYXBwX2lkIjoidmw2amRvYnh5NWdhZmtyM2R2enRidnpydWUiLCJpYXQiOjE3NTI0MzgzNDgsImp0aSI6IjJ5emtjamRrMjVjbDdlM3V1Z2d6ZW82a2ZhIn0.dU-AmJsdcIKLM0aZx_ipBj2UG_KOp3jiqG79cTqudS4OoCmZiFWYaECSDf2uKE81aEhXZkYUC4uwnhXTMw67YbjVaVxfuSOvU0OaLfHAXCixXkK3nVdFlJzD3SXEyC-1QwxH9uEFt5M1iF3fZpFG7kUWb5FNyOhX14AJ693mDUdvj6Tj0I1gUQVm4mQ_Yu1z4iUeQcGiEiNJwbu4Izk1taROzZmDc33cgpFDxVjAIsPk3HRPPAtYyaEcluqHzSXBt-Q4Mx0hr06bS3MSrByD9d-clE-27deywE3mqbA70ijDIxVV0WCvZ8PPvwnAufHk891gCTiFATDgWUi43eMdKASignature Verification
Wristband access tokens are structured as JWTs; as such, they are composed of three parts: a header, a payload, and a signature. The different parts of the JWT are delimited by dots (.) as follows: <header>.<payload>.<signature>. Each section of the JWT is a JSON object, base64 URL-encoded, except for the signature, which is a base64 URL-encoded cryptographic hash.
To verify the token signature, you'll first need to decode the JWT header, which should have the following structure:
{
  "kid": "qtott5t4fvau7lp3zk5dizbpju",
  "typ": "at+JWT",
  "alg": "RS256"
}
The typfield should be at+JWT which asserts that the token is an access token. For Wristband-issued access tokens, the alg field should always be RS256, indicating that the token was signed using RSA with a SHA-256 hash. The kid field provides the ID of the public key that can be used to verify the RSA signature.
After decoding the JWT header, use the kid value to lookup the public signing key from Wristband's JWKS Endpoint. The key can be cached in memory to avoid making repeated calls to the JWKS endpoint for each request.
Next, use the public signing key to verify the signature of the JWT. The signature can be computed as follows:
RSA_DECRYPT(public_key, SHA256("<header>.<payload>"))If the computed signature matches the signature from the JWT, then you can be sure that the JWT is valid and hasn't been tampered with.
Claims Validation
After verifying the access token's signature, the next step is to validate the following token claims from the payload:
- Issuer (iss): The issuer should have the format:
https://<your-application-vanity-domain. For example, if your application vanity domain wasyourapp-yourorg.us.wristband.devthen the issuer should behttps://yourapp-yourorg.us.wristband.dev. - Expiration (exp): Verify that the current time is less than the expiration time.
If the above claim validation checks are successful, you can be certain that the access token is valid and continue processing the request. Conversely, if any of the access token validation checks fail, then the request should not be processed, and a 401 response should be returned.
Using Access Tokens From the Frontend
In some cases, your frontend code running in the browser may need to call your backend APIs directly. If your backend APIs require a valid access token to be present in the request, then you'll need to provide a way for the frontend to retrieve the access token. Remember, if you're using a backend server, then the tokens should be associated with the user's session and only be accessible by the backend server.
To make the access token available to your frontend, you'll need to implement a new endpoint on your backend called the Get Token Endpoint. The Get Token Endpoint will be responsible for extracting and returning the access token from an authenticated user's session. Frontend JavaScript can call the Get Token Endpoint to fetch the user's access token before making backend API calls.
Only Expose The Access Token to The Frontend if NeededPassing the access token to your JavaScript code running in the browser makes them susceptible to XSS attacks. A safer alternative is to use the Backend-for-Frontend (BFF) pattern, where the frontend authenticates with the BFF using a session cookie. The BFF then extracts the access token from the session and uses it to call the backend APIs.
When requests are made to the Get Token Endpoint, it needs to perform the following actions:
- Ensure that the user's session is still valid.
- Retrieve the access token associated with the user's session.
- If the access token has expired, the Get Token Endpoint should refresh the access token before returning it in the response. Note that your existing session middleware logic should already handle refreshing expired access tokens; in this case, you shouldn't need to perform any additional work to handle token refreshing for the Get Token Endpoint.
- Returns the user's access token and access token expiration time in the response.
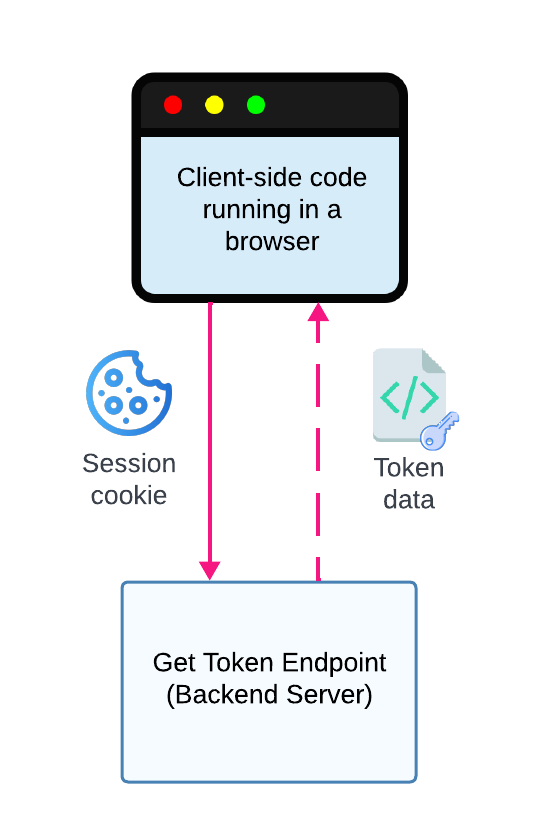
Figure 1. Client-side JavaScript calls the Get Token Endpoint to retrieve the user's access token and the expiration time of the access token.
End-to-End Examples
Let's walk through several examples where JavaScript running in the browser makes a request to a protected API using an access token to authenticate:
Example 1 - First API Request
Listed below are the steps taken when the frontend needs to make its first authenticated API call:
- Before making the API request, the frontend calls the backend's Get Token Endpoint. The user's existing session cookie is passed to the Get Token Endpoint and used to retrieve the access token.
- The server's session middleware validates the session cookie and confirms the access token hasn't expired.
- The Get Token Endpoint returns the access token and expiration time to the frontend.
- The frontend stores both the access token and expiration time in memory.
- The frontend makes a request to a protected API, including the access token in the Authorization header (e.g,
Authorization: Bearer access.token.123). - Your backend's JWT verification middleware extracts the token from the Authorization header and validates it before the protected API's logic executes.
- The protected API executes and returns the response to the frontend.
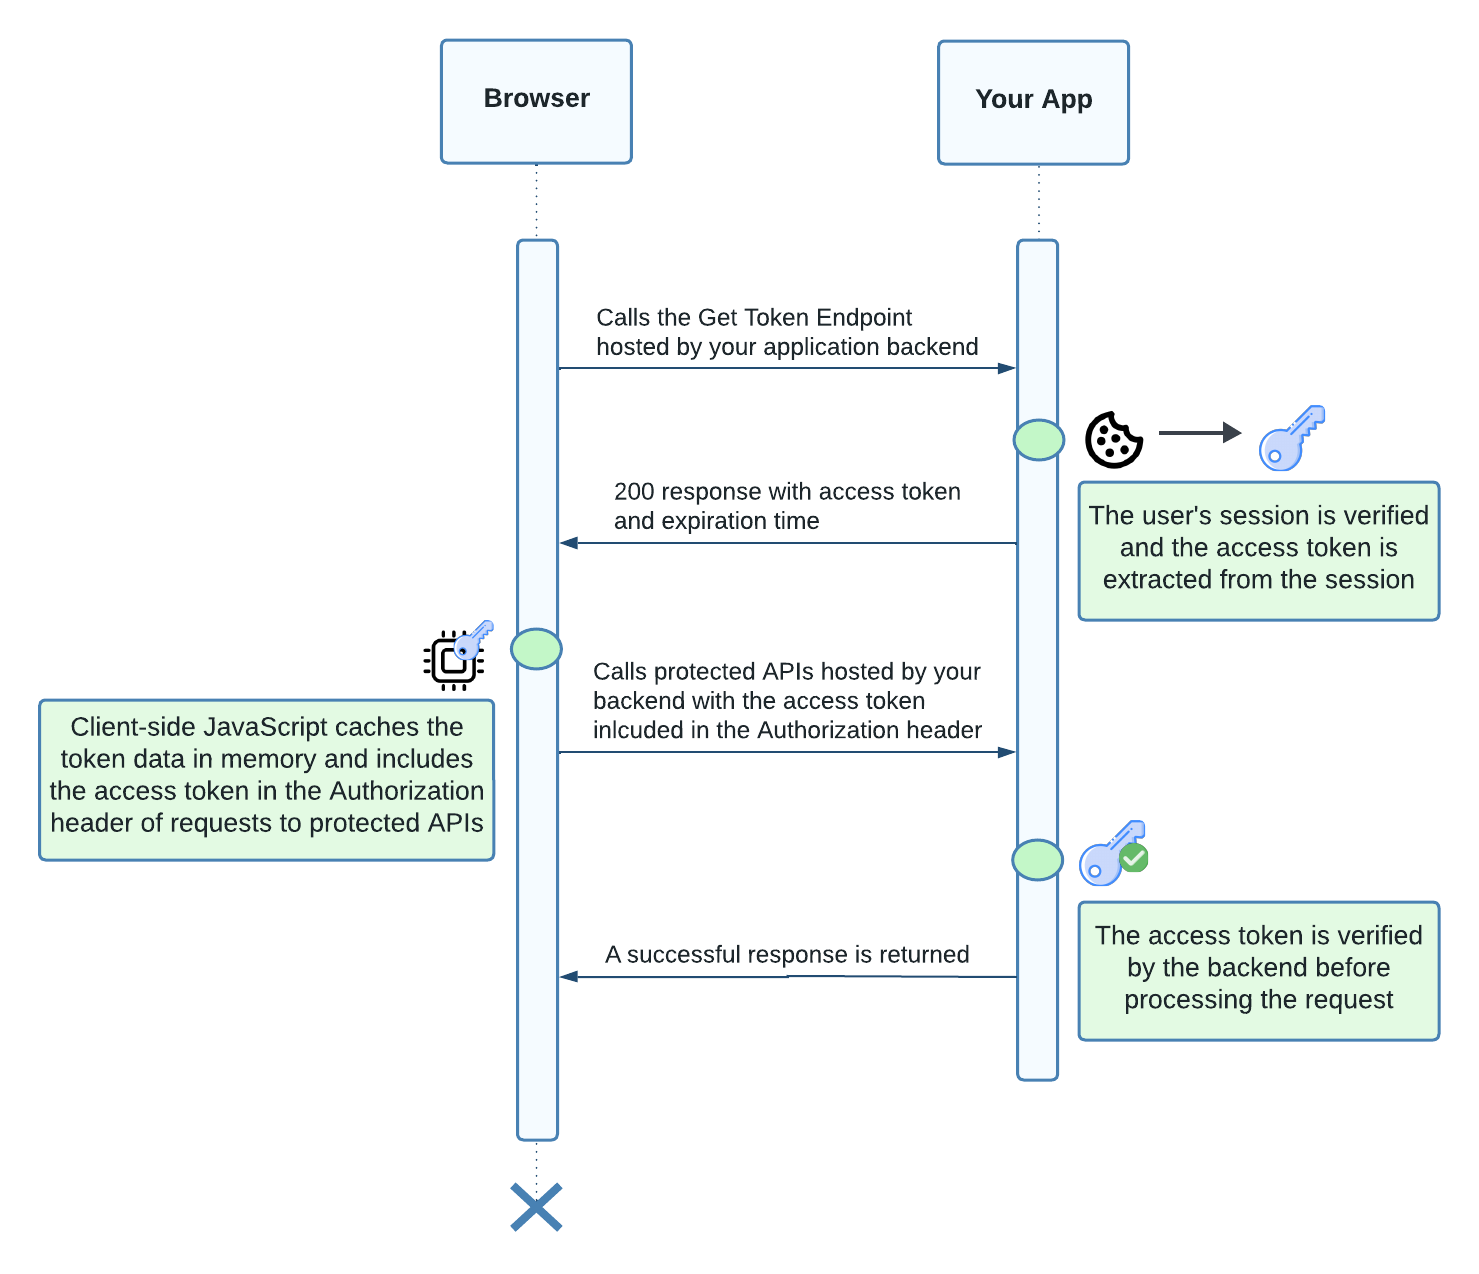
Figure 2. Sequence diagram showing client-side JavaScript making its first authenticated call to a backend API.
Example 2 - Subsequent API Requests
Listed below are the steps taken when the frontend needs to make subsequent API calls and the cached access token hasn't expired:
- The frontend validates that the cached access token hasn't expired.
- The frontend makes a request to a protected API, including the access token in the Authorization header.
- The backend's JWT verification middleware validates the token from the Authorization header.
- The protected API executes and returns the response to the frontend.
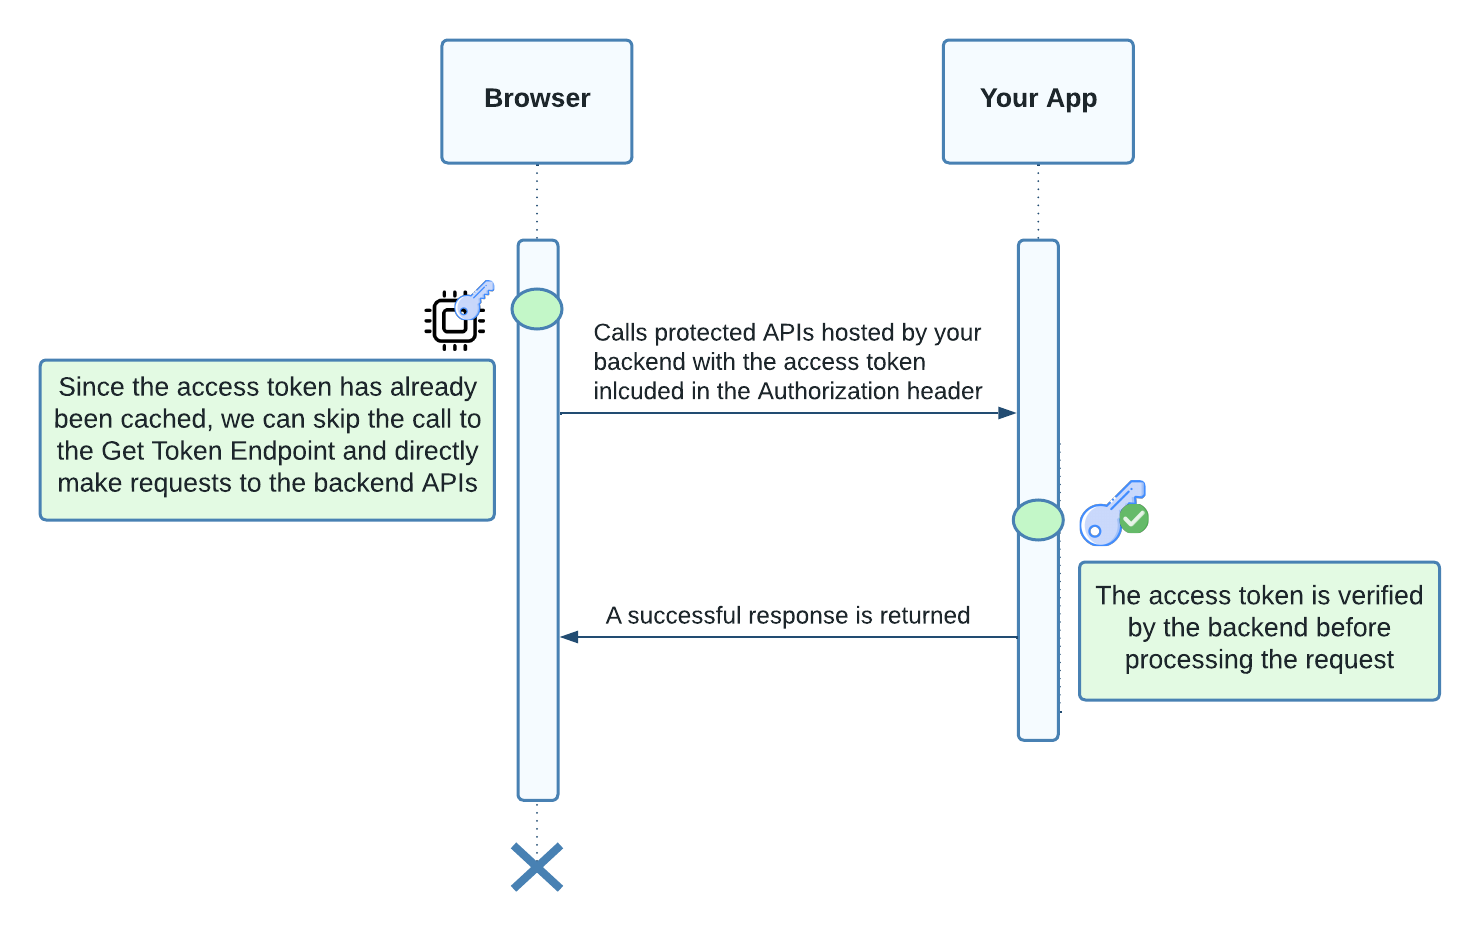
Figure 3. Sequence diagram showing client-side JavaScript making subsequent backend API calls utilizing a cached access token.
Example 3 - API Request With Expired Access Token
Listed below are the steps taken when the frontend needs to make an authenticated API call and the cached access token has expired:
- The frontend detects that the access token has expired by checking the cached expiration time.
- The frontend calls your backend's Get Token Endpoint to retrieve a new access token.
- The backend's session middleware confirms that the access token has expired and refreshes it by calling Wristband's Token Endpoint using the refresh token from the user's session.
- Wristband returns a new access token and expiration time, which the backend uses to update the user's session.
- Now that the user's session has been updated with new token data, the Get Token Endpoint returns the new access token along with its expiration time.
- The frontend caches the new access token and expiration time, then proceeds with the original API request.
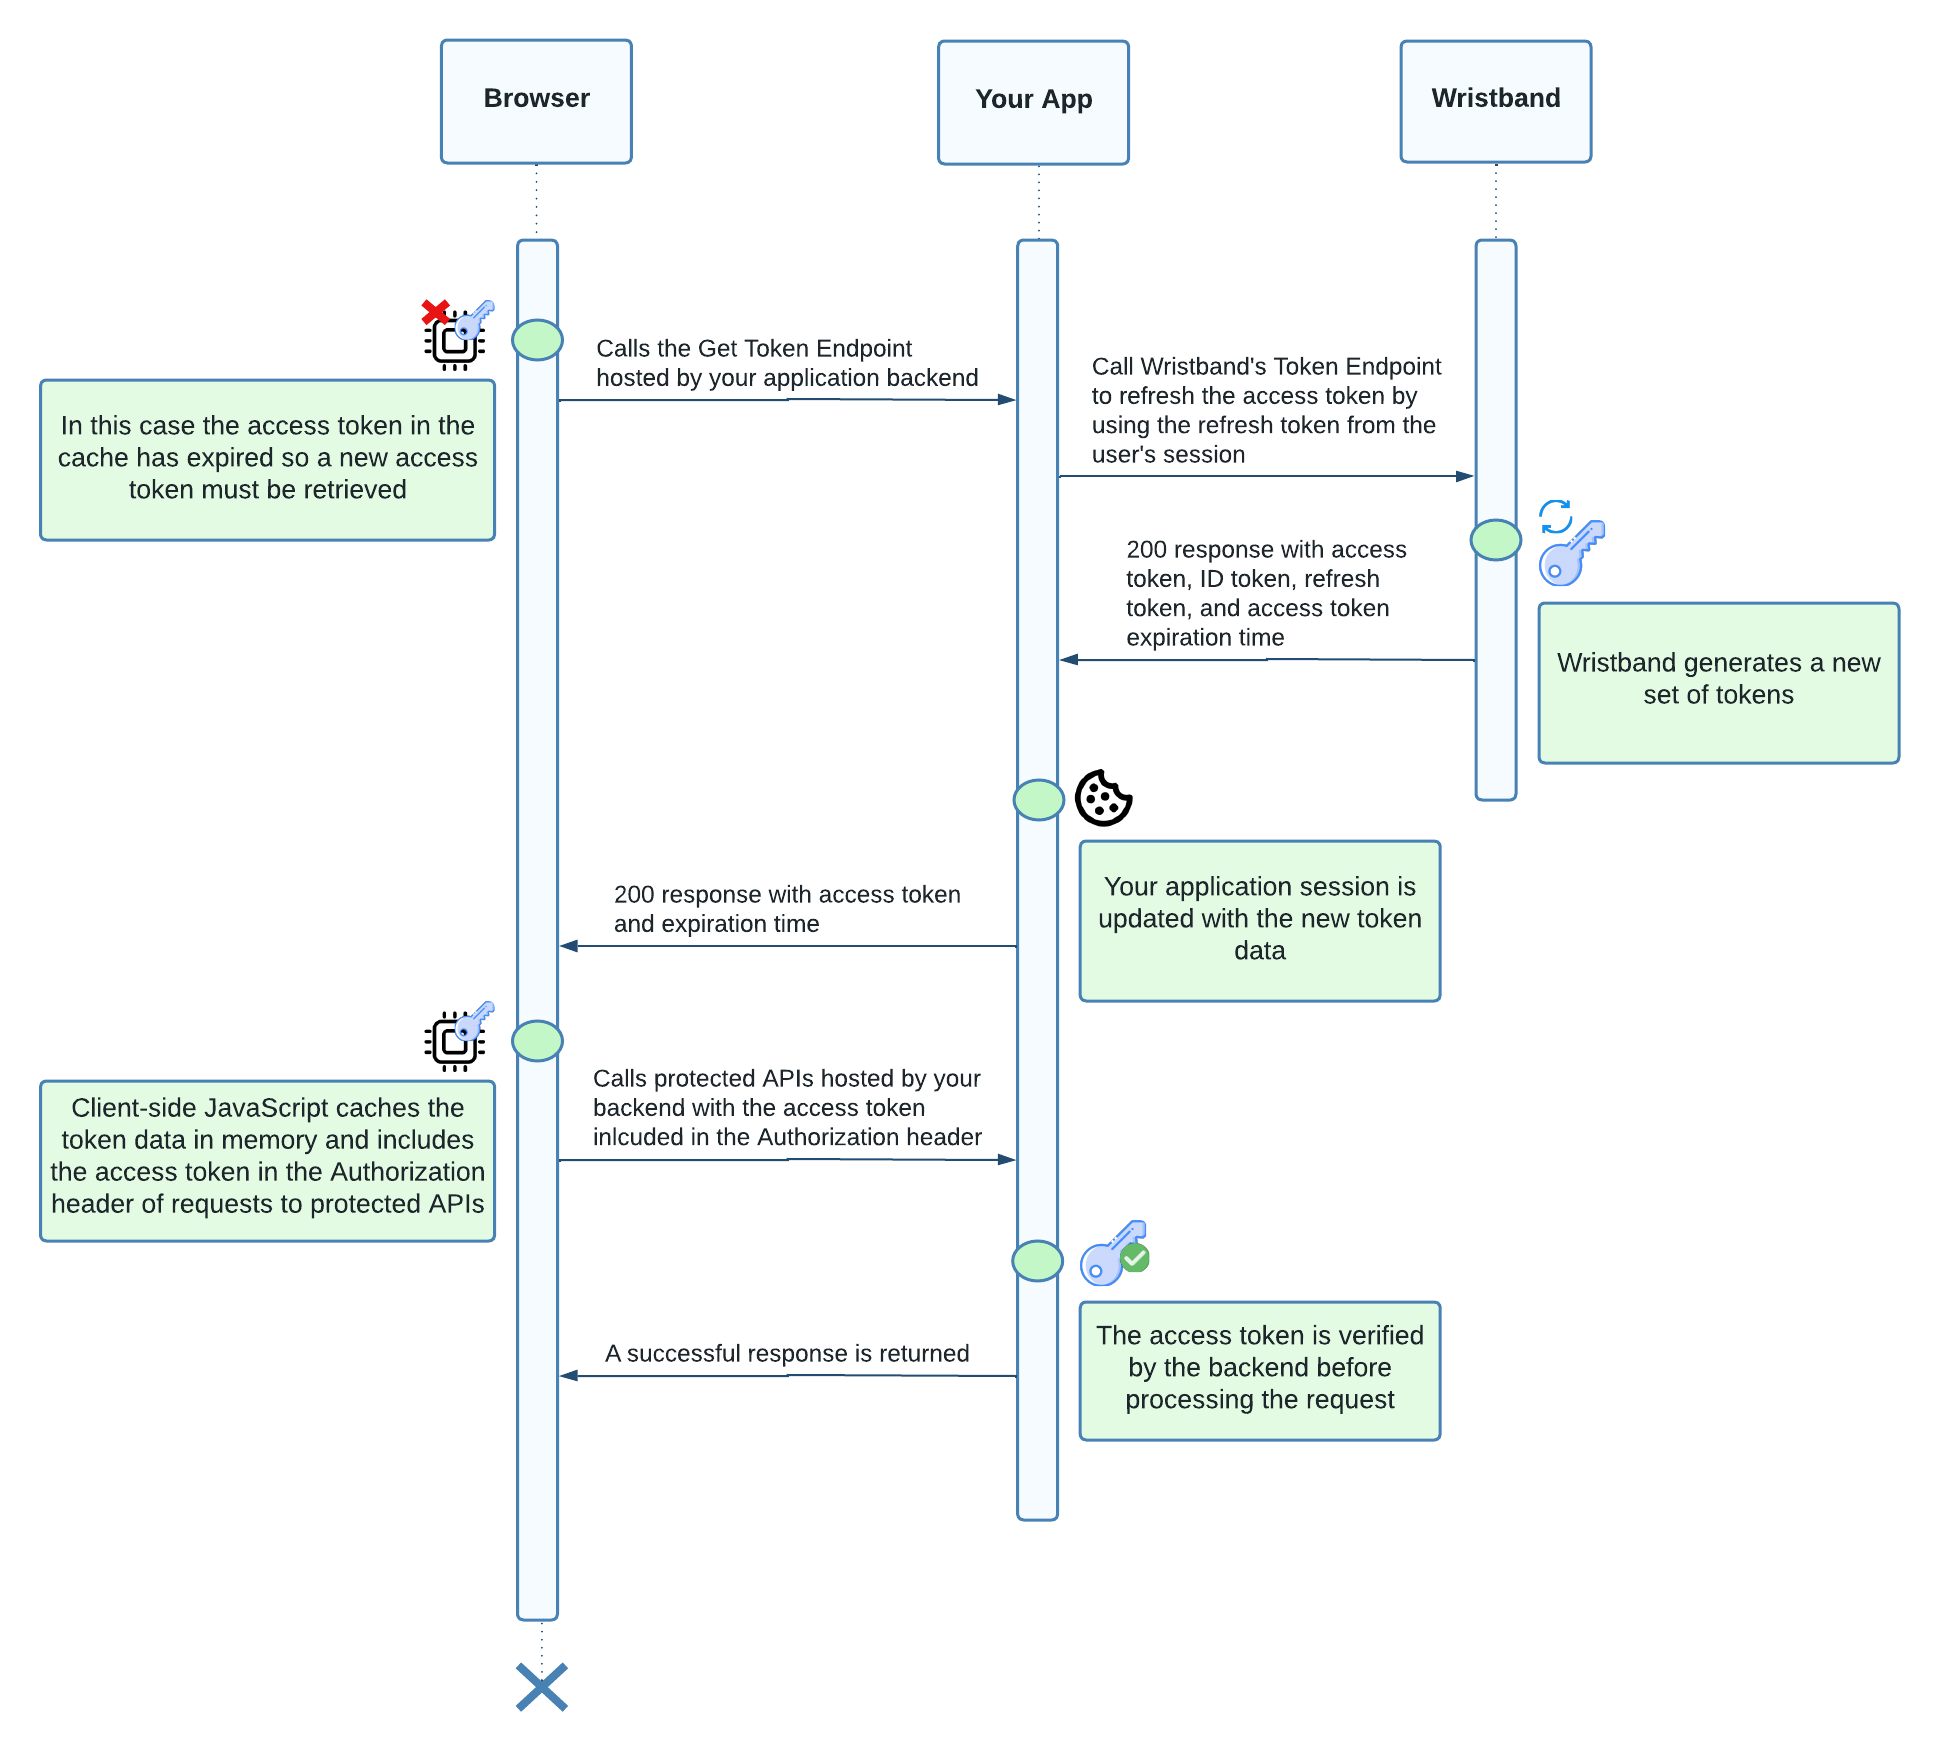
Figure 4. Sequence diagram showing client-side JavaScript making a call to an authenticated backend API with an expired access token.
Updated 3 months ago