
OAuth2 Clients
An OAuth2 client is an application or service that requests authentication from Wristband.
Wristband uses OIDC to authenticate users and the OAuth2 Client Credentials grant to authenticate machines. As a result, all authentication requests to Wristband must be initiated by an OAuth2 client. In Wristband's model, a single application can have multiple OAuth2 clients to handle different workloads. For example, an application might use:
- A backend server client to authenticate users on a web application.
- A native client to authenticate users on a mobile application.
- Machine-to-machine (M2M) clients for backend software that requires authentication without user involvement.
You can create OAuth2 clients at either the application level or the tenant level, depending on your specific use case.
- Application-Level Clients: Use these clients to authenticate users within your application and to allow your own backend machines to authenticate without user involvement.
- Tenant-Level Clients: Use these clients to let your customers securely authenticate their calls to your application's APIs.
Client Types
Each OAuth2 client in Wristband has a specific type that determines how it handles authentication requests. Choosing the correct client type for your use case is essential. Wristband supports three client types:
- Backend Server
- Native
- Machine-to-Machine
These client types are categorized as either public or confidential based on their ability to handle credentials securely:
| Client Classification | Client Types | Description |
|---|---|---|
| Public |
| These are clients that cannot securely store credentials locally. As such, when you create a public client, it will not have a client secret. Since public clients don't have a secret, they can't authenticate themselves, and can only be used to authenticate users. When making authentication requests to Wristband, public clients must use PKCE to ensure secure communication. |
| Confidential |
| These are clients that can securely store client credentials. When you create a confidential client, a secret will be generated that must be stored securely. During authentication flows, confidential clients must authenticate themselves using their client ID and secret. |
Beyond the basic public or confidential classification, OAuth2 clients differ in several ways. The sections below provide a detailed overview of each client type and its key features.
Backend Server Type
Backend server clients are designed for web applications running on a server. As confidential clients, they have a client ID and a secret that must be stored securely on your backend. All authentication requests to Wristband must originate from this backend server.
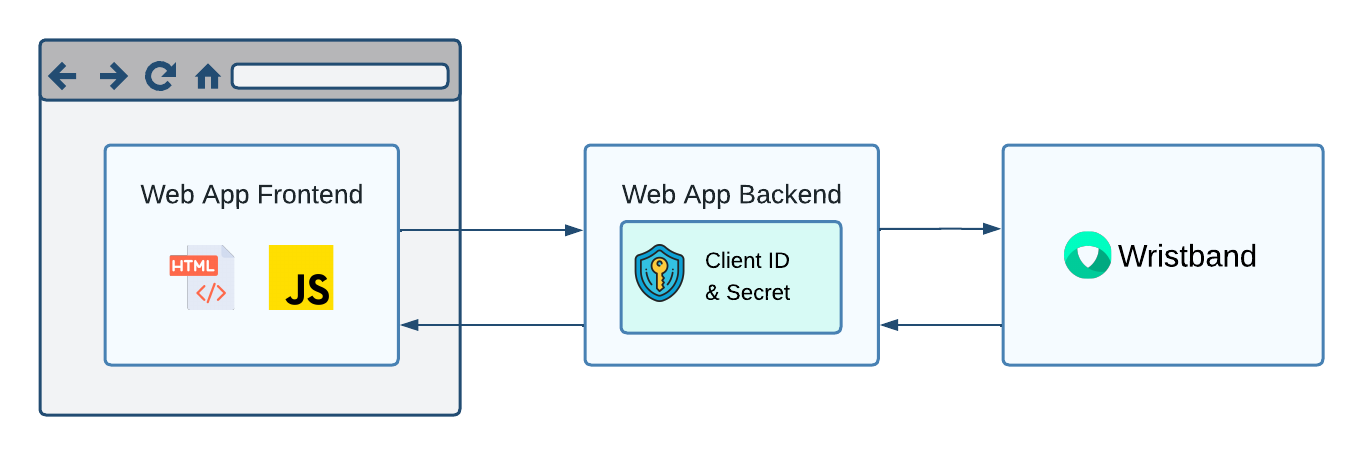
Figure 1: For backend server clients, the client ID and secret must be stored on the server, and all authentication requests to Wristband need to be made from the backend.
Supported Grant Type
Backend server clients support the following grant types:
- Authorization Code: The Authorization Code grant is used to authenticate users.
- Client Credentials: The Client Credentials grant is used to authenticate the client application itself.
Native Client Type
Native clients support software running directly on a device (e.g., mobile or desktop apps).
- Security Classification: They function as public clients, meaning they cannot securely store a client secret and only support user authentication.
- Authentication Flow: The native app opens a browser to Wristband's authorization endpoint, launching the hosted login page.
- Completion: After a successful login, Wristband redirects to the app's registered redirect URI, enabling the native app to call Wristband's APIs.
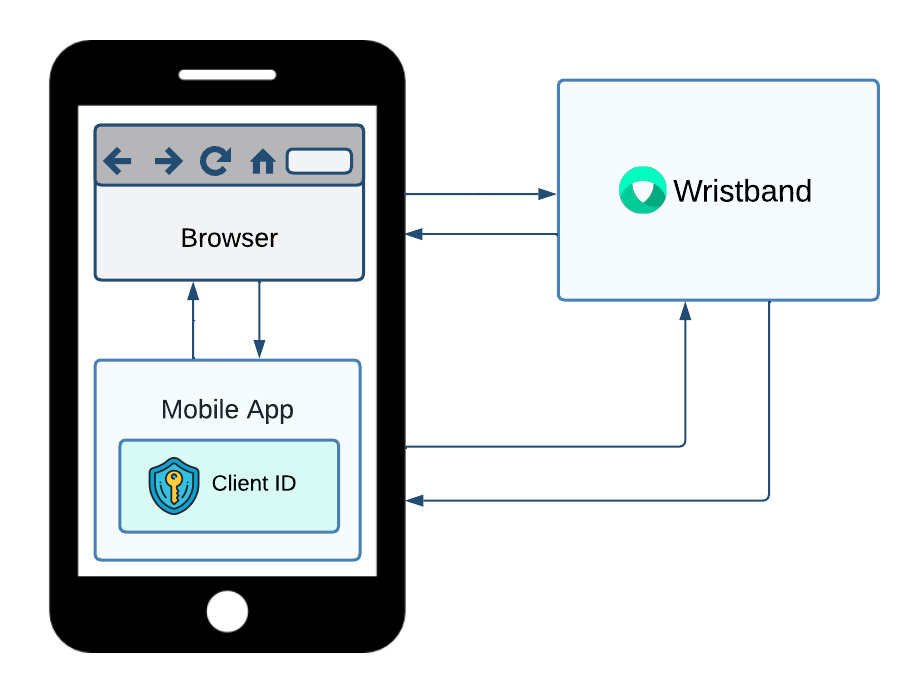
Figure 2: For native clients, only the client ID is stored in the mobile app. To initiate the login flow, a browser must be opened and redirected to Wristband's authorization endpoint. After the user logs in, Wristband redirects back to the mobile app.
Supported Grant Type
Native clients support the following grant types:
- Authorization Code With PKCE: The Authorization Code grant is used to authenticate users. For native clients, PKCE (Proof Key for Code Exchange) is required.
Unique Features
Native clients offer unique features that are not available to other client types, including:
- Support for Custom Schemes in Redirect URIs: Native clients can register custom URL schemes (like
yourapp://) as redirect URIs. These schemes allow the browser to automatically launch your native app when the redirect happens. - Support for Loopback Addresses in Redirect URIs: Native clients can register redirect URIs using loopback addresses like
localhostor127.0.0.1. - Support for Dynamic Ports in Redirect URIs: Dynamic ports can be used in loopback redirect URIs to handle authentication via an ephemeral local server running on a random port. To use dynamic ports, omit the port number when registering your client's redirect URI. You can then specify any port number in the
redirect_uriquery parameter when calling Wristband's Authorize API.
Machine-to-Machine (M2M) Client Type
Machine-to-Machine (M2M) clients authenticate software processes that operate without user involvement.
- Common Use Cases: Backend microservices or scheduled background tasks.
- Security Classification: They function as confidential clients and require a unique client ID and a secret to be stored securely on the machine.
- Authentication Flow: They authenticate by calling Wristband's Token API directly using the
client_credentialsgrant.
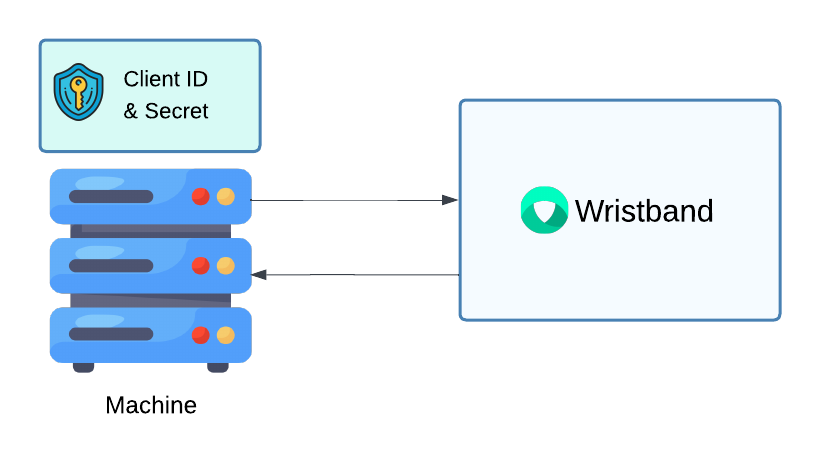
Figure 3: For Machine-to-Machine clients, the client ID and secret are stored locally on the machine and used to authenticate directly with Wristband.
Supported Grant Type
M2M clients support the following grant types:
- Client Credentials: The client credentials grant is used to authenticate the client itself.
URLs
Backend Server and Native clients support two URL-related settings:
- Redirect URIs.
- Login URL
Redirect URIs
Redirect URIs are the explicit addresses permitted during the Authorization Code grant flow.
Security
Wristband only redirects to registered URIs to prevent authorization codes from leaking to unauthorized destinations.
Tenant Subdomains
You can use the {tenant_name} placeholder as the leftmost domain label to support tenant subdomains.
For example, if the following redirect URI was registered:
https://{tenant_name}.myapp.com/callbackWhen calling the Authorize API, you would provide the redirect URI with the {tenant_name} placeholder exactly as registered, without substituting the actual tenant name. For example:
https://<tenant_vanity_domain>/api/v1/oauth2/authorize?...&redirect_uri=https://{tenant_name}.myapp.com/callback...'After the user successfully authenticates, Wristband replaces the {tenant_name}placeholder with their actual tenant name before redirecting. For example, if the user belongs to tenant1, Wristband redirects to the following URL:
https://tenant1.myapp.com/callbackLogin URL
During certain authentication flows, Wristband redirects back to your application's login endpoint.
- Default Behavior: Wristband uses the Login URL set on the application.
- Client Overrides: Setting a Login URL on an individual client overrides the application default. This is ideal if you run clients across different environments (e.g., staging vs. production) and need distinct routing.
- Tenant Subdomains: You can include the
{tenant_name}placeholder as the leftmost domain label. Wristband will dynamically replace it with the active tenant's name when performing the redirect.
Client Secrets
Wristband only stores a hashed version of your client secret. Keep the following security rules in mind:
- One-Time View: You can only view the plaintext secret immediately after the client is created.
- Storage: Record the secret right away and store it in a secure location.
- Recovery: If you lose the secret, you must rotate it to generate a new one.
Verifying a Client Secret
If you are unsure whether a client secret is still valid, you can verify it in the Wristband Dashboard or programmatically using the Verify Client Secret API.
Secret Rotation
Rotating a client secret helps you update credentials without application downtime:
- The Process: Wristband generates a new primary secret and moves the old one to a secondary slot.
- Zero Downtime: Both primary and secondary secrets remain valid while you migrate your clients.
- Execution: Perform this action in the Wristband Dashboard or via the Rotate Client Secret API.
Deleting a Secondary Client Secret
Once all your applications are updated to use the new primary secret, you can clean up the old credential:
- Action: Delete the secondary secret via the Wristband dashboard or the Delete Secondary Client Secret API.
- Impact: This action is permanent and invalidates the old secret immediately.
Generating Access Tokens for Testing
Note: This feature is only available for Machine-to-Machine clients or Backend Server clients that have the
CLIENT_CREDENTIALSgrant type enabled.
To test Wristband APIs using tools like cURL or Postman, you can generate an access token directly from a client's Edit Client page in the dashboard. For a step-by-step walkthrough, see Getting Access Tokens to Test Wristband APIs.
JWT Settings
JWT Settings let you configure token lifespans for a client, including access tokens, OpenID ID tokens, and refresh tokens.
Note: All configurations below require a minimum duration of 5 minutes.
| Setting | Description | Default Expiration | Max Expiration | Applies to Client Types |
|---|---|---|---|---|
| Access Token Expiration | How long until the access token expires. |
| 1,440 minutes (24 hours) |
|
| ID Token Expiration | How long until the OpenID ID token expires. | 30 minutes | 1,440 minutes (24 hours) |
|
| Refresh Token Idle Expiration | How long Refresh Tokens can remain unused before they expire. | 1,440 minutes (24 hours) | 129,600 minutes (90 days) |
|
| Refresh Token Absolute Expiration | An absolute limit on how long Refresh Tokens can stay alive, regardless of usage. | 1,440 minutes (24 hours) | 525,600 minutes (365 days) |
|
Login Session Duration
When an application triggers a login flow using the Authorize API, Wristband tracks the process using an authorization request JWT. The Login Session Duration dictates the lifespan of this token. If it expires, Wristband's hosted pages will force the user to restart the login flow.
You can configure these two settings for Backend Server and Native clients:
- Restrict Time to Complete Login: Controls whether a time limit is enforced. By default login sessions are disabled giving the user unlimited time to complete the login flow.
- Login Session Duration: If login sessions are enabled, this value determines the amount of time before the login session expires.
Assigning Roles to Clients
Like users, clients can be assigned roles to enforce permissions within your application. When a client calls Wristband APIs using an access token from the client credentials grant, it must have a role that grants the necessary permissions.
The available methods for assigning roles to clients are listed below.
- Manually via the Wristband Dashboard: Administrators can manually assign roles to a client through the Wristband dashboard.
- Programmatically via Wristband's APIs: Use the following APIs to manage client role assignments programmatically:
Updated 26 days ago