Getting Access Tokens to Test Wristband APIs
In Wristband, access tokens are the primary way to authenticate API requests. Before calling a protected API, you’ll typically need to generate one. This tutorial shows how to create access tokens for manual use with tools like cURL or Postman.
Step 1: Create an OAuth 2 Client
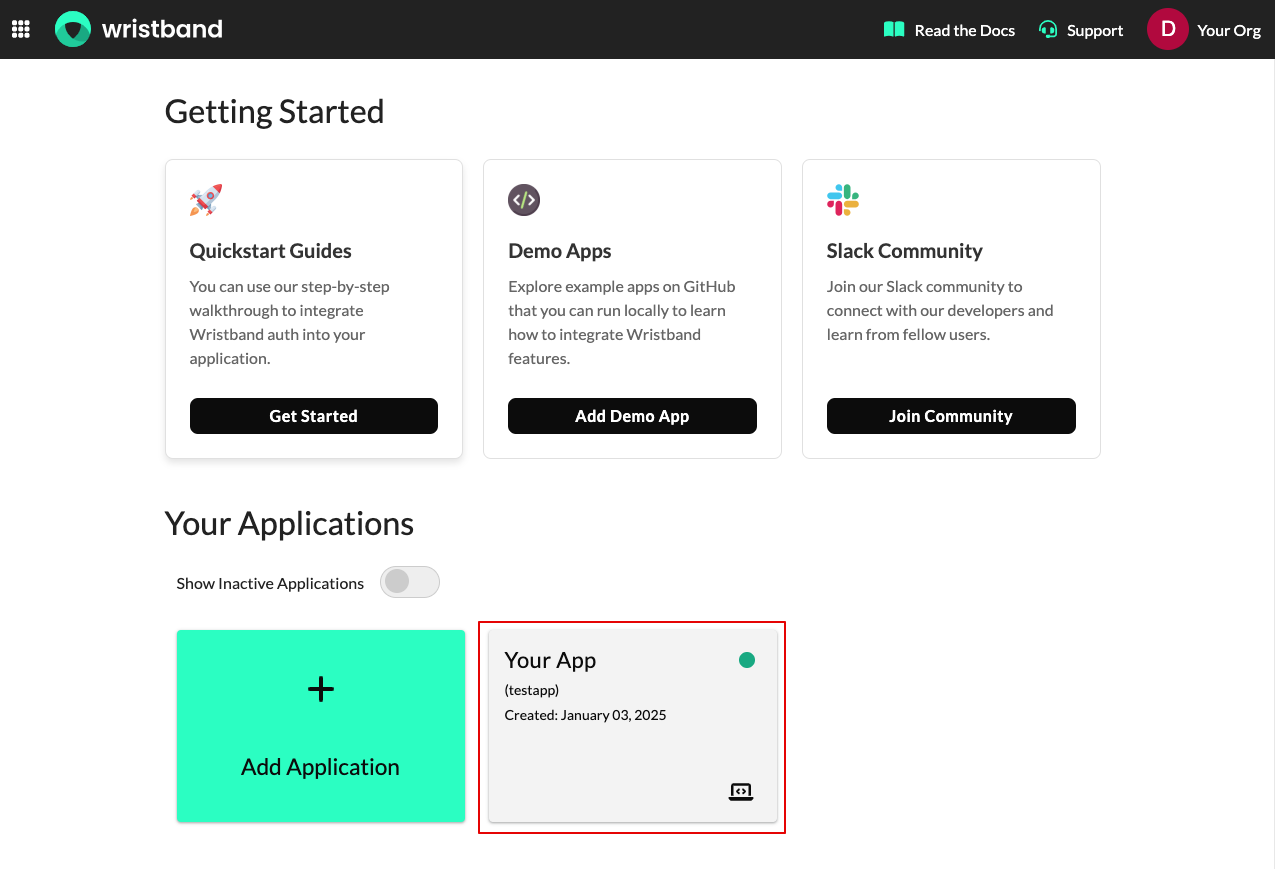
Log in to the Wristband dashboard. From the home page, select the application that the OAuth 2 client should be provisioned under.
NoteClients can only access resources within the application they were provisioned for. When creating a client for testing API calls, be sure to create it under the application that owns the resources you need to access.

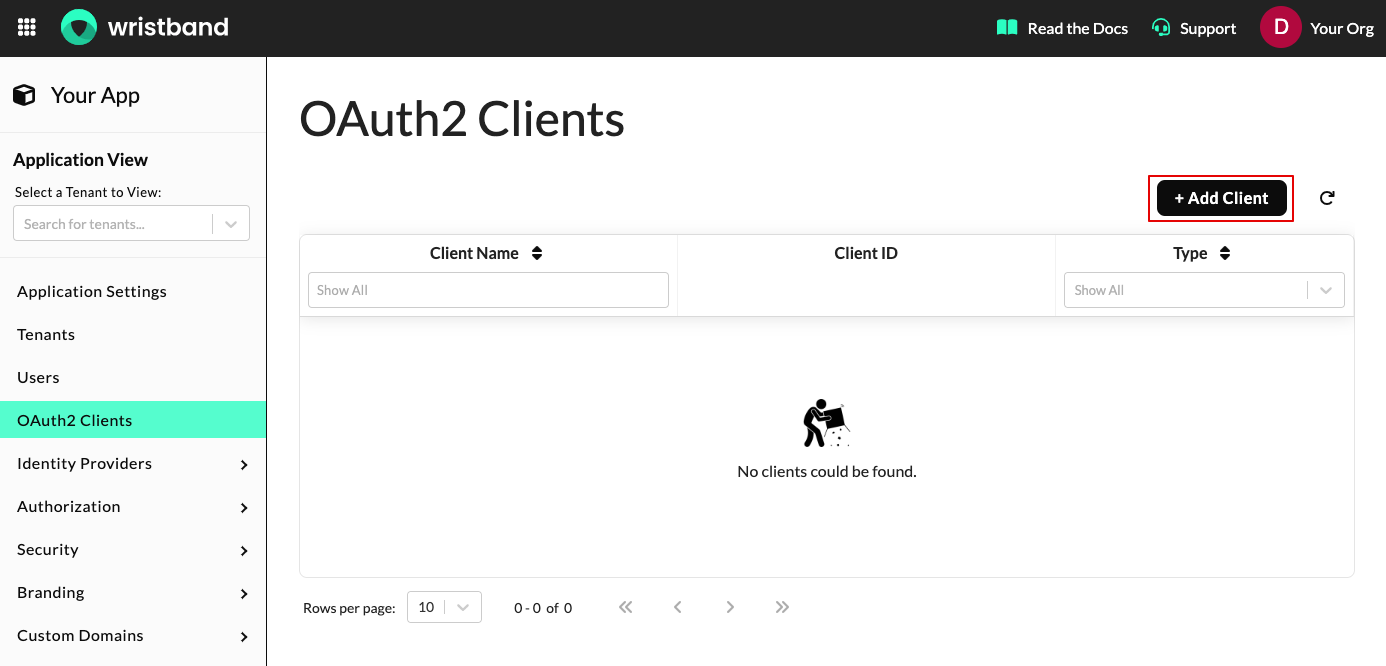
Once inside the Application View, select "OAuth2 Clients" from the left navigation menu, then click the "Add Client" button.

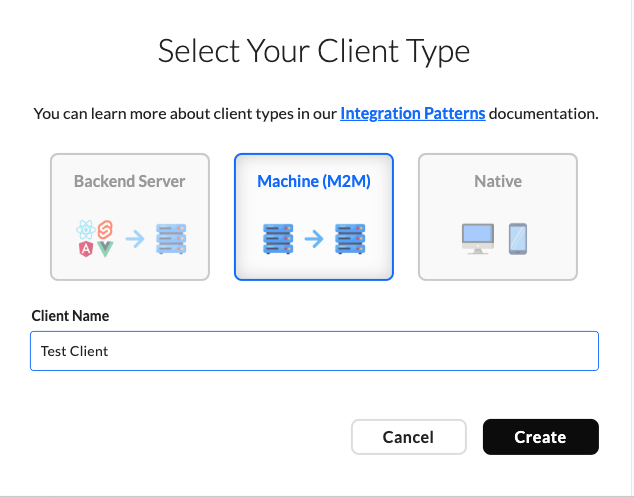
On the create client modal, select "Machine (M2M)" as the client type. Next, enter a name for the client, then click the "Create" button.

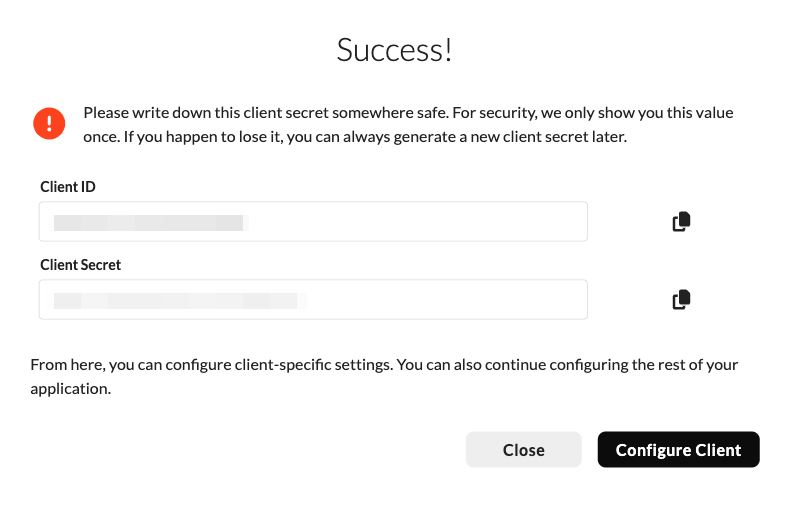
You'll immediately be shown the client ID and client secret associated with the newly created client. Copy the client secret, as it's only displayed once after creation, and you'll need it to generate an access token later.

Step 2: Assign a Role to the OAuth 2 Client
Most APIs within Wristband require the subject accessing the API to have specific permissions granted to them. Therefore, for the OAuth 2 client to call Wristband's APIs, it must be assigned a role with the correct permissions. In this tutorial, we'll assign the predefined "Application Admin Client" role to the OAuth 2 client, which contains all the permissions needed to call any API.
NoteThe "Application Admin Client" role is useful for testing when you need to call any API. In production, however, follow the principle of least privilege and assign only the minimum permissions required by the OAuth2 client.
After closing the modal, select the created client from the table in the Clients UI to enter the Edit Client UI. Once inside, scroll down until you reach the "Roles" section. In the "Assigned Roles" dropdown, select "Application Admin Client" and then click the "Save" button.

Step 3: Generate an Access Token
While still on the Edit Client UI page, scroll up to the "Generate Access Tokens" section. Here, you will need to paste in the client secret that you copied earlier. Then, click the "New Token" button.

A modal will pop up and reveal your brand new access token value. Copy that off somewhere safe - this is what you need to make API requests.

Using the Access Token to Make API Requests
To use the access token to authenticate API calls, include the access token in the Authorization header of your HTTP requests, using the Bearer authentication scheme. Below are some examples showing how to make authenticated API calls using cURL and Postman.
cURL
Below is an example of how to pass the access token to the Get User API when using cURL:
curl --request GET \
  --url https://yourapp-wristband.us.wristband.dev/api/v1/users/a3u2ixfpkvdkxcvtoidbhc5tly \
  --header 'Accept: application/json' \
  --header 'Authorization: Bearer eyJraWQiOiJiZWE0ejc0YzJmZmFqbzR4Y25lcWxhcnZ6eSIsInR5cCI6ImF0K0pXVCIsImFsZyI6IlJTMjU2In0.eyJzdWIiOiJjYXk1a2NzbmZuYTd0Zm5wc3hxamt0cnNmNCIsInZhbl9kb20iOiJ5b3VyYXBwLXdyaXN0YmFuZC5kZXYud3Jpc3RiYW5kLmRldiIsImlzcyI6Imh0dHBzOlwvXC95b3VyYXBwLXdyaXN0YmFuZC5kZXYud3Jpc3RiYW5kLmRldiIsInN1Yl9raW5kIjoiYXBwbGljYXRpb25fY2xpZW50IiwiZXhwIjoxNjk0NjY3NTk3LCJhcHBfaWQiOiJueDNjeHQ1ZmdyZnlkbXJoYmhiaXRvYW02ZSIsImlhdCI6MTY5NDU4MTE5NywianRpIjoic2llYXp0anF0emVsZmhxZDJrZHEyZHdnNWEiLCJjbGllbnRfaWQiOiJjYXk1a2NzbmZuYTd0Zm5wc3hxamt0cnNmNCJ9.tS2sxxHL9--gXPjL3p6PStDmFBbRe-vMdyBYRFKWhNvRWKe8GNP61xe55TrNoElbkfxpGvoqJlv83torqkYbMwDxdWEa14dr5XiavbrL21pH3zm65tXfZM8gDAVXdQLFMwjTGRjpy5yS0LDy0QockUYaRBZdZmZEgI0zOG2x_DHxaDxBsyqTNPOjnfV0gX4m8CzYGe6GQU4JSyOHTe8iJ8feGiW_HnTOnvwq9VuzJdSbvelpxb6ZTuAoLxnT0DOMY0jZpUZahD6bpoJohMT4EgoXhW8Ok3qV4IQ2-7ZRZNh2MIhWnmc203yUNCiYDFvyyxB0DYbWvbd08G_PBU1AUA'
Postman
Below is an example of how to pass the access token to the Get User API when using Postman. Assuming you have a collection and request set up for the Get User API, you can click on the tab navigation for "Authorization". There, you can find a dropdown select menu for authorization type. Select "Bearer Token" as the value.

Now you should see a "Token" input field appear. Paste your access token value there. After doing so, you will be able to successfully complete your API request when you click the "Send" button.

Updated 4 months ago