Learn how Wristband authorizes API requests.
Request-Level Authorization
When calling most Wristband APIs, authenticated subjects (either users or machines) must be granted a specific permission to pass the authorization checks. To determine which permissions are required for an API, refer to the Required Permissions section in the API reference documentation.
Some APIs Don't Require PermissionsIf an API’s reference documentation does not include a Required Permissions section, no permissions are needed for the authenticated subject to call that API.
In the next section, we'll examine the Required Permissions section for the Get User API, to help illustrate how Wristband utilizes permissions to enforce authorization.
Required Permissions Example
If we look at the Get User API as an example, we can see that it has the following table under its Required Permissions section (note, the Description column has been omitted from the table for brevity):
| Permission | Boundary |
|---|---|
| user:read | Application |
| Tenant | |
| Tenant Inclusion List | |
| Tenant Exclusion List | |
| Self |
To determine how the API will enforce authorization decisions, we need to look at the Permission and Boundary columns of the table. The Permission column specifies the required permission for a subject, while the Boundary column lists the supported permission boundaries that can be applied to that permission. The sections below explain how these work together to control access to the Get User API.
Permission Column
The Permission column shows that the authenticated subject must have the user:read permission to call the Get User API. Calls made without this permission will return a 403 Forbidden response.
Boundary Column
The Boundary column defines which permission boundaries can be combined with the permission. These boundaries determine the scope of access granted to the authenticated subject. For example, for the Get User API, the permission boundaries dictate which users within an application a subject is authorized to retrieve.
If we look at the Boundary column from the table above, we can see that the user:read permission can be used with the following permission boundaries:
- Application
- Tenant
- Tenant Inclusion List
- Tenant Exclusion List
- Self
To see how these different permission boundaries affect which users can be read using the Get User API, let's imagine we have a Wristband application with the tenants and users shown in the diagram below:
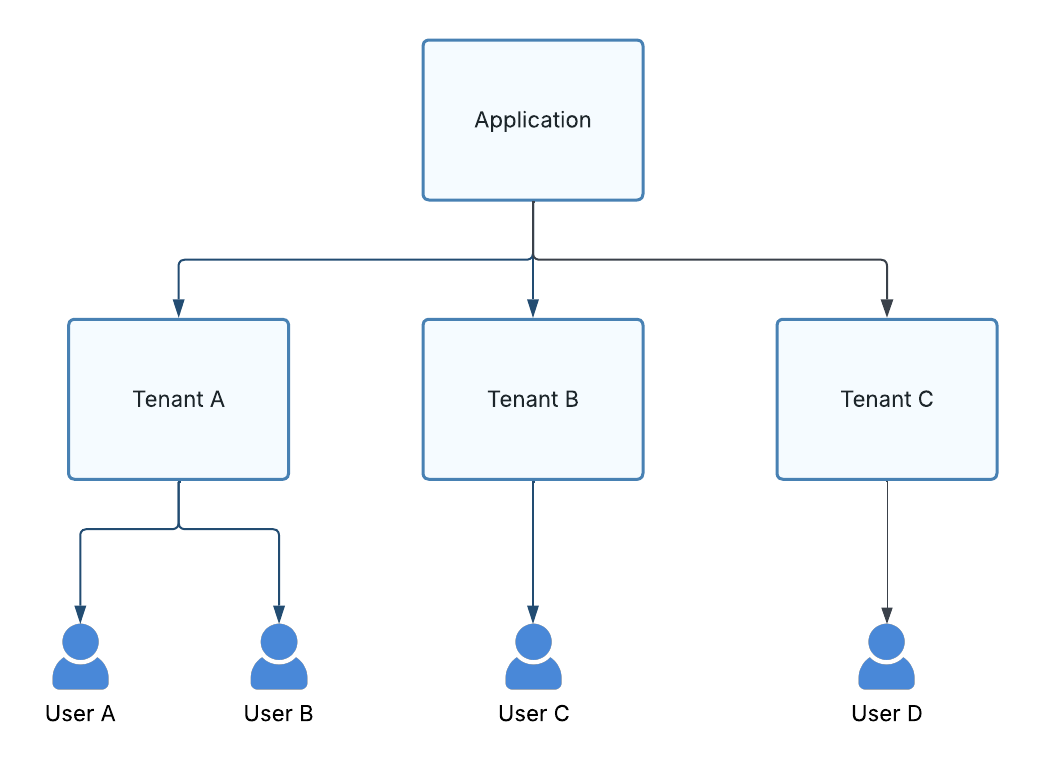
Figure 1. Diagram illustrating the tenant and user entities associated with a fictitious Wristband application.
Now, let's examine how different permission boundaries impact the users we can read using the Get User API.
Application Permission Boundary
If the user:read permission is combined with an Application permission boundary, the authenticated subject can call the Get User API for all users within the same application. For example, if User A is the authenticated subject, they can retrieve User A, User B, User C, and User D.
The diagram below illustrates this scope of access. The users in the green box represent those that User A can successfully retrieve using the Get User API.
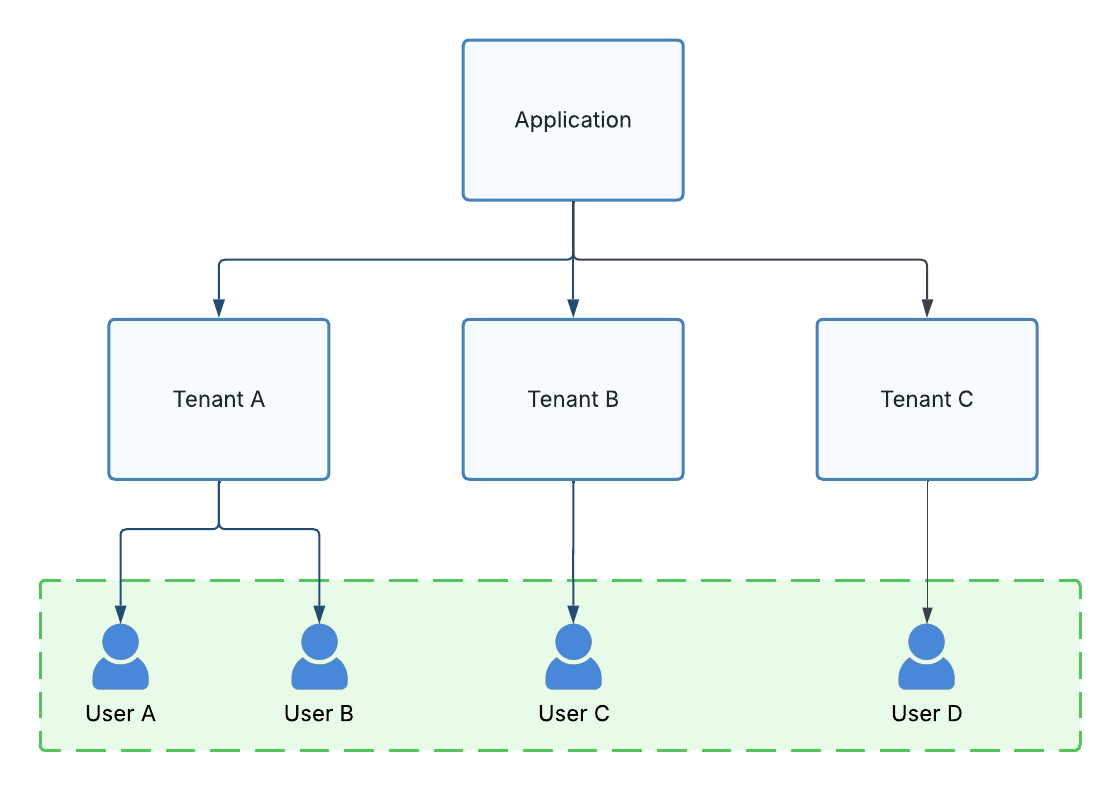
Figure 2. Diagram illustrating the scope of access granted by the Application permission boundary.
Tenant Permission Boundary
If the user:read permission is combined with a Tenant permission boundary, the authenticated subject can call the Get User API for all users within the same tenant. For example, if User A is the authenticated subject, they would be able to retrieve User A and User B.
The diagram below illustrates this scope of access. The users in the green box represent those that User A can successfully retrieve using the Get User API.
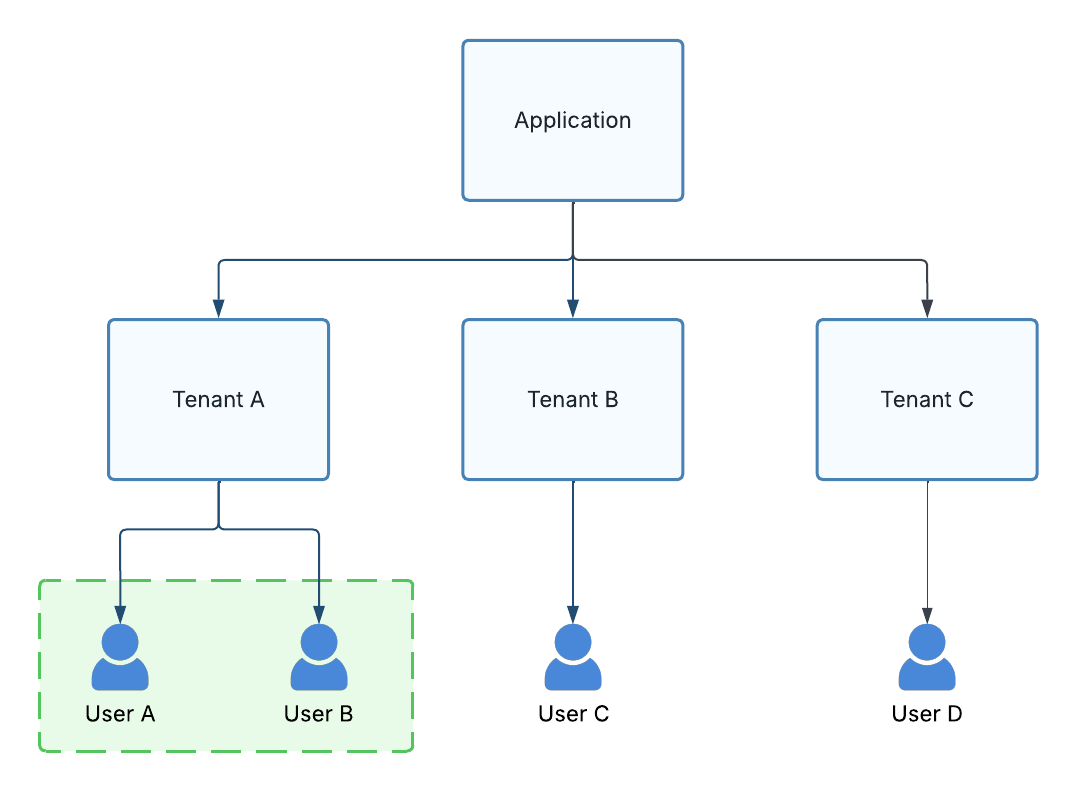
Figure 3. Diagram illustrating the scope of access granted by the Tenant permission boundary.
Tenant Inclusion List Permission Boundary
If the user:read permission is combined with a Tenant Inclusion List permission boundary, the authenticated subject can call the Get User API for all users belonging to tenants specified in the inclusion list. For example, if User A is the authenticated subject and the tenant inclusion list contains Tenant B and Tenant C, they would be able to retrieve User C and User D.
The diagram below illustrates this scope of access. The users in the green box represent those that User A can successfully retrieve using the Get User API.
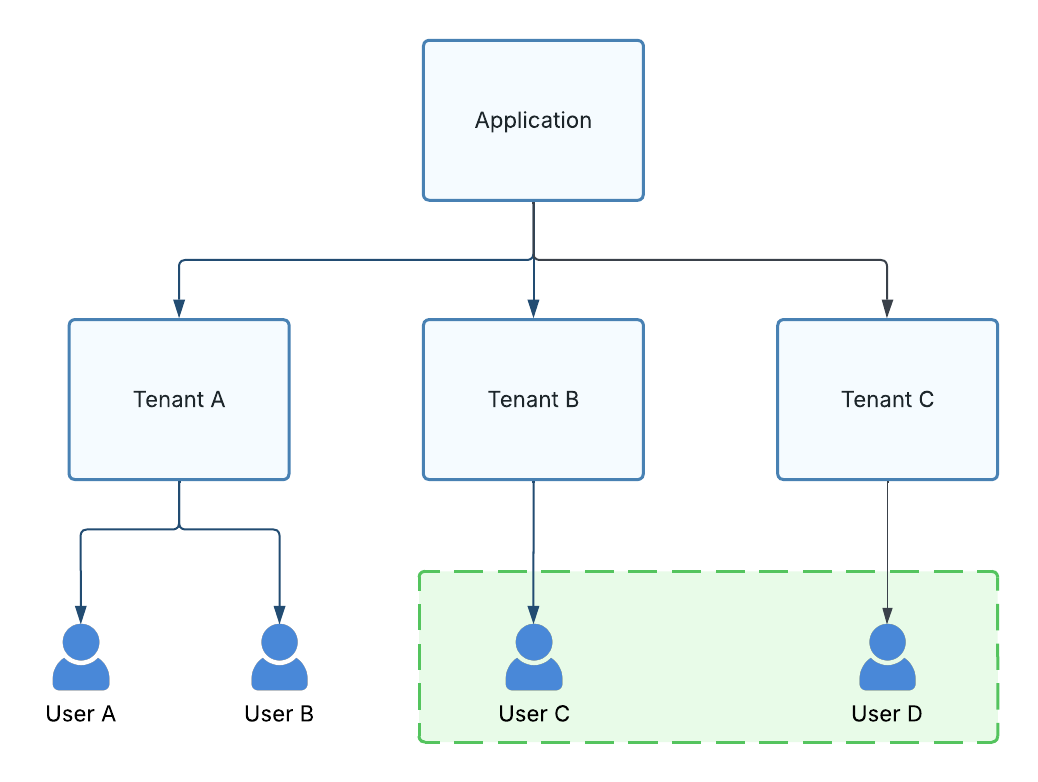
Figure 4. Diagram illustrating the scope of access granted by the Tenant Inclusion List permission boundary when the inclusion list contains Tenant B and Tenant C.
Tenant Exclusion List Permission Boundary
If the user:read permission is combined with a Tenant Exclusion List permission boundary, the authenticated subject can call the Get User API for all users belonging to tenants not specified in the exclusion list. For example, if User A is the authenticated subject and the tenant exclusion list contains Tenant C, they would be able to retrieve User A, User B, and User C.
The diagram below illustrates this scope of access. The users in the green box represent those that User A can successfully retrieve using the Get User API.
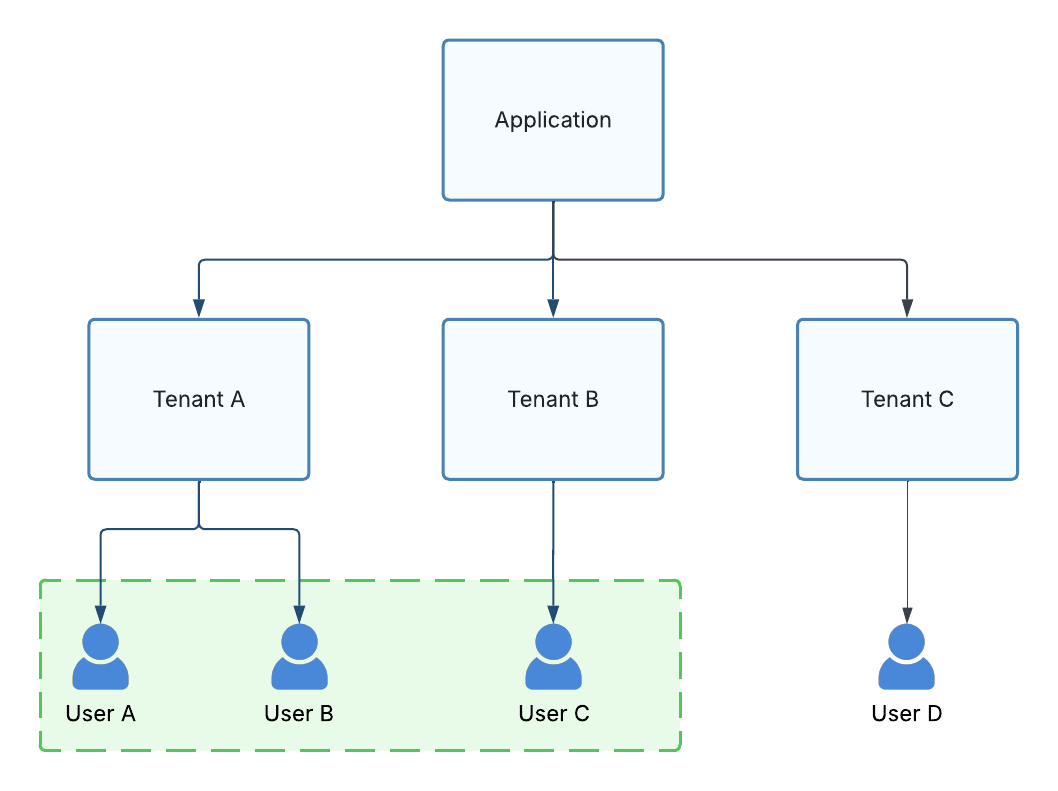
Figure 5. Diagram illustrating the scope of access granted by the Tenant Exclusion List permission boundary when the exclusion list contains Tenant C.
Self Permission Boundary
If the user:read permission is combined with a Self permission boundary, the authenticated user can only call the Get User API for itself. For example, if User A is the authenticated subject, they would only be able to retrieve User A.
The diagram below illustrates this scope of access. The users in the green box represent those that User A can successfully retrieve using the Get User API.
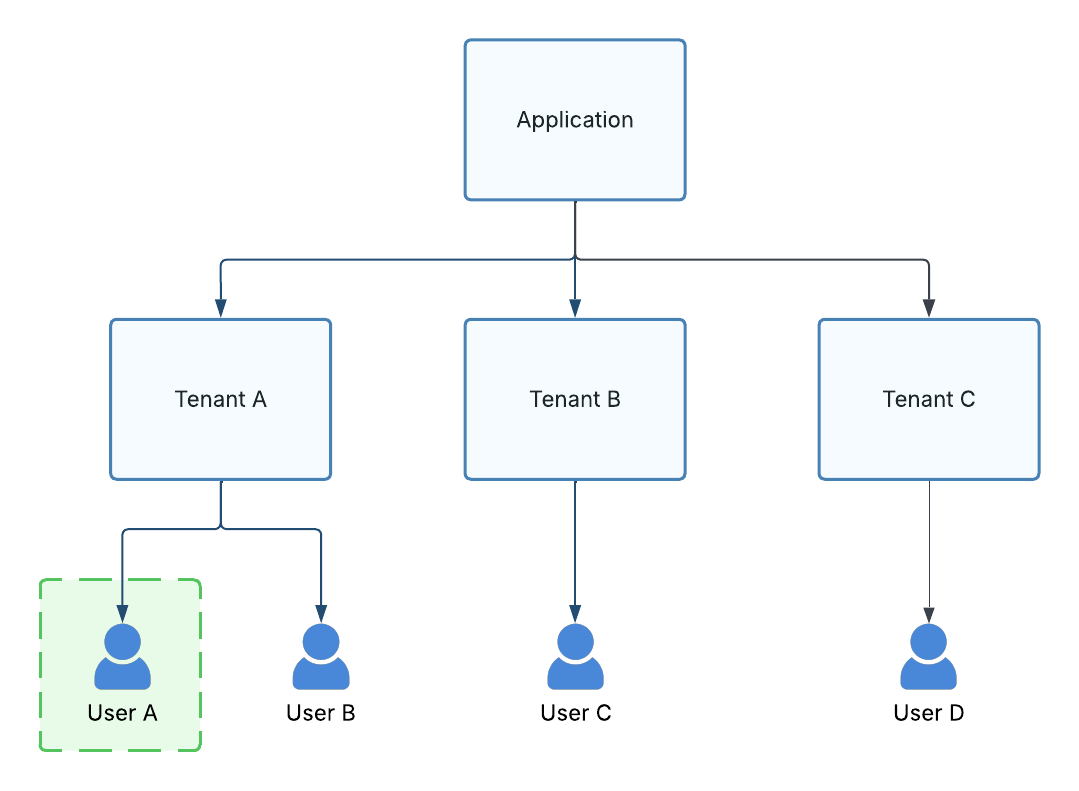
Figure 6. Diagram illustrating the scope of access granted by the Self permission boundary.
Unsupported Permission Boundaries
Not all APIs support every type of permission boundary. For example, if we look at the Required Permissions section for the Change Password API, we can see that it only supports the Self permission boundary.
| Permission | Boundary |
|---|---|
| change-password-workflow:execute | Self |
Therefore, in order to call the Change Password API, the authenticated subject must be granted the change-password-workflow:execute permission with a Self permission boundary. Any other combination of permission and permission boundary will result in a 403 Forbidden error. For example, if a user was granted the change-password-workflow:execute permission with an Application permission boundary, they would not be able to call the Change Password API, since the Application permission boundary isn't supported.
Field-Level Authorization
In addition to request-level permissions, some APIs also enforce field-level permissions, which are required to view or update specific fields within an entity. When applicable, these permissions are documented in a Field-Level Permissions section that appears below the Required Permissions section.
To gain a better understanding of how field-level permissions work, let's examine a couple of examples that illustrate how they can restrict updates to specific fields and grant read access to others.
Field-Level Update Restrictions
To illustrate how field-level permissions restrict modifications to specific fields, let’s look at the Patch User API. In its Required Permissions section, you’ll find a Field-Level Permissions subsection with the following table:
| Permission | Description |
|---|---|
| user:manage-email | Required if the email or emailVerified fields are modified. |
| user:manage-external-id | Required if the externalId field is modified. |
| user:manage-restricted-metadata | Required if the restrictedMetadata field is modified. |
| user:manage-status | required if the status field is modified. |
In this case, there are four field-level permissions, each restricting modification to a subset of user fields. For example, the user:manage-status permission is required to update the status field while the user:manage-restricted-metadatais needed to modify the restrictedMetadata field. If the patch request attempts to update a user field protected by a field-level permission, and the authenticated subject has not been granted that permission, then a 403 Forbidden response will be returned.
NoteFields protected by field-level permissions may still be included in a patch request, even if the user lacks the required field-level permission, provided the field's value is not modified.
Field-Level Read Restrictions
To illustrate how field-level permissions restrict reading specific fields, let’s look at the Get Identity Provider API. In its Required Permissions section, you’ll find a Field-Level Permissions subsection with the following table:
| Permission | Description |
|---|---|
| identity-provider:view-protocol | Required to view the protocol field. |
In this case, there's one field-level permission restricting the ability to read the protocol field. If a request is made to the Get Identity Provider API, attempting to read the protocol field, and the authenticated subject has not been granted the identity-provider:view-protocol permission, then the request will succeed, but the protocol field will be undefined in the response.
Field-Level Permission Boundaries
As with request-level permissions, field-level permissions must be assigned the correct permission boundaries. The boundaries that apply to field-level permissions are identical to those for their corresponding request-level permission. For example, in the Patch User API, the user:update request-level permission supports the following boundaries:
- Application
- Tenant
- Tenant Inclusion List
- Tenant Exclusion List
- Self
Therefore, the Patch User API’s field-level permissions also support the Application, Tenant, Tenant Inclusion List, Tenant Exclusion List, and Self boundaries. Permission boundaries function the same way for both request-level and field-level permissions. For instance, to allow a user to update the status of all users within an application, you would grant them the user:manage-status field-level permission with an Application boundary.
NoteIn addition to the
user:manage-statusfield-level permission, you must also grant theuser:updaterequest-level permission with an Application boundary to allow the authenticated subject to update the status of all users within an application.
Assigning Permissions
Now that we've covered how Wristband's APIs enforce authorization using permissions, let's next go over how to assign permissions to users and OAuth2 clients.
Step 1: Create a Role
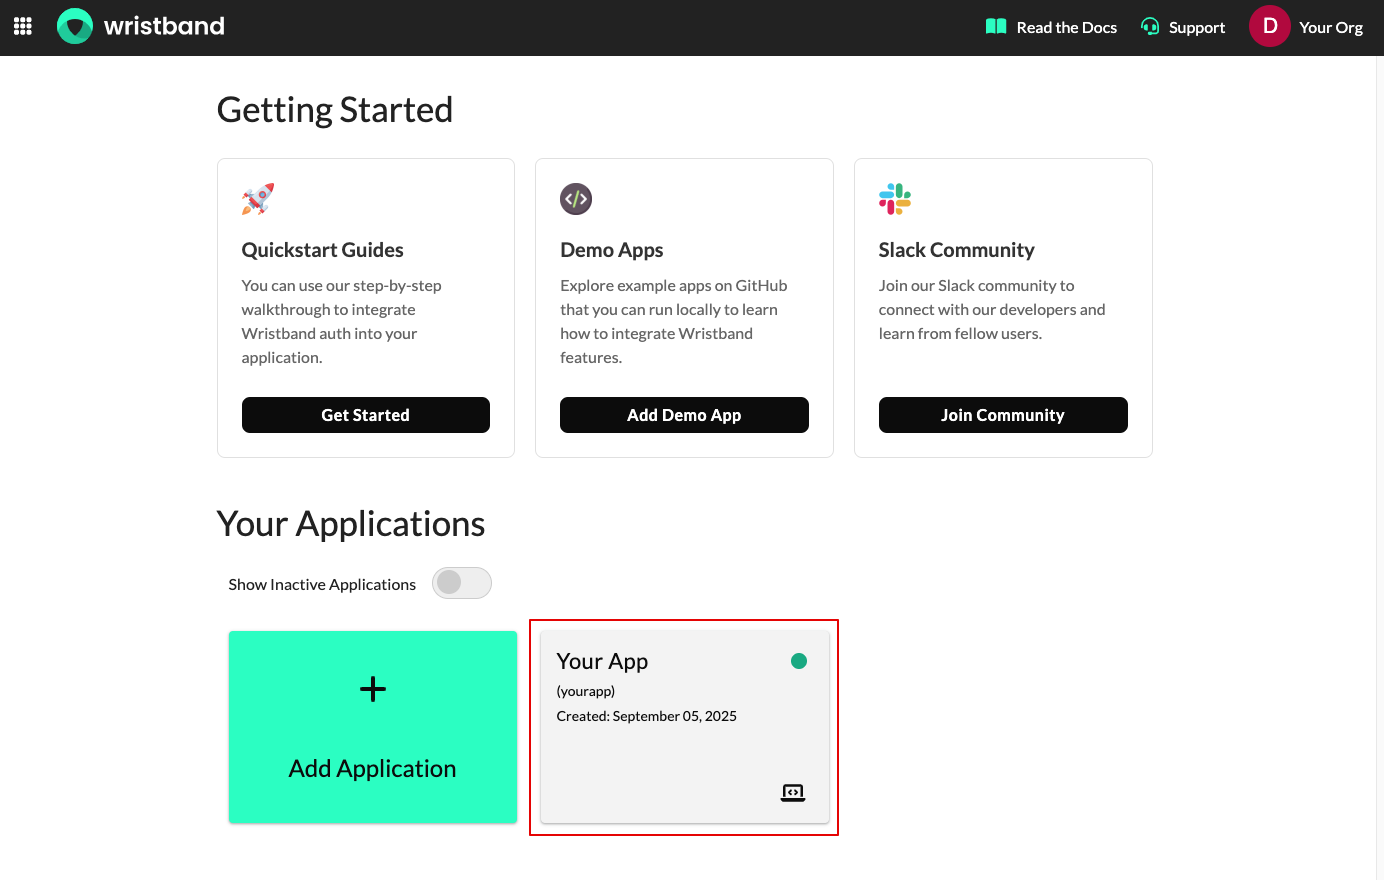
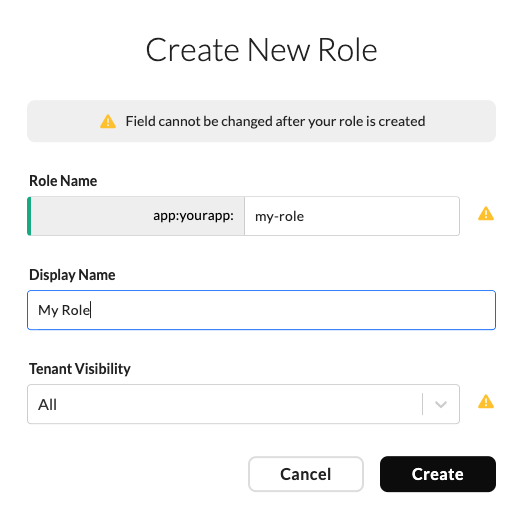
Before you can start assigning permissions, you'll need to create a role. In Wristband, roles are groups of permissions that can be assigned to either users or OAuth2 clients. To create a role through the Wristband dashboard, first select the application under which you'd like to create the role.
Next, click "Authorization" and then "Roles" from the left navigation menu. On the "Roles" page, click the "Add Role" button.
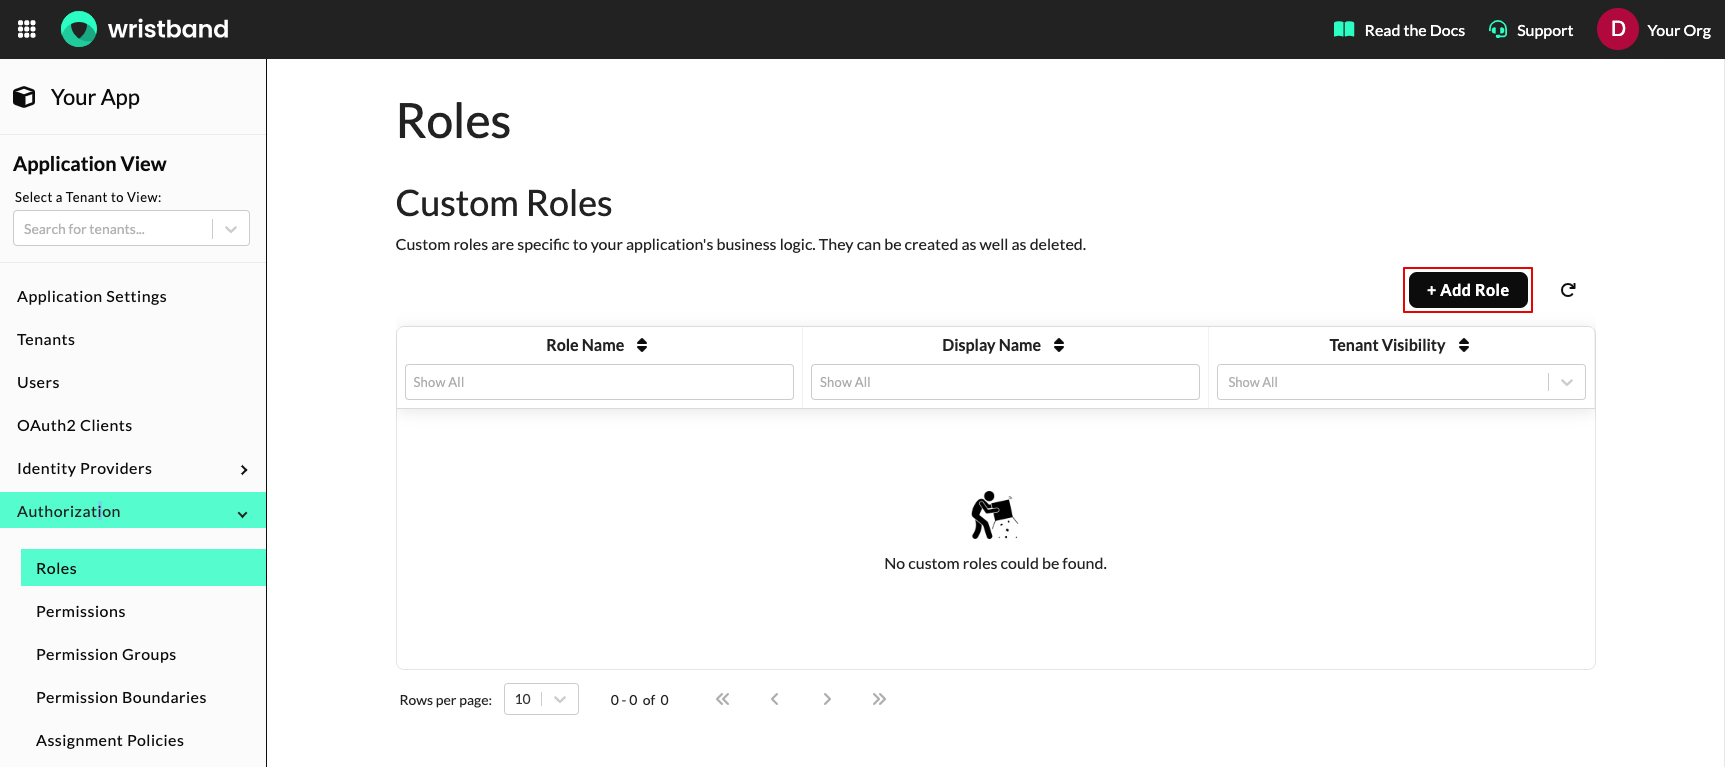
A modal will appear prompting you to enter the following information required to create a role:
- Name: A unique (per application) case-insensitive identifier for the role.
- Display Name: A free-form name shown when the role is displayed.
- Tenant Visibility: Defines which tenants can see the role. Options include:
- All: The role is visible in all tenants. Select this if you want the role to be assignable to every user in an application.
- Tenant Inclusion List: The role is visible only in tenants included in the inclusion list.
- None: The role is not visible to any tenants and can only be assigned to clients created at the application level.
Once you've finished entering the required values, click the "Create" button to create the role.
Predefined RolesIf you don't want to create your own role, you can instead use one of Wristband's predefined roles. These roles contain common sets of permissions that are useful for testing purposes. For example, the Application Admin Client role contains permissions to manage all resources under an application.
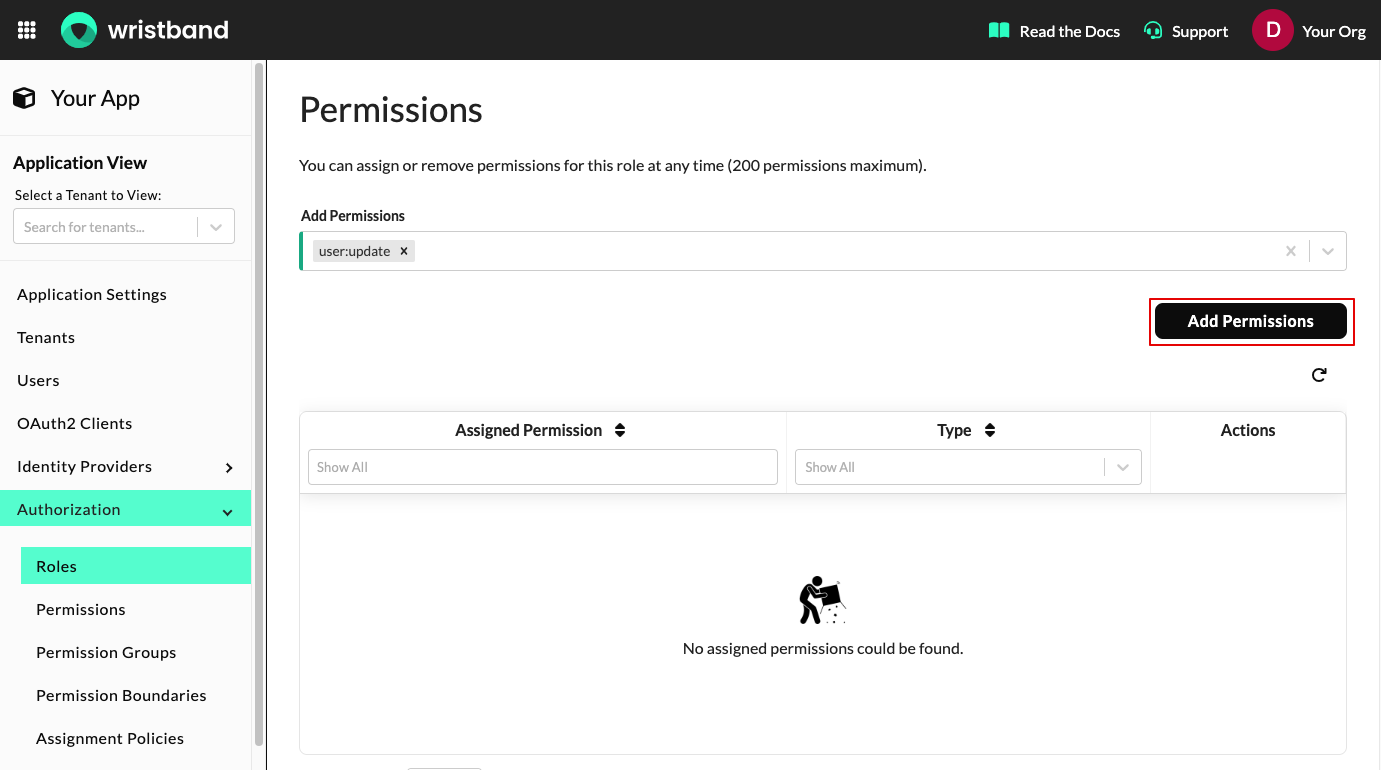
Step 2: Assign Permissions to the Role
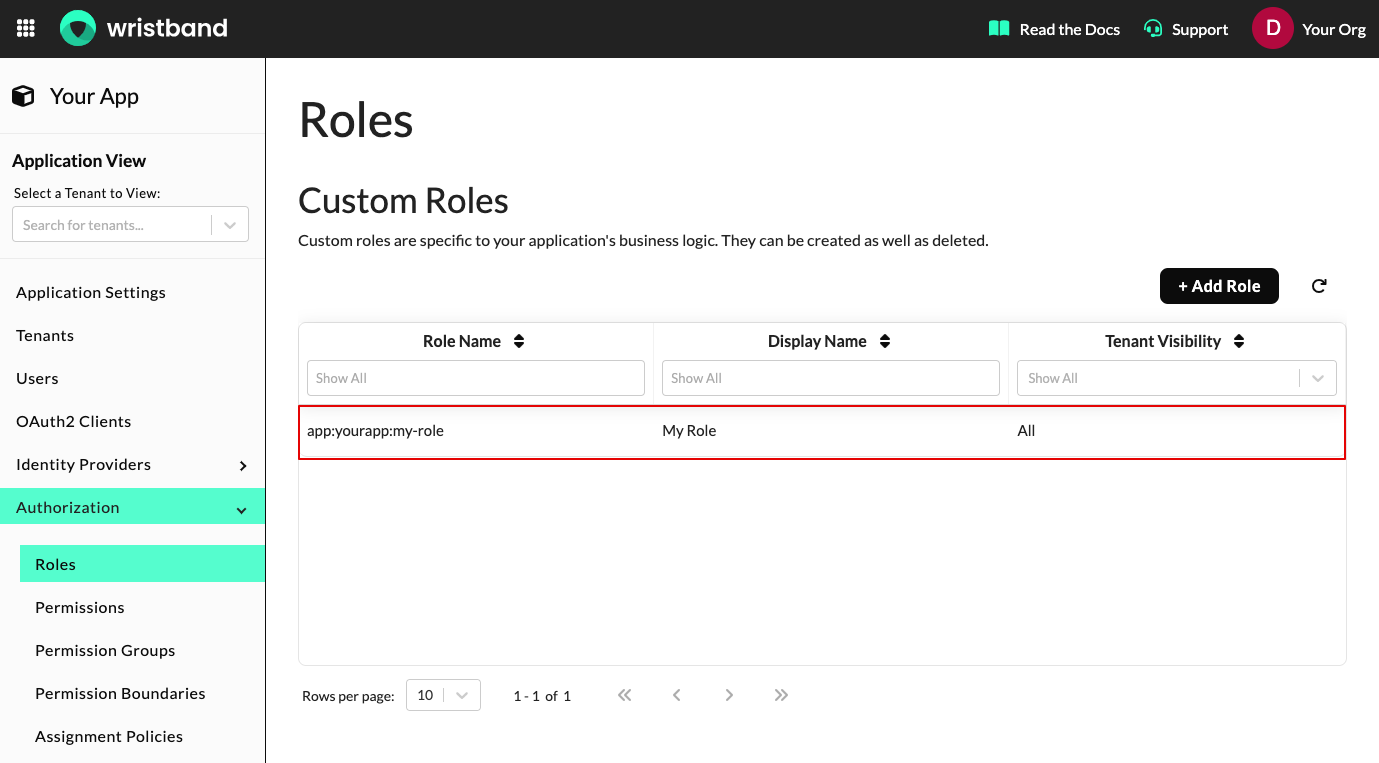
After creating the role, select it from the "Custom Roles" table to enter the "Edit Roles" page.
On the "Edit Roles" page, scroll down to the "Permissions" section. In the "Add Permissions" multi-select box, choose the permissions that you'd like to assign to the role. Next, click the "Add Permissions"button to complete the assignment.
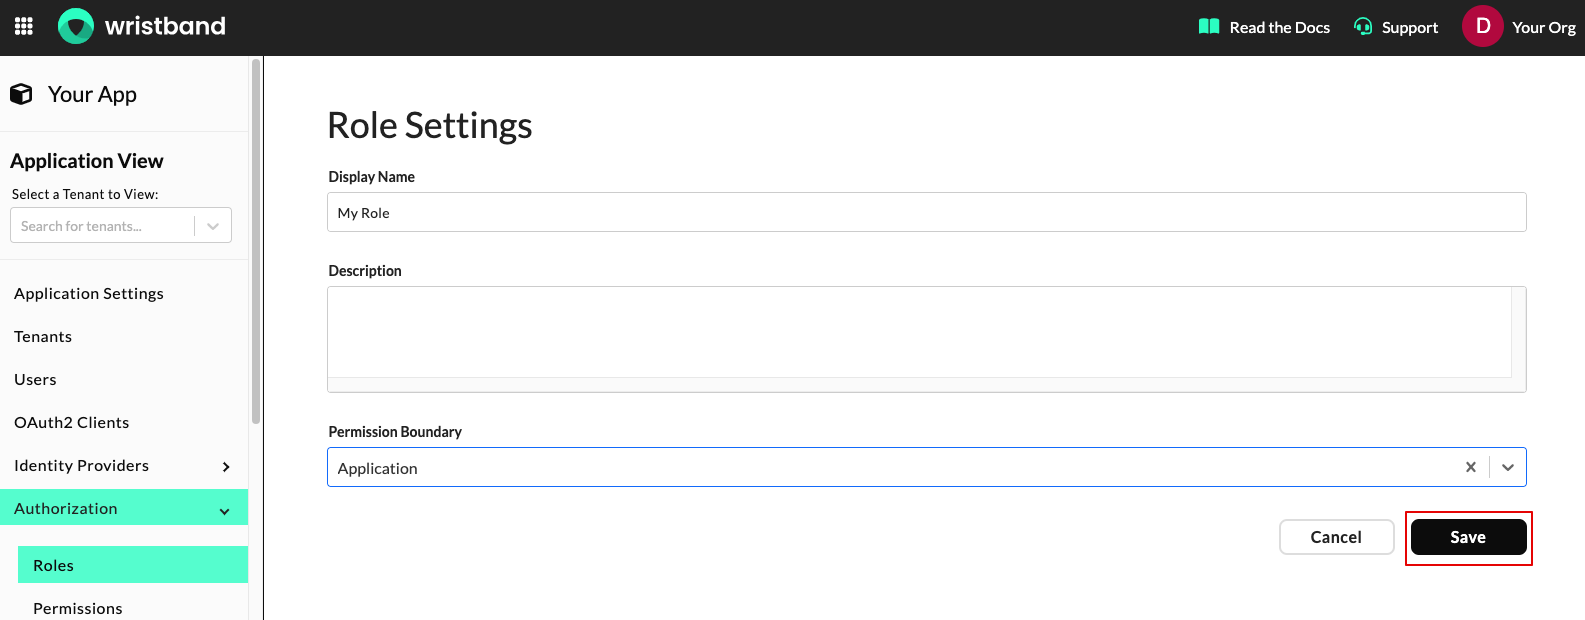
Step 3: Assign a Permission Boundary to the Role
After adding the necessary permissions to the role, you must assign a permission boundary. The boundary you assign will apply to all permissions directly associated with the role.
To assign a permission boundary to the role, scroll to the "Role Settings" section, select the appropriate permission boundary from the "Permission Boundary" dropdown, and then click the "Save" button.
Supporting Multiple Permissions Boundaries Within a Single Role
In some cases, you may want a role to include permissions that belong to different permission boundaries. For example, you might apply an Application boundary to the user:read permission and a Self boundary to the change-password-workflow:execute permission, while still keeping both permissions in a single role. To support this use case, you’ll need to use permission groups.
Permission groups, like roles, can have permissions and an associated permission boundary. Unlike roles, permission groups cannot be assigned directly to users or clients - they can only be assigned to roles. When a role includes a permission group, it inherits the group’s permissions, and the group's boundary applies only to those inherited permissions. Multiple permission groups with different boundaries can be combined in a single role, allowing it to include permissions with varying boundaries.
To help illustrate how permission groups work, let's revisit the original example where we want a single role to contain a user:read permission with an Application boundary and a change-password-workflow:execute permission with a Self boundary. To achieve this, we would first create two permission groups: Group A and Group B. We would assign the user:read permission to Group A and the change-password-workflow:execute permission to Group B. Then we would assign the Application permission boundary to Group A and the Self permission boundary to Group B. Finally, both Group A and Group B are assigned to a single role. Any subject assigned this role will receive the user:read permission with an Application boundary and the change-password-workflow:execute permission with a Self boundary.
Role Permission Boundaries Are Not Inherited by Permission GroupsIf a role has a permission boundary, permission groups assigned to that role do not inherit the role’s boundary. For example, if a role has an Application boundary but includes a permission group with no boundary, the permissions in that group will not inherit the Application boundary from the role.
Step 4: Assign the Role
Now that we've created the role and added the necessary permissions and permission boundary, it's time to assign the role to the appropriate users and clients.
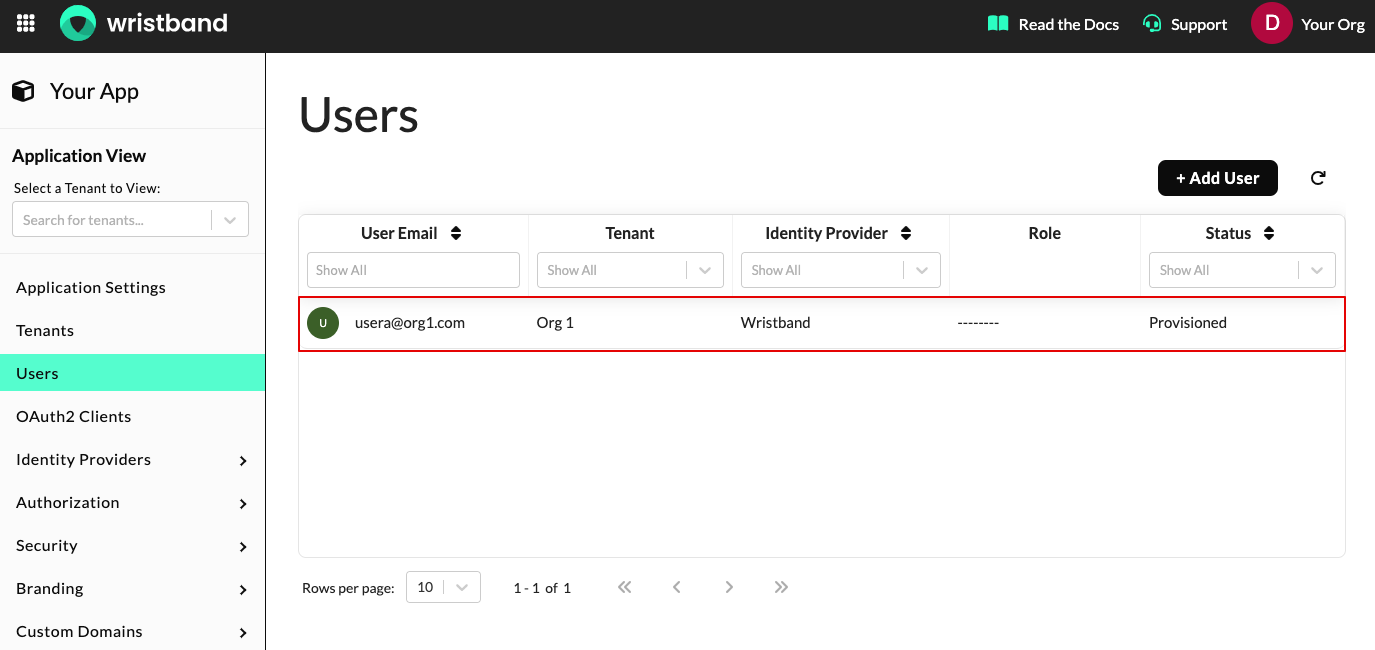
Assigning the Role to a User
To assign the role to a user, select "Users" from the left navigation menu, and then select the user whom you'd like to assign the role to from the "Users" table.
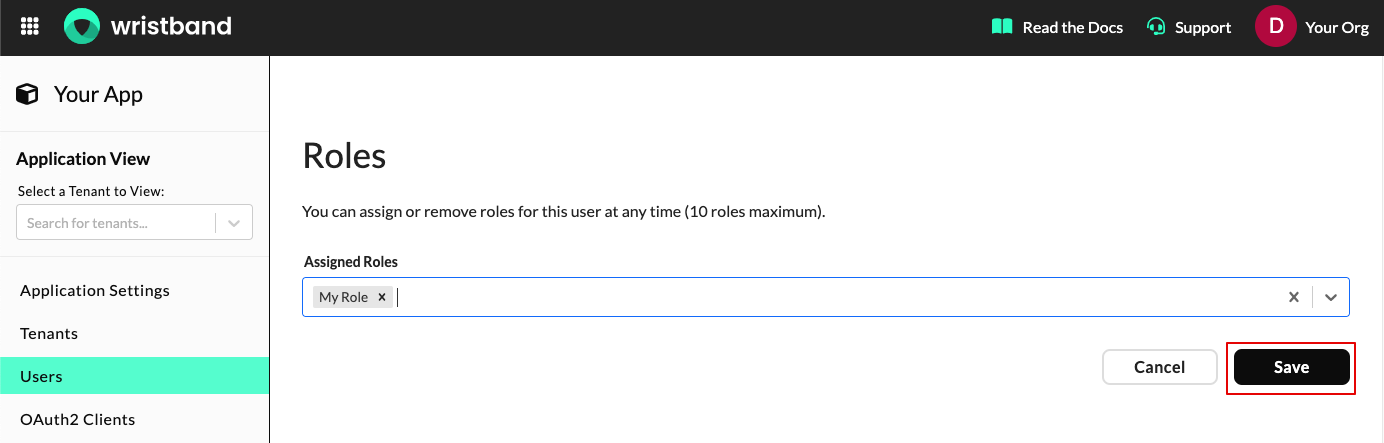
On the "Edit User" page, scroll down to the "Roles" section. In the "Assigned Roles" multi-select box, choose the role that you'd like to assign to the user. Next, click the "Save" button to complete the assignment. The user will now have all the permissions granted to them that are associated with the role.
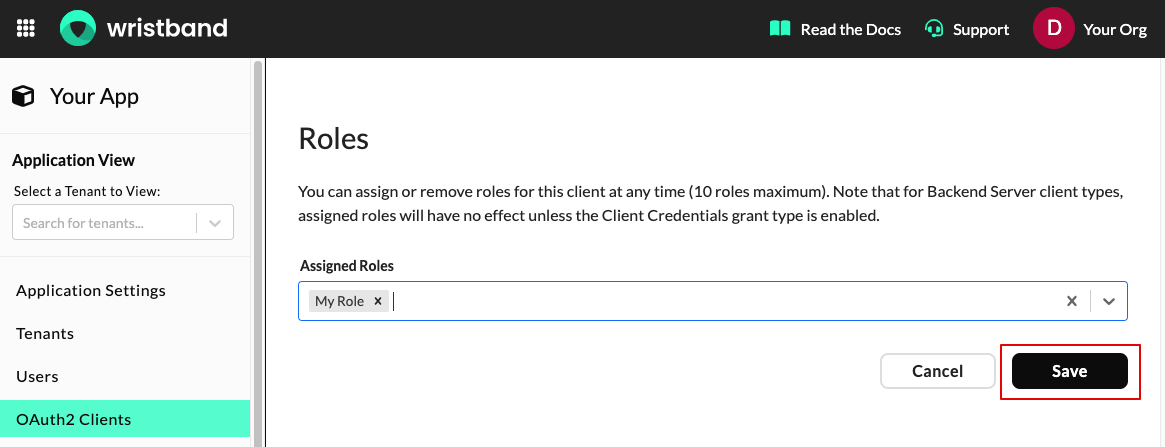
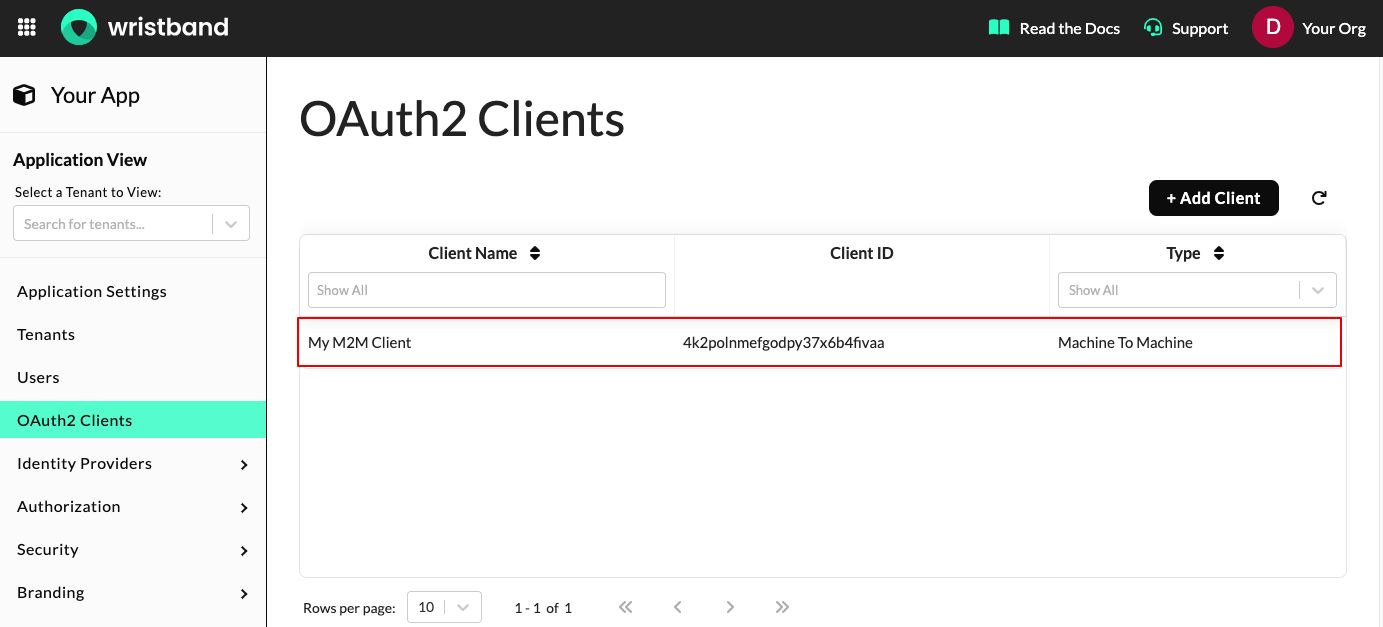
Assigning the Role to an OAuth2 Client
To assign the role to an OAuth2 client, select "OAuth2 Clients" from the left navigation menu, and then select the client whom you'd like to assign the role to from the "Clients" table.
NoteOnly OAuth2 clients that support the client credentials grant type can have roles assigned. These include:
- Backend Server Clients
- Machine-to-Machine Clients
On the "Edit OAuth2 Client" page, scroll down to the "Roles" section. In the "Assigned Roles" multi-select box, choose the role that you'd like to assign to the client. Next, click the "Save" button to complete the assignment. The client will now have all the permissions associated with the role granted to them.